HOLIDAY DONATION DRIVE - SUPPORT MSW - DO YOUR PART TO KEEP THIS GREAT FORUM GOING! (Only 20 donations so far - C'mon guys!)
×

Landlocked123
-
Posts
449 -
Joined
-
Last visited
Content Type
Profiles
Forums
Gallery
Events
Everything posted by Landlocked123
-
 Mario, You forgot the rest of the the quote......."You are gentleman and a scholar and a judge of good liquor and there are dammed few of us left".
- 106 replies
-
- 4
-

-
- Japanese boat
- Wasen
- (and 2 more)
-
Mario, You forgot the rest of the the quote......."You are gentleman and a scholar and a judge of good liquor and there are dammed few of us left". Best, John
- 106 replies
-
- 3
-
-
- Japanese boat
- Wasen
- (and 2 more)
-
New 3M Sandpaper
Landlocked123 replied to Landlocked123's topic in Modeling tools and Workshop Equipment
Frank, Mark, Today I found the answer to my 3M post. It came about when I was trying to describe the backing paper for the new paper. In my initial post I thought the backing looked like it was dried glue. Well I know you can re activate glue with heat, so I cut a piece of sand paper slightly larger than the block placed it on top and put a hot clothes iron it for a few minutes. Whatever the new backing is, it melted onto the block and seemed to be fairly permenant. I bought this paper at Home Depot and will continue to do so now that I found a way to make sanding blocks. Check this stuff out, it's not expensive and seems to be a real improvement over traditional garnet sandpaper. Best, John -
Tiny fake nails/nail heads
Landlocked123 replied to Landlocked123's topic in Metal Work, Soldering and Metal Fittings
Jay, It really is my first. John ps. I didn't notice your being snide, but I appreciate the info. It gives me a good idea idea of how to interpret your future posts. -
Hi All, I'm not quite sure that sandpaper qualifies as a tool, nevertheless I thought this would be the best forum for my question. I'm also unsure of when 3M switched from its old "tan" paper to the newer red/blue/purple variety. In my opinion the new paper is a significant improvement on the old in how quickly it cuts, its tendency not to load, and how long it lasts. But it also has one significant disadvantage for me. I make sanding blocks in all shapes and sizes out of scraps of 3/4" MDF. I have yet to find a glue that will work with the new paper. It has an irregular backing with some kind of little bumps (looks like some kind of dried glue) and an underlying glossy surface. I've tried titebond, contact cement, even CA (on small pieces) and nothing creates anything close to a permenant bond. Has anyone else had problems with this or perhaps has found something which will work? Thanks, John
-
Hi Gaetan, I far as I am concerned, you have won! (without having had the hassle of the the whole entry process). I can't believe there could be an entry of this scale that could possibly be better. Best, John
- 728 replies
-
- 3
-
-
- le fleuron
- 64 gun
- (and 1 more)
-
Tiny fake nails/nail heads
Landlocked123 replied to Landlocked123's topic in Metal Work, Soldering and Metal Fittings
Thanks Jay. It's my first. Best, John -
Danny, Thanks again. Following this build is like getting a masters degree in ship building. Actually, it's more like a PHD. Bravo! Best, John
-
Hi All, Sounds like interesting stuff. What kinds of sizes does it come in? Thanks, John
- 396 replies
-
- 2
-
-
- Idea
- Bright Idea
- (and 1 more)
-
Tiny fake nails/nail heads
Landlocked123 replied to Landlocked123's topic in Metal Work, Soldering and Metal Fittings
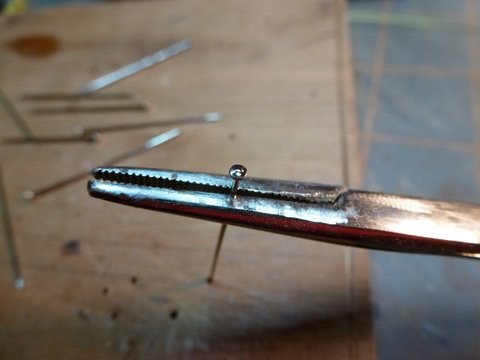
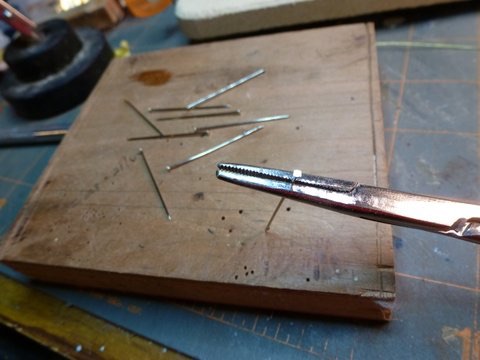
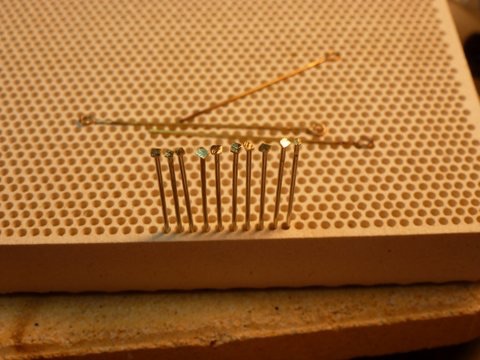
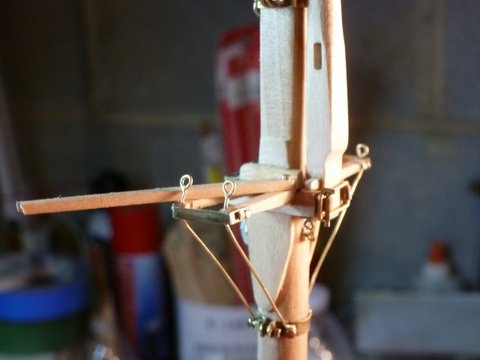
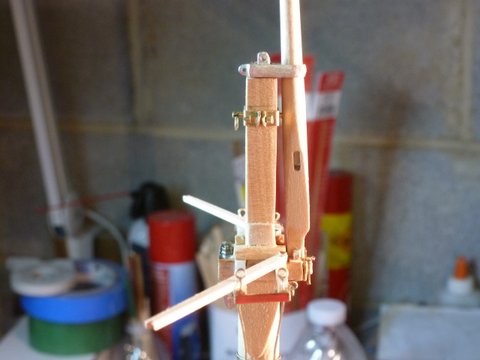
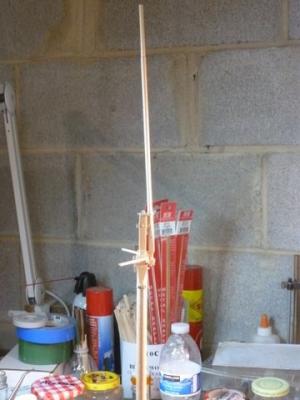
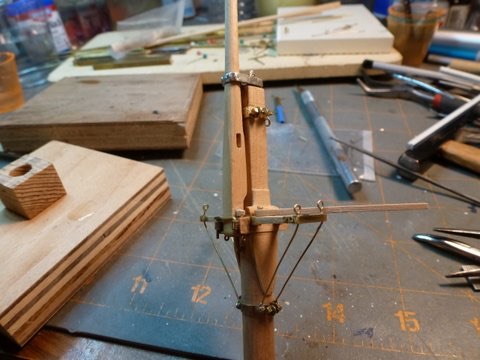
Hi fellow travelers in the world of Tiny, I appreciated all your suggestions, but I went a somewhat different route. At one point I had purchased some larger than normal (ie what you get with a new shirt) dressmakers pins. That are 1.25 inches long with a head about 3/64ths of an inch wide and made of chrome plated brass. I think I got about 250 for a couple of bucks at a Joanne's Fabrics (a notions and crafts store in the Northeast). I then clamped one in a pair of hemostats. I used a few quick passes with a mill file to square the side of the head and flatten the top. It took less than ten minutes to make 10. Mine are going to be painted, but I did a quick check and heads blacked nicely with BirchwoodCassey. The heads of the ones I made averaged about 5/128th or a bit less that 2 scale inches at 1/48th. As I mentioned I wanted them to attach a band holding futtock shrouds to the crosstrees on my schnooner. Here's how they turned out. I also finished mounting the top mast to the lower fore mast. Here are some pics (please note that I caught my mistake of attaching the top mask backward.


-
Jay, Thanks for offer but I'm one of the happily married guys (40 yrs). And besides, it doesn't sound like your granddaughter will be in want of suitors. My daughter is 25 and a dead ringer for Natalie Portman. I keep telling her that when she's ready to get serious, I'm going to interview her beau in my den while cleaning a shotgun. Best, John
-
Hi All, I've often thought about trying to buy a mill, either new or used, but have put those thoughts in the same bin as my thoughts about dating Kate Upton. I have a lot of experience with wood working power tools, but have never used a mill, much less seen one in operation, add to that to the fact that I'm at least a couple of builds away from my first scratch build, makes buying a mill less than practipble, But looking at some of the work being done by the Masters on this site (Danny V, EdT, Remco, Gaetan and others) and my general level of "tool lust" keeps a mill on my wish list. I really hope this topic catches on. I see it has the potential to be another great tutorial for model ship builders in general. Best of luck, John
-
Tiny fake nails/nail heads
Landlocked123 replied to Landlocked123's topic in Metal Work, Soldering and Metal Fittings
Thanks Guys, I'm pretty much at the moment of truth. I really appreciate all the suggestions and in the next day, or so, will decide what to do. I'll post some pics and show how things turn out. Best, John -
Hi Danny, That's quite the challenge especially on a limited budget. What's story about the paint below the waist? It really is a rather bilious color. Best, John
- 59 replies
-
- 3
-
-
- norske lowe
- billing boats
- (and 1 more)
-
OK All you Alchemists and Wizards, Does anyone have any techniques for creating tiny fake nails or nail heads? I'm working on the mast of a schnooner and I need to represent an iron band about 1.5 mm wide which will be glued on to the cross trees of the mast ostensibly to hold the futock shrouds in place. There is no real stress on the band so after I epoxy it on, I plan drilling a couple of 0.5mm holes and inserting a few bits of 0.02 inch brass wire to look like bolts. I'd like to do something which would make the bolts look like they have heads. I know this seems "like chasing mice to see if they're farting"' but a lot of what we do is like that but the idea of having heads on 0.5mm bolts works for me. The one idea I had, was to take a piece of steel, drill a hole about 0.55 mm wide, 1.5 mm deep, putting in a bit of brass maybe 1.7mm long and wacking it with a ball peen. The only problem is I don't have a nice flat, heavy, piece of steel. All ideas, suggestions, or telling me I'm a wack-job are welcome. Best, John
-
Fiskars #11 blade knife
Landlocked123 replied to JohnB40's topic in Modeling tools and Workshop Equipment
Hey John....those are great. Get a few more and give this guy a run for the money!!!!!
-
Hi Danny, Your work is simply fantastic! Not much else to say. As you know, you've educated, motivated, and inspired me and for that you have my heartfelt thanks. As a relatively new member of MSW, what happens to the log now(next)? Will it always be accessible under Scratch Builds in Progess? Is it saved in it's entirety somewhere else on the site? You have created an astonishing build log and an great educational reference tool. Do you have any suggestions for me if I wish to retain access somehow. Thanks again, Best, John
-
Hi Ken, I've never seen a card model and I'd love to pull up a chair. Best of luck with it. John
- 80 replies
-
- 5
-
-
- choctaw
- heinkel models
- (and 1 more)
-
Hi Danny, Taking "scratch building" to flags is a new one for me. But, as usual, you keep pushing the bar higher!!! I don't know if this would help anything but if you painted taped edges with something like "gloss cote" it seals the edges and limits bleeding. I may be going a bit off topic, but as you know, you inspire me to push myself to new levels and you've succeeded. For the past few months, I've found myself doing things which I would've wagered I could never have done. It's one of things I totally love about this avocation. I'm in my early 60's and I can't think of any aspect of my life where I continue to grow and achieve success, especially with new endeavors. Frankly, my wife and kids (not really kids any more) are amazed at what I'm doing. I've got two questions. One, how long have you been scratch building? And, it is possible to do what you do without a micro-lathe and milling machine? Thanks. Best, John
-
Danny, Every time I think you can not go to higher level.....you do. I promise you that what I've learned on this build log has taken me to a higher level as well. I have no idea if I can ever reach your level but the clarity of the log and your willingness to share has definitely make me a better modeler. Thank you. Best, John
-
Hi Ed, Do you know the type of pine you used for the clamping blocks. I have some now but I'm running out and I'm nor sure what it is. I like it quite a bit. I find it easily as workable as bass wood, but still a bit harder and stiffer. Thanks. Best, John
- 191 replies
-
- 1
-
-
- young america
- clipper
- (and 1 more)
-
Hi All, If you want to see anchors that are completely fantastic look at the recent posts in Danny Vadas' HMS Vulture in scratch builds. Like everything else in this build they are absolutely unbelievable!!!!!! I can't imagine how anyone could do better. By the way, Danny uses paper to represent the bands holding the halves of the anchor stock together. To my way of thinking it is better to use whatever technique or material you can to get the best representation of the prototype. Concerning one-selves about use a preferred materials as opposed to the best materials is counterproductive. John
-
Hi All, I have read in a number of build logs that one can use Liver of Sulfer to blacken brass when it I'd already attached to wood with no ill effects on surrounding wood. Does the same thing hold true for Casey's Brass Black? Thanks. John
-
Hi Alex, I just read through this post from start to finish and your work is some the nicest I've seen on MSW and until now, I thought I had read though all the great builds!!!I Would it be possible for you to share how you made those fantastic checker board floor shown early in this topic. Thanks. I'm really looking forward to the rest of the build. Best, John