HOLIDAY DONATION DRIVE - SUPPORT MSW - DO YOUR PART TO KEEP THIS GREAT FORUM GOING! (Only 13 donations so far - C'mon guys!)
×


rafine
-
Posts
2,932 -
Joined
-
Last visited
Content Type
Profiles
Forums
Gallery
Events
Everything posted by rafine
-
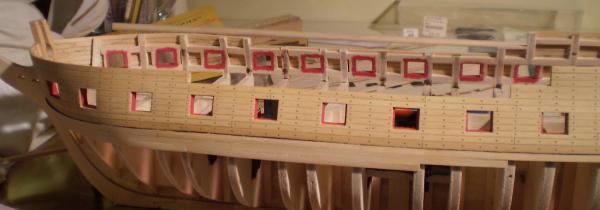
 You're much too kind, guys, but much appreciated. Sam, I am going to copper. I will use the boxwood for the visible portion of the planking below the wales, but the kit basswood for the part to be covered by the copper. My current intention is to leave the boxwood unpainted, except for the wales and possibly the counter. Robert, the Poly is Minwax. Bob
 -
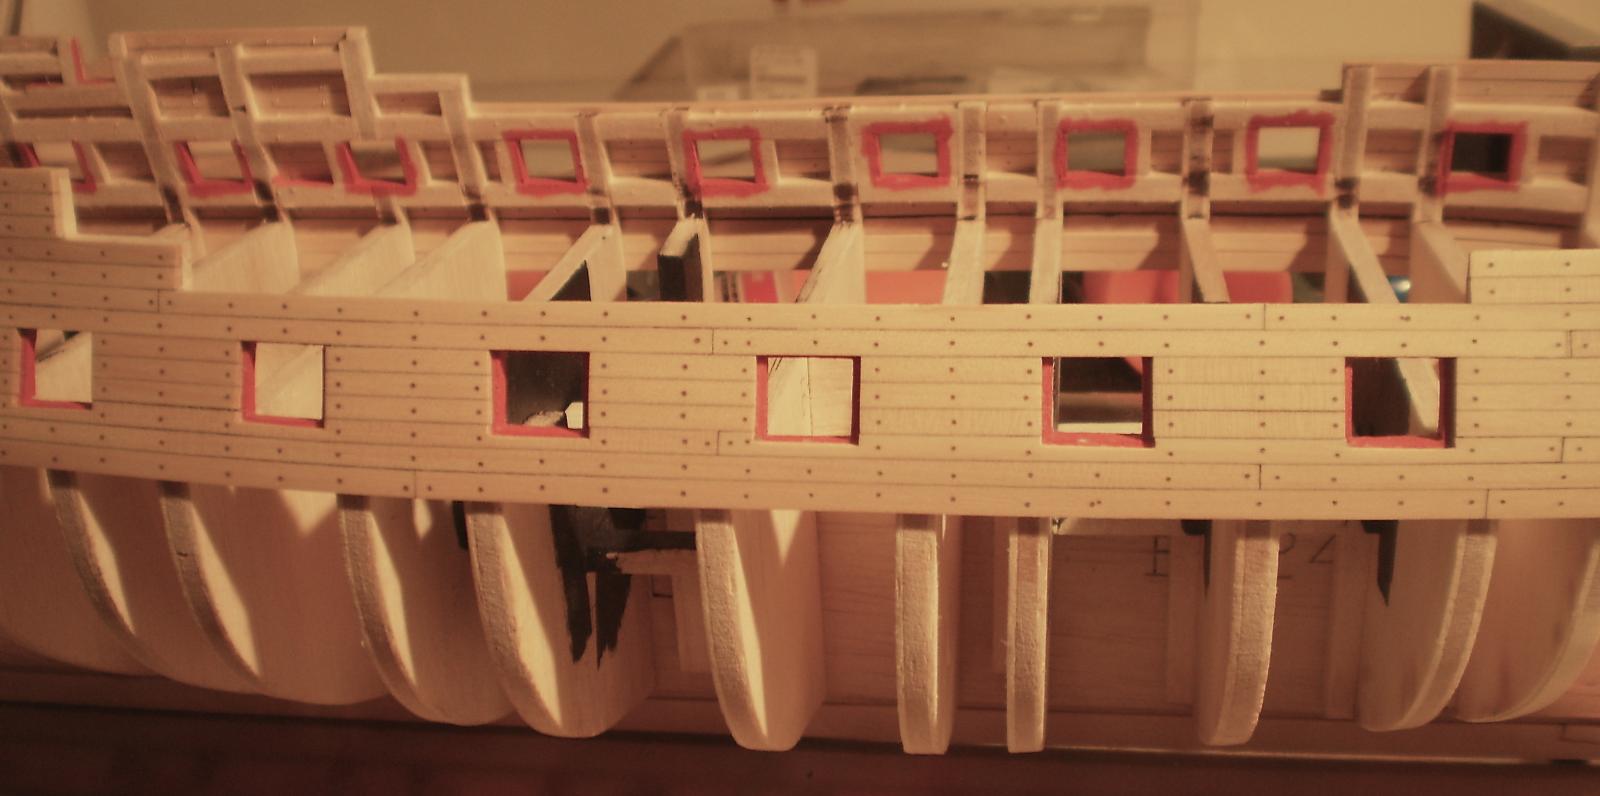
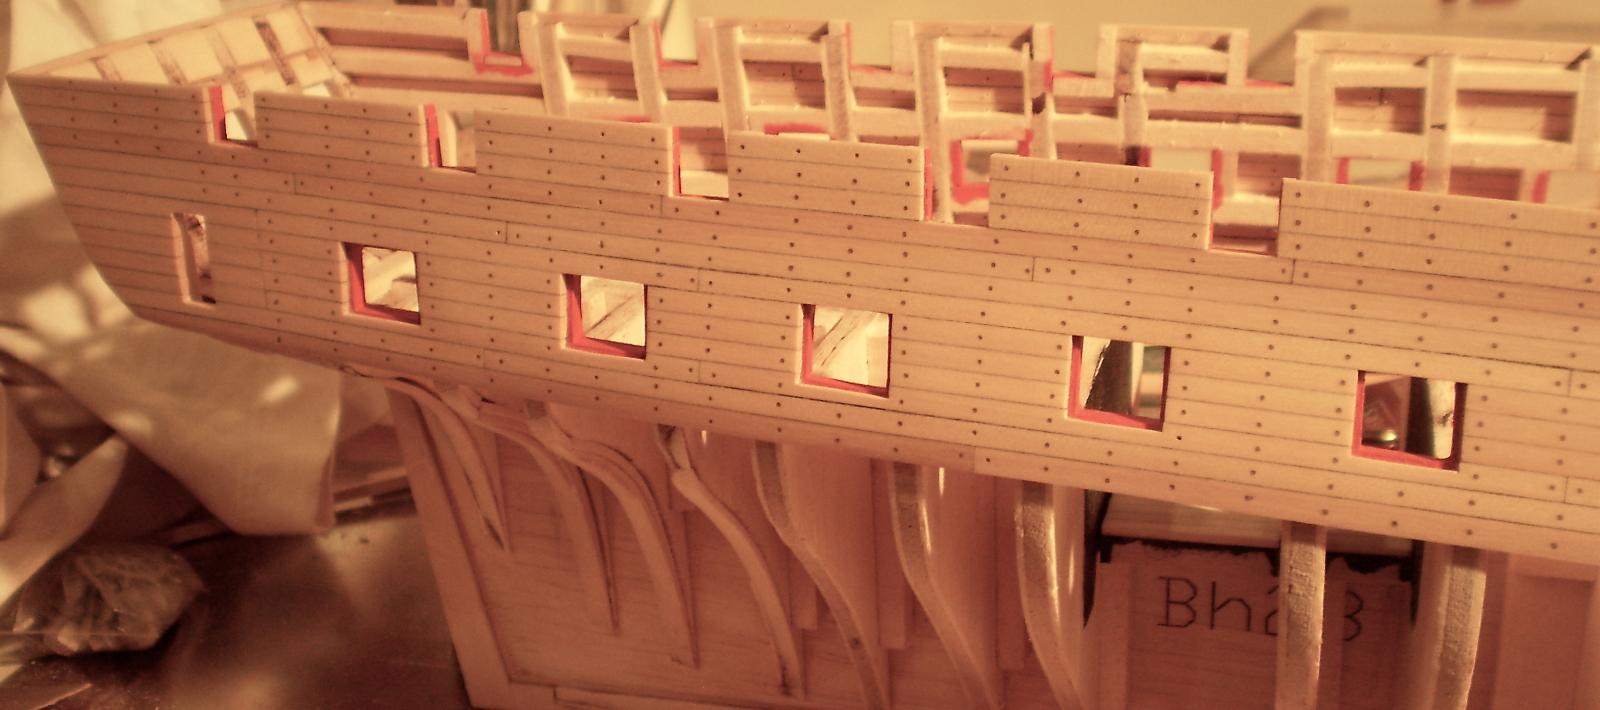
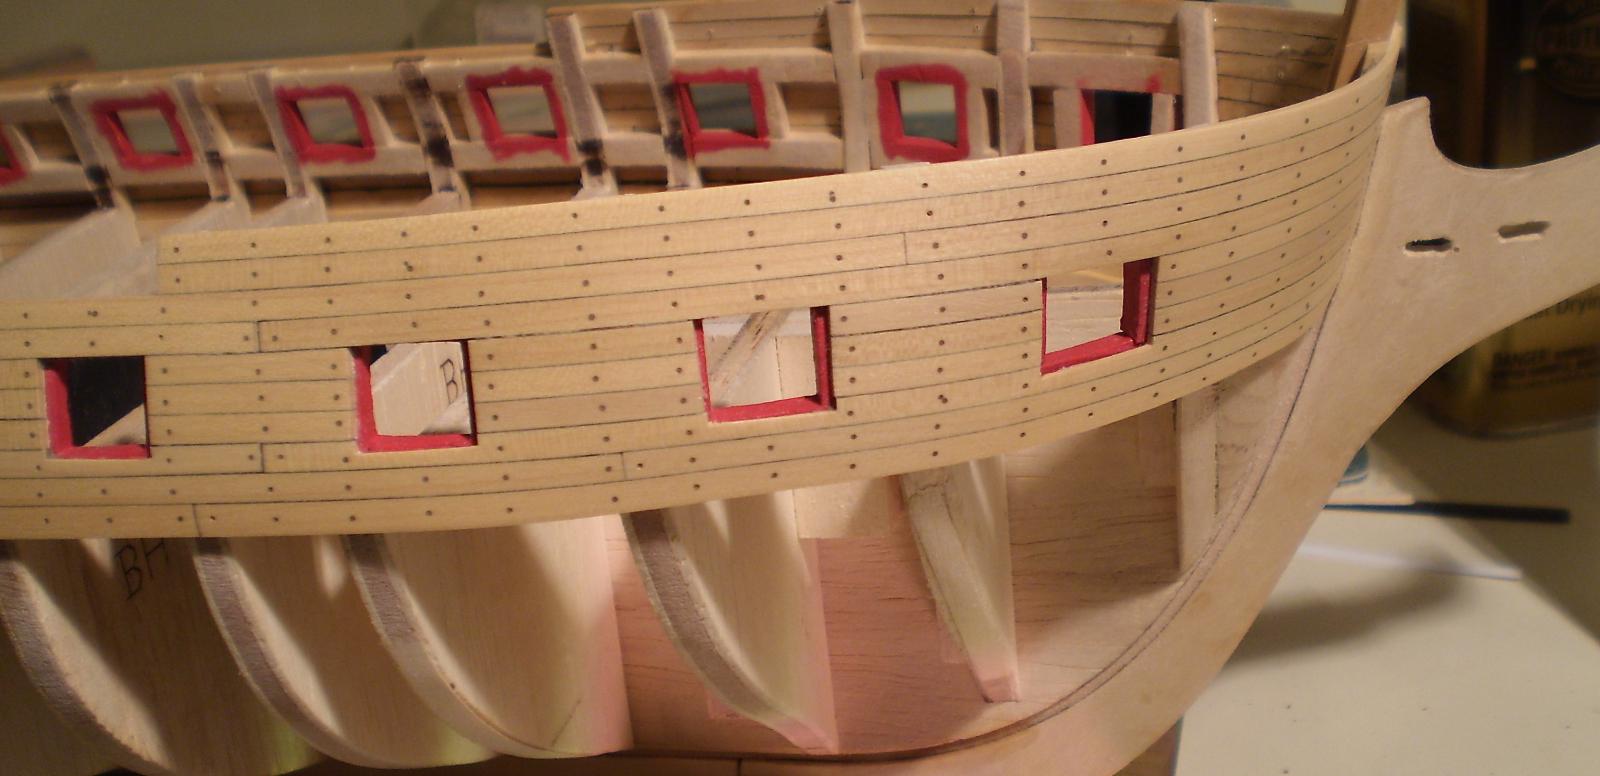
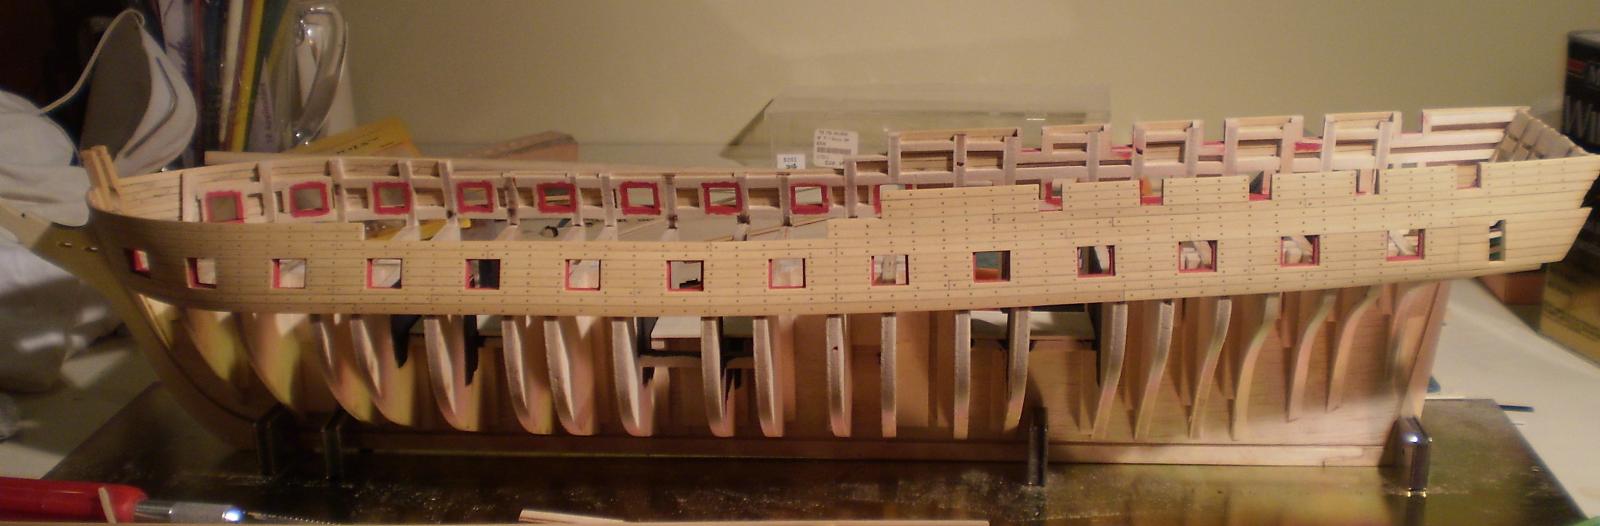
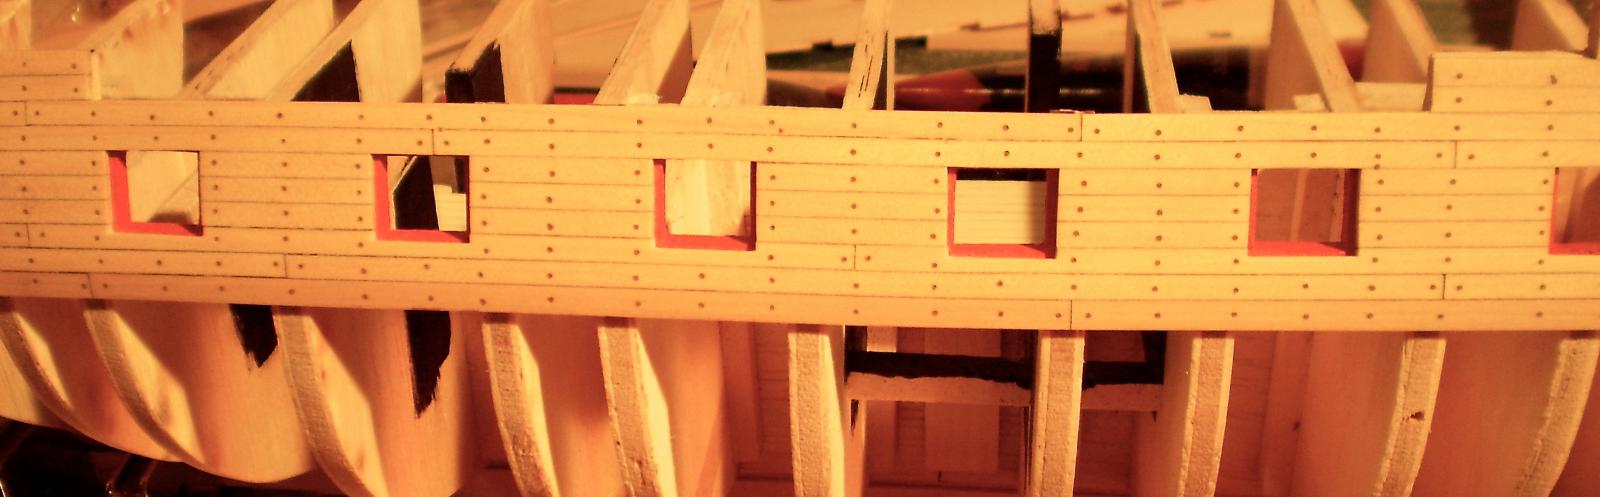
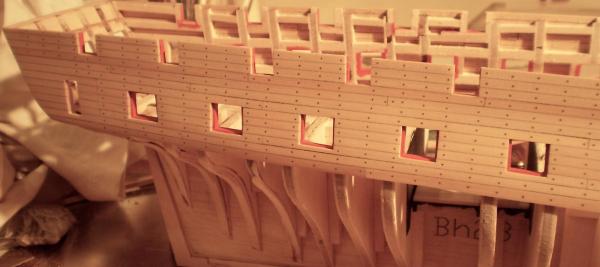
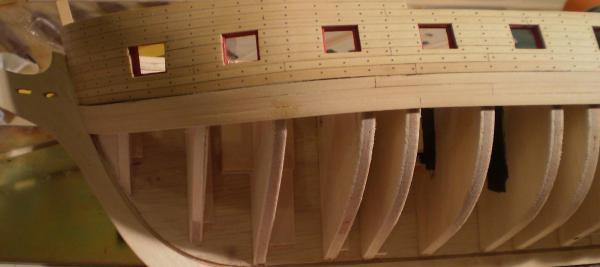
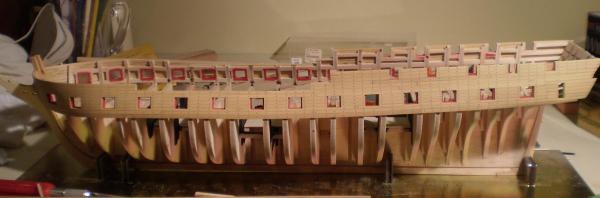
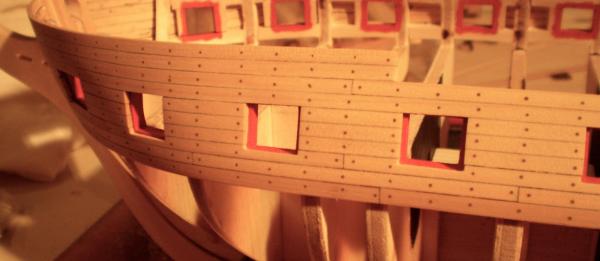
I've completed the upper hull planking on the starboard side and done the treenailing on that side, as well. All of the procedures followed the methods used on the port side earlier ( boxwood planking, caulking simulated with pencil, treenails simulated with Elmers walnut filler, coat of Wipe-on Poly as a sealer). Finishing a section of treenailing always feels good,like when you stop banging your head against a wall. Now it's on to the starboard wale and some stern planking, before tackling the lower planking. Bob

- 1,477 replies
-
- 14
-

-
- essex
- model shipways
- (and 1 more)
-
Many thanks, Patrick and Augie. I don't know about flying, Augie. I was pretty bogged down for a while. Bob
-
Thanks so much, Hamilton. Bob
-
Ken, I use the pencil on only one side of the plank and then try to apply the glue to the edge of the plank without the pencil to avoid getting the pencil/glue mixture on my finger. Like Alistair, I wait until the glue is dry before scraping or sanding. I've never had a real problem doing this with either holly or boxwood. Bob
-
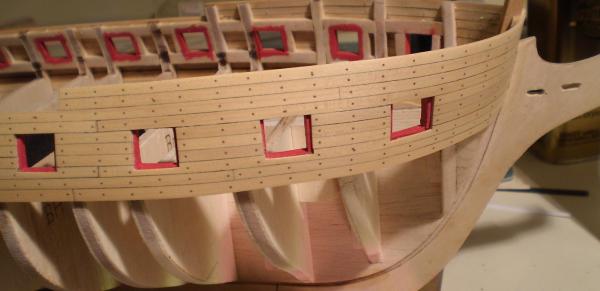
Thanks for the interest, Ben and Kurt. But that's enough of Flying Fish for some months. Back to business on Essex. A small update. I've installed the wale on the port side ( the stern still needs to trimmed). The wale is made of three strakes of boxwood. Later, it will be painted black. Now it's back to the starboard side and maybe some stern planking. Bob

- 1,477 replies
-
- 17
-
-
- essex
- model shipways
- (and 1 more)
-
Beautiful work, as always, Rusty. Bob
-
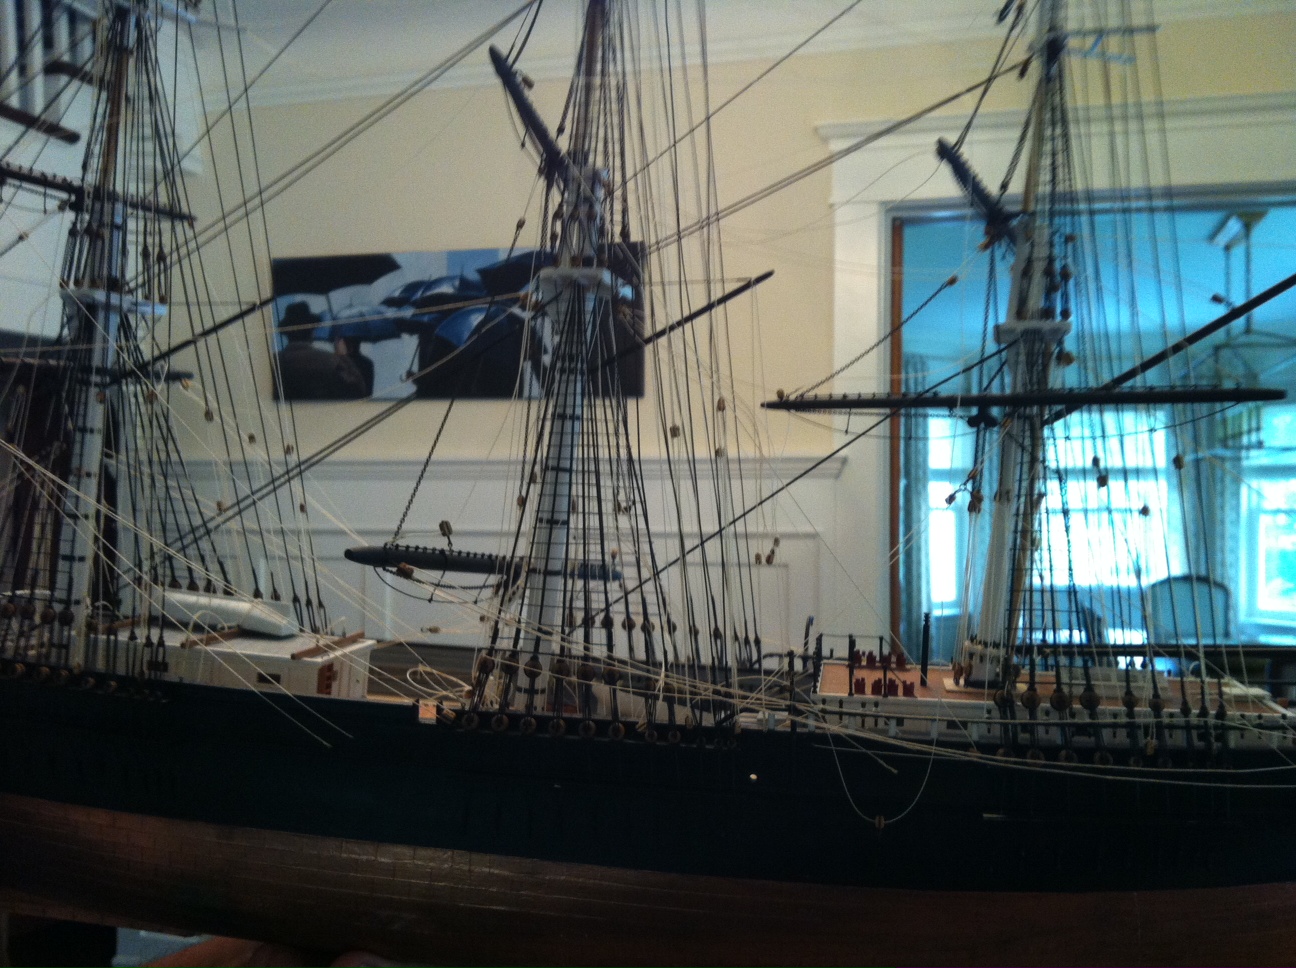
Thanks, Grant. If I had it home with me, I would have seriously considered removing at least the running rigging and starting again. Given the logistics, however, I'm just going to have to deal with fixes instead. Bob
-
Thanks for the interest and concern, Hamilton and Tom. It was a shock to see it in person even after getting pictures from my daughter. Bob
-
Thanks Augie. The best you can say now is that she WAS a beauty. Rusty, until it happens, you don't really know just how much it sucks. As much as I enjoy model building, I hate repairs and I'd rather be spending the time with the grand kids. Bob
-
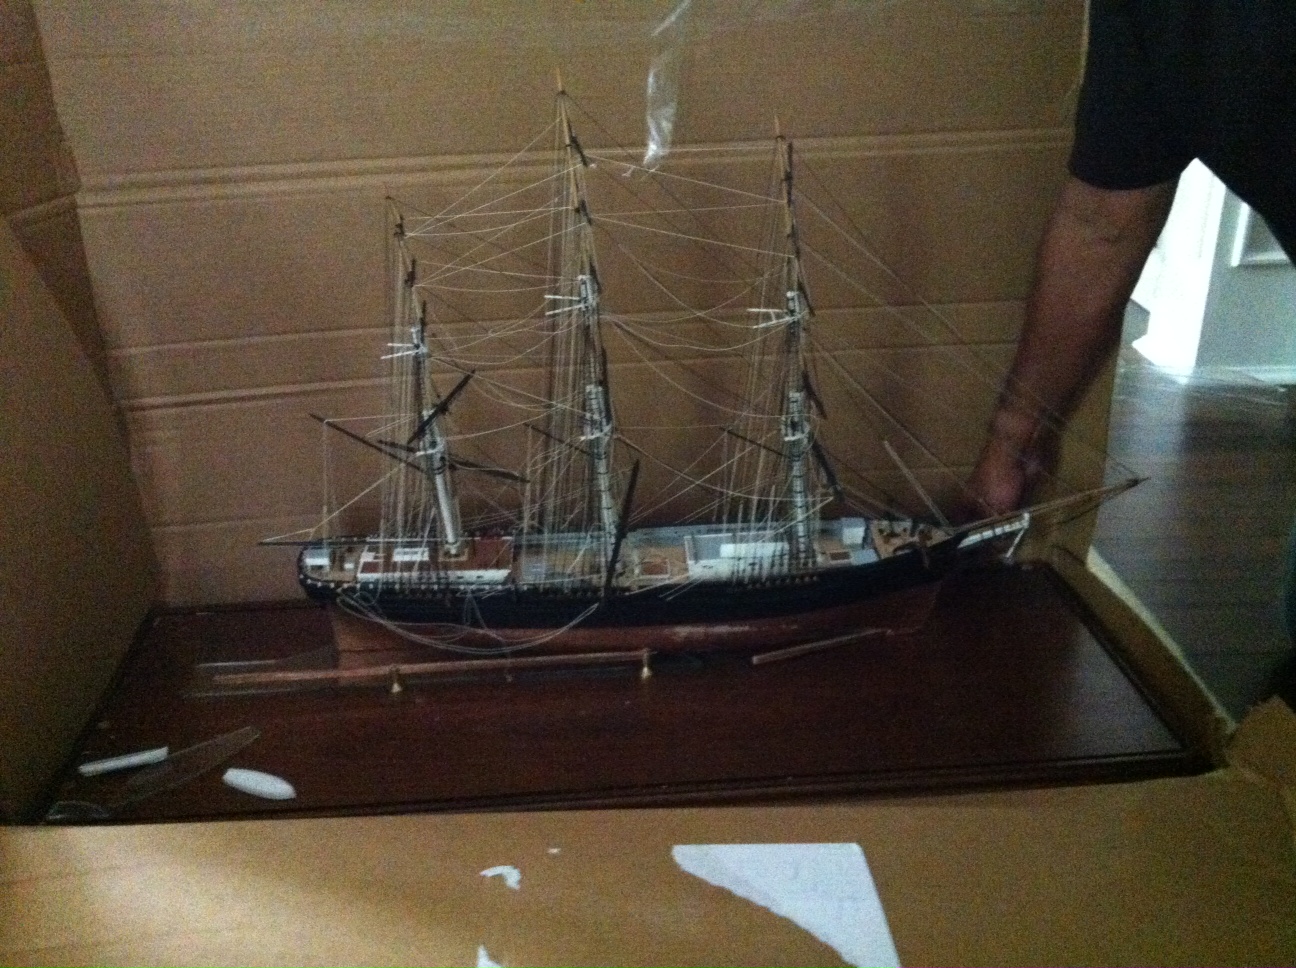
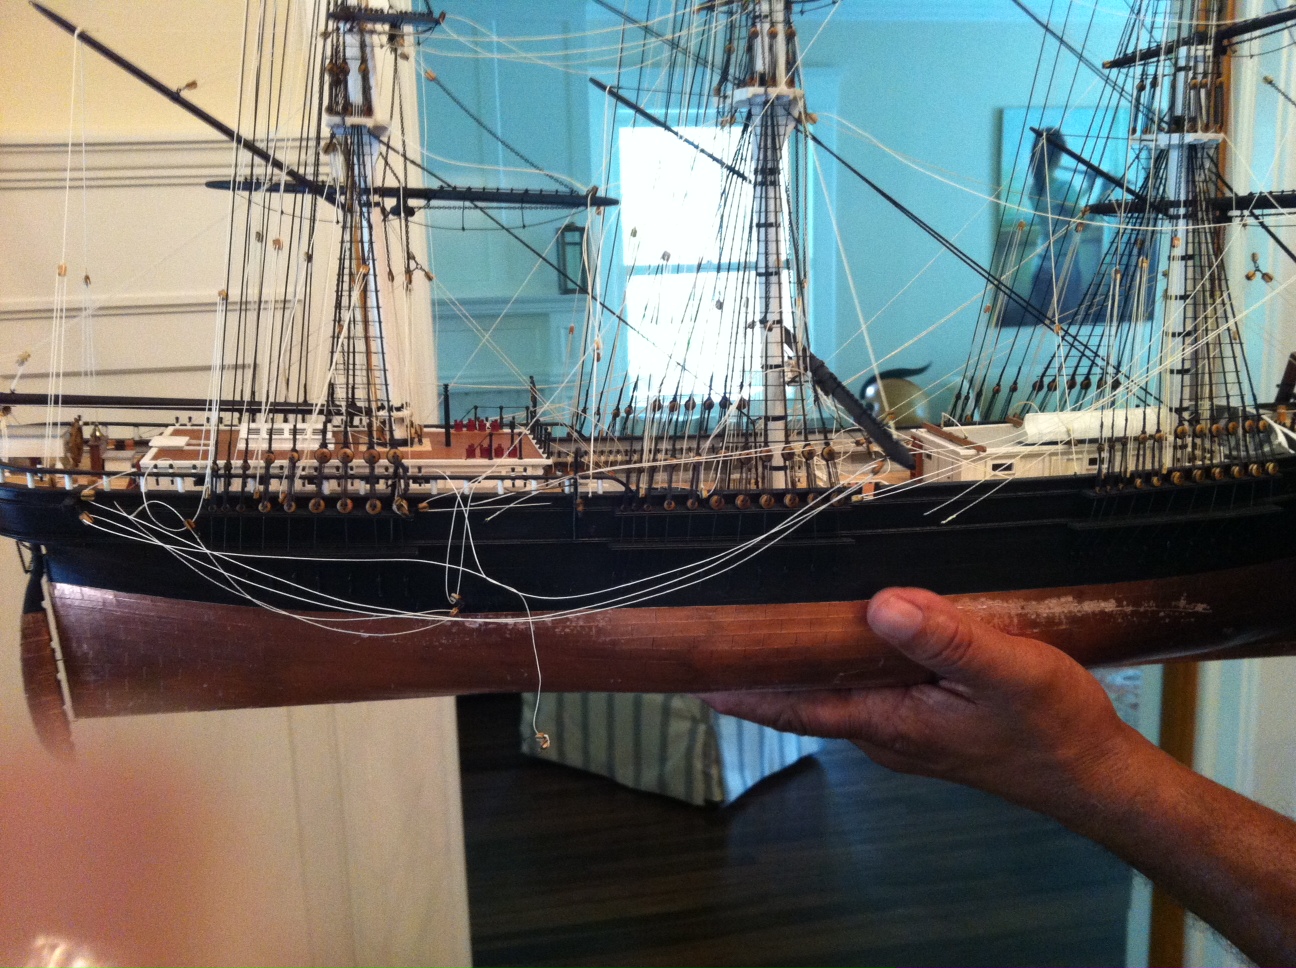
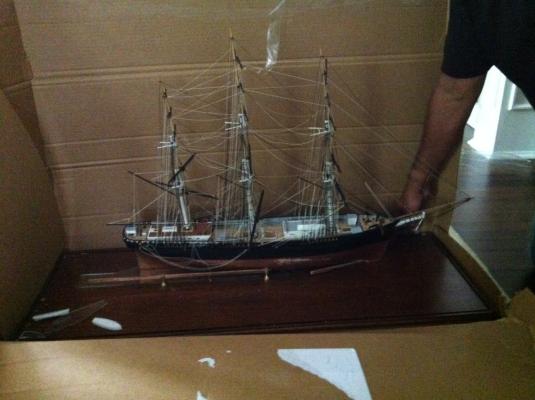
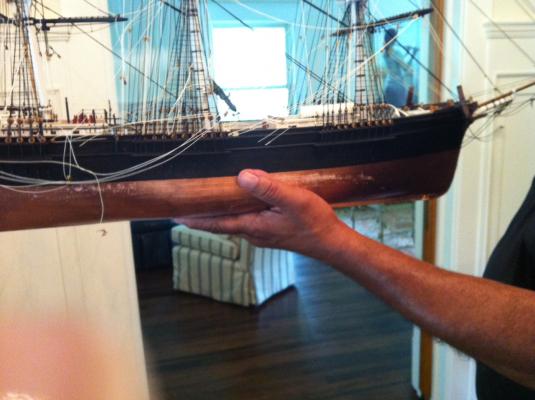
I'm going to hijack my own thread for a bit. Recently, I shipped two completed ships in glass cases to my daughter in the Chicago area. The shipper was one that we had used numerous times before, including multiple shipments of ship models. One of the models arrived perfectly. The other, however, was a disaster. The glass case was smashed and the ship, an MS Flying Fish done some years ago, was significantly damaged. I went to Chicago this past weekend to assess the damage, determine if it could be repaired and start the repair process. As shown in the attached photos, the keel had been torn off in two pieces, leaving the model detached from its base. Numerous other parts were also torn off and/or damaged. The masting and rigging were in a very bad way. After some agonizing, I decided to try to go forward with repairs. In the few days I was there, I was able to reinstall the keel and remount the model using much longer screws to give some stability. I then repaired the copper bottom and did a little work on the deck fixtures, rudder and other more readily accessible parts. I spent the remainder of the time trying to come up with a plan for the masting and rigging. Since we live so far away and won't visit again until spring and summer, and then only for a few days at a time, tearing it out to start again was not an option. Being without access to my tools and supplies doesn't help either. I'm hopeful that I can pull this off, but it will take time. I'll keep you all informed on progress when it occurs. Bob


-
I'm sorry Ed but I don't recall, and I'm in Chicago at the moment and can't take a look at it. Bob
-
Your blocks are wonderful, Grant. I'm afraid that I will remain a " buy them, don't make them " guy. Bob
-
It' all looking really great, Wes. A beautiful build. Bob
-
Very nicely done, John. Great to see you back at it. Bob
-
Thanks, Ben. Bob
-
Thanks Patrick and Grant. I'm glad I did them and I'm pleased with the look. Ken, That sounds like a good way to do it, but the stuff dries out so quickly, i'm surprised you can keep it flowing. Bob
-
Thanks Alistair for the very kind words . Much appreciated. Bob
-
Thanks so much, Sjors. Actually, I use both. I use a hand drill to make starter holes and then a Dremel to finish. Bob
- 1,477 replies
-
- 1
-
-
- essex
- model shipways
- (and 1 more)
-
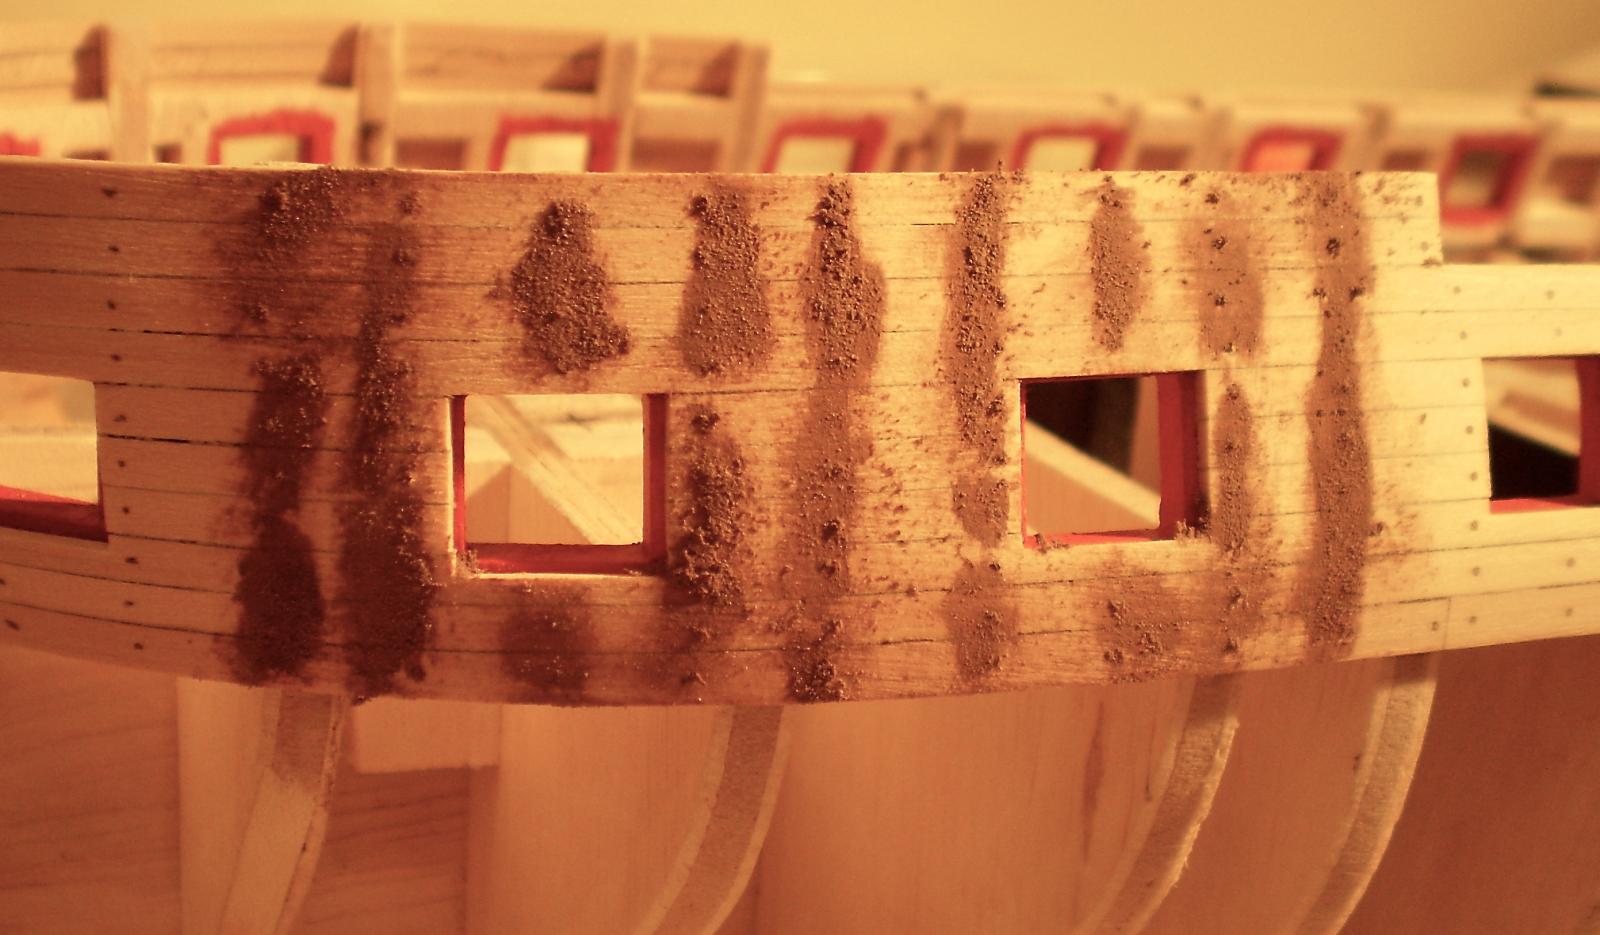
Thanks, Augie, Hamilton and Wes. Hamilton, the old Elmers was a creamy paste. The current stuff is dryer and grittier -- I don't like it as much, but you can get it to work. I put a little on with a piece of strip wood and then use my finger. Bob
- 1,477 replies
-
- 1
-
-
- essex
- model shipways
- (and 1 more)
-
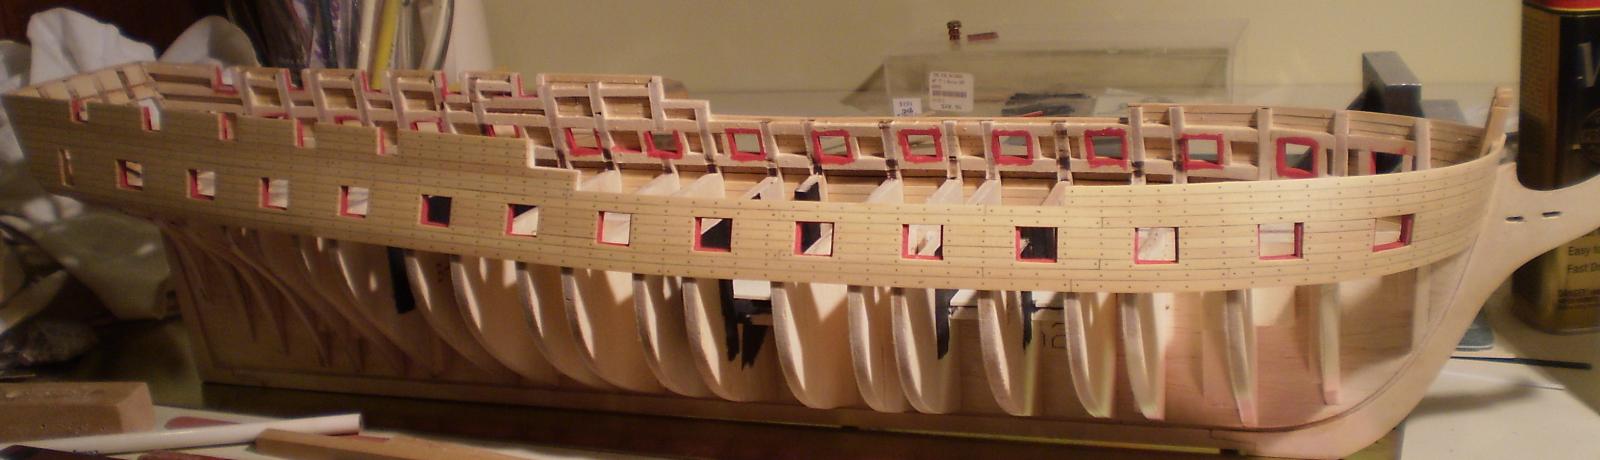
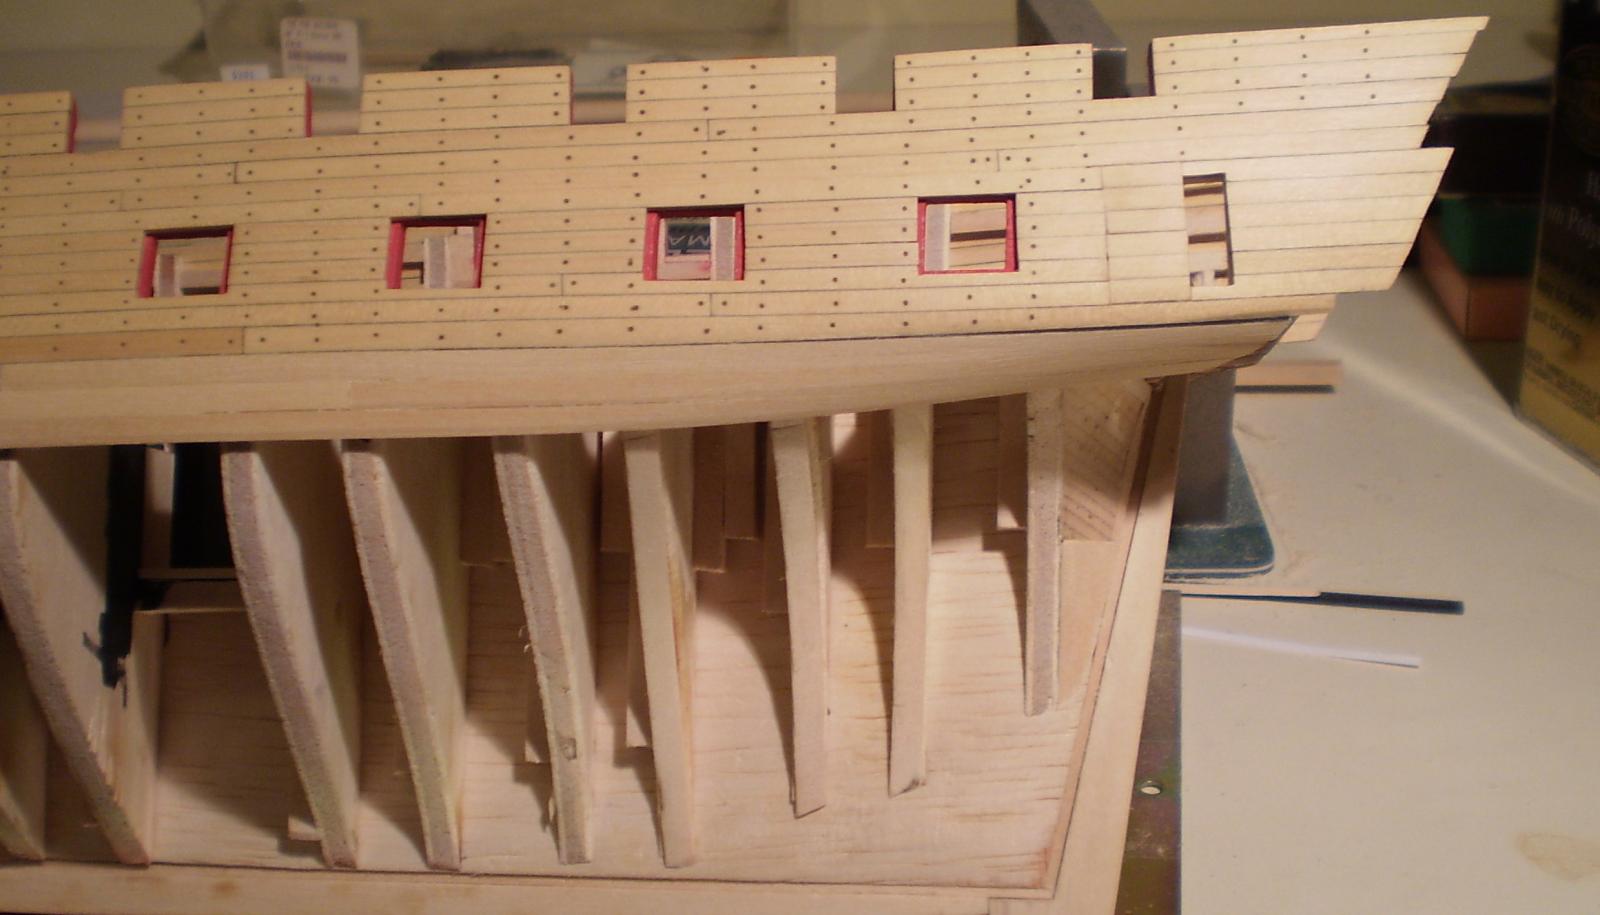
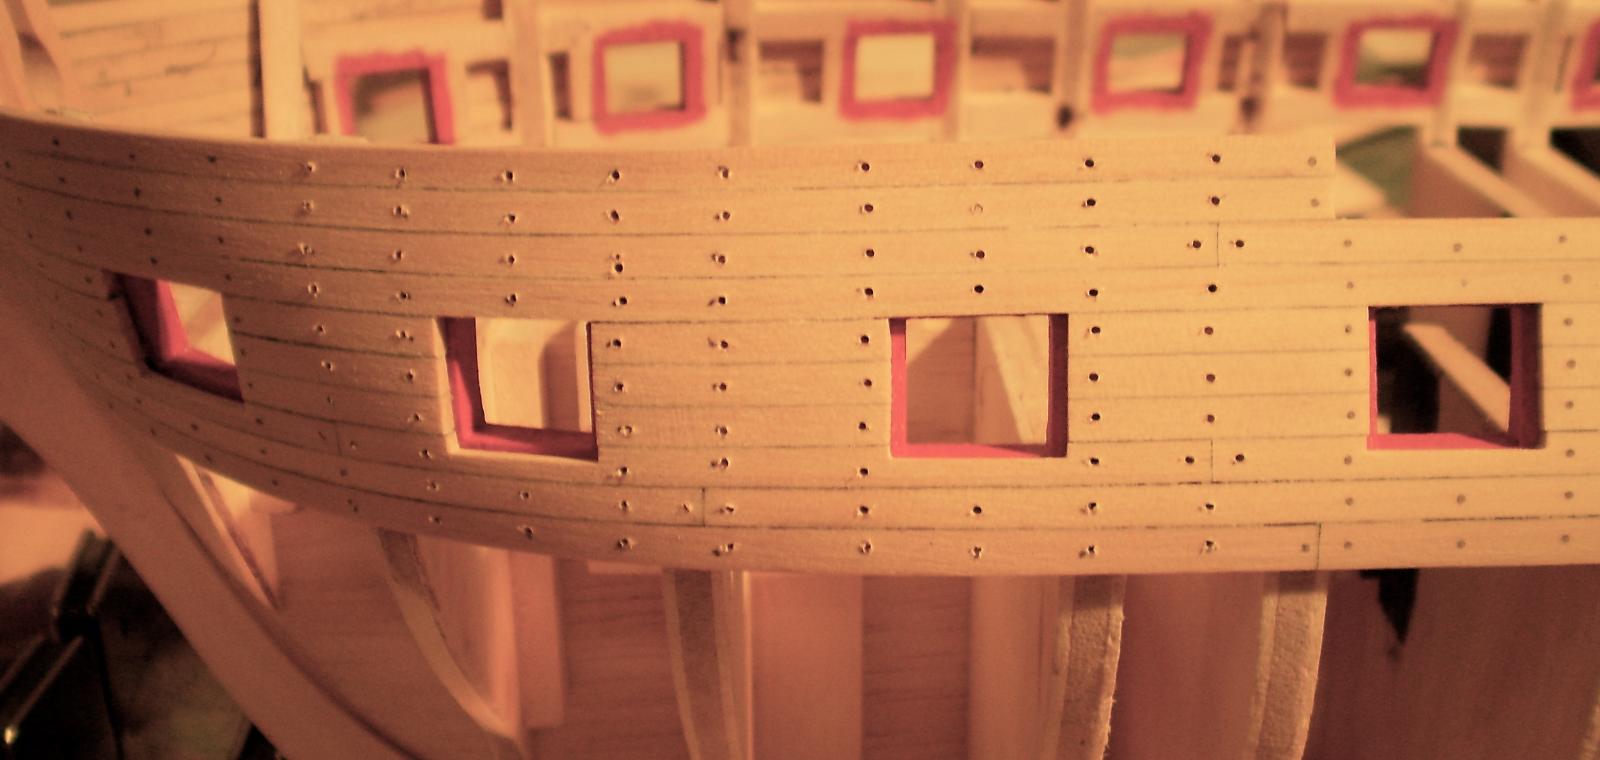
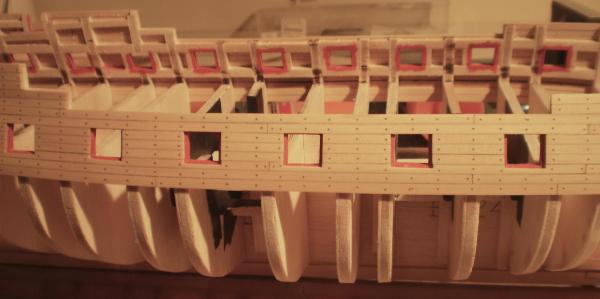
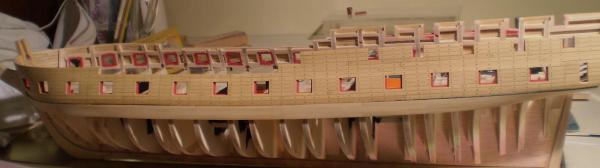
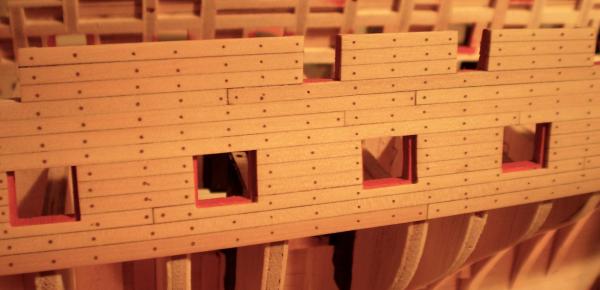
I added the remaining planking down to the wales on the port side and was about to do the wales when Sam informed me that he would have previously omitted material on the wales ready soon, so I decided to wait. That brought about the end of my procrastination on the treenails. Probably to the surprise of no one, I decided to go ahead and do them. After marking and drilling what seemed like an endless number of holes, I filled them with Elmers walnut filler.This is probably a little dark, but I liked the look better than using golden oak, which I have used in the past. Considerations of the small scale, and aging eyes and hands, led me to use an arrangement of the treenails which is more stylized than accurate, but which I think (hope?) gives the right impression overall. After filling and sanding, I applied a coat of Wipe On Poly for protection. Now, I can do it all over again on the other side. Bob


- 1,477 replies
-
- 15
-
-
- essex
- model shipways
- (and 1 more)
-
It's all looking very sweet, Rusty.Your joinery which has always been good, just keeps getting better. Bob
-
Beautiful looking framing, Ben. Glad to see you back at it. Bob