HOLIDAY DONATION DRIVE - SUPPORT MSW - DO YOUR PART TO KEEP THIS GREAT FORUM GOING! (Only 24 donations so far out of 49,000 members - C'mon guys!)
×


rafine
-
Posts
2,932 -
Joined
-
Last visited
Content Type
Profiles
Forums
Gallery
Events
Everything posted by rafine
-
 I don't like the term "old age" anymore, John. These days, I like to think of it as maturity. Bob
- 81 replies
-
- 2
-

-
- kingfisher
- lauck street shipyard
- (and 1 more)
-
Thanks Daniel and Grant. I am looking forward to raising the frames, Daniel. Grant, one of the benefits of retirement is that even if the work is slow, you have plenty of time to do it, making it seem like it was done quickly. Bob
-
Thanks so much, John and runner63. John, I was sure that you had seen the log on the old site. Bob
-
Thanks, Pete, Paddy and Russ. We'll see if you still envy me after the sanding, Russ. Bob
-
Many thanks, Augie and Robert. You may see fabulous, but I see the warts. Bob
-
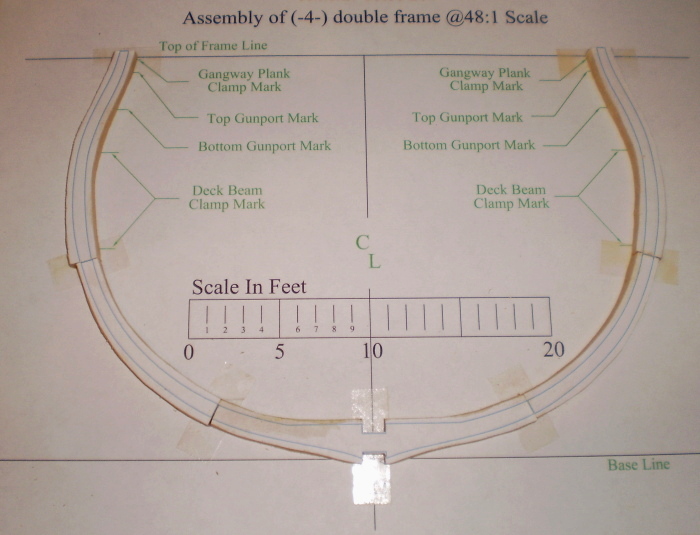
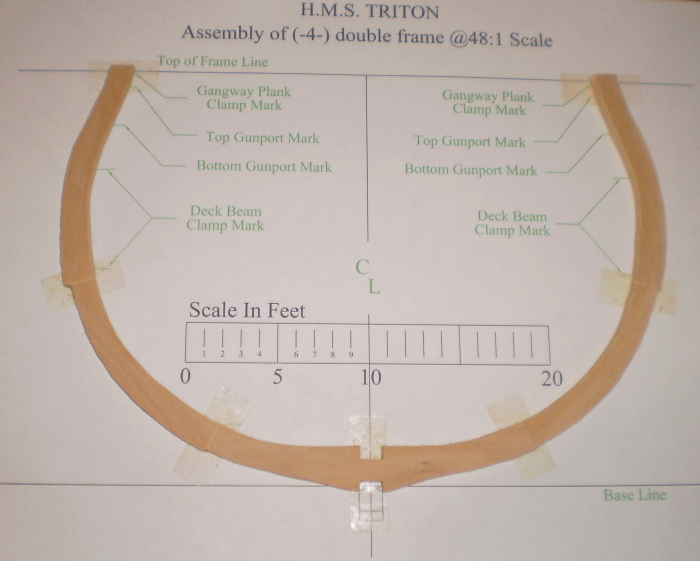
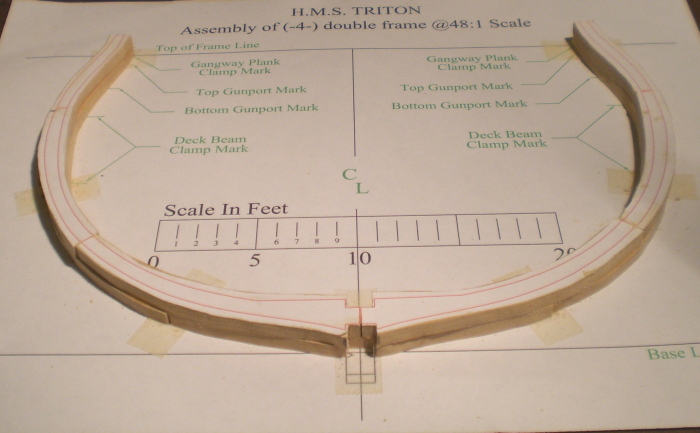
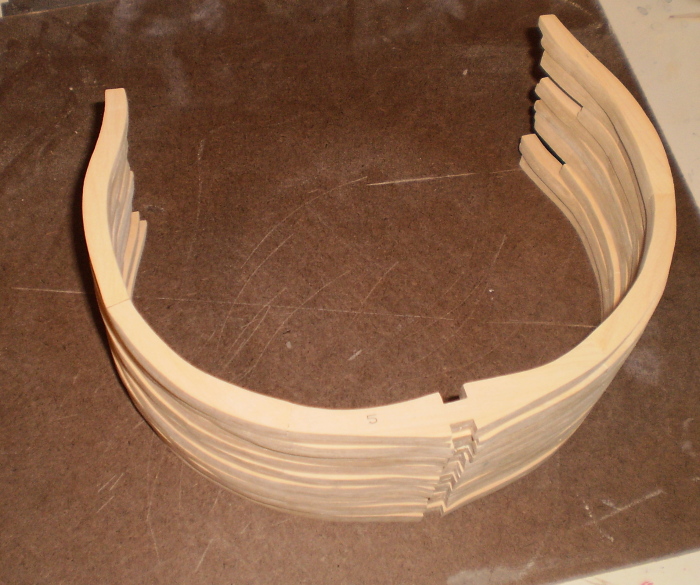
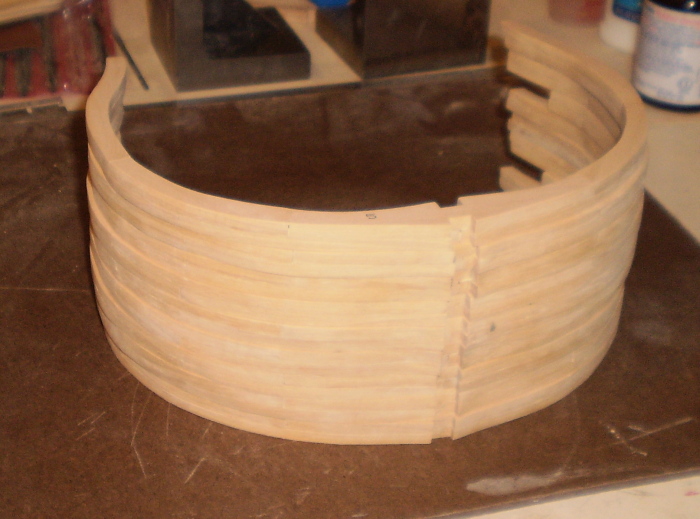
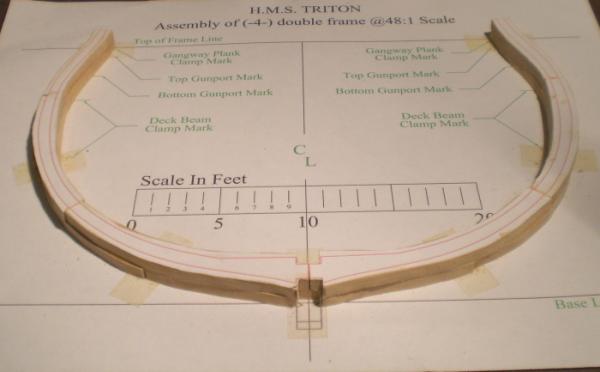
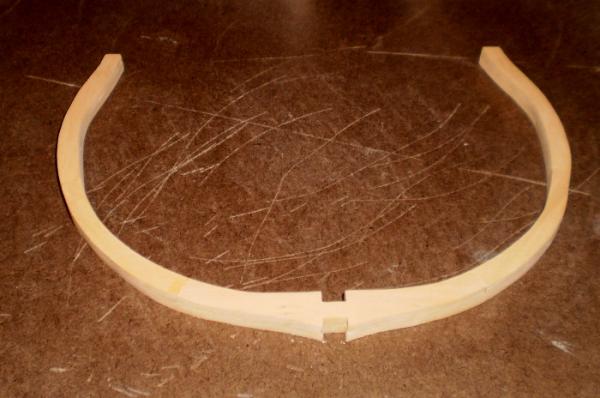
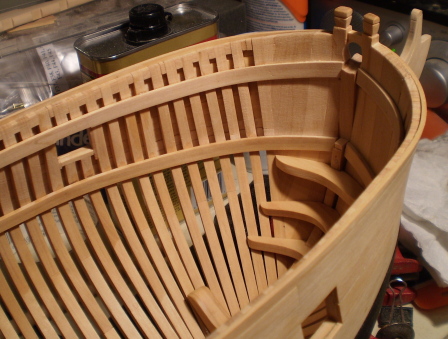
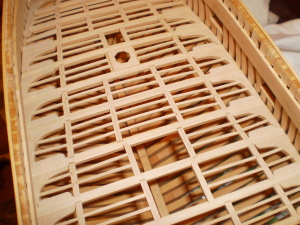
I've completed cutting and assembling the frames. After enjoying the beautiful jigs and high tech tools and appliances that fill this forum, I thought some comic relief was in order -- a tutorial in the use of low tech and ugly. The component parts were cut from the plans and rubber cemented to sheet boxwood. All of the frame parts were cut by hand, leaving very generous extra wood on the pieces. The notches for the keel and keelson were done with the saw and a chisel. As can be seen from the photos, my assembly "jig" was double sided tape on the joint lines of the plan sheets. After assembly, I rough trimmed the frames, using my only power tool, a Dremel, with a sanding drum. I still left considerable extra in place, since I have little trust in my accuracy to this point. My jig to raise the frames will also be simplistic, although I haven't thought it through completely yet. Bob


-
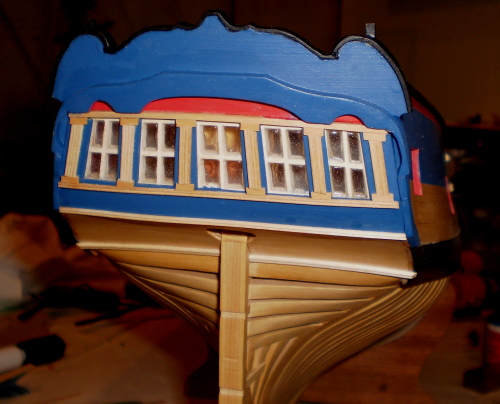
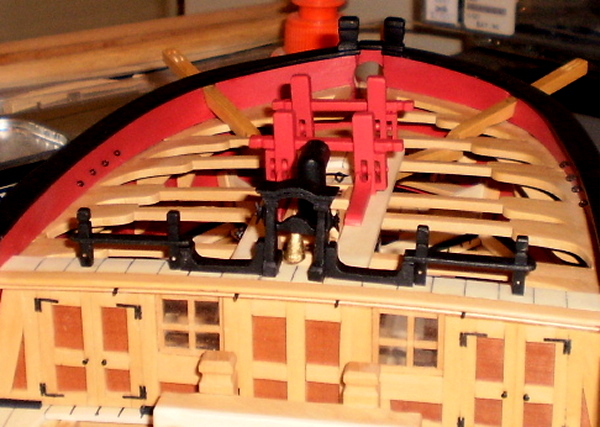
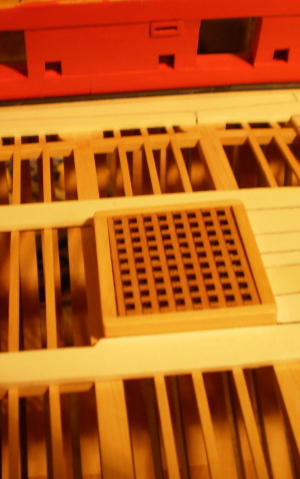
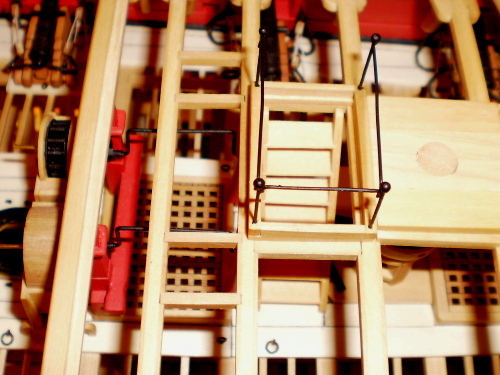
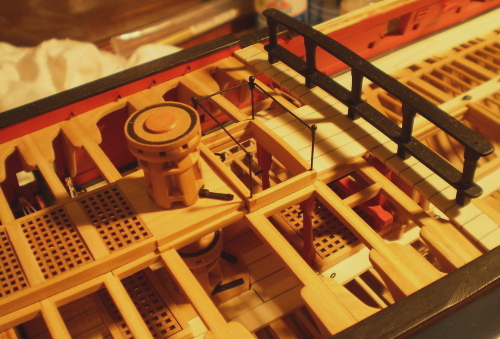
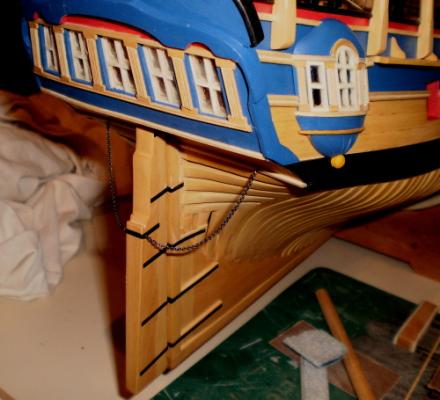
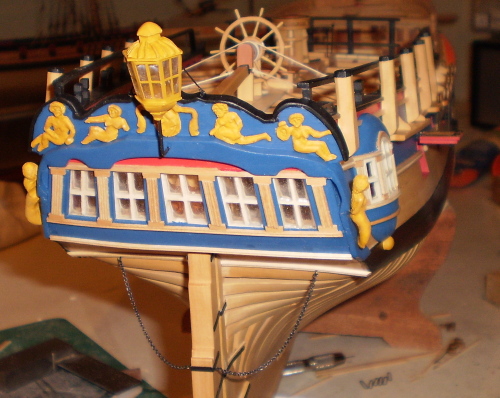
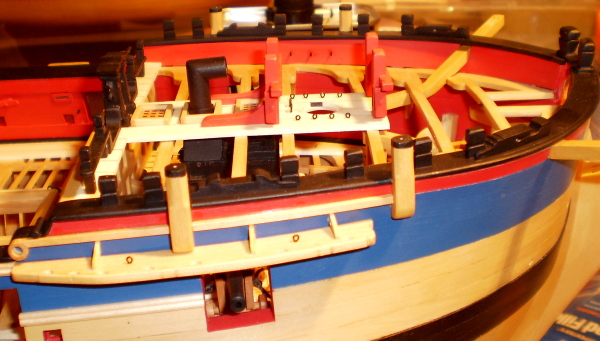
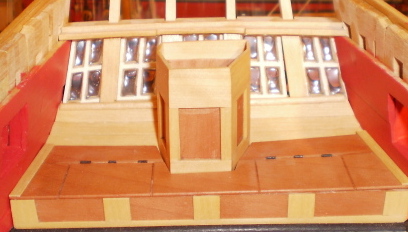
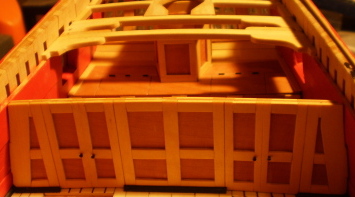
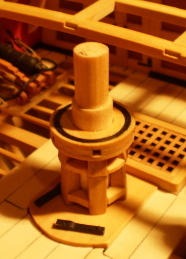
This installment will also cover a wide area of work. The first is the quarter deck, which included a limited amount of planking; the hatches and gratings; the companionway ladder and railing; the skylight; the upper capstan; the breastwork; and various eyebolts. Next was the stern, which included the transom; mounting of the rudder with it's hardware and chains; the rudder head housing, tiller, wheel and rigging; and the quarter badges. The kit transom didn't come close to that shown in TFFM, so I chose to scratch build something at least similar to the book. The same was true for the quarter badges. With some work, I was able to use the kit's lantern parts and I also used the kit's castings, with some modification, for the transom carvings. I then moved on to adding the main and mizzen channels, gun port lids, moldings, timberheads and blocks, swivel gun mounts and the quarter deck rail. After that, I moved forward to do the forecastle. This included the catheads, some planking, the hatches and gratings, the belfry and breastwork, the galley cowl, the fore jeer and topsail sheet bitts and various eyebolts. Lastly, I made and installed the fore timberheads and blocks, the fore channels, the fore swivel gun mounts and more moldings. Bob


- 81 replies
-
- 8
-
-
- kingfisher
- lauck street shipyard
- (and 1 more)
-
Thanks, B.E. and Joe. Your support is appreciated. Bob
-
Beautifully done, Augie. One more storm and you should be done. Bob
- 1,668 replies
-
- 1
-
-
- syren
- model shipways
- (and 1 more)
-
Thanks so much, Ben and Robert. No need to give up, Robert. I had done numerous builds prior to Kingfisher. Bob
-
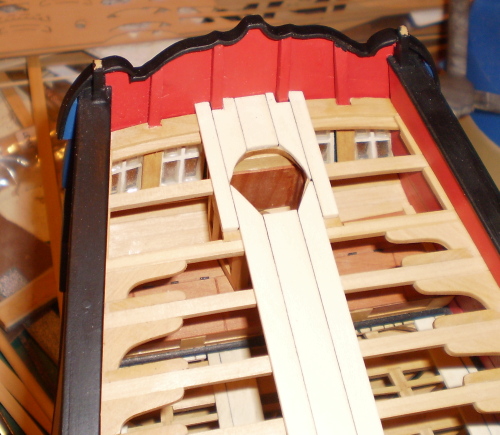
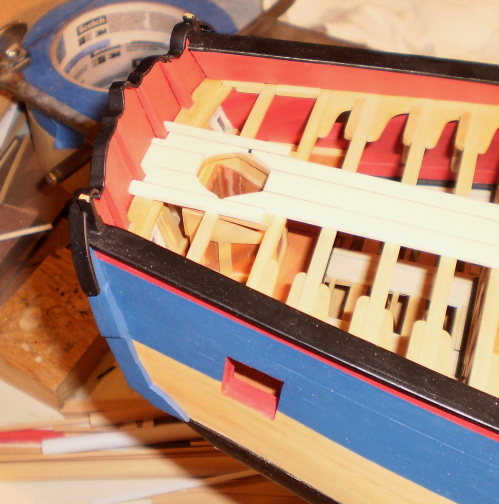
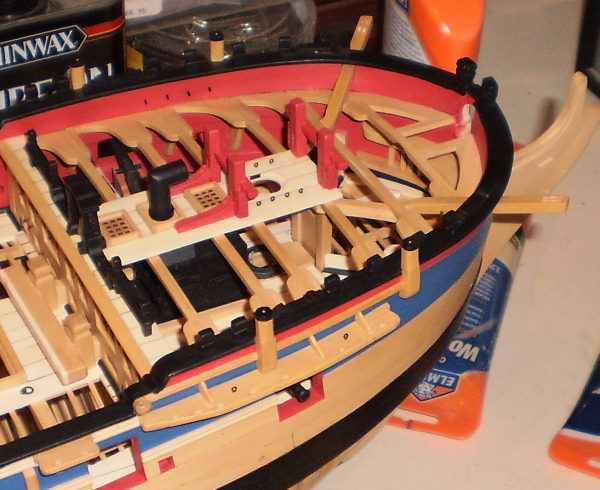
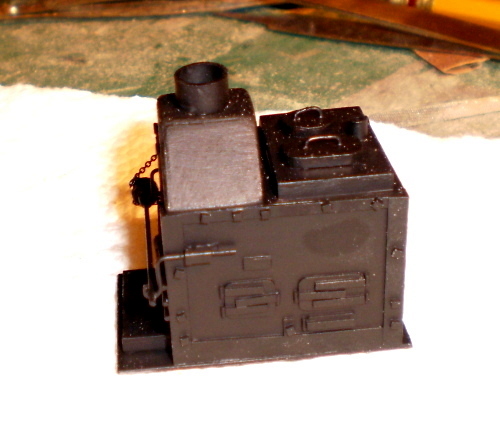
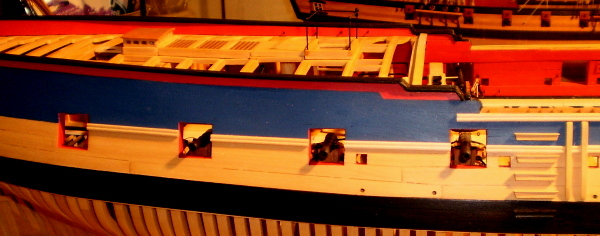
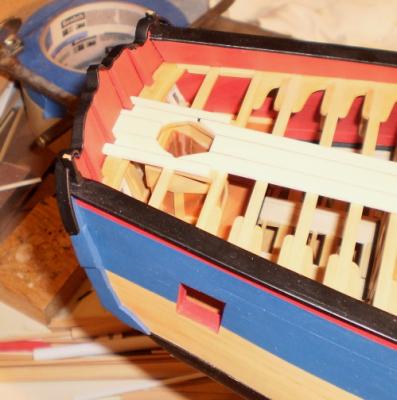
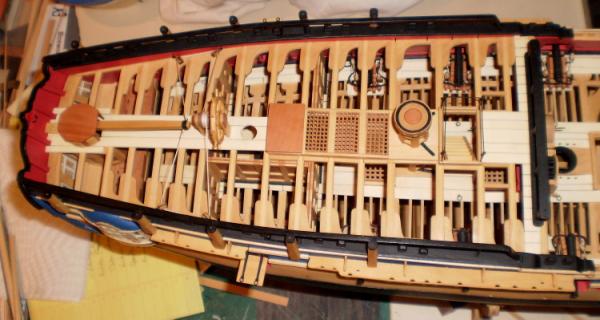
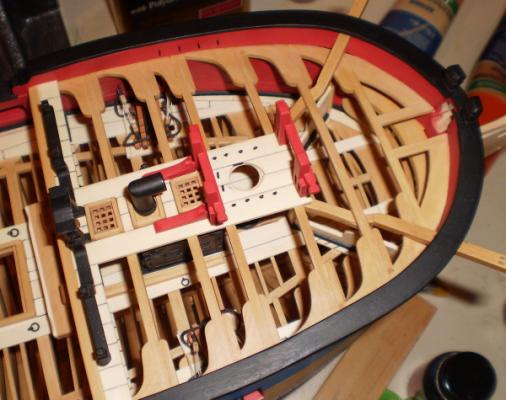
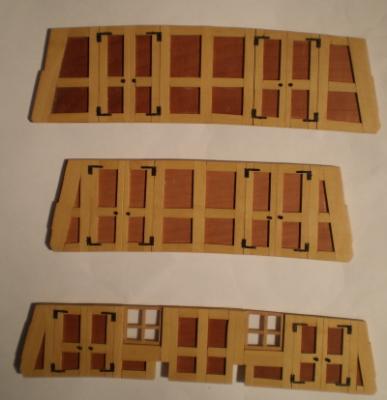
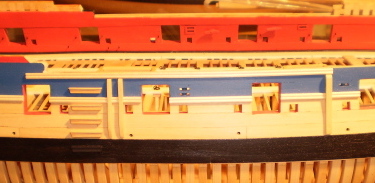
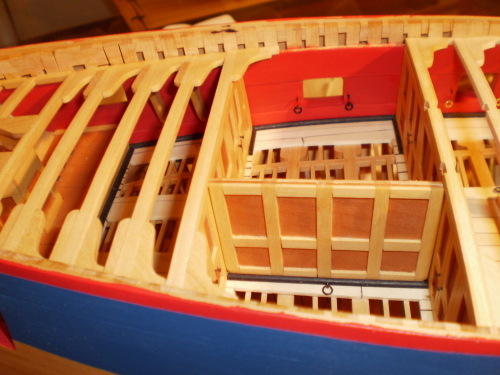
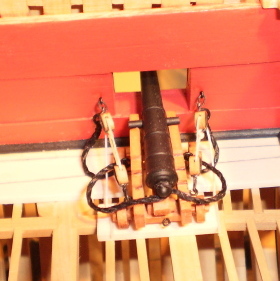
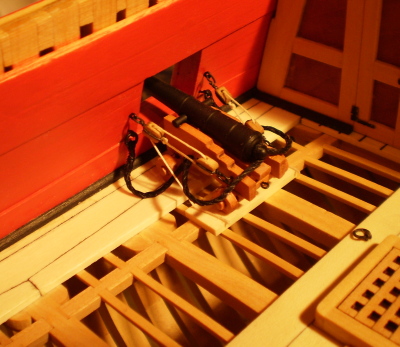
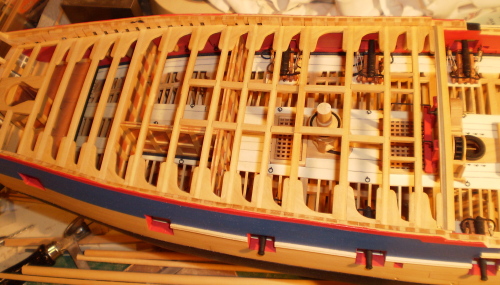
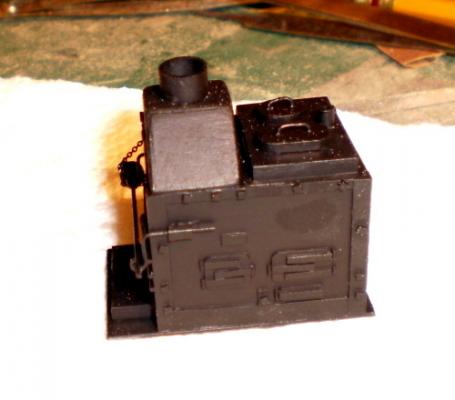
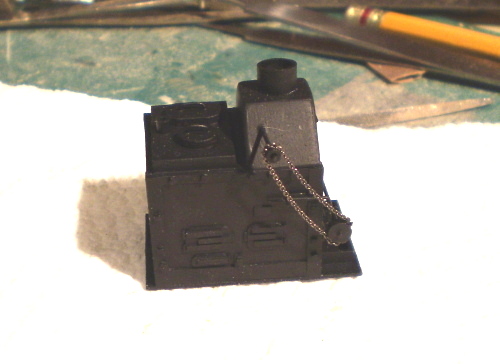
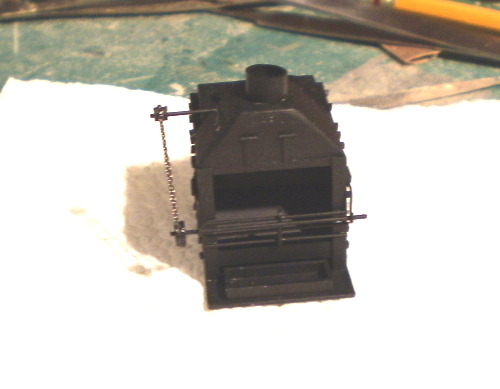
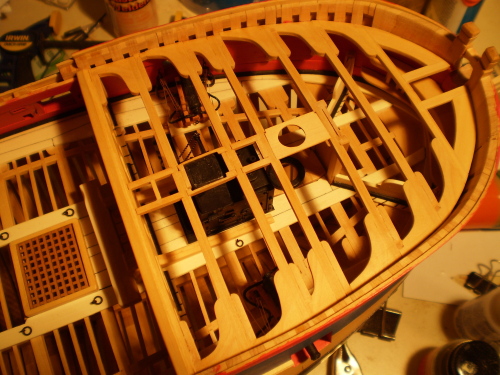
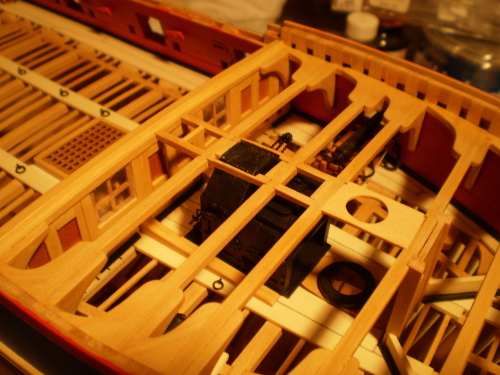
This next installment covers a wide range of work. Included are the quarter deck and forecastle framing; the bulkheads and partitions; the rudder trunk, transom planking and lockers in the great cabin; the manger and the upper breast hooks and bucklers. A good part of this ( e.g. the bulkheads, manger,cabin work) was scratch built, either because it was not included in the kit at all or was provided for only 1/2 the width. Also included are the making and mounting of those cannon under the quarter deck and forecastle; the riding bitts; the lower capstan; the chain pumps; the main jeer and topsail sheet bitts and the stove. The kit cannon were replaced by cannon from the Lumberyard because there were only eight in the kit and Bob Hunt would not provide another eight. The stove was scratch built from styrene following the plans in TFFM. Lastly, work on the outer hull began with painting of portions with blue and red; the hull steps; the fenders; chesstrees and some molding; the scuppers and the stern lights. I did not do the frieze painting because after some bad experiments I had no confidence at all about it. Bob


- 81 replies
-
- 8
-
-
- kingfisher
- lauck street shipyard
- (and 1 more)
-
Clever ideas for the sanding, Pete, and a good result. Bob
-
A small update, but a very nice one. Bob
-
Thanks, B.E. Funny how we all have regrets about things that we didn't do. As I've said before, I have a whole list of "I wish I hads" on this build. Bob
-
I hope that your recovery becomes all "ups" with no more "downs" and we all look forward to your return to Victory. Be well. Bob
-
Many thanks, Robert, Jeff and Christian. Robert, I think the alignment varies from ship to ship. I don't think there is one definitive answer. Bob
-
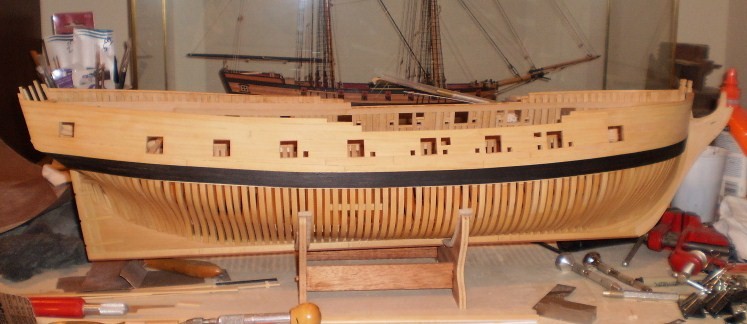
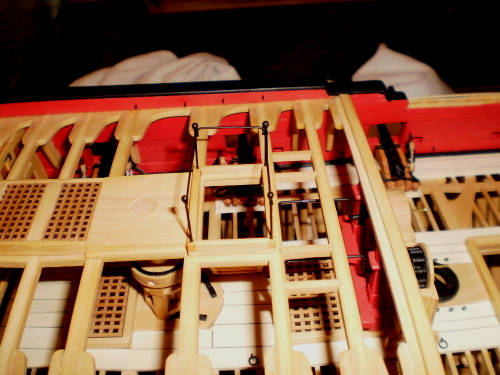
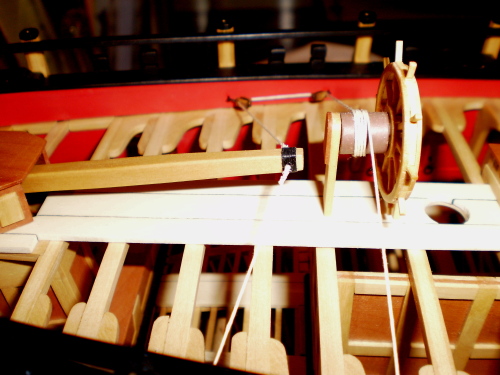
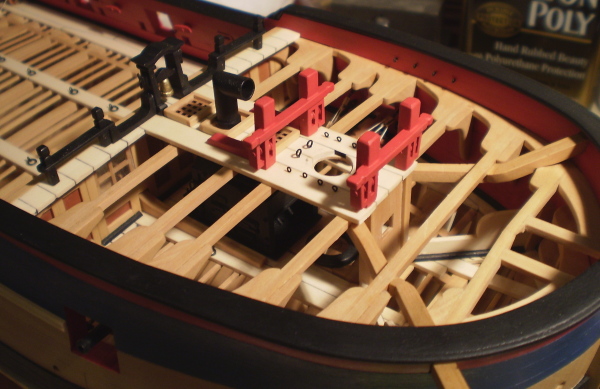
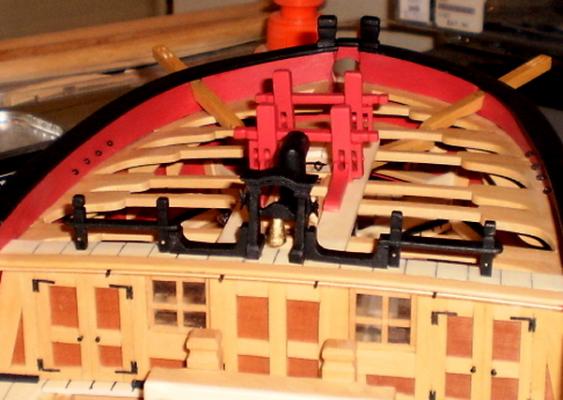
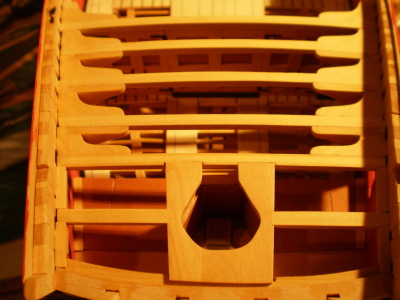
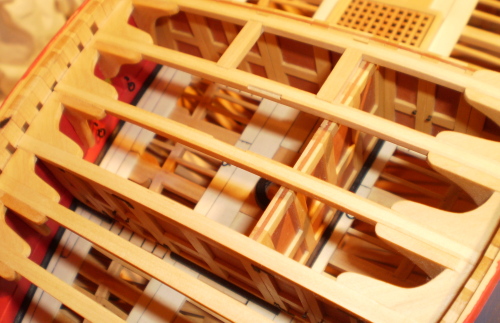
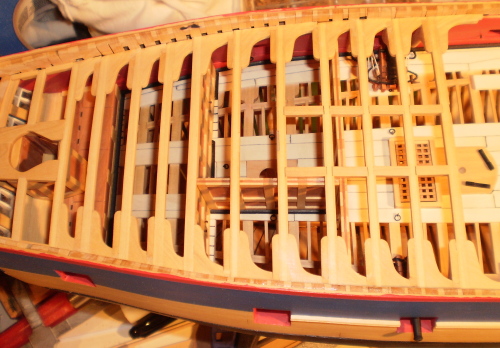
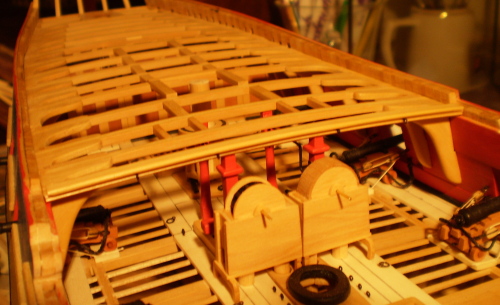
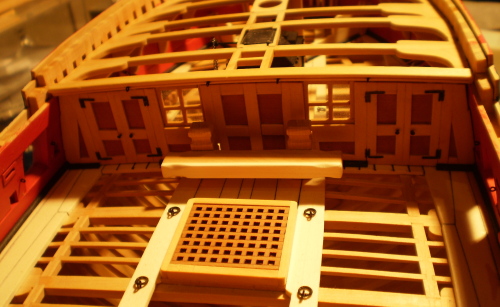
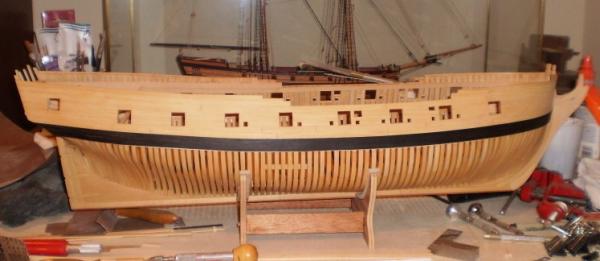
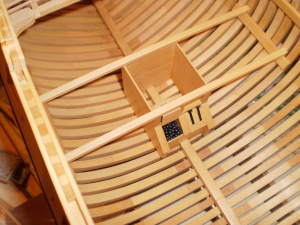
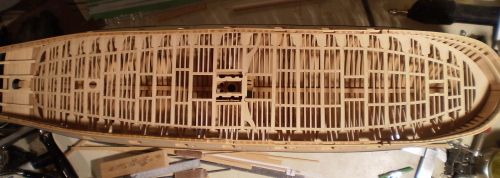
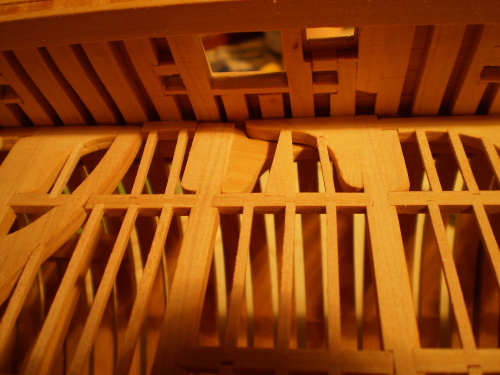
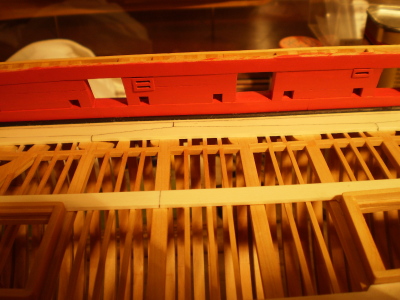
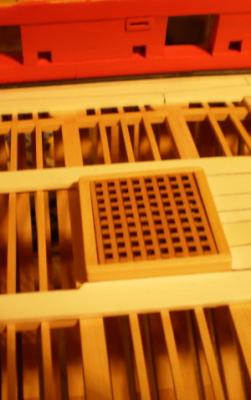
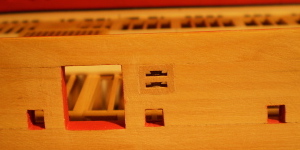
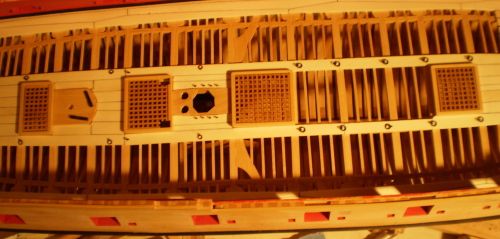
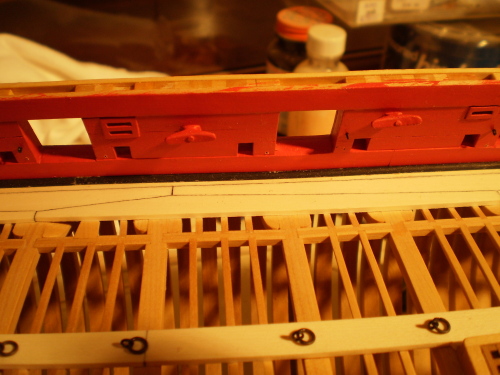
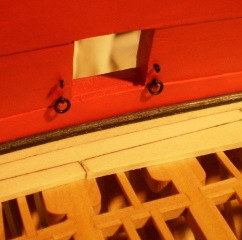
As I previously indicated, when I joined the original MSW, framing of the hull and planking of the outer upper hull had been completed. The most difficult problems with the framing were caused by the building jig, particularly in the bow. In the end, I basically discarded the jig, using only the bolts through the keel and the through the jig base, and the stem and stern supports. Unfortunately, I have no photos at all of any of this work. My first photo is of the hull at this stage of completion. At this point, I had also made and installed the various breasthooks and mast steps and had also done the deck clamps as a means of strengthening the hull for fairing and planking. Among the many " I wish I hads" on this build is my failure to treenail the planking. From that point, I proceeded to do the lower well and shot locker and then the upper well. Another of my "I wish I hads" was not doing more of the lower interior detailng. Next for me was the gun deck framing. The kit simplified the deck framing construction by providing layered beams and carlings that created mortises without the need for cutting. A clever, if unprototypical, method. I also added the waterway and a limited amount of deck planking at the edges and center. I made and added the fixed blocks and sheaves. I added the bulwark planking. I had decided to paint portions of the ship, including the bulwarks, which were painted red. The last additional work shown in this installment are hardware and fittings such as eyebolts, ringbolts and cleats that were installed on the bulwarks and decking and the gundeck hatches and gratings, mast partners and lower capstan base. Bob

- 81 replies
-
- 12
-
-
- kingfisher
- lauck street shipyard
- (and 1 more)
-
Great start on the rigging, John. Bob
-
Thanks so much, Martin. I'm not aware of anything quite like this kit available now. The Lumberyard does have a nice POF kit of the brig Oneida with laser cut framing parts. Bob
-
Thanks Grant. I'm sure you're right about the extra width. Bob
-
Thanks very much Greg. Bob
-
Thanks guys. Don't worry Joss. I'm in no rush -- this is my day job and I'm just not used to things taking quite so long. Bob
-
Thanks, guys. It was fun to build and will be fun to revisit. Bob
-
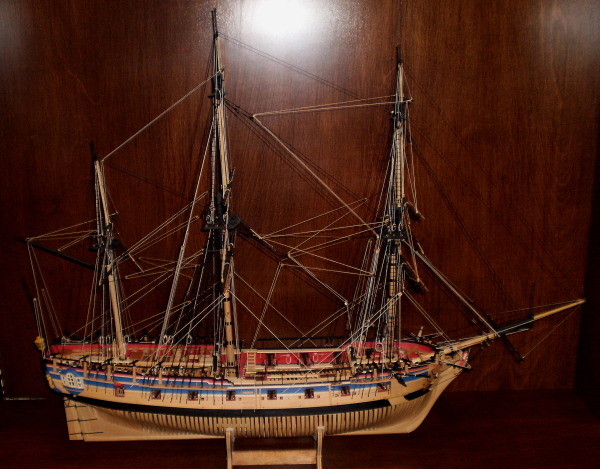
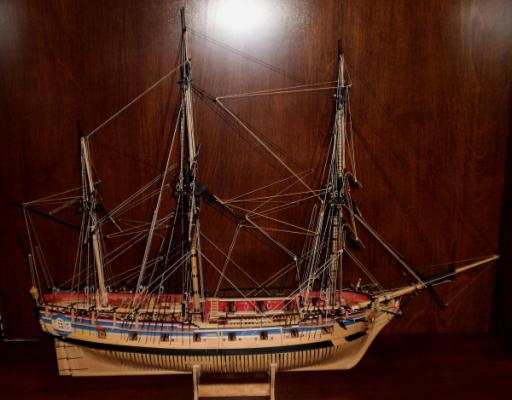
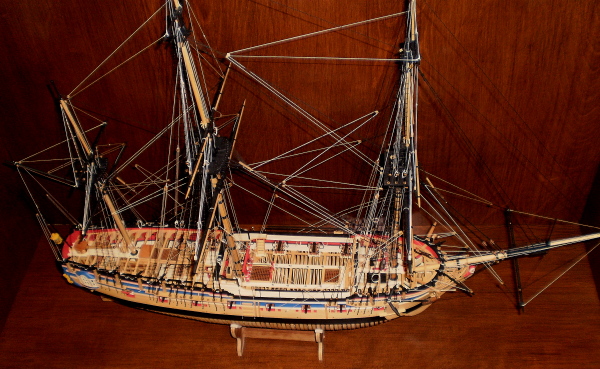
Some years ago, when the kit first came out, I bought one from Bob Hunt (Lauckstreet). Unfortunately, that was well before I had ever heard of MSW and also well before I was aware of the TFFM books by David Antscherl. The kit appeared to provide an opportunity for someone like me without any power tools to build a fully framed model, without spending the rest of my life trying to cut all the framing by hand. While the kit had some shortcomings and problems (e.g. the provided building jig was more trouble than help), it did, in fact, allow me to build a boxwood fully framed model of a Swan class ship in 1:48 scale. From the beginning, I decided on two major changes from the kit. First, I wanted to do a rigged model, rather than the hull only model provided for in the kit. Second, and in part as a result of the first decision, I chose to plank both sides of the upper hull and bulwarks, rather than only one side as provided in the kit. This led me to my first of a number of happy experiences with Jeff Hayes at Hobbymill, to get the additional wood needed. By the time that I joined the original MSW, I had completed the hull framing and had planked the wales and upper outer hull. Sadly, I have no photos of any of that work. At about that time, I also obtained the first two volumes of TFFM, which then became an invaluable aid to the project. Reference to the books allowed me to make various changes and additions to the kit as I proceeded from that point. In hindsight, I regret that I didn't have the opportunity to see the kinds of spectacular work that has been done by Remco, Danny and Toni on their Swans and that I lacked the imagination or confidence to try to do that kind of interior detailing. After completing the hull work, I took a pause of about a year to await the publication of TFFM Vol. 4, before doing the masting and rigging. I built the MS Syren during that pause. This log will be a repost of those photos that I still have, together with some brief summary text. The pictures attached to this post are a couple of the completed model photos. Subsequent posts will begin with the work after framing and hull planking. Bob
- 81 replies
-
- 12
-
-
- kingfisher
- lauck street shipyard
- (and 1 more)
-
Thanks, Rusty, Ron, Paddy and Christian. Practice may not make perfect, but it is improving my confidence. Bob