Chuck
-
Posts
9,054 -
Joined
-
Last visited
Content Type
Profiles
Forums
Gallery
Events
Everything posted by Chuck
-
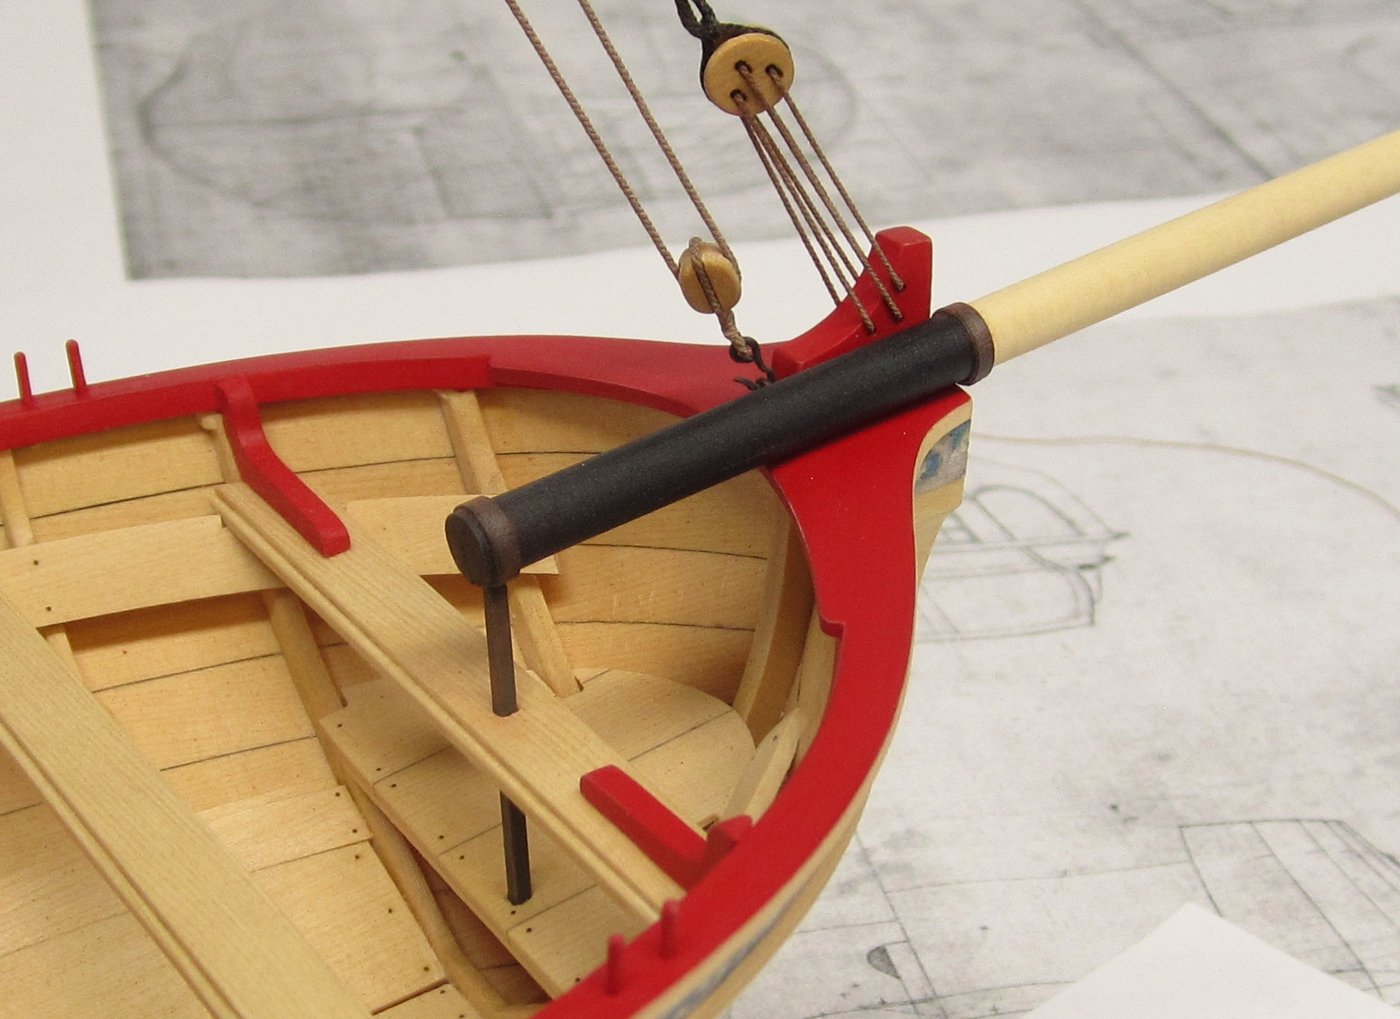
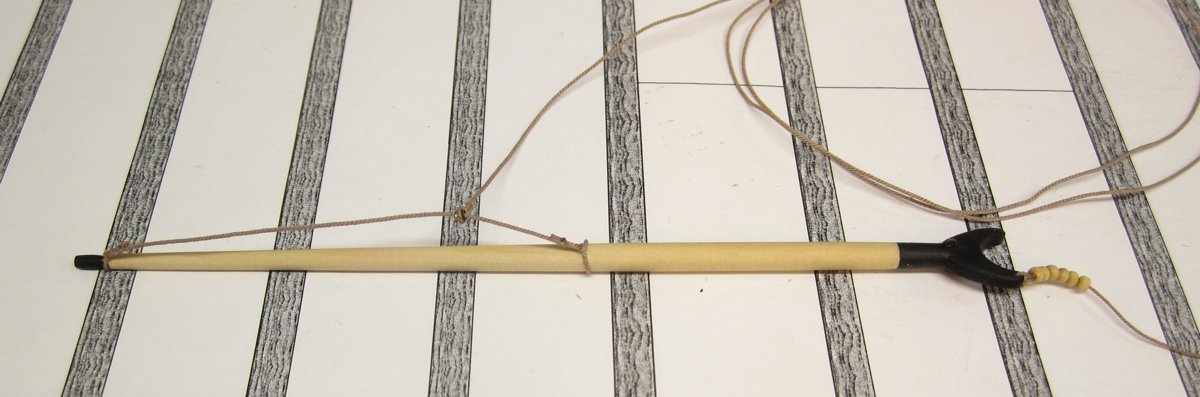
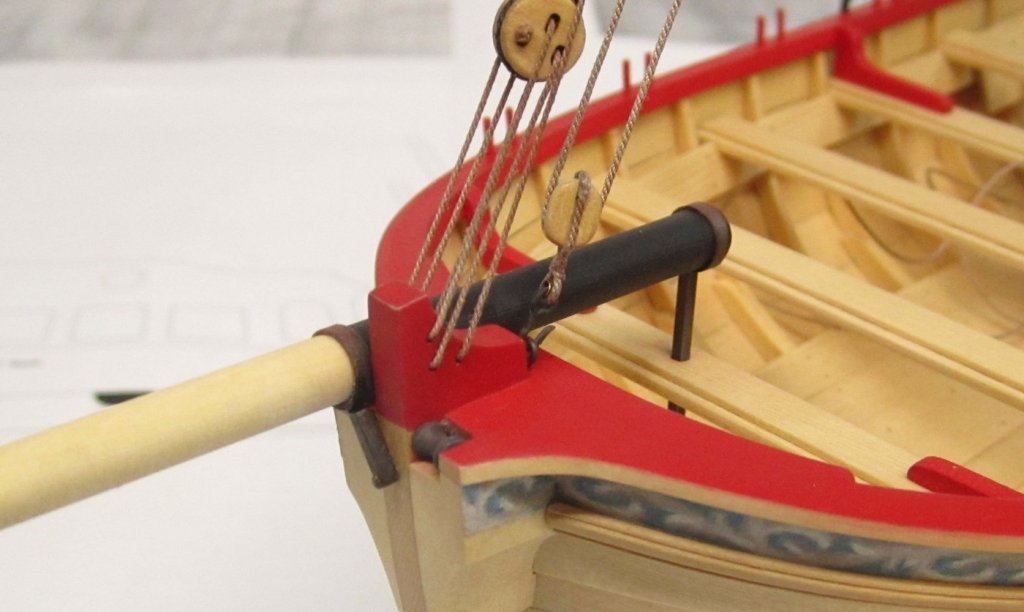
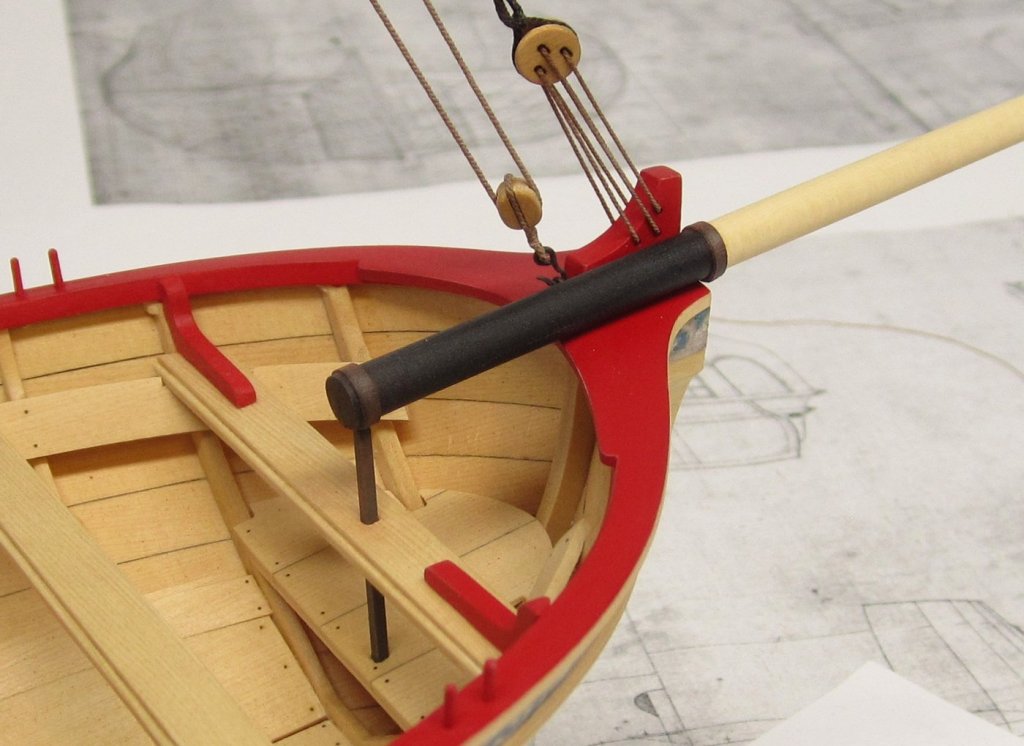
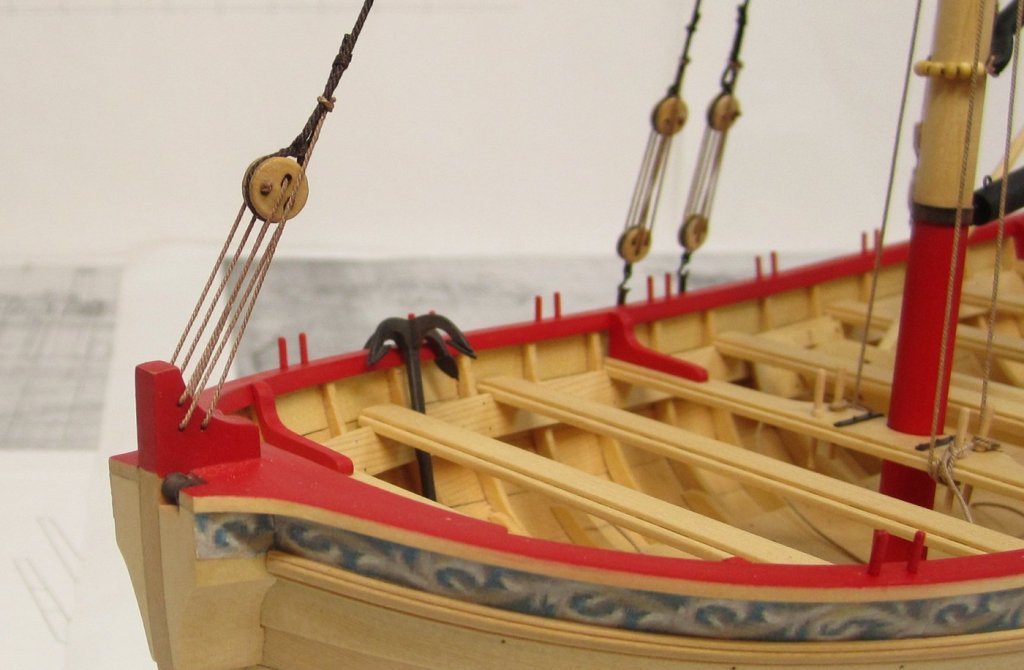
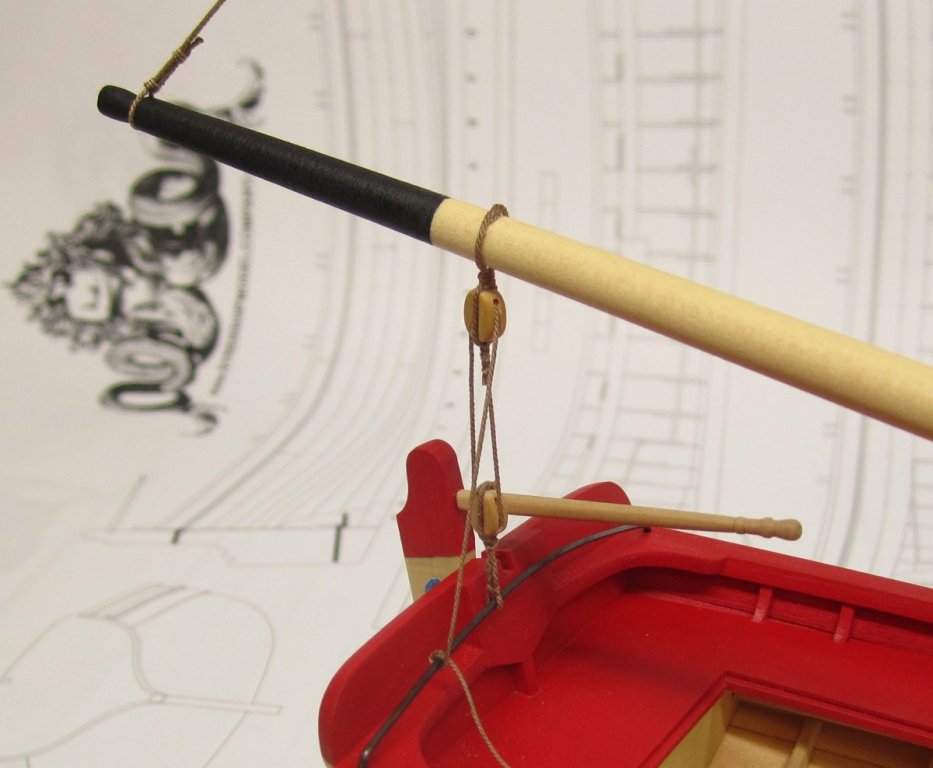
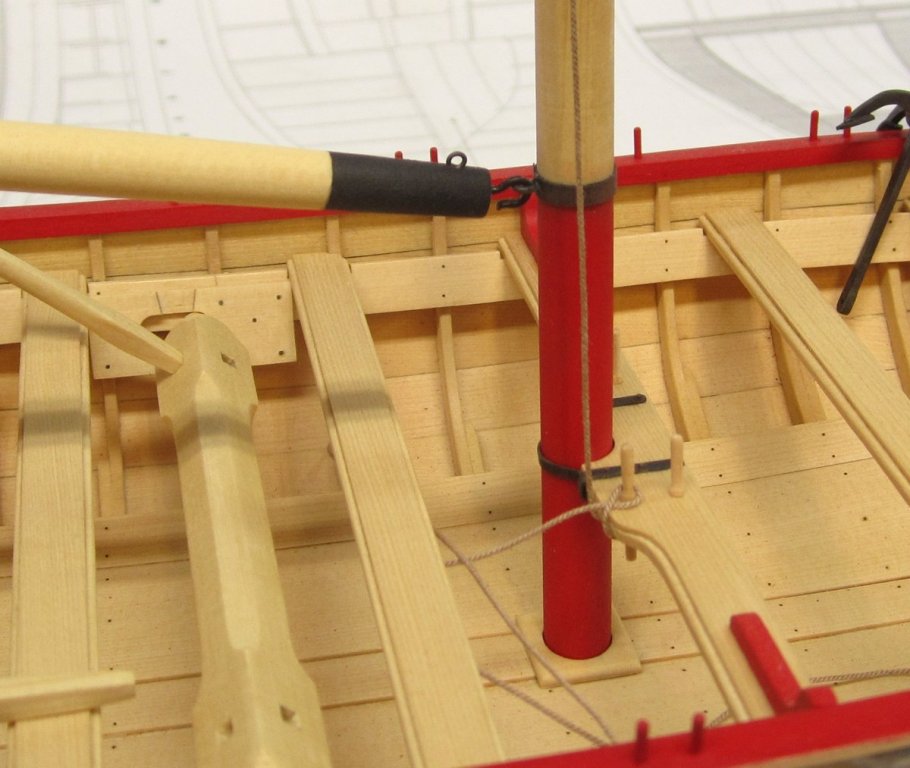
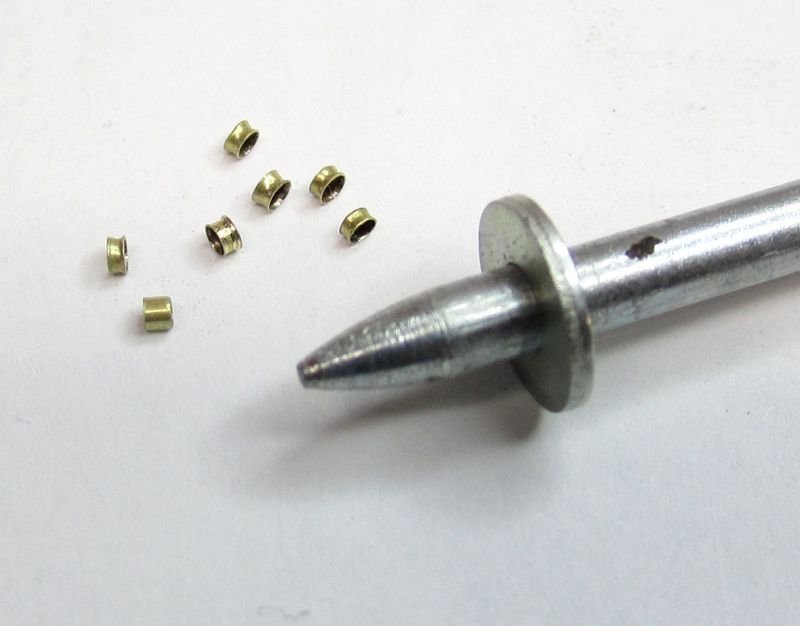
 Thank You!! 😊 Time to step the bowsprit. The bowsprit irons can be made many different ways. You can use brass for all the parts and do some soldering if you want. That is one method. I did use some brass but I also simplified the process so I wouldnt have to solder anything. The photo below shows the two brass bars 1/16" x 1/16". The longer one was pretty simple. I just cut the strip to length after filing a pin in one end. You could also file this pin into both sides if you like. It will be blackened later before I add them to the model. The second smaller piece was the same. I filed a small pin into one side. BUT I also drilled a small hole through the other. This is for the little brass pin. I used a #66 drill bit. The trick is to use a light tough and let the bit cut through the brass. To much pressure and you will break the bit. Then I rounded off that end. Both of these pieces need to be measured off your own model. They are shown on the plans but because there will be so many small differences you need to measure your own model for their length. Finally...black tape was cut to 1/16" wide and wrapped around the bowsprit to simulate the iron rings. The brass strips will be pinned into these. Once blackened and with the use of some weathering powder you wont be able to tell they are two pieces or not metal. You could also use boxwood strips and just use some black wire for the pins. If you paint them black and weather them you wont be able to tell. Its up to you. You must figure out exactly where the tape bands should be before you commit to gluing everything in position. Measure carefully. Then drill a small hole in the bottom of the aft end of teh bowsprit. Make sure the sheave on the other end is facing the correct way first. That would be a big mistake. You will need to drill a hole through the thwart for the larger brass strip with the pin facing up (unless you put a pin on both sides then it doesnt matter). But once again you must drill the hole in the right place. You only have one shot at this. Make sure you test the bowsprit in position and figure out where on the thwart you need to drill the hole. I used a #49 drill bit. Then I squared up the hole with a small needle file. Once done you can see how convincing it looks. The pin was glued into the hole on the tape (simulated iron ring) on the end of the bowsprit. The bottom can be pinned into the platform or just glued into another hole through the platform. Its up to you. Finally.....the small brass piece was glued into a hole drilled into the other iron strap (tape). Then a small brass pin was used to secure the other end through the stem as shown below. Make sure these are glued in good. You must carefully find the length for this brass piece because it determines the angle for the bowsprit. If the brass strip is too long or short then the bowsprit will not sit at the correct angle. You can see that I also added the foresail halliard. The single block was hooked into an eyebolt at the aft side of the stem. Note the optional thimble on the block.
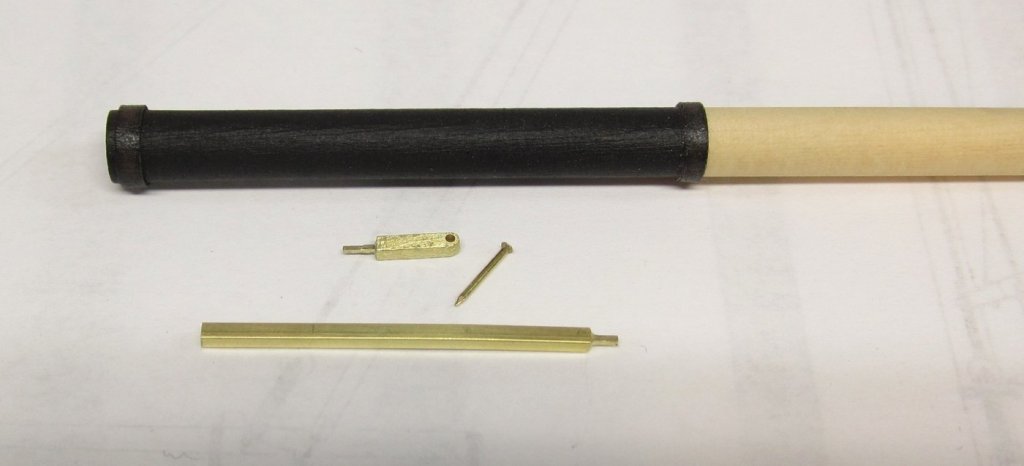
- 421 replies
-
- 17
-

-

-
- medway longboat
- Syren Ship Model Company
- (and 1 more)
-
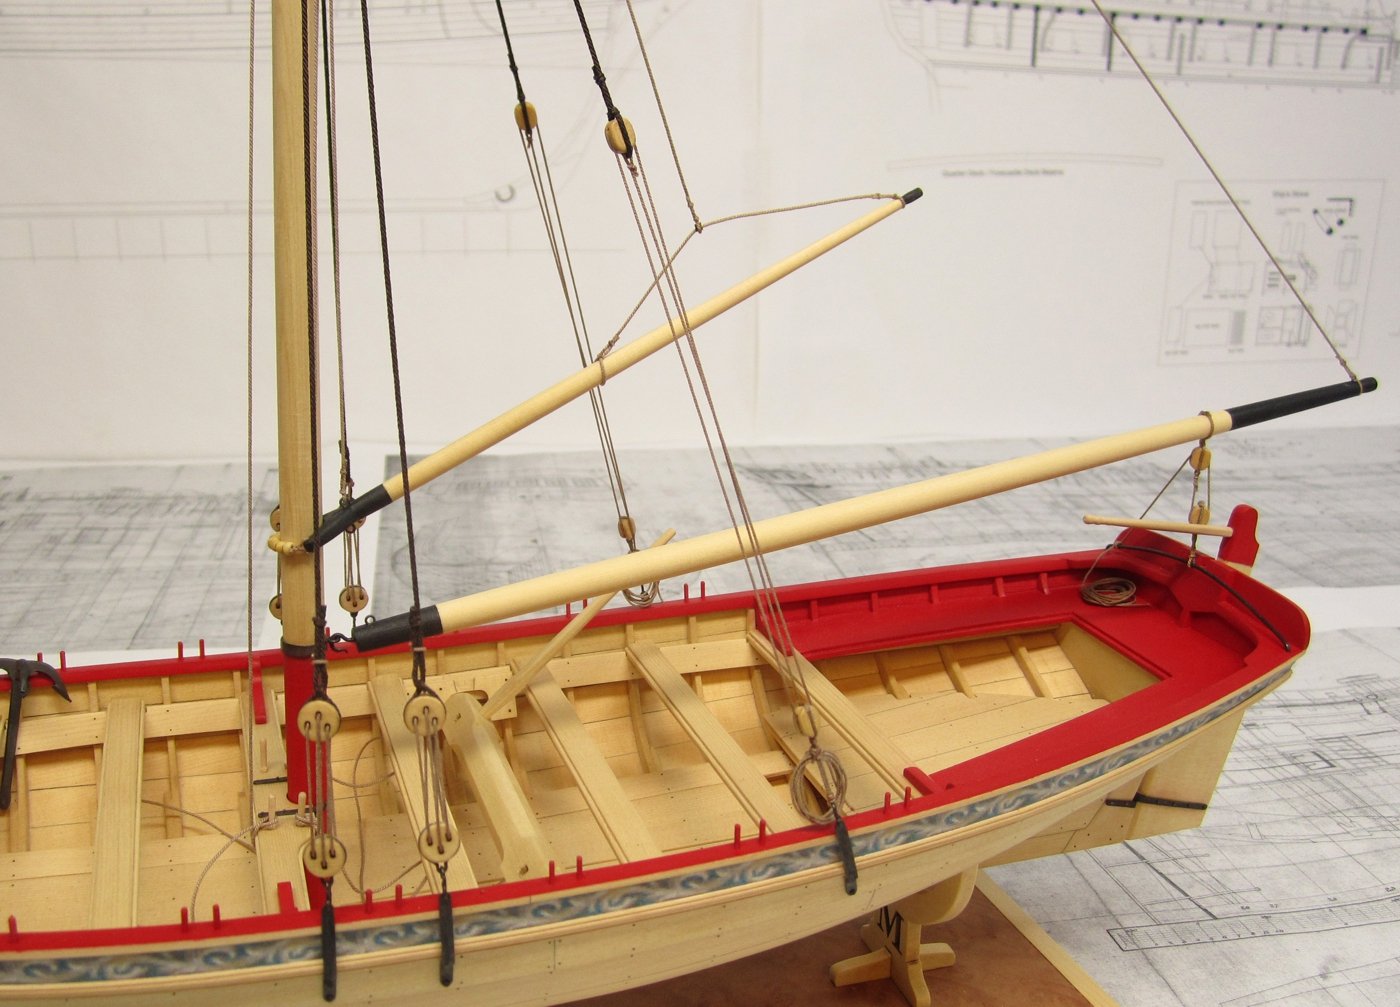
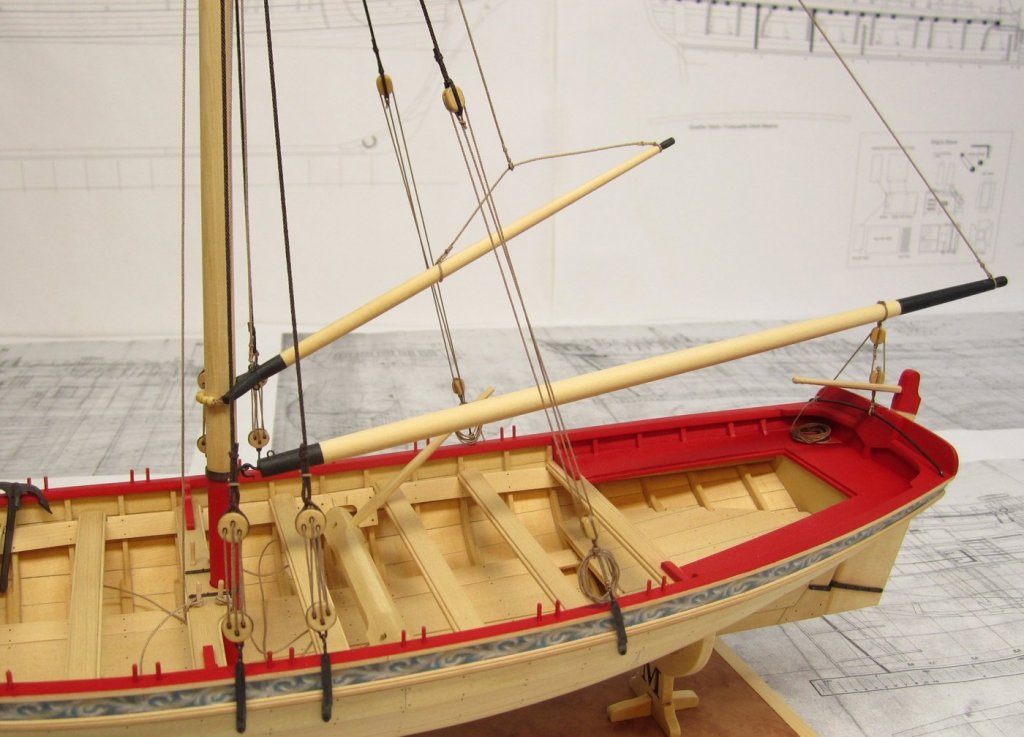
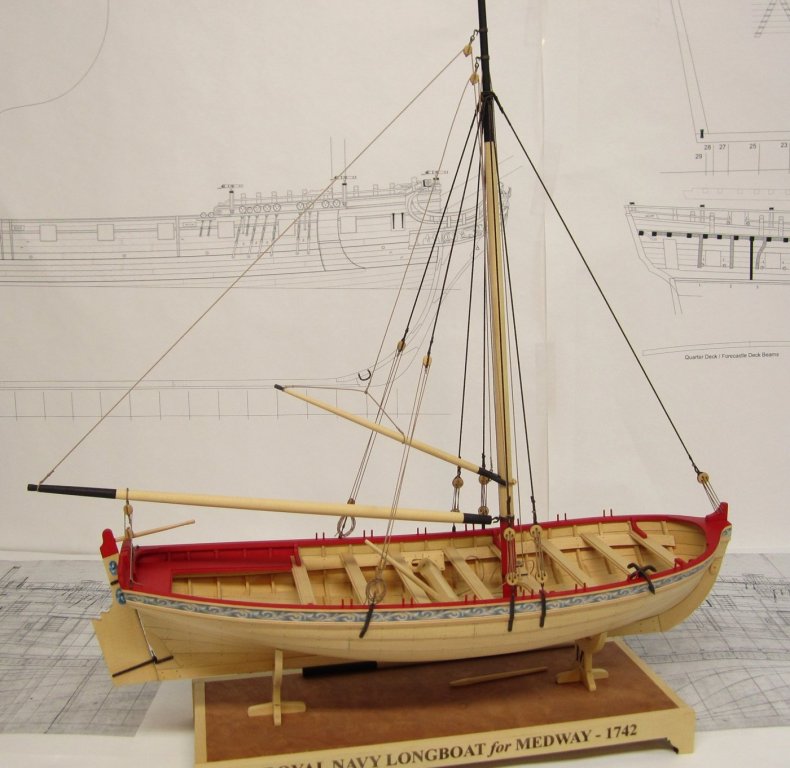
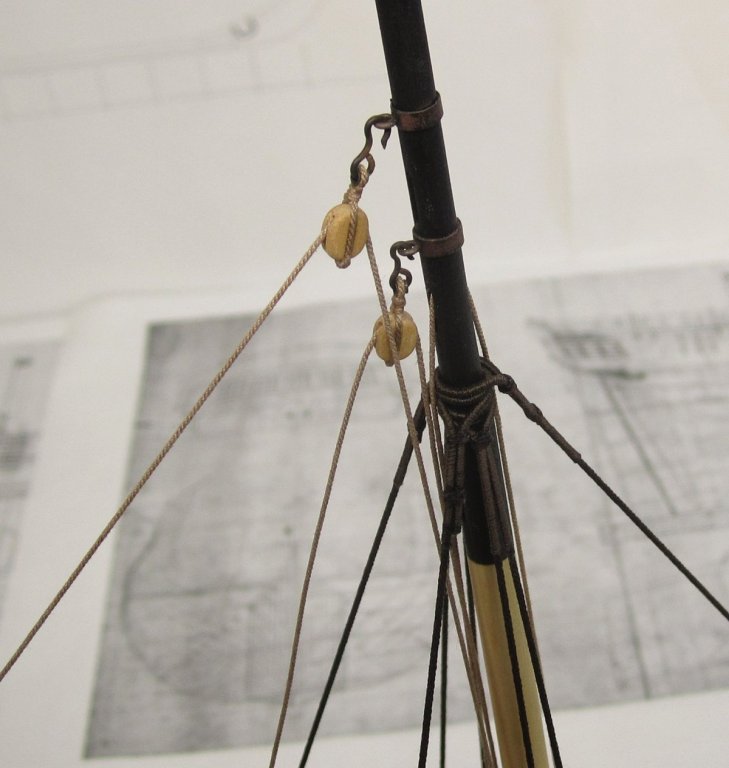
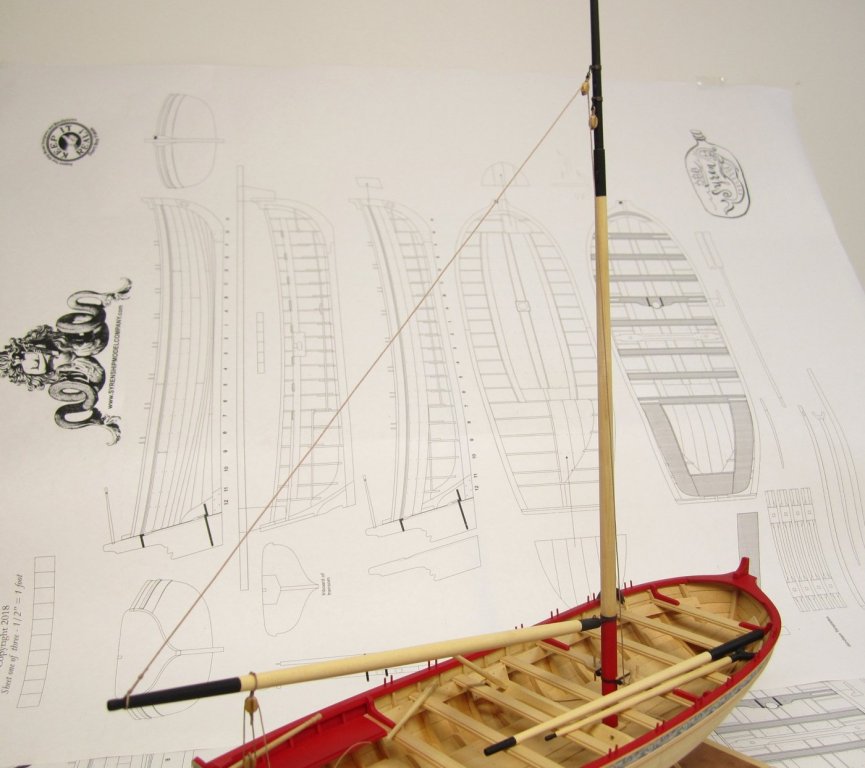
Making rigging progress. Will have more details once I get back from the dentist. But here is what the longboat looks like today. Just have the bowsprit to install and some running rigging. Almost there. Gaff was rigged first...then it was time for the shrouds followed by the backstays. Most of the lines were attached prior to placing this on the model. Deadeys and shrouds are hooked to the straps. So they were prepared ahead of time. Including the straps and hooks for the backstays. Finally the forestay... Note how the straps were bent to fit around the molding. The shrouds, backstays and forestay were served but only where they are seized around the mast. The area served extends about 1" below the where it was seized. This is an optional detail. You dont have to do this. But it does look good. Chuck


- 421 replies
-
- 32
-
-
-
- medway longboat
- Syren Ship Model Company
- (and 1 more)
-
I anticipated this and made tgose ears a bit large. Once planking is fone and you apply the frieze, you will bo doubt have to sand off more and even resuce and lower the top edge of the transom.
- 254 replies
-
- 1
-
-
- Medway Longboat
- Syren Ship Model Company
- (and 1 more)
-
That looks wonderful! A really nice job with those. The thicker floorboards can be tricky and you made it look easy.
- 152 replies
-
- 1
-
-
- medway longboat
- Syren Ship Model Company
- (and 1 more)
-
Check this out... https://www.wawak.com/Gutermann-Mara-30-Top-Stitch-Button-Hole-Thread-Tex-100-328-yds Chuck
-
Unfortunately not all colors are available in all sizes. But yes that is the correct color number. You cant rely on the color chart either. The colors only vaguely resemble the swatches. There are plenty of sources in the states. I am fortunate to live just 6 miles from the garment district in NYC. So i can get everything pretty easy. So no need for me to buy online. I have decided to stick with all natural stuff and am waiting for my supplier to custom dye a batch to match the lighter color shown. Its gonna be a few weeks though before i get it.
-
Yes they specified the brand and colors as 100 percent poly.
-
I have a lot of time to think about what I am going to do. At the very least I will think about adjusting the color but for the foreseeable future nothing will change. As mentioned, I asked my current supplier to match both colors and send me samples. I will see how that goes. In the end though, eventually I will have to decide on whether I will continue to make black rope any longer. Its not a very good choice for standing rigging at all. Just removing that one color would be a huge help to keep costs and time in check. Folks have just gotten used to it being available in kits and use it out of habit rather than based on what actual tarred rope looked like. That may be the way to go and it will save me a bundle and let me continue using the catolin in the 3 remaining colors. OR it would allow me to try and make another custom dyed version that would allow me to to just choose one for running rigging. Time will tell. But for now and probably the next six months or so....nothing is going to change. I am nearly fully stocked with rope right now too!! But alas...the info provided is good for others to consider should they want to make polyester rope.
-
I have also asked my current supplier to dye me a batch of the current thread I am using in the same colors as the polyester rope. So I am excited to see what that will look like. Once I get it I will experiment with it and see how it goes. Not to get off-topic but I amy as a business decision to help moderate the time and labor involved in rope making, select another color for running rigging. I like the poly colors a great deal. Then I will discontinue the current colors and go with just one for running rigging. We shall see...much to think about in the coming year. Chuck
-
Thats the issue really....it boils down to economy. The cost for cotton and linen as a commodity is going through the roof this year. Many think I charge too much for my rope now. So I cant raise prices and now must absorb the price increase for my catolin thread. If I made the polyester stuff and charged more because I would then be making natural fiber rope in 4 colors and 36 sizes by hand.....along with polyester in two colors and 18 sizes. Its just impossible. I can only do one or the other. Consider that I must make at least 800 feet of rope every single day right now to keep enough in stock. Its maddening. I may however cut down on the current colors and drop two of the catolin colors and just make light brown and dark brown moving forward so I could offer two choices of polyester rope. But then the people wh o love my light tan and black rope would be upset. I would lose a lot of business. Other than that, I just cant even consider it. So before I make such a decision....I must gauge what interest is out there for this stuff. I literally just ordered $1000 worth of cataolin before the price goes up on January 1st. That is about a 3 month supply.
-
B.E. you would be surprised how well it hangs once you get accustomed to it and the tricks you would use. Once again....no need to wet down like you would cotton or linen with diluted white glue while getting it to hang properly. My tests included hitting it with the hair dryer to relax it in any shape.... No need to stretch it at all. I go back and forth with which of these two colors I like best. Which do you guys prefer? Should I decide to use it I would select only one for the same reasons. Getting back to the heat knife. My experiments were pretty exhaustive. I found that if you didnt knot the ends before heating it in the oven or using a hair dryer, the rope would just unwind horribly almost its entire length. So my thoughts were that using a hot knife would also have the same effect. If you touched the end and it didnt immediately seal, it would unravel like crazy. The sam is true for dipping rope untreated with heat in water, either hot or cold. The rope would just unravel badly. Some glues worked but I dont know which ones the guys were using at the museum. That seemed to time consuming to me and if you forgot to do it when cutting you would regret it. Same is true if you didnt get a good bond. So there are trade-offs. The poly does have a slight sheen which I dont like. But its not noticeable really or distracting. It is also very stretchy. That is not a problem but you will need to get used to it. If not for anything else....I found it important to post my findings and experiments here and every can give it a try and make up their own minds. Its worth the effort. I am hesitant to not use any material just because its the current "rule" or traditional line of thinking that MUST be observed because well known builders and institutions have said so. Times are changing and the traditional materials are getting more and more expensive and less and less high quality. There may come a time where we must adapt. As a business I this stuff is constantly on my mind. Chuck
- 115 replies
-
- 15
-
-
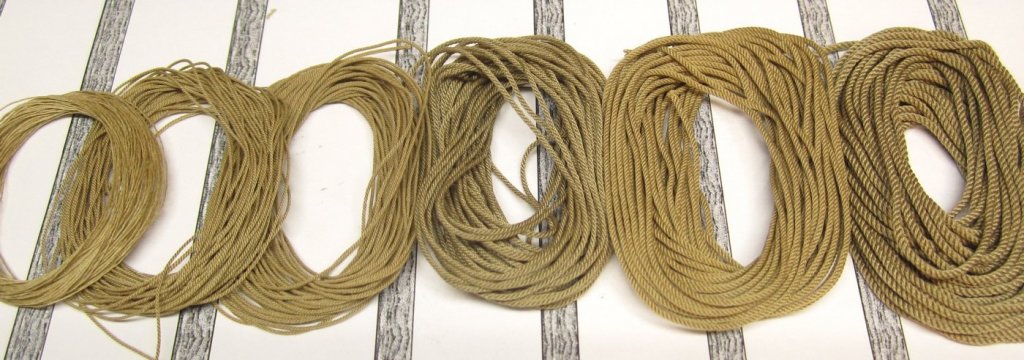
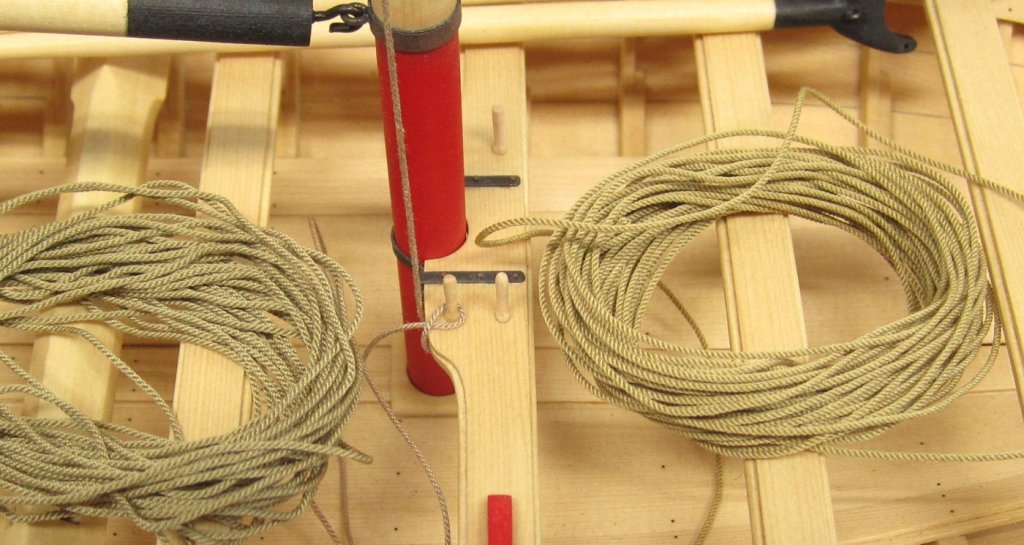
I was testing at 200 - 275 F After a few test I found it better to go with the higher temp for a much shorter time. But if you get distracted you will have a mess on your hands. In the end I found the hair dryer worked the best. Unless you have to make thousands of feet at a time like me I would suggest you stick with a hair dryer on the hottest setting. Just clamp the rope gently so it doesnt blow all over the workbench. Here is a photos of what I have left in terms of sizes.....you can get very very thin rope using Mara 120. Remember that the lower the mara size the larger the thread is. Its the opposite of TEX sizes. Ultimately I was using Tex 25, 40, 100, and Tex 200 for those familiar with Tex sizes. The lighter color is the 265. I though about a heat knife but then I thought about how much cutting you do on the model. Its hard enough navigating through a web of rigging with a sharp blade and I though a hot blade would be even more dangerous. So I discounted the idea in favor of stabilizing the rope first so you didnt have to worry about it at all. Here is a look at both colors sitting on my model. Just to show it in a real life setting on a model. The rope on the belaying pin is my cotton/linen blend rope....as good as that rope is it just cant compare to the crispness of the poly rope. But yes...it is poly and I wonder about the stigma attached to it and whether folks would shun using it. So I stopped considering switching over to it. But I may still in the future should there be interest. I just could never make rope in both materials....its just impossible for one person to make that much rope.
- 115 replies
-
- 19
-
-
I created a new topic for this as I feel bad about steering the topic in this build log. We can discuss more details about my experiments with polyester thread here.
-
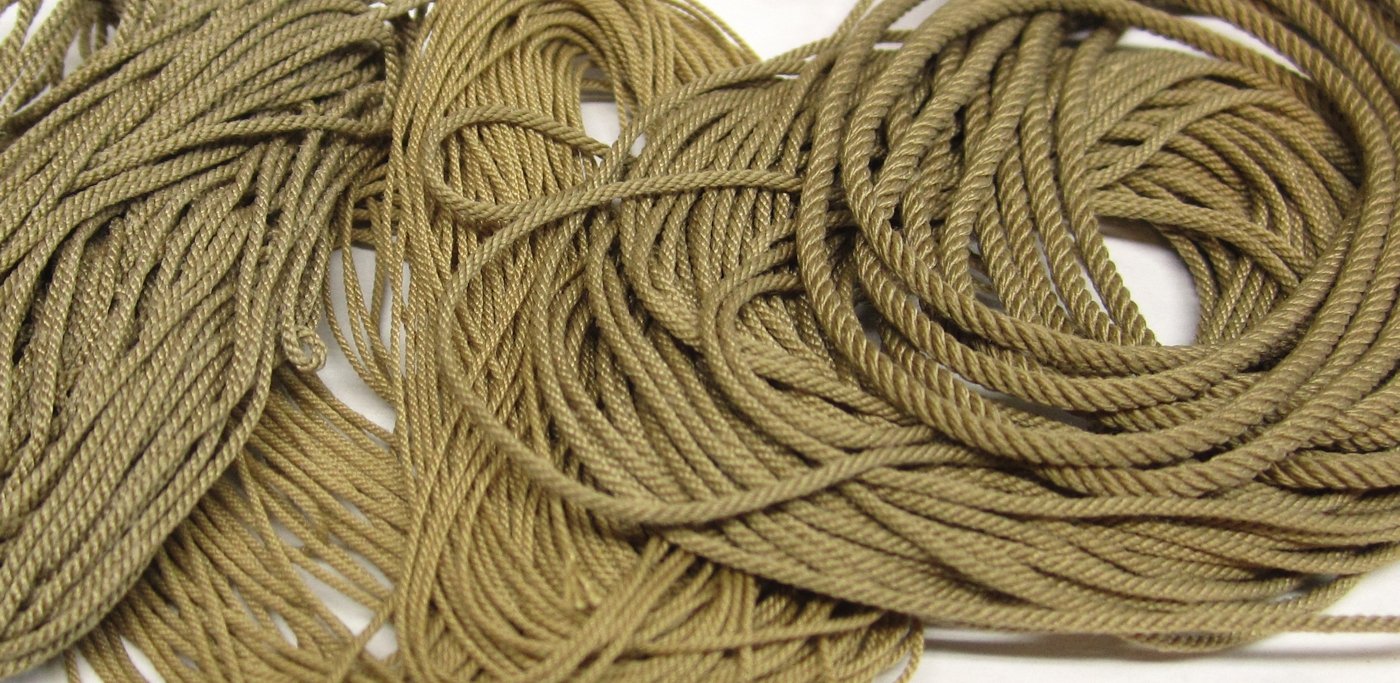
I was quite surprised about 4 months ago with the prevailing thought about only using linen or cotton for scale ropes. This has been the requirement of Museums and collectors for quite some time. Synthetics are frowned upon. But I think there is some movement and acceptance starting with these folks. I was hired by a major well known museum in Europe (I wont mention their name) to make several thousand feet of rope for them. They were going to use it to restore a contemporary model....and also to rig a newer model. But they told me they have now decided that polyester scale ropes are being used from this point forward because of its longevity and its crispness and beauty. It really lays up like real rope. They have (like all of us) been unable to find good quality linen or even cotton that isnt fuzzy or lumpy or that requires custom dying. This makes it very time consuming and expensive to make in large quantities with sometimes inconsistent results. The custom dying opens up a whole host of other issues for them. So anyway, they specified polyester rope made the same way I make my other rope which they have purchased many times before. But this time they also specified the brand and color they wanted for the polyester thread I was to use. They created a new standard for themselves. I did have some adjustments to make and it took some time to get used to working with material that is a bit more "stetchy". It does unravel like mad.....just like morope....BUT they are aware of this and use a conservatoires glue that is used to stop fragile textiles from fraying and deteriorating on it before they cut it. They seemed to have a whole plan set up for now accepting the use of this material. Below is a photo of some of that rope I made for them. Its beautiful and I like its appearance and handling more than the rope I sell. I even considered switching to it for all of my rope from Syren. Come Jan 1st, the prices for linen and cotton as a commodity are increasing pretty drastically (about 20%) because of the Trade wars now underway. DMC has even decided to STOP production of many sizes of their Cordonnet Cotton thread. That is a shame. But then I thought model builders wouldnt get used to how it unravels.....it really unravels if you dont glue or burn the ends. Just thought I would share this with everyone. There are actually two colors they specified for all running rigging. Both are in the photo. No fuzz and no lumps and it laid up the best I could have asked for. But for those of you who have a ropewalk....you can order Gutermann Mara Thread...color 2899 for running rigging and color 696 for standing rigging (very dark brown). But you need to go to the industrial division to get the sizes which arent available retail. You will need Mara 120 .....Mara 70..... Mara 30.... and Mara 15..... thread in these colors to make it but they have so many colors to choose from. Unfortunately there color charts do NOT accurately reflect the true colors of the thread when you get it so beware of this. I experimented after making the rope and found that if you knot off the ends and place them on a cookie sheet, place them in the oven at 200 - 275 degrees for 7-10 minutes. You must watch closely and set the stove on the lowest setting because polyester has a low melting point. The rope looks the same afterwards and wont unravel at all. In addition, when your wife finds out you did this and gets mad....another method I used when experimenting was to use my hair dryer and a very hot setting and heat up the rope for a minute or two. Dont be afraid to get close to the rope when you are doing this . This method works very very well....because its easier to watch whats happening and not melt your rope. But you can only do smaller quantities at a time. I was able to replicate all of my current sizes of rope ranging from ,008 to ,080 in diameter using various strands of the thread sizes shown. I even managed to make a huge cable for them 3mm in diameter. It was just a matter of experimenting with the number of threads and either 3 strand or 4 strand. Once you have your recipe established for each size you can easily replicate the sizes with great consistency and accuracy. Because there was some interest in this topic I started a new one rather than post it in another members build log. I will take some more photos of the packages I still have remaining to show the size variables and give you guys a better idea of what the rope looks like. Feel free to ask me any questions. Happy New Year !!! Chuck

- 115 replies
-
- 26
-
-
Jeff that looks terrific. Well done. Hope the project is helping you get excited about being in the workshop again. 😊
-
I dont want hijack Johanns topic but to answer.....No I dont have any plans to offer it. Being a one man factory, its tough enough to make what I already offer. I couldnt possibly stock another 8 sizes in another material or color. I just dont have the time. But for those of you who have a ropewalk....you can order Gutermann Mara Thread...color 2899 But you need to go to the industrial division to get the sizes which arent available retail. You will need Mara 70..... Mara 30.... and Mara 15..... thread in that color. I experimented after making the rope and found that if you knot off the ends and place them on a cookie sheet, place them in the oven at 275 degrees for 7-10 minutes. Then rope looks the same afterwards and wont unravel. Chuck
-
Yupp!!! Thats why I am sticking with what I am using. But it was just interesting to see that some of these big museums are switching over. Its just getting tougher and tougher to find good linen and cotton material to work with.
-
That is some great looking rope you have made there. I am also someone that has been biased by tradition and try to only use natural materials for my rope. Silk is OK but it is too shiny for me and very slippery so it tends to unravel after you make it. In some instances it unravels quite a bit like morerope. But I suspect you have experienced that too especially on the larger ropes. I was quite surprised about 4 months ago however with the prevailing thought about only using linen or cotton for scale ropes. I was hired by a major well known museum in Europe (I wont mention their name) to make several thousand feet of rope for them. They were going to use it to restore a contemporary model....and also to rig a newer model. But they told me they have now decided that polyester scale ropes are being used from this point forward because of its longevity and its crispness and beauty. It really lays up like real rope. They have (like all of us) been unable to find good quality linen or even cotton that isnt fuzzy or lumpy or that requires custom dying. The custom dying opens up a whole host of other issues for them. So anyway, they specified polyester rope made the same way I make my other rope which they have purchased many times before. But this time they also specified the brand and color they wanted for the polyester thread I was to use. It does unravel like mad.....just like morope....BUT they are aware of this and use a conservatoires glue that is used to stop fragile textiles from fraying and deteriorating on it before they cut it. They seemed to have a whole plan set up for now accepting the use of this material. Below is a photo of some of that rope I made for them. Its beautiful and I like its appearance and handling more than the rope I sell. I even considered switching to it for all of my rope. But then I thought model builders wouldnt get used to how it unravels.....it really unravels if you dont glue or burn the ends. Just thought I would share that while you are making your experiments. There are actually two colors they specified for all running rigging. Both are in the photo. No fuzz and no lumps and it laid up the best I could have asked for.
-
In some instances the buildboard may be slightly thinner than 1/4". In these cases you should sand the bottom tabs of each frame so that your frame sits down onto the buildboard. It shouldnt be higher. This will happen if your frame tabs stick out on the bottom of the build board a little. Just sand them down flush. Hope that helps.
-
They may be out of business.....will try and contact tex. But I am pretty sure the site no longer exists..
-
I never serve the block strop. To much of a finicky detail for me.
- 421 replies
-
- 1
-
-
- medway longboat
- Syren Ship Model Company
- (and 1 more)
-
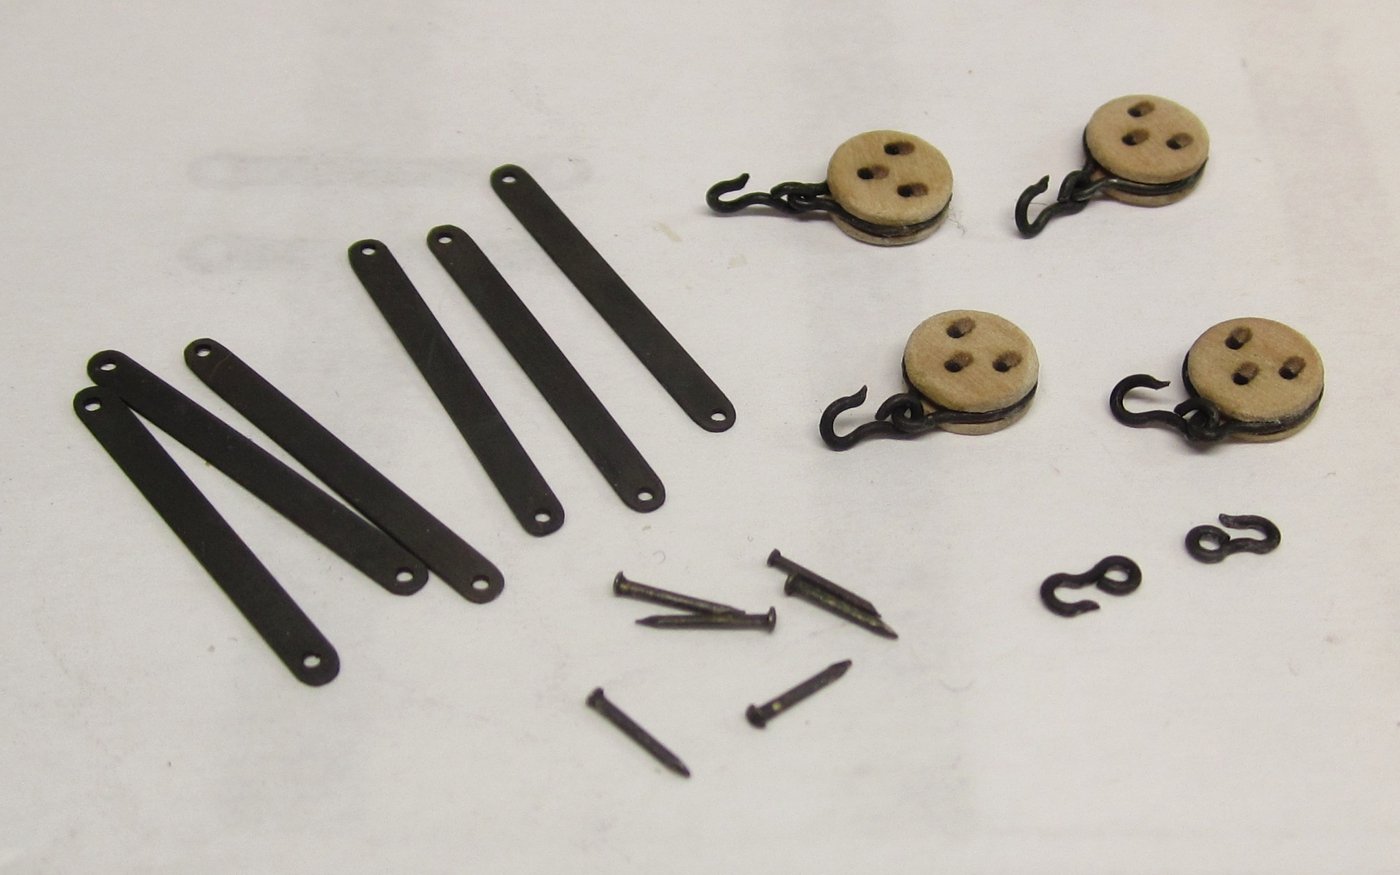
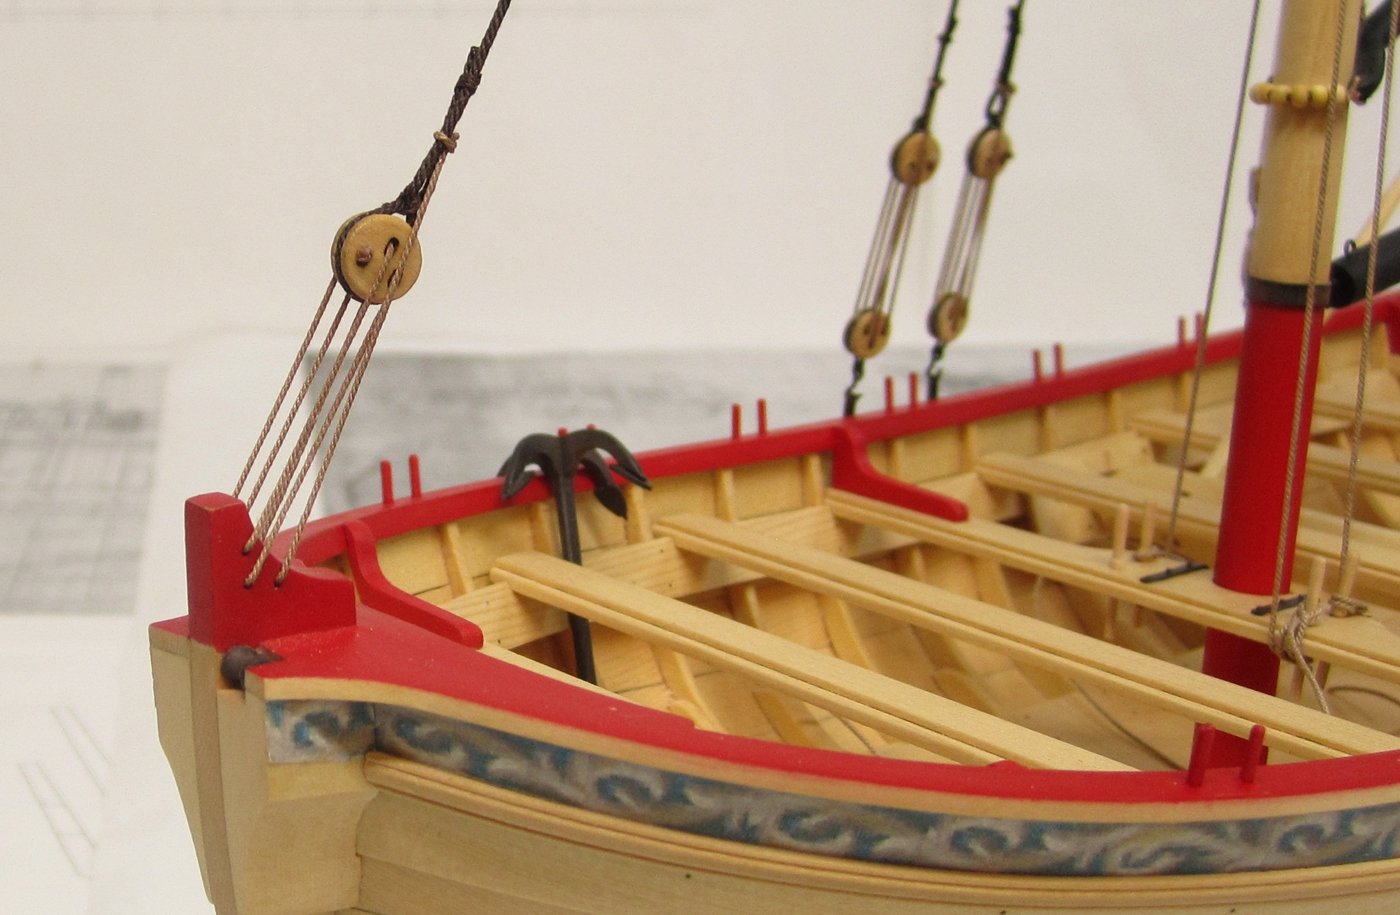
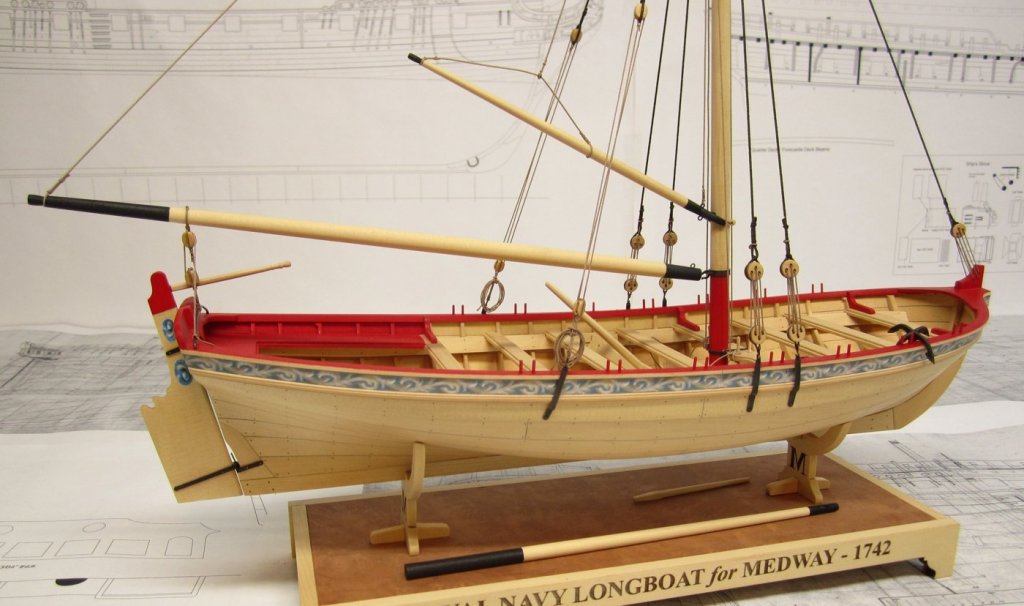
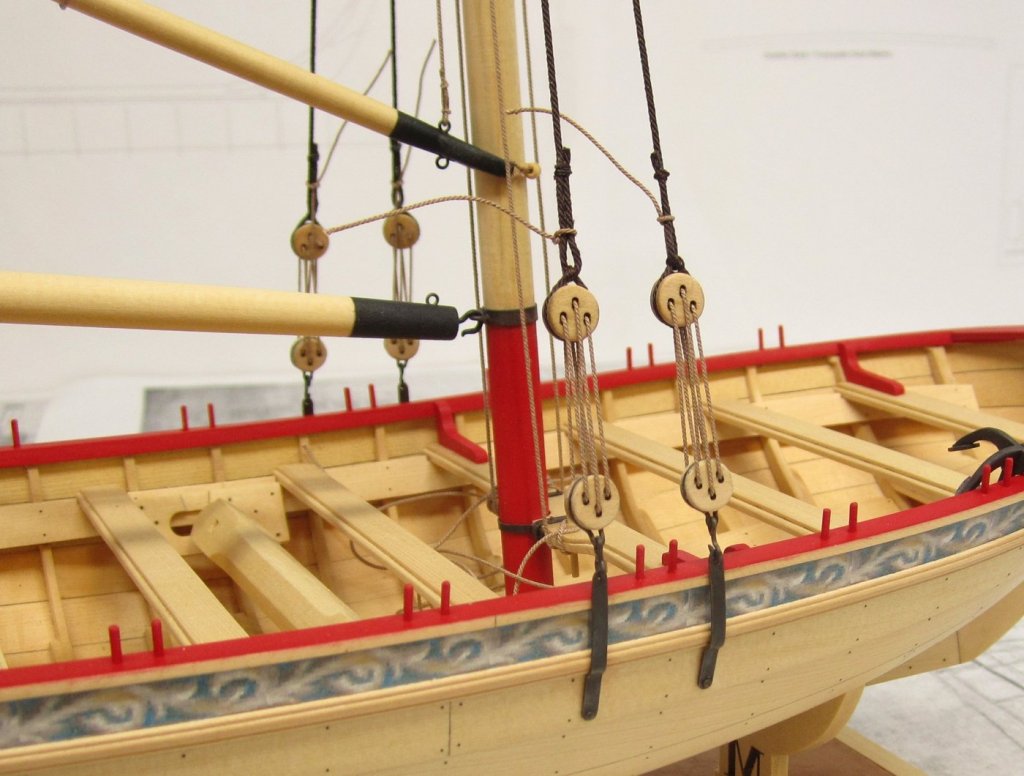
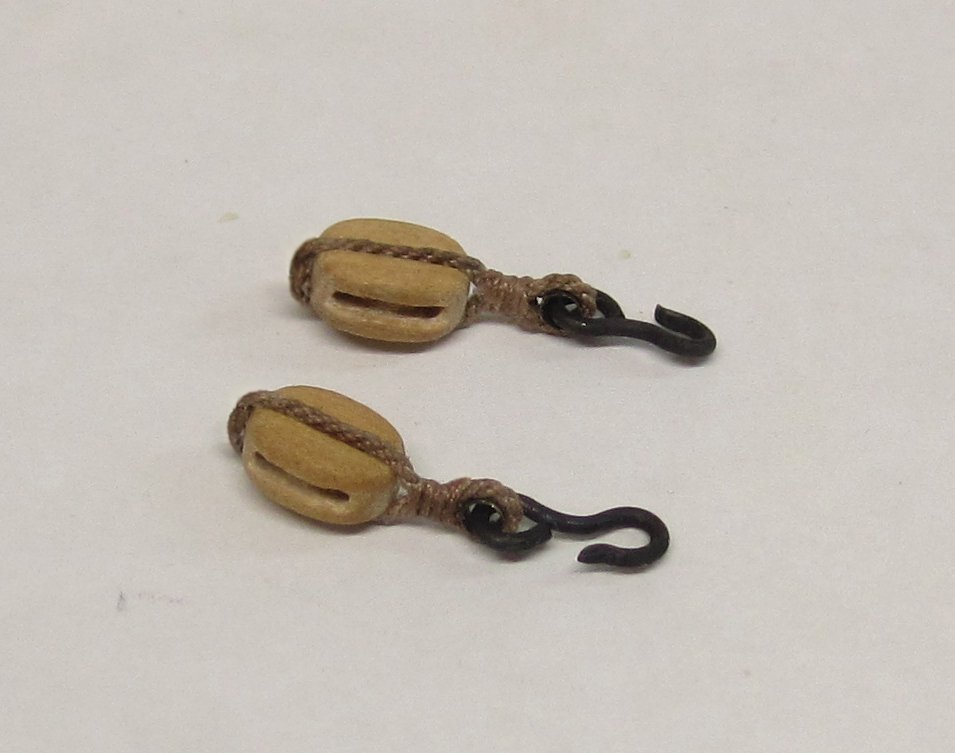
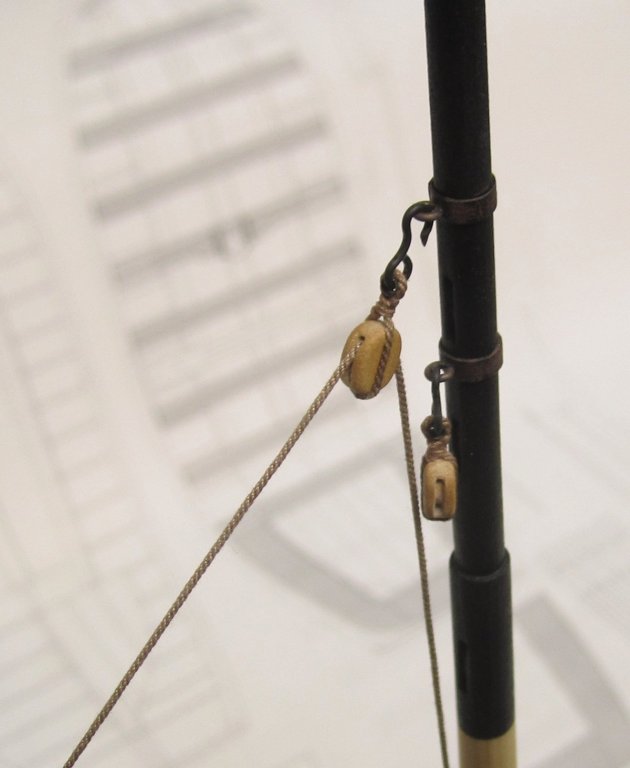
Starting rigging... The boom was rigged first. But before I started I knew I would need two 1/4" single blocks set up with hooks. See below. One is for the boom and the other is for the gaff. So I made these first. They were stropped with .025 light brown rope. The hook was made with 22 gauge black wire. I also used a thimble but this is optional. I know they are a pain to make but if you want to give it a go, use some 1/16" brass tube to make them. The photo shows the blocks without a coat of wipe on poly..... Making thimbles if you want to give it a try. Just use a small punch to lightly tap both sides so they flare out. Then blacken them. With those done, I started rigging the boom by adding the topping lift first. I used .025 light brown line. It was seized to the outboard end of the boom. Then it was brought up to one of those blocks hooked to the mast. See below. Then the loose end was brought down to the aft belaying pin on the starboard side. I set the angle of the boom I thought looked good and then secured the line to the belaying pin on the thwart. But it isnt glued on permanently yet. It will absolutely need adjusting and retensioning as I progress. So I left it extra long with no glue for now. I probably wont use any glue at all. But remember I will be rigging it with sails after I I rig it first without sails. So I will need to be able to undo all of these lines and readjust them later. You can see that second block on the mast hanging which is for the gaff peak halliard later. So to finish off the boom rigging, I added the main sheet which is shown below. Two 1/4" single blocks were used. One lashed to the boom and another seized to the horse. The sheet was run between both using .018 light brown rope. The loose end was made fast to the horse and left extra long again. No glue being used yet. Once the shrouds and stays are added everything will be retensioned.
- 421 replies
-
- 23
-
-
-
- medway longboat
- Syren Ship Model Company
- (and 1 more)
-
Great progress. All of your joints look clean and crisp.
-
And dont forget that in the topic with all the Medway downloads you will find a PD with all of the spiled plank templates. Your model looks really great. Awesome job on the planking.
- 32 replies
-
- 1
-
-
- medway longboat
- Syren Ship Model Company
- (and 1 more)
-
Here is a downloadable PDF full size of the rigging plan. This is without sails for those who wish to rig it this way. I have omitted the sizes of ropes and blocks as this will all be explained in the instructions. Its a simple rig and this way those notations wont crowd the paths of the rigging on the plan sheet. I am releasing as a download also because I know there may be folks who would prefer not to pay for a masting and rigging package especially after so few items are needed that you might already have. I will do the same with the sail plan. This will hopefully help those in other countries where the shipping would be ridiculous to send a plan sheet and mast material in a mailing tube. But I will offer it of course for those who still want to buy all the parts in cedar and use my rigging blocks and rope which will be part of the rigging kit. let me know if you have any questions about the rigging plan. The mast blank is 20" long and will be expensive to ship internationally even though its very light. 26ftlaunchsheetonehalfsheet3.pdf