


Chuck
-
Posts
9,079 -
Joined
-
Last visited
Reputation Activity
-

 Chuck got a reaction from Rustyj in Sloop Speedwell 1752 by Chuck - Ketch Rigged Sloop - POF - prototype build
You could give it a few swipes. But you will be fairing inboard at some point and that will all be removed later. But its best to get rid of most of it now as it will dirty up your hull.
-
 Chuck got a reaction from Freebird in Sloop Speedwell 1752 by sfotinos - Syren Ship Model Company - 1:32 Scale - POF Sloop
It really doesnt matter. Whatever you find easier.
thats a lot of frames
-
 Chuck got a reaction from Jack12477 in Sloop Speedwell 1752 by Chuck - Ketch Rigged Sloop - POF - prototype build
I dont quite understand the question. Perhaps a photo?
-
 Chuck got a reaction from glbarlow in Sloop Speedwell 1752 by Chuck - Ketch Rigged Sloop - POF - prototype build
Thank You...
With the catheads completed I could finish some inboard details at the bow in preparation for fitting the bulwarks with the pissdale and other stuff.
In this photo you can see the the waterway was added around the perimeter of the fcastle deck. It was done exactly like the other decks.
Then I I added the final breast hook at the bow. This was done just like the others on the deck below it. It was laser cut in two pieces. I made sure to bevel the inside edge so I got a tight fit against the bulwarks and stem. I added nine bolts that stood proud using 30lb black fishing line. Then it was painted red.
Lastly, I added the thin an delicate molding strip on the inboard bulwarks. If this is made too heavy it would just look bad. So I made sure it was very thin and not too wide. Its a nice feature on the model actually. You guys wont have to worry about scraping the fancy profile into a strip of wood. I laser cut these for you with the profile. But I didnt use wood. I laser cut them from very thin syre-nite acrylic. This stuff is awesome really. It is very, very flexible. And we will need it to be, which is why I chose to use it. It bends so nicely without breaking. We will need that flexibility when it has to go around the top edge of the pissdales which are up next. I would just recommend that you round off the top edge to make it look like a nice fancy molding strip. Just be careful and use a fine 400 grit sandpaper. Its beige to match the wood color but I could have actually laser cut them in red. But for those of you who want to go natural without paint I am using the stuff that looks like boxwood. The same stuff I used for the stern lights etc. So you must paint it red before you glue it on the hull.
It runs from the aft side of the cat tail and along the sheer in the waist. It continues all the way back to the poop bulkhead.
You really must try and keep a nice run with this molding. It should be a graceful run from bow to stern without any dips or waviness. Follow the run of your inboard planking. the top of the molding is flush with the top of the cap rail along the waist.
-
 Chuck got a reaction from Tobias in Sloop Speedwell 1752 by Chuck - Ketch Rigged Sloop - POF - prototype build
Thank You...
With the catheads completed I could finish some inboard details at the bow in preparation for fitting the bulwarks with the pissdale and other stuff.
In this photo you can see the the waterway was added around the perimeter of the fcastle deck. It was done exactly like the other decks.
Then I I added the final breast hook at the bow. This was done just like the others on the deck below it. It was laser cut in two pieces. I made sure to bevel the inside edge so I got a tight fit against the bulwarks and stem. I added nine bolts that stood proud using 30lb black fishing line. Then it was painted red.
Lastly, I added the thin an delicate molding strip on the inboard bulwarks. If this is made too heavy it would just look bad. So I made sure it was very thin and not too wide. Its a nice feature on the model actually. You guys wont have to worry about scraping the fancy profile into a strip of wood. I laser cut these for you with the profile. But I didnt use wood. I laser cut them from very thin syre-nite acrylic. This stuff is awesome really. It is very, very flexible. And we will need it to be, which is why I chose to use it. It bends so nicely without breaking. We will need that flexibility when it has to go around the top edge of the pissdales which are up next. I would just recommend that you round off the top edge to make it look like a nice fancy molding strip. Just be careful and use a fine 400 grit sandpaper. Its beige to match the wood color but I could have actually laser cut them in red. But for those of you who want to go natural without paint I am using the stuff that looks like boxwood. The same stuff I used for the stern lights etc. So you must paint it red before you glue it on the hull.
It runs from the aft side of the cat tail and along the sheer in the waist. It continues all the way back to the poop bulkhead.
You really must try and keep a nice run with this molding. It should be a graceful run from bow to stern without any dips or waviness. Follow the run of your inboard planking. the top of the molding is flush with the top of the cap rail along the waist.
-
 Chuck got a reaction from archjofo in Sloop Speedwell 1752 by Chuck - Ketch Rigged Sloop - POF - prototype build
Thank You...
With the catheads completed I could finish some inboard details at the bow in preparation for fitting the bulwarks with the pissdale and other stuff.
In this photo you can see the the waterway was added around the perimeter of the fcastle deck. It was done exactly like the other decks.
Then I I added the final breast hook at the bow. This was done just like the others on the deck below it. It was laser cut in two pieces. I made sure to bevel the inside edge so I got a tight fit against the bulwarks and stem. I added nine bolts that stood proud using 30lb black fishing line. Then it was painted red.
Lastly, I added the thin an delicate molding strip on the inboard bulwarks. If this is made too heavy it would just look bad. So I made sure it was very thin and not too wide. Its a nice feature on the model actually. You guys wont have to worry about scraping the fancy profile into a strip of wood. I laser cut these for you with the profile. But I didnt use wood. I laser cut them from very thin syre-nite acrylic. This stuff is awesome really. It is very, very flexible. And we will need it to be, which is why I chose to use it. It bends so nicely without breaking. We will need that flexibility when it has to go around the top edge of the pissdales which are up next. I would just recommend that you round off the top edge to make it look like a nice fancy molding strip. Just be careful and use a fine 400 grit sandpaper. Its beige to match the wood color but I could have actually laser cut them in red. But for those of you who want to go natural without paint I am using the stuff that looks like boxwood. The same stuff I used for the stern lights etc. So you must paint it red before you glue it on the hull.
It runs from the aft side of the cat tail and along the sheer in the waist. It continues all the way back to the poop bulkhead.
You really must try and keep a nice run with this molding. It should be a graceful run from bow to stern without any dips or waviness. Follow the run of your inboard planking. the top of the molding is flush with the top of the cap rail along the waist.
-
 Chuck got a reaction from Seventynet in Sloop Speedwell 1752 by Chuck - Ketch Rigged Sloop - POF - prototype build
Thanks…very interesting but boy that would be an ugly fixture on a model. I think the old masters who built these contemporary models had a great eye for what looked good….and not so good. I believe they might have left off many of these features because they would just not look good.
I think I may just follow that same logic and sensibility.
-
 Chuck got a reaction from KentM in Sloop Speedwell 1752 by sfotinos - Syren Ship Model Company - 1:32 Scale - POF Sloop
That is a cant frame....its in chapter two....
Its cant frame #12 which is a half frame under the aft gunport. You need to finish all the other square frames first. The last square frame is 12F.
Chuck
-
 Chuck got a reaction from mtaylor in Sloop Speedwell 1752 by Chuck - Ketch Rigged Sloop - POF - prototype build
Thanks…very interesting but boy that would be an ugly fixture on a model. I think the old masters who built these contemporary models had a great eye for what looked good….and not so good. I believe they might have left off many of these features because they would just not look good.
I think I may just follow that same logic and sensibility.
-
 Chuck got a reaction from Ryland Craze in Sloop Speedwell 1752 by Chuck - Ketch Rigged Sloop - POF - prototype build
Thanks…very interesting but boy that would be an ugly fixture on a model. I think the old masters who built these contemporary models had a great eye for what looked good….and not so good. I believe they might have left off many of these features because they would just not look good.
I think I may just follow that same logic and sensibility.
-
 Chuck got a reaction from Trussben in Sloop Speedwell 1752 by Chuck - Ketch Rigged Sloop - POF - prototype build
Thanks…very interesting but boy that would be an ugly fixture on a model. I think the old masters who built these contemporary models had a great eye for what looked good….and not so good. I believe they might have left off many of these features because they would just not look good.
I think I may just follow that same logic and sensibility.
-
 Chuck got a reaction from marsalv in Sloop Speedwell 1752 by Chuck - Ketch Rigged Sloop - POF - prototype build
Thank You...
With the catheads completed I could finish some inboard details at the bow in preparation for fitting the bulwarks with the pissdale and other stuff.
In this photo you can see the the waterway was added around the perimeter of the fcastle deck. It was done exactly like the other decks.
Then I I added the final breast hook at the bow. This was done just like the others on the deck below it. It was laser cut in two pieces. I made sure to bevel the inside edge so I got a tight fit against the bulwarks and stem. I added nine bolts that stood proud using 30lb black fishing line. Then it was painted red.
Lastly, I added the thin an delicate molding strip on the inboard bulwarks. If this is made too heavy it would just look bad. So I made sure it was very thin and not too wide. Its a nice feature on the model actually. You guys wont have to worry about scraping the fancy profile into a strip of wood. I laser cut these for you with the profile. But I didnt use wood. I laser cut them from very thin syre-nite acrylic. This stuff is awesome really. It is very, very flexible. And we will need it to be, which is why I chose to use it. It bends so nicely without breaking. We will need that flexibility when it has to go around the top edge of the pissdales which are up next. I would just recommend that you round off the top edge to make it look like a nice fancy molding strip. Just be careful and use a fine 400 grit sandpaper. Its beige to match the wood color but I could have actually laser cut them in red. But for those of you who want to go natural without paint I am using the stuff that looks like boxwood. The same stuff I used for the stern lights etc. So you must paint it red before you glue it on the hull.
It runs from the aft side of the cat tail and along the sheer in the waist. It continues all the way back to the poop bulkhead.
You really must try and keep a nice run with this molding. It should be a graceful run from bow to stern without any dips or waviness. Follow the run of your inboard planking. the top of the molding is flush with the top of the cap rail along the waist.
-
Chuck got a reaction from archjofo in Sloop Speedwell 1752 by Chuck - Ketch Rigged Sloop - POF - prototype build
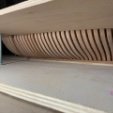
Catheads...
I usually hold off on making the catheads, but it just makes sense to get them done now. It will make it easier to finish off the inboard bulwarks which will be next up. With the catheads all done I can get the waterways in on the f'castle deck along with the pissdale and other details.
All the pieces are laser cut for the catheads. Below. I have cleaned all the char off of these pieces and they are ready to assemble.
The sides with the carved panels were glued on first. First the outside cover to establish the raised panel look and then the inboard piece. These are 1/64" thick and are sanded down even thinner afterwards.
Then the carved front piece and sheaves were added. These are a hair larger than needed so you can sand them all nice and flush.
Then the cathead was glue to the cat tail...no worries about the seam because that will be completely covered.
Using the templates that we used to establish the hawse holes, the position for the catheads were marked outboard. Then the bulwarks were notched out carefully. I used a razor saw. The notch was made narrower than needed and not as deep as ultimately needed. Once the basic notch was cut out, I used a good file to slowly open it up to its final size and shape.
You will also notice I painted the inboard cat tail red in advance. I painted up to the seam line. Note the chamfered edges inboard.
When test fit and in the final position, the inboard side of the cat tail is flush with the top of the cap rail. But the angle of the cathead rises and so it will be above the cap rail height on the outboard side. You can see this in the picture. This is what you are shooting for. The cat tail is also left longer on the inboard side so you can shorten it accordingly. It should sit flat on the deck. You will soon see some inboard pics.
Above the cathead there is a cat block. Usually this is an open cat block but on the contemporary model it is closed. So I will follow suit. This is laser cut and 3/16" wide. ...but is currently a straight cat block. You need to sand a slight curve into this when viewed from above. It needs to conform to the rounded shape of the cap rail when viewed from above. See the plans. This is easy enough to do. It is a very slight curve.
Then a sheave is added and a slot is created on the bottom. This slot will accommodate the top of the cathead. It will sit right on top of it and thus this slot must be angled to match the upward slope of the cathead. Again this is not hard to do. I just used a small flat file. But yes you can carve it with a chisel also. The catblock was painted black.
A final pic of the catheads in position and the cat blocks too. There is still a bunch of paint touch up to get done.
Now as you know there are many ways to build and position these. For example, if you wanted to, you can add the inboard cat tail separately without gluing them together first. Maybe that will be easier for some. Cut it to length and paint it red. Glue it to the inboard bulwarks and partially in the notch. Then add the cathead by placing it into the notch up against the cat tail.
Its up to you. I just thought it might be easier this way to make them look like one piece if they were glued together first. But its not the only way to do it. And remember, the seam between the two parts will be completely covered by the cat block. So it doesnt have to be perfect.
-
 Chuck got a reaction from Dave_E in HMS Indefatigable 1794 (prototype) by James H - Vanguard Models - 1:64 - FINISHED
Really fantastic finish. Well worth the time and effort. That is a large model.
-
Chuck got a reaction from KentM in Sloop Speedwell 1752 by Chuck - Ketch Rigged Sloop - POF - prototype build
Thanks…very interesting but boy that would be an ugly fixture on a model. I think the old masters who built these contemporary models had a great eye for what looked good….and not so good. I believe they might have left off many of these features because they would just not look good.
I think I may just follow that same logic and sensibility.
-
 Chuck got a reaction from yvesvidal in Sloop Speedwell 1752 by Chuck - Ketch Rigged Sloop - POF - prototype build
Thanks…very interesting but boy that would be an ugly fixture on a model. I think the old masters who built these contemporary models had a great eye for what looked good….and not so good. I believe they might have left off many of these features because they would just not look good.
I think I may just follow that same logic and sensibility.
-
 Chuck reacted to davyboy in Sloop Speedwell 1752 by Chuck - Ketch Rigged Sloop - POF - prototype build
I made them on my Speedwell according to David's plan,the largish diameter would make sense for solids disposal. The question of these being discharge points for only pissdales intrigues me.
If there were only pissdales on Speedwell where/how was the solid waste of the ordinary seamen disposed of ? Using the headrails would be rather dangerous,the channels maybe,or just hang their rumps over the side ? Just asking
Dave
-
Chuck got a reaction from KentM in Sloop Speedwell 1752 by Chuck - Ketch Rigged Sloop - POF - prototype build
Thank You...
With the catheads completed I could finish some inboard details at the bow in preparation for fitting the bulwarks with the pissdale and other stuff.
In this photo you can see the the waterway was added around the perimeter of the fcastle deck. It was done exactly like the other decks.
Then I I added the final breast hook at the bow. This was done just like the others on the deck below it. It was laser cut in two pieces. I made sure to bevel the inside edge so I got a tight fit against the bulwarks and stem. I added nine bolts that stood proud using 30lb black fishing line. Then it was painted red.
Lastly, I added the thin an delicate molding strip on the inboard bulwarks. If this is made too heavy it would just look bad. So I made sure it was very thin and not too wide. Its a nice feature on the model actually. You guys wont have to worry about scraping the fancy profile into a strip of wood. I laser cut these for you with the profile. But I didnt use wood. I laser cut them from very thin syre-nite acrylic. This stuff is awesome really. It is very, very flexible. And we will need it to be, which is why I chose to use it. It bends so nicely without breaking. We will need that flexibility when it has to go around the top edge of the pissdales which are up next. I would just recommend that you round off the top edge to make it look like a nice fancy molding strip. Just be careful and use a fine 400 grit sandpaper. Its beige to match the wood color but I could have actually laser cut them in red. But for those of you who want to go natural without paint I am using the stuff that looks like boxwood. The same stuff I used for the stern lights etc. So you must paint it red before you glue it on the hull.
It runs from the aft side of the cat tail and along the sheer in the waist. It continues all the way back to the poop bulkhead.
You really must try and keep a nice run with this molding. It should be a graceful run from bow to stern without any dips or waviness. Follow the run of your inboard planking. the top of the molding is flush with the top of the cap rail along the waist.
-
Chuck got a reaction from Trussben in Sloop Speedwell 1752 by Chuck - Ketch Rigged Sloop - POF - prototype build
Catheads...
I usually hold off on making the catheads, but it just makes sense to get them done now. It will make it easier to finish off the inboard bulwarks which will be next up. With the catheads all done I can get the waterways in on the f'castle deck along with the pissdale and other details.
All the pieces are laser cut for the catheads. Below. I have cleaned all the char off of these pieces and they are ready to assemble.
The sides with the carved panels were glued on first. First the outside cover to establish the raised panel look and then the inboard piece. These are 1/64" thick and are sanded down even thinner afterwards.
Then the carved front piece and sheaves were added. These are a hair larger than needed so you can sand them all nice and flush.
Then the cathead was glue to the cat tail...no worries about the seam because that will be completely covered.
Using the templates that we used to establish the hawse holes, the position for the catheads were marked outboard. Then the bulwarks were notched out carefully. I used a razor saw. The notch was made narrower than needed and not as deep as ultimately needed. Once the basic notch was cut out, I used a good file to slowly open it up to its final size and shape.
You will also notice I painted the inboard cat tail red in advance. I painted up to the seam line. Note the chamfered edges inboard.
When test fit and in the final position, the inboard side of the cat tail is flush with the top of the cap rail. But the angle of the cathead rises and so it will be above the cap rail height on the outboard side. You can see this in the picture. This is what you are shooting for. The cat tail is also left longer on the inboard side so you can shorten it accordingly. It should sit flat on the deck. You will soon see some inboard pics.
Above the cathead there is a cat block. Usually this is an open cat block but on the contemporary model it is closed. So I will follow suit. This is laser cut and 3/16" wide. ...but is currently a straight cat block. You need to sand a slight curve into this when viewed from above. It needs to conform to the rounded shape of the cap rail when viewed from above. See the plans. This is easy enough to do. It is a very slight curve.
Then a sheave is added and a slot is created on the bottom. This slot will accommodate the top of the cathead. It will sit right on top of it and thus this slot must be angled to match the upward slope of the cathead. Again this is not hard to do. I just used a small flat file. But yes you can carve it with a chisel also. The catblock was painted black.
A final pic of the catheads in position and the cat blocks too. There is still a bunch of paint touch up to get done.
Now as you know there are many ways to build and position these. For example, if you wanted to, you can add the inboard cat tail separately without gluing them together first. Maybe that will be easier for some. Cut it to length and paint it red. Glue it to the inboard bulwarks and partially in the notch. Then add the cathead by placing it into the notch up against the cat tail.
Its up to you. I just thought it might be easier this way to make them look like one piece if they were glued together first. But its not the only way to do it. And remember, the seam between the two parts will be completely covered by the cat block. So it doesnt have to be perfect.
-
 Chuck got a reaction from PaddyO in Sloop Speedwell 1752 by Chuck - Ketch Rigged Sloop - POF - prototype build
Thanks…very interesting but boy that would be an ugly fixture on a model. I think the old masters who built these contemporary models had a great eye for what looked good….and not so good. I believe they might have left off many of these features because they would just not look good.
I think I may just follow that same logic and sensibility.
-
Chuck got a reaction from Jack12477 in Sloop Speedwell 1752 by Chuck - Ketch Rigged Sloop - POF - prototype build
Thanks…very interesting but boy that would be an ugly fixture on a model. I think the old masters who built these contemporary models had a great eye for what looked good….and not so good. I believe they might have left off many of these features because they would just not look good.
I think I may just follow that same logic and sensibility.
-
Chuck reacted to dvm27 in Sloop Speedwell 1752 by Chuck - Ketch Rigged Sloop - POF - prototype build
I completely forgot I included them on my model Chuck. At any rate some research shows that the pissdales were made of lead, copper or occasionally wood. There was a lead small discharge tube directly under the pissdale. This 1.4" tube would exit through a small scupper in the waterway. My discharge tubes are comically large. They should only be about twice the diameter of a treenail. The pissdale discharge scupper holes on my model would be more appropriate for a herd of horses. They were discontinued after 1765.
I'm going to have to fix that now damn you!
-
Chuck reacted to BANYAN in Sloop Speedwell 1752 by Chuck - Ketch Rigged Sloop - POF - prototype build
Chuck, I cannot recall where I read this, but during my research I came across a comment that some vessels used internal piping as long as there was gravity to assist drainage. Other ships used a vertical drop to where the pipe exited but only protruded a few inches and then had a canvas (or rubber in later ships) hose fitted, but this seems a very weak connection to me. It would not have taken much of a seaway to break it off; perhaps the flexible pipe was only while in port?
If I can find the reference again I will pass it on.
cheers
Pat
-
Chuck got a reaction from Ryland Craze in Sloop Speedwell 1752 by Chuck - Ketch Rigged Sloop - POF - prototype build
Thanks Greg...
The contemporary model doesnt show the discharge for the pissdales nor does it show the scuppers. I have added the scuppers but I am waffling on the discharge holes for the two pissdales. It would be in such a prominent place on the outside of the hull it would certainly look odd to those who are not sure what they are. I have plenty of time for that though. I did place them on the plans so anyone who wants to add them can.
Chuck
-
 Chuck got a reaction from albert in Sloop Speedwell 1752 by Chuck - Ketch Rigged Sloop - POF - prototype build
Thank You...
With the catheads completed I could finish some inboard details at the bow in preparation for fitting the bulwarks with the pissdale and other stuff.
In this photo you can see the the waterway was added around the perimeter of the fcastle deck. It was done exactly like the other decks.
Then I I added the final breast hook at the bow. This was done just like the others on the deck below it. It was laser cut in two pieces. I made sure to bevel the inside edge so I got a tight fit against the bulwarks and stem. I added nine bolts that stood proud using 30lb black fishing line. Then it was painted red.
Lastly, I added the thin an delicate molding strip on the inboard bulwarks. If this is made too heavy it would just look bad. So I made sure it was very thin and not too wide. Its a nice feature on the model actually. You guys wont have to worry about scraping the fancy profile into a strip of wood. I laser cut these for you with the profile. But I didnt use wood. I laser cut them from very thin syre-nite acrylic. This stuff is awesome really. It is very, very flexible. And we will need it to be, which is why I chose to use it. It bends so nicely without breaking. We will need that flexibility when it has to go around the top edge of the pissdales which are up next. I would just recommend that you round off the top edge to make it look like a nice fancy molding strip. Just be careful and use a fine 400 grit sandpaper. Its beige to match the wood color but I could have actually laser cut them in red. But for those of you who want to go natural without paint I am using the stuff that looks like boxwood. The same stuff I used for the stern lights etc. So you must paint it red before you glue it on the hull.
It runs from the aft side of the cat tail and along the sheer in the waist. It continues all the way back to the poop bulkhead.
You really must try and keep a nice run with this molding. It should be a graceful run from bow to stern without any dips or waviness. Follow the run of your inboard planking. the top of the molding is flush with the top of the cap rail along the waist.