michael mott
-
Posts
5,200 -
Joined
-
Last visited
Content Type
Profiles
Forums
Gallery
Events
Everything posted by michael mott
-
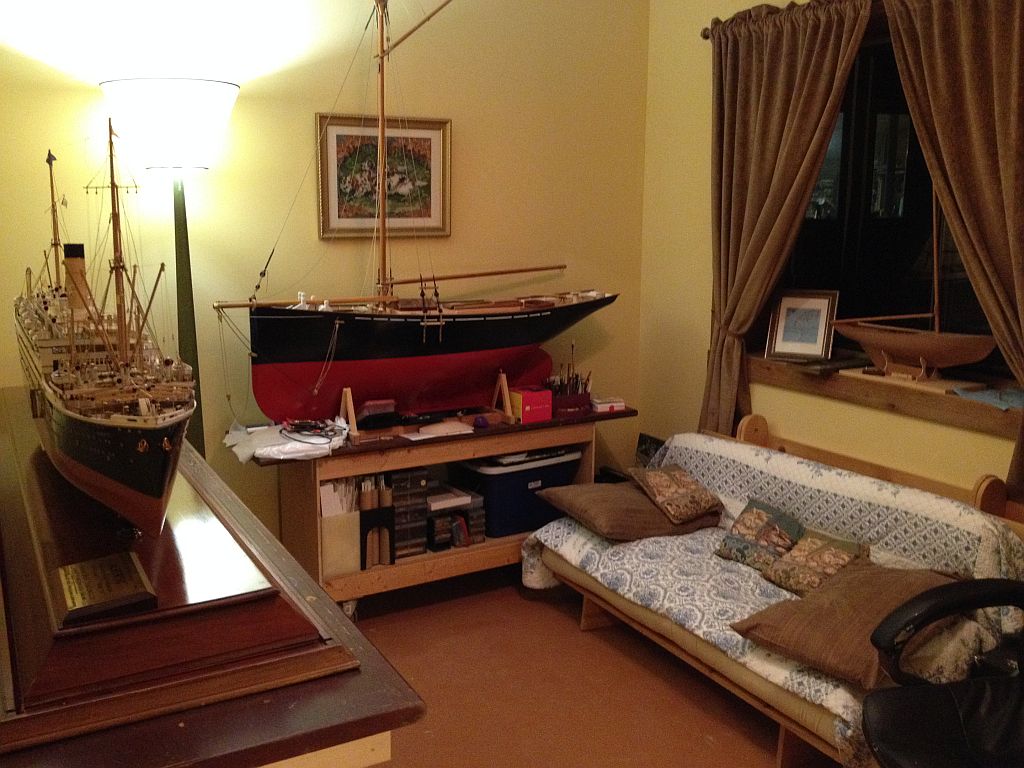
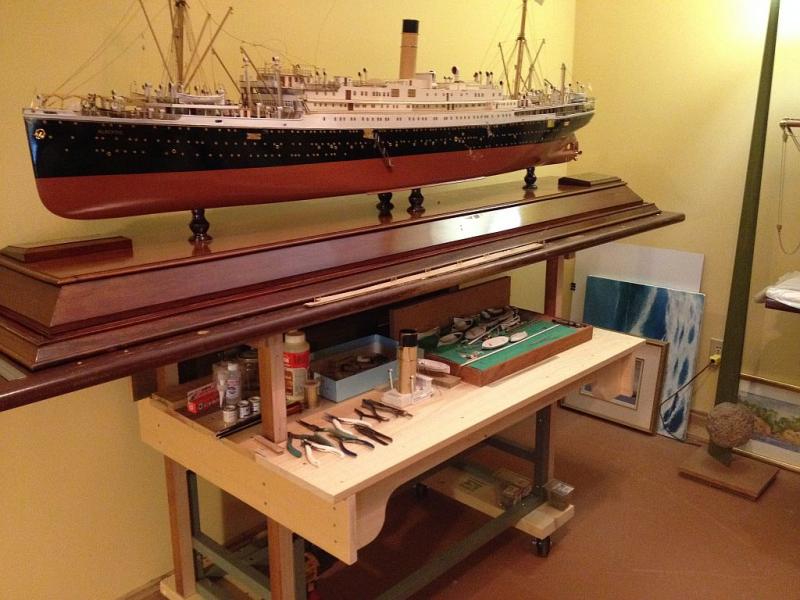
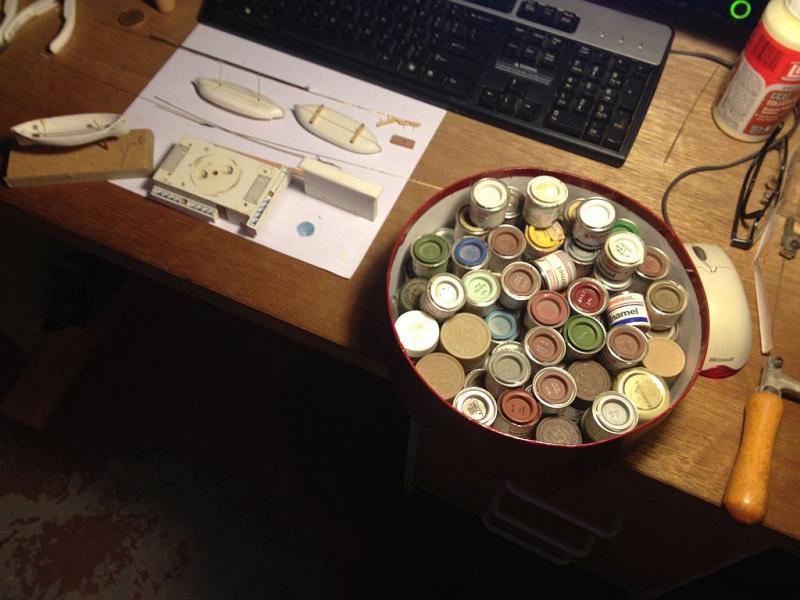
 It was a productive day today, a couple of friends came over and moved the model into the house,(stable temperature). I was getting a little concerned by the temp fluctuations in the shop. It is heated with wood, although there is a heat exchanger for the in-floor but it is not easy to keep it even through the cold which is on its way. I also cobbled together a simple bench as part of the trolley that the model is on when I am up and dancing again in a week or two I will finish off the trolley base with some additional shelving. I also have a place to relax. I was thinking if the ship was the same scale as the cutter it would be 76 feet long on the other hand if the cutter were the same scale as the ship it would be only 5 inches long. And it allowed me to clean up the computer desk, so now I don't have to move stuff when i want to type or draw. the Computer on the left is for my drawing it is a stand alone and running XP the one on the right is connected to the web and is running 7 professional. Michael
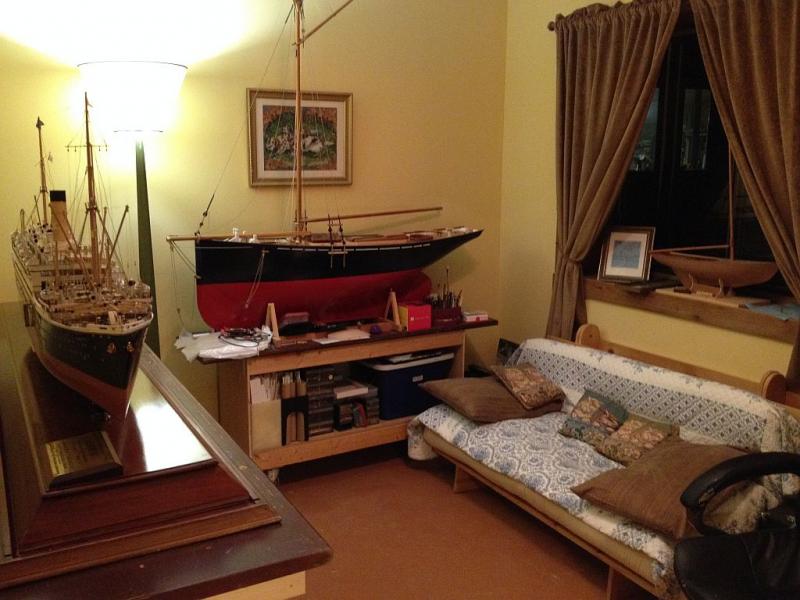

- 749 replies
-
- 23
-

-
- albertic
- ocean liner
- (and 2 more)
-
Beautiful shop space Rusty, I really like the subtle curves in the deck planking. Michael
- 310 replies
-
- 2
-
-
- cheerful
- Syren Ship Model Company
- (and 1 more)
-
A lock on the cabinet to keep out unwanted help. Drastic but sends a message. Michael
- 745 replies
-
- 2
-
-
- francis pritt
- mission ship
- (and 1 more)
-
I am always amazed by the differences from the start of planking to the finished hull after painting. Michael
-
Hi Roger thanks for the sympathy, I sent you a new PM I understand the principle and have used the same procedure on my rope making machine. I can wind up left hand 3 wires. Make 4 sets of that then wind up the 4 sets right or left by just twisting them in the same manner. the wire does not wind itself up in the same way as the thread does. I am just waiting for the brass wire to come for the next test. Michael
- 749 replies
-
- 4
-
-
- albertic
- ocean liner
- (and 2 more)
-
Many thanks to everyone for your kind comments and good thoughts. Michael
- 749 replies
-
- 5
-
-
- albertic
- ocean liner
- (and 2 more)
-
Nice work on the fish box Denis, the tip about bending the hinges gives me some ideas. Michael
-
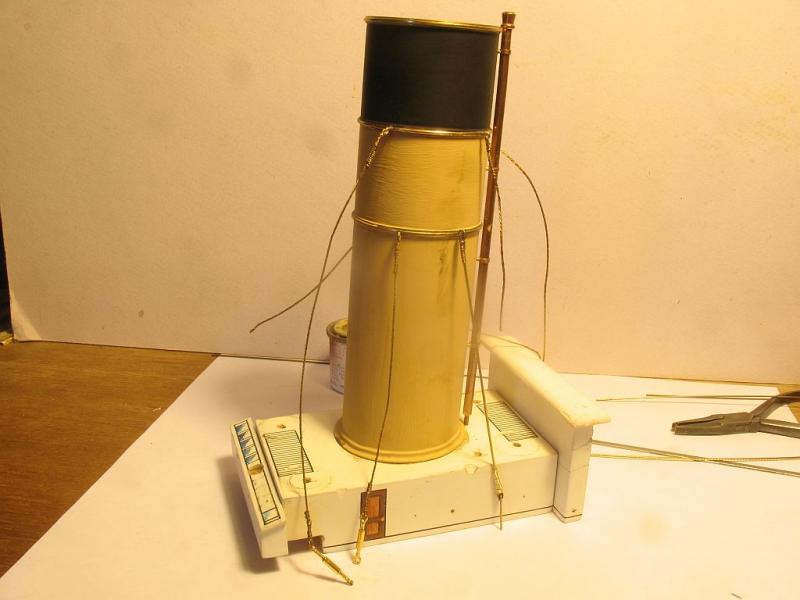
Thanks Jack, yes as long as I can sit at the desk and putz I'm OK yesterday I plotted the positions of all the anchors on the funnel deck so now I can plot all the funnel stay lengths. they are all going to need replacing regardless of the individual few that are OK just so that they are all consistent colour and wind wise. I recall I think it was Bob in Arizona who set up the rigging on one of his boats by working at them off the model, I am going to do the same thing That way I will be able to just insert the eyes at the deck into slightly loose holes with some glue rather than forcing them back into tight holes. I will prepare a dummy funnel deck so that I can access the stays easily at the edges while working them. Michael
- 749 replies
-
- 8
-
-
- albertic
- ocean liner
- (and 2 more)
-
Druxey Read these word just before stepping out for a meeting last night.....it's a long story suffice it to say I wound up in emergency, after tripping over a u channel stake in a front lawn cut and peeled back the skin on my shin to the bone. 7 stiches a lot of pain and a lot of deep breaths as the freezing was being done. I'm on some serious antibiotics and will be keeping fairly stationary for a couple of days to let the healing take a good start. Thanks for the tip about the Humbrol paints I will look them up. Bob, I agree with you on these scores, I will see how the smaller control wire looks, but will reserve all judgement until I have been able to fabricate the stays with the 34 gauge wire when it arrives. I have some of the type of pends that you mention, and had never thought about using paint in them, so will give this a try. cheers Michael
- 749 replies
-
- 2
-
-
- albertic
- ocean liner
- (and 2 more)
-
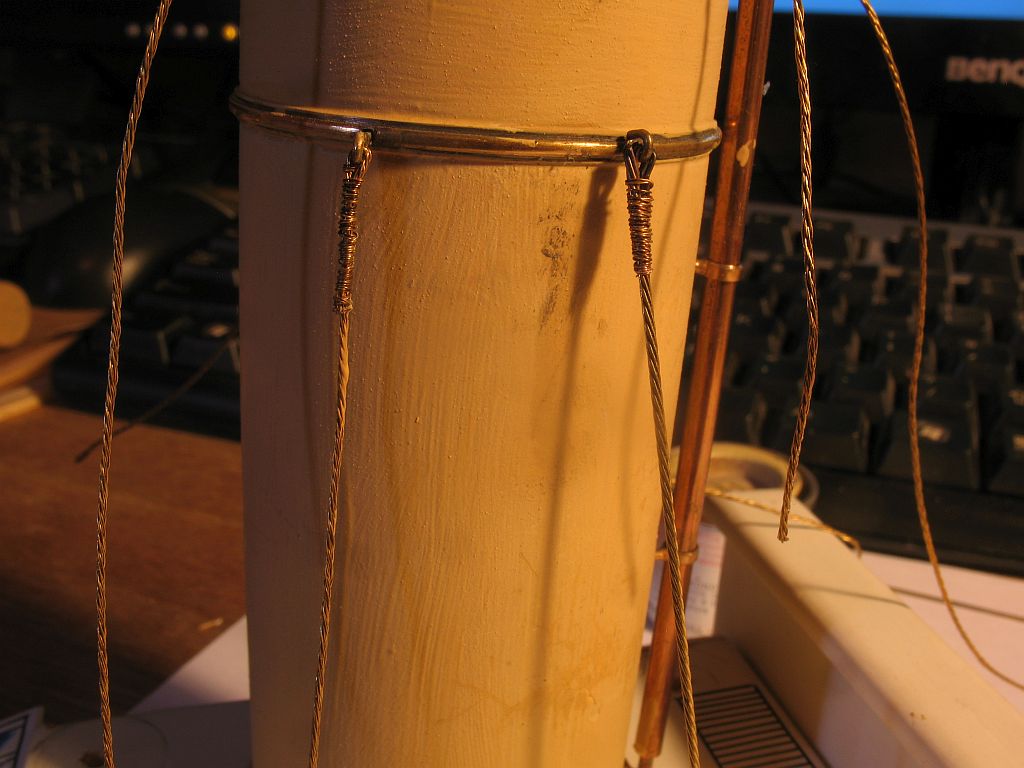
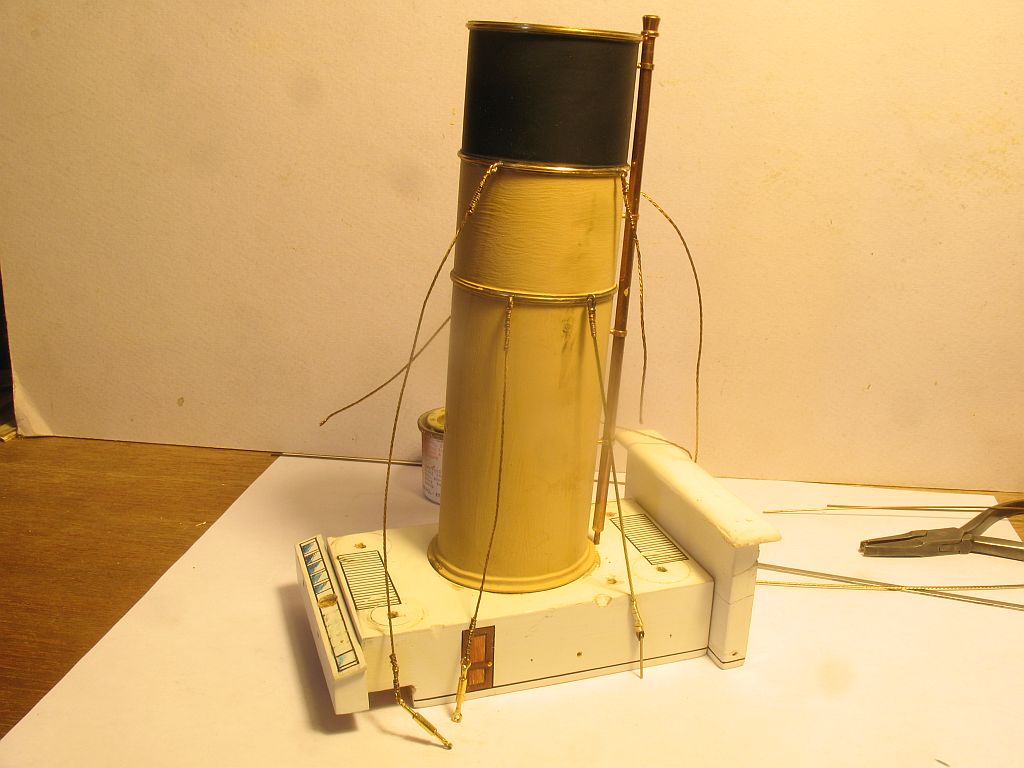
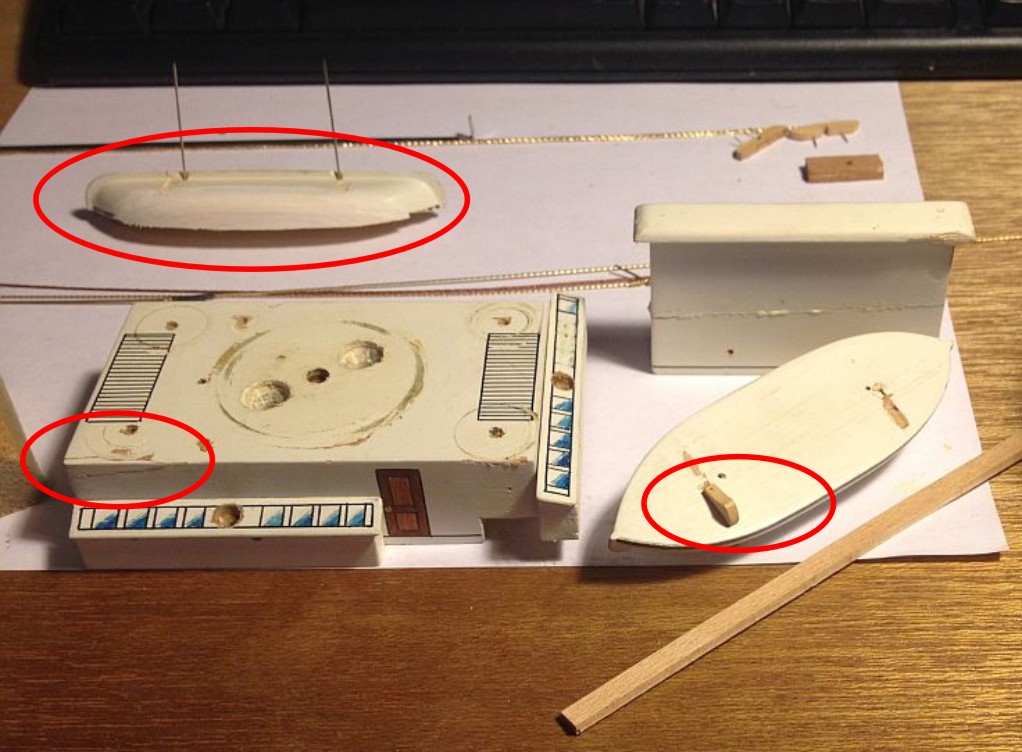
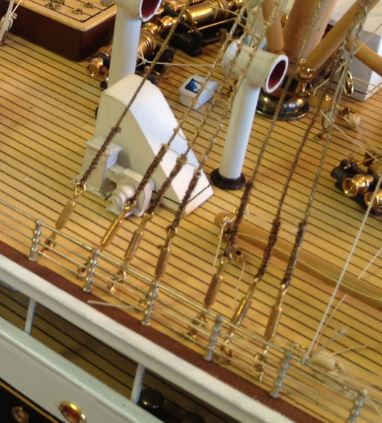
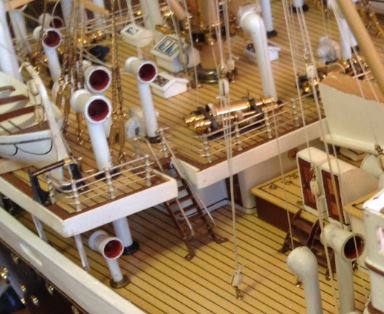
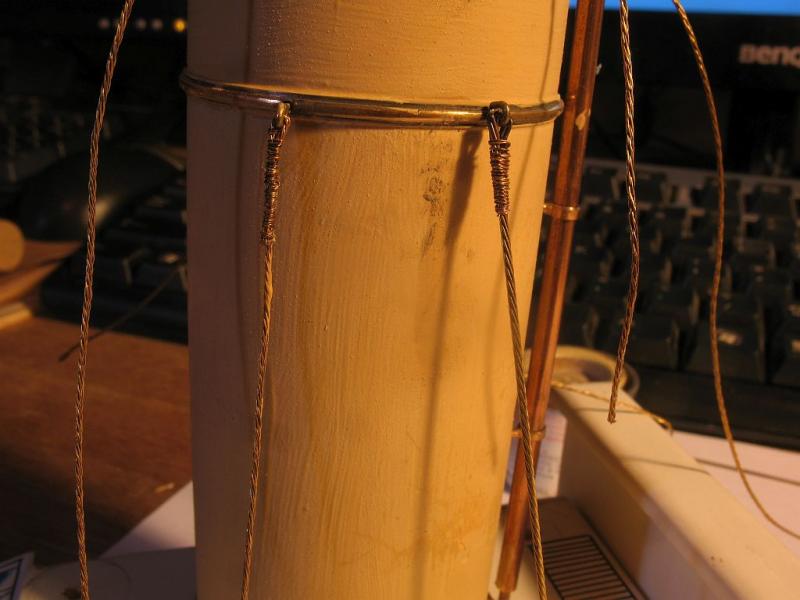
Nils I have some brass coloured control line wire in both .018" and .032" the original B&L wore is .028" The hidden damage is now becoming more apparent. I am also of the opinion now that this ship has been knocked pretty hard on some earlier occasion.the following pic shows two concerns I have within the highlighted area the cargo winch deck is sprung that is the same on both port and starboard. you can see that the underside of the deck is unfinished and not very clean. The area below and just above the brass hatch is bulged a little and this is an old repair it is only on the starboard side. My concern is that the cargo deck is flexible enough that I should be able to pull it back down into alignment by using the vent stacks as a clamp by fixing the base ring that sits on the deck so that as the vent is reseated into the main block of the hull deck the black rings which are loose would pull down the deck. Both the foremast shrouds and the stern-mast shrouds are loose and I am reluctant to tighten them to make them look clean because they will put an additional strain on the already compromised decks. here you can see that the lifeboat deck at the bow is bent upwards in the same way as the deck at the stern, no doubt that pressure on the shrouds during the fall contributed to this. This brings me back to the funnels I think that having the shrouds and stays more rigid and made to exact lengths and replacing all of them might end up giving the best solution. The following picture shows a new stay using the .032" brass control line wire it is brass plated steel. with some of the Bassett Lowke wire used as a serving to emulate the same look but neater. I could do this with all the standing rigging, it even has the wrong lay up as the B&L help I'm falling down the rabbit hole........ Michael

- 749 replies
-
- 15
-
-
- albertic
- ocean liner
- (and 2 more)
-
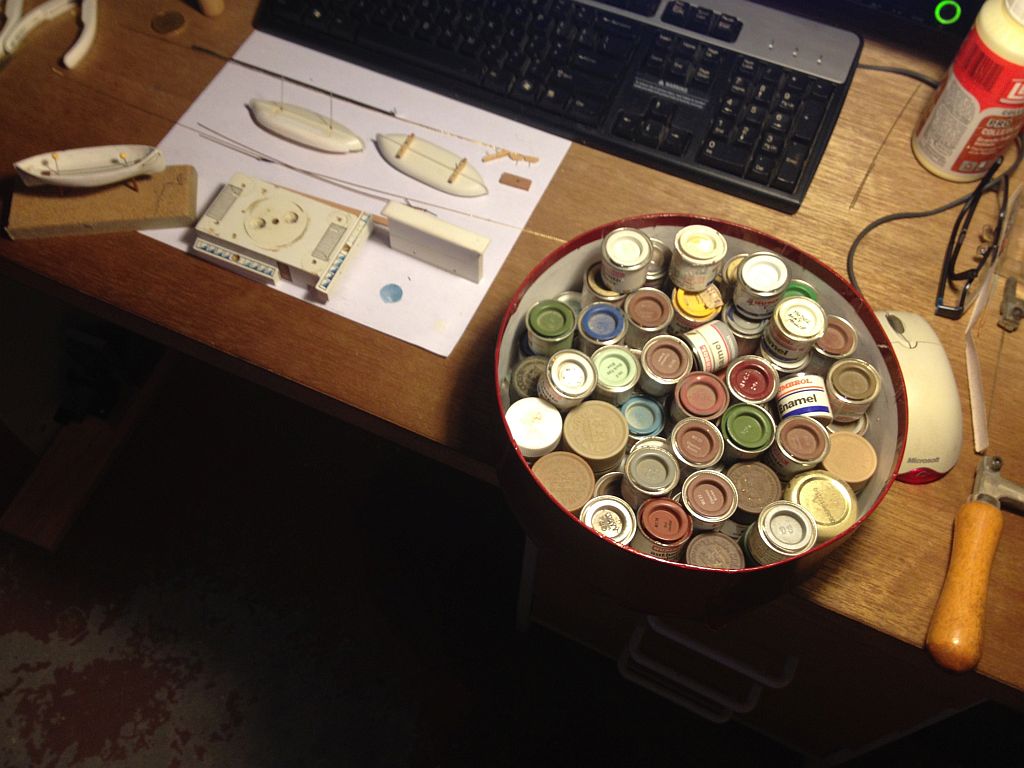
Hi Nils I consider you as one of the masters of this type of ship model, so any advice that you have to offer will most certainly be welcome. The tins I have seem to be OK after a while of remixing the pigment from its long rest on the bottom of the tins I use a piece of stainless steel that I salvaged from a wiper blade as the tool to remix The straight end works to dig into the pigment to break it up and the folded end works like a sort of potato masher once the pigment is mobile. Bob Not sure on this one yet, I might have to do a spot of practicing with my ruling pens and compasses, its been a while. I have some very fine lining brushes so might go with that option. I am reminded of a video I watched some time ago where someone was doing a decorative glaze on some china and they had obviously been doing the same motion for a long time and made it look like child's play. The other thought might be to use the type of pens that are used for doing the Pysanka but to use enamel instead of wax. and I would not need the heat either. This might be an interesting tool to sort out for painting. Has anyone used something like this for paint? Michael

- 749 replies
-
- 7
-
-
- albertic
- ocean liner
- (and 2 more)
-
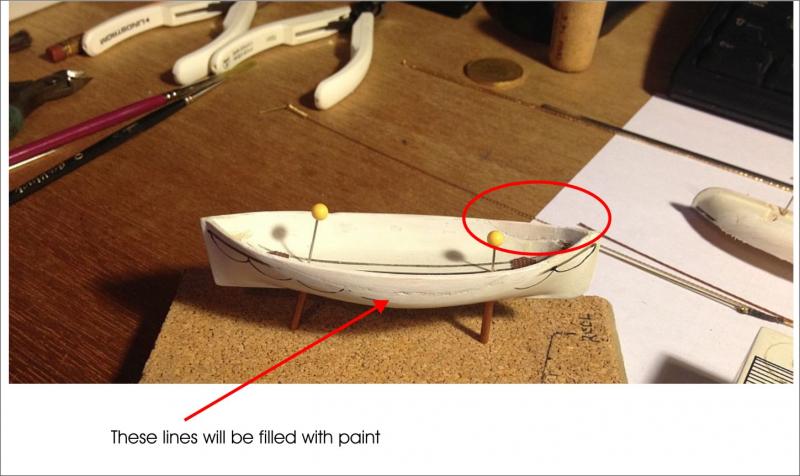
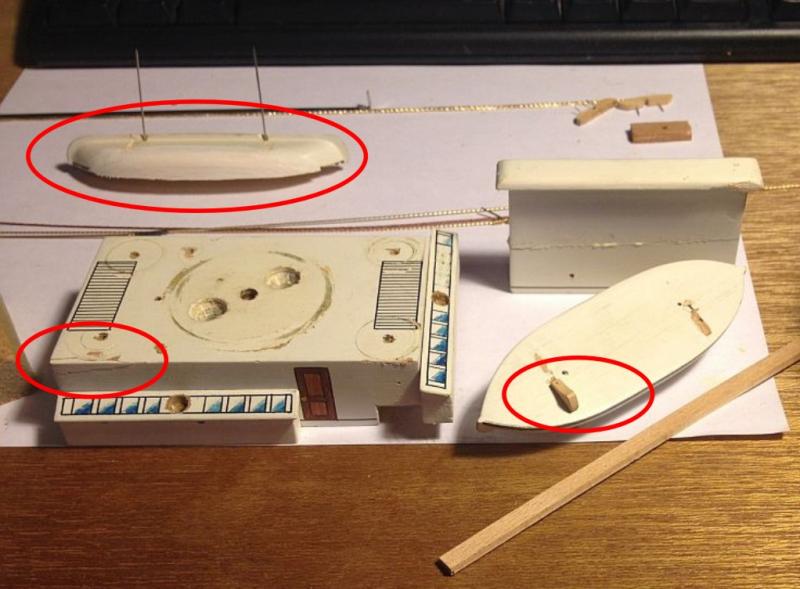
Ah yes Jan...that is why I still have this 40 year old Humbrol enamel, one of the best model paints that was ever on the market for hand painting in my humble opinion. Seriously though I hear what you are saying and my intention is to do as little painting as is possible. blending in a 1/16th line of paint will be a lot less hassle than a large repaint. The collapsible lifeboat that was the most damaged is about as far as I hope to have to go regarding replacing broken wooden parts. There are a few bits missing and I will tackle them as I get to them. I am going to use the enamel paint to fill the joint lines where possible this will take time to let the paint harden but will give me a lot of control over these small areas. In all likelihood Bassett Lowke used a very fine grind of enamel although they might also have used Lacquer, which is what we did at Allmodels when I was a young man in the early 60's we matched all our paints from the British Standard Colour charts I cannot remember the actual name of the Standards now but we only used the primaries and black and white to make any colour we needed. You are right in that this will be one of the most challenging areas but I do have a little background from the old school so I will be proceeding with a great deal of caution. Druxey, yes adding a little grime will no doubt be in order. Denis, my plan is to do as little to disturb the original surfaces as possible, the colour oxidation is already apparent regarding the areas of the deck that were hidden from exposure when I removed the structures from the funnel deck. The white will be the least problematic in my view. the most difficult I think will be the side of the hull, I will mix some colour let them dry after some initial test sample to get close, and then use the damaged area to test them with very small spots of the Humbrol to see how well they will blend. The next picture shows the aft funnel structure and the area highlighted is where one of the tiny broken bits somehow avoided being swept up it is glued back on with carpenters glue. The vertical rectangular section was snapped completely in half and a section at the bottom was broken off as well. The section highlighted on the collapsible lifeboat is one of the supports for the top boats and is the only pattern left, all the rest are missing from the port side boat deck, I managed to pull a small piece of similar Maple from my scrap maple drawer, so they will be easy enough to replace. time for some breakfast and a coffee. Michael
- 749 replies
-
- 16
-
-
- albertic
- ocean liner
- (and 2 more)
-
Cutty Sark by NenadM
michael mott replied to NenadM's topic in - Build logs for subjects built 1851 - 1900
Nenad What a great job on the canvas, you must be very happy with the look. Michael- 4,152 replies
-
- 8
-
-
- cutty sark
- tehnodidakta
- (and 1 more)
-
Denis it's just a bit of green felt I'm afraid. Greg two weeks! I cannot make any gravy in only two weeks....but thanks for the compliment. Druxey, it feels good to be actually repairing and not just removing broken parts. Joel I was using the end bench vise to clamp the V table for cutting out the curved piece for the open boat and wondering how to set up a stop, and it just came at the moment so I dropped the table about an 1/8th inch lower to create the well. John, yes I wanted to start doing some positive work as much for the inspiration as anything else, it cheered me up for sure to see some progress. I glued in the opposite piece this evening and will finish it off in the morning. Michael
- 749 replies
-
- 14
-
-
- albertic
- ocean liner
- (and 2 more)
-
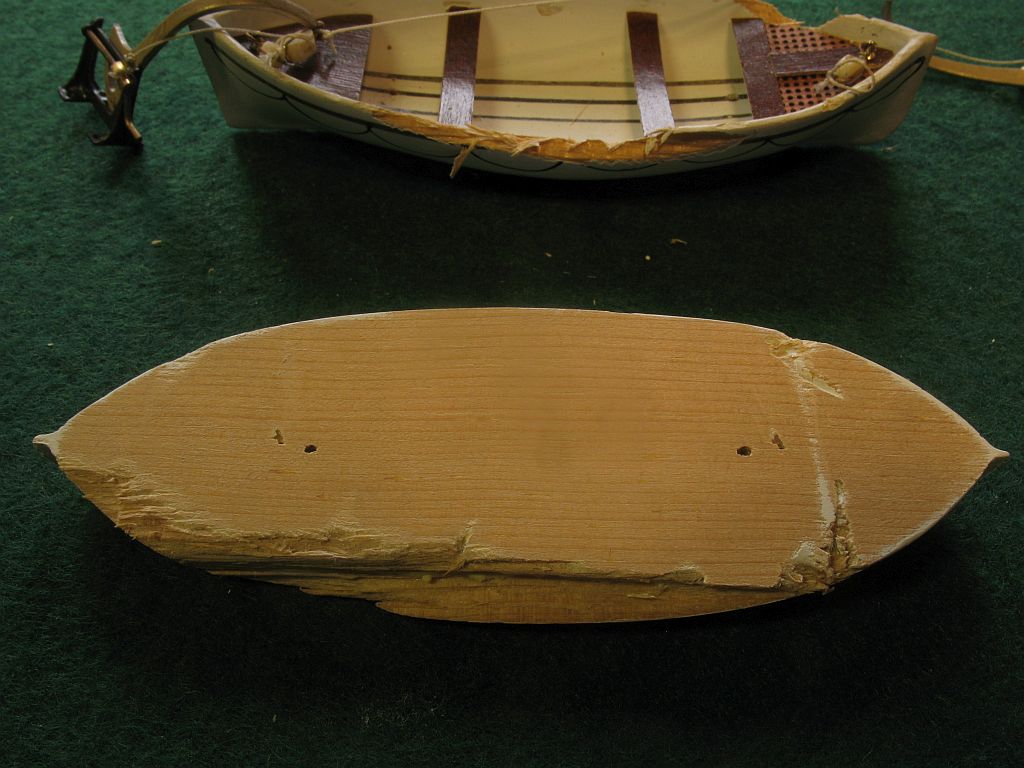
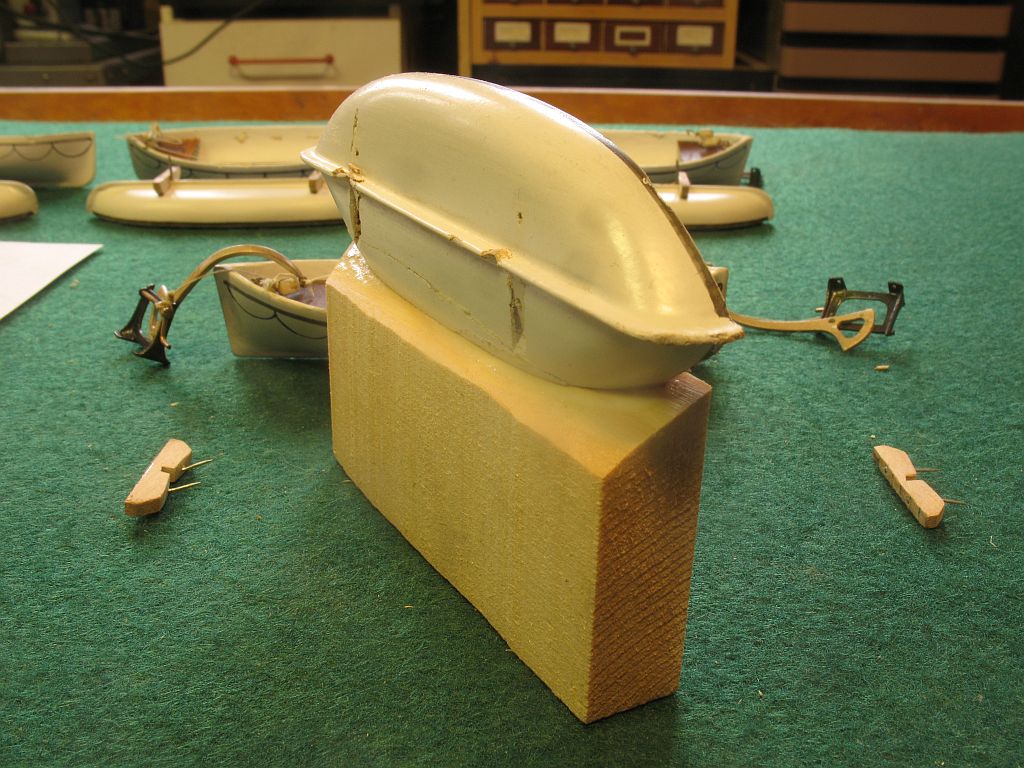
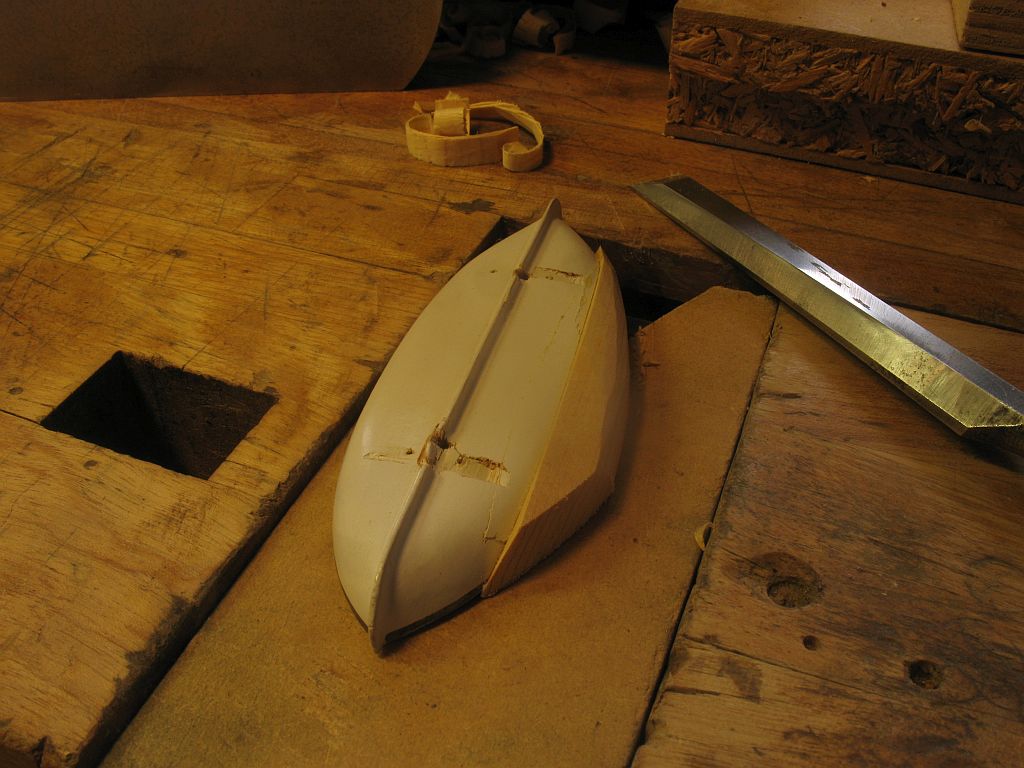
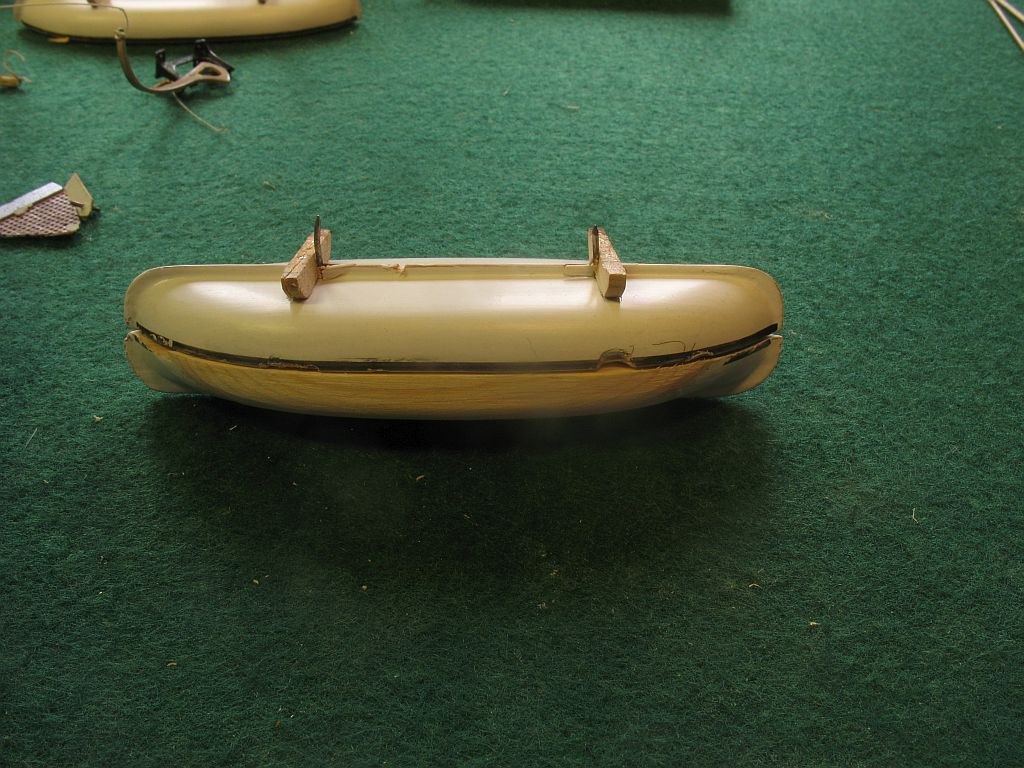
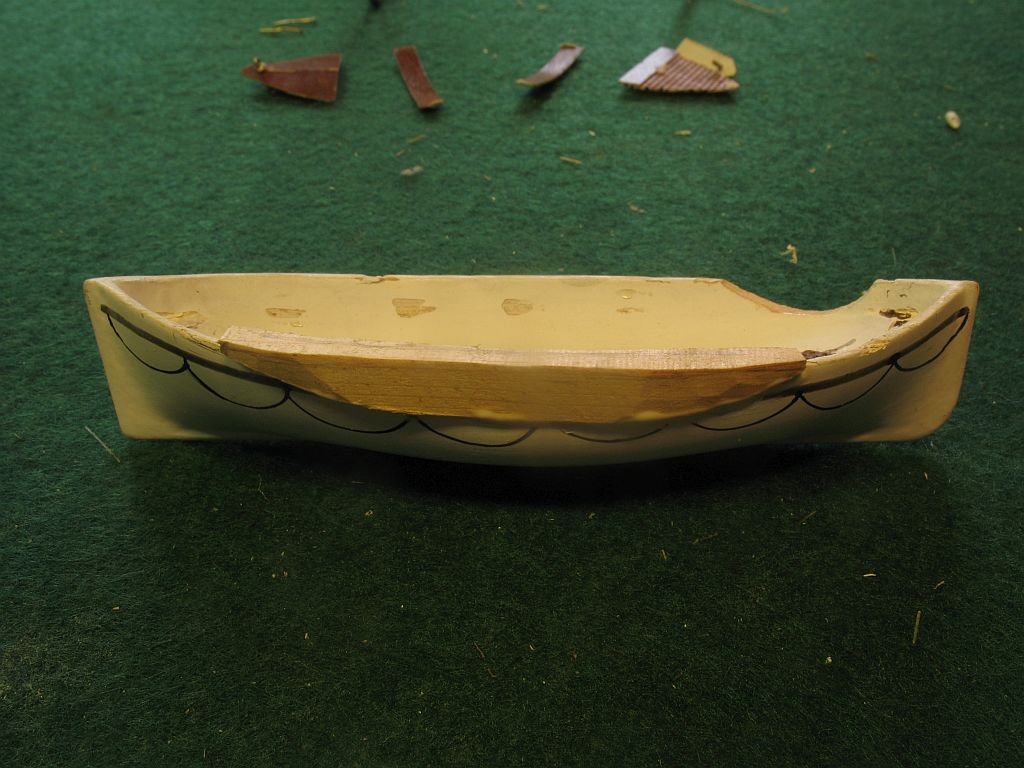
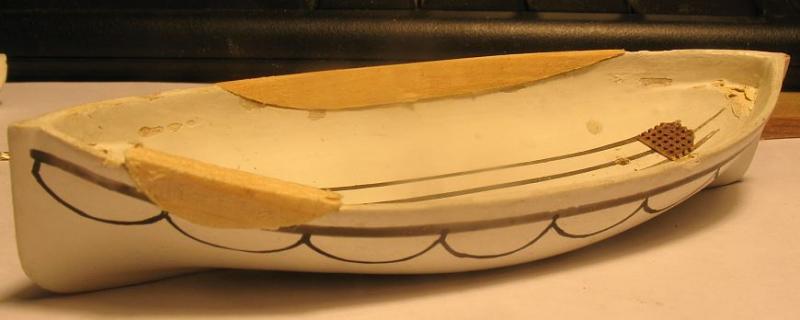
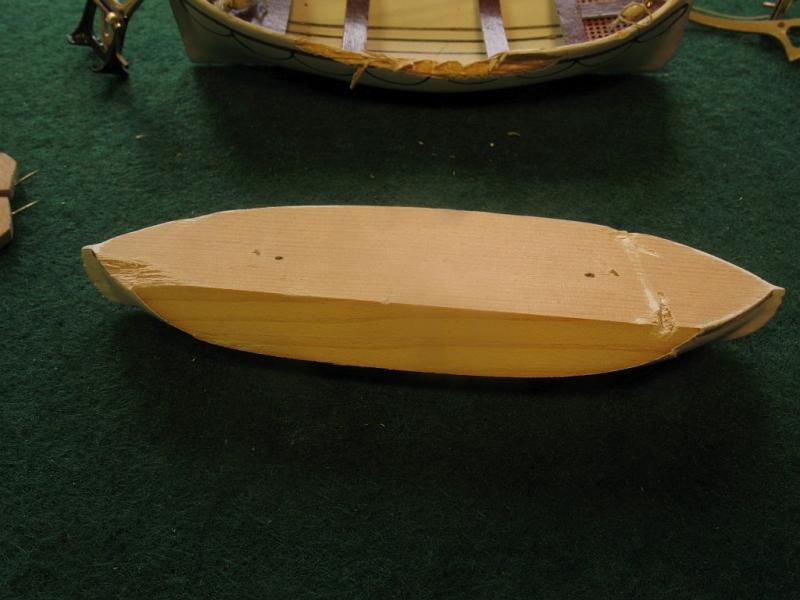
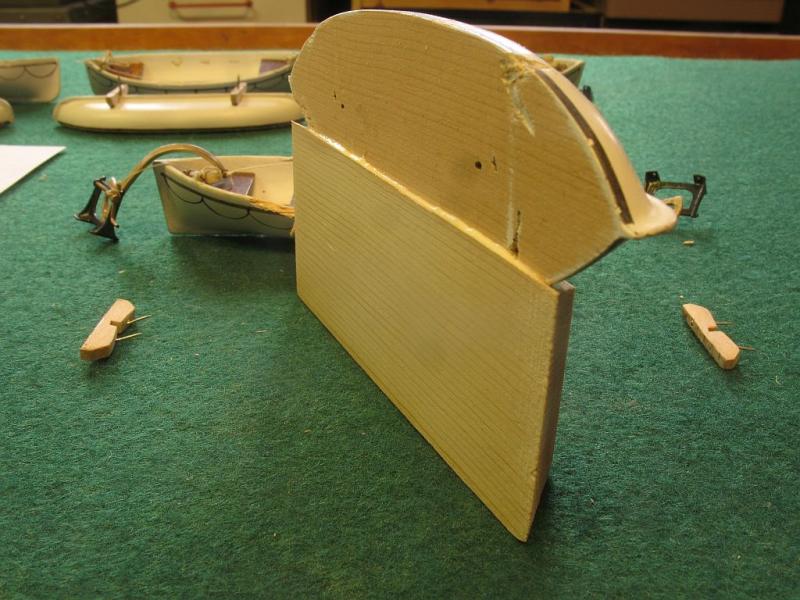
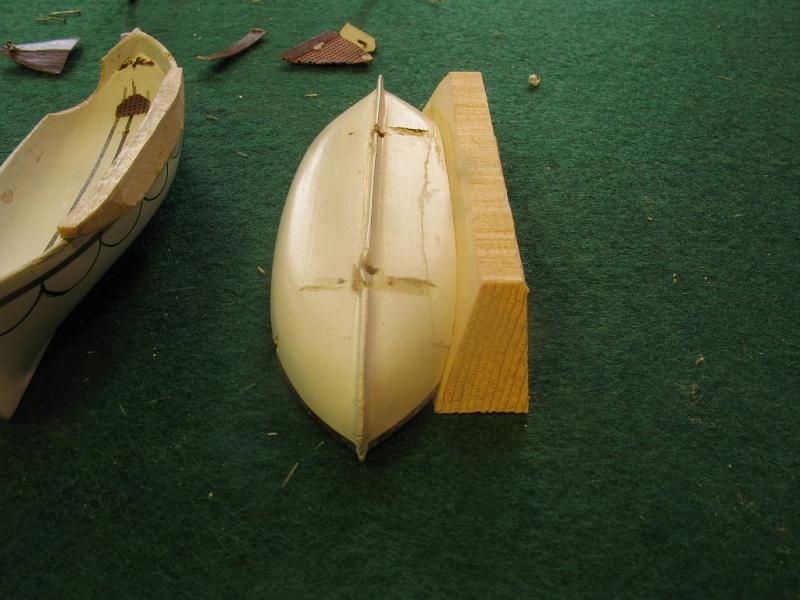
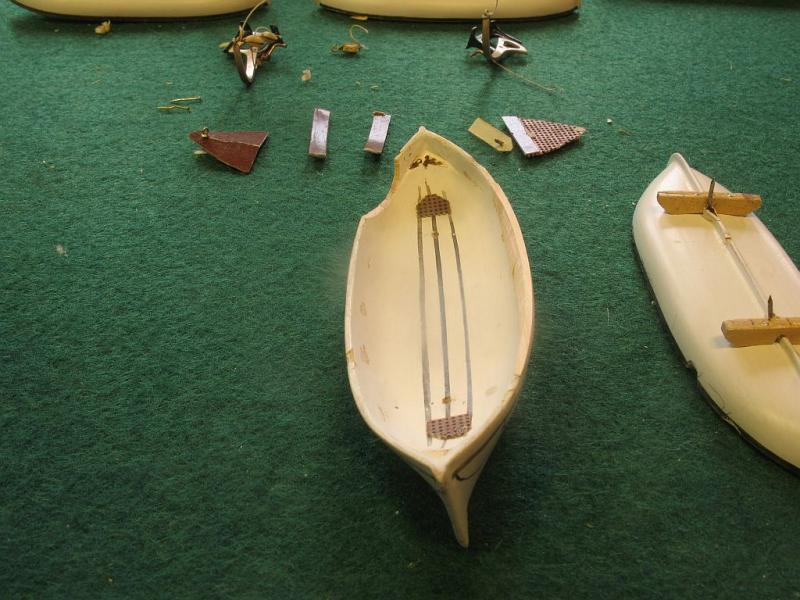
Made a start on the easy stuff first. The most damaged lifeboat is the one at the stern end of the boat deck. the damaged area was planed flat in preparation for some new wood I determined that it is sugar pine. glued to the new block trimmed off the main block Used a pairing chisel to shape the new wood I used one of the other boats to get the shape right Next was the open boat that sits on top of the collapsed one, I used the #11 blade to create a smooth shape for the new wood. then used the #11 to do the rough shaping That's it for now I'm off to make supper. Michael


- 749 replies
-
- 21
-
-
- albertic
- ocean liner
- (and 2 more)
-
Bob there are some good prices out there. Denis I have also ruined a good pair of flush cut pliers doing exactly the same thing. regarding the stays I am looking forward to getting the right gauge of brass wire then I will be able to replicate the correct strand count. Greg I agree with you regarding browsing in the store, I spent a good hour discussing the round nose and the flush cut pliers with the owner. Fortunately his son is taking up the cause and is as pleasant and knowledgeable as his father. They both practice the epitome of good customer service. they have been serving the community for 30 years and it look by all accounts that they will continue. I have to visit their store most times I head into the city for supplies. I was able to try the different pliers with different wires in the store before deciding which ones serve my needs best. Albert thanks for your kind comment. Again thanks for all the likes and for those who looked in. Michael
- 749 replies
-
- 9
-
-
- albertic
- ocean liner
- (and 2 more)
-
Hi Bob they are Lindstrom as are the flush cutters. the round nose are number 7590 and the flush cut are number 7291 The PDF product catalogue has some great technical data in it I did not pay quite as much but they are the best pliers on the market as far as I can tell, the difference is like night and day I have a couple of lesser quality round nose and they cannot hold alignment as well and flex too much for some tasks. One of the things that I make a point of doing is to use any remuneration on projects to improve the quality of my tools. These pliers are a joy to use. Michael
- 749 replies
-
- 6
-
-
- albertic
- ocean liner
- (and 2 more)
-
Pandora by marsalv - FINISHED - 1:52
michael mott replied to marsalv's topic in - Build logs for subjects built 1751 - 1800
Just finished going through the entire build Marsalv. Amazing detail and your sequencing of the construction of many of the elements make a great deal of sense. I particularly liked the way you fabricated the knees. beautiful workmanship on the stern details, very nice work on the lettering. Michael -
Igor you are amazing! I would have been happy to have made the yacht as beautifully as you did. but then you had to go and fit it into a lovely bottle, I just sit and shake my head,... Michael
-
Dr Per I have no trouble resizing pictures, My issue is with the fact that in order to upload multiple pictures to this site one need to have Flash 9 as the flash version. The single uploads are fine, it is just a more cumbersome way of doing things. I like using IfanView for resizing it does all that I need. Thanks for the thought though. Michael
-
ancre La Salamandre by tadheus - 1:24
michael mott replied to tadheus's topic in - Build logs for subjects built 1751 - 1800
Very nice grating Pawel. Michael -
Franks question is interesting, Why would there be so many holes and some not used, would it relate to different sail and or rigging configurations? Michael
- 649 replies
-
- 7
-
-
- dunbrody
- famine ship
- (and 2 more)