
Supplies of the Ship Modeler's Handbook are running out. Get your copy NOW before they are gone! Click on photo to order.
×

dgbot
-
Posts
3,993 -
Joined
-
Last visited
Reputation Activity
-

 dgbot reacted to md1400cs in Wasa by md1400cs - FINISHED - Corel - 1:75
Hi Mates,
Thanks for the likes and the comments
Ferit, yes this bit is somewhat "not clear". The 1/10th and the museum's differ. I think that the museum just did a plain single wrap just for the visitor visuals. I then also think that the 1/10th builders decided to execute a more accurate representation of the actual block wrap. ??
In any case, I will use the 1/10th as my guide. I will, as I did for the mast rope wraps, use cleats to anchor the two ends of the ropes.
Though I also noticed in the 1/10th photo, (just below) - that there seems to be two versions of how the block was attached to the mast. 1) the photo you highlighted. and 2) the other having a loop, then a second rope used for the wrap. Though bothe photos seem to be taken at diff. build stages.
I think that I will use two simple cleats and just move on (:-) but, then I'm always changing my mind about things ha ha
MIchael
-
dgbot reacted to DocBlake in Armed Virginia Sloop Patrick Henry by DocBlake - FINISHED - Lauck Street Shipyard - Scale = 1/32 - POF Admiralty Style
The timberheads were pinned and epoxied in place.
-
dgbot reacted to DocBlake in Armed Virginia Sloop Patrick Henry by DocBlake - FINISHED - Lauck Street Shipyard - Scale = 1/32 - POF Admiralty Style
Thanks, John.
I've been working on fiddly things. I finished the gun carriages, but I had to order 5/64" brass rod to make new trunnions. The supplied ones were too short. next up was the cap squares...an annoying bit of work I have been putting off!. I decided I wanted them made of blackened brass, so here is how I made them (a tip of the hat to John Earl at "modelboatyard.com" for his idea).
I took a length of 5/64" brass rod and filed it flat, creating a half-round. I then soldered this to a piece of brass bar stock 3/32" thick. This was my "mold". I then inserted the brass bar and a strip of blackened brass in the jaws of a machinist's vice and clamped down. Bend the strip over the brass half-round with a needle nosed pliers. Release from the vice and trim to size. The squares need to have holes drilled for the bolts and have the blackening touched up before mounting on the carriages.
-
 dgbot got a reaction from Elijah in Majellan by Omega1234 - FINISHED - 1/200 - Luxury 37 m Motor Yacht - Miniature
I am sorry to see this happen Pat. Thankfully you were able to repair the damge and at the same time not go totally mad with grief. I have felt that way many times over the years.
David B
-
 dgbot got a reaction from Martin W in SS Kaiser Wilhelm der Grosse 1897 by Mirabell61 - FINISHED - scale 1:144 - POF - first German four stacker of the Norddeutscher Lloyd line
Amitious is not the phrase I am thinking of at the moment. Nils. In the future I would like to try my hand at a model of the USS United States at my normal scale. And I am saving everything you are doing. I wil shamlessly use your methods to build it. Your log should be a book on how to build a 20c ship. I merely just save it and drool every now and then.
David B
-
 dgbot got a reaction from Piet in Majellan by Omega1234 - FINISHED - 1/200 - Luxury 37 m Motor Yacht - Miniature
I am sorry to see this happen Pat. Thankfully you were able to repair the damge and at the same time not go totally mad with grief. I have felt that way many times over the years.
David B
-
 dgbot got a reaction from mmdd in SS Kaiser Wilhelm der Grosse 1897 by Mirabell61 - FINISHED - scale 1:144 - POF - first German four stacker of the Norddeutscher Lloyd line
Amitious is not the phrase I am thinking of at the moment. Nils. In the future I would like to try my hand at a model of the USS United States at my normal scale. And I am saving everything you are doing. I wil shamlessly use your methods to build it. Your log should be a book on how to build a 20c ship. I merely just save it and drool every now and then.
David B
-
 dgbot got a reaction from cog in Majellan by Omega1234 - FINISHED - 1/200 - Luxury 37 m Motor Yacht - Miniature
I am sorry to see this happen Pat. Thankfully you were able to repair the damge and at the same time not go totally mad with grief. I have felt that way many times over the years.
David B
-
 dgbot got a reaction from IgorSky in Majellan by Omega1234 - FINISHED - 1/200 - Luxury 37 m Motor Yacht - Miniature
I am sorry to see this happen Pat. Thankfully you were able to repair the damge and at the same time not go totally mad with grief. I have felt that way many times over the years.
David B
-
 dgbot got a reaction from PeteB in SS Kaiser Wilhelm der Grosse 1897 by Mirabell61 - FINISHED - scale 1:144 - POF - first German four stacker of the Norddeutscher Lloyd line
Amitious is not the phrase I am thinking of at the moment. Nils. In the future I would like to try my hand at a model of the USS United States at my normal scale. And I am saving everything you are doing. I wil shamlessly use your methods to build it. Your log should be a book on how to build a 20c ship. I merely just save it and drool every now and then.
David B
-
dgbot reacted to Jeronimo in THE 74-GUN SHIP by Jeronimo
Hi friends,
construction mistake removes,
some accesories there made.
Karl
-
dgbot reacted to Mirabell61 in SS Kaiser Wilhelm der Grosse 1897 by Mirabell61 - FINISHED - scale 1:144 - POF - first German four stacker of the Norddeutscher Lloyd line
Hi Capt.
simple little gadget....
two laundry pegs , backs glued together, and inner legs cut off...
Nils
-
dgbot reacted to Mirabell61 in SS Kaiser Wilhelm der Grosse 1897 by Mirabell61 - FINISHED - scale 1:144 - POF - first German four stacker of the Norddeutscher Lloyd line
Build log part 35
Update
Starting with the 8 mm high railing of and around the promenade deck.....
the railing is a very fragile piece of equipment. I start with the portion which requires the most attention. In opposite to the forecastle deck railing this long railing will be glued on in sections to the base rail, instead of soldering it. I`ll ty and fit a handrail afterwards, in order to stabilize it better
Nils
The two rectangular (unplanked) patches take up the nav-light cabinets
the stern anchor rests on a special place aft / midships
before cutting the railing lengths to fit, I made some templates.......
the railings are from chemical etched copper, 0,5 mm thick, in scale 1:150 (also suits my scale 1:144 well)
-
dgbot reacted to Louie da fly in Venetian Carrack or Cocha by woodrat - FINISHED - 1/64
This picture of the Santa Caterina do Monto Sinai, though a little late, shows two sheets holding the centre of the mainsail back, plus two others starboard of it (presumably mirrored on the port side), and the sail pressed hardup against the forestay.
Steven
-
 dgbot got a reaction from ggrieco in USS Maine by dgbot - HMV - 1/250 - CARD
I finally started on the repair adding to what I had learned. The first was the walkway and saffolding in the aft section. The first attempt at the walkway came out badly because I was not using a new blade as a result the part was unacceptable,
I redid the part by cutting and folding a little glue I put the part under some weight so the piece would dry flat.
The scaffold was cut out and prepared.
This time I put a straight edge on the part and cut out the inner area first in order to keep the integrity of the part.
I also made some cuts on the backside to make to make it easier to keep from tearing the part.and this was the time when I stropped the blade on a strop with buffing compound. Because the cutting mat dulled the point.
Once I get the point sharpened I will finish with the cutout.
David B
-
dgbot got a reaction from ggrieco in USS Maine by dgbot - HMV - 1/250 - CARD
I move back to my digs in Chicago and after a couple of months wound up back in the hospital. I am now back at my sisters where She can keep an eye on my health. The doctors are happy and She is too. I finally found my plans for the Maine am now getting started on the repairs. This is where I am starting over.
David B
-
dgbot got a reaction from ggrieco in USS Maine by dgbot - HMV - 1/250 - CARD
I am finally back home and in my shipyard. A larger work area along with the rest of my tools. I put my model on my work table and started to look it over to see what damage was done to it.
So far what I found can be redone but will take some time. Here are the major problem areas and the one that gave me the most trouble to begin with.
The area marked is and area that has to be redone do to damage.
I already printed out a new sheet and am cutting out the parts.
David B
-
 dgbot got a reaction from GrandpaPhil in USS Maine by dgbot - HMV - 1/250 - CARD
I am finally getting back to the Maine and it is not as easy as it sounds getting into the groove is what helps. The first thing was print out some more sheets to cut out the blanks. I first started on the scaffolding and walkway.
Then fold and glue the parts as before. I started on the walkway first but it came out bad because the tip of my scalpel. And the end result it came out pretty sloppy. And I had to redo it.
did another blank and put a weight on it so the part did not warp and went to the scaffolding.
After cutting the blank and folding and gluing I started cutting and using a straight edge to keep from damaging it.
I noticed that the tip of my blade was starting to dull so I grabbed my strop with compound and brought back the tip. The compound is from Flex Cut and is an Aluminum and Titanium Oxide. Works great for putting the edge on and polishing at the same time.
By cutting the inside cures first with light stokes yields a fine cut. That is the reason for a sharp tip.
The next part was the walkway and I had a rude surprise the glue diluted with the ink and have to redo the part accidents happen but you learn from every redo that you have if you can afford it.
Well tomorrow is another day of having fun.
David B
-
dgbot reacted to Keith Simmons in Steamboats and other rivercraft - general discussion
Hi Cathead,
After seeing your thread I decided to take the hull design I was working on and create my twist on a river tug. Once I got started I added a second mission to the tug as a hemp trader just because I had the hemp string..lol
-
 dgbot got a reaction from jonny.amy in WWI Aircraft Carrier being restored
I found this article about 1918 Thorneycraft Seaplane Lighter interesting. A far cry from what we have now.
http://www.express.co.uk/news/world-war-1/468761/Last-remaining-World-War-1-aircraft-carrier-lovingly-restored
David B
-
dgbot reacted to tlevine in HMS Atalanta 1775 by tlevine - FINISHED - 1:48 scale - from TFFM plans
Not too much has gotten accomplished on Atalanta these last few weeks. Two weeks ago she took a trip to the Midwest Model Ship Show in Manitowoc Wisconsin. Bill Maxwell's magnificent Fly and Atalanta were displayed next to each other as works in progress. Last week was spent in the garden. This week it rained so much I was able to put in a little quality modeling time. Next week all the weeds will have grown like...weeds!
The standards and most of the eyebolts have been added to the main and mizzen channels. The iron supports for the main studding sail boom are fixed to the main channel. These are a gooseneck and an eyestrap. My apologies for lack of photos-in-progress but the camera was not available until after completion. These are straightforward pieces to fabricate. The straps taper in thickness outboard to in. The "neck" on the gooseneck is a piece of brass tubing cut in half and silver soldered to the strap. There is a step on the eyestrap which was made by soldering an extra piece of brass to the undersurface and filing down the top to form the step. They are bolted to the channel.
There are eight swivel gun mounts, three on the forecastle and five on the quarterdeck. Although identical in configuration, each one is different in length. I started with a 9" square stock and milled the top part into an octagon. Then, based on the plan, the final length of the octagonal section was determined and cut by hand. There is a shoulder transitioning between the square and octagonal sections and this was made with a file. The square section tapers at the foot except where it abuts the hull. It is installed perpendicular to the waterline and secured with two bolts.
There is a reinforcing strap and socket which accepts the mount for the swivel gun. In real life, this is recessed into the gun mount. In 1:48 life, this was made of acid free paper which was dyed with a archival black pen. I attempted to make a decent appearing hoop but decided the only way to get an octagonal hoop was to also use paper, wrapped three times around the gun mount to get the correct thickness (0.5"). I have also finally cut off the top timbers flush with the rail. I left them long to protect the top of the ship. Now, on the port side, the gun mounts will perform the same duty. They have temporarily been kept long on the starboard side.
-
dgbot reacted to Don Quixote in Niagara 1813 by Don Quixote - Model Shipways - 1:64 - First build
Hey y'all! I finally had a good idea. *I* think anyway. I was getting frustrated that my work kept coming off the serving machine. I have replacement erasers for my mechanical pencils so I cut a couple pcs. off and stuck it on top of the wires.
My fist stroped block. Somewhere along the line it got upside down.
-
dgbot reacted to Elijah in Phantom by Elijah - FINISHED - Model Shipways - 1:96 - New York Pilot Boat
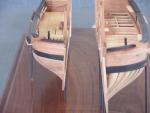
I have gotten a little bit done over the past week. I drew up, cut, and glued on my first two strakes. I have also decided on a planking pattern, and am preparing my third strake. You might also notice that I cut the rabbets for the bow and stern. Anyway, here are the pictures so I can get back to work!
So far, no steam bending has been necessary. I noticed that my second strake looks a little better than my first. My first is on the starboard side. It just goes to show how much I am learning! Spilling is definitely a long process, but I like what I see!
Thanks for any comments and advice! Until next time!
Edit: The planking looks worse in the photos ! Darn 5 megapixel camera !
-
 dgbot got a reaction from Omega1234 in Phantom by Elijah - FINISHED - Model Shipways - 1:96 - New York Pilot Boat
Looking good Elijah. You could also remove the bulwarks this will make it easier to carve the deck Then rebuild the bulkhead with stantions notched in the hull. At the next meeting talk to Bob Filipowski who has done it many times.
David B
-
 dgbot got a reaction from canoe21 in Phantom by Elijah - FINISHED - Model Shipways - 1:96 - New York Pilot Boat
You have a long way to go before you have enough tools. Show her a photo of my shop before I moved.
Since I am a bachelor it could have been neater.
David B