tkay11
-
Posts
1,827 -
Joined
-
Last visited
Content Type
Profiles
Forums
Gallery
Events
Everything posted by tkay11
-
 Thanks, Gregor. And I really like the image on your membership photo: that's real protection! For me, I just wear a face mask when using the table saw. Tony
 -
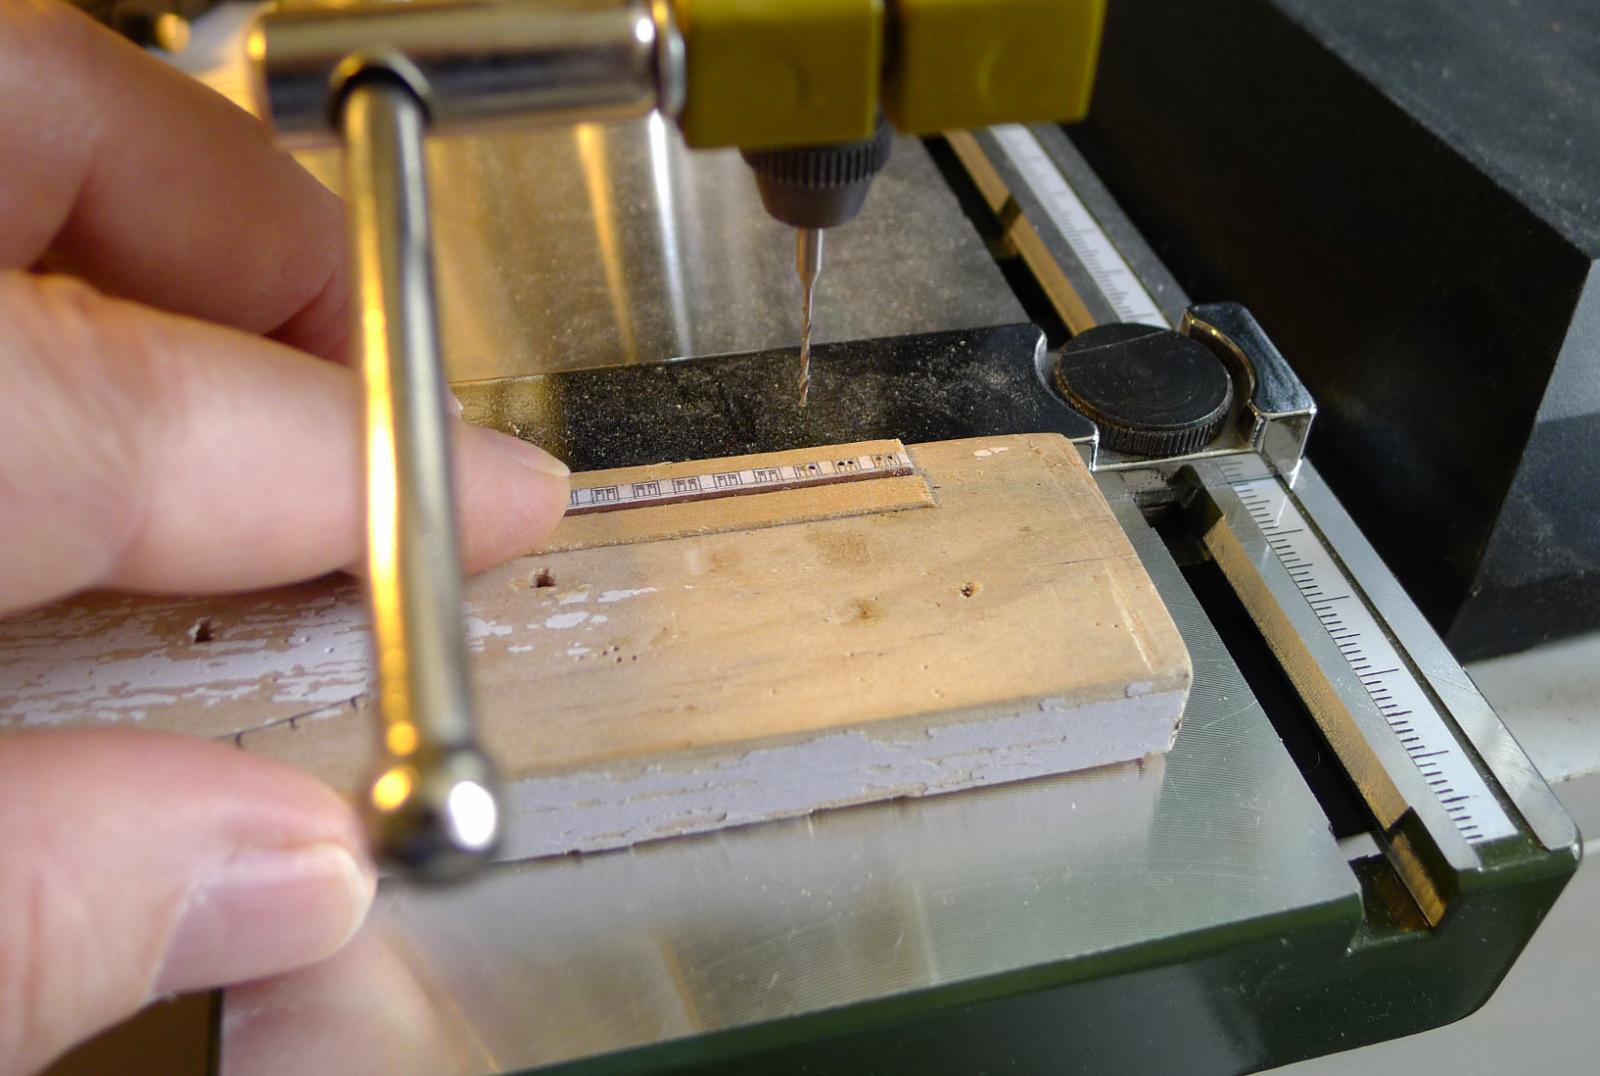
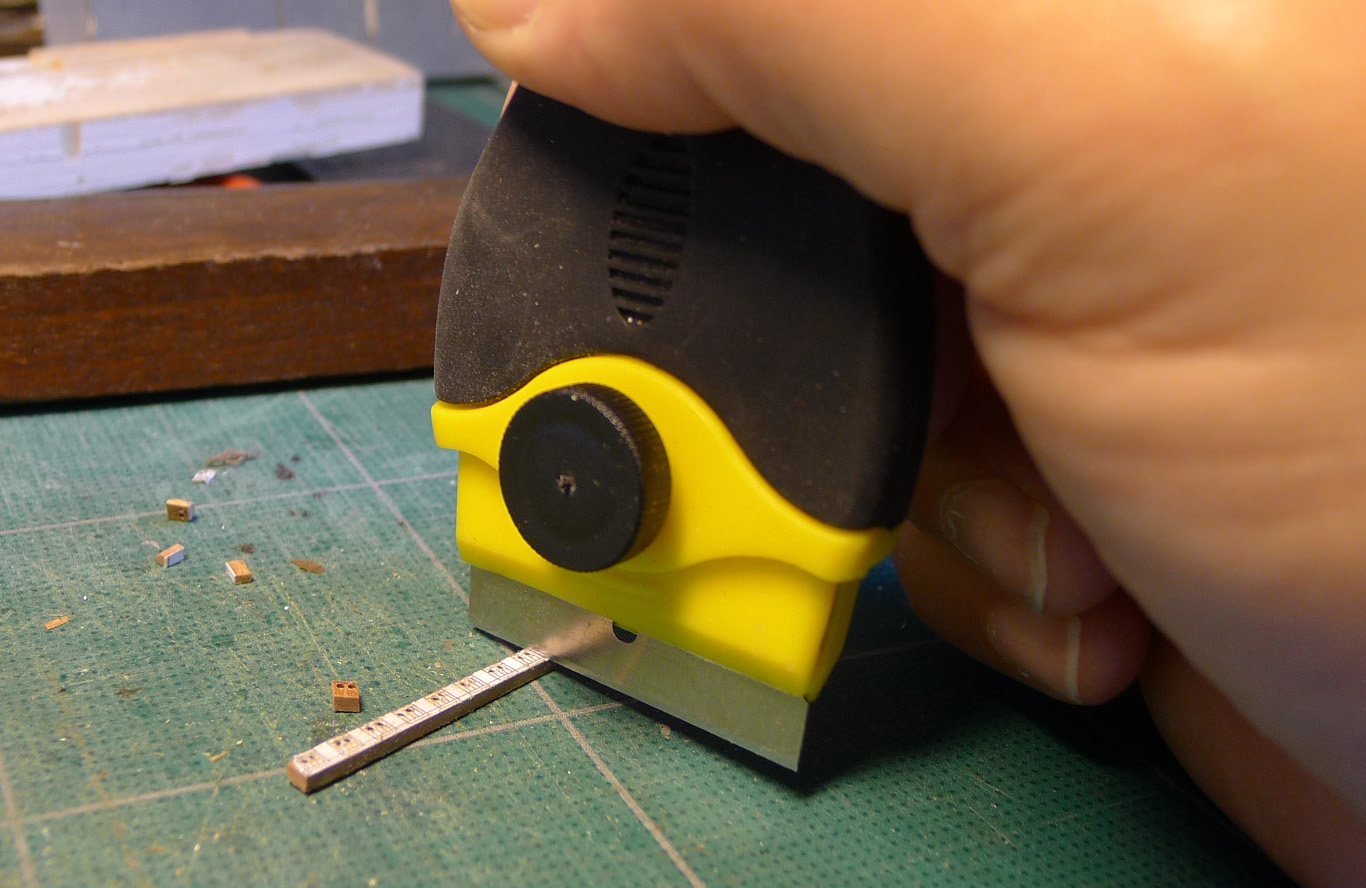
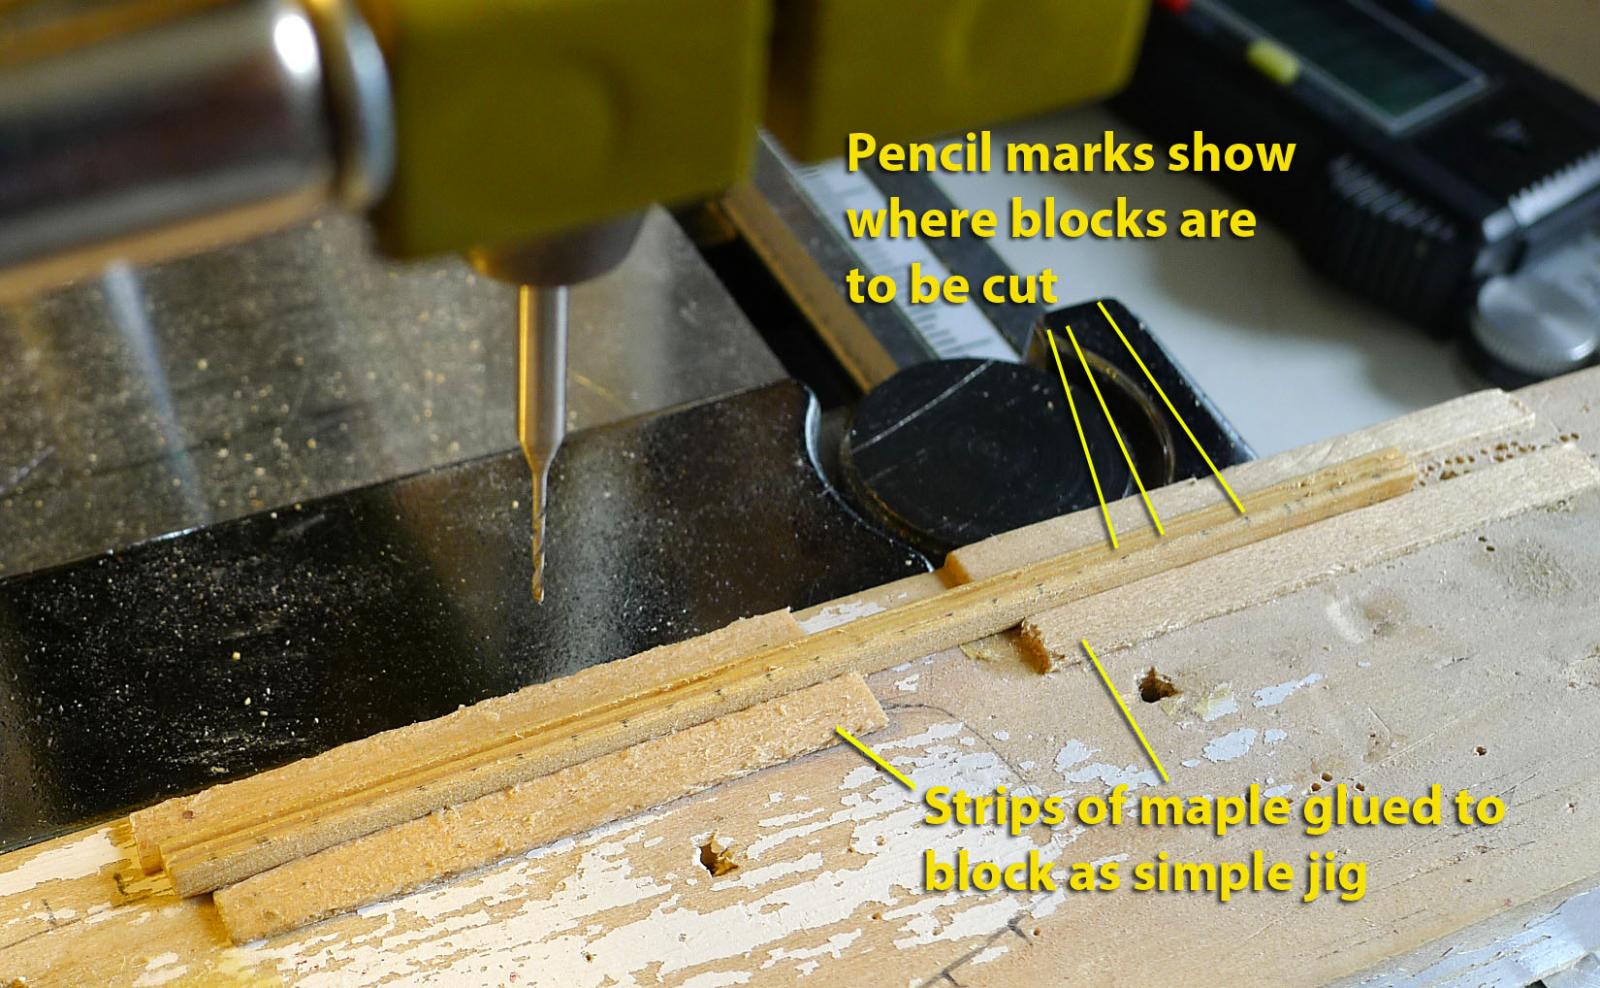
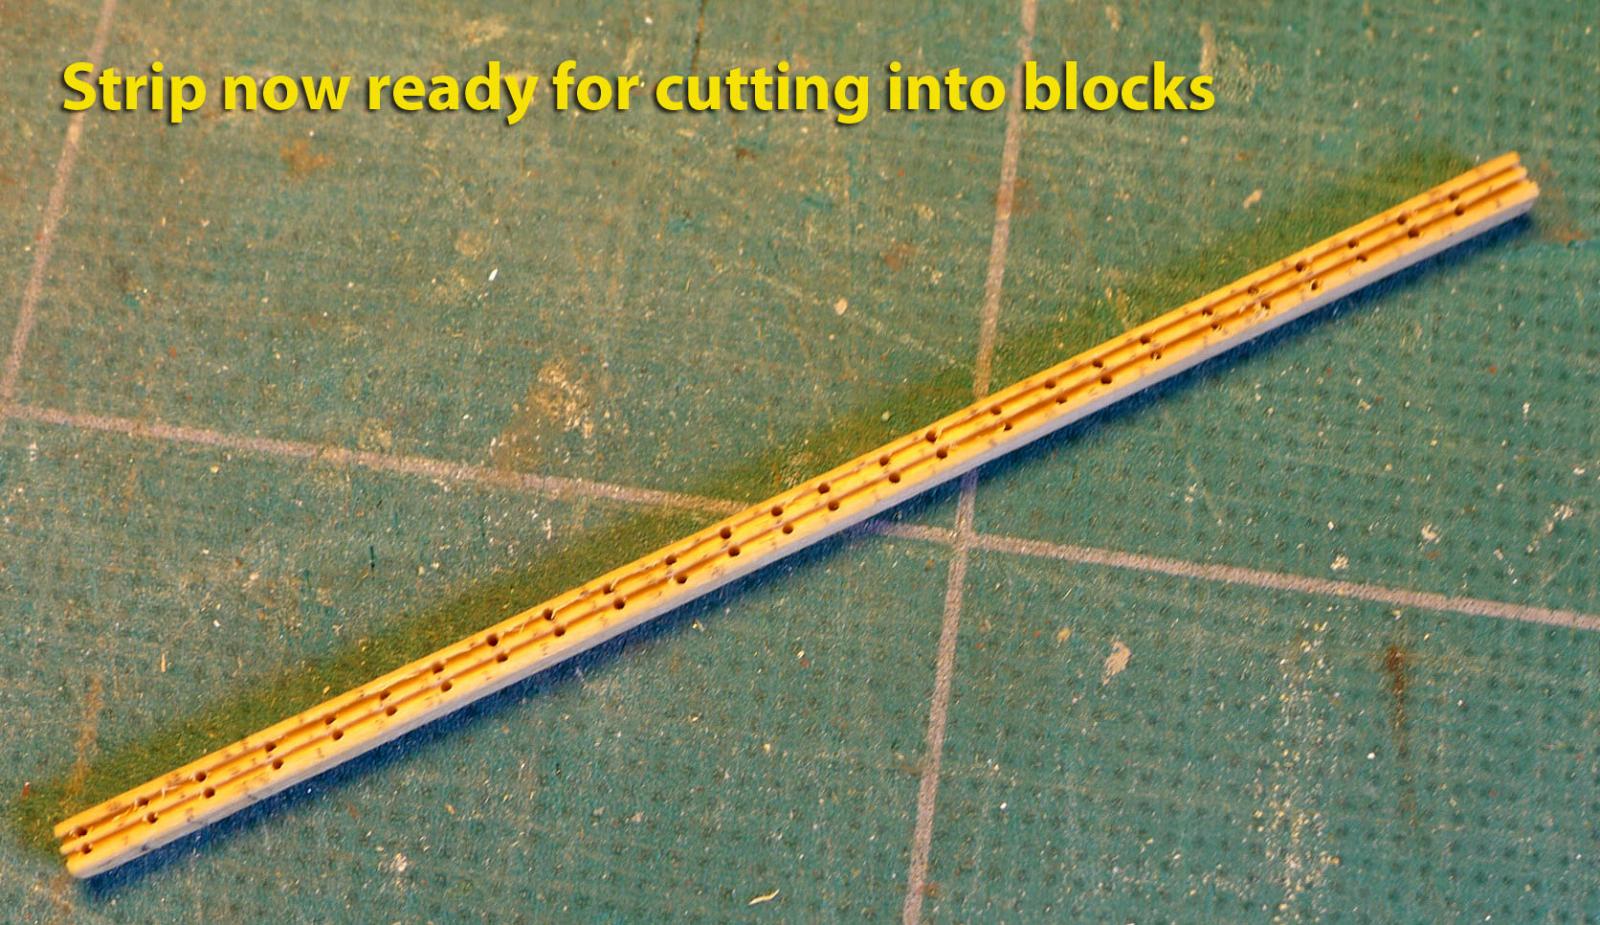
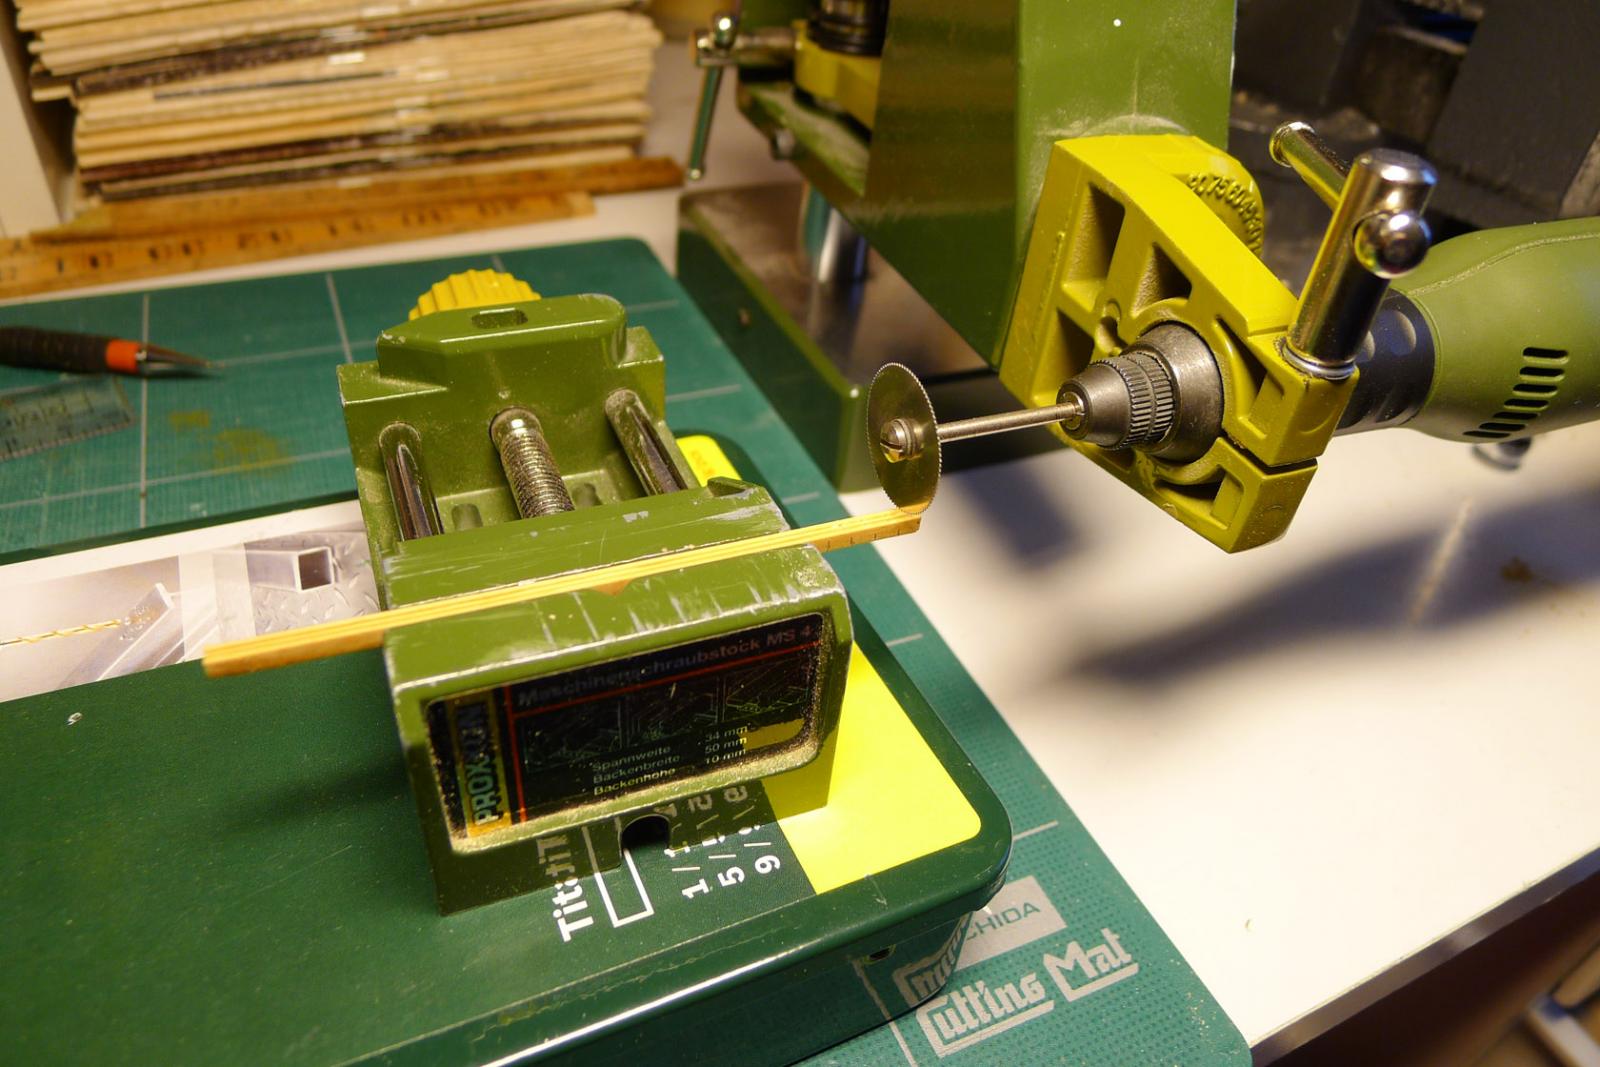
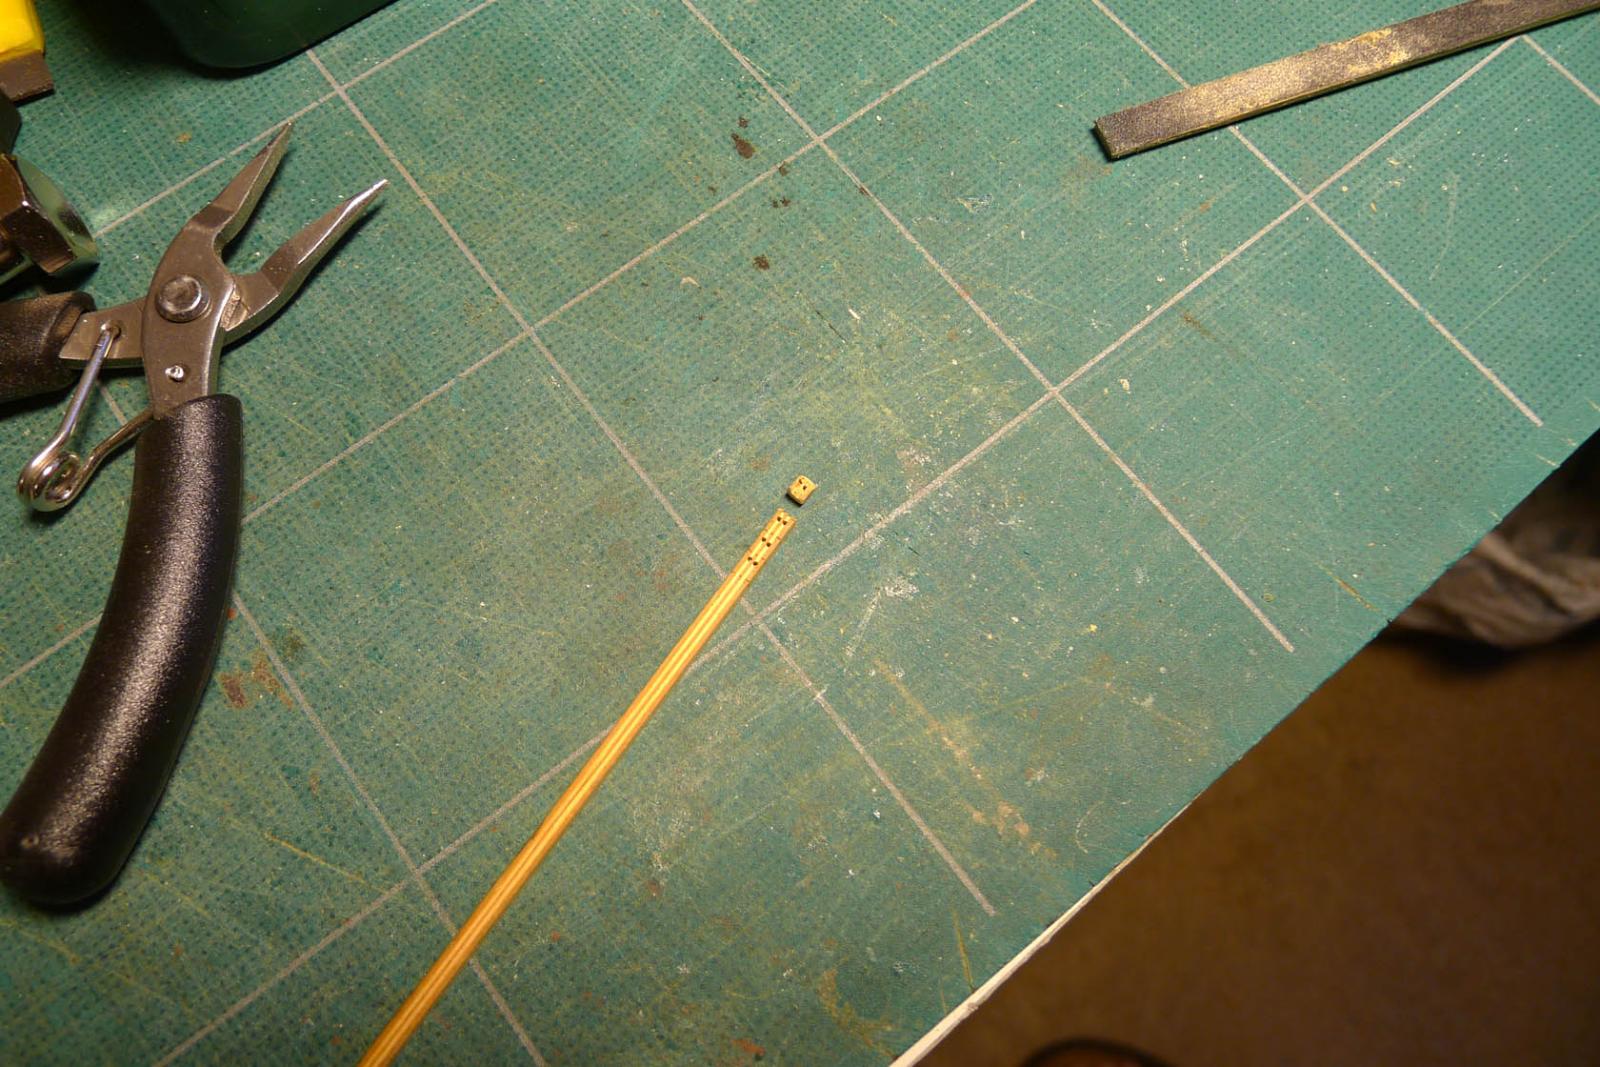
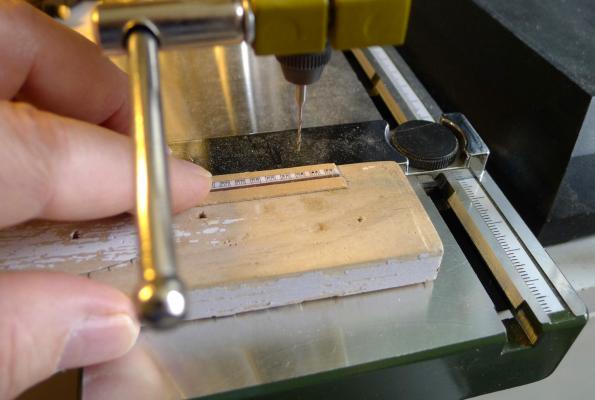
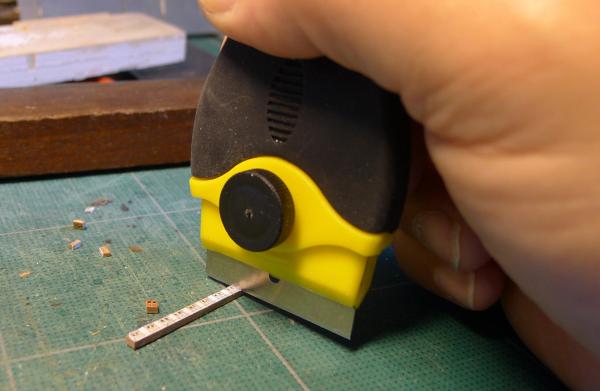
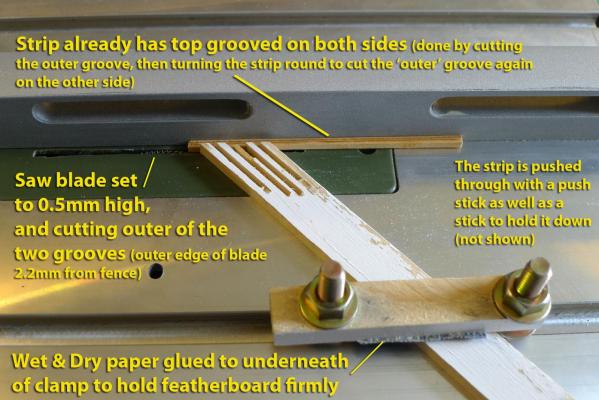
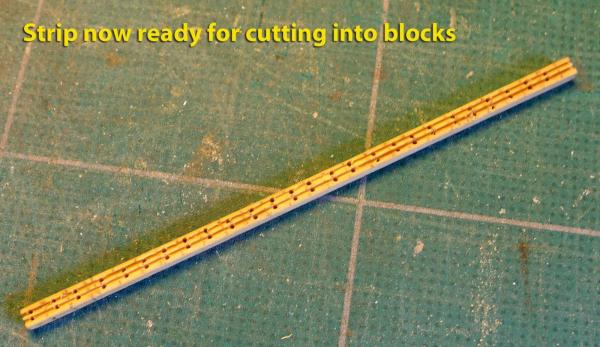
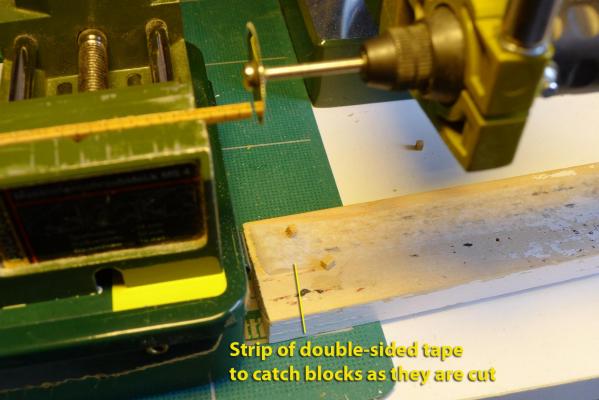
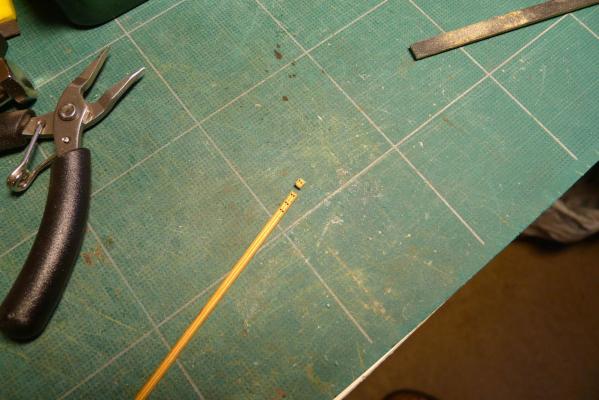
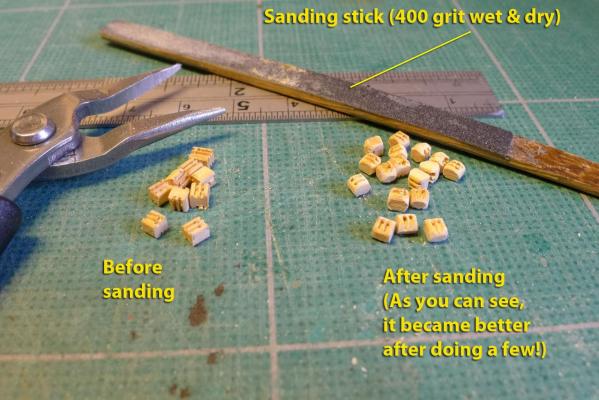
APOLOGIES TO THE EXPERIENCED: Please accept my apologies because, as usual, many of you on this forum will have been through all this and may regard it as somewhat basic. I am recording my experiences mainly for those, like myself, who are new to the game and no doubt have faced many of the same questions as I have when learning to make blocks. The blocks to progress Over the last few weekends, when I was able to get away from the demands of work, I concentrated on making blocks. The primary reason is that the guns have been made and they have been waiting very patiently for the gun tackle while I busied myself making a ship’s boat (and on which I continue to work). The secondary reason is that the skill of block making is going to be very useful for the rigging and for any future model as well. So I thought I might as well spend time to get it right. And time it has been taking. There were three main elements that slowed me down: The first was the simple one of trying to make blocks of a reasonably identical shape and size. The second was trying to make the holes in the double blocks parallel. The third was finding out how to use the circular saw properly. An accurate block? Starting with accuracy of size, I made a CAD drawing in TurboCAD of a double block according to the recommendations in Zu Mondfeld. This was scaled to 1/64 and long lines of them printed. I had been thinking that by doing this it would be easy to drill the holes for the rope in the correct position, accurately and in perfect line using my small drill and drill stand. All it would take then would be to saw them off and sand them. So a line from the printed sheet was then stuck (using Elmer's Rubber Cement) to a strip of hardwood that had been cut to the right dimensions with my circular saw. For the hardwood I was using old oak floorboards that I’d picked up off a street near our home as I reckoned I’d be making many mistakes and didn’t want to waste anything expensive. This proved to be a good call as there were a lot of attempts! After gluing the strip, the job was then to drill the holes and cut the blocks using my favourite small tool (a razor blade holder). You can see the sequence in the following photos. Not quite! Although this gave reasonable results, there were some problems. The main one was that I had cut no grooves to simulate the sheaves so the holes left the blocks looking a bit unrealistic. This partly resulted from my decision to orient the print out so that all the holes would be in line – something that was more to do with the fact that I was drilling the holes using my drill stand. I then found that my method of separating the blocks from the strip led to a problem with sanding the edges. After quite happily using the razor blade holder to separate the blocks from the strip, I found that sanding the blocks wasn't so easy as the wood often simply disintegrated. (I realised much later that this was primarily due to my choice of wood -- the floorboards were made of oak which at small scale is harder to work. You'll see that I returned to the simple slicing of blocks later on in the post -- although with a different orientation of the holes for the sheaves.) In order to avoid this my second attempt involved rounding the edges before separation using a triangular file between the blocks, then cutting with a razor saw. The results were really messy. The rubber cement I was using for the print out was not strong enough to withstand filing or sawing and although I got round this by making a mark with a scalpel, my filing was so inaccurate that I lost sight of where to cut. The fact was that the triangular file was at too great an angle and I hadn’t thought through the fact that there should be almost no angle between blocks when lined up side by side. I had overlooked the fact that all the sources that show how to make blocks from a strip of wood show them lined up end to end and not side by side as I had done. So my attempts thus far had been a failure – but I had learned from the attempts. I had also been wary of the traditional method which uses a table saw because I didn’t trust my accuracy with the table saw to cut the line for the sheaves. However, trying to use dividers to run lines down a strip of wood turned out to be a waste of time as the grooves were not at all distinct and it was very hard to keep the lines parallel. So should I buy the ready-made blocks? It was at this stage that I seriously considered buying ready-made blocks. Chuck’s looked oh so very tempting. But I said to myself that so many thousands of modellers previously had patiently made blocks for themselves, and if I didn’t do it I’d probably be losing an opportunity to learn a new and useful skill. Naw! Coward I am not! So I went back to the traditional method of lining the blocks end to end before cutting, and turned to the saw. As I have said, it had been something that I had been fearful of as I really didn’t believe I was capable of cutting the tiny grooves for the sheaves in those very narrow strips (2.5mm square) of wood. I made lots of attempts to run grooves down a strip with the saw, but they all ended in failure. It wasn’t until there was a discussion about the correct way to use a table saw on this forum (see the discussion that starts at http://modelshipworld.com/index.php?/topic/2470-microlux-tilt-arbor-saw-problems/#entry63704) that I finally learned the simple trick of using a featherboard clamped to the table top to hold the strip from the side. I also learned how important it is to cut strips on the side away from the fence. Once I’d grasped all that it was relatively easy. Nay. It was wonderfully exciting to discover I could do it properly! Re-thinking the block size I also made it easier for myself by thinking carefully about the size of the holes I’d be drilling and the rope I’d be using. The correct size for rope going through the double blocks on the guns is 0.25mm diameter. However, my saw blade size is 0.6mm, so any 'sheaves' I would make would have to be 0.6mm.That meant that I’d have to make a double block 2.7mm wide (two 0.6mm holes, 0.5mm between them, and 0.5mm on either side. Previously I’d been making 2.5mm wide blocks. I reckoned that although my blocks would be slightly oversize at scale, such a discrepancy would hardly stand out against all the other discrepancies from perfection in my build. Far more important for me at this stage is to get the hang of basic skills and allow time to improve them. The featherboard The following shows the simple featherboard clamped to the table and holding the strip against the fence. I made the clamp from a couple of 6mm bolts I found in my spares box and a bit of pine from that continuing wonderful wood source – the streets round my home. You’ll see some holes already drilled in the strip – this was because I’d already cut the grooves on both sides and was starting on the holes before I remembered to photograph the process. This time the wood was boxwood – cut from an old boxwood ruler I bought on eBay (thanks to a tip from ‘Blue Ensign’ when I asked him about his sources of boxwood in the UK). One thing you'll want to note is the use of a strip of wet & dry paper which is glued to the underside of the featherboard clamp. This is not mentioned in the article posted by Mark Taylor in the discussion referred to above, but is important as it really holds the featherboard very firmly. For those wondering how I set the saw to a height of 0.5mm, I simply used the digital vernier caliper -- which I also used to determine the distance of the saw from the fence. …and is the Proxxon FET up to the job? No, stop right there. The question should be: am I up to the job? Just as an aside, there’s been a lot of discussion recently about the merits of the Proxxon FET table saw. I do realise it’s not as wonderful as the Byrnes saw but now I have come to understand how to use it, it really does do the jobs I have asked of it. Maybe a better way of putting this is that my skills are not up to the standard attainable with the Proxxon saw – so I doubt very much whether I’d be able to obtain better results with the Byrnes’ saw! The next stage is drilling the holes. I use a simple jig for the Proxxon Drill as you can see in the photo. It was while doing this that I found out that the grooves provided a natural way to place the drill bit – I could feel the drill bit sliding into the groove, so that told me exactly where to drill. The pencil marks on the top of the strip are there to show where to cut the blocks. You can see the strip with the drilled holes in the following photo: Cutting of the blocks Now for the cutting of the blocks. You'll now see that I reverted to the simple idea of cutting the blocks without trying to file the joins (the method suggested by many books). This is as suggested by Hubert at his site Wooden Ship Modelling for Dummies. Just before cutting, though, the corner edges of the strip were lightly sanded to save sanding them once they were cut. In order to cut the strips accurately, rather than using the hand-held razor blade holder I had used previously, just for fun I used the Proxxon drill with a small saw blade mounted horizontally in the drill stand. It was easy to set it all up so that the cut was vertical and at right angles to the end by using the marks on the cutting board as reference points. Most people will worry that the blocks would go flying off into the far corners of the room. This was easily avoided (i) by moving the saw slowly through the block, and (ii) by having double-sided sticky tape on a block of wood underneath (an idea I derived from something Hubert showed on his site (referred to above). Note in the second photo below that the vice is not square to the saw bit: this was just an error when setting up the photo. Having cut off the blocks, they needed to be sanded. I used Hubert’s method of gluing a strip of 400 grit wet and dry to a stick and sanding by hand. I had thought I’d try to build a drum sander, but instead decided to stick with Hubert’s method for the while. You can see the results in the following photos. You’ll notice that some blocks came out better than others: That's simply because my technique gradually improved between first and last! I still have to think how to finish them (oil, varnish) and also will now have to work out how best to add the strops and hooks. Oh, and I do realise that I made no grooves for the strops. That’s something I’ll reserve for the next set of blocks! It's not perfection, but the basics are now more in place than they were a month ago. That's it for now. Tony


- 269 replies
-
- 5
-

-
- Caldercraft
- First build
- (and 3 more)
-
Very interesting discussion about the channels. I hadn't seen it. Thanks for posting the link, Gregor. Have a good break! Tony
-
Microlux Tilt Arbor Saw Problems
tkay11 replied to capnharv2's topic in Modeling tools and Workshop Equipment
Wow!! I have just gone through the process of cutting out featherboards as in the article linked by Mark. I fixed one to the table surface to hold the wood from the side, and clamped one to the fence. The difference this has made is astonishing! I have perfect cuts every time now in pear and apple (the wood, that is, not the fruit), with no detectable difference in the width of the cut between front and back. No burn marks, and the wood comes out as though it's been planed. In addition I'm now quite comfortable with moving the fence less than a millimetre at a time -- though it's taken some time to learn the trick. I now really can see the potential of the Proxxon FET. Now I want to teach myself how to do the gratings as well continuing to figure out block making. Getting there, slowly but surely! Thanks again, Mark -- you've eased my path! Tony -
Well done! (and I hope you don't take that as an excessively used meaningless phrase!). Looking forward to the resumption. Tony
-
That's brilliant, Bob! I hadn't seen that tutorial before. Many thanks! Tony
-
I am not sure that the FET has bad reviews. I think it's more that the Byrnes machine is very much better in probably every way. Jim's blades are better. I should imagine its fence is very much better engineered than the Proxxon's and that there are a lot of other differences. It's also about twice the cost of an FET if you buy in Europe because of the added shipping ($175 to the UK), VAT at 20% (on the combined value of the machine and the postage) and handling charges by the carrier. I would certainly like to have a Byrnes saw, and if I were in the USA there would be no contest. However, I am quite happy with the FET. I am beginning to understand how to obtain really accurate cuts with it and there are lots of modelers on this forum and in the European model forums who use it and report on it very happily. For the £350 I saved by buying it, I will be able to buy a micro mill and a disc sander (though I'm still thinking about these as I can't afford that yet). The FET has allowed me to explore easier ways of cutting wood than by hand, and I have obtained precision cuts that would have been very hard if not impossible for me to do by hand. But of course I should imagine the Byrnes saw would be even better. The only 'fault' I have found so far with the Proxxon is the fence which is fiddly to adjust. That just means it takes slightly longer to adjust. I don't know if that helps. I am sure others who have had experience of both saws will chime in here! Tony
-
Microlux Tilt Arbor Saw Problems
tkay11 replied to capnharv2's topic in Modeling tools and Workshop Equipment
Nice comments, Alex -- especially about the bandsaw. I hadn't realised before just how useful a bandsaw is. Just on the clubs: I was thinking they might be a way in to handling machines with someone who knows. I was at the Model Engineering Exhibition at the Alexandra Palace in London in January, and it was fantastic for me when one of the exhibitors invited me to make something on his lathe. Those few minutes did far more to stimulate my interest and provide some understanding than a host of words, pictures and descriptions. I'm one of those people who need the 'hands on' experience as well. There's no denying the huge value of the expertise on this site. I have learned a lot from it. It's just that there's often a lot more that people take for granted in their explanations (as a result of their familiarity with equipment) and it's often the tiny details that make the difference. The article posted by Mark is one of those rare articles that really do seem to go to the very basic first steps which are invaluable for beginners such as myself. Tony -
I don't know if this is old hat for everyone, but following a recent discussion on table saw problems, I was researching the different waxes people use for their saws and blades. I came across the following site called 'Waxing Philosophic' which discusses the various waxes, their mixtures and their solvents. Tony
-
Really nice touch, that brass rail. And your hatch covers are much better dimensioned than mine and the covers nicely rounded. Excellent work! The ship's boat was often towed. There are many models with it shown separately or with a length of rope towing it. I don't know yet what I'll do about that. Tony
-
You'll see a lengthy discussion about it in Dan's build of the Vulture. It's under the topic 'Rudder Coat'. I think 'Blue Ensign' has done it as well on his build of the Pegasus kit. Tony
-
I think your tiller is just fine. I attach the drawing from the Anatomy of the Ship book on the Cutter Alert which is supposed to be about the same period. The tiller points upward and is slightly curved, so don't worry! Imagine a figure standing on the deck (you can draw a scale figure on card, 26mm high) and see where the hand might lie. That will tell you how realistic it is. As to what they did with the rudder if it fell off, well, there are probably a few jokes in there. Maybe another thing to think about is a leather cover that protects the hole through which the rudder is placed. Other modellers on this forum have pointed out that very few model kits include mention of this, but clearly it would be important to stop seas coming in through that opening. I'm still undecided about whether to attempt that! Tony
-
Microlux Tilt Arbor Saw Problems
tkay11 replied to capnharv2's topic in Modeling tools and Workshop Equipment
Just finished reading the article on the site referenced by Mark (Cutting Scale Lumber on a Table Saw, Tips and Techniques). Really excellent! Thanks again, Mark. Tony -
Microlux Tilt Arbor Saw Problems
tkay11 replied to capnharv2's topic in Modeling tools and Workshop Equipment
Yeah! That's a neat idea. Seems like you two (Michael and Mark) think alike. Thanks for the link as well, Mark. What pleasure there is in these little excursions and experiments! I look forward to hearing more from you and anyone else looking at this. Meanwhile I'll do a bit of experimenting on my own. What is interesting is that when I cut two parallel grooves 0.5mm deep and 0.7mm apart, using my 0.6mm wide blade, the grooves remain perfectly parallel. In case you're interested, I'm doing that because I'm still experimenting with ways of making blocks without using a mill, following the classic way of making them. Thanks Tony -
Microlux Tilt Arbor Saw Problems
tkay11 replied to capnharv2's topic in Modeling tools and Workshop Equipment
Excellent thoughts, Michael. I have been noticing exactly that behaviour when I measure the front and back of the cut. I even see it happening as the wood goes past the blade. So even though the fence is locked tight and parallel to the blade, it still happens. It can lead to up to a 0.4mm variation over a 10cm length. I saw your stop when you first posted, but forgot about it, not thinking about the significance. I'll study it now and see if I can set one up. I can't envision your 1/8" parallel strip idea. Is the idea that the wood comes up to the strip and then is pushed away from the fence? Thanks again for your expertise and experimentation! Tony -
Microlux Tilt Arbor Saw Problems
tkay11 replied to capnharv2's topic in Modeling tools and Workshop Equipment
Very good comments, Michael, Mark and Harvey. This thread has been really interesting. As Harvey has noted, it has been exploring different aspects. We have the 'wobbly blade' strand, the 'fence' strand' and the 'fit for purpose' strand, all interlinked. The point about being trapped by convention is really nice, along with the problem of differences of interpretation. However I had thought that for ship modelling the thin blades with low kerf have specific function: to provide thin slits in wood at a small depth. My personal interest in using them, for example, is for gratings, slicing small (e.g. 4mm x 0.5mm) planks to smaller widths, making accurate cuts in very small pieces, cutting slots to hold slivers of wood and, in the absence of a mill, making shallow grooves. That's why I felt I had to buy more than one thickness of the thin type. Because of my lack of experience with saws, I may have gone over the top in this regard, but I'm now confident that I have the range I would like. Part of the problem for tyros such as myself is that it's hard to find resources that explain all these aspects of using a saw before we plunge in and buy them. I really liked Michael's suggestion of joining up with a model engineering society. I should have thought of something like that before buying a saw! I have not had any problem at all with the 80mm 1.6mm kerf tungsten carbide blade provided with the saw for cutting at a depth of 20mm or so. I bought 25mm thickness oak and pear pen turning blanks to experiment just to see what the saw could do. I also found 18mm solid oak floorboards left on our street which are extremely hard. The tungsten carbide blade cuts through all these with ease. So it is an easy job to cut down the larger sizes using this blade and using the smaller width blades for the smaller work. The discussion of the blade capabilities has clarified the problem Harvey brought up in the first instance, so now I'm looking forward to future discussions about how best to modify the fence! It's not that I can't cut to a specified width with the saw. It's more that it's extremely fiddly with back-and-forth readjustment. So it's become more of a challenge than a necessity to look for ways of improving the fence to make our lives easier. Even without a further modification it's certainly a whole lot easier than trying to do it with a hand saw. I see it as part of the process of learning to work with the tools we have (even though in this case I gave up on the hand saw rather quickly!). In order to avoid the problem of jumping in without knowledge, and following Harvey's thought, I'll now be buying 'Using the small lathe' which is available on Amazon in the UK at a very reasonable price of less than a tenner. [Edit] The reason, of course, being to prepare myself and to think through the value of having a lathe. And sorry for intruding, Harvey, with comments that may have been superfluous to your original interest! It's just that I am delighted when we have a thread that illuminates so much. Tony -
Microlux Tilt Arbor Saw Problems
tkay11 replied to capnharv2's topic in Modeling tools and Workshop Equipment
Nice choice! Much envy from me! I look forward to hearing how you get on! Tony -
Microlux Tilt Arbor Saw Problems
tkay11 replied to capnharv2's topic in Modeling tools and Workshop Equipment
OK, so I started searching for reports on the Accuriser. Here's what someone said on a classical guitar forum: "I received the Accuriser II accessory fence for my MicroLux mini table saw today. The idea is great, but I am quite disappointed in the quality, lack thereof. The advertising claims 0.001" accuracy, so I expected a precision machined part, but it is actually just some stamped and bent metal, looks cheap, and doesn't work very well. It is difficult to slide into position, has lots of play so who knows where true square is, and the securing knobs are unpleasant to the fingers." Of course, classical guitar players are sensitive about their fingers, but this is the only comment I found so far! I'll probably turn up more thoughts as I continue to explore. Tony -
Microlux Tilt Arbor Saw Problems
tkay11 replied to capnharv2's topic in Modeling tools and Workshop Equipment
Sorry, Harvey, what I meant about Jim's blades is that they are the same size (1/2") arbor as those sold by MicroMark. Both his and MicroMark's need an adapter for the Proxxon which has a 10mm arbor. Jim doesn't make the adapter, and the only place I could find an adapter from 1/2" to the Proxxon's 10mm was MicroMark. So the choice is to get everything from MicroMark to reduce postage and Royal Mail costs, or to buy the adapter from MicroMark (cost = $6 + $18 postage + VAT + £8 Royal Mail Handling fee) and the blades from Jim. Either way it's expensive. As to the fence, so far all I have been able to do is to ensure the fence is square to the blade when clamped (fairly easy to do by loosening the nut at the base of the fence that links it to its tail piece) and to press down on the fence very firmly against the table (horizontally and vertically) when tightening the fence to the adjustment screw which should already be clamped. [Edit] Just an addendum about clamping the fence. Before locking the adjustment screw to the table, because that too has some play, it is important to hold the fence firmly against the table as well and then to lock the adjustment screw. After that you can ensure the fence is square to the table by holding it firmly and then locking it. I am sure someone like Mark Taylor who knows this saw far better than I do will make some more learned comment! Ideally we could develop some kind of Accuriser fence replacement, but that only works on the Proxxon FSE saw and I haven't seen anything on the market that does the same. Part of the problem is the fact that the back end of the table on the FET saw has no ledge on which to hold a fence firmly. I think one could be made from aluminium and glued to the back. If that were done it might be worth looking at the exact dimensions of the Accuriser to see if it would fit the length of the FET (or ensure at least that the new length of the table would be the same as for the FSE). I hope that makes sense! Tony -
Microlux Tilt Arbor Saw Problems
tkay11 replied to capnharv2's topic in Modeling tools and Workshop Equipment
I've been through the same process as you, Antony. The arbor hole size with Jim's saw blades is the same as that of those sold by MicroMark, but he doesn't sell an adapter (I had emailed him and asked). Clearly his blades are better. I trawled through various European sites to find an adapter but the only one I could find was that supplied by MicroMark. So I bought two of the blades and the adapter from MicroMark. Be prepared to spend £14.93 to the Royal Mail for handling and duty, $6 dollars or so for the adapter, and $22 dollars or so per blade and $18 for shipping. That's pretty expensive all in all. The adapter itself could easily be made on a lathe, if you have one. I don't, unfortunately. I like my FET saw. The only thing is trying to make a better way of clamping the fence. Tony -
A very nice tiller, Gregor. Hmm. I think I might re-make mine following your example. You also have a very nice finish to the wood. [Edit] oh, and I just saw the last picture. Someone told me in MSW 1.0 that the rudder pendants may not have been used for this type of cutter when I asked the same question after reading Zu Mondfeld. I can't remember the details, but I didn't go ahead with trying to make them. Tony
-
Microlux Tilt Arbor Saw Problems
tkay11 replied to capnharv2's topic in Modeling tools and Workshop Equipment
That's very helpful, Michael. I hadn't thought of model engineering groups. I'll look into that this weekend. Thanks a lot! Tony -
Microlux Tilt Arbor Saw Problems
tkay11 replied to capnharv2's topic in Modeling tools and Workshop Equipment
That's a wonderful demonstration as well of the uses of a lathe, Michael (in addition, that is, to your very useful experimentation). I do so wish I'd had some training on machine tools. There used to be lots of adult education classes in the UK that taught those skills, but I can't seem to find any at the moment. It's a pity because I am sure there are lots of us who come to modeling and see the wonderful possibilities with machine tools, yet either have to jump in and buy, say, a lathe or a mill, and struggle to pick up the skills and the knowledge of what extras to buy and how to work with them, or just stand at the sidelines and watch with a certain amount of jealousy. I bought a couple of books on lathe and mill use but what is needed really is the hand on experience an apprentice or engineer would have. I know this is a bit off topic, but do you (or anyone) have suggestions of the best way for novices to learn -- other than trial and the multiplicity of errors? Tony -
Thanks, ZyXuz, I hadn't noticed the archive section. Excellent work! And if you were able to look closely enough at my face, you'd see I'm winking. But the resolution of the image doesn't seem good enough for that. Tony
- 269 replies
-
- 1
-
-
- Caldercraft
- First build
- (and 3 more)
-
Thanks for reminding us, Hubert. That's exactly what I've been practising over the last couple of weeks. It's taking time, though, to achieve consistency so that the blocks all look the same size and shape. And I still can't get the grooves for the strops right. But it's certainly been worth the effort and I feel confident I'll get there in the end! I still might experiment with making a drum as a tumbler to put on my drill as others have done. Many thanks for your excellent site, which continues to give me inspiration on how to do things without expensive machinery. I love it! Tony