AntonyUK
-
Posts
1,190 -
Joined
-
Last visited
Content Type
Profiles
Forums
Gallery
Events
Everything posted by AntonyUK
-
Hi A not so easy one. Ive had the pleasure of sailing on this ship. One clue per day. Regards Antony.

-
Hi Danny. Yea easy one. Over to you. MARK Regards Antony.
-
Hi. Second one that I have got. An intresting bit of kit Regards Antony.

-

Starting Solidworks
AntonyUK replied to AntonyUK's topic in CAD and 3D Modelling/Drafting Plans with Software
Hello Terry and Nick. Thanks I might take you up on that offer if I get stuck. Doing alright at the moment and just tracing the frames into Solidworks. Again thanks for the offer. Regards Antony. -
Hi Paddy. Looking very nice. I keep looking at the colour of your frames and I think I will be changing to the same timber. Gratz on the framing very neat and tidy. Regards Antony.
-
Hi YOGN 82 http://www.ww2pacific.com/conchulk.html Regards Antony.
-
Hi Is it USS YO-144 Or in the same class USS YO-145 Regards Antony.
-
Starting Solidworks
AntonyUK replied to AntonyUK's topic in CAD and 3D Modelling/Drafting Plans with Software
Hi. After 1 and a half hours i produced the keel. Its my First ever CAD item. Thats it for tonight Regards Antony
-
Starting Solidworks
AntonyUK replied to AntonyUK's topic in CAD and 3D Modelling/Drafting Plans with Software
Hi Joe or is it Wacko ? I am following a Utube vid "Canoe hull loft in Solidworks". By Behnt. This looks like the best bet for me. I have the Longridge and the McKay books on the Victory. So it's going to be a long hall. But self satisfaction is the key to enjoyment while learning. I will report any major steps here as I go along. Thanks Antony -
Starting Solidworks
AntonyUK replied to AntonyUK's topic in CAD and 3D Modelling/Drafting Plans with Software
Hi Wacko. Thanks for the pictures. They look brill. I had the software some years ago. A friend went to collage and bought the software and quit collage and engineering design. So I ended up with the software How did you get the curves for the frames ? Inport a scan or draw freehand ? Regards Antony. -
Hi. I am just getting into CAD modeling and I have Solidworks ver 2005. I am learning the very basics at the moment. Not easy at when your over 60. The purpose of learning this is I want to do a very detailed cross section of the Victory. My question is... Is there anyone else out there using Solidworks ?? I have found a few very good Utube starter videos. Any advice apart from telling me to change software is welcome (as I already own Solidworks the cost will kill the project). Many thanks Antony.
-
Hello Paddy. Very nice framing and your timber looks the part. Well done on reaching this milestone Regards Antony.
-
Hi Richard. You have made a good start. And yes it's always a good idea to test things with some scrap first.. Regards Antony.
-
Hi. I concur with the others. Looks brill. Well done. Regards Antony.
-
Door hinges
AntonyUK replied to src's topic in Discussion for a Ship's Deck Furniture, Guns, boats and other Fittings
Hi. Not quite on the same subject but. I have found a source if some very small working hinges. http://www.jacksonsminiatures.com/12_009.html Under the label of Mini hindge. Don't want to hijack this thread but some one might find a use for them. Regards Antony. -
Hello Karl. I have just finished reading through the entire log. It has taken me some 3.5 hours and at every photo I am amazed at the skills and quality of this build. You always add that little bit more detail and enhance the already perfect build. Please keep the photos and build posted as I am following this build. Regards Antony.
- 662 replies
-
- 1
-

-
- bonhomme richard
- frigate
- (and 1 more)
-
Hi. I am now the very pleased owner of the Byrnes saw. I have been working through the link provided below ( and a very usefull like too). http://modelshipworld.com/index.php?/topic/2593-cutting-scale-timber/ I am an engineer by trade that has worked to dead size tolerances and when I look at its build I can tell that Jim is also a engineer. Every part of this saw is made to exacting standards and quality is outstanding. No wonder you people over the puddle send so many rockets into space with this standard of machining and quality. I have to say this is one quite machine and I could use it in the lounge while skipper is watching TV. So far I have produced timber that far exceeds the timber I have purchased. Tolerances and finish are wonderful. If any one has any questions ..Please ask. Would I recommend this saw ... YES. Regards Antony.
-
Hi Rusty. Nice work on the brackets. I love the colours you have used on this cross section And the quality of your work is outstanding. Regards Antony.
-
Hi. Found another source of timber and other modeling materials. http://www.workshopheaven.com/tools/wood.html Based in the UK they hold some very nice timber at a good price. Regards Antony.
-
Hello Juan. Congratulations on a very nicely constructed cross section. One of the best I have seen. You should be very pleased with your skill's and workmanship. I can only say that I am looking forward to your next build regards Antony.
-
Hi. Yes there are a few things that flash led's on the market. The only difference is that thease LED's flicker as a real candle do. I can build in a simple switch to adjust the timing and the brightness that's activated by draft. Regards Antony.
-
Hello Juan. I am very impressed with your build. The quality of your rigging is excellent to say the least. Tha whole model is finished to a very high standard. Well done. You should be very pleased with the finished product. Regards Antony.
-
Hi. And The circuit just to clarify. Regards Antony.

-
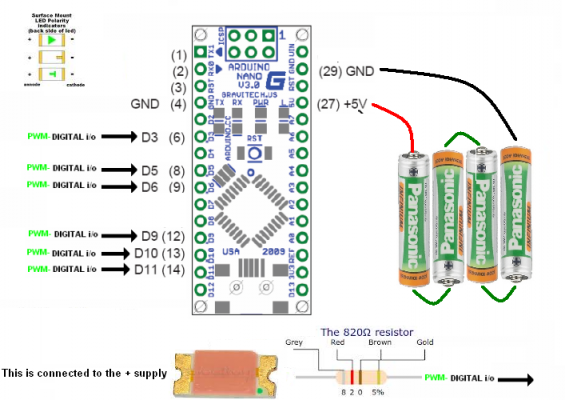
Hi. Having seen a few people on this site put LED's into there models I thought it would be nice to have a flickering candle lamp for the period ship. Its cost is low and the effect is real. The brightness and the duration of the flickering are randon on each candle. I found this on the Arduino page and its is freeware IE no lisence to use. I used surface mount LED's as they are very small and easy to put into almost any scale of model. Step by Step instructions below. Equipment needed :- 1 Arduino nano chip. Source Ebay 261232492487 Very thin wire (Copper will hold its shape after bending). Insulated or un insulated will do. 6 SMT 1206 White LED’s . Source Ebay 121077374673 or you could use 3mm LED’s (much bigger). 6 Resisters 820 Ohms. Grey, Red, Brown. 1 Battery holder for 4 AAA batteries. 4 Batteries AAA Rechargeable. 1 Simple On/Off switch. 1 orange shopping bag. For the colour. Computer with USB. Total cost £18 Step 1 Download the Arduino software from :- http://www.arduino.cc/ Second Tab click the Download. A little way down the page click on Windows Installer and it will install the Environment. Now click the Getting started to the Right of the Windows Installer. Agree with the download (varies with Windows version) and click to install. It will ask if you want to install the drivers Yes install. Next click the Chip you are using ”Arduino Nano”. There are two types check the type you have. Run the Arduino software and use the information on selecting the Arduino Nano. A small box area will appear. Copy and paste the Code below into the white area. Next plug in the Arduino Nano into the USB and the computer will find the Arduino Nano. Now under File in the Arduino Environment select File in the Top left corner move down to Upload and click. The Arduino should flicker when uploading. And the Arduino Environment will display any messages relating to the uploading. You may need to change the COM port to get a successful upload. That’s the programming Done. Step 2. The Arduino Nano Chip Has no Headers soldered in place. This makes it easy for us to connect the LED and Power. Refer to picture. Connect the + on the battery box to the Switch Connect the + from the switch to Pin No 27 Connect the Ground from the battery Box to Pin No 29 Now solder a resister into Pin’s numbers. 6.8.9.12.13. and 14. Next you solder the SMT LED’s to the Wire. You can test each one as you complete the soldering by connecting the Anode to the 5 volt power supply. And the cathode to the Unconnected en of a resister. With the battery on the connected LED should flicker. Repeat the same for all 6 LED’s. Next we tear off strips of the Orange bag and wrap it around the LED. Do not buy Orange LED as the effect is not the same. Mount the LED inside lanterns around the ship. Careful planning will hide all the wires. The Anode of each resister can be connected to the same wire. Common Power. The LED’s and wire can be built into the model as it’s rare for a Led to fail. The Arduino Nano and the Battery box can be hidden in the base. Code Below this line. ****************************************************** /*http://forum.arduino.cc/index.php/topic,7115.0.html * randomly flickering LEDs */ int ledPin[] = { 3,5, 6, 9, 10, 11}; // pwm pins only int ledState[6]; // last state of each led long randNumber; void setup() { pinMode(ledPin[0], OUTPUT); // Just tells the Arduino that this is a output pinMode(ledPin[1], OUTPUT); pinMode(ledPin[2], OUTPUT); pinMode(ledPin[3], OUTPUT); pinMode(ledPin[4], OUTPUT); pinMode(ledPin[5], OUTPUT); randomSeed(analogRead(0)); // seed the random generator with noise from unused pin ledState[0] = random(20, 201); ledState[1] = random(20, 201); ledState[2] = random(20, 201); ledState[3] = random(20, 201); ledState[4] = random(20, 201); ledState[5] = random(20, 201); } void loop(){ analogWrite(ledPin, ledState); // set the pwm value of that pin determined previously randNumber = random(-70, 71); // generate new random number and add that to the current value-40,41 ledState += randNumber; // that range can be tweaked to change the intensity of the flickering if (ledState > 200) { // clamp the limits of the pwm values so it remains within ledState = 200; // a pleasing range as well as the pwm range } if (ledState < 10) { ledState = 10; } } delay(100); // the delay between changes } Any questions ..PLease ASK. Regards Antony.
-
casting cannon
AntonyUK replied to syartbox's topic in Discussion for a Ship's Deck Furniture, Guns, boats and other Fittings
Hi SY. http://modelshipworld.com/index.php?/topic/540-how-to-add-pictures-in-your-posts-and-pms/ Here is the link on how to add Photos to the Page. Regards Antony.