Trussben
-
Posts
1,995 -
Joined
-
Last visited
Content Type
Profiles
Forums
Gallery
Events
Everything posted by Trussben
-
 Work has restarted on Pegasus, completing the upper planking and treenailing, then I have to machine the upper deck beams. ben
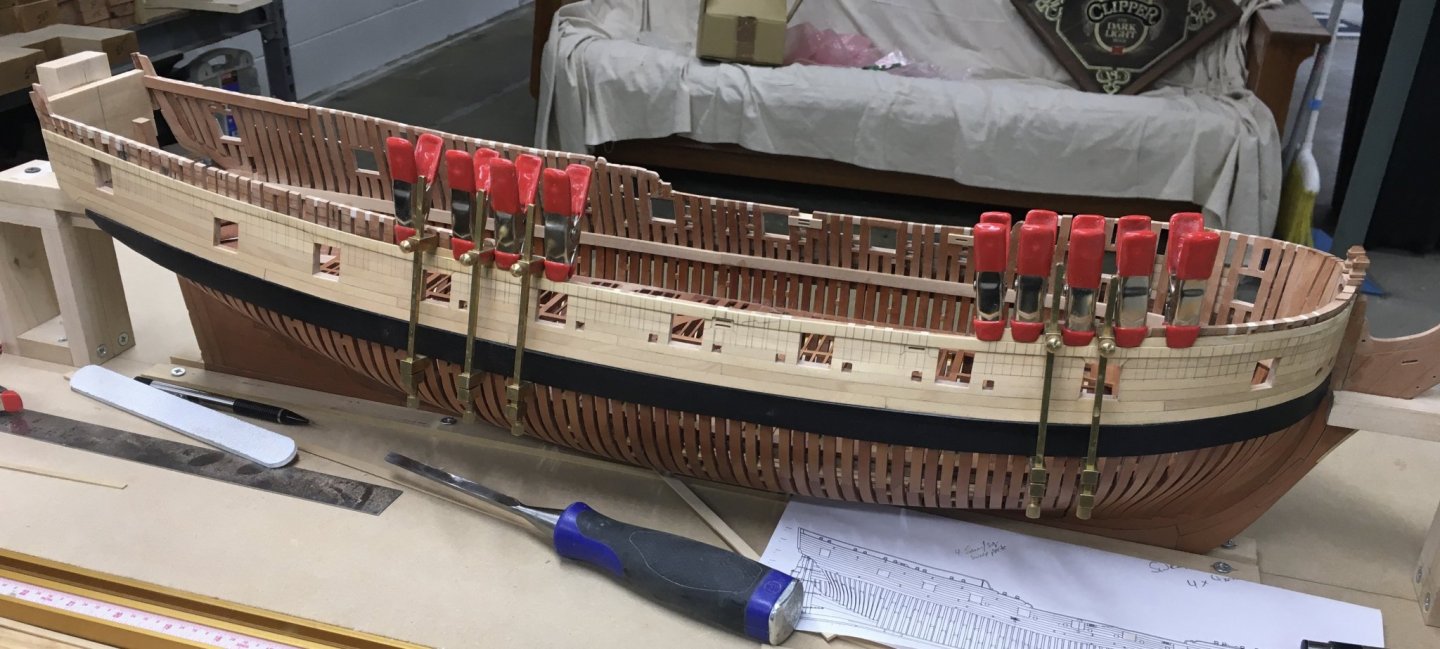
- 889 replies
-
- 26
-

-
Upper planking above the Wales in Boxwood has been completed, now to install the two strakes below the Wales and start machining the ebony I need for the 2nd layer of the Wales. Covid-19 lockdowns do equate to more modeling time. ben

- 399 replies
-
- 25
-
-
- winchelsea
- Syren Ship Model Company
- (and 1 more)
-
I use this online company for all my large printing, they do great work. https://blueprintsprinting.com
-
1st layer of the wales have been installed using AYC. ben

- 399 replies
-
- 20
-
-
- winchelsea
- Syren Ship Model Company
- (and 1 more)
-
I too enjoyed the visit, you will not be sorry with the Byrnes sander purchase. ben
-
She looks good Ron, but it was better seeing her in real life the other day. ben
-
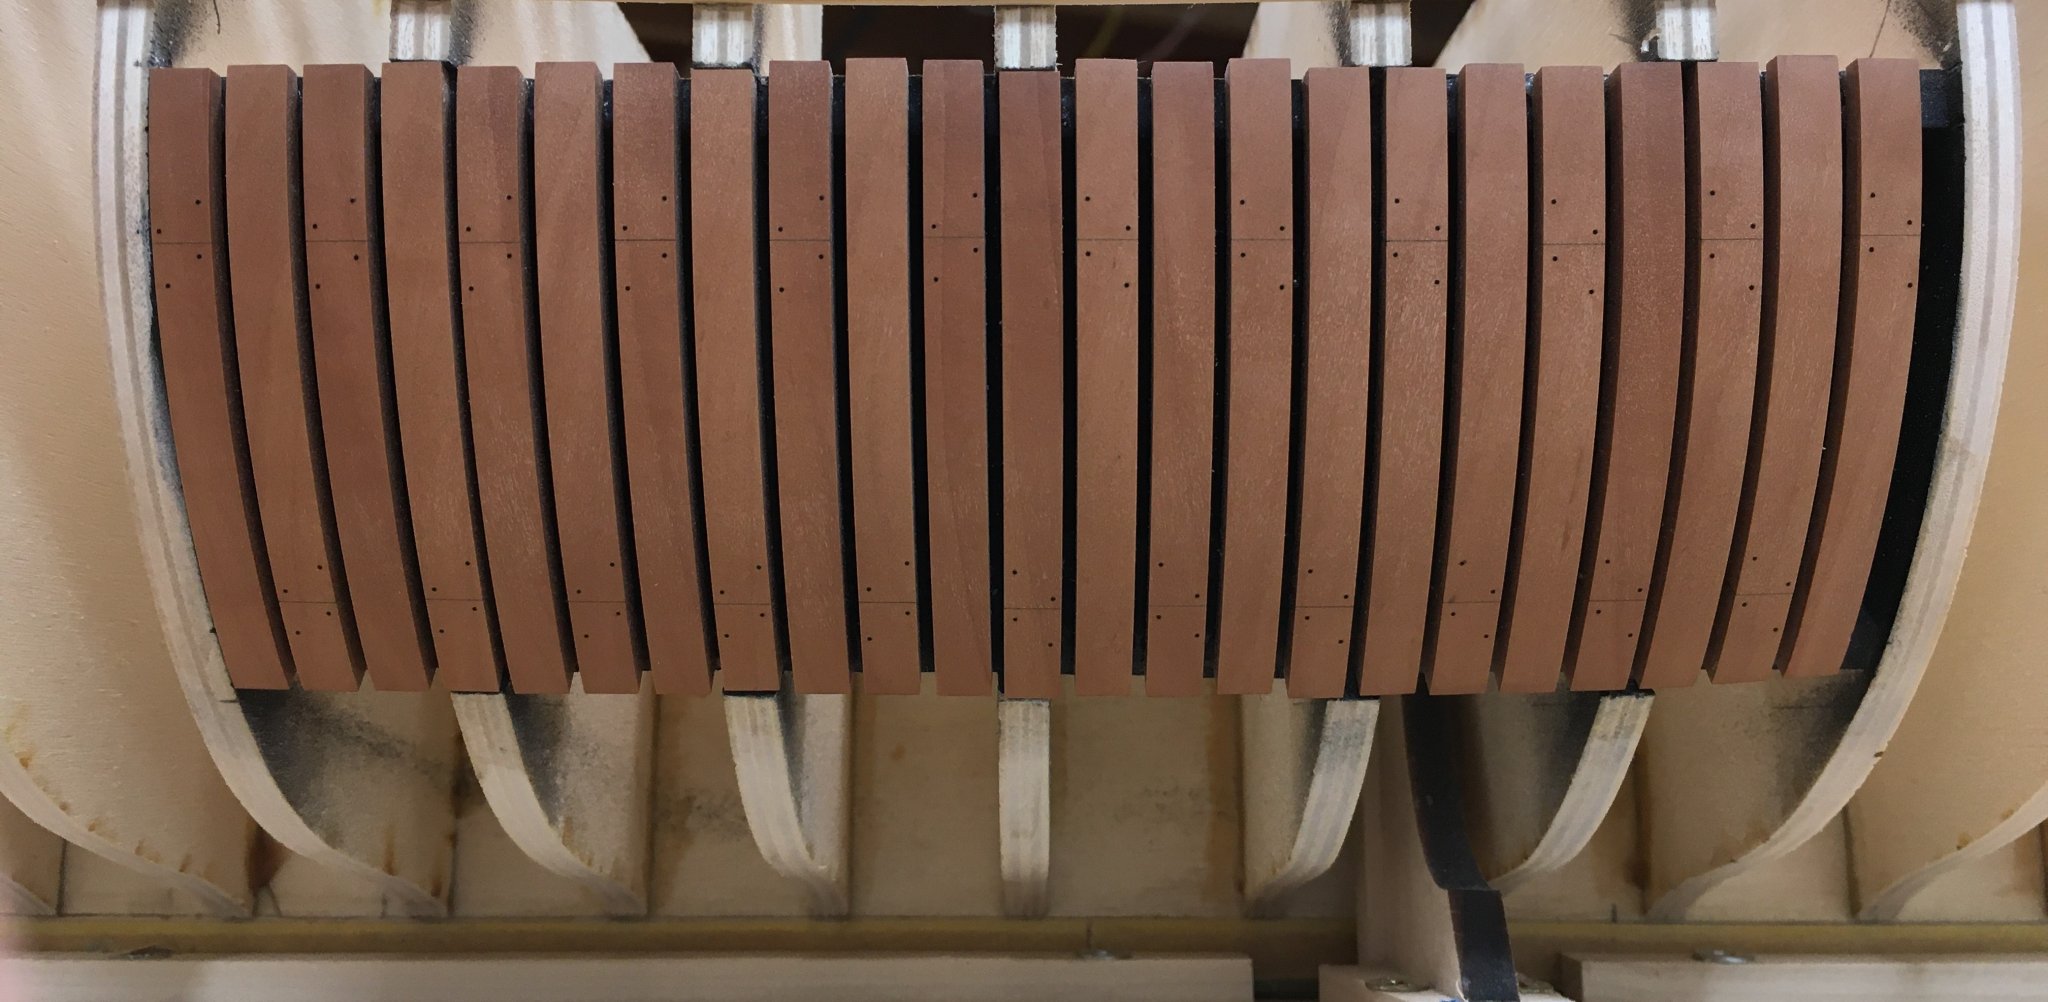
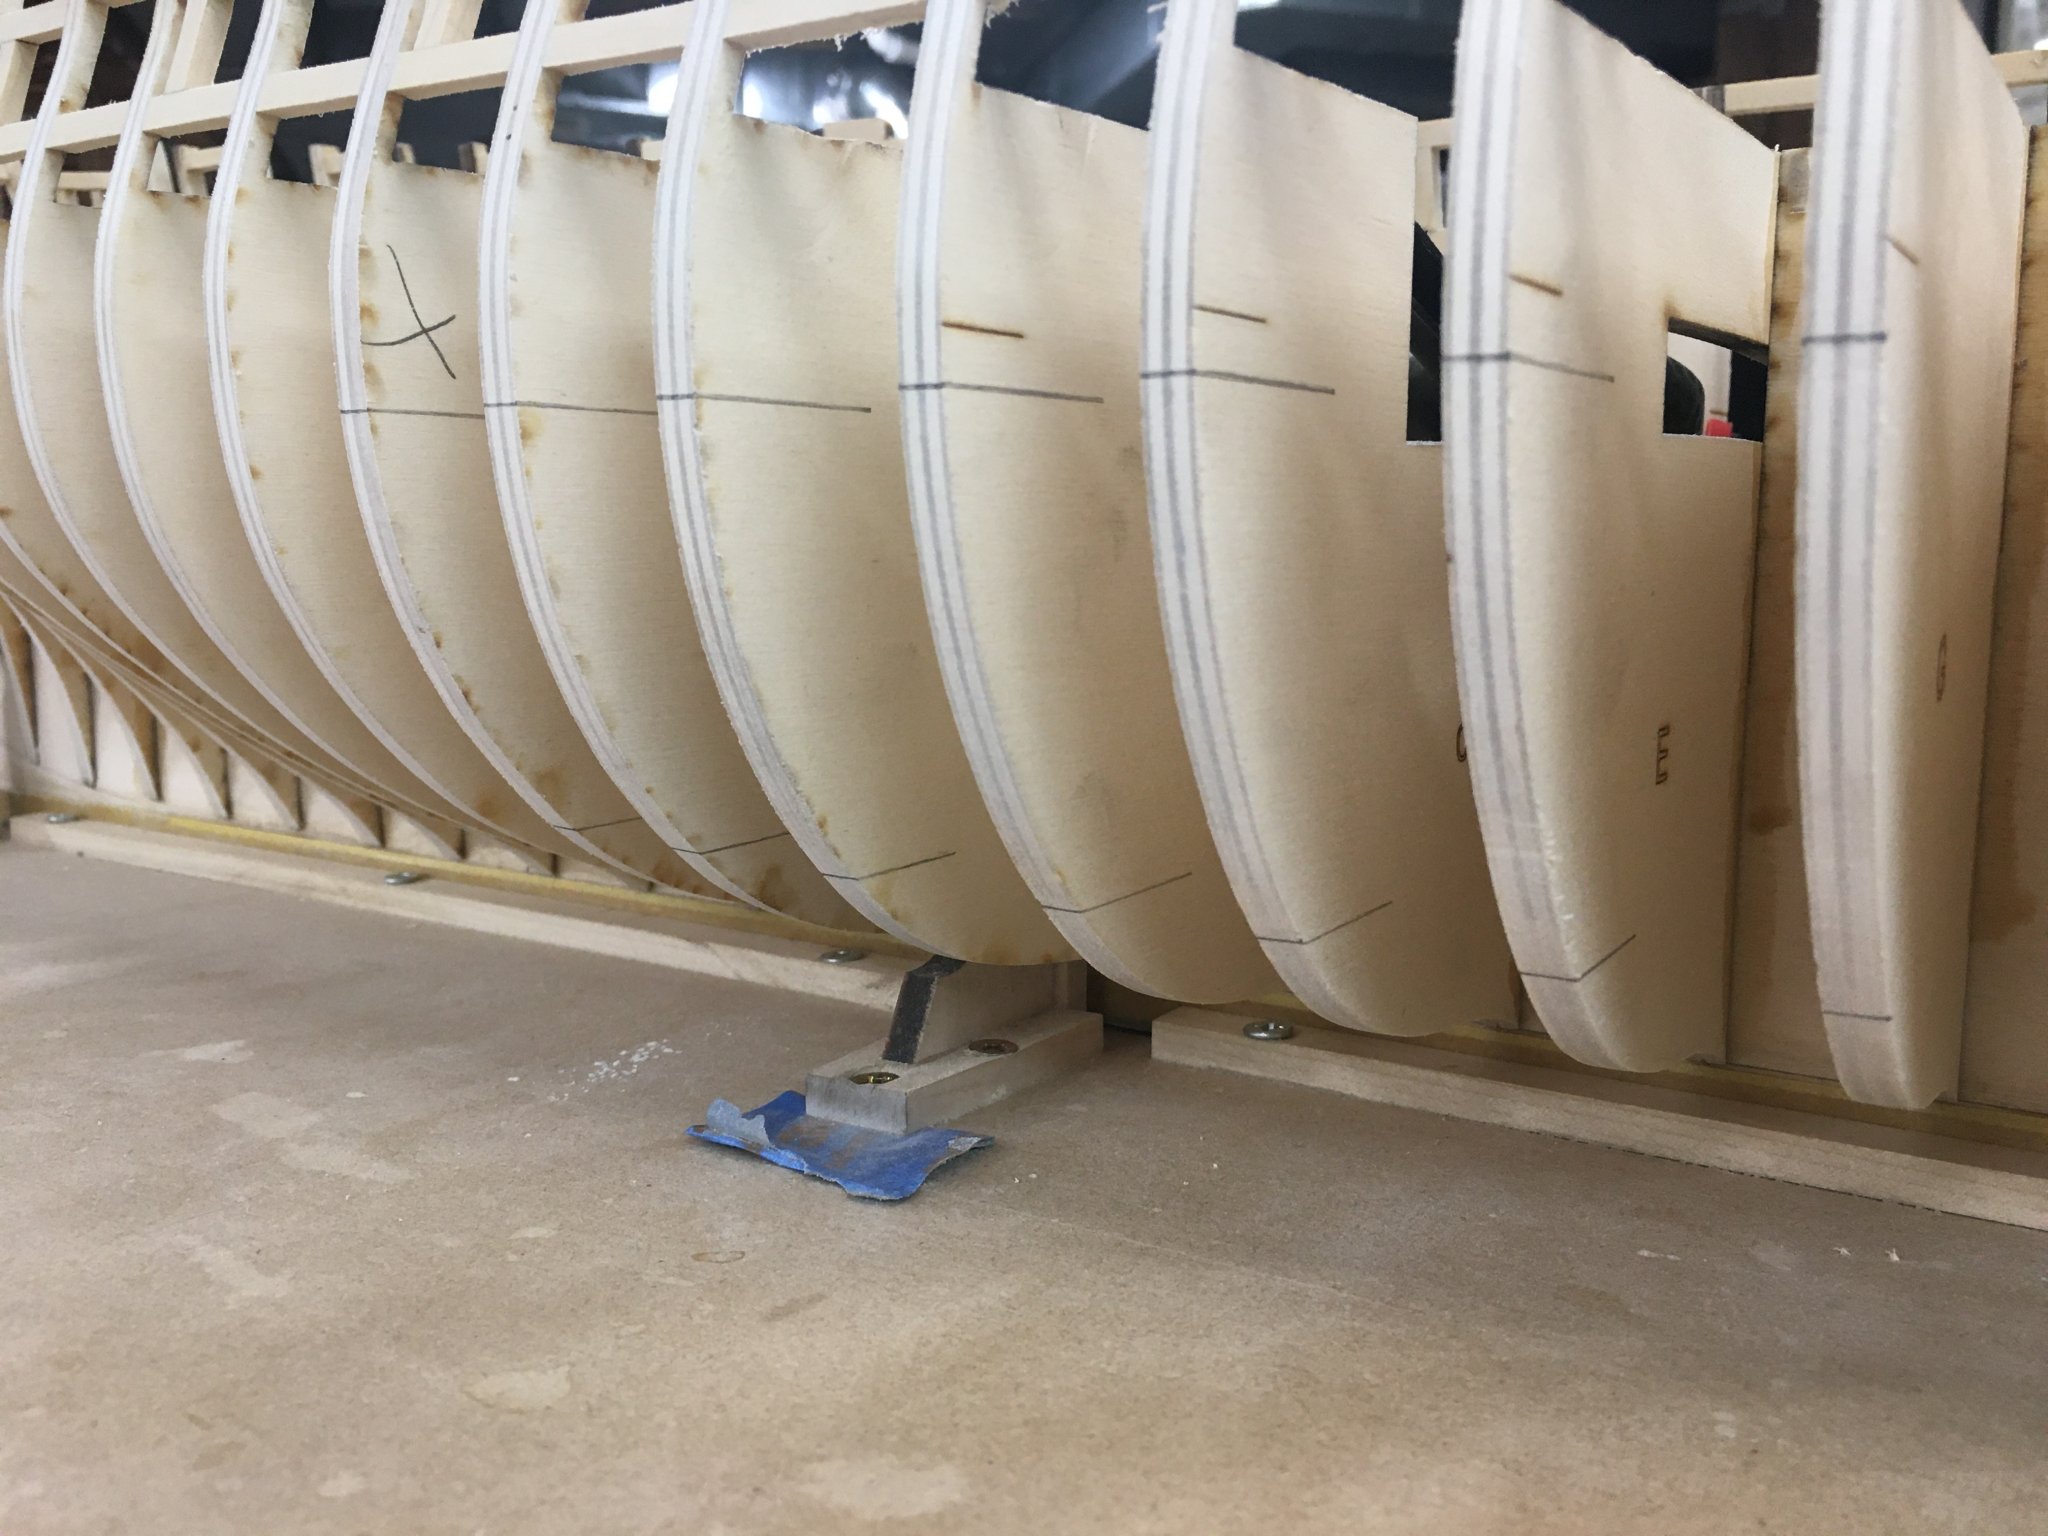
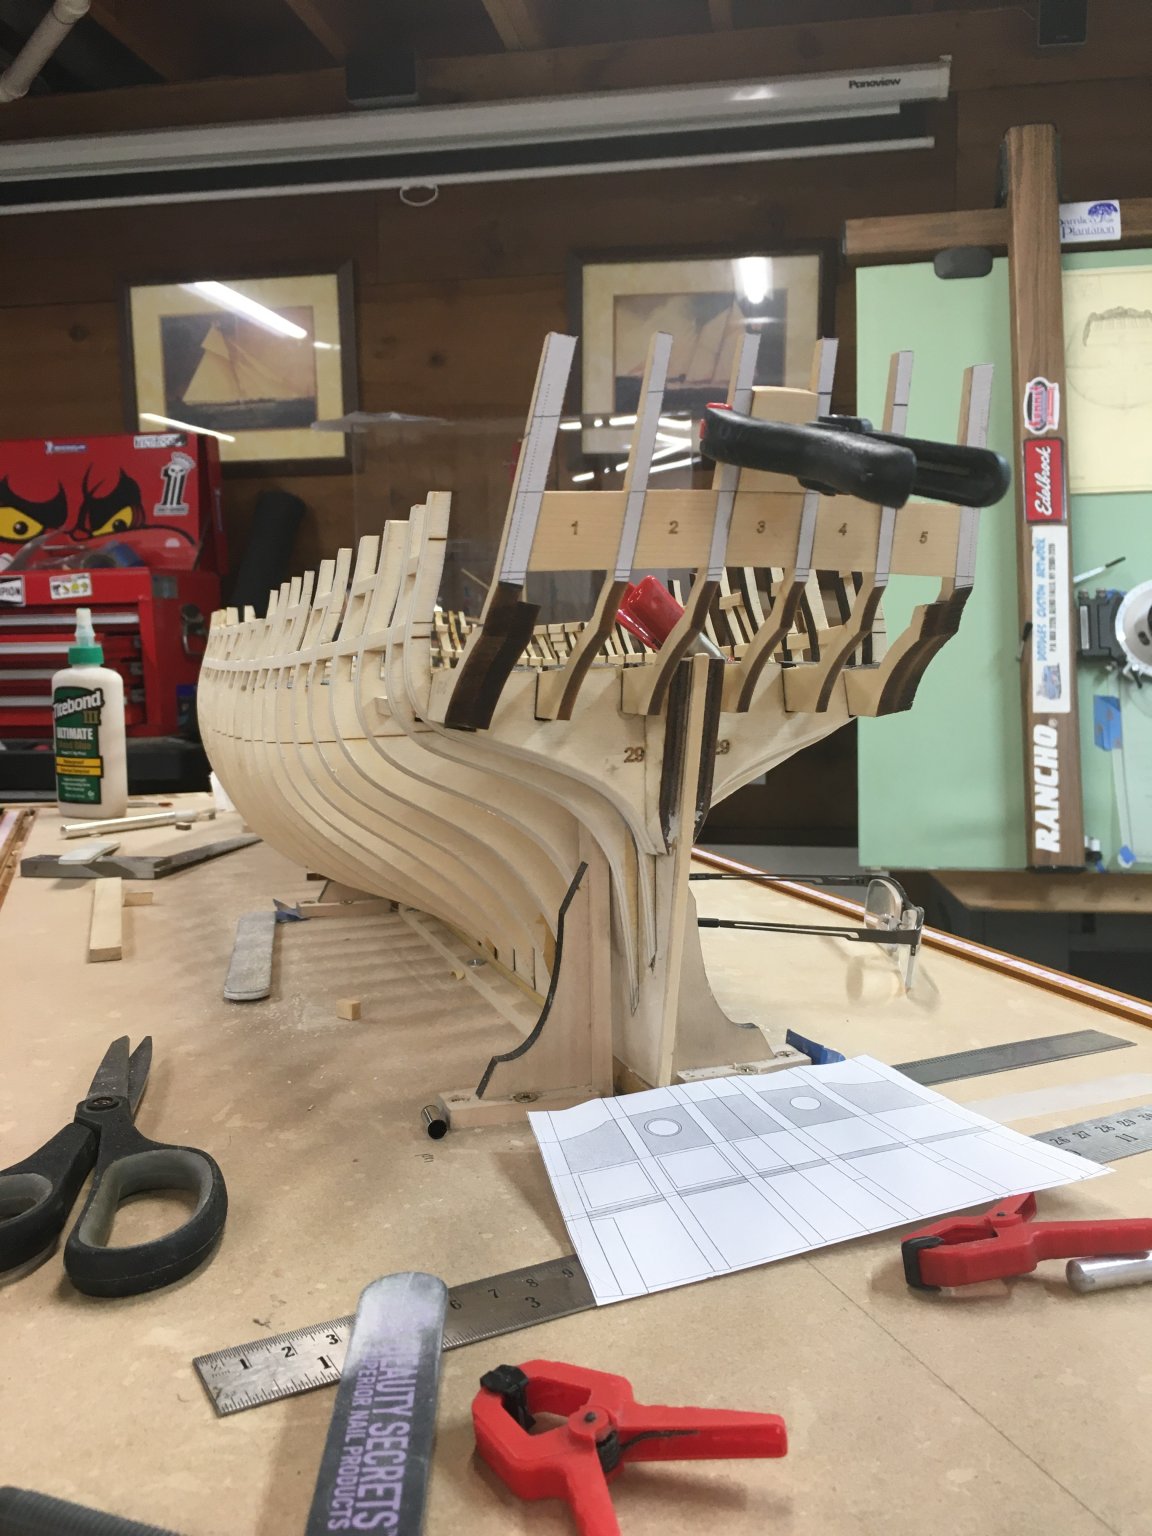
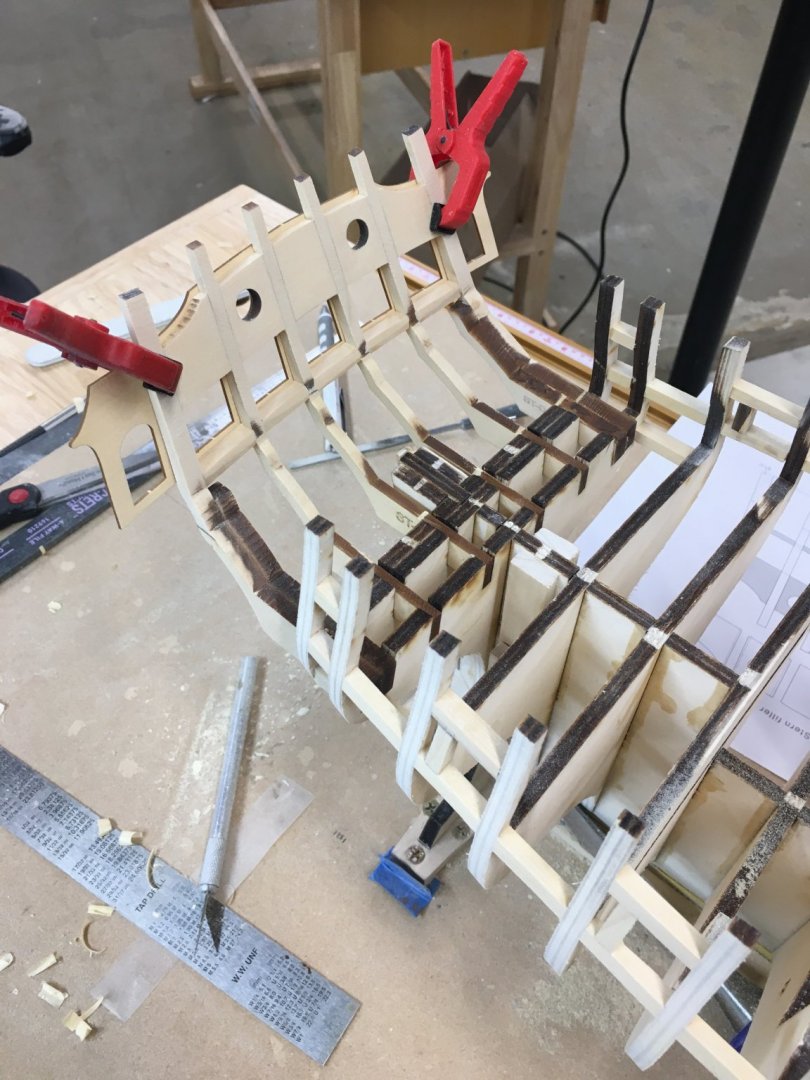
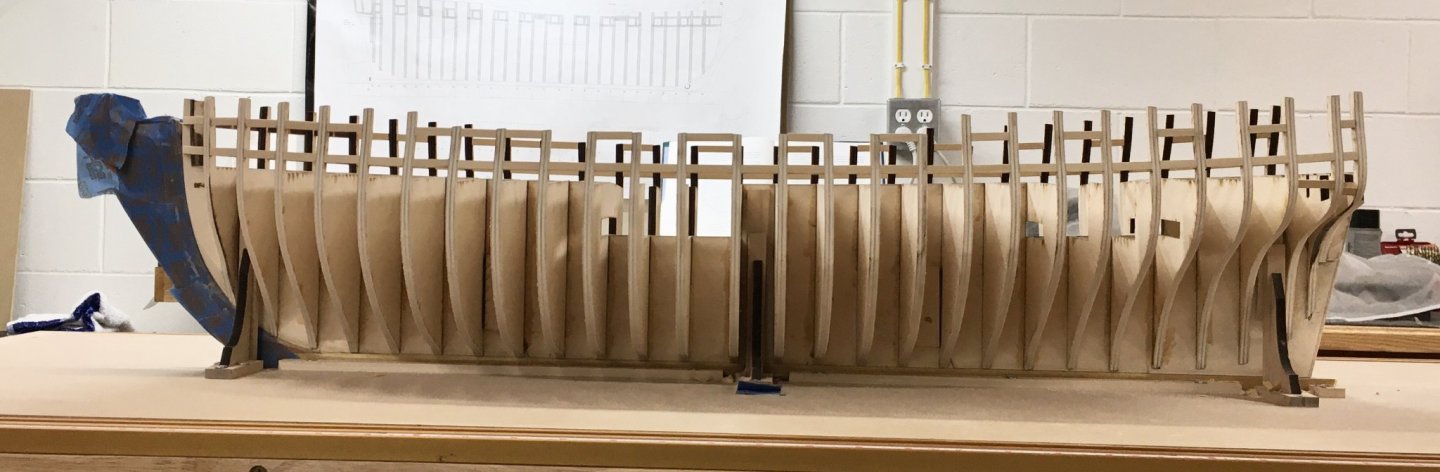
Well here is my port side frame reveal completed, in the end it turned out to be 23 frames that i could fit between the bulkheads. I did the treenails with 20lb black line and reversed the pattern aft of the deadflat frames. I'm so happy with how this came out in the end that I'm considering building one on the starboard side as well but we shall see. ben

- 399 replies
-
- 28
-
-
- winchelsea
- Syren Ship Model Company
- (and 1 more)
-
Thanks Rusty. Fred - it’s really not that complex once you have it planned in your mind what you are trying to achieve. I hope to have the reveal completed this week as I’m installing frames and treenails as we speak. ben
- 399 replies
-
- 3
-
-
- winchelsea
- Syren Ship Model Company
- (and 1 more)
-
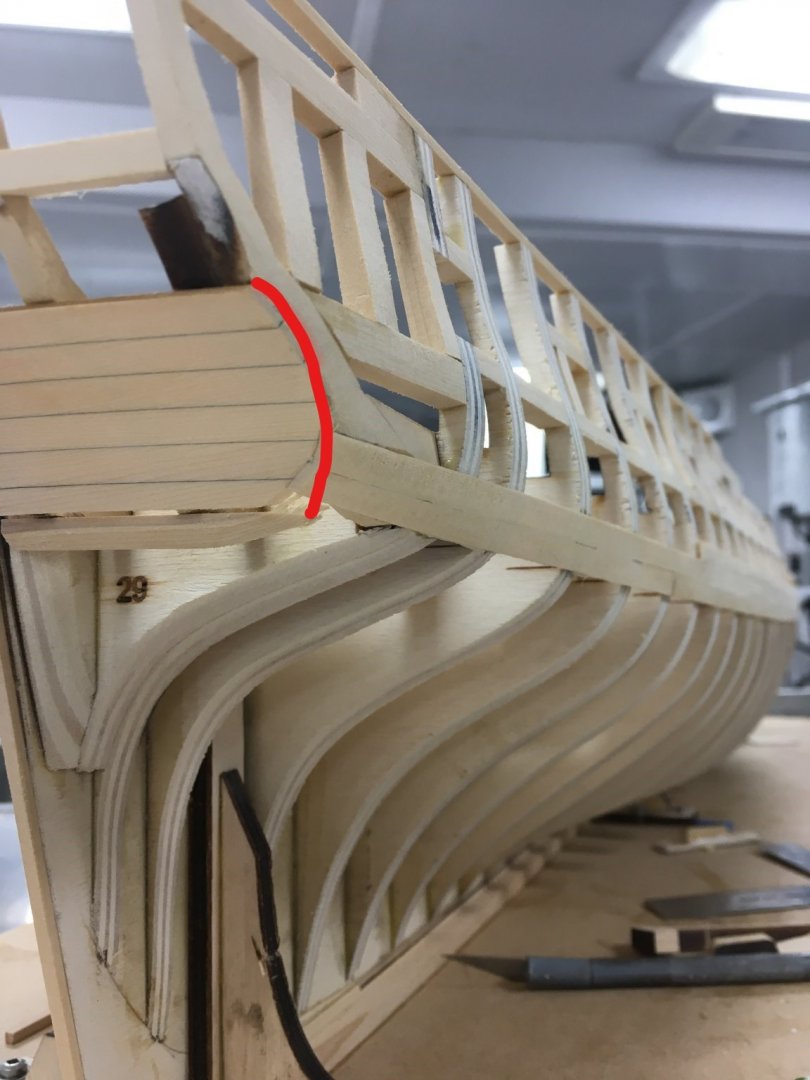
While I’m working on the frame reveal I also decided to plank the counter in boxwood. ben

- 399 replies
-
- 17
-
-
- winchelsea
- Syren Ship Model Company
- (and 1 more)
-
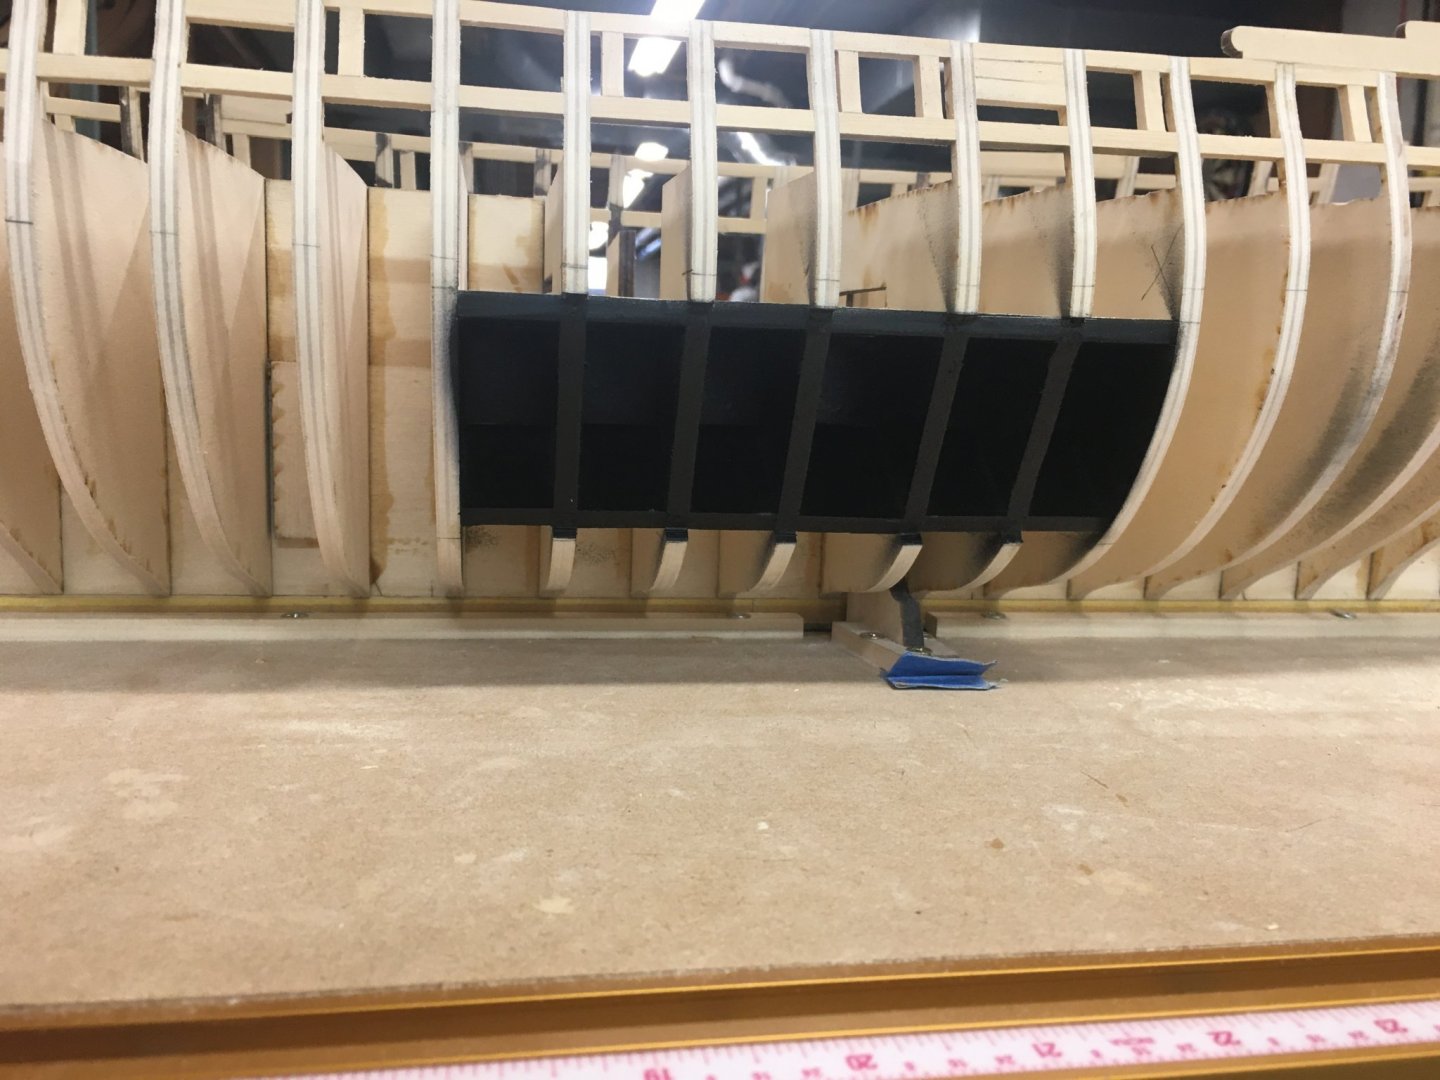
Thanks Chuck/Mike and all the likes. Here is the shadow box installed and spray painted flat black, I’m currently cutting the frames out of Swiss Pear sheet that I milled down to 11” thick, maybe get that done and this completed in the next few weeks. ben

- 399 replies
-
- 20
-
-
- winchelsea
- Syren Ship Model Company
- (and 1 more)
-
If anybody out there is still looking to buy Holly, try these guys in US. https://www.domexhardwoods.com/ ben
-
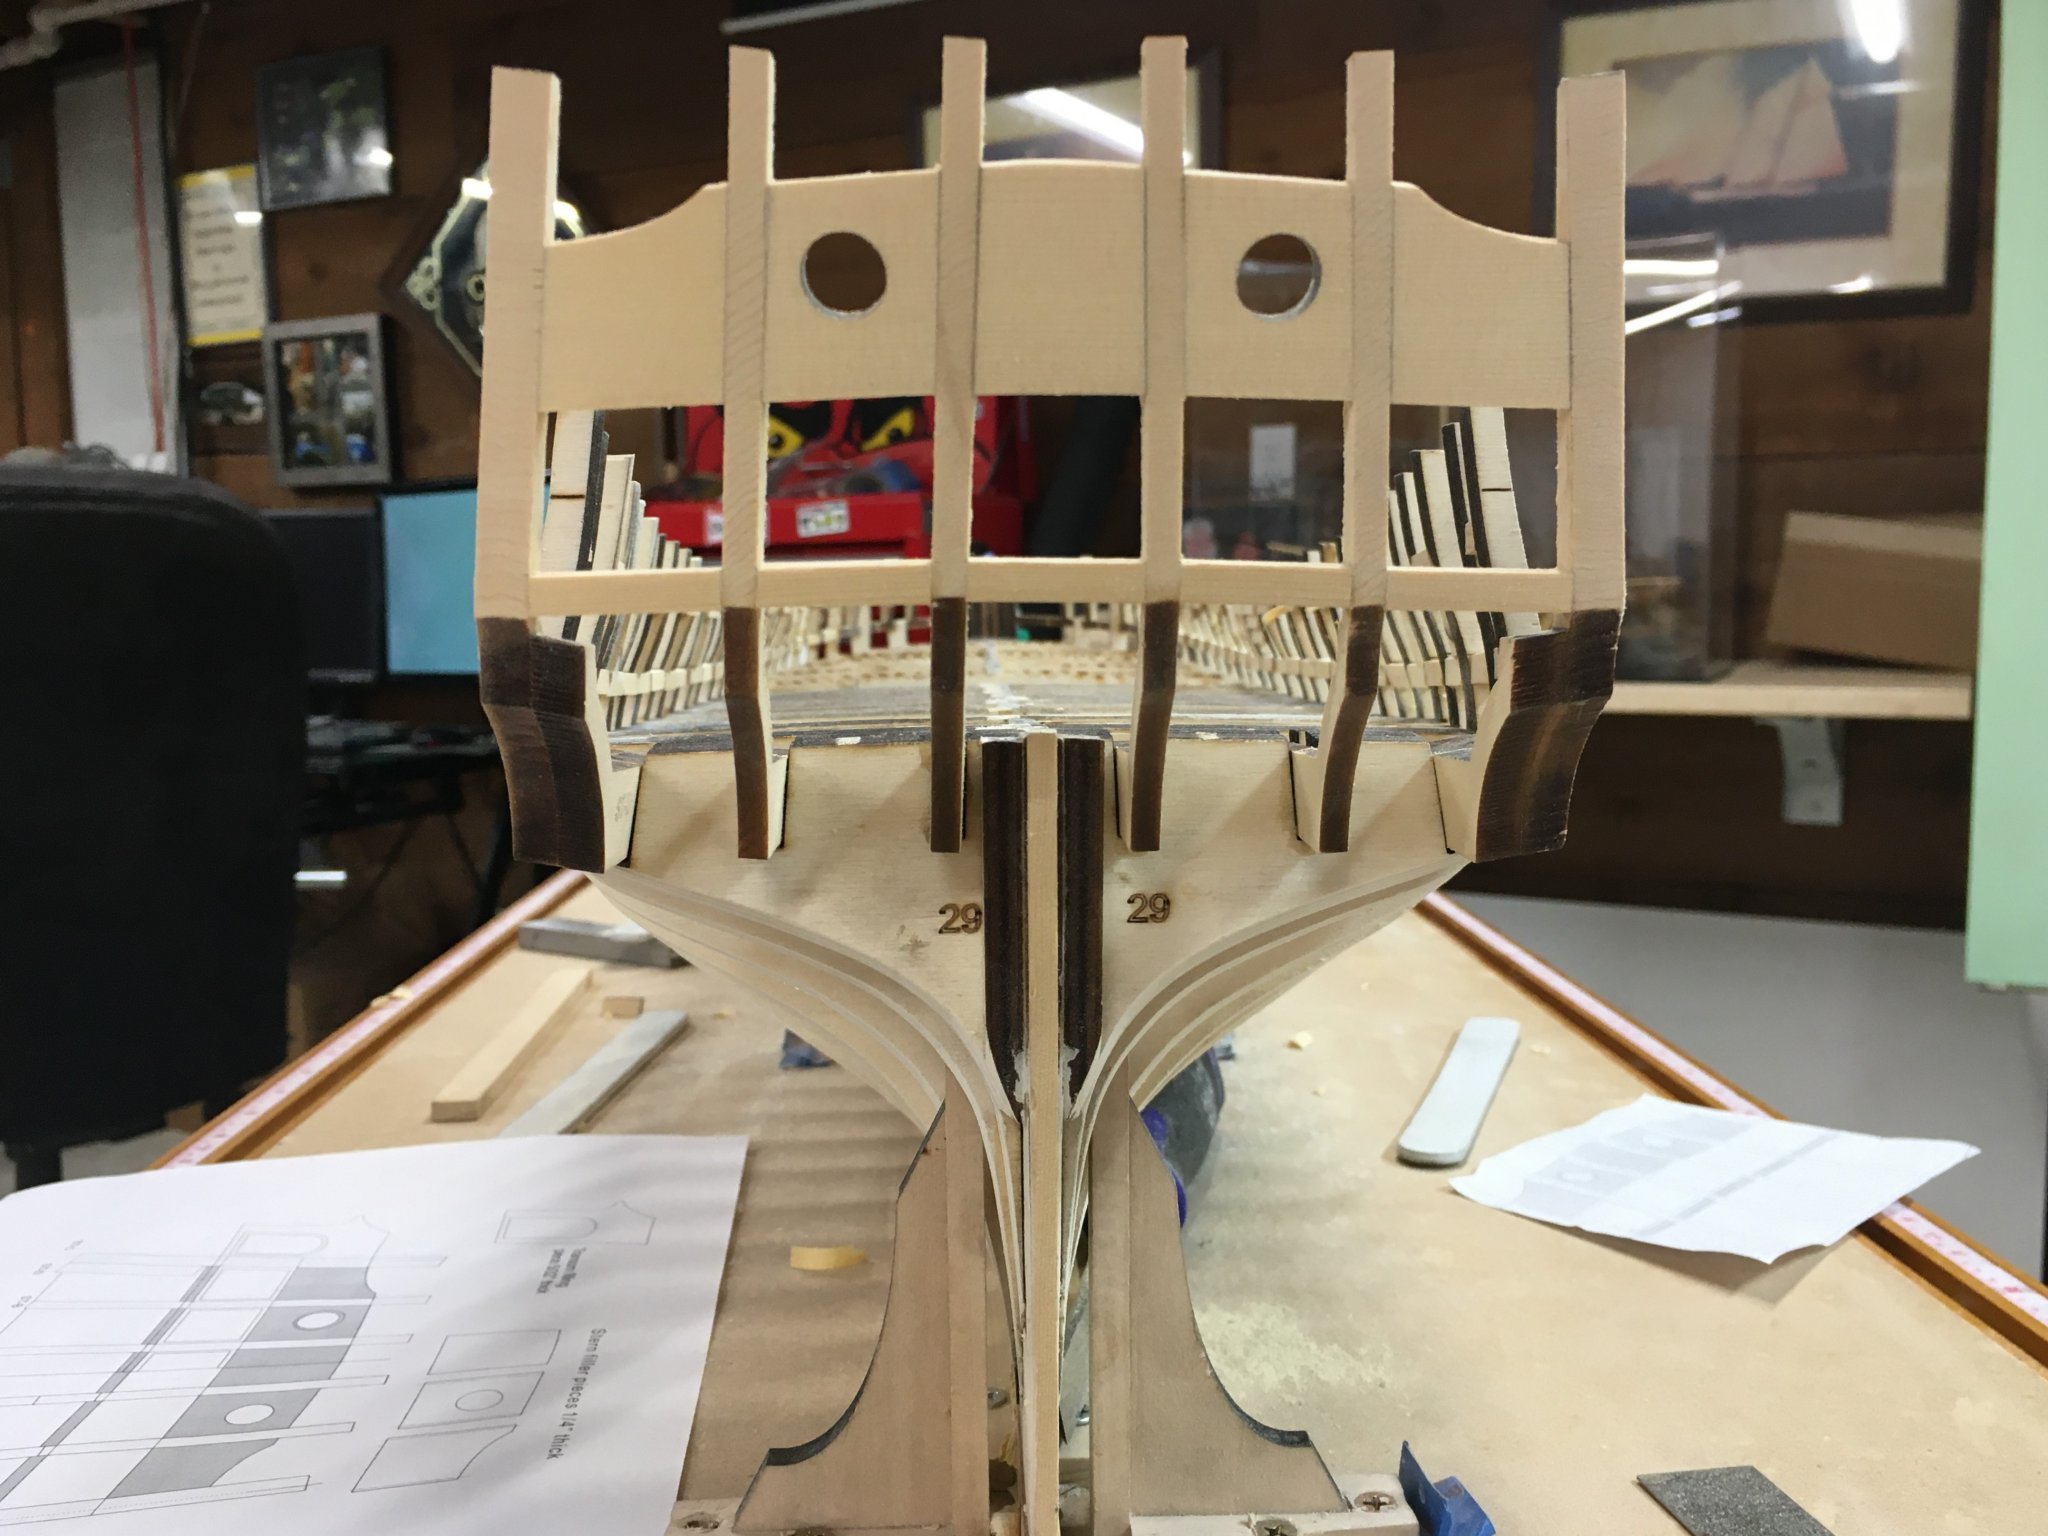
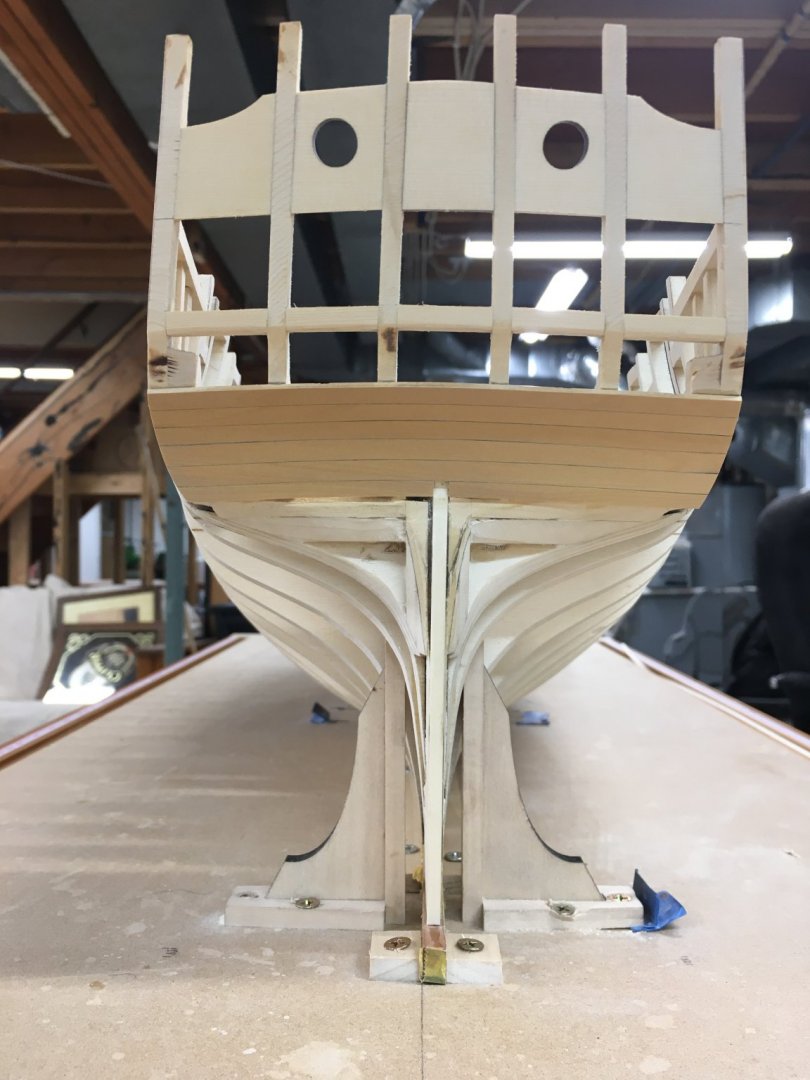
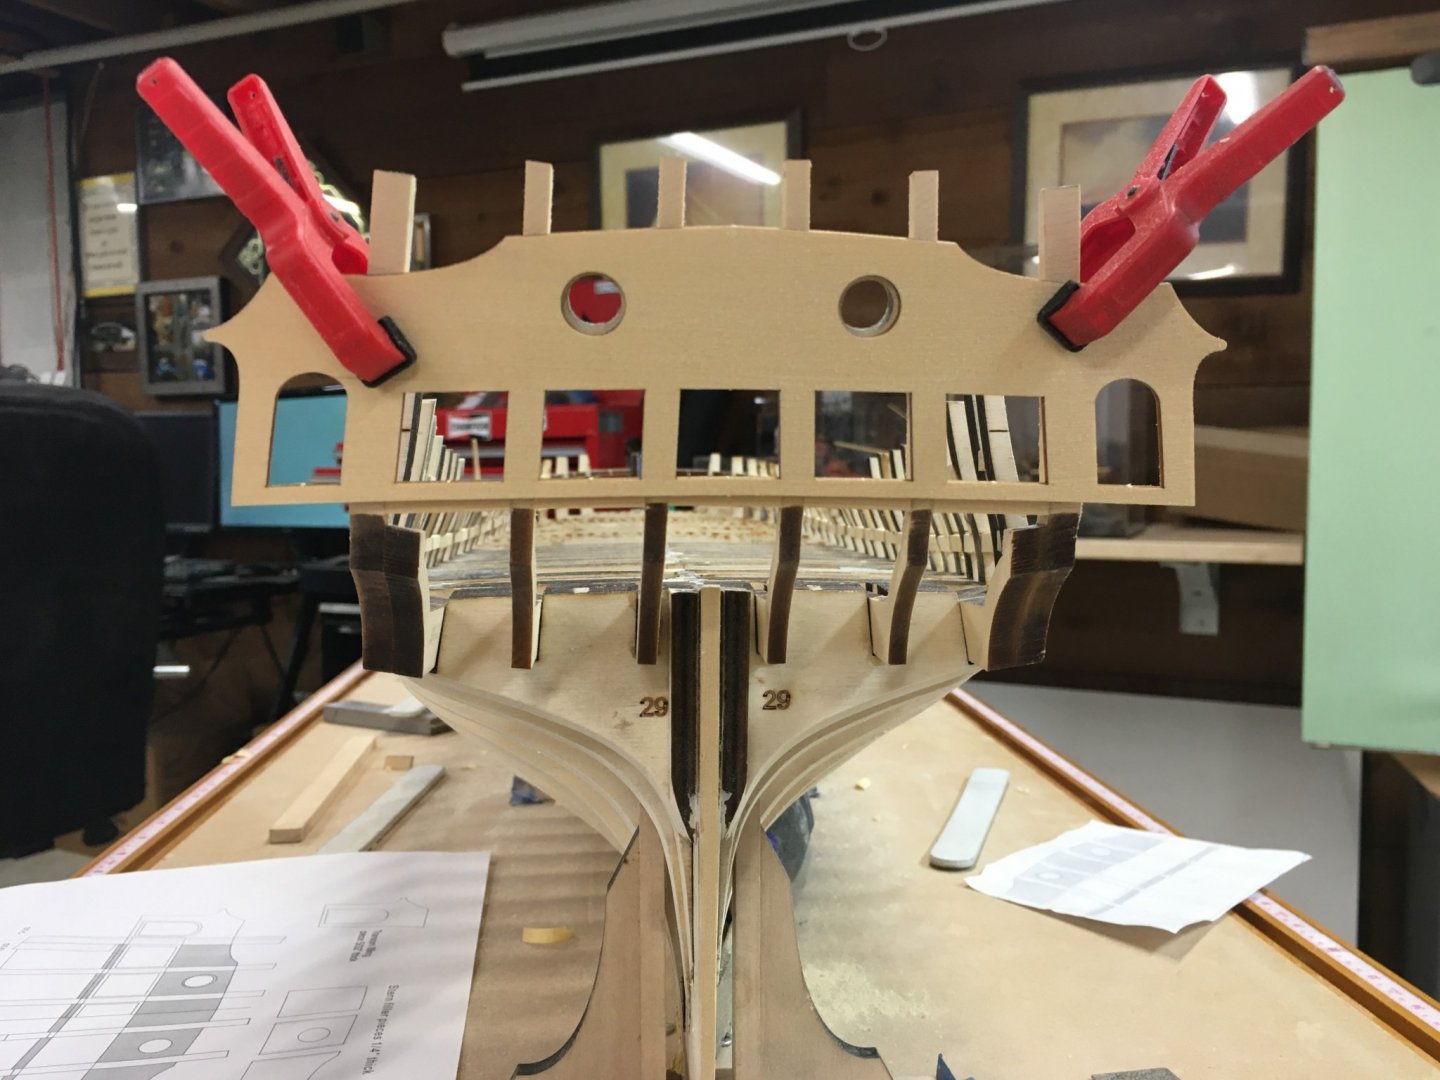
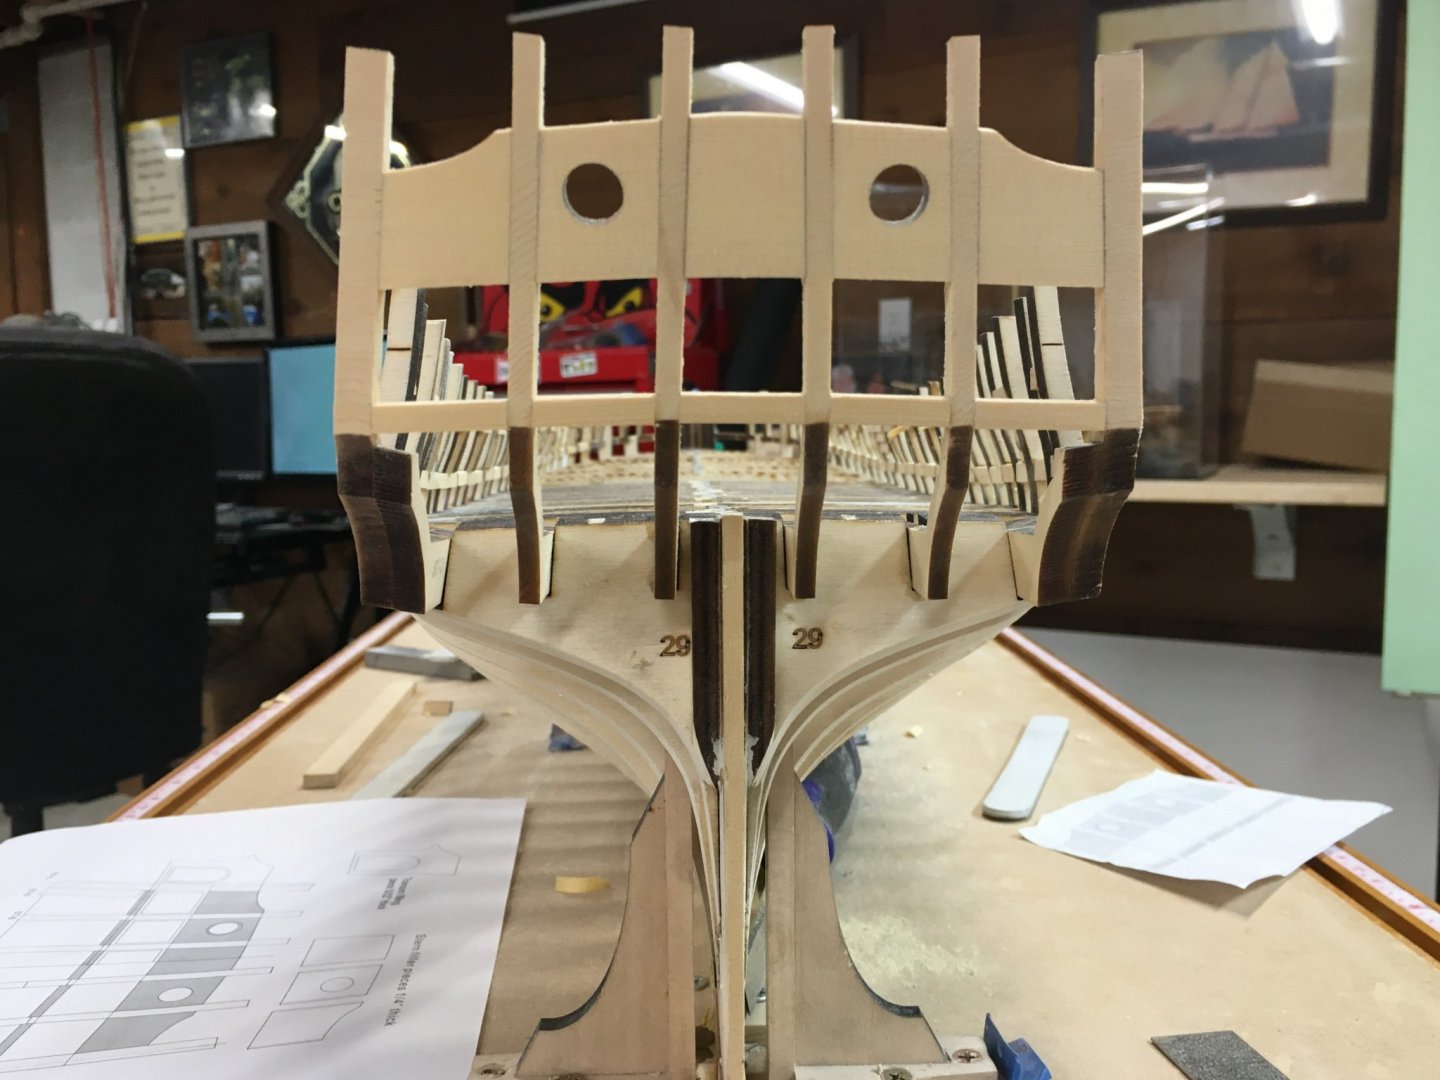
Stern framing completed and transom looks like everything is where it should be, I will now add the QG supports and begin installing the frame reveal shadow box. ben
- 399 replies
-
- 18
-
-
- winchelsea
- Syren Ship Model Company
- (and 1 more)
-
JJ From what I see from that stern view, it appears that you have tapered them too much inwards, look again at the plans from astern to see the correct shape and adjust from there. ben
-
Thanks All, After manipulation of the NMM plans in Autocad I have now also completed the design of the hull framing parts and where their joints will be. I need to make a load of these and construct the shadow box, I’m not going to make actual chocked joints - just simulate them and highlight with black monofilament line treenails. This could take a while. ben

- 399 replies
-
- 14
-
-
- winchelsea
- Syren Ship Model Company
- (and 1 more)
-
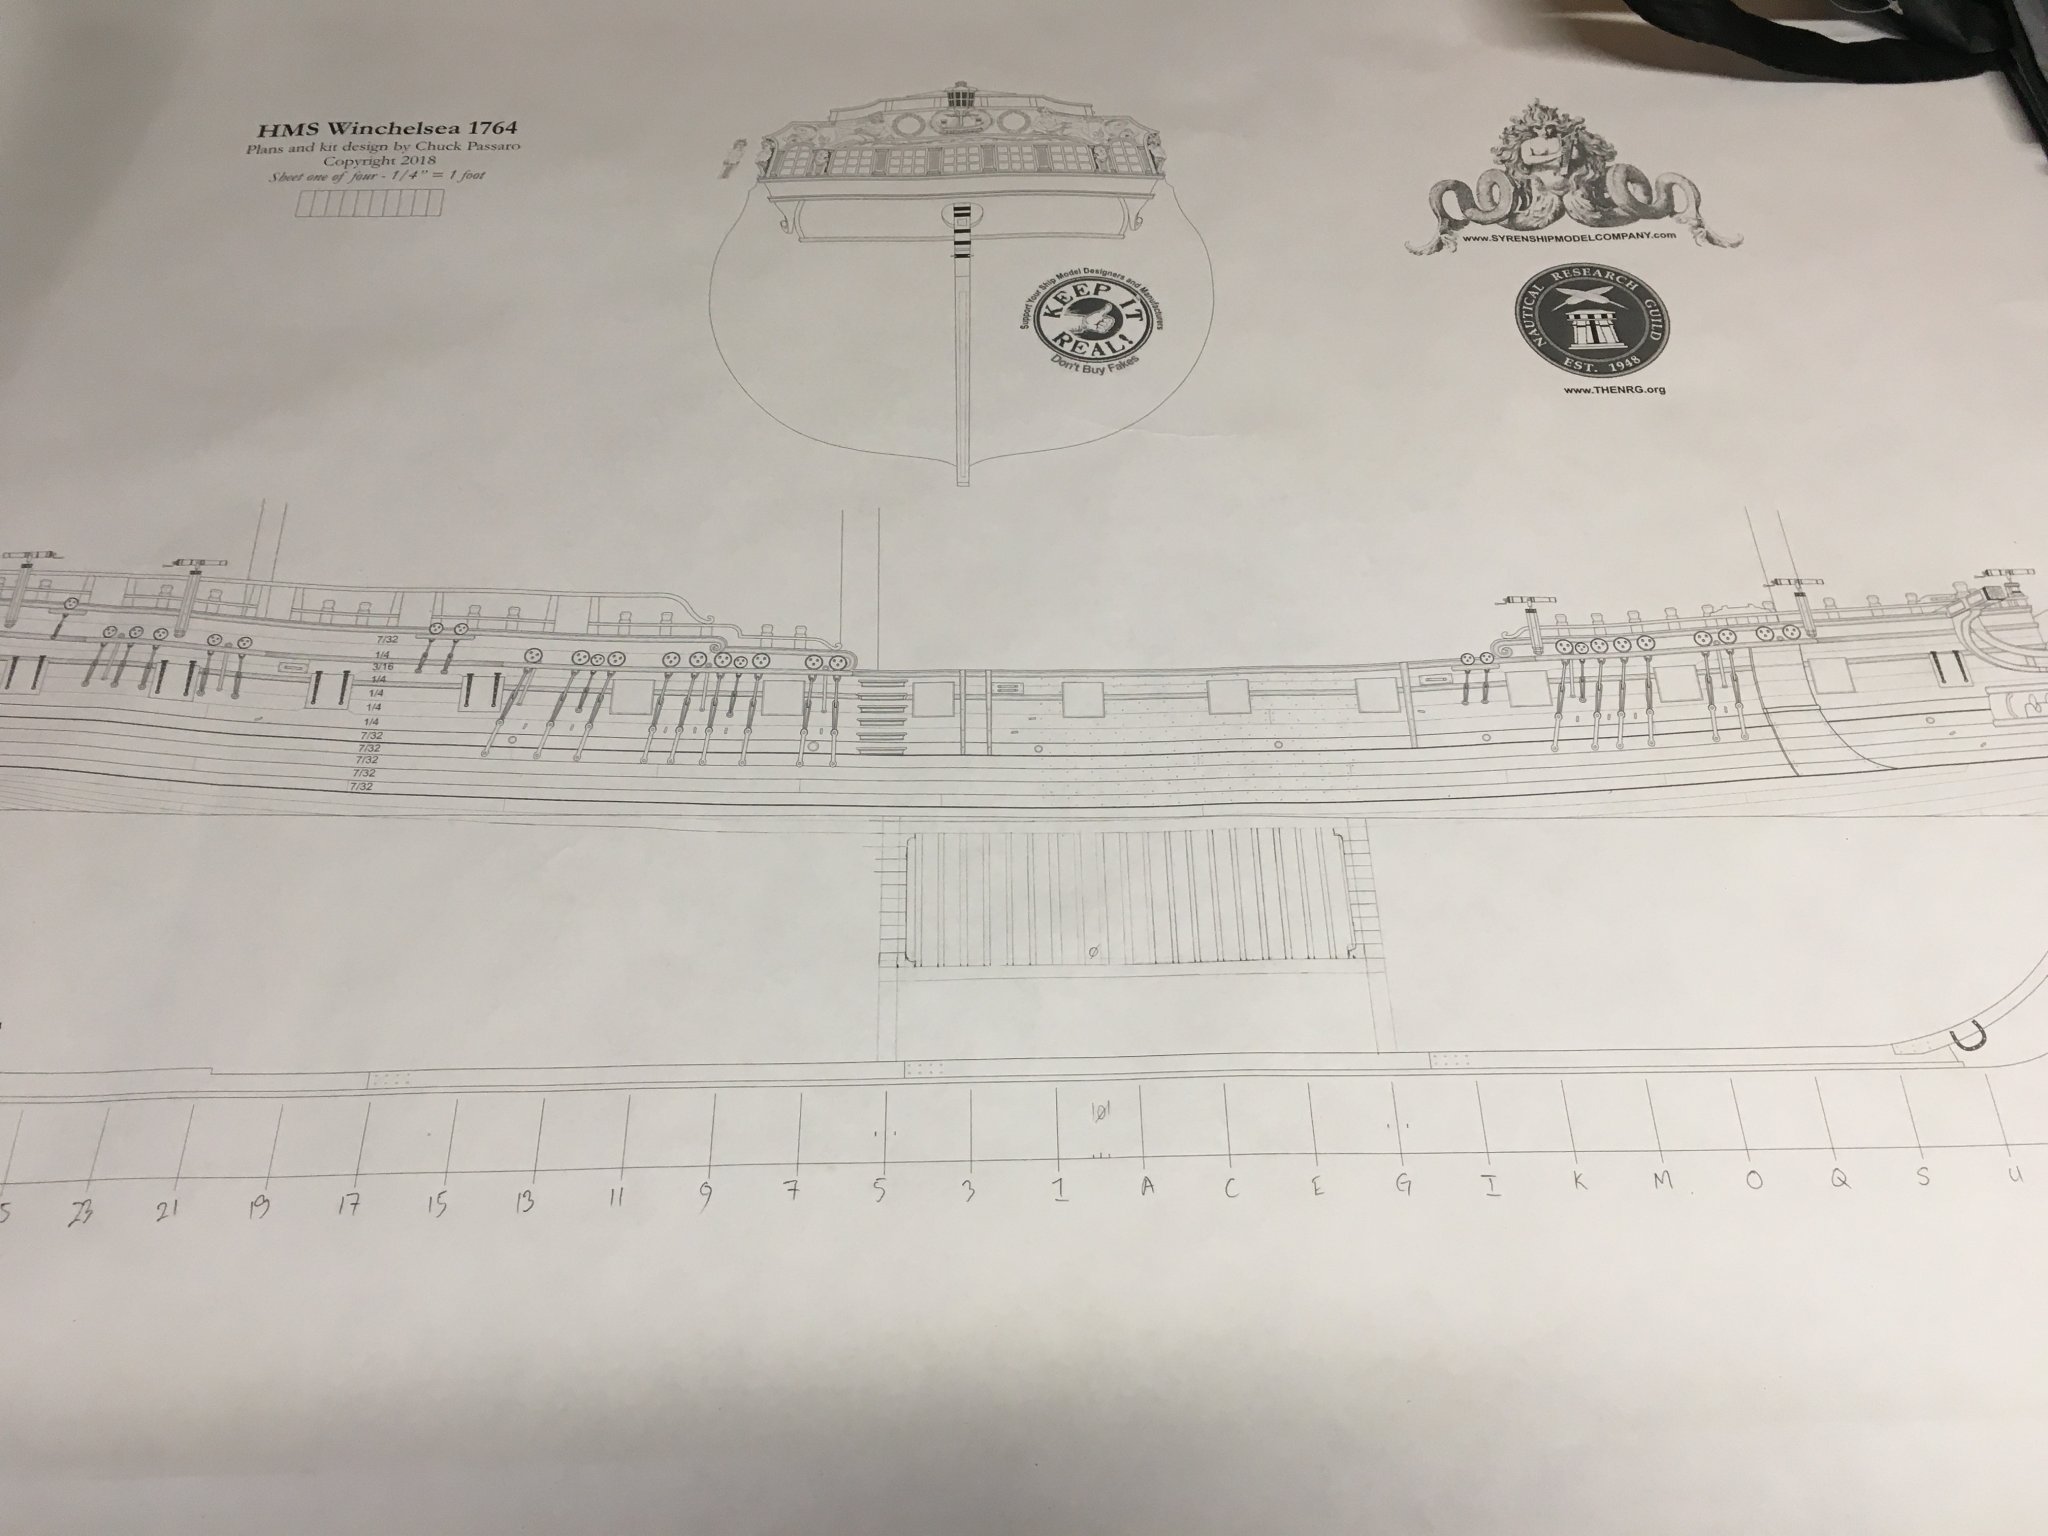
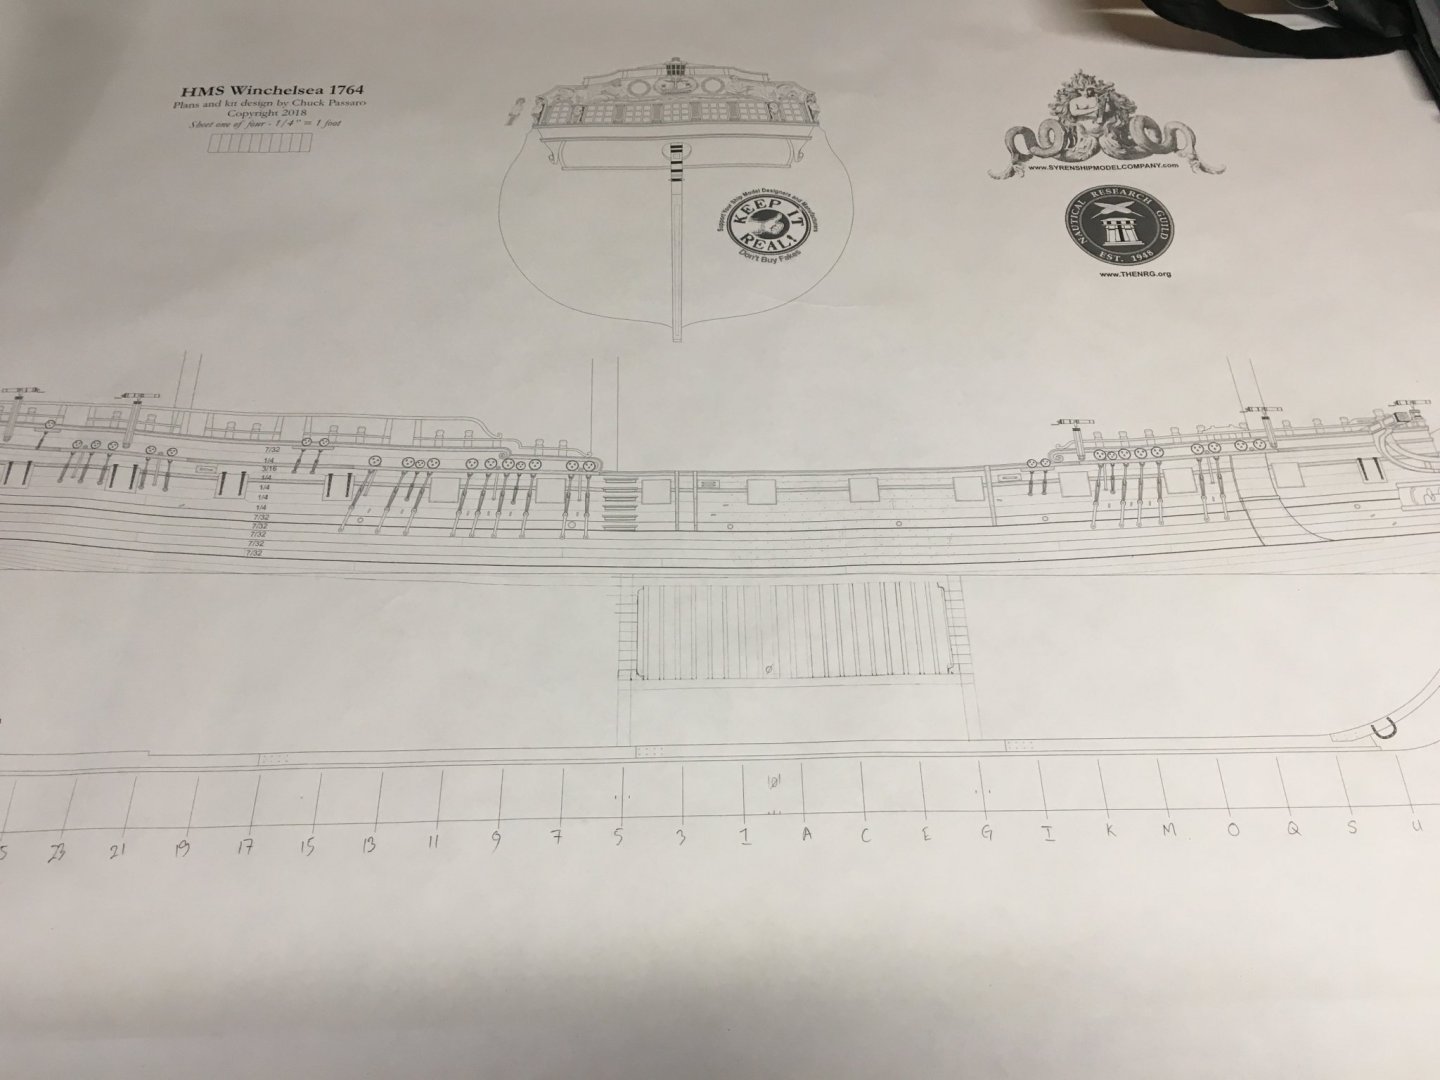
Here is my shadow box design and it will be made from 1/4” ply just like the bulkheads.

- 399 replies
-
- 14
-
-
- winchelsea
- Syren Ship Model Company
- (and 1 more)
-
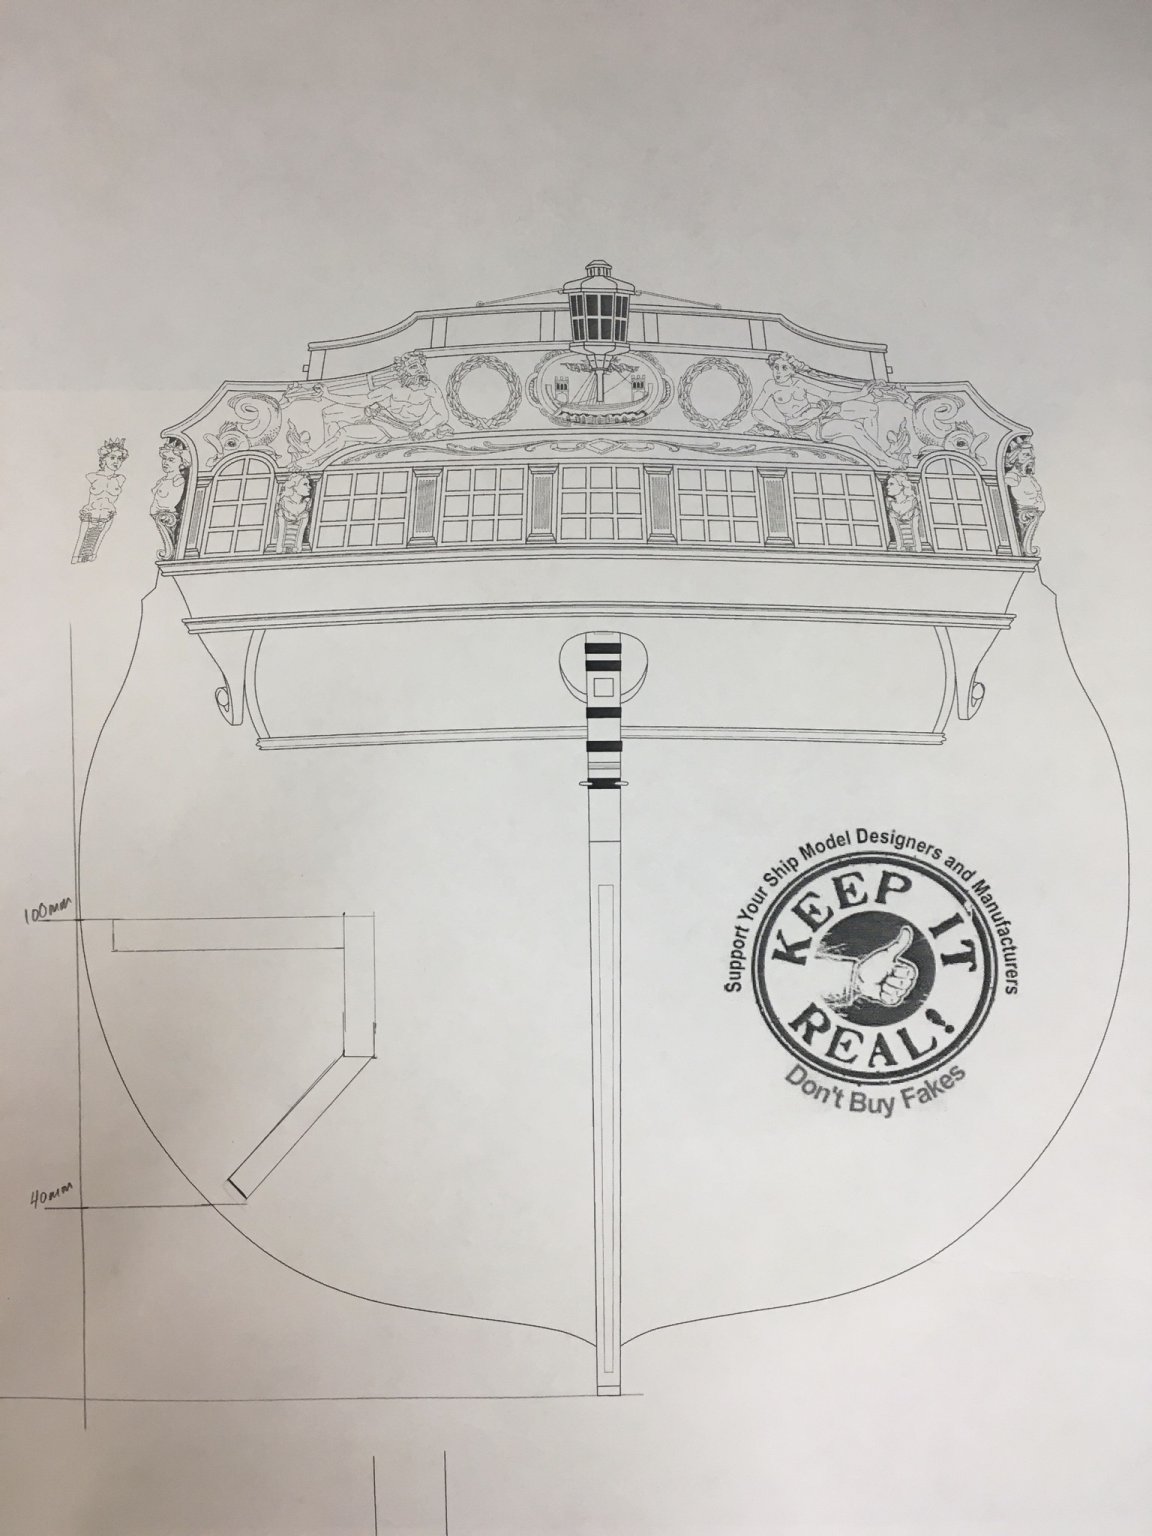
Here is what I have cooked up for my Winchelsea build to add a little difference to it. I intend to add a frame reveal to the model, much like Chuck's one on his Confederacy or David's one on the Comet. Midships is the obvious place to put a reveal so as to simplify the design work and make construction easier, so I have decided to make mine between the bulkheads of station frames G thru 5, Also it will be just below the wales to allow for two strakes of lower planking above and several below it. It will be quite a large reveal so as to show the first and second futtock frame joints, I will have to construct a shadow box behind it to be painted flat black and the simulated frames will be made of swiss pear. According to "Steel" and the "Shipbuilders repository" table of scantlings, a 32gun frigate of the time would have had 11 1/2" wide second futtock framing, molded 9" with a room and space of 27 3/4", I intend to simplify this a little with 11" wide framing with 3" between them, and it works out that I can fit 23-24 frames in the reveal. I will finish the design side of this soon and start building it when I have completed construction of the stern framing. ben
- 399 replies
-
- 14
-
-
- winchelsea
- Syren Ship Model Company
- (and 1 more)
-
I’ve begun lining up the stern framing and adjusting everything before glueing using the patterns and plans supplied by Chuck, everything is lining up nicely and looks real good. ben

- 399 replies
-
- 12
-
-
- winchelsea
- Syren Ship Model Company
- (and 1 more)
-
Real nice work Bob, she’s coming along fast. ben
-
Thanks Rusty, I have a feeling you will like the recipe I have in mind. ben
- 399 replies
-
- 3
-
-
- winchelsea
- Syren Ship Model Company
- (and 1 more)
-
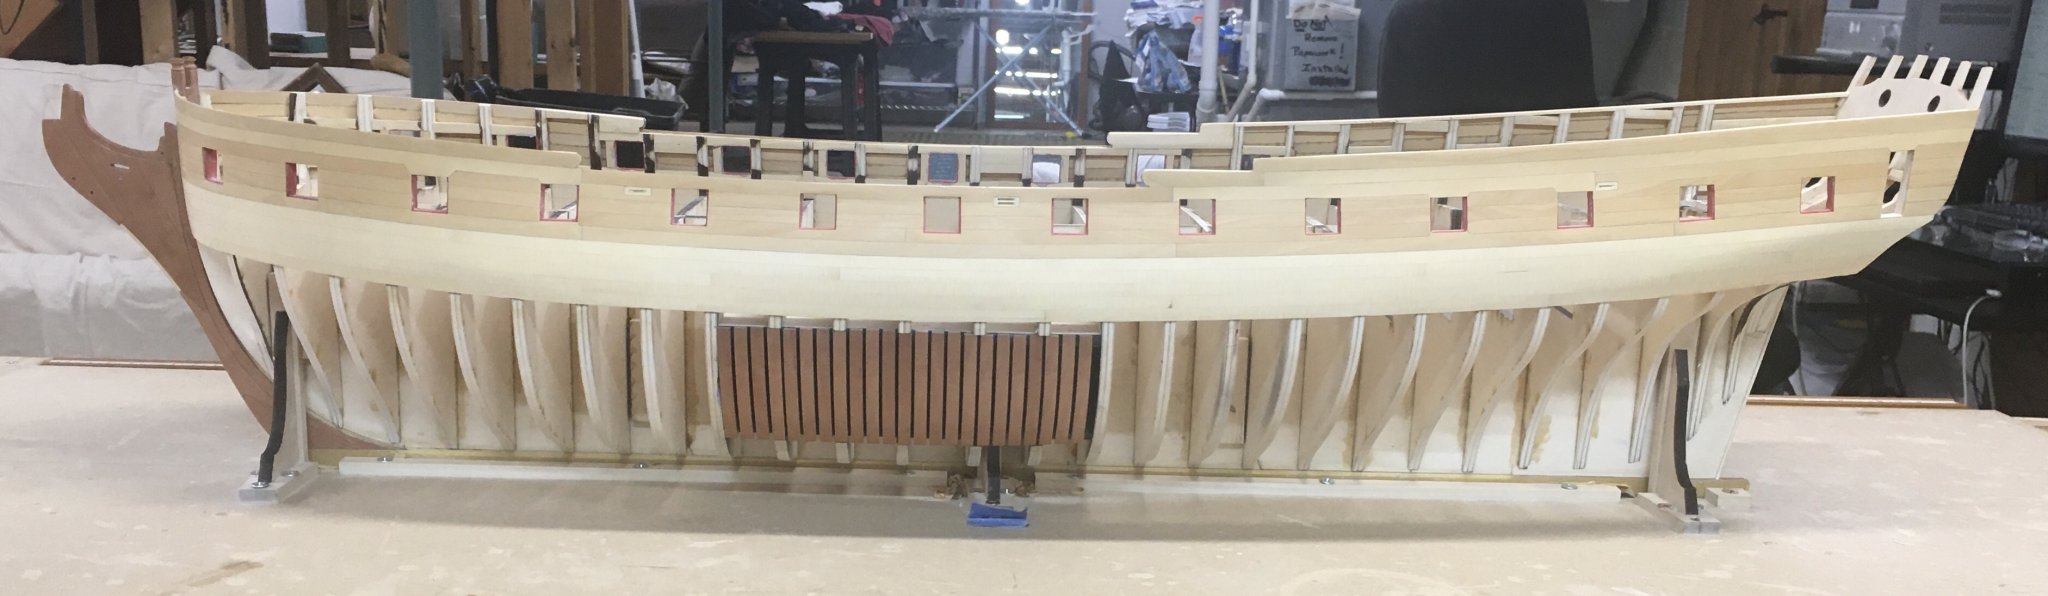
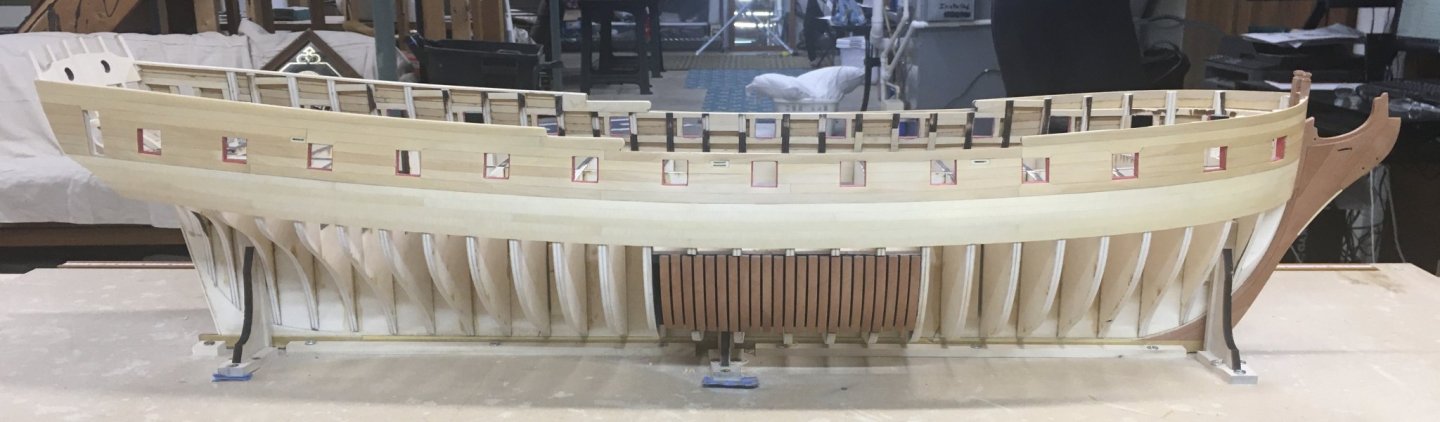
Port layout and upper/lower cill framing complete, no issues were encountered with this process, and I have begun installing the port sides. Next up will be adding the stern framing and I’m also cooking up something special to add to this model which will change the original design somewhat but hopefully it will add to the whole. ben
- 399 replies
-
- 21
-
-
- winchelsea
- Syren Ship Model Company
- (and 1 more)