


Overworked724
-
Posts
1,218 -
Joined
-
Last visited
Content Type
Profiles
Forums
Gallery
Events
Posts posted by Overworked724
-
-
Just an update on my blog. The Syren is now boxed up. My ship room is closing down as I put everything in boxes for our upcoming move. Looks like she’ll be finished in Japan! I’ll be on line occasionally to pipe in on other builds.
Stay Tuned…the journey has literally just begun. 👍🏽😎
-
Ok…tales of my demise have been greatly exaggerated! I’m still kicking about…just packing and getting ready to sell our house and move. So these might be the last pics of progress for the remainder of the year. (We shall see!)
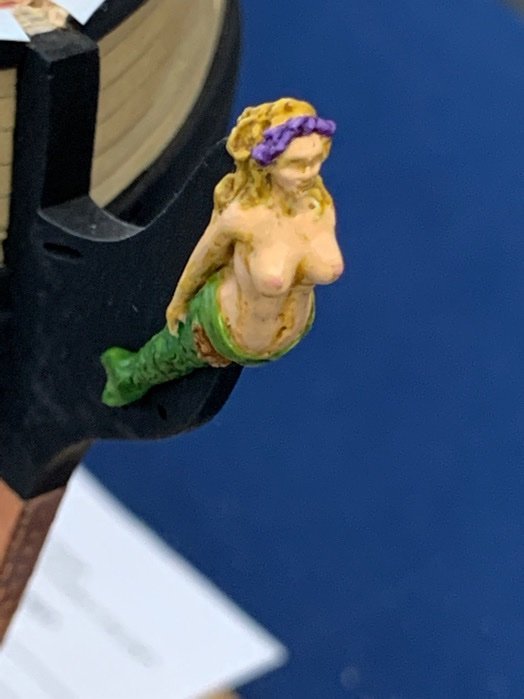
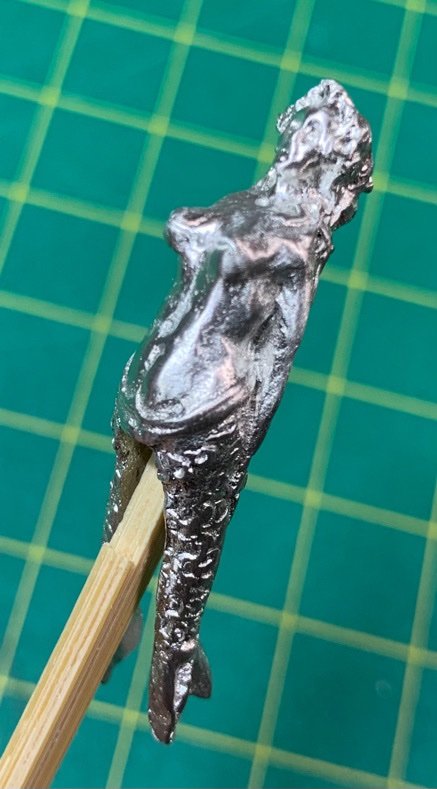
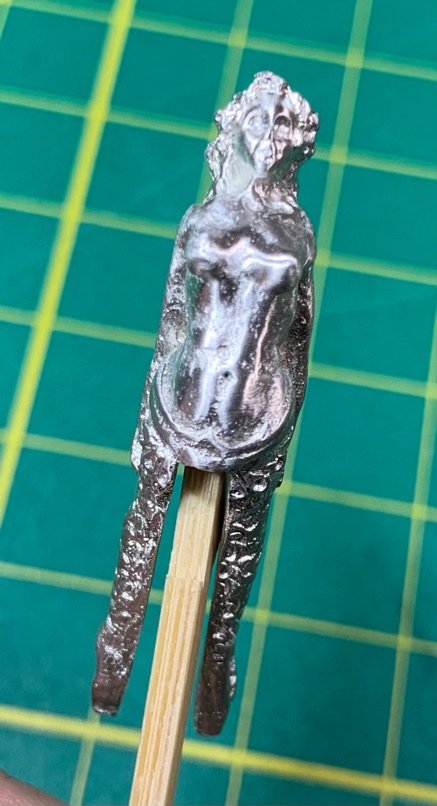
The kit supplied metal figurehead was one piece I did not feel inclined or proficient enough to bash and achieve superior results. So, as I trimmed, polished, and buffed it until I felt I couldn’t get her in any better shape.
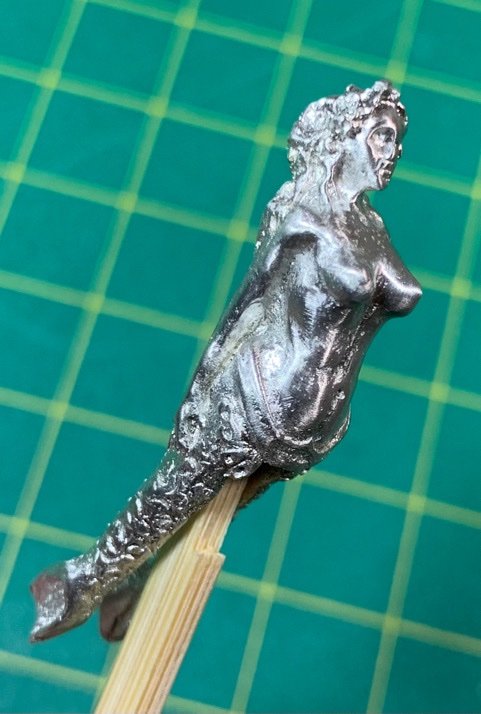


After a coat of primer, I originally planned to paint it as if it were simply unpainted wood. But since the detail came out so nice, I decided to go for full detailing. Turned out damned nice! The slight nicks and imperfections actually seem to add warmth. A watered down light brown paint to add some weathering.
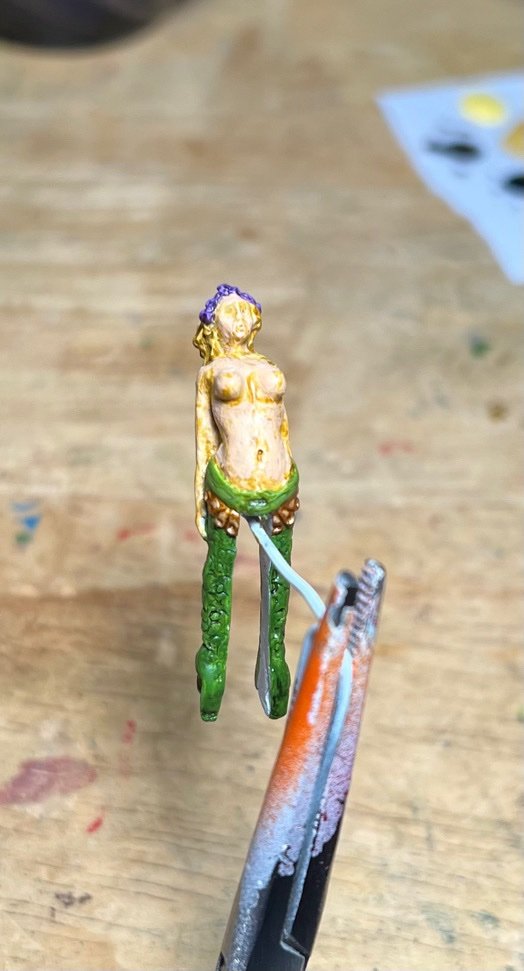
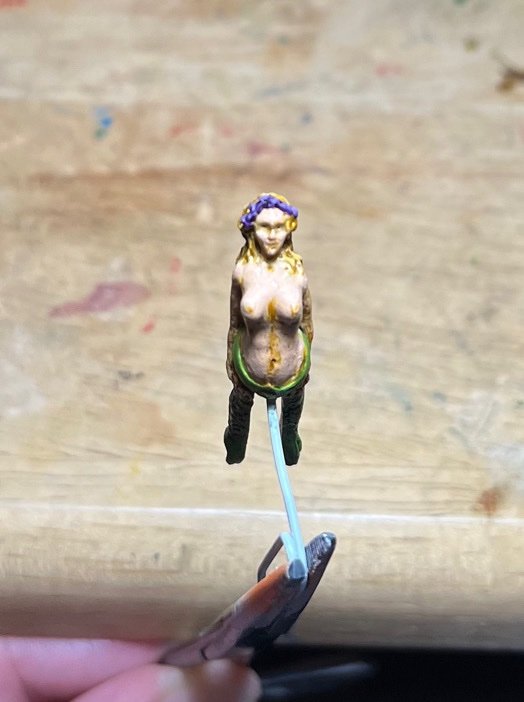
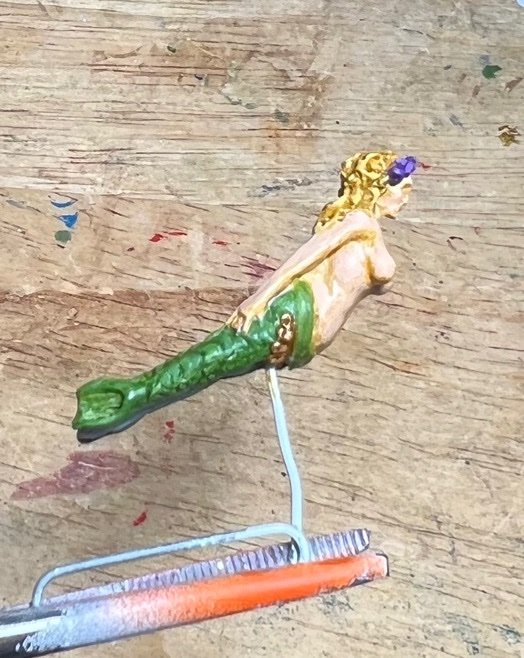
Followed it up with a coat of dull coat. All in all…I’m happy with the result!
Moving on!!!

(ok. I have to be honest. This was a team effort. A buddy of mine who paints miniatures offered to help me out on the painting. So I’ll only take 1/2 credit on my figurehead. 😁)
-
-
Can you reach out to Shipways (Model Expo) to get a replacement? I did that for my frames when they were warped out of the box. No issues. They were really good for customer service.
-
-
15 hours ago, abelson said:
Nice work on the scratch build capstan.
Thanks, Abe! -
Sounds much like the issue I had with my Syren in the early part of my build. I ended up in a similar situation where the planking (not being comfortably shaped to the curvature of the hull) exerted outward pressure on the stem causing some separation. It was recoverable.
Wood is forgiving!!!
Great job so far!
-
-
-
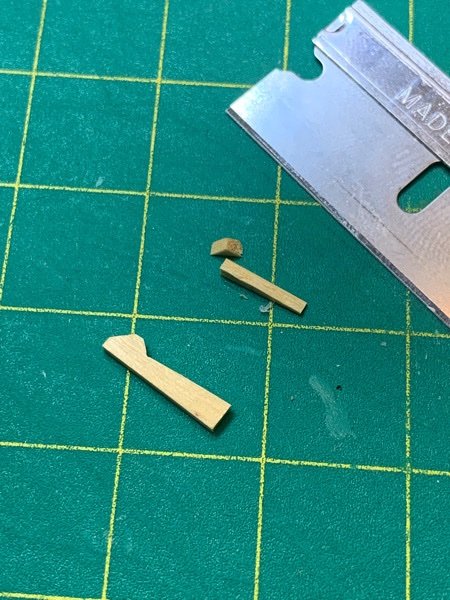
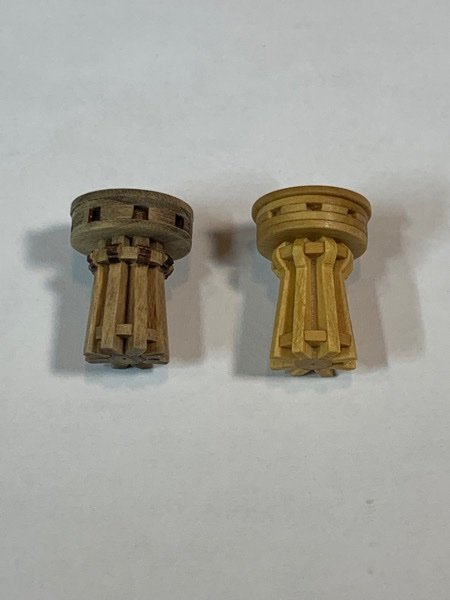
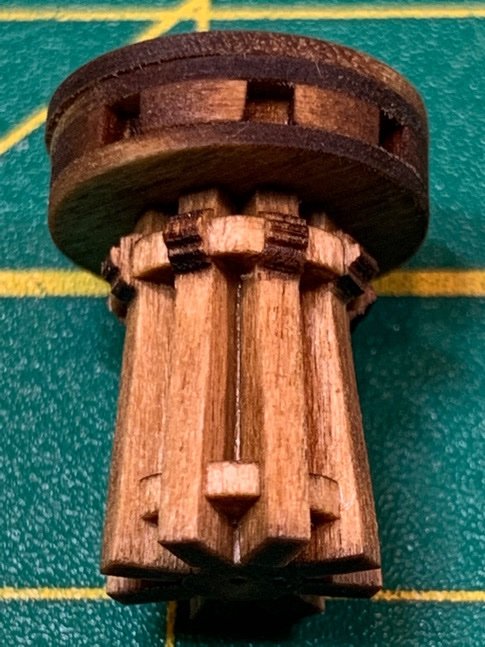
So...spent the last couple days on the 'Capstan Redux' project. It was my own damned fault for using Golden Oak stain. I wasn't thinking and I knew the effect, especially after the stain dried, would be ghastly....and it was. But, it gave me another fun problem to solve. So, here was my brief journey using boxwood to scratch build the capstan.
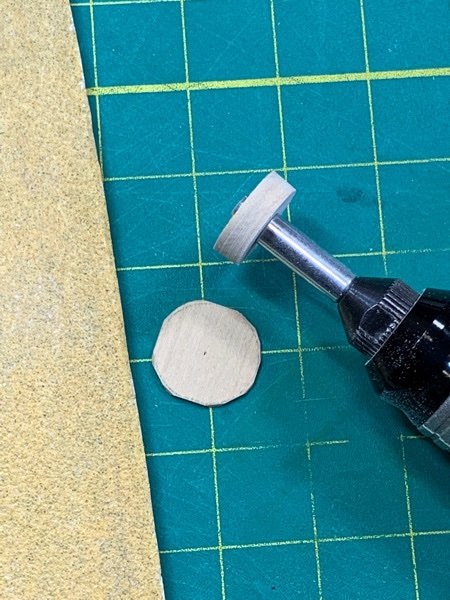
I don't have a lathe...so the little circular sandwich pieces were a problem. So I thought of using my Dremel sanding attachment, and create a sandwich of roughly hewn boxwood sections, then run it across sandpaper. So I cut a bunch, drilled a hole in them, loaded them up, and TaaDaa! 😆 Worked like a charm.
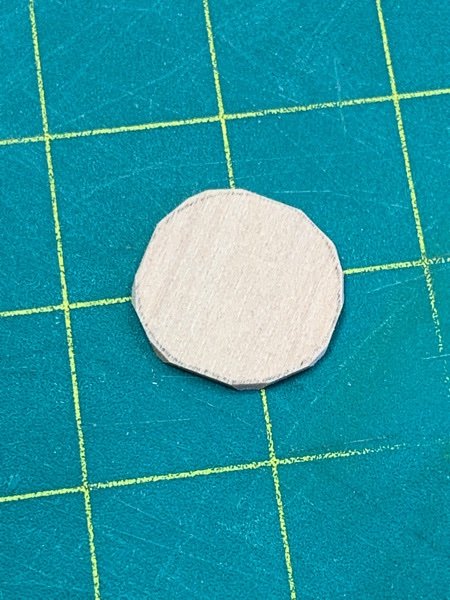
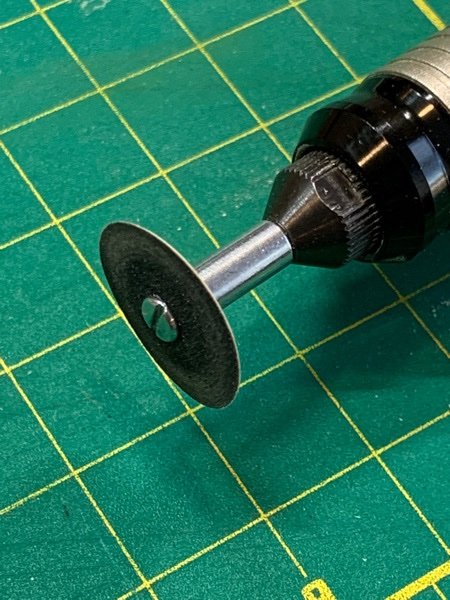
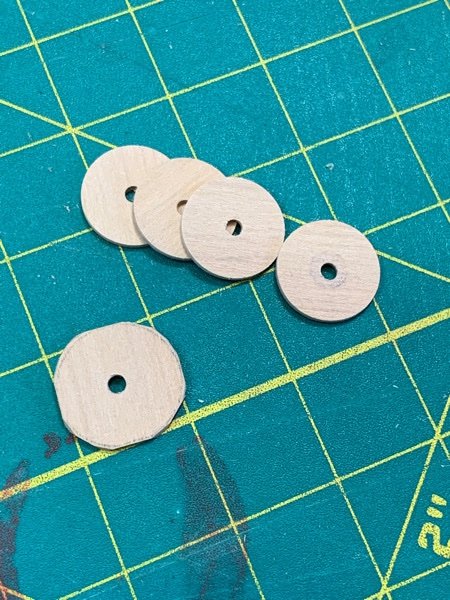
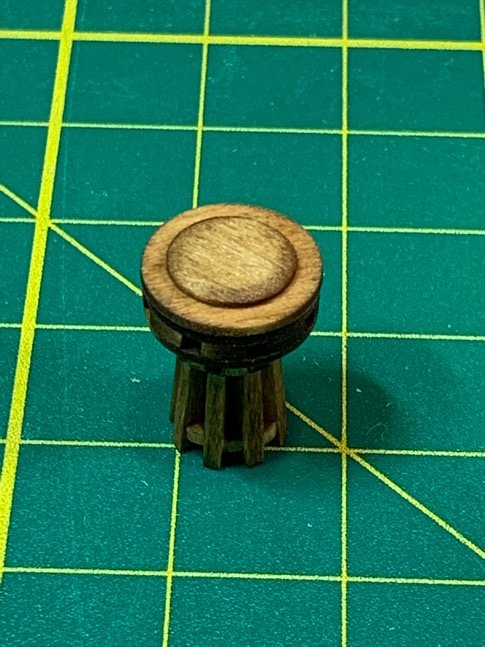
I made the top circular section sans hole (photos not shown) by glueing the roughly rounded section to the top of a wooden dowel, sticking it in my drill, and doing the same thing as above....then I just soaked the assembly in water to separate.
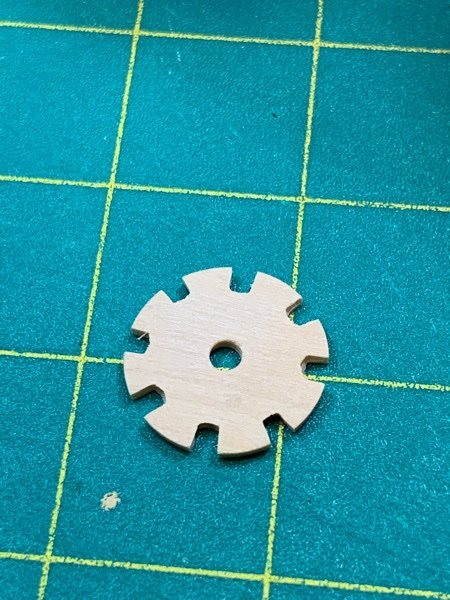
The cog section was easy to make using my drill press, sandwiching the section between other wood...to get consistent depth and width.
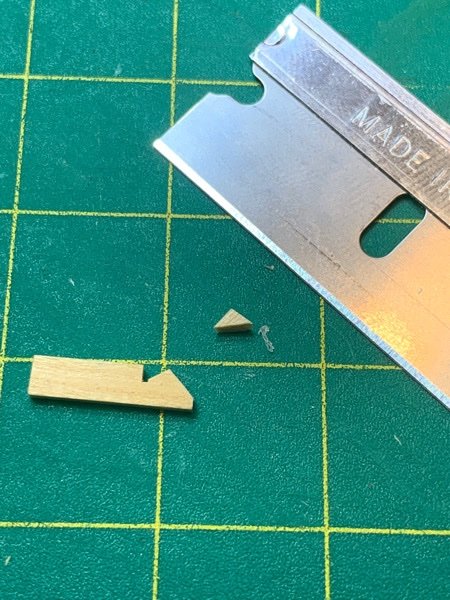
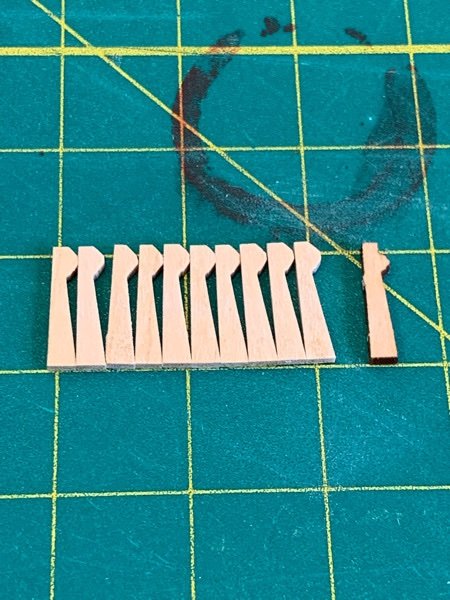
The whelps (leg-like sections of the base) were a bit difficult for me. I decided to manually shape them by cutting a groove in the individual sections of boxwood with my table saw and using a straight razor to trim the meat. The gap acts as a terminator to prevent the wood from splitting.

I combined together and bulk sanded the little guys using an emery board. This was about as close as I could get to the laser cut pieces.
Then I put them all together...
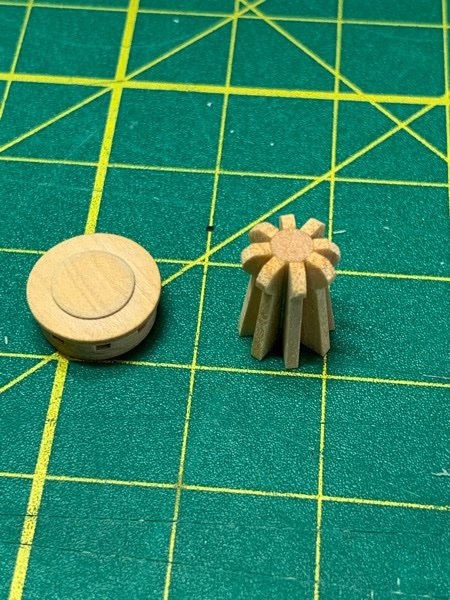
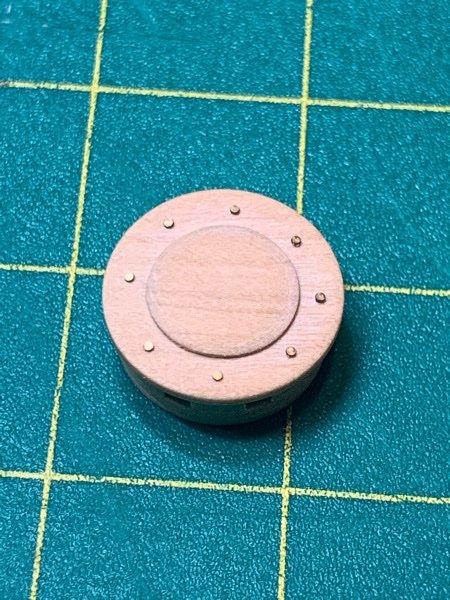
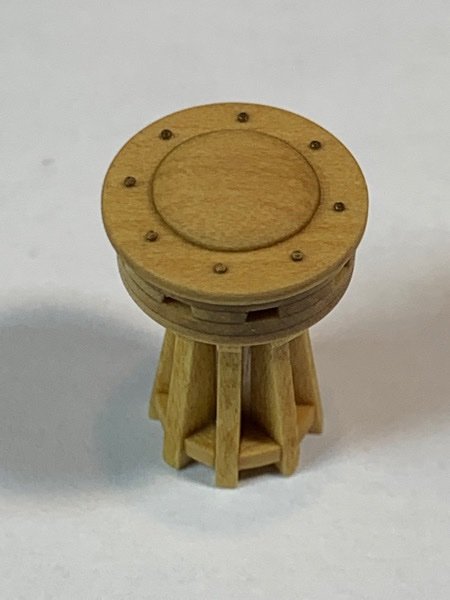
And decided I would put in some bolts (nails) on the drum as a nice detail.
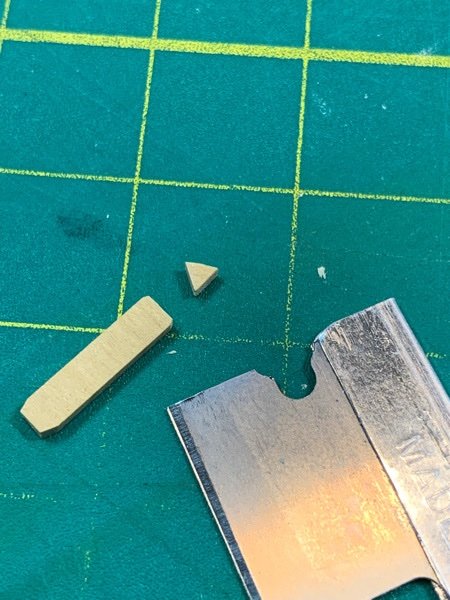
The two rows of boxwood chocks (yeah...these suckers are small) I created using boxwood strips cut 'cross grain' and sanding them to a point.
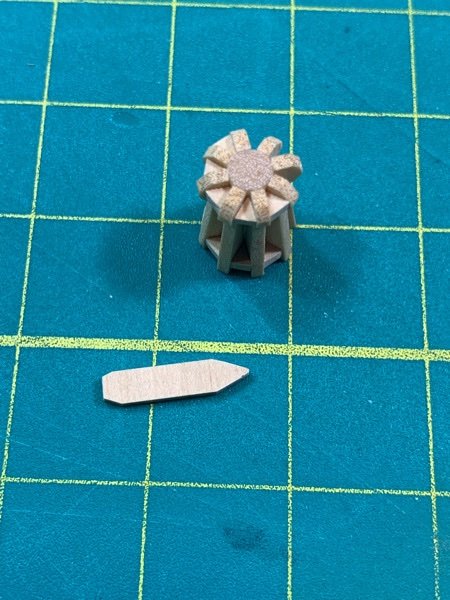
Then I touch up sanded to ensure the tip 'fit' in the the appropriate section I was filling, then I simply used a straight razor to slice off the end section. This was easy and the grain runs across the width of the wood strip. Then I touch sanded a bit for a good fit before gluing in. This was easier than using a dowel.
The end result wasn't perfect....since the holes aren't square. But - again, it's a minor thing and I'm sure I could remake with a perfect square hole if I'd been a bit more careful of my measurements.
Final result was a pretty decent redux of the original capstan.
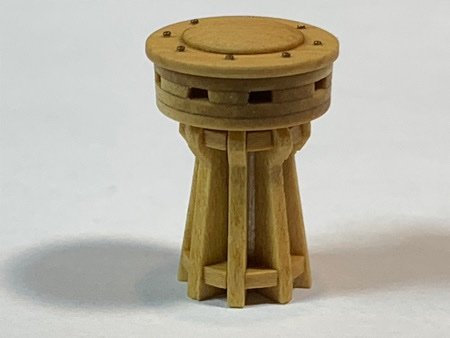
And I'll consider this a win over my original attempt using the kit sections. But this was not the kits fault....it was mine. The laser cut parts were easy to separate, prep and assemble, I just screwed up (badly) the staining. So - word to the wise, don't go messing with stain unless you know what it's going to look like!!
Here is the final comparison. Kit (left) and my scratch built (right). I'm leaving it completely natural.
Moving on....

-
1 hour ago, niwotwill said:
Just a thought if you're using kit material (i.e. basswood) you might try WOP on material before using and then another coat when finished.
Thanks, Will. Not sure what WOP is…wipe on poly? Either way…not certain that would help. I think the grain is pretty loose for those laser cut pieces so I’m guessing basswood.
No way around this as the end grain soaked up that darker color like it was painted black.
Redoing it from scratch….
-
Well…took a side trip and made my capstan from the kit materials. I did a decent job of putting it together. The small triangular sections between each support were easy to make using a cross section of a wooden dowel, divided up like a pie.
Made a mistake by staining with Golden Oak. The end result is that it looks like a turd. 😖
I might redo it…we shall see. Baby poop pics below. Definitely not happy with this result.
-
3 hours ago, Gahm said:
You did an excellent job on your rudder! It looks great!
Thomas
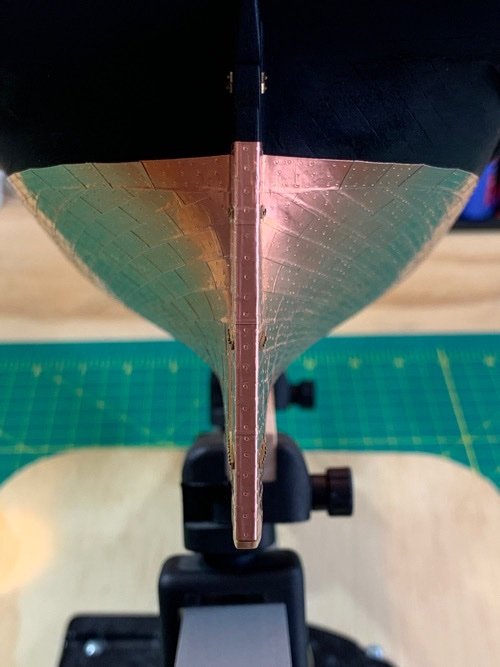
Sincere thanks, Thomas!!! It was a joy to see the rudder slide into place without issue. Over planning made that fearful task a bit less ominous. I won’t be so gun shy on my next build…which at my current speed probably won’t occur until 2030! -
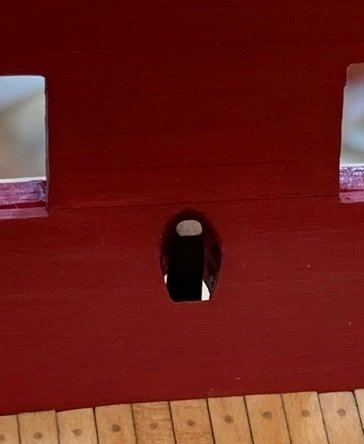
Just putzed a bit with the figurehead. Spent some time polishing it and getting rid of the burrs and roughness. It’s actually a pretty nicely shaped piece after all that…and I’ve double checked the fit and she slides onto the stem like a glove.

I had briefly entertained the idea of trying to carve one, but I’m humble enough to admit I’d never come close to this clean of an image. So I’ll plan on painting her…just not sure the effect I’m shooting for…Wood? Copper? Multicolor? Decisions…
-
5 hours ago, abelson said:
Excellent working rudder.
Thanks , Abe! -
3 hours ago, CPDDET said:
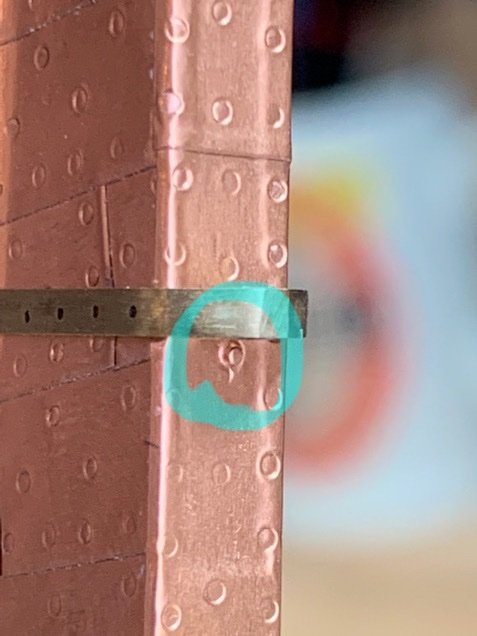
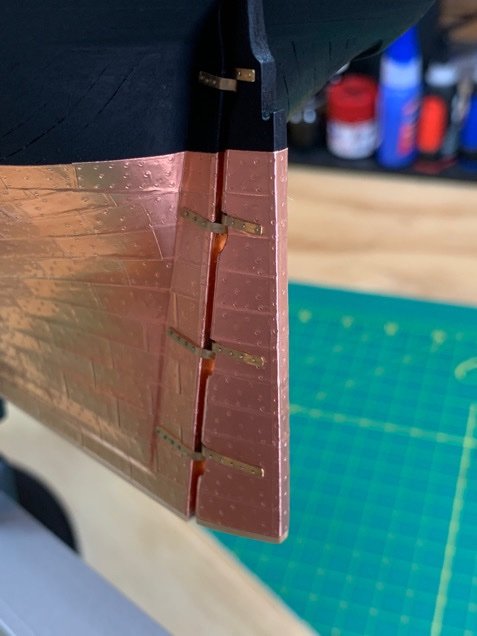
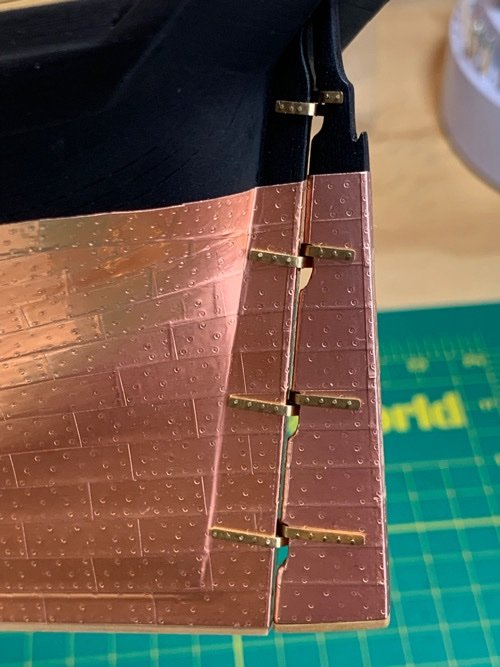
They look great against the copper plate.
I've often struggled over consistency in my model when it comes to metal work. All blackened? All natural brass color? Mixed?
Actually, Dave…the topmost P&G’s are supposed to be black to match the paint. However, now that they’re on, I reconsidered and went with exotic metal clash rather than historic accuracy! 😜 -
21 minutes ago, CPDDET said:
Just a thought. Did you consider blackening these pieces or coating the brass to prevent discoloration?
Nope. Call it a purposeful deviation. I think the P&G’s, polished and with an obvious brass metallic sheen contrasted nicely with the copper. I’m a chemist, and I’m not entirely certain that copper (a soft metal) was used in the P&G’s. Anodic/cathodic reactions would occur due to impurities in the metals available in that age regardless of whether they were the same metals or not. So I’m more inclined to believe they may have been bronze.
The copper plating and brass P&G’s will oxidize and take on a different patina.
Either way, they look good and the idea of blackening never touched my awareness! 😁
-
FYI…and the rudder is easily removed and installed as needed which was my ultimate goal. 👍🏽
- Gregory and Ryland Craze
-
 2
2
-
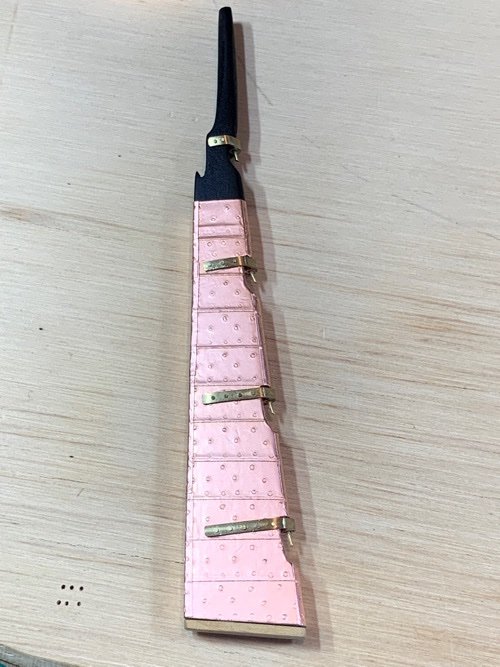
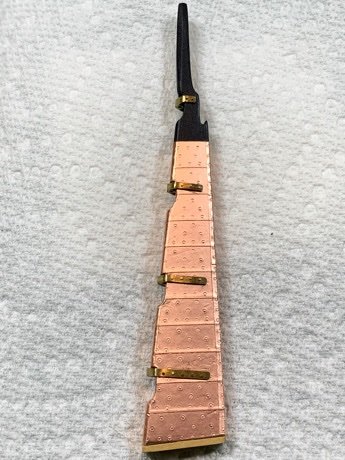
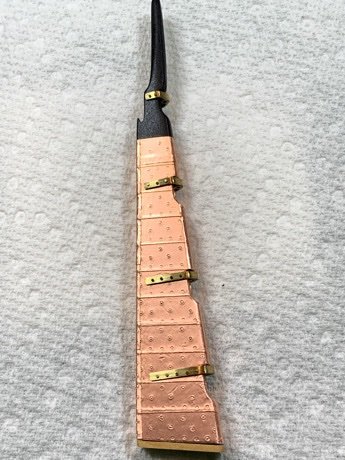
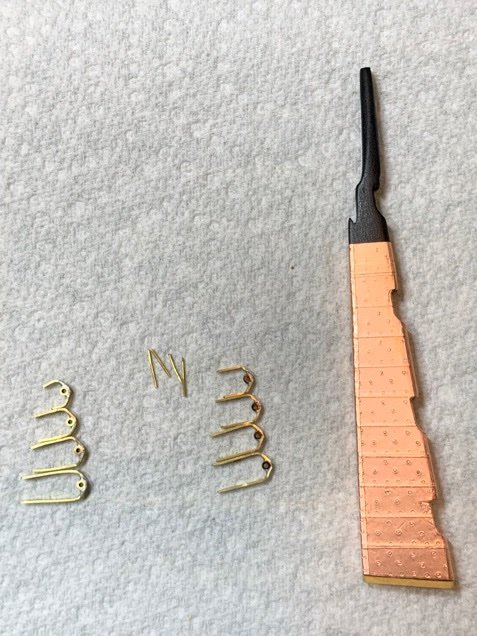
Ok. Got my gudgeons in…I’m not certain how others make/line up/install there P&G’s, but this part of the build is really intimidating to me. So I put a lot of preparation into how I would avoid bruising the copper. That was my biggest concern!
So… here was my ridiculous approach to mounting these suckers.
First, I put in the ‘pins’ into the pintles on the rudder:
Next, I sanded in a slight bevel into the inner edge of each side of the gudgeons. Imagine snow skis. I wanted the gudgeons to slide across the sternpost without grabbing/scratching the copper foil.
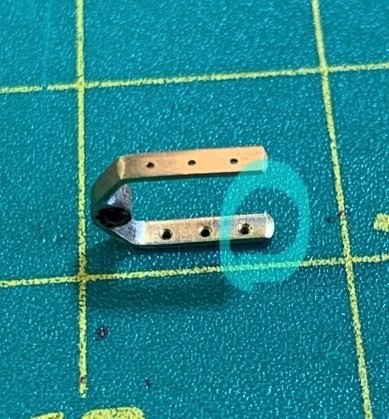
Then, I slid the gudgeon onto the stem post, using the tiny nail head I had placed into the post as an abutment to keep them from sliding. If you recall, when I test fit the P&G’s, I put in tiny nails (used in installing the P&G’s) as markers. They can’t really be seen and the copper easily wrapped around them.
Then I lined up the gudgeons with the pintles and inserted the nails.
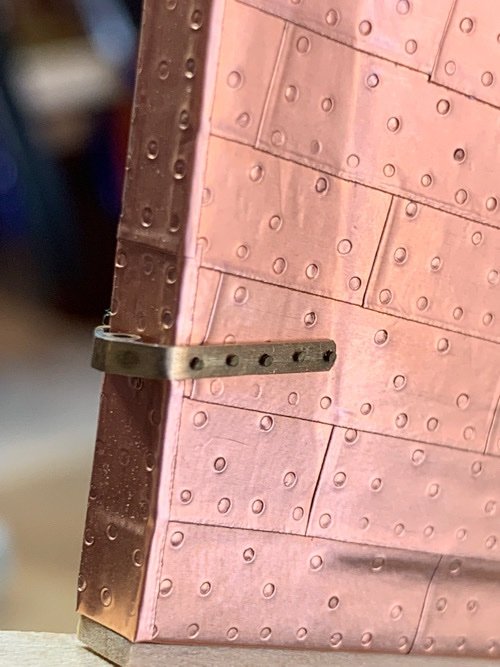
The end result is pretty nice. 👍🏽 The copper plating was unscathed, and the rudder was cleanly aligned.
The only minor discrepancy which my eye sees immediately is the fact that the bottom of the rudder ended up about 0.5mm higher then the false keel. However, I’m totally willing to accept that little ‘wart’ considering how nicely they turned out.
Miller Time!!!!
- Ryland Craze, Gregory, ccoyle and 6 others
-
9
-
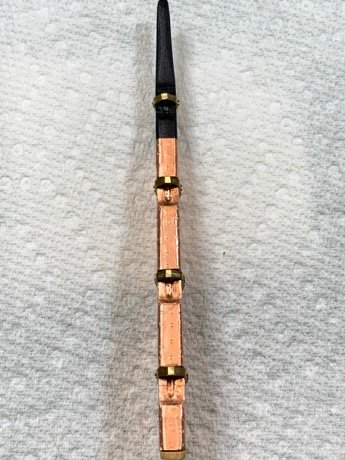
Pintles in…they look OK. I think I could still go down a bit in thickness on them but they work. The small brass nails were actually quite easy to install…was lucky enough to invest in a ‘nail’ pliers which made inserting the bolts much easier. I test fit the pins into the pintles and will install them later after the gudgeons (🤞) have been installed.
Baby pics:
Moving on…
-
@Gregory Your P&G’s look marvelous! I did consider paper and had actually used them in the past on another build. This time, my goal was to actually make them as real functional P&G’s…bolts and all.
Mounting the rudder using pins certainly makes the process more bullet proof. I’ll probably use this method in future builds. If anything, it will lower my blood pressure! 😁
-
-
How’s your sinus infection? I hear champagne toasts during the New Year cure most infections! 🍾
-

US Brig Syren 1803 by Overworked724 – Model Shipways – Scale 1:64
in - Kit build logs for subjects built from 1801 - 1850
Posted
Well…my mid-life migration to Japan is still proceeding. I miss my Syren (which is packed up and shipped). Seems like a while before I’ll be back in my shipyard, but it will happen.
👍🏽