


Overworked724
-
Posts
1,263 -
Joined
-
Last visited
Content Type
Profiles
Forums
Gallery
Events
Everything posted by Overworked724
-
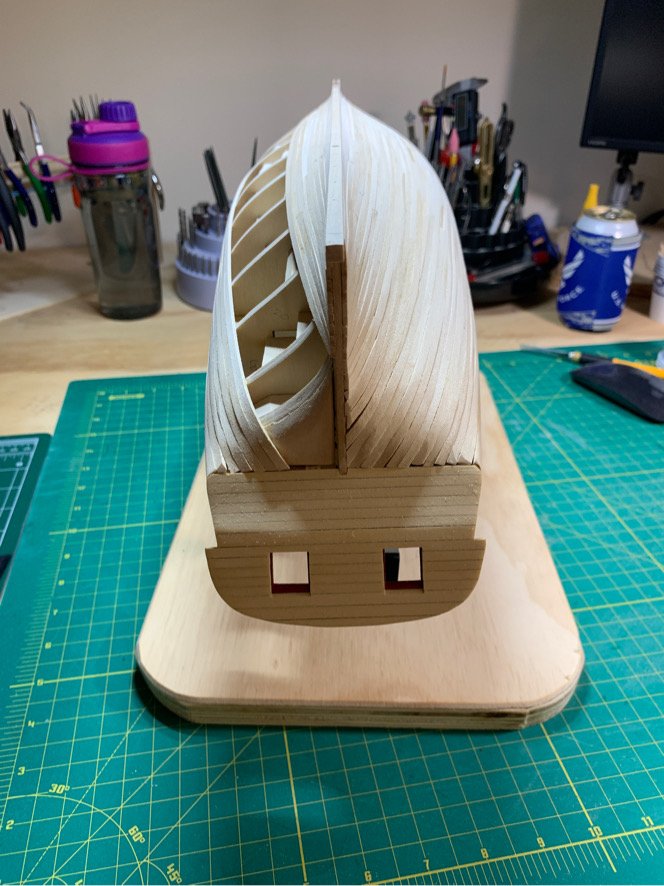
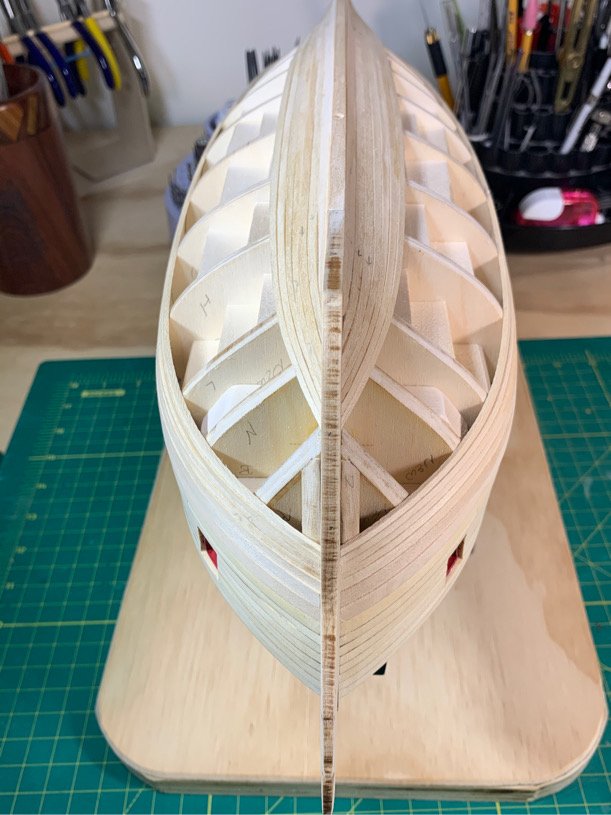
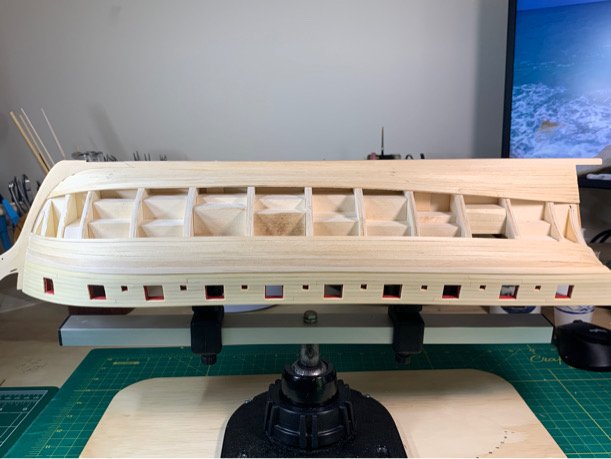
 Gone but not forgotten...got 1/2 of my Syren planked. Just focused on getting the hull covered without too many garish errors (but it’s not historical planking). I figure filling, sander, and sealing will be my next endeavor. On to finish second side...yippeee. Will save accuracy’s planking skill development for my 1/2 hull project. But I still need to work out how to trim planks accurately...it’s A real bear of a problem. But I want to continue modeling my Syren so I’ve changed my mindset to ‘get the wood on the bloody hull!’ Here are some gratuitous photos... Moving on....
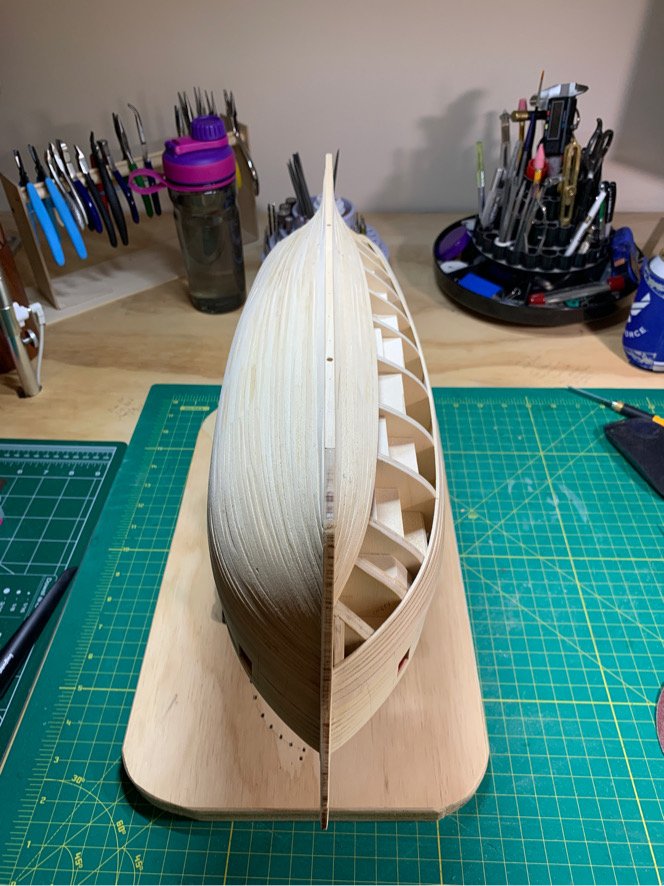
-
One other thing. Glue. Any glue...PVA (water based) or CA can penetrate the pores in the wood which the stain absorbs into. Pencil marking and sanding is no difficulty. But if you have any glue penetration across the surface you intend to stain (especially if it’s CA) then the glue might not penetrate. Then you get a blotchy look which no sanding can correct. I had this same question when I made the Sultana (my first ship). I’ve seen some folks prestaining their wood, which makes this less an issue. Best thing is the use PVA and be sure the surface is clear of any glue spots...on decks this can occur if you press an adjacent plank on with too much glue...the PVA may push up in the gap between planks, which means you need the wipe the residual glue out, and some PVA may absorb into the wood. Rule of thumb...carpenters PVA holds like steel once dry and you don’t need a lot. If you minimize glue spread, especially on making the deck, you are fine to stain after it’s down and sanded. Order is pencil once (or both) facing edges. Glue on. Sand down. Stain. That’s how I approached and the results were great.
-
Yep! I agree. The challenge really is getting them even and flat...then using the stamp to create reproducible plates.
-
You can look at my blog and see how I made mine. They protrude out about 3-4 mm on my stamps.
-
Just reading directions and chopping out the bits and doing some dry fit. So far same as the practicum. Moving on...
-
Thanks, Will. No worries. I’ve passed a few hurdles recently. More to come!
-
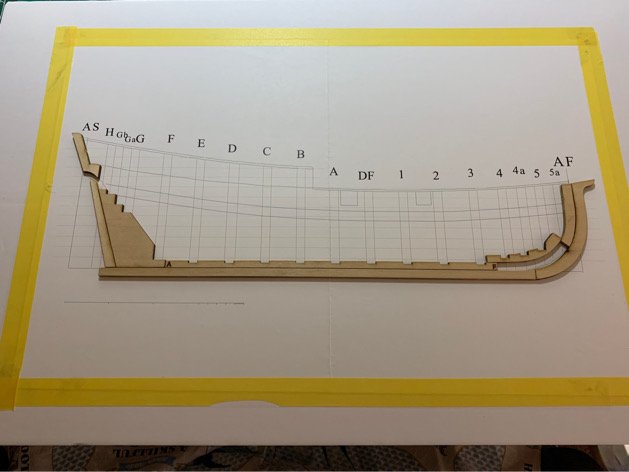
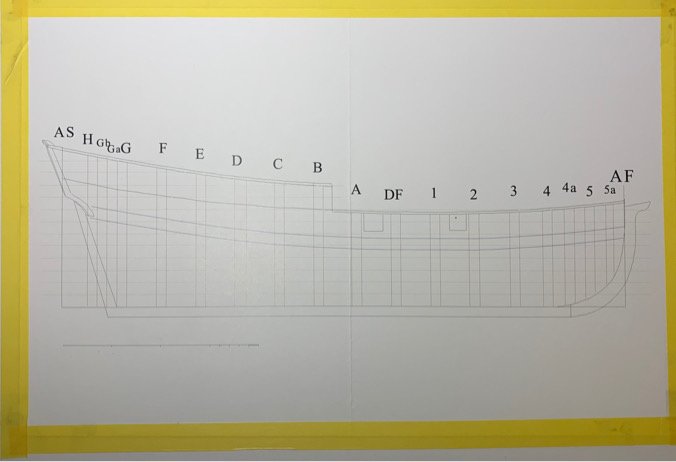
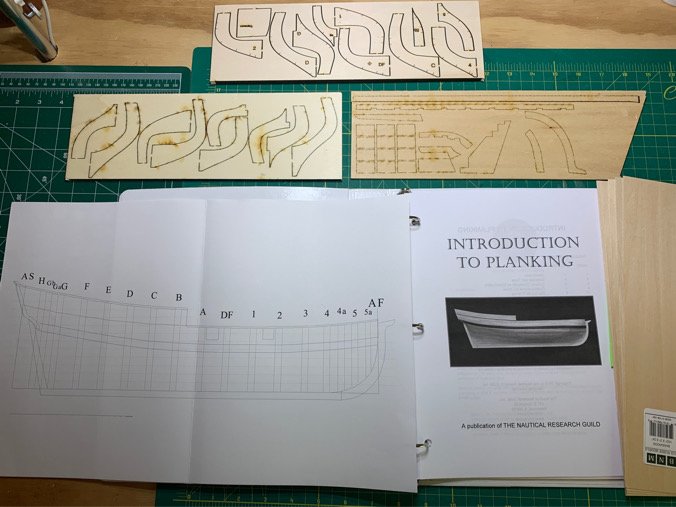
As with all new logs, here are the baby pics. 👶 This is a side project focusing solely on planking technique, so will give me a valuable added tool to build some confidence, and when I need a break from the Syren. Besides...should be fun! Printed out the practicum. Already read it, and I know I’ll have some questions for Toni @tlevine when I get to those parts. Nicely written though and easy to follow for the most part. Stuck it in a spare binder because I’m anal retentive like every other modeler. Already had a 1/4” trifold foam presentation board I got from Walgreens. It fits the plans perfectly. Used 3M spray to adhere the plans and fixed the border of the plans with some Tamiya tape...just for giggles really. The folded flaps were also sprayed and glued down to make a sort of double layer foam board. 🤓 Let the fun begin...after reading a couple of the other builds for the tutorial kit, I’ll be interested to see if any of the frames seem to ‘bulge out’ asymmetrically. More to come....
-
Well, I decided to invest in a side project developed by my ship club mate, Toni Levine (@tlevine). Since my last post on my Syren build log, I've made more progress in some basic techniques of manipulating the planks. Specifically, I received an old plank clamp which was the property of Steve Wheeler (we all miss you, Steve). Hopefully that will take some of the plank trimming frustration away...so far it works great on a few trial planks. In the interim - I've received the NRG tutorial kit. Like others who adopted this side project, I wasn't really sure where to put this build log, so stuck it where others have - hope that's ok. If this turns out, aside from gaining a bit more confidence, I plan to mount it as a wall hanging and make a present out of it...but have to wait and see the final result. Pics to follow... Moving on!
-
I took a metal straight edge (10cm ruler) and stuck some 600 grit sandpaper to the back of it...it certainly helps grip the plank when I'm trying to cut it. Good tip!
-
That is exactly what I do, Jamie...I'm just not very skilled at it I guess. Another thing is that basswood tends to get scored to a certain point then cracks apart along the cutting line unevenly. I'm sure with denser wood like the cedar or boxwood this is not a problem. Something to consider for future.
-
Well, Dave. I just ordered Toni’s half hull kit! I have the same opinion...I want to get my planking down so I’ll be jumping it on it part time as a fun distraction.
-
Actually - I'm sure that is part of the problem. I would back stop the plank and overlay the straight edge, but halfway through the cut, I would notice the ever so slight wandering for the edge from the marking. I agree with you and Dave that sandpaper may be a much better grip than cork. Luckily, I'm going to (hopefully) copper the hull, so I just need the shape...but this is giving me some good experience on what NOT to do...so I'll probably jump on the half hull kit from NRG and try to focus on planking technique as a fun side project.
-
HI Dave. That is precisely how I have been trying to taper - but my efforts are a bit below par. Only difference between how you are doing it and how I have been is that I used cork instead of sandpaper on the back of the ruler. I might try sandpaper...! A very helpful call from Kurt cheered me up. I'll jump back on the planking horse a bit later. May amuse myself with drilling and setting the treenails on the bulwarks... Moving on!
-
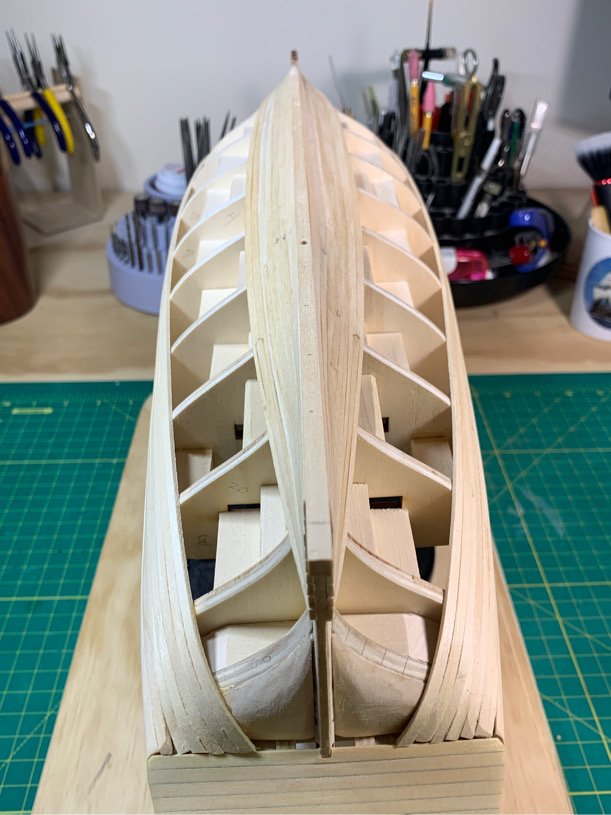
Well...I was not expecting perfection. I’m using this planking project to identify my weaknesses and build some skills. However, my frustration is boiling over. I won’t post pics because it’s too embarrassing... I realize my biggest problem is trying to cleanly taper a 1/8” plank. I just don’t know how others do it. Another problem is the basswood strips. I realize now many of them are wider/narrower than they should be...which makes the job even harder. The quality of the basswood strips is poor and the edges are extremely rough. However, I’m glad I’m using the basswood because I don’t feel like I could do a respectable job using nicer wood. I’ve tried lining the hull, but the lines are defunct after I lay a plank because I can’t get the plank to lay clean against the edge of the adjacent plank. Plus the taper (I am using a razor blade and straight edge - poor method) is not a straight clean edge...which makes it impossible. How do others taper their planks? Finally...I can see why having a seamless hull is the recommended way forward. The gaps between the frames only give you the adjacent planks to adhere to...and so you are completely limited by the frame edge for surface area. Makes setting stealers more troublesome, and you need to bend the strips across individual small sections instead of having a clean continuous surface area. Next time it’s filler blocks all the way. I also think my fairing was not spot on...as I have the irritating clinker built effect continuing along the front of the hull. I really tried to fair her up as tightly as I could. Not certain what to do at this point, so I’m taking a break for the weekend. I’ll work on something else. I’m sure I can finish the planking, one way or another...but it won’t be planking...it will be ‘dry walling’ since I’ll just be covering the hull with wood to fill and copper over. Was really hoping I could do a better job. Moving on...kind of....
-
You just described the method I’m using. 🤣
-
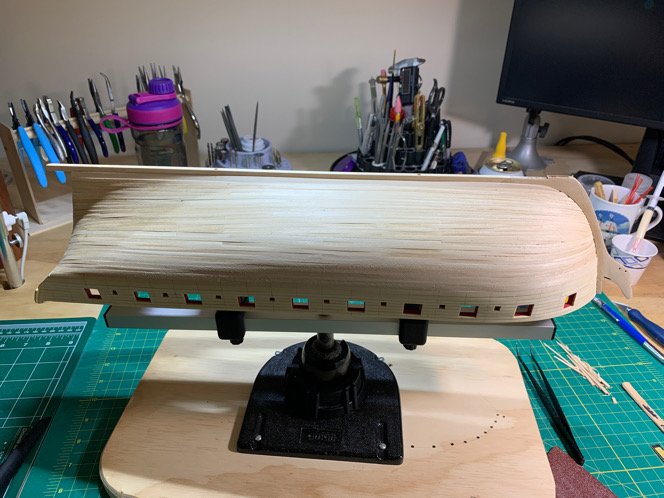
Planking continues. I’m doing my best, but it’s some rough going. Transom is especially difficult. The bend below the counter, and trying to accurately trim the planks is beyond me. Doing my best though. Have a feeling my planking job once done is going to look like a patchwork quilt! I see a lot of wood filler in my future. Moving on....!
-
No worries. I’m still slowly pecking away at planking and other side projects for my model. Now that it’s Thursday, I should be able to get some progress over the weekend. On a side note, I think I might have a way to make the holes for the Shreveport blocks. We shall see....
-
Outstanding job on the head rails! Tricky work which came out flawless!
- 950 replies
-
- 1
-

-
- syren
- model shipways
- (and 1 more)
-
Some folks prefer a more subdued tree nail profile. I tend to agree with you, Will. The darker treenails pop out and it’s a pleasant effect, especially when considering how much work goes into setting them in the model!
-
Hi Will. Thank you. Yes, I’ve read many many blogs and watched several vids. I am attempting to use the method lining off the frames. As with all things, seeing is one thing, doing and developing the skill set is another. 😏 Again, my problem is understanding the technique needed to consistently thin down a plank. it’s funny you mention the Winchelsea. That’s probably going to be my next build...which could be a few years out at the rate I’m going. 🤔 Thanks for the helpful feedback on Chuck’s YouTube vids. I’ll check them out!
-
Well, Dave...I'd say as a beginner, I'm probably right where I should be as my efforts are barely passable as far as I can tell. I see a crap ton of wood filler in my future! I had some initial thoughts of trying to get the hull planking done in a way that might allow me the option of leaving the hull natural and forgo the copper plating. But I don't think that will be possible. I'm doing ok...nothing horribly bad, but it's going a bit rough...the stern especially... I have learned a couple of things first hand that I will not forget for my next model: 1. Basswood strips are absolute crap. The basswood strips that came in my kit are bad even for basswood...knots everywhere, dry as a bone, and grainy as all get out. After I get the hull planked, I'm not using basswood again. 2. If I ever do another plank on bulkhead I will be using filler blocks between every bulkhead frame. I can see the imperfect depressions between the frames where I don't have fillers...and planking the bow and the stern area without full surface area makes the planking that much harder to put on. So filler blocks it is...live and learn 3. Spiling or trimming planks is a mystery to me. I need to technique to make uniformly trimmed planks. Have no clue how other people do it...I'm using a razor blade and a ruler! (I'm equipment challenged) Ok....off to bed. Pics to follow a bit later! Moving on...to dreamland.
-
Ugh. I really stink at planking. 😑