


Overworked724
-
Posts
1,263 -
Joined
-
Last visited
Content Type
Profiles
Forums
Gallery
Events
Everything posted by Overworked724
-
 Awesome! Another Syren build! Will watch with great interest. Love your building board...wow...looks like you need a pilot's license to run it! 😃
 -
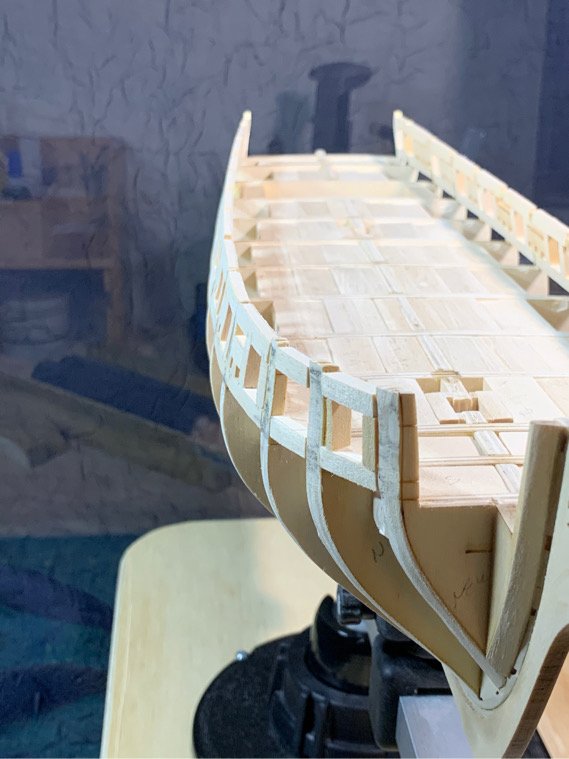
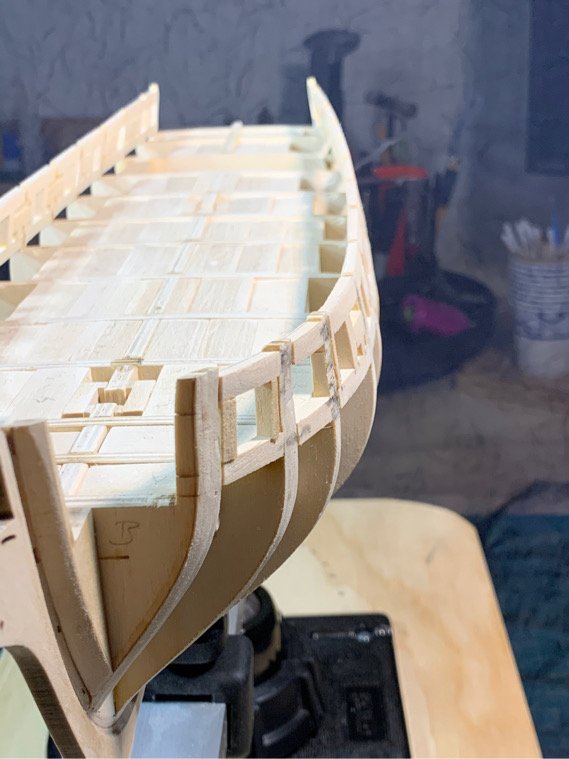
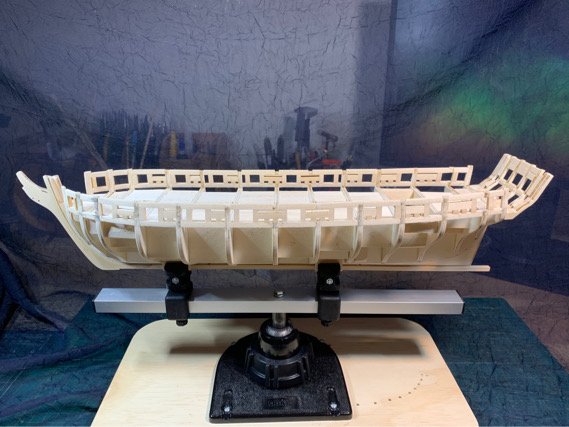
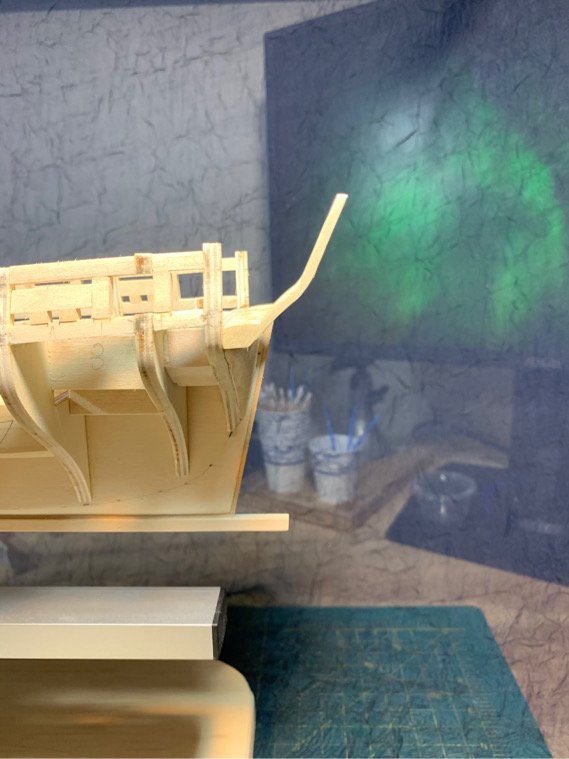
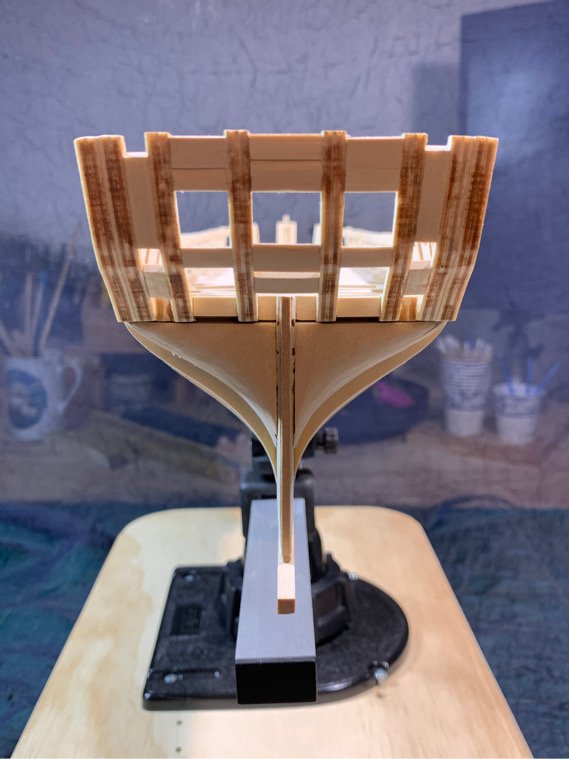
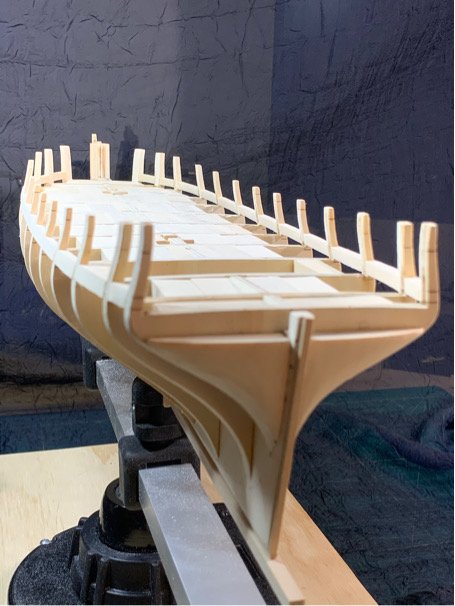
I realize I have been saying 'transom' when I actually meant 'stern framing'. Oh well...live and learn new nautical terms! Putzed a bit with the STERN FRAMING today...whittled the sides and counter protrusion so it marries up with my test planking. (I'm going to assume I'm close...but it's a coin flip!). Actually, my dremel and a tongue depressor sanding stick (240 grit) were all the tools I required to make quick work of the trim job. I think I have hit the point where I need to jump into the more difficult and finicky part. With my exterior sanded and ready for planking, I am both nervous and reluctant to permanently attach the stern frame piece to the ship. I also need to determine what wood I choose to commit for the exterior hull planking as well as the deck. Also - whether I want to take the plunge and make an attempt at creating my own hull sheaves (saw some builds where this really made a nice impression)...decisions, decisions... Moving on...
-
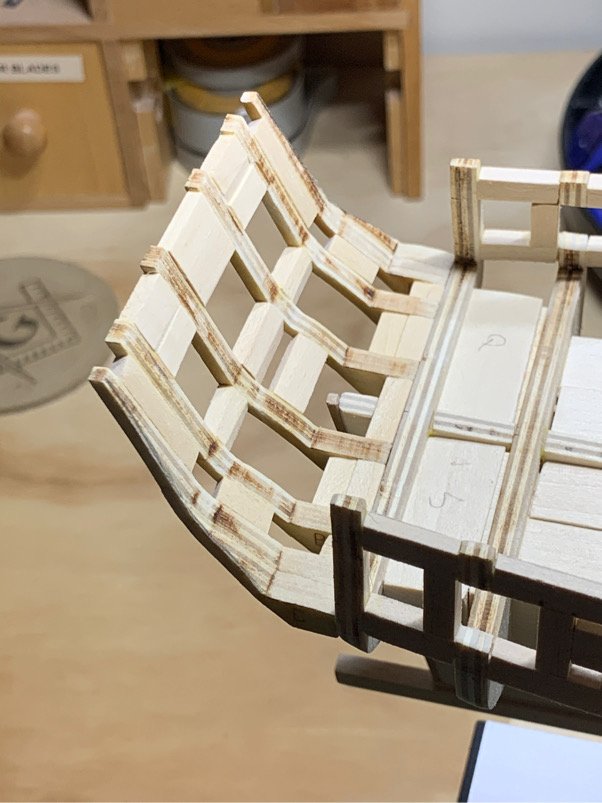
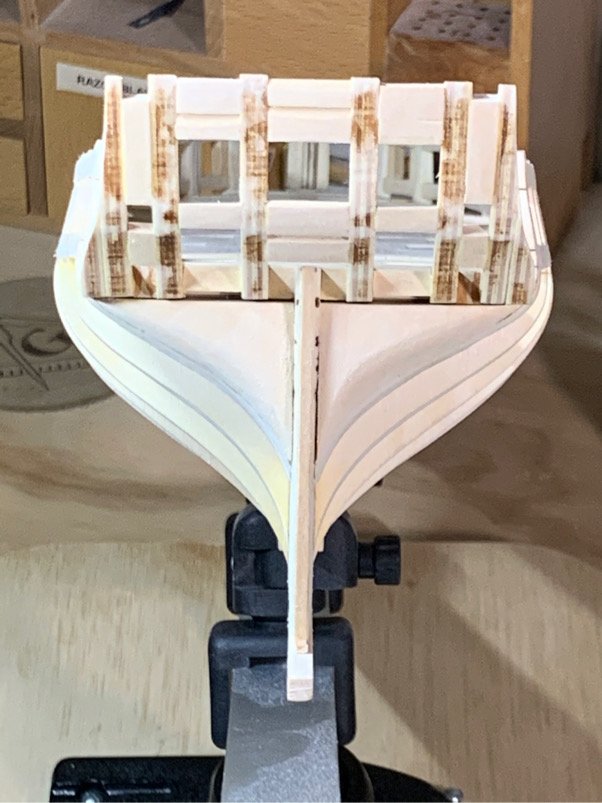
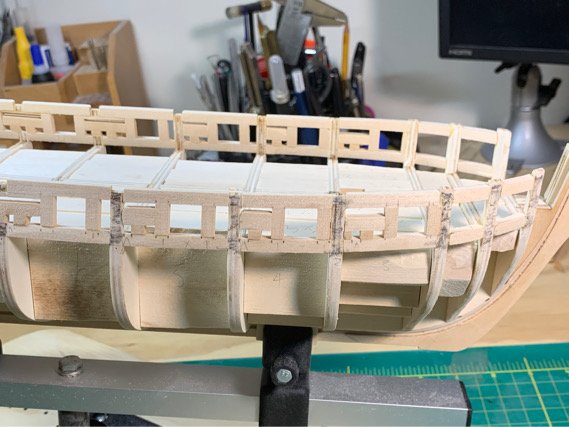
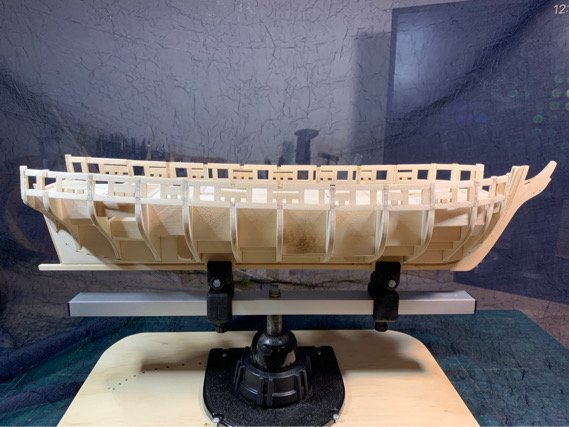
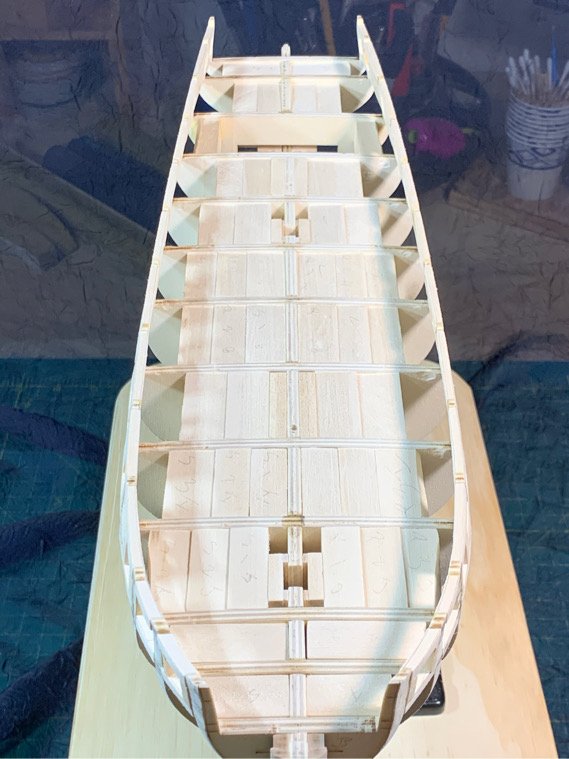
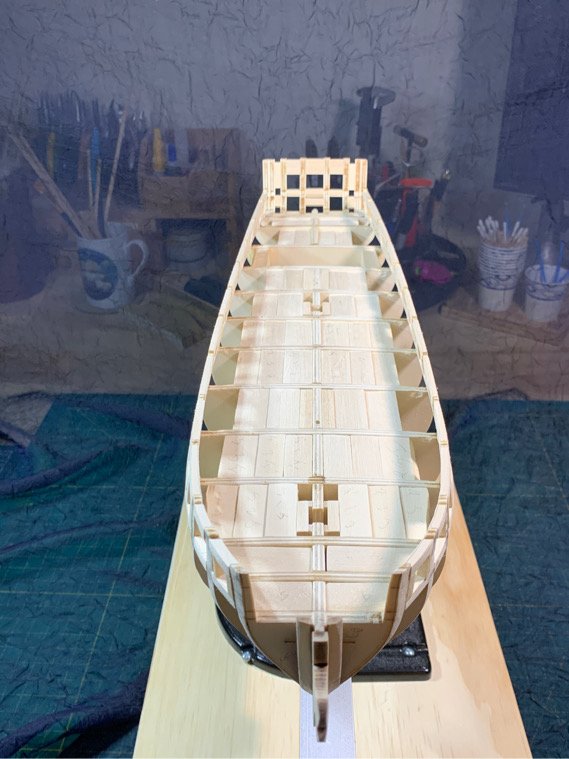
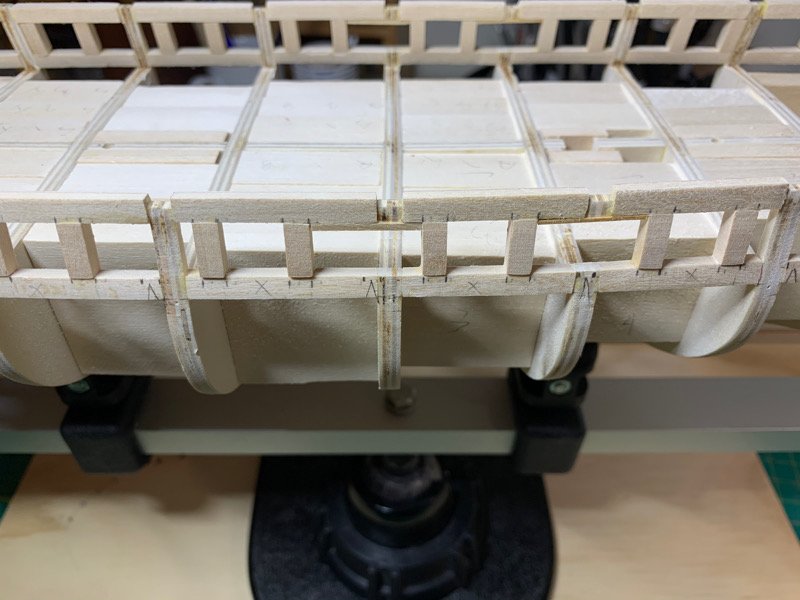
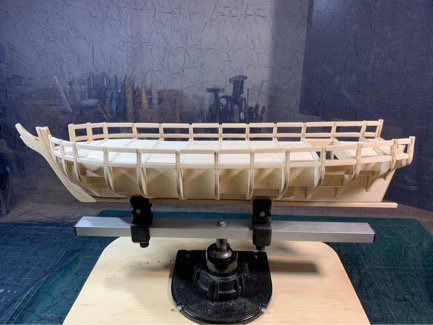
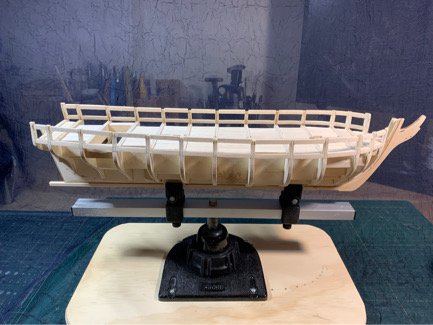
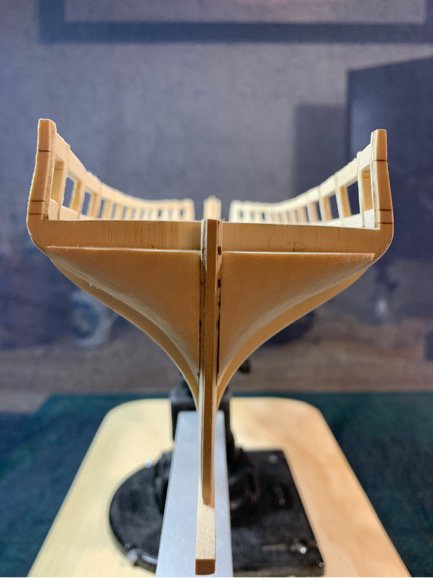
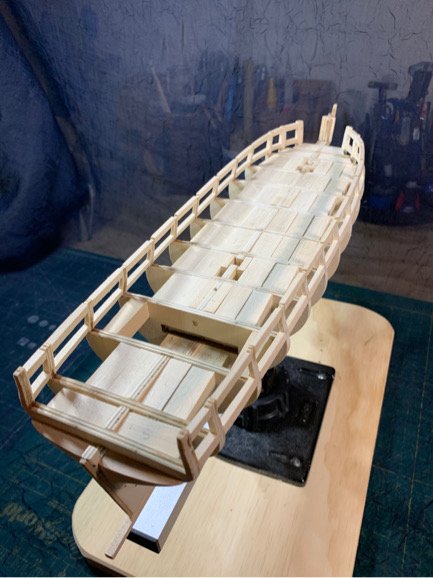
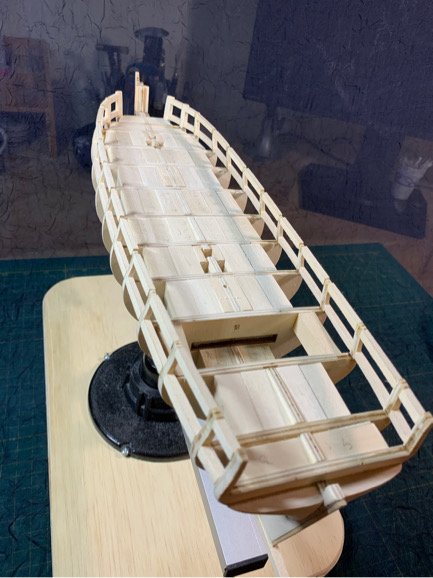
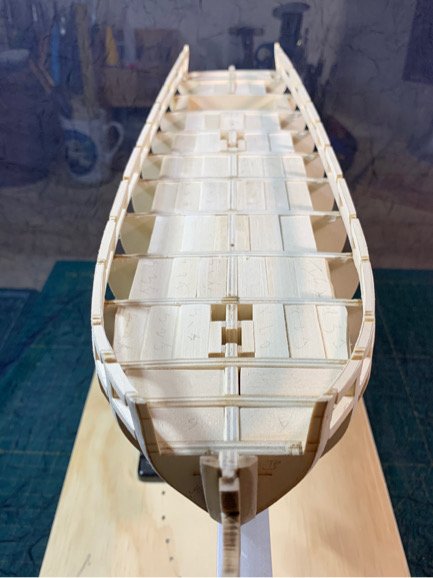
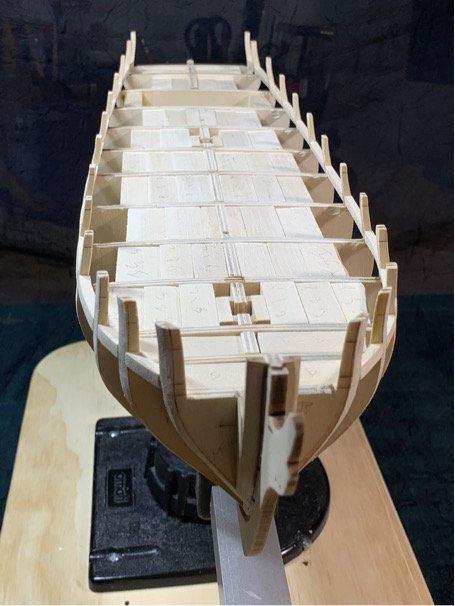
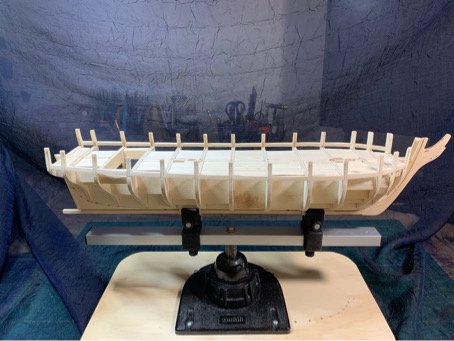
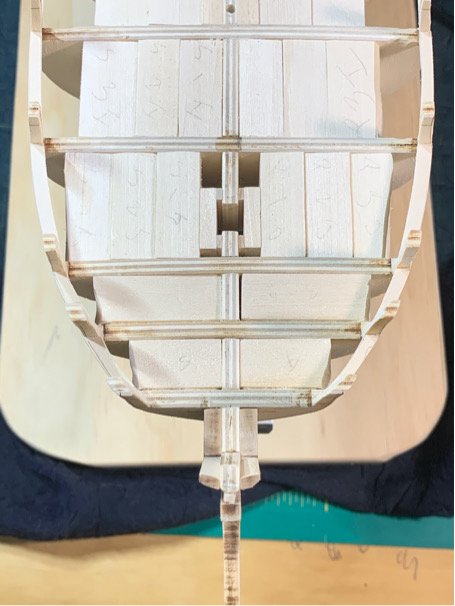
A bit of progress to report. I got the un and sweep ports in. Sanding down the outer bulkheads will be easier of than the inner side, considering the inner bulkheads have that slight 'lean', making sanding a bit more problematic due to the leaning in of the bulkheads. I think I've created 8 different sanding blocks - and about 5-6 different sanding sticks. One thing I want to keep from doing is over sanding. I'm using 160 grit paper and manually taking down the excess after trimming down the meat of the lintels/sills/filler blocks with a Dremel sanding drum. I used a pencil to color in the bulkhead frames which are recessed from the added blocks. Once the pencil marks start fading, I know I've sanded to the bulkhead. (Easy tricks are best when generating so much saw dust!) Outer sanding is pretty much done...and I'm amazed I haven't snapped anything else off! Lines look OK, and the gun ports and sweep ports are symmetrical and spaced appropriately. OK...is it me or is it just fun taking pics of your build? It's almost like I want to show it off before I do something horribly wrong which will take me weeks to correct! But one point of interest...I finally have an excuse to slip on the transom (which was built off the ship as a separate piece). Not time to glue in just yet, but I can at least show how easy it is to slide on...shaping the transom off the ship should be a bit easier (I hope). Moving on...!

-
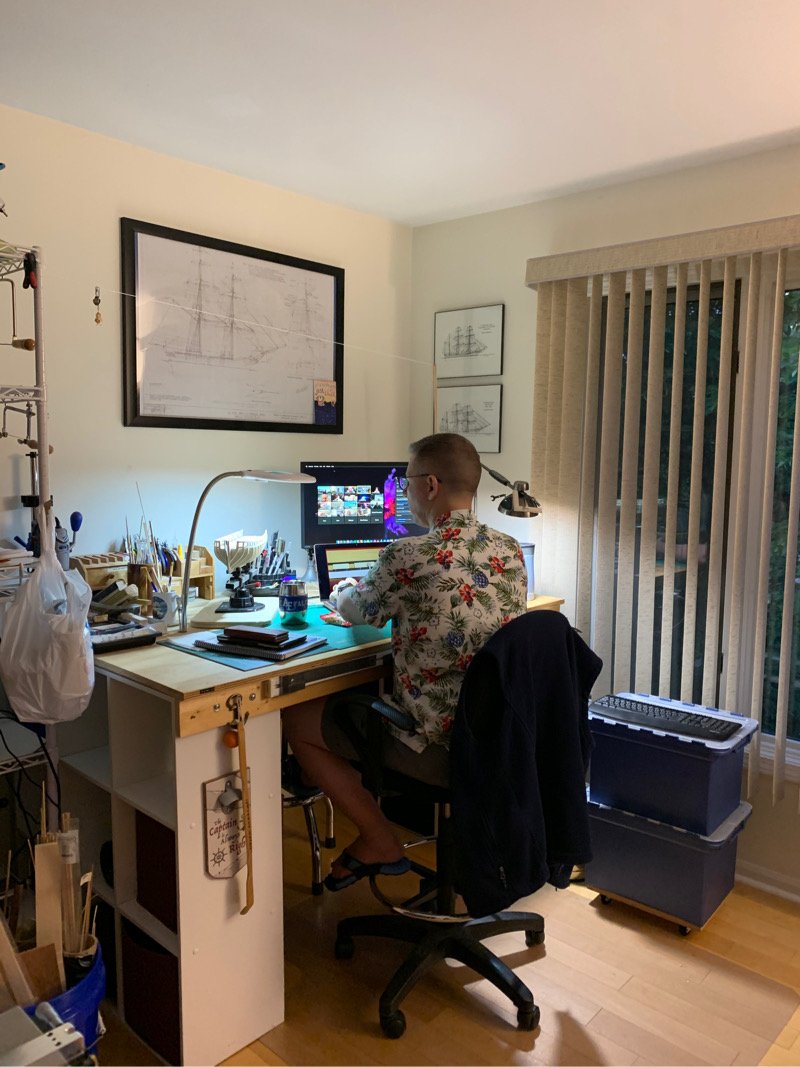
Well...made a mistake. Working late in the ship room and sawed off the wrong bulkheads. Don’t know how I did that! No major damage...decided to bolster the section with a piece of 1/8” thick strip wood used for planking. Got most of the sweep ports/gun ports setup...just a ton of sanding and shaping to do. Just for fun, here is a pic of my shipyard which doubles as my work from home office. The admiral ninja-snapped a photo during my recent ship club meeting! 😊 Moving on....

-
Awesome! She turned out brilliant! Very clean job. That’s toast worthy.
- 950 replies
-
- 1
-

-
- syren
- model shipways
- (and 1 more)
-
Slow on this part makes all the difference. I think it's one of the more eye catching parts of a copper bottomed ship. You are doing a bang up job so far...very clean!!! Beautiful!!!
- 950 replies
-
- 3
-
-
- syren
- model shipways
- (and 1 more)
-
Welcome!!!!
-
I’d love to do this with you and the gang, Chuck. But I Don’t think I have the bandwidth for this and to complete the Syren. Hoping for another scratch build opportunity with you on the forum soon since I’m still developing my skills! 😊
-
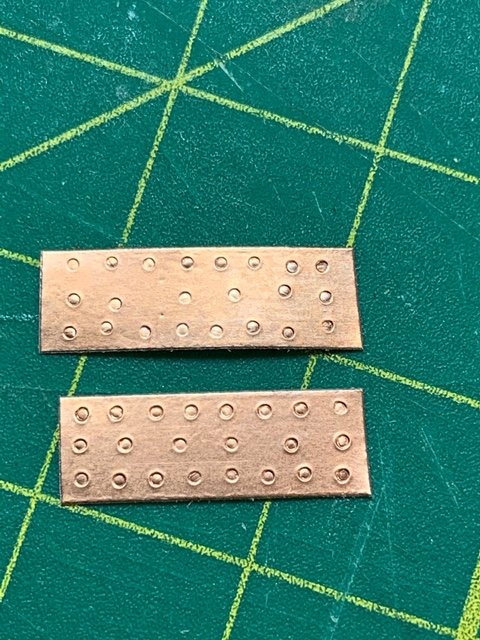
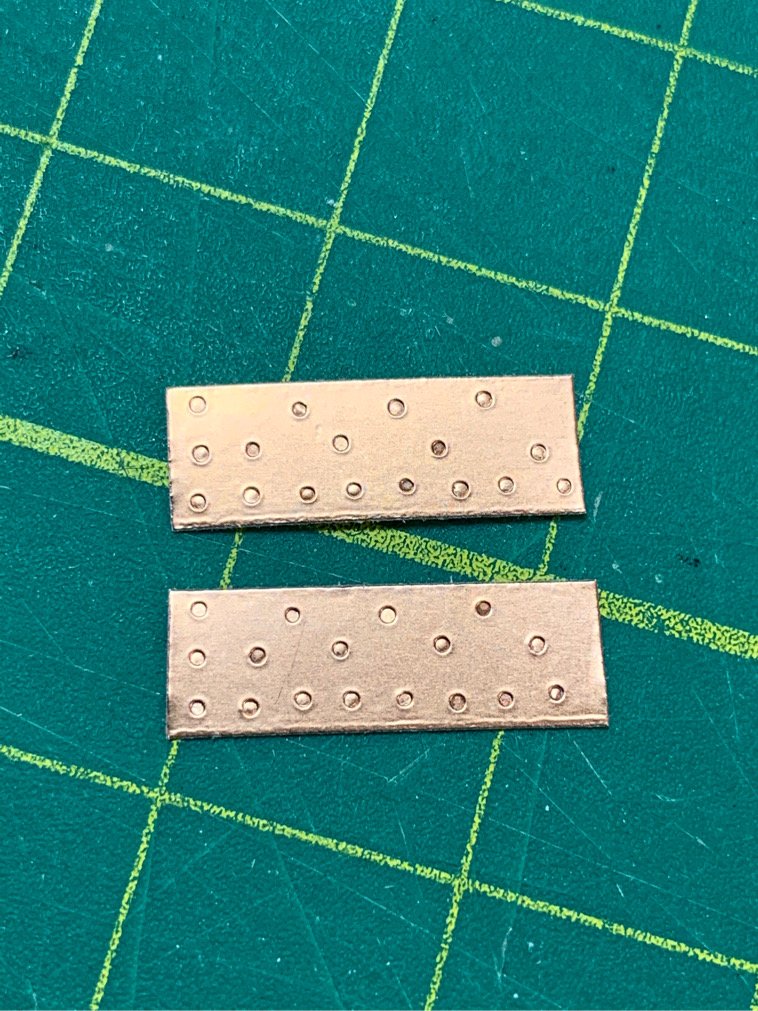
Thanks, Dave. Everyone seems to have a bit of a different approach to making the bolt pattern on the brass plates. I’m glad I did this now though...I could see myself getting hung up and discouraged while my ship sat in the background waiting to be coppered!! 🤣
-
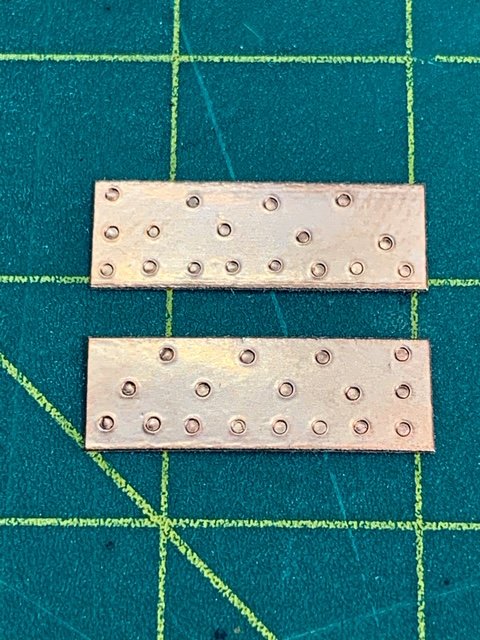
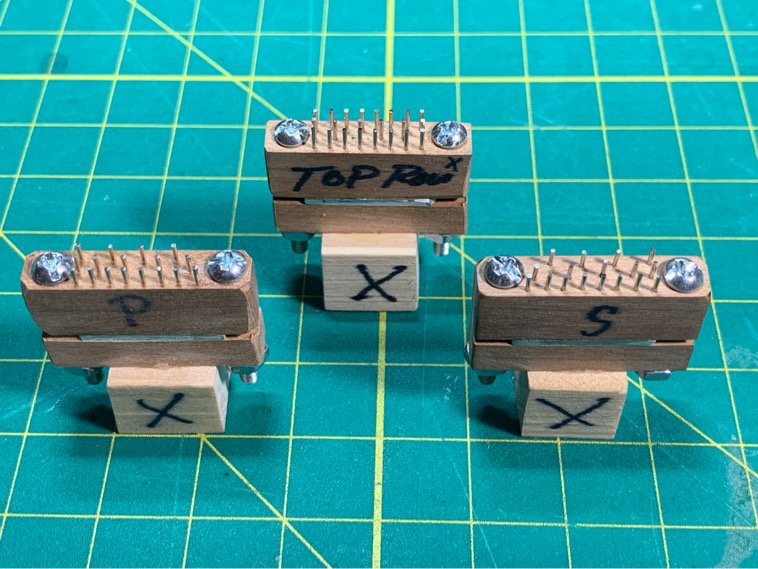
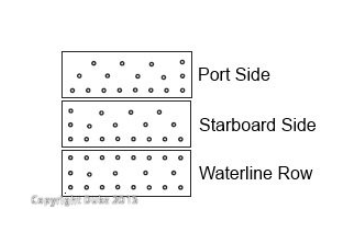
Well, after being reminded (thanks Dubz) that I had not yet made the third template for the top row of brass plates, I took time today to make it and discovered a couple things. In making my top row template jig, I noticed the 'bolts pattern' in the trial copper plate were a touch "off kilter". I would guess that in drilling the holes in the cherry wood I used for the jig, the tiny drill bit might be following the wood grain and perhaps coming through the other side a bit off center from the top hole. Since the pins in my jigs are not glued (friction holds them in), and since the top and bottom of the wood pin holder are the same (there is no 'handedness' like the Port and Starboard templates), I just reversed the orientation of the wood and pushed the pins through the other side...and voila...straight bolt pattern. See below...the top plate was the original wood/pin orientation, and the bottom pic is reversing the wood and pins so the pins are coming out the face of the side which was 'marked and drilled'. Not certain how else to describe it, but my earlier posts show how I made my templates and they are easy to modify. You can see the bottom plate in the pic shows a marked improvement in the alignment of the 'bolt pattern'. It turned out pretty good! After getting my 'Top Row' jig made, and since I was plunking with my brass plate jigs, I noticed that I accidentally made two Starboard template jigs! Well...this sort of pissed me off. I was lamenting making another jig...However, since I had such success in reversing the pins in the 'Top Row' jig above, I decided to do the same for one of my Starboard template jigs. Reversing the pins simply results in a mirror image...or a Port side jig! The result speaks for itself...I am glad I designed my jigs for easy disassembly without glueing in the pins!! It saved me a lot of frustration after discovering my error!!! TaaaDaaaa! In the end, my trio of jigs work nicely, and give consistent plates...and they look like weird chess pieces. Moving on....back to the gun and sweep ports, and the nail-biting pressure of trying not to snap off the little bits!
-
Ah!!! Thanks, Dubz for for the reminder...I forgot to make that one as well. However, I note many of the build just continue to use the port/strbd templates for the top row which still looks good. But the waterline template give a more finished and historic look.

- 950 replies
-
- 2
-
-
- syren
- model shipways
- (and 1 more)
-
Hope it works out for you, Steve! I’ve been using this same one for a couple of years with no issues. Good luck!
-
Hi Dave A couple points are that it’s thinner by about 0.5” and it’s a plug in vs battery. I personally like the plug in...power is constant under extended use with no recharge time.
-
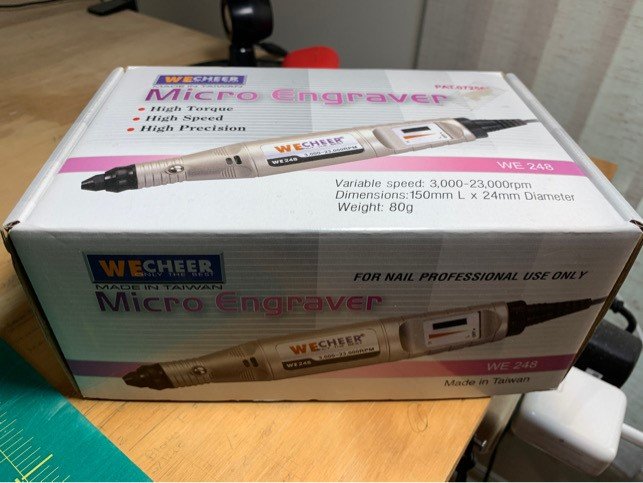
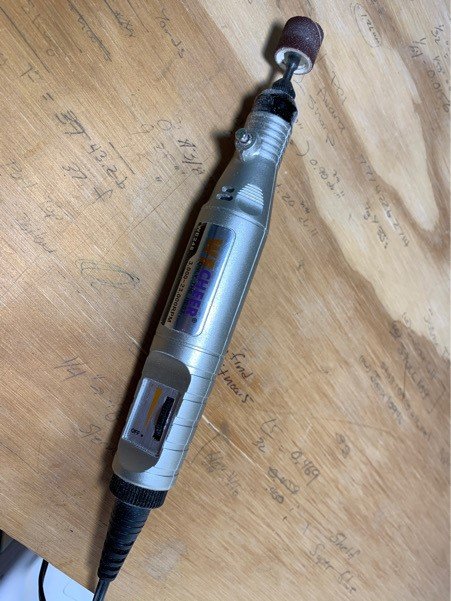
Hi Dave. I'll claim a bit of a 'lie'. In my reference to a DREMEL, I used that as a sort of blanket term which is commonly accepted as a rotary device. In fact, I use a rotary tool which is NOT a DREMEL. I'll claim some benefit from my discussions with Gus Augustin. Gus is a sculptor, and he uses small rotary tools often for his carvings for his ships (miniatures). One such tool he uses (and I invested in as well) is a variable speed, lightweight rotary tool by WECheer (WE 248). See below for a pic. This is actually a micro Engraver, and is wonderfully easy to use, very slim (1" diameter) and lightweight (NOT BULKY like my DREMEL), and the variable speed is easily and smoothly adjusted using the thumb wheel. The colettes from my DREMEL 3000 fit in this Micro Engraver. What I really love is that the response and accuracy of the rotation speed (which ranges from slow to light speed (23K rpm)) are stellar...so using a drum sander (or micro drill bit, carving bits) is a breeze. Imagine your a dentist...this thing spins incredibly fast, which actually gives you much more control of the wood you take off - with no vibration whatsoever. I tried using my variable speed DREMEL, but found the RPMs would randomly change and the bulkiness (~ 2.5") made it hard to handle as well as see what you were sanding! If I had to compare - imagine if you had to swim the length of a swimming pool and you had a choice between putting on flippers (Micro Engraver) or mountain climbing boots (DREMEL). One makes the job easy, the other creates more work than it actually does. OK - so take this at face value. (But you can get these on Amazon for 70$ USD! Which is why I got a spare - just in case)
-
Dave, I was wondering what tool this is with the small round end? Do you know where I can get one?
- 389 replies
-
- 1
-
-
- bluenose
- model shipways
- (and 1 more)
-
Outstanding, Will. Another Syren build to keep me motivated and well read! 😃
-
Hey, Will. Love your choice of Alaskan cedar. I have a stash of that as well as some boxwood which I plan to use for planking and deck. Basswood is hit or miss...mostly miss. It's so thready and difficult to work with.
-
I think those look fabulous. Actually, I used quite a lot of tape building up my jig and attempting the removal/application process. That is a whole new skill set and it looks like you already have it nailed down. You plates look fantastic. You did a marvelous job on your template jig. I would NOT worry about the new penny look...it's copper, and it will oxidize very quickly over the next several months. I'm looking forward to watching your coppering progress!!
- 950 replies
-
- 3
-
-
- syren
- model shipways
- (and 1 more)
-
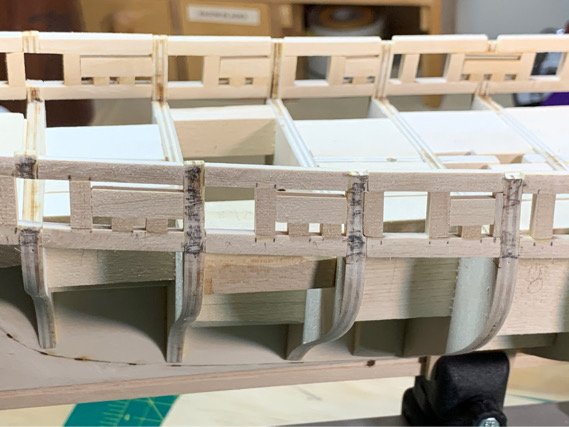
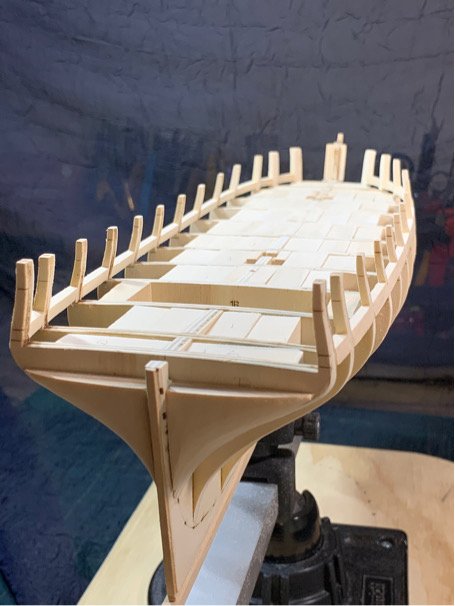
Well, I got the lintels in. I must say, I think the man (or woman) who invented the Dremel drum sander fitting should get a medal! I was able to fair down both the sills and lintels without too much difficulty, but going very slowly. I would say the fairing is still 'rough' as I still have just a touch overhang either side. Instead of fairing all the way down to the frame at this point, I'm going to move forward with installing the gun and sweep ports. I'll save the final fairing until the bulwarks are fully built (and more solid - I'm nervous about another breakage - I've had 4 so far!). After I rough sand the middle bits which frame the ports, I'll fair down the inboard and outboard to the final shape. And...here be some pics...Yar!! Moving on...to a beer! <cough!> I need something to wash down the taste of basswood sawdust!!
-
Thanks, Dave! Very slow going...but I keep myself occupied during breaks reading everyone's building logs (BLogs)! Your deck fittings are turning out incredible...I'm learning a lot!
-
Awesome work, Dave!!!
-
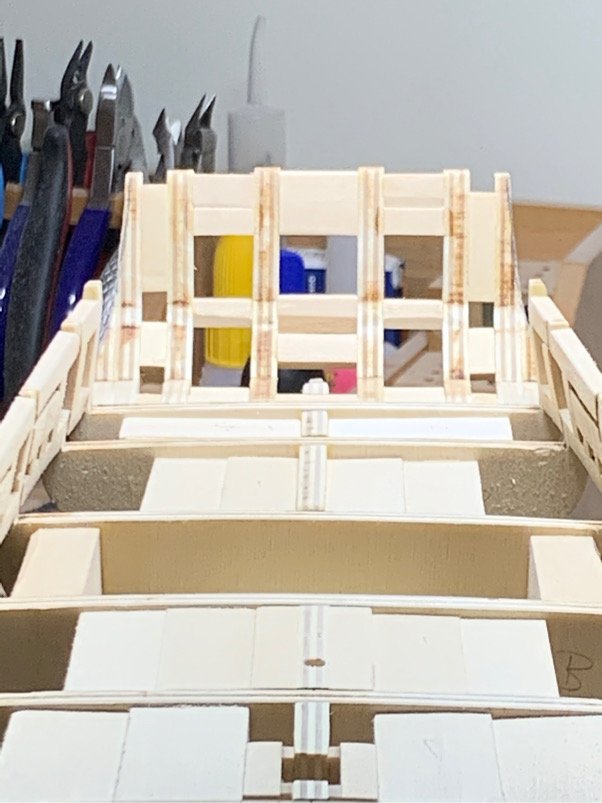
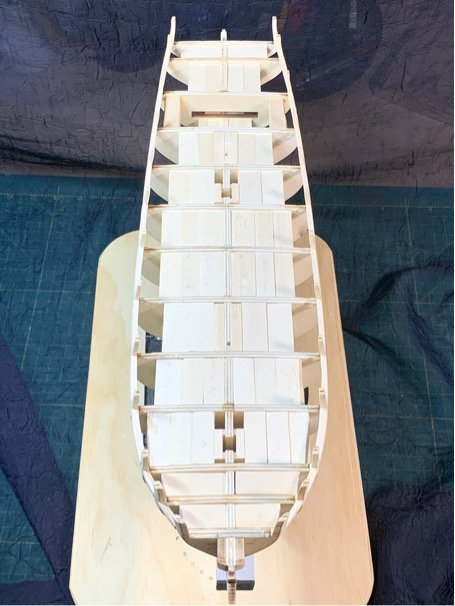
Slow going here. I got the sills in...and finished off the initial sanding (what a mess). I find myself making multiple little sanding sticks/blocks, and switching back and forth between my Dremel drum sander and sanding by hand. Always too nervous I'll over-sand or snap something off...which happened (3 times). I broke one frame head where the laser cutter had cut much too deep. Many other folks had noted this, and as careful as you might be, the occasional breakage does occur. Easy enough to glue back on - but alignment can be tricky. Also ended up accidentally pushing 2 of the sills out during sanding...again, easy enough to glue back in, just had to be careful of alignment. (Did I mention I'm not very good at sanding?) Here a a few pics of the finished sill. The Admiral gave me an old sheer window curtain as a background drop to mask the noise of my workbench. Today I'm starting on the lintels...looking forward to the day when the bulkheads have some actual muscle and support - so I can stop worrying about breaking off the little bits! Moving on...
-
I swear by tung oil. It really made your deck 'pop'! Only thing I used on my Sultana and the grain of the wood glowed afterwards. You might find yourself seeing the finish dull after a time, but you can easily apply another coat/touch up as needed without hassles, and at any stage in your build. I love the stuff...I think wood loves it, too! Beautiful work!
- 950 replies
-
- 2
-
-
- syren
- model shipways
- (and 1 more)
-
That’s very clear! Do you know what size the round nose pliers were? Those are very small hooks! Nicely done.
-
Wonderful job! Enjoying your build and learning quite a bit!