


Overworked724
-
Posts
1,263 -
Joined
-
Last visited
Content Type
Profiles
Forums
Gallery
Events
Everything posted by Overworked724
-
 I did plan to make the holes after sanding down the inner bulwarks and prior to installing the inner bulkhead planking. The problem I referred to is in the technique needed to make straight edges to the holes, and making the holes themselves...without marring the hull overmuch. We shall see!! Moving on...
 -
HI Dave. The single blocks I made exactly one plank width. The double blocks are by necessity a bit wider, but those should be slightly easier to cut as the stern area has no bulkhead behind that are of planking. I'll do my best!
-
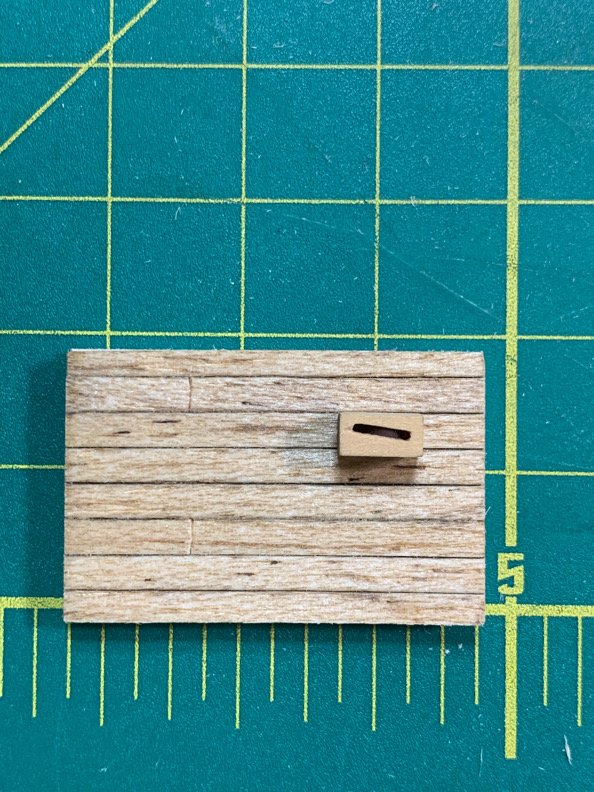
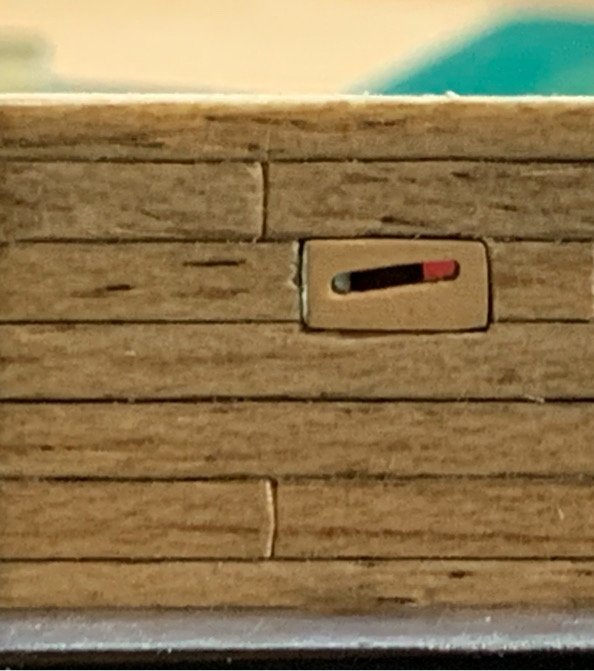
Took a stab at trying to install one of my earlier sheave blocks. I used the earlier faux deck made of basswood and added some filler blocks to simulate the thickness of the bulkhead. In the end, after making a horrible mess, I was able to get the block into my fake bulkhead. It’s ok...but It’s not as clean as I’d like. I wish I’d have made clean openings to instal the blocks while building up the exterior bulkheads. 😣Sanding sticks and pin vise with drill bit... I’ll be sweating bullets when trying to make these slots. 🙄 OK...
-
That’s a ton of work, Will. Those tree nails are always monotonous. I’ve just discovered audio books to make the time pass more smoothly. Got any background attention grabbers you use to take the edge off? Looking great!!!!
-
Looking nice! Love those detailed pieces!
-
Thanks, Will! Very much appreciated!! Like you, I get ideas from other build logs and read yours as well. Many different ways to simulate the sheaves. I liked your approach to making the sheaves. Since I don’t have a mill or mini-lathe, I needed to go a bit out of the box...which is the fun part of our gentle hobby. But...Making them is one thing...getting them on the ship is another. Seems Jesse’s build log was the right approach. Have the sheave blocks made and make the openings for them as you plank up the exterior bulkheads. 🤔 I’ll make the block openings before I put in the shear strake. So I’m now working on that approach while I continue to noodle over planking. Planking is going slow...but here are a couple of boring pics. 😊 Moving on...!
-
Didn't think of this until now....but this little side trip into making the sheave blocks is identical to how I would make the sheaves for the catheads. The block height for the double sheaves in the stern bulkhead is roughly the same as the cathead width...awesome. One less thing. And what's funny is that I just imagined a simple jig to make reproducible cross sections with exact thickness...will try on the catheads!! Moving on...
-
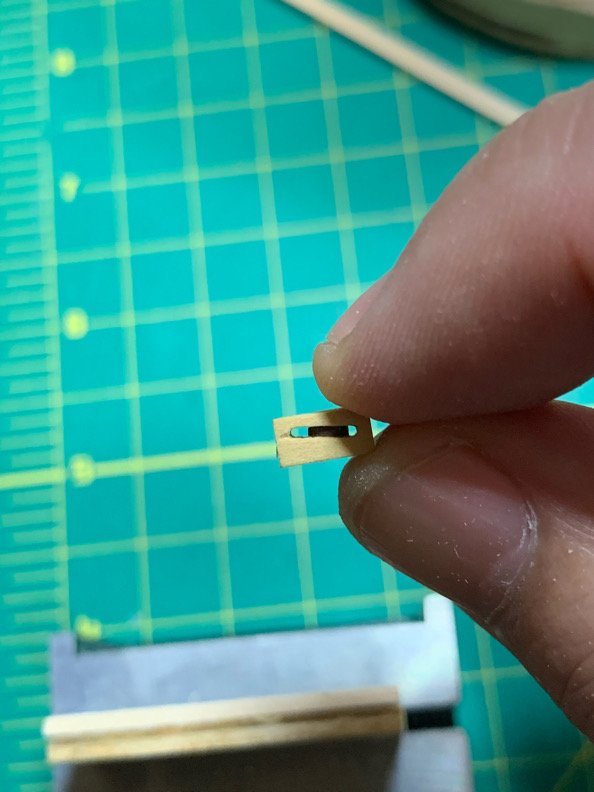
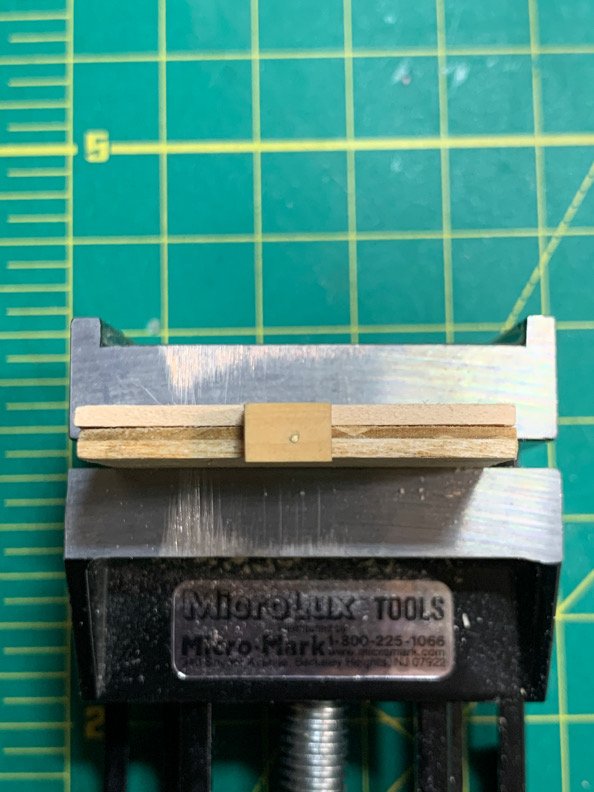
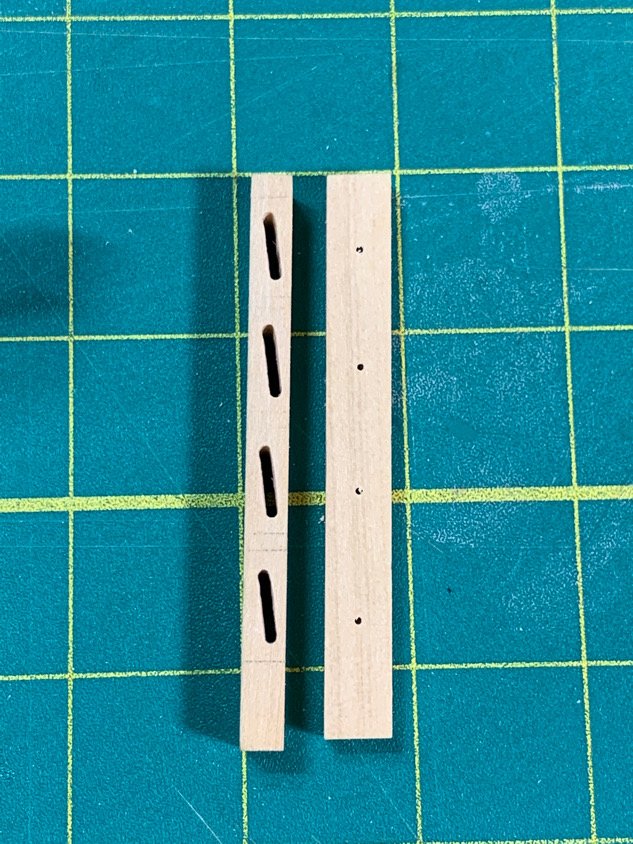
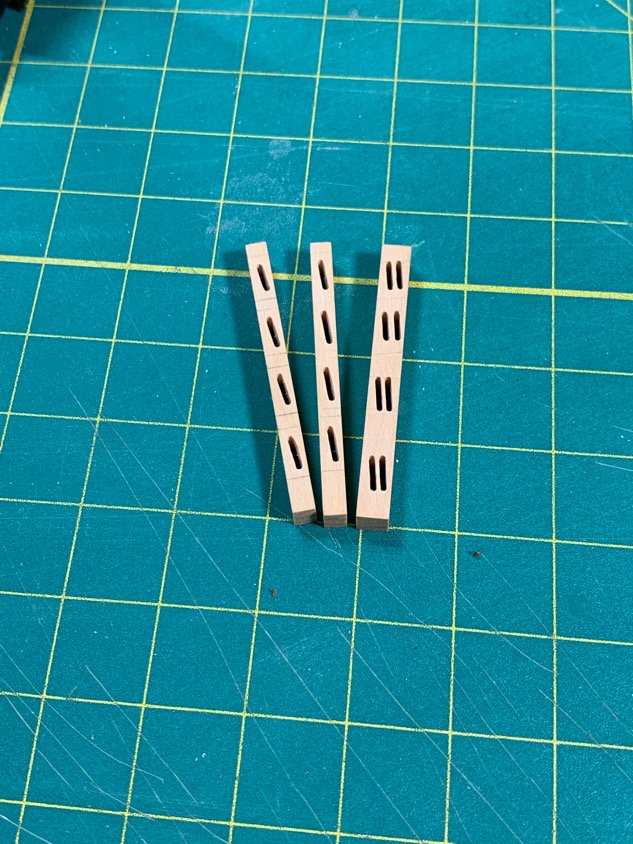
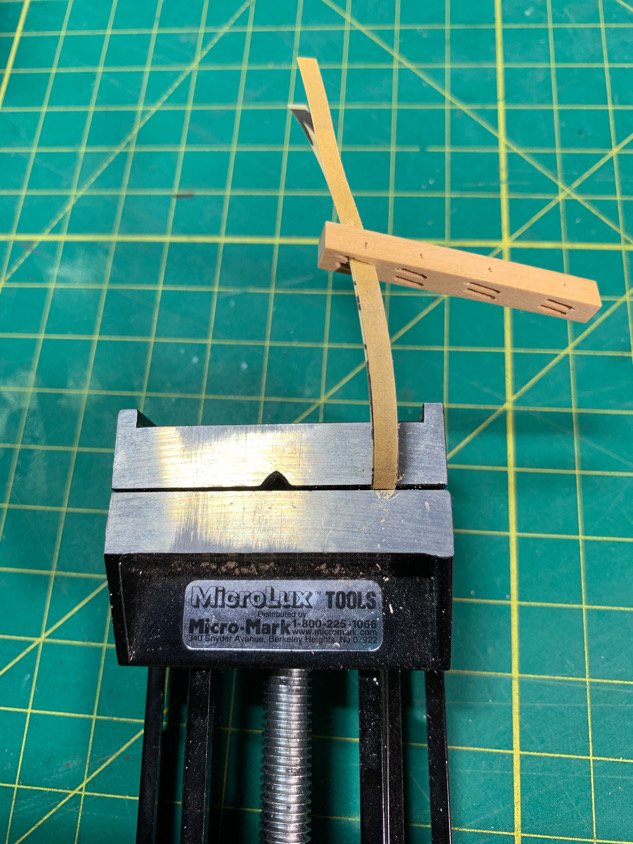
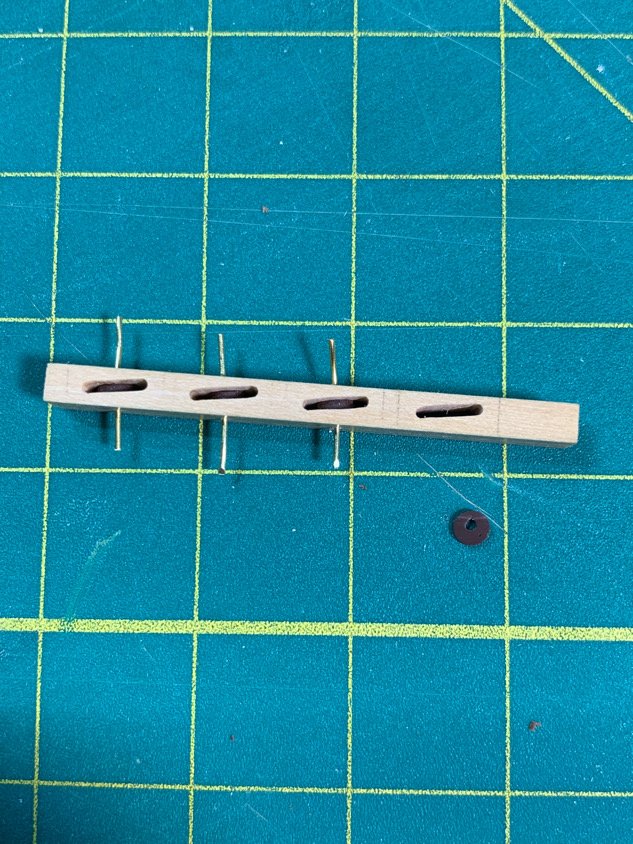
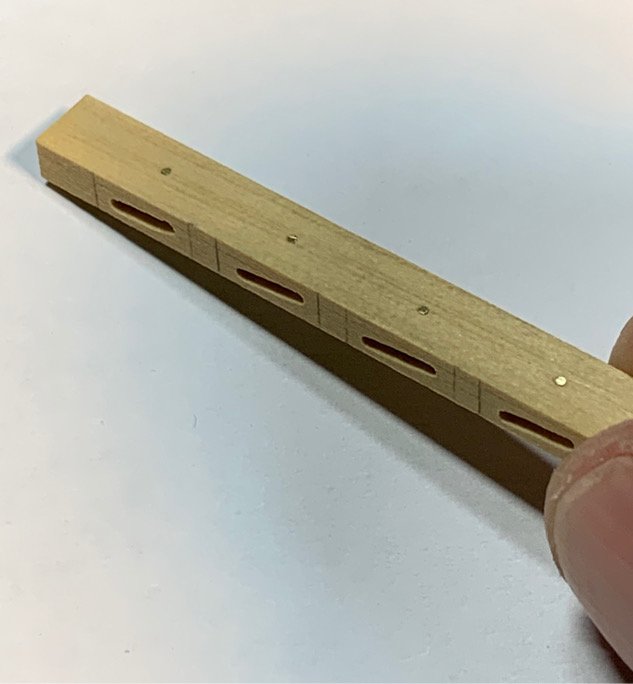
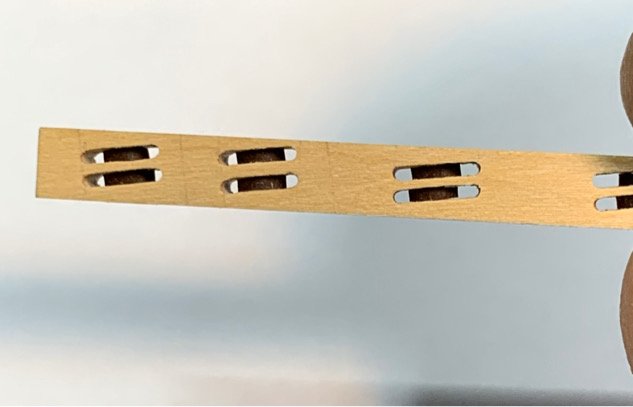
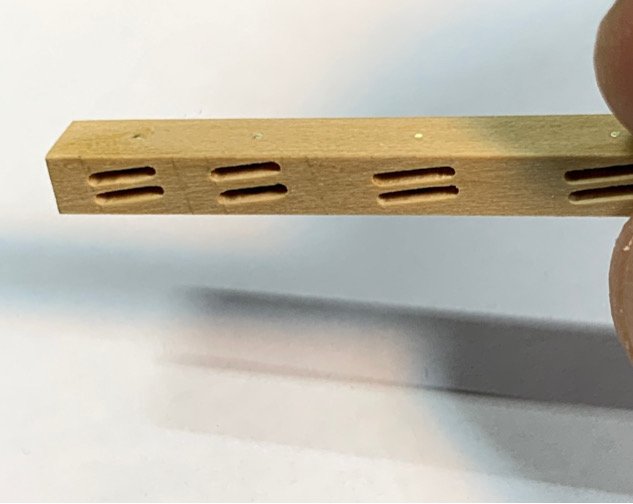
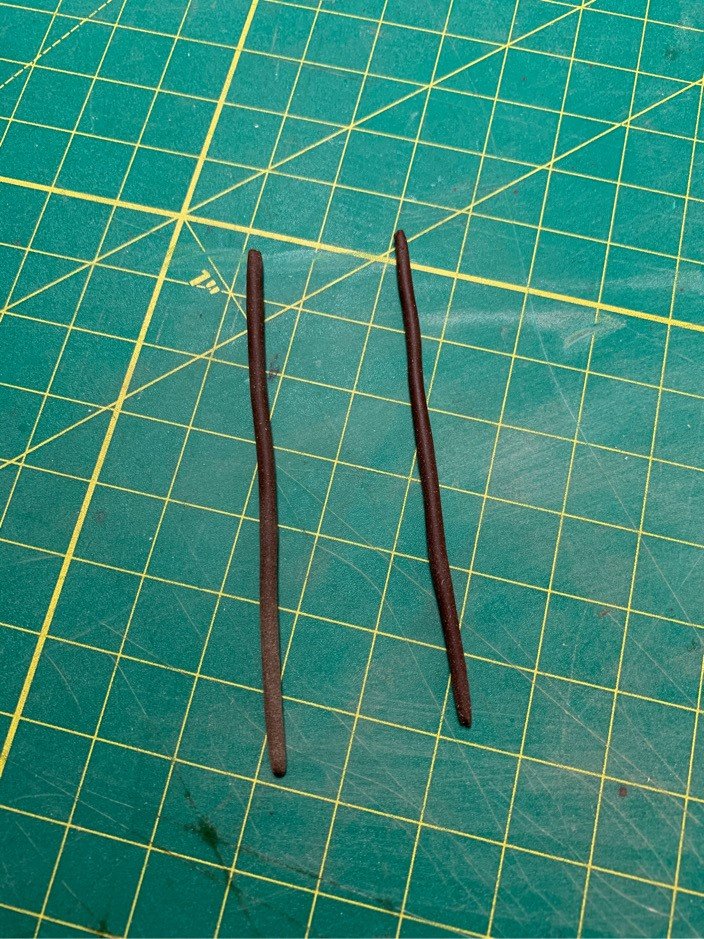
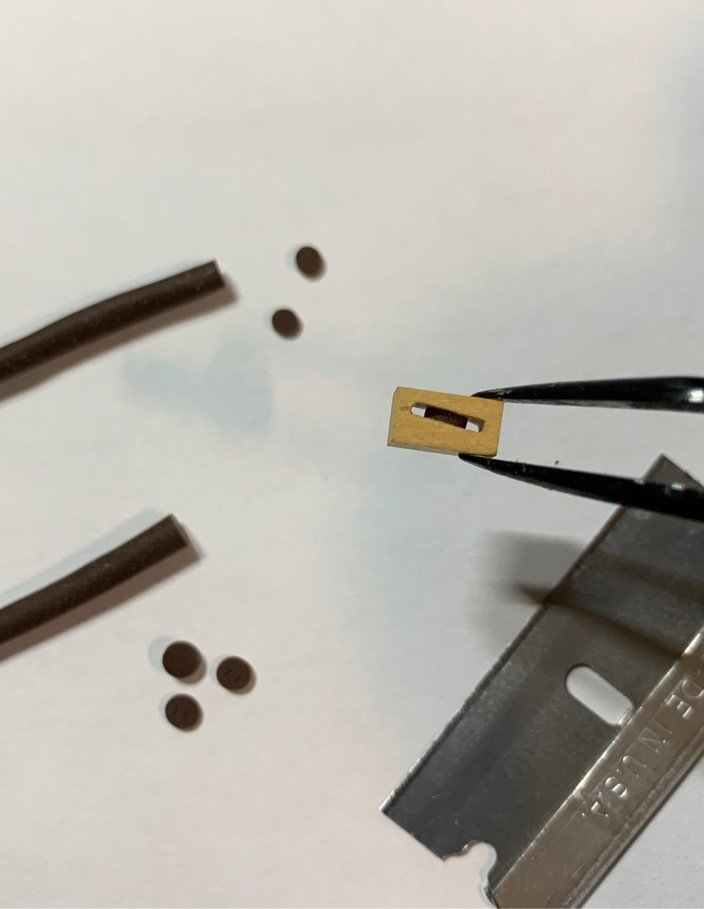
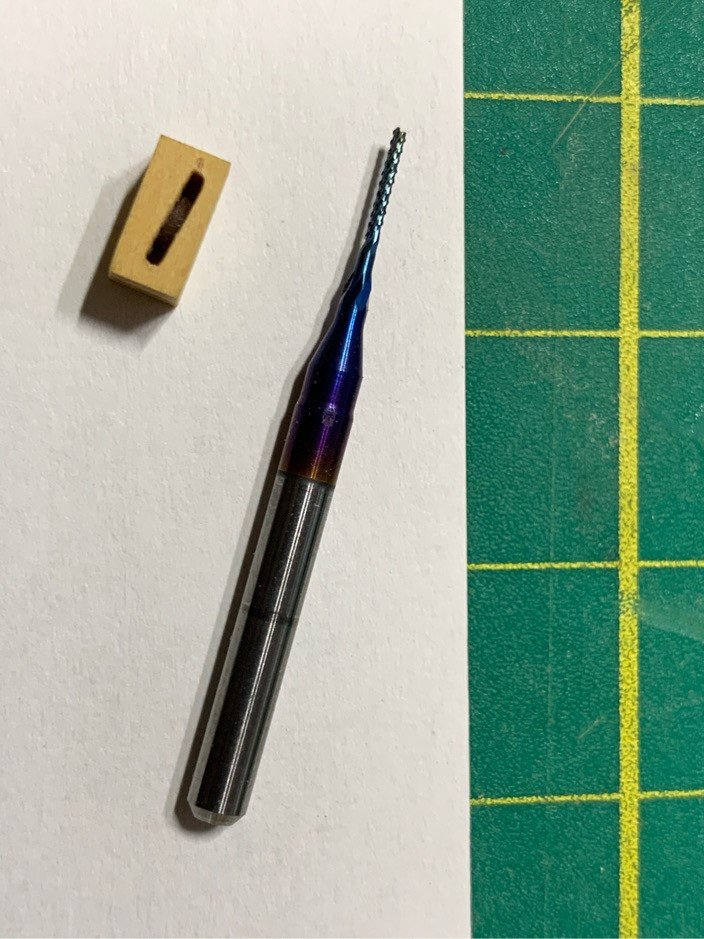
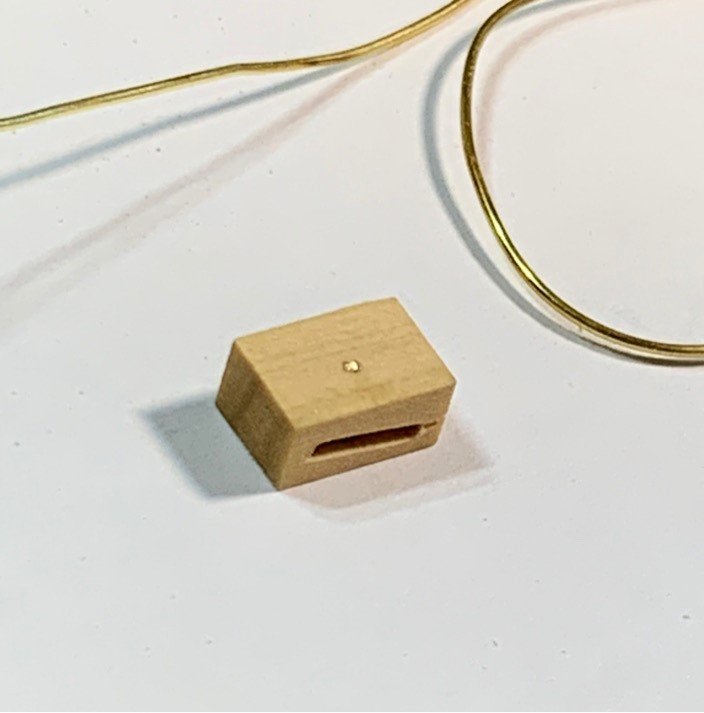
"Bringing in the Sheaves"...continued. So I cut out the holes for the single and double sheaves. After cutting the sheave holes, I reset the piece on it's side in the mini vise on my x-y table at the proper angle to drill the hole for the axle (is that the proper term) which will be 0.50mm brass wire. For each section of wood, I could make 4 blocks comfortably, so made eight (8) singles and four (4) doubles. I like to think I made this many to pick the 'best of the lot', but it's really because I know me and I screw up a lot! After getting the sections predrilled, I did a brief sanding using 400 grit sandpaper. I cut some strips that would slide into the sheave holes, and connected them (back to back) in my mini-vice. Then I just slid them into the sheave and I could do a touch up sand on both sides of the hole’s interior. (I'm not looking for perfect...I'm looking for decent!) Afterwards, I cut my little sheaves from the mini-Skulpy noodle, and lined them up with the axle holes. You'll notice the Skulpy sheave in the pic below has a hole in it. I just ran my pin vise with a little drill bit down the center (again - I'm just eye balling here but it worked.) I got the wire set in the block with CA by touching one side of the wire with CA and slowly pulling the other end through until the wire seized in the wood. Then I trimmed off both sides and sanded with my 220 girt sanding stick (my most useful tool!). Now the strips with the sheaves can be put away until I'm ready to cut the individual blocks to place on the ship. The blocks have enough room on front/back to sand down if required. Not sure if they are accurate, but this is the best I can do with them...and I prefer these over drilling holes and simulating the sheaves by carving. I don't trust my expertise enough in carving to do that... Moving on....

-
Oh my GOD!!! You started my Pg 6 with an emoticon!!! 🤣
-
Those turned out beautiful!! Very clean work!
-
Way to go, Dave! There’s something very therapeutic about sticking up on new toys for the shipyard!!!👍🏽👍🏽👍🏽
-
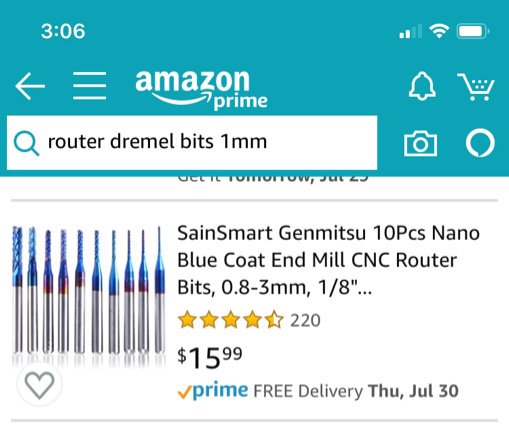
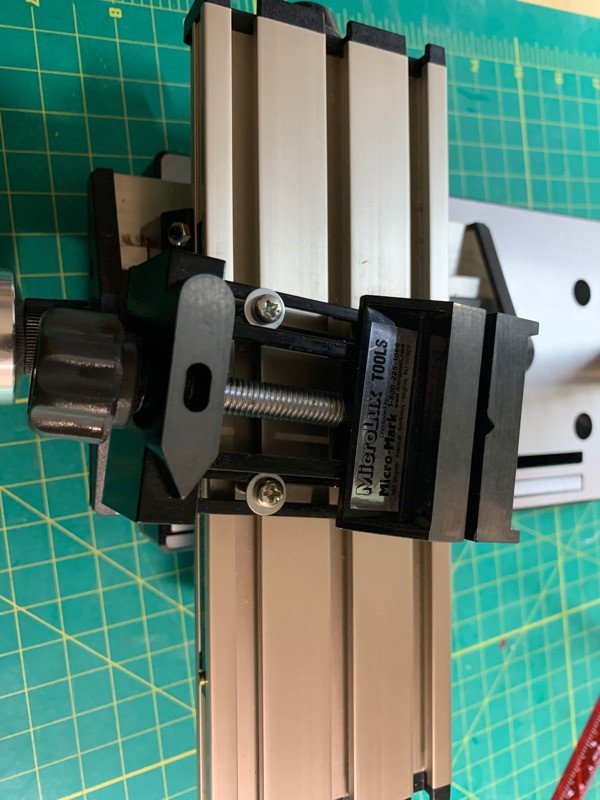
Hi Dave! Yep!!! That’s it exactly. I Got these on Amazon. In the drill press they operate like a regular drill bit but it is more rigid. The sides have carving surfaces. After the initial holes are drilled, you can insert the rotating drill bit inTo the end hole and slowly shift the x-y table along the path of the holes...very slowly since any lateral pressure might snap the router bit. This will easily clean up the hole so the sides are smooth.
-
Very nice!
-
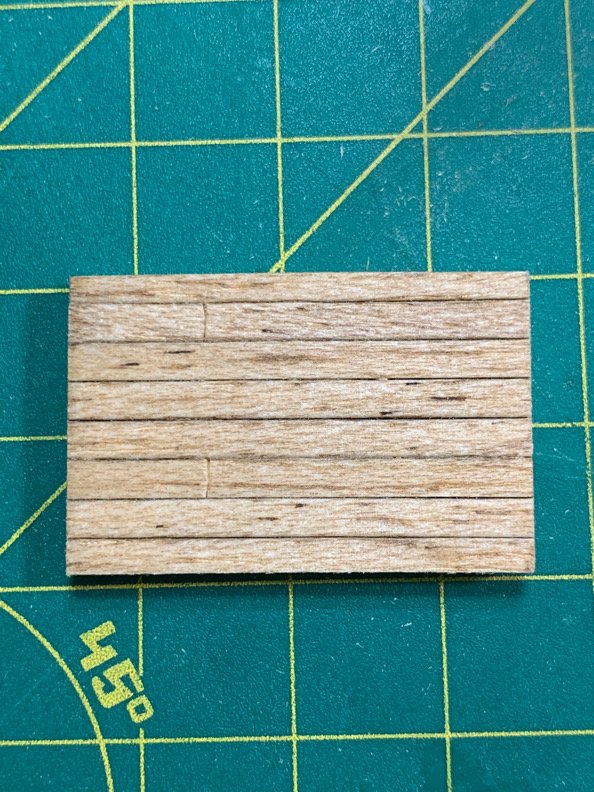
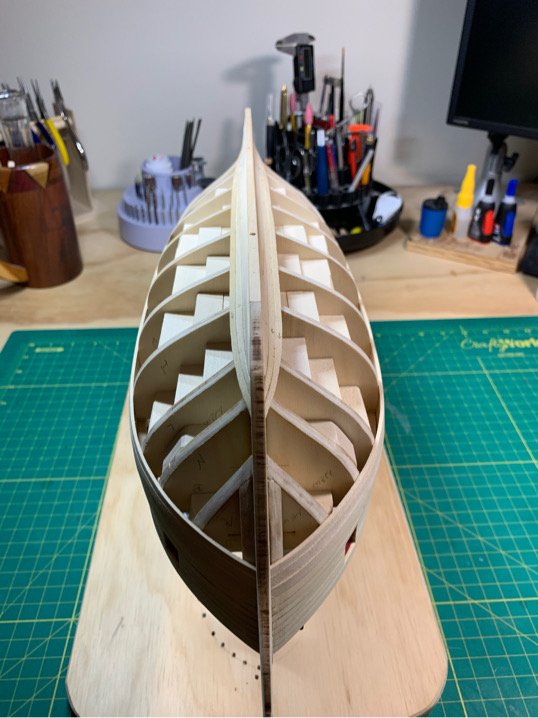
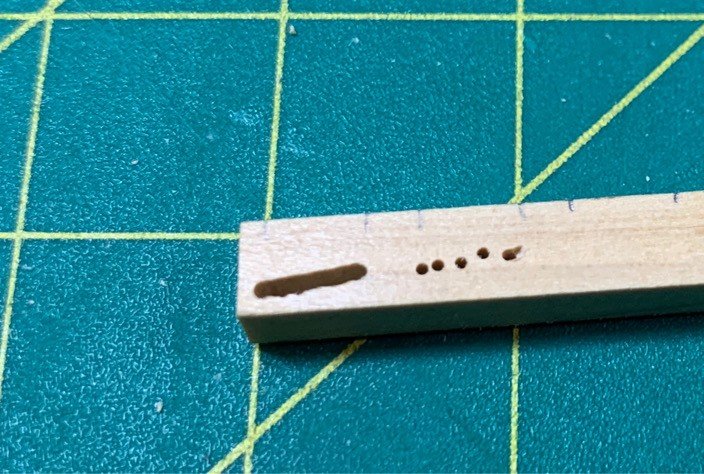
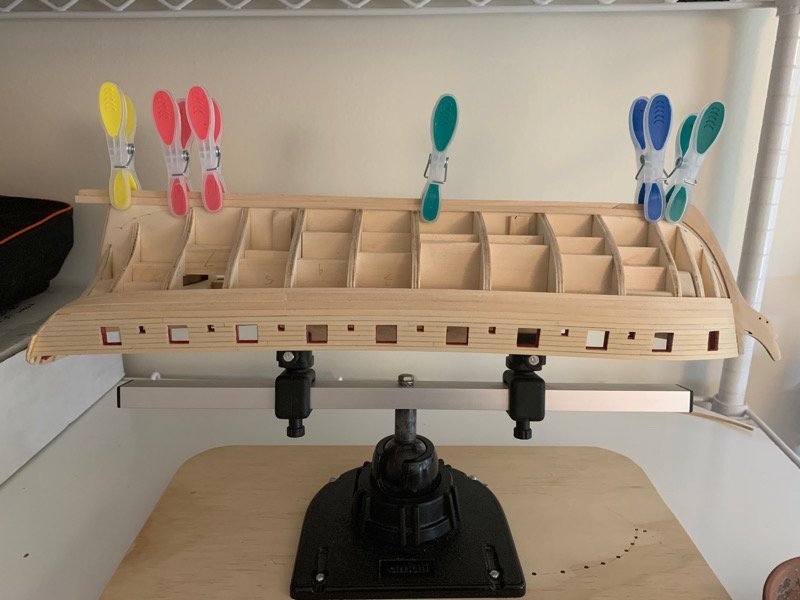
OK folks....after a short break to deal with some emergent issues at work...I'm back to post a sub-project update. Yes, planking continues (slowly...due to work), but everyone has seen planking, and I'm sure most people WON'T wish to see mine. (LOL) Soooo...I will now post on one of my ridiculous side projects (everything in model ship building is a side project). In this case, I was really hung up on the sheaves. There are 4 single, and 2 double sheaves which need to be put in place below the sheer strake. Check's practicum gives you the same strategy to put them in as the practicum for the Sultana. Drill a couple holes and carve in the gap between them to simulated the pulley (sheave). The plans actually show an individual block for each sheave...and I wanted to try making the blocks and sheaves for a more authentic look. Besides...I knew it would be difficult, and wanted to try and find a way to make them (functional if possible) with the little bit of equipment I have! So...first thing I'll say is basswood is really hard to work with....I gave up any attempts early on with this wood. The cedar is tighter grain and easier to work with...and you CAN use my ridiculous method below using cedar. However, I opted to try using my meager stock of boxwood to make the blocks so I could have the best/cleanest edges. Also, I don't have a mill...and most of what I do is simply eyeballing and staring down my work if I see any lack of symmetry! 😝 First I cut a strip boxwood to the size I needed to make my blocks. I'm using 1/8' x 7/32" strips for the single sheaves, and slightly taller for the double sheaves. I figure I should come close to the appropriate thickness once I've whittled down the bulkheads and planked the interior hull. I don't have a milling machine...but what I do have is a cheap mini-drill press. I gauged the angle of the sheave opening at ~ 8-10 degrees. This way I can mount the 1/8" strip in my clamp mounted on my x-y table and simply adjust the angle of the mount. After that, I mounted the strip and tried using a 0.8mm drill bit versus a 0.8mm router bit. As expected, the wood grain bends the tiny drill bits off axis and you end up with jagged lines...hard to create a clean hole from that...but the little router bit worked like a charm. Once the openings were made...I just ran the router back a forth using the x-axis knob on the table a few times and I was able to get a nice, neat, symmetrical hole. I used a tiny strip of 220 grit paper the smooth out the interior of the hole. Bingo! But...that that was the easy part. My real struggle was how to make a clean looking, and (maybe) functioning sheave! I tried multiple materials, techniques...and frankly...wood of any type was out. I just don't have the experience or tools...or know how...to make them like others before me. The bits I'm working with are just too damned small. The challenge is trying to make the sheaves (the pulley wheels) thin enough and with the right shape (i.e. round!) to slip into this ridiculously small hole and still retain the look of a miniature pulley wheel... Adding the functionality of a working axle for the sheaves was just more difficulty but at a higher level! So I thought out of the box...and my result was pretty good! Chuck makes good use of Sculpy clay in the Sultana practicum. Sculpy clay is this very fun molding/sculpting clay which after baking in the oven at 275F for a short period (30 min) transforms into a firm rubber-like material with the original color as the clay. In order to make the pully wheels (sheaves), I used a small amount of my remaining brown Sculpy clay and made thin 'noodles' by rolling it between my hands. I eyeballed a couple of the noodles I made as looking about the right width (comparing the thickness of the noodles to the opening in my trial block). The only thing the Admiral said after she cooked them in her oven was "They look like really long mouse poops." and then left my shipyard. Ok...yes they do look like long mouse poops. BUT...they also slice like really tiny cucumbers! Giving you a sharp and clean circular cross section. So I cut a few from each noodle to gauge how they would look and ensured they fit inside the sheave opening. It took me only a couple of slices of the mini-Sculpy cucumber to get a good cross section. To wrap it up, I used a 0.50mm drill bit and some brass wire (0.50mm) to simulate the axle of the sheave. You can drill out the shreave first with a pin vise, then line up the hole in the sculpy sheave with the hole you make in the block (which I make with a drill press), then insert the wire. I used some CA to lock in the wire, then clipped, and sanded (220 grit sanding stick) smooth. My sheave trial is over...and amazingly...it is a working sheave!!! I'll take my time and make my working sheaves now...along with a couple of spares. Once done, I can relax a bit, since my plan was to ensure I HAD a solution for making the sheaves before I began my interior planking. Moving on!!!!
-
Hope you are recovering, Dave. Take it easy!
-
Thanks, Will! Actually, I don't know that there is a hard and fast rule on the garboard, but it is a 'rule of thumb' as it is easy to add too much curve (bend) to the bow portion of the strake. Then you end up paying for it later due to crowding. Of course, as I've never fully planked a bull, take my posts for the 2 cents they are worth! LOL Work is killing me this week, but hope to get back in the shiproom this weekend!
-
She looks brilliant! Nice work!
-
Well...life got in the way recently. Some very small progress. Working on the garboards. Got one carved/shaped/twisted appropriately for glueing. Just wanted to ensure I can do both sides at same time. So will wait until the starboard strake is ready. Deviating a bit from the Practicum. Chuck’s pics clearly show the tip of the 3/16” garboard strake crossing but not passing the N frame. I find the strake is straight and level provided I terminate it just prior to where the N frame starts. I just want to avoid crowding of planks at the bow at all costs. (My club mates have drilled this into me...no upswing on the garboard strake!). Ok. I’ll put this to the test. One measly pic... Moving on...ever so slowly. 😊
-
Very pretty! Nice work. Good reminder on paint adding thickness...
- 950 replies
-
- 1
-

-
- syren
- model shipways
- (and 1 more)
-
Thanks, Dave! Your work does the same for me! And I’m pretty happy with my progress so far...but like all the builders on this forums, shipmate support really helps you keep going!
-
Exciting stuff! Looking great, Will!
-
Well, that’s a booboo on me. When I planked, I basically followed the line down from the stern gun ports. So yeah...it is straight and there should be a curve. Well, live and learn. 😭 This will not be the last mistake I make!! Damn...and I was so happy with the stern planking. Moving on...
-
Outstanding! Off to a fine start, Jamie.
-
Awesome! Just be careful. They are carbon discs and very brittle. Any lateral force on them, especially while they are rotating, can make them break. Actually, explode is more the effect. I have first hand knowledge! So wear safety glasses and ensure you are cutting edge on straight. And these will slice everything...so safety first!😁!