


gjdale
-
Posts
4,821 -
Joined
-
Last visited
Content Type
Profiles
Forums
Gallery
Events
Everything posted by gjdale
-
 Great work so far Bob. And yes, it’s a very tight fit to get it into the bottle, so grinding a little off the keel is a good idea.
 -
Making brass parts chrome
gjdale replied to John Ruy's topic in Painting, finishing and weathering products and techniques
I’ve used both the plating method using the Calwell system mentioned above, and the Molotow liquid chrome. Both work but the Molotow would be less expensive. If using the Molotow, I would recommend buying a “refill” and then spraying the contents through an airbrush - it sprays beautifully with no thinning required. Be aware though, that the Molotow will not stand up to handling - it needs to be left alone for several days to a week, and then handled the minimum amount possible. I do not know of any top coat that can be used without dulling the shine. I used the Molotow on plastic parts of my Pocher car model. I used the Calwell plating system on the scratch built brass parts of my Dumas Chris Craft model. Being RC, this model gets handled a lot more. I was happy with both results. -
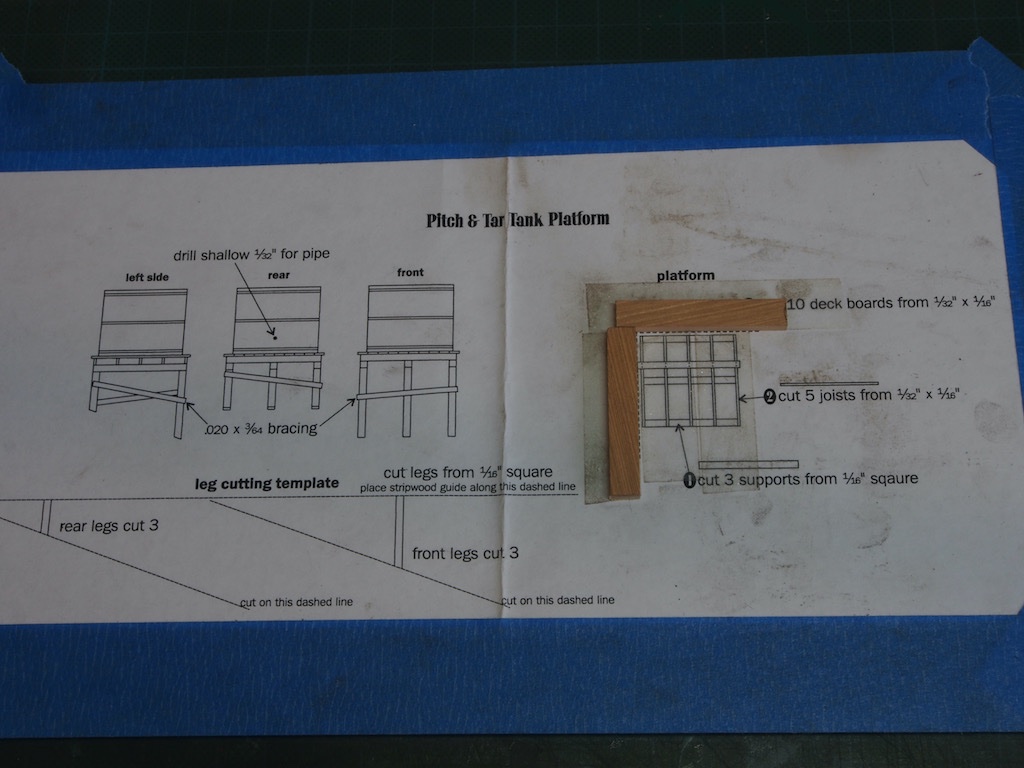
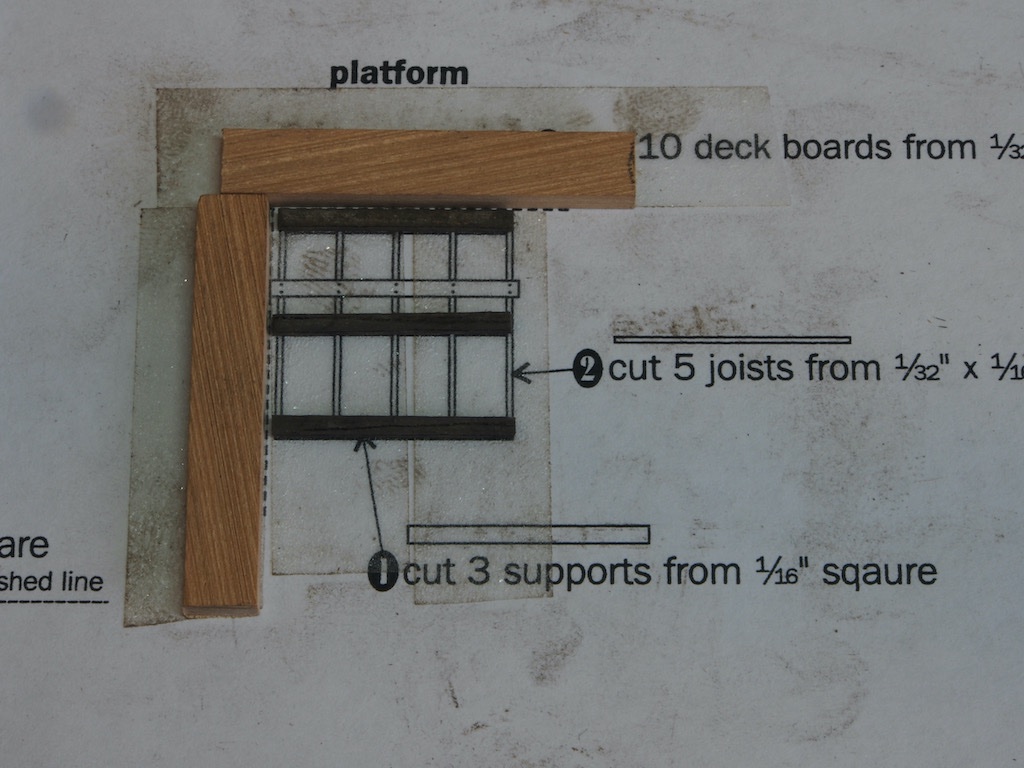
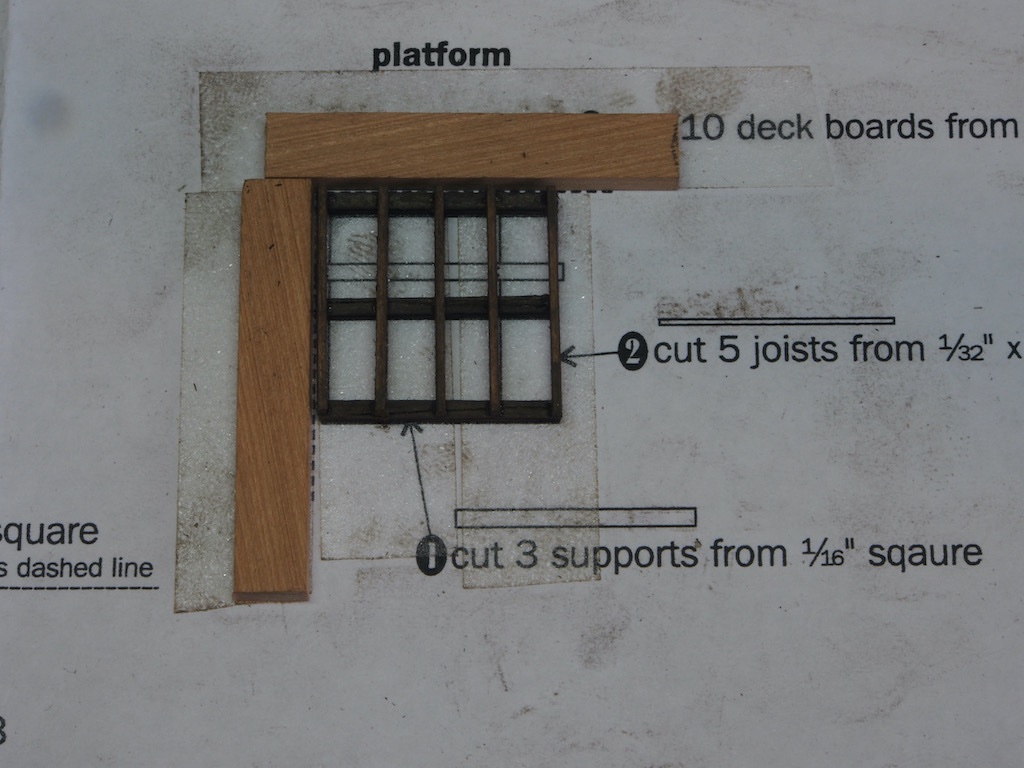
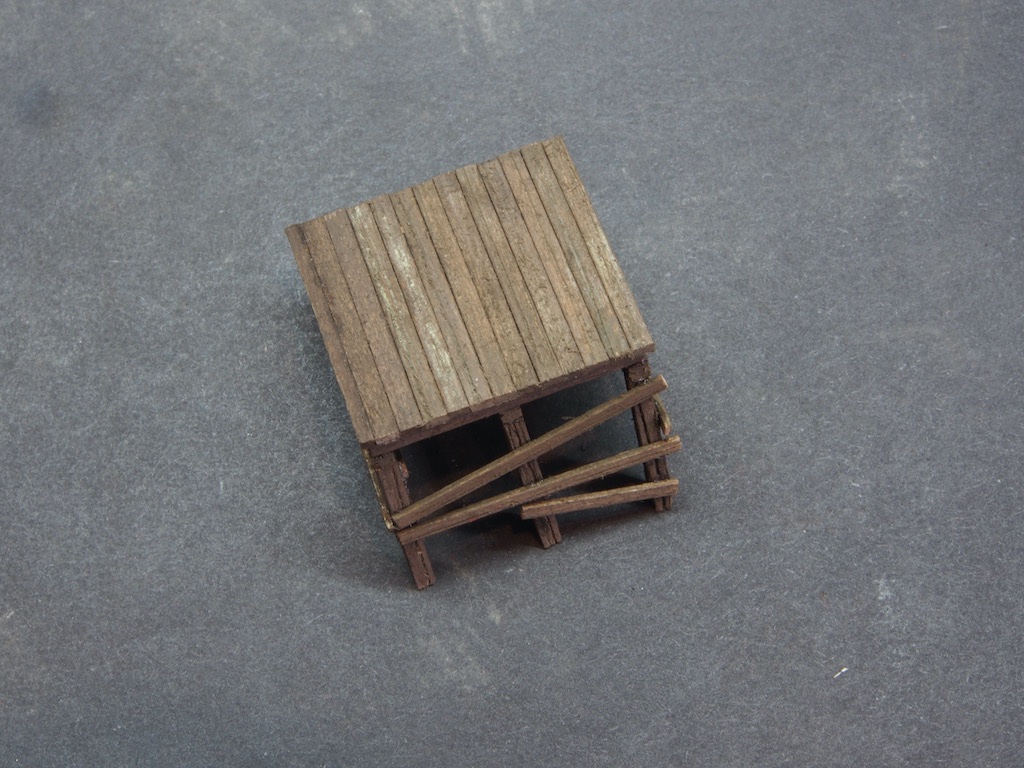
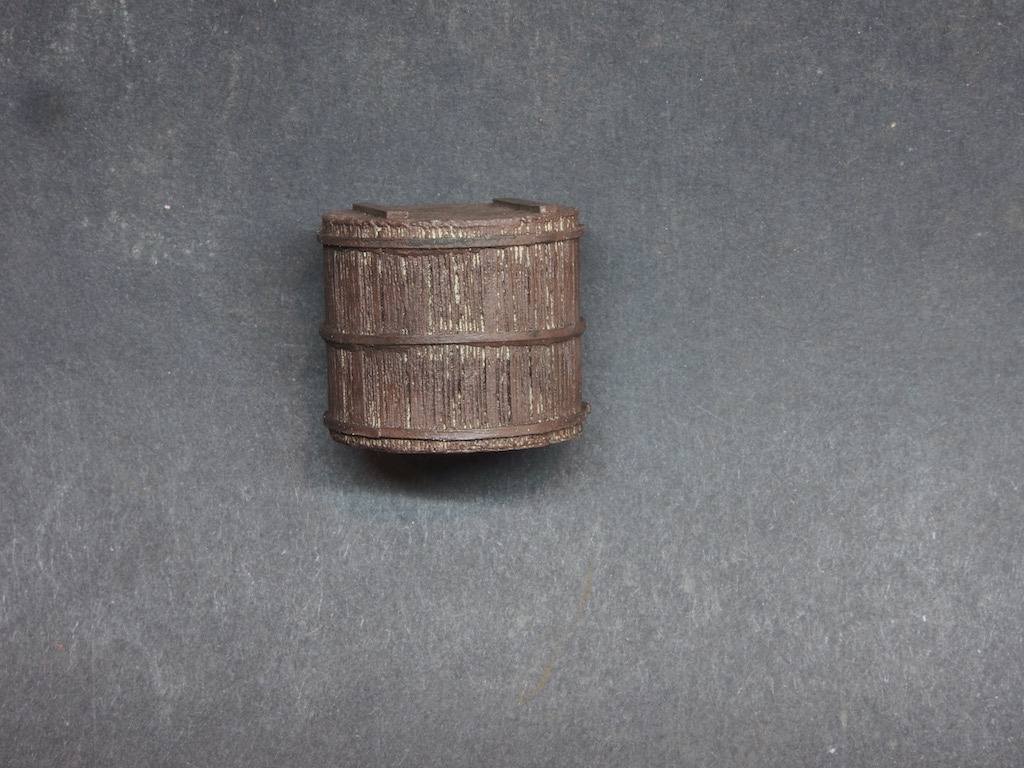
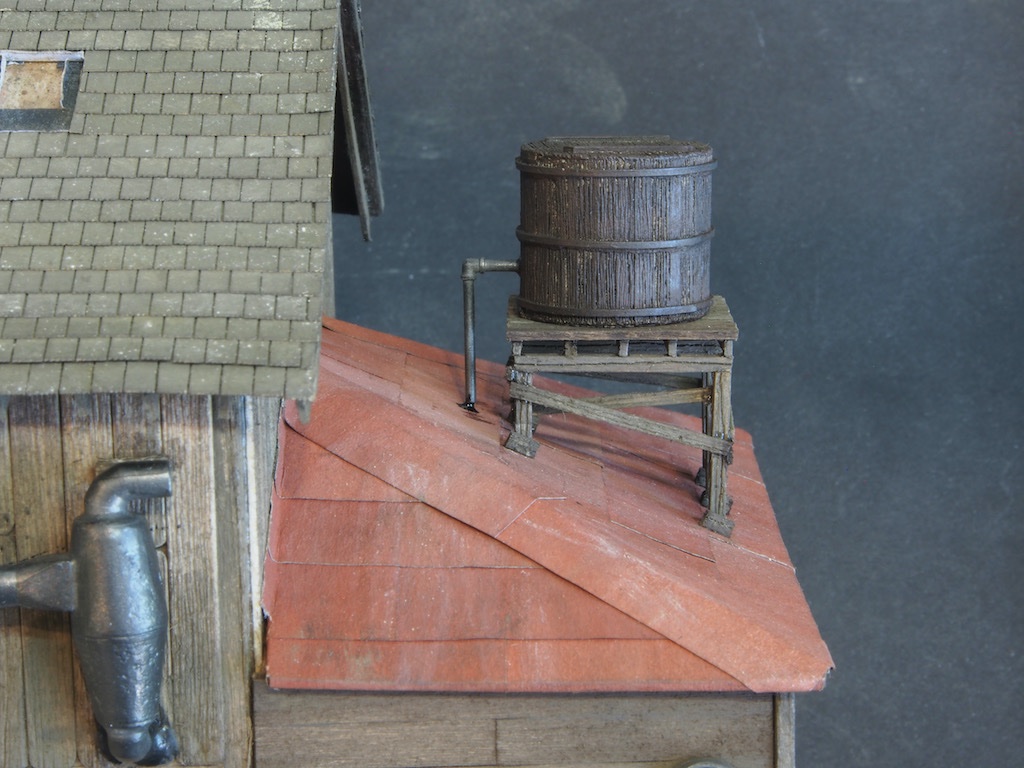
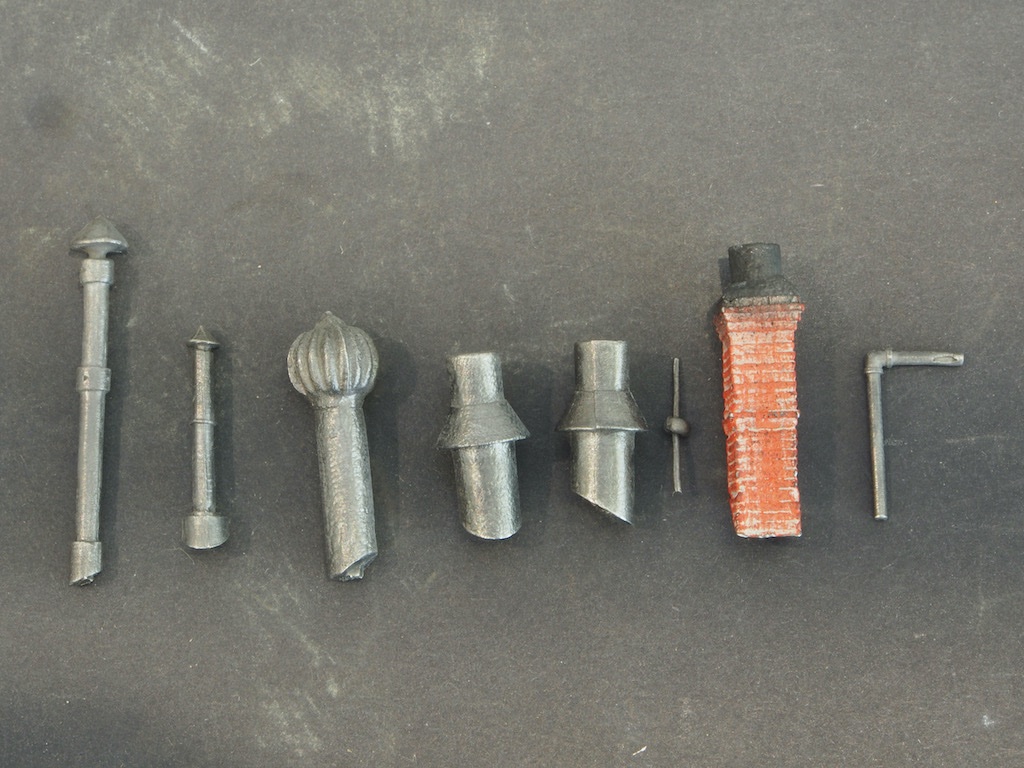
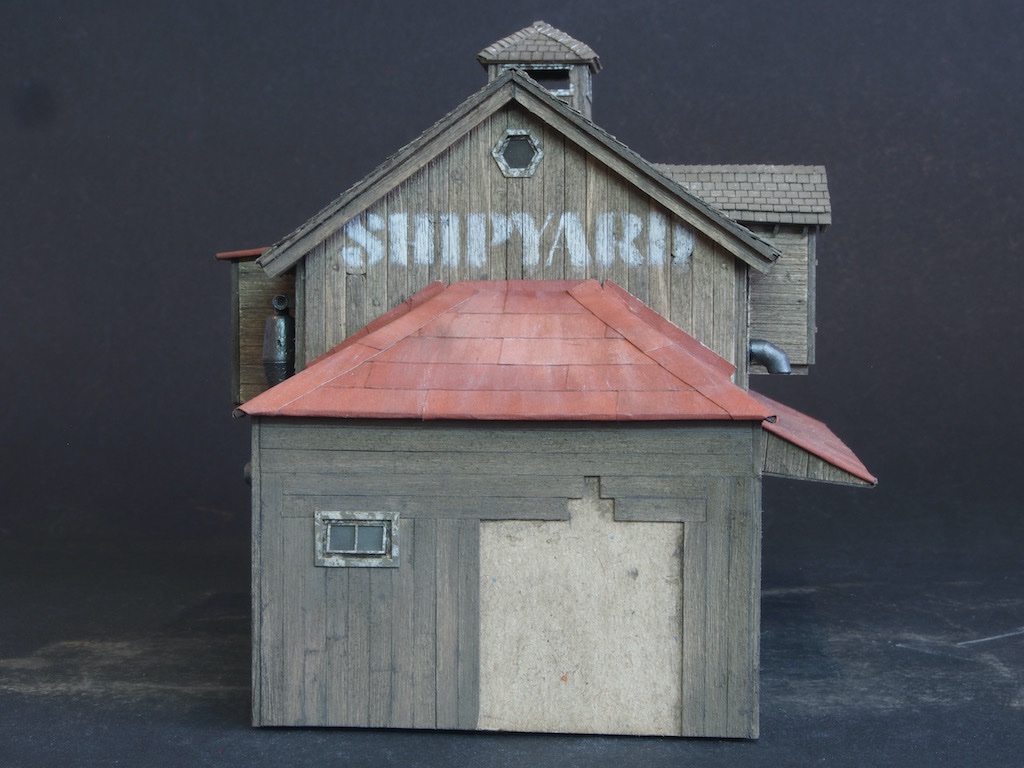
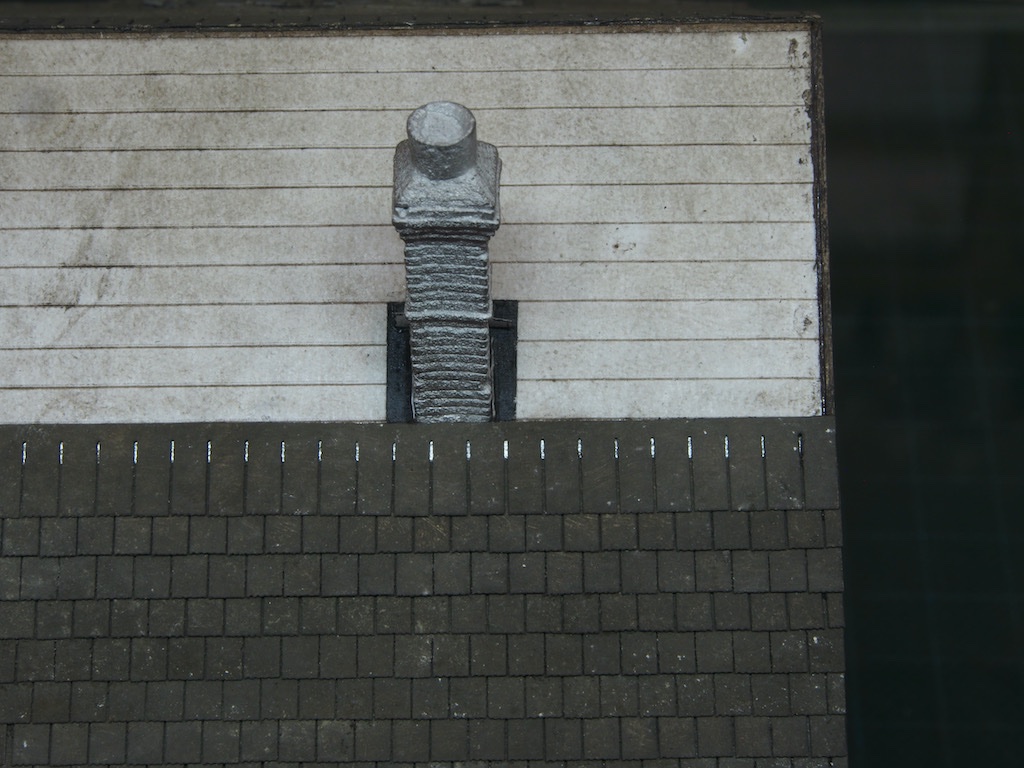
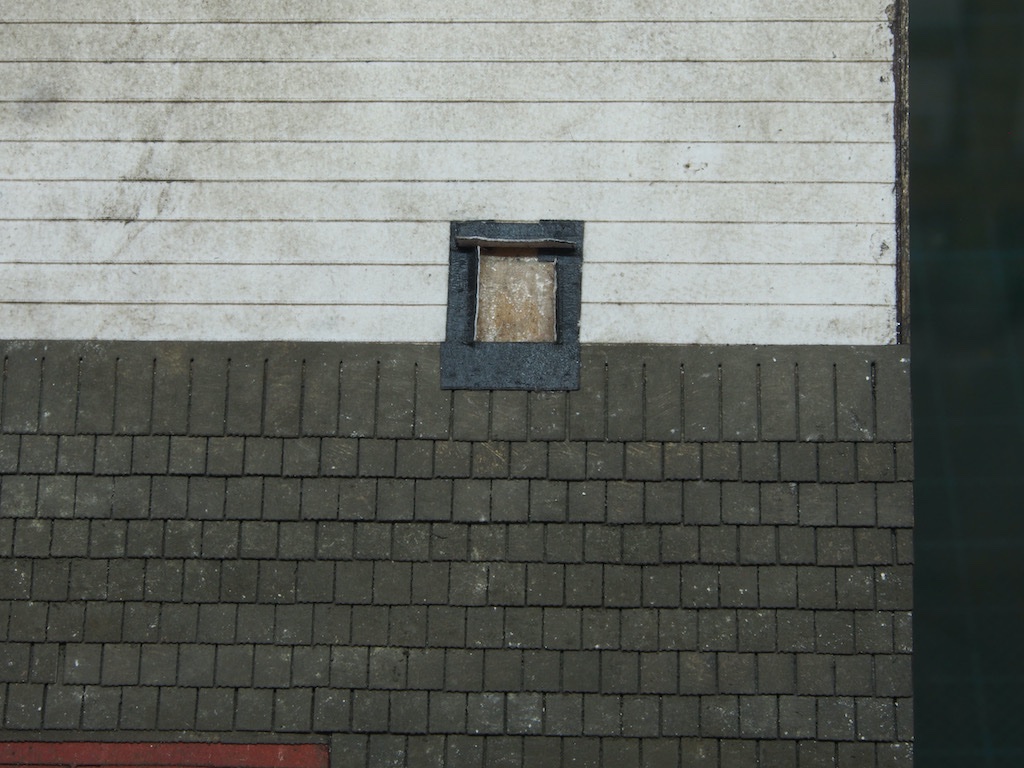
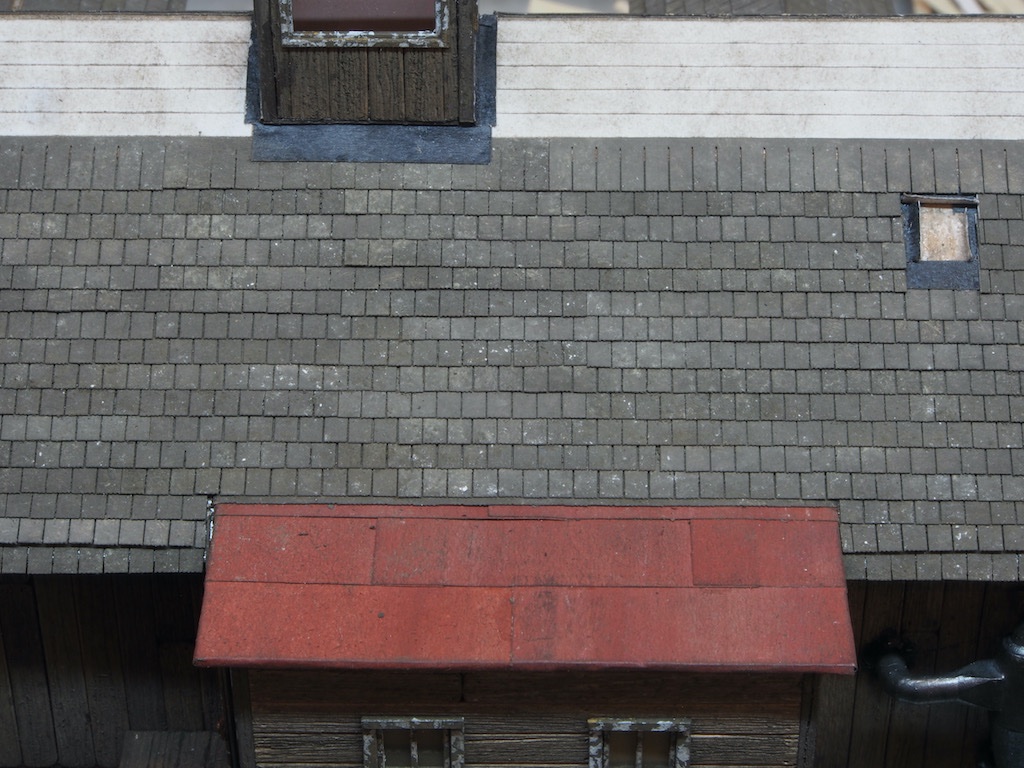
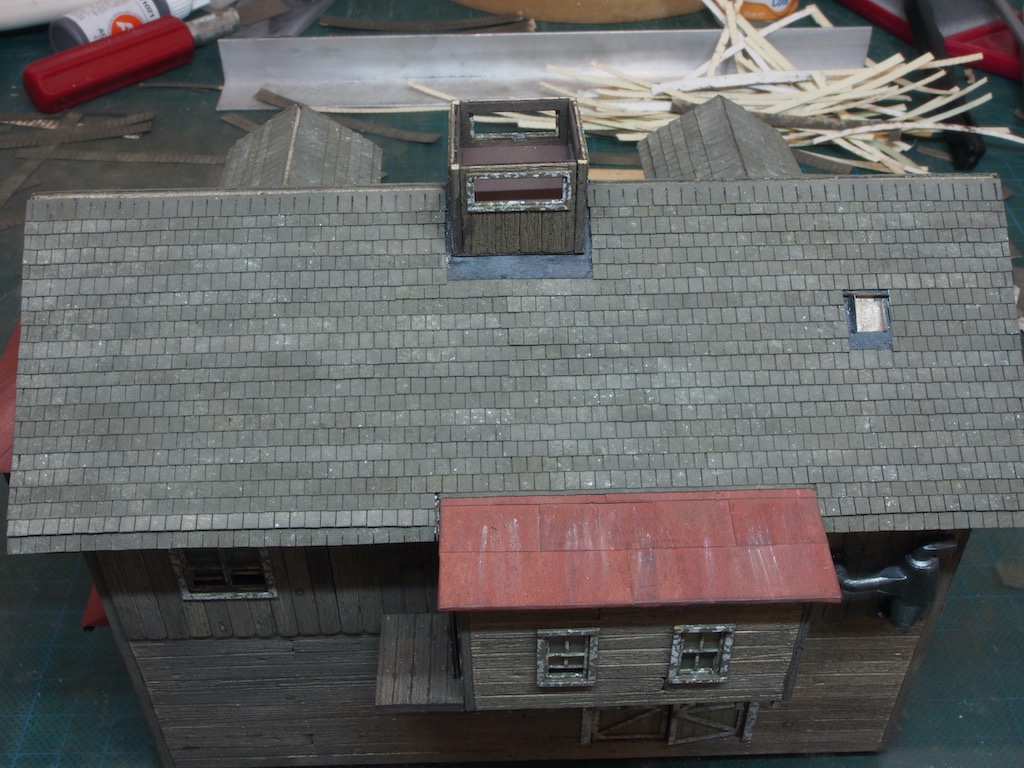
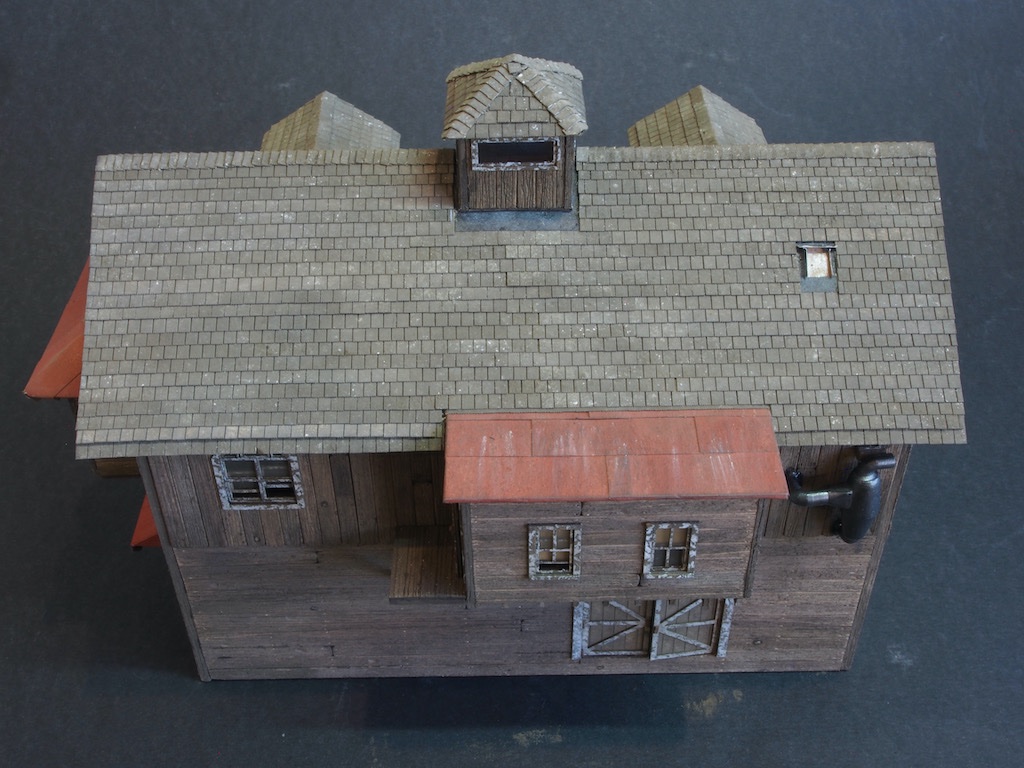
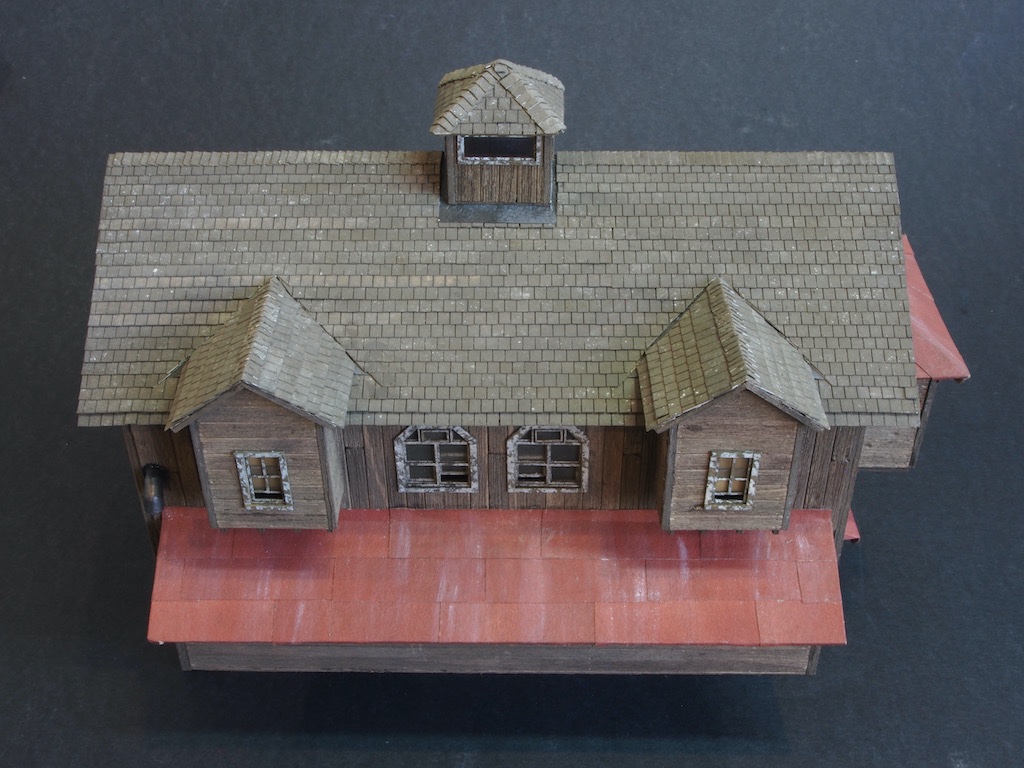
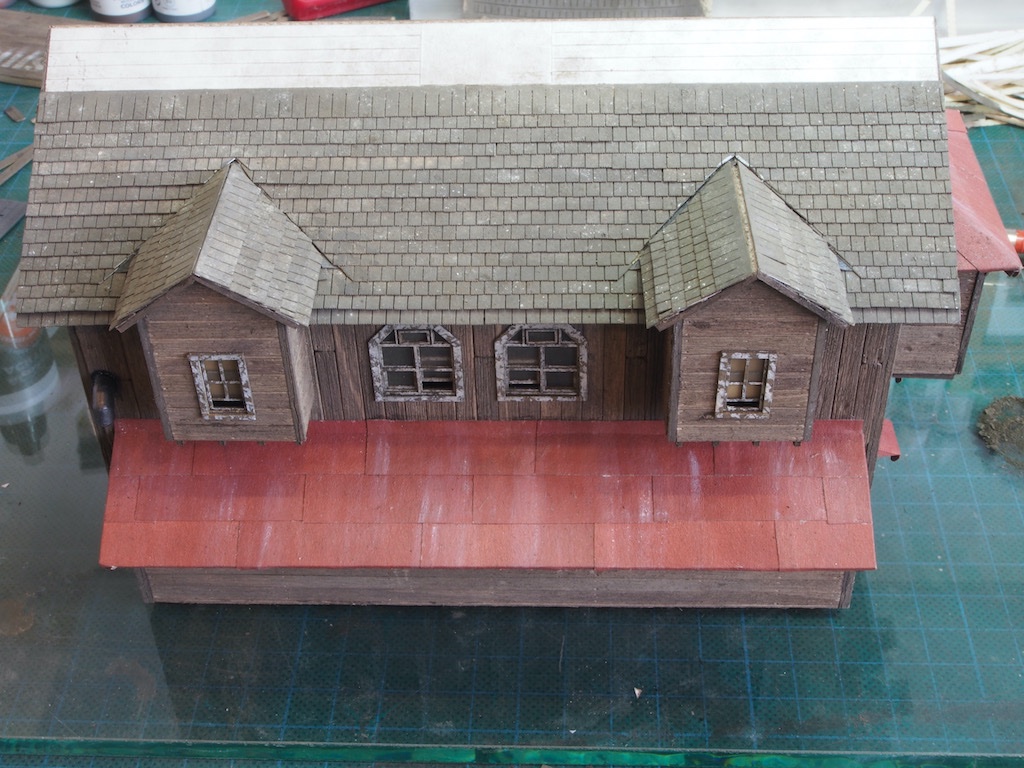
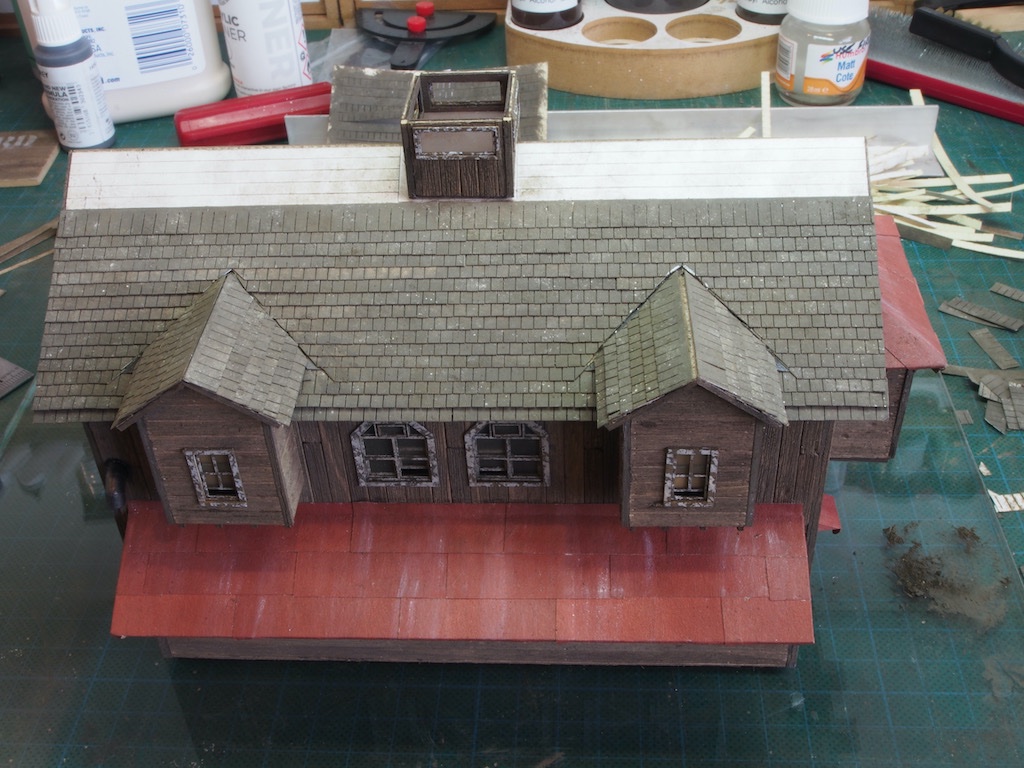
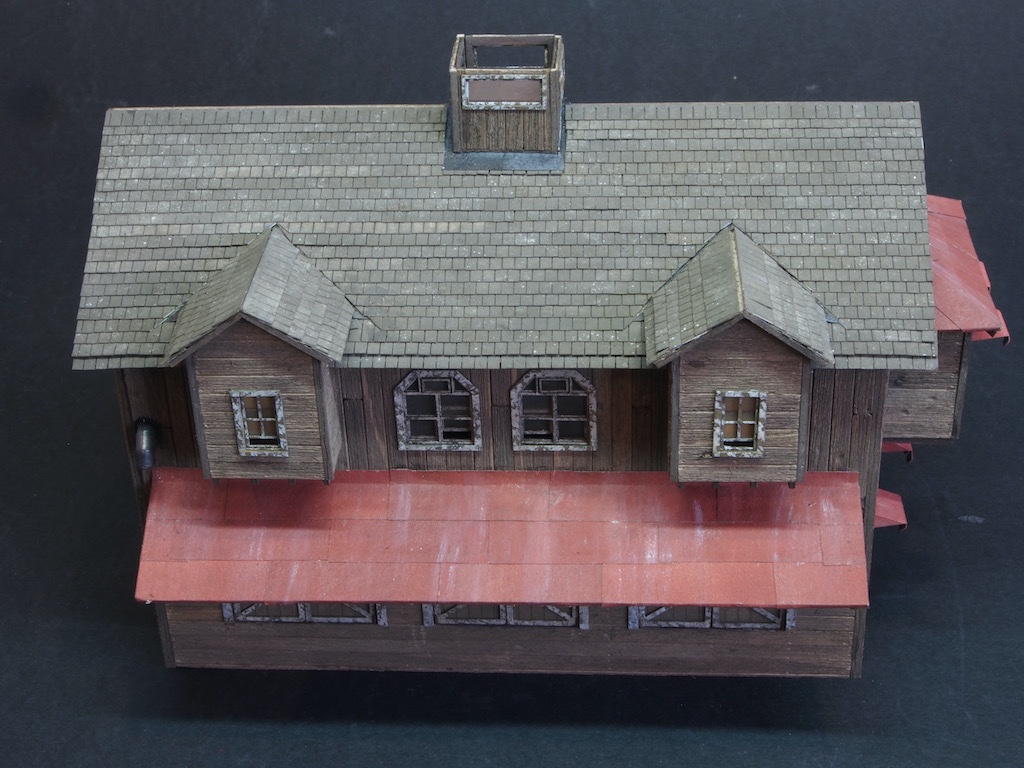
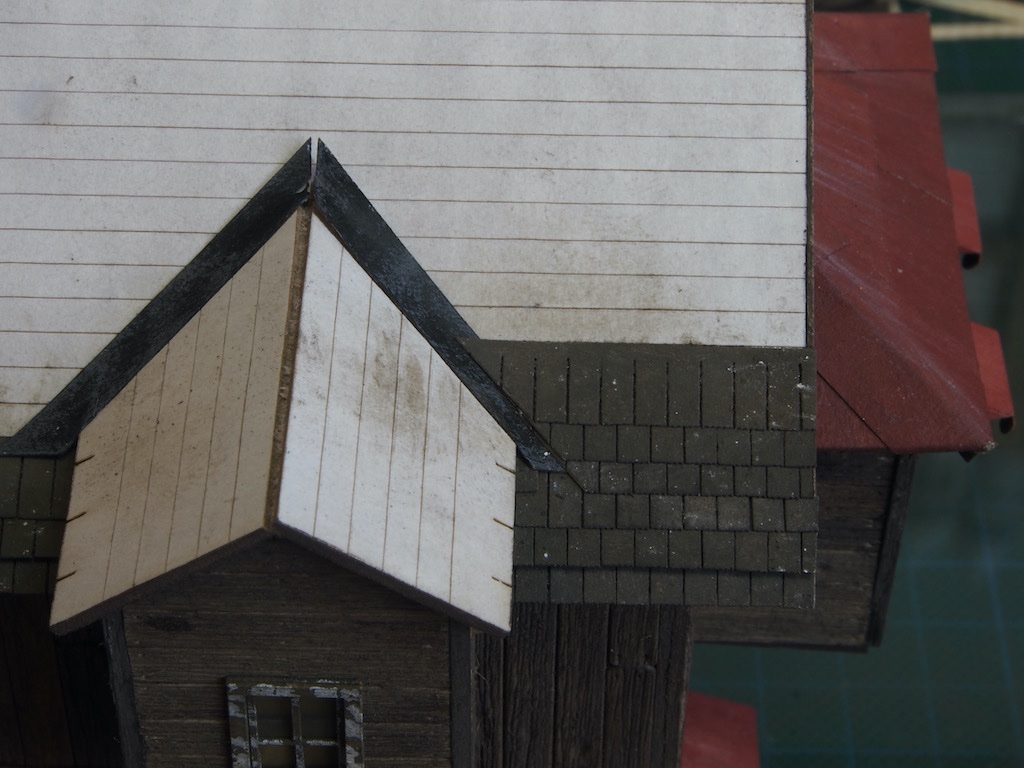
Thanks Gary. Details, details, details… While waiting for the additional shingles to arrive, I have begun work on some further details. First up is adding the Pitch and Tar Tank and it’s platform. A 1:1 scale drawing is provided as a template upon which the platform is built. A couple of scrap wood guides are first attached to the template with double-sided tape. Three support beams are then cut to the size specified on the drawing and these are also attached to the template using double-sided tape. The five joists are cut to size and glued atop the support beams. We are then instructed to cut 10 deck boards from the 1/32” x 1/16” material. As can be seen from the first picture above, the drawing shows these 10 deck boards in place. The only problem with this is that the completed platform measures 7/8” x 7/8”. 10 deck boards that are each 1/16” wide are only ever going to cover 5/8” (or very slightly more allowing for a little size variation and potential small gaps). In the end I needed 13 boards to fill the space, with the last one trimmed back a little. I checked the size of my completed platform against the drawings, and it matches these. It is also a good fit for the size of the tank. No big deal, but there is definitely a discrepancy in the drawings/instructions/materials here. Anyway, once the platform is completed, some bracing is added to all sides. Here is a picture of the completed platform. The Pitch and Tar Tank is a resin casting. This is our first foray into the plethora of resin and metal castings included in the kit. It is prepared by painting a light undercoat and then dry-brushing a darker brown over the top. It is then given a dusting of dry chalk powder to finish. Subsequent to this photo being taken, I decided to give the entire tank a dunk in my Alcohol/Ink mixture and was quite pleased with the result. Here are a couple of pictures of the completed structure in place atop the Warehouse roof. Note also the addition of support blocks around the platform legs. Prior to final placement, the metal pipe was prepared, blackened and attached to both the tank and the roof. As with previous metal fixtures, black paint was added to the epoxy glue to represent tar and pitch where the pipe enters the roof. It has yet to be finally finished off with some chalk to dull it down a little further. The Chimney and Stacks for the other roofs were then prepared. These are all white metal castings. With the exception of the Chimney, they are simply cleaned, blackened, polished, and dusted with some grey chalk powder. The Chimney itself has a multi-phase preparation. An undercoat of AK11007 (Rock Grey) is used in place of the Pollyscale Concrete called for in the instructions. This represents the mortar between the bricks. AK 11087 (Scarlet Red) is then used in place of Floquil Scarlet Red and dry-brushed over the top. The aim is to colour only the bricks, leaving the mortar seams untouched. This project has been my first real attempt at the dry-brushing technique, so I’m learning as I go. From normal viewing distance I think it looks okay – the macro lens of the camera is a little brutal though. The top of the Chimney is painted with AK11021 (Basalt Grey) in place of Floquil Grimy Black and finished off with a dusting of black and grey chalk powders to give a “sooty” appearance. All of these parts, except the Pitch and Tar Tank pipe, have now been set aside and will be fitted in place once the Yard Master’s Office roof has been completed and that building attached to the Warehouse front. Next up, I’ll be starting work on the loading docks…

- 326 replies
-
- 23
-

-

-
Vahur, Would you please post a link to this as I can’t seem to find it in the “Tips and Tricks” section, nor by searching content under your screen name? Thanks
-
Thanks Glen. I believe that is the intention - to show the growth of the building/business over time. You are quite right Ken and that is exactly what some people do with this structure. I neglected (forgot?) to lift/angle any of the boards as I was going…… so mine is a little less distressed. 😉
- 326 replies
-
- 10
-
-
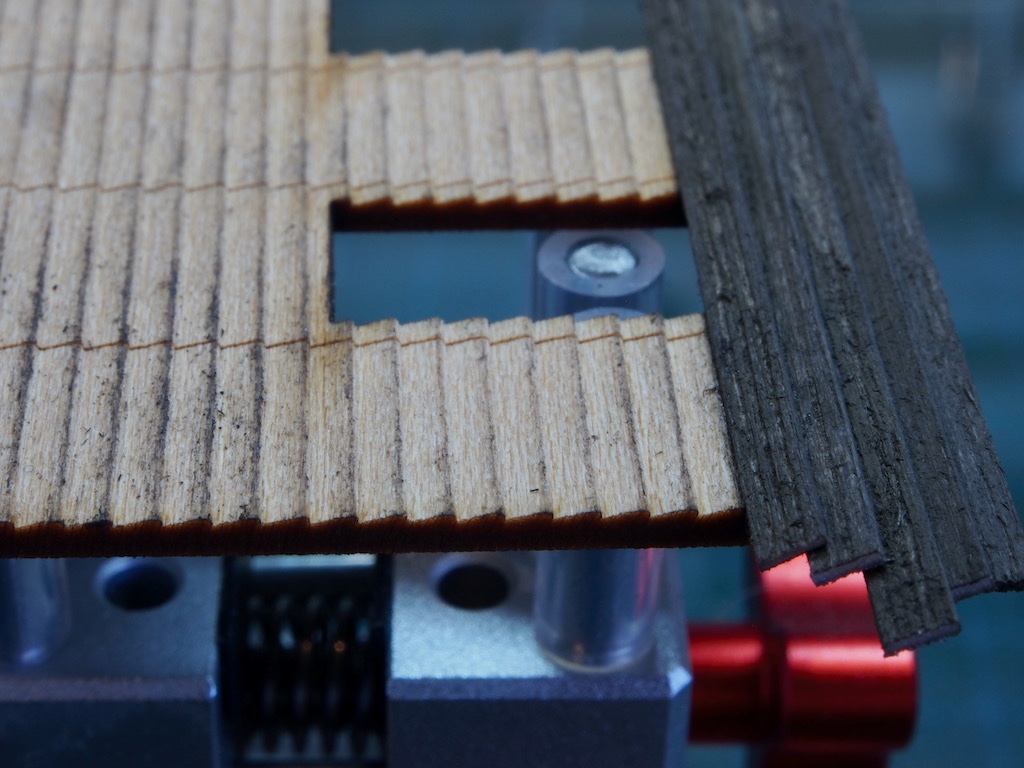
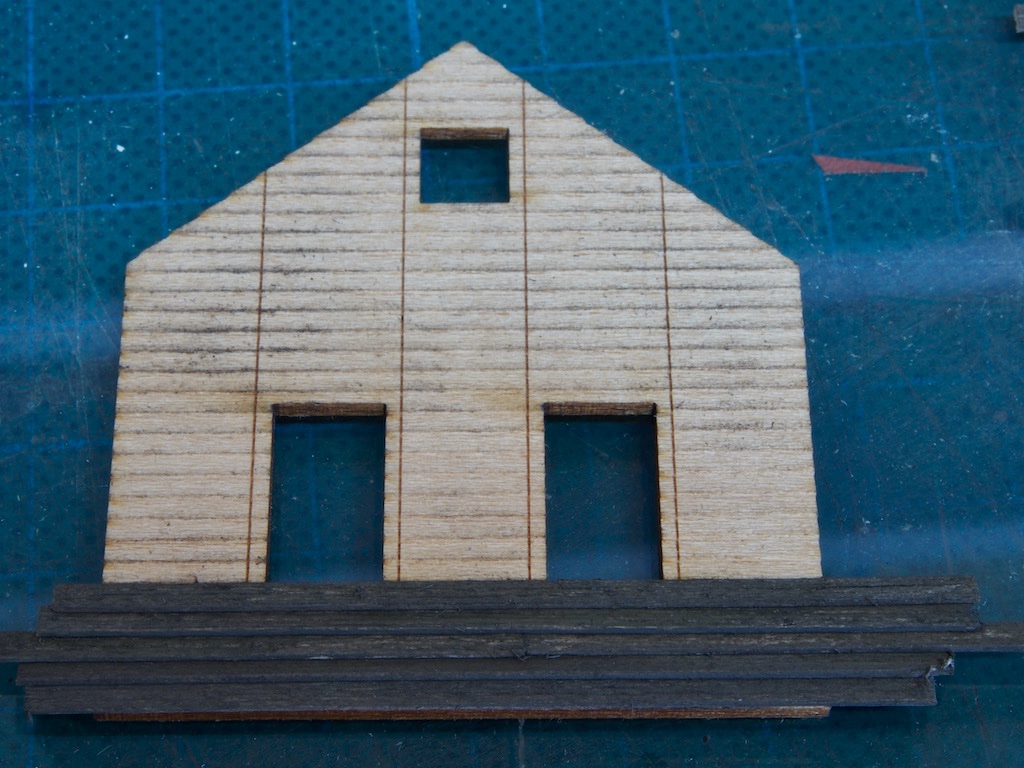
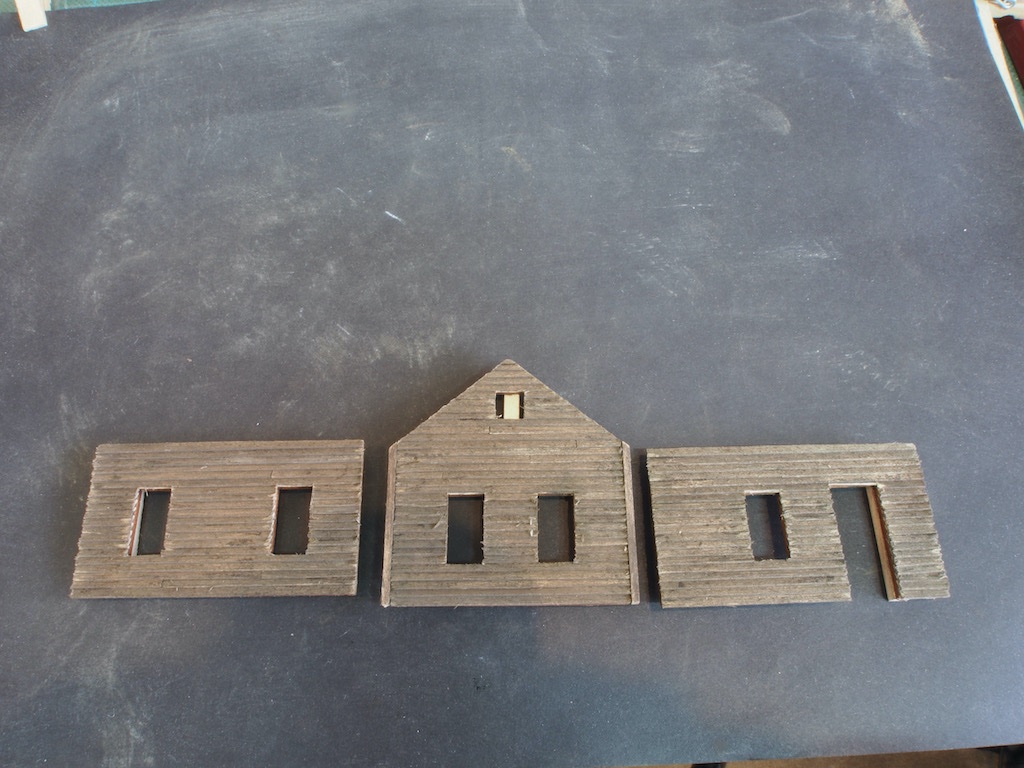
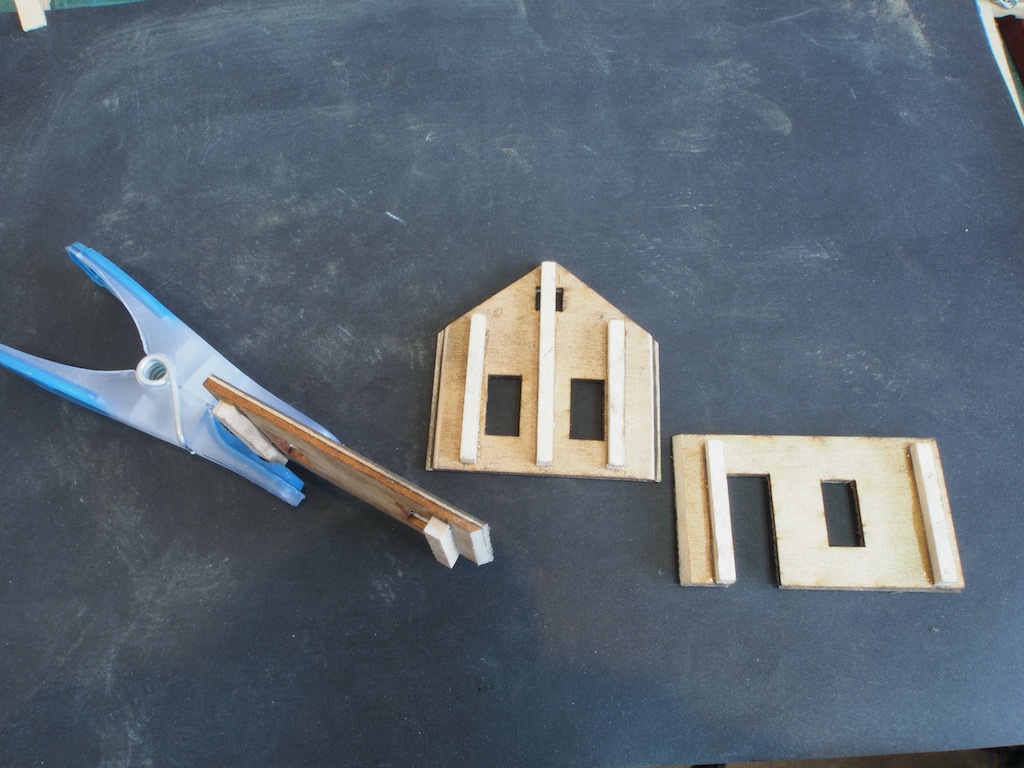
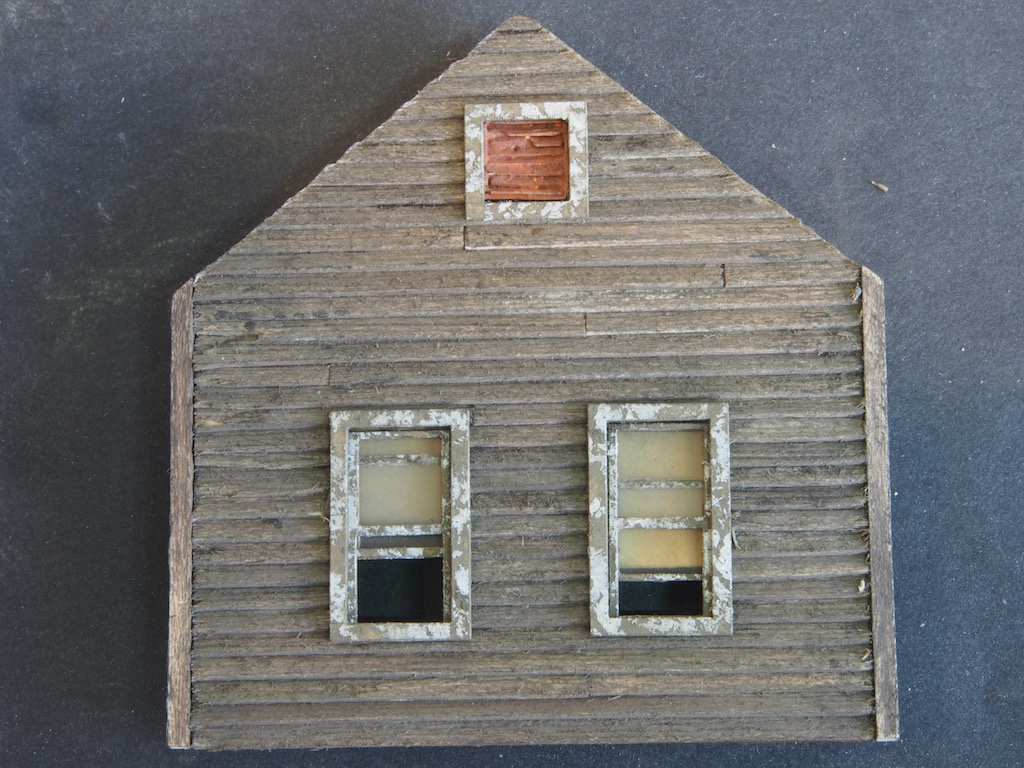
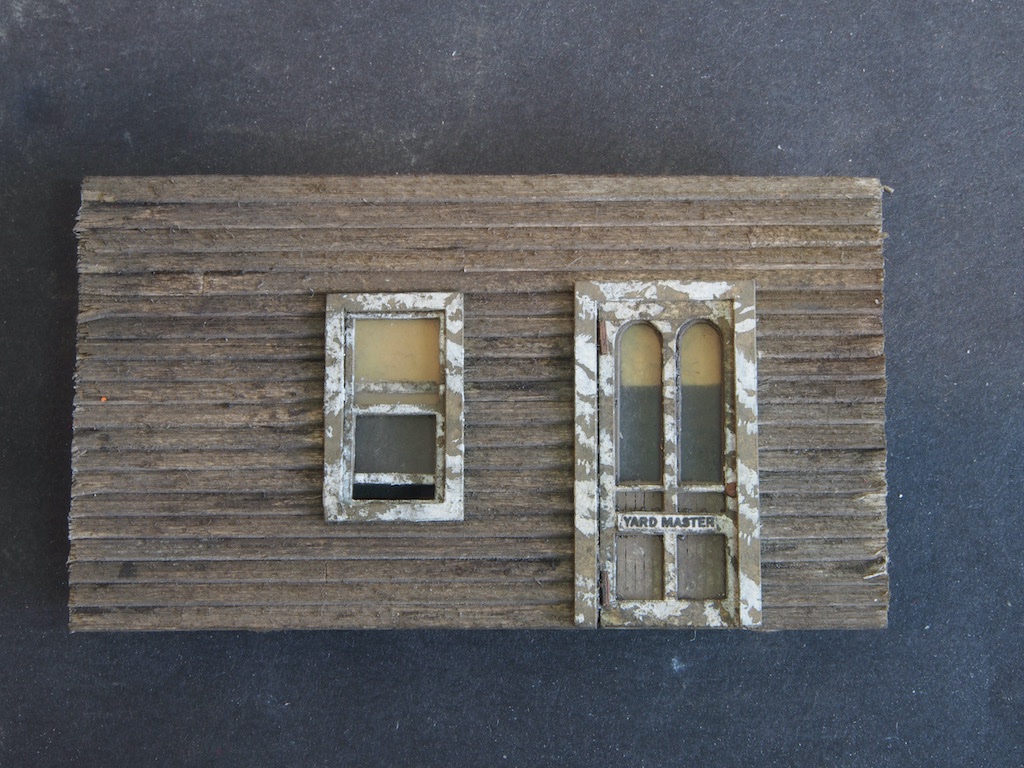
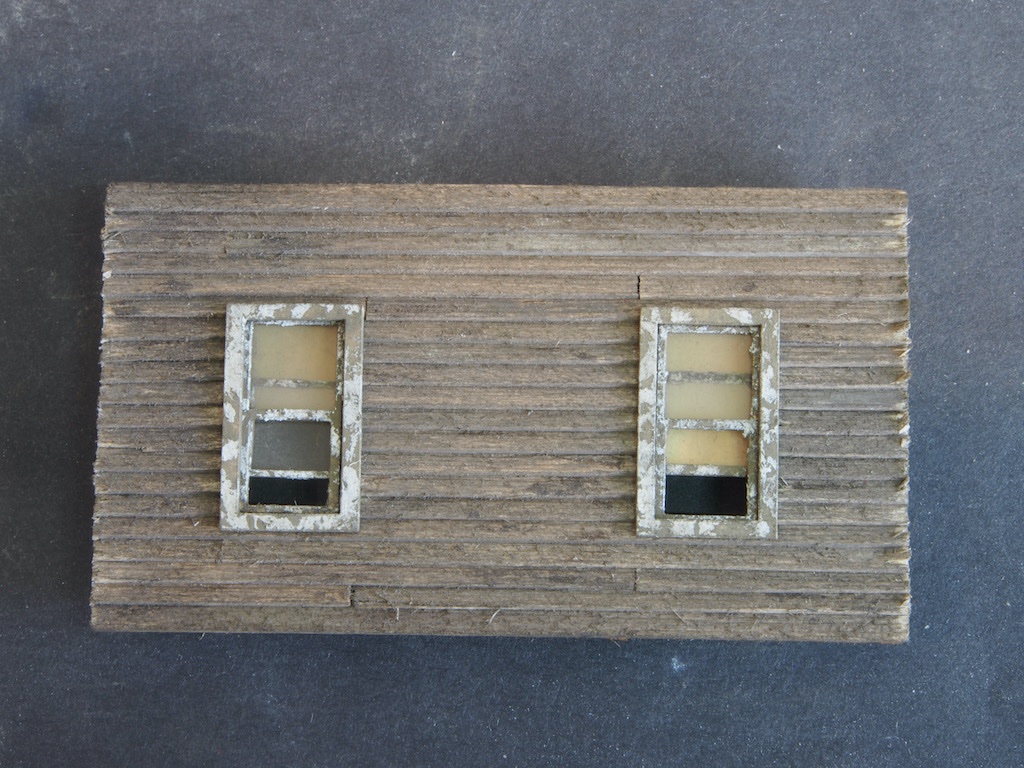
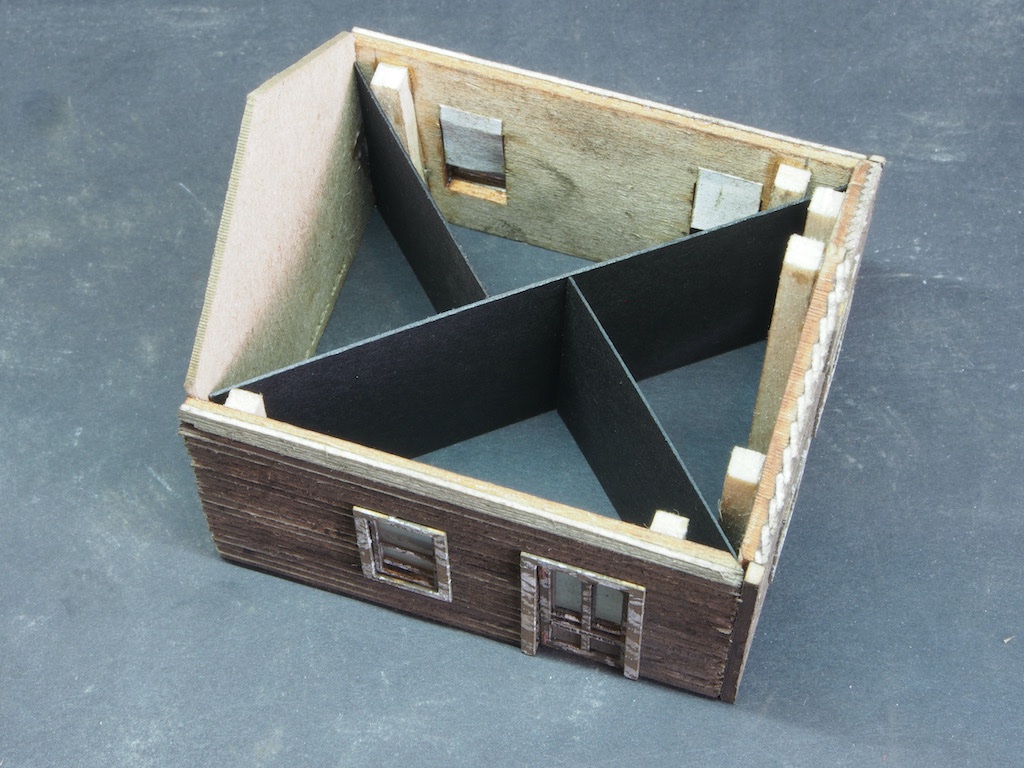
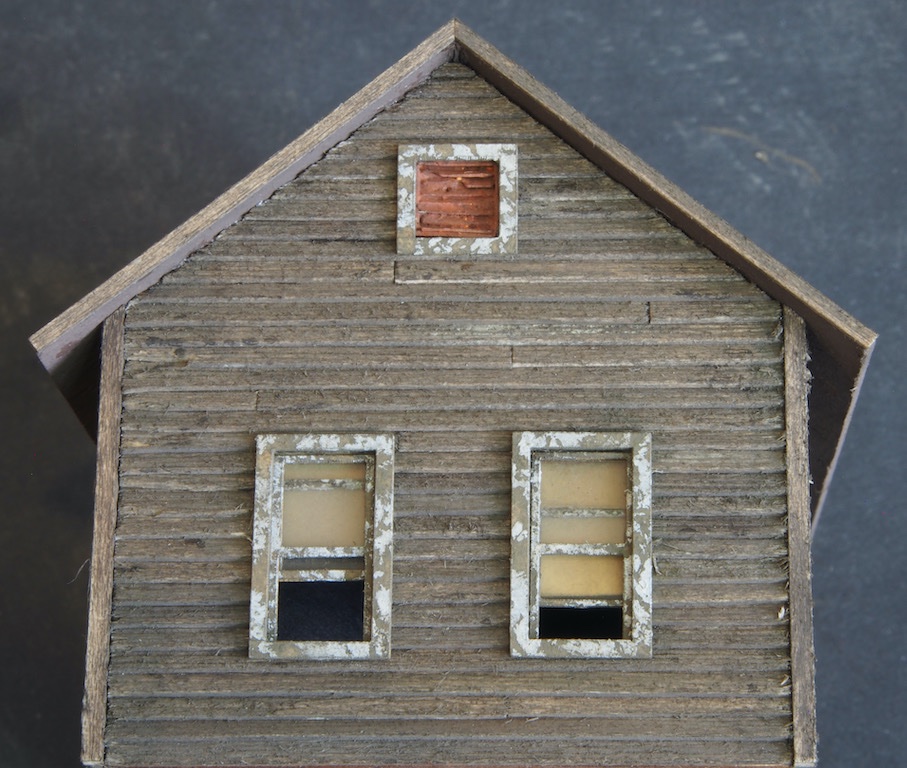
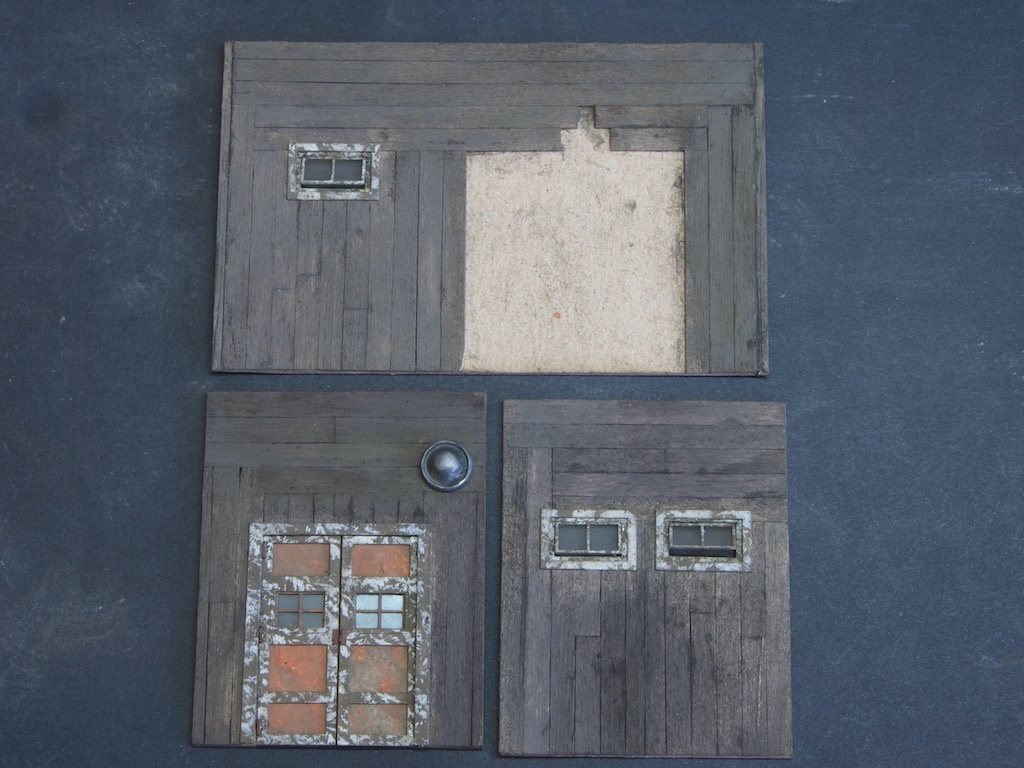
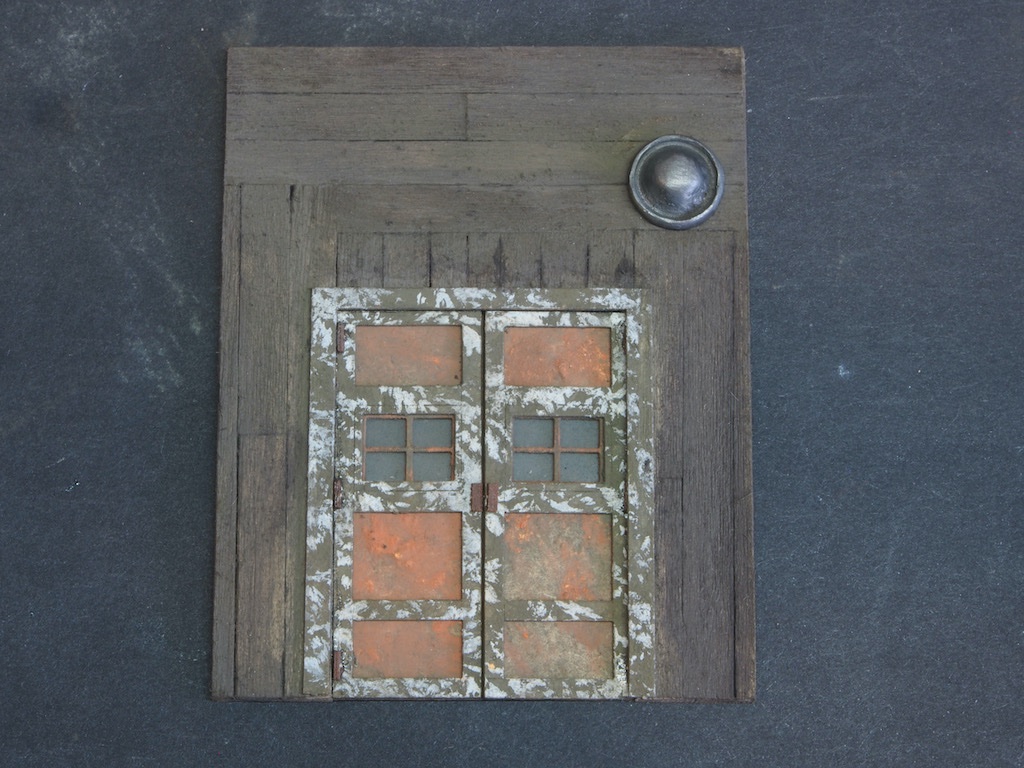
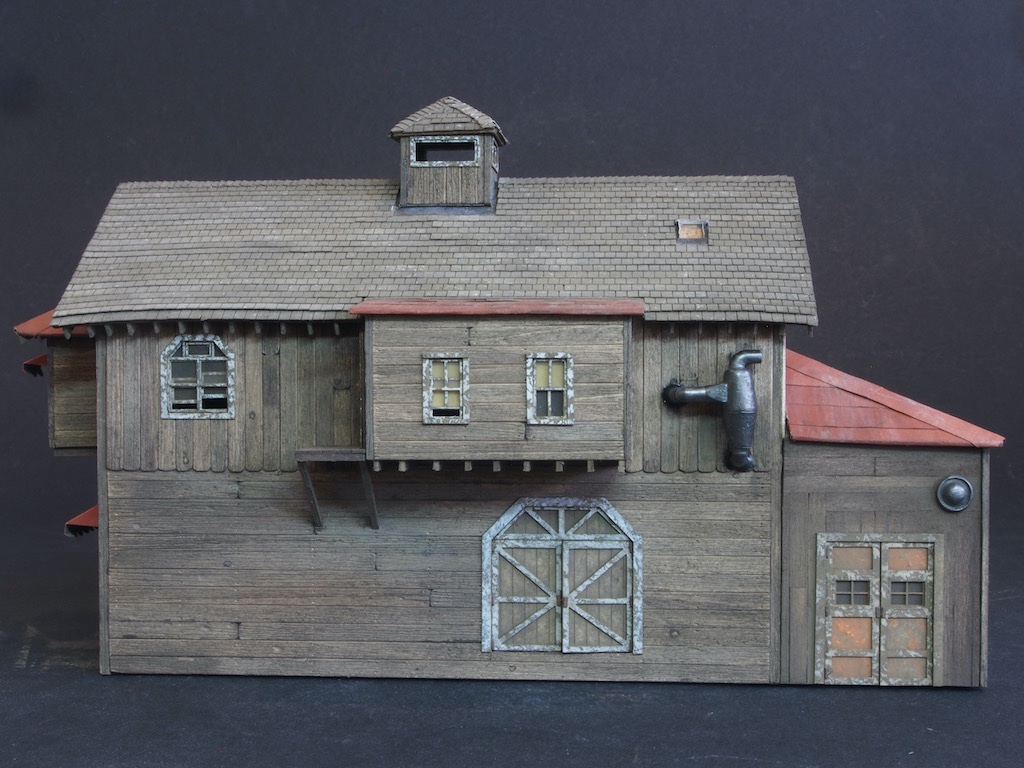
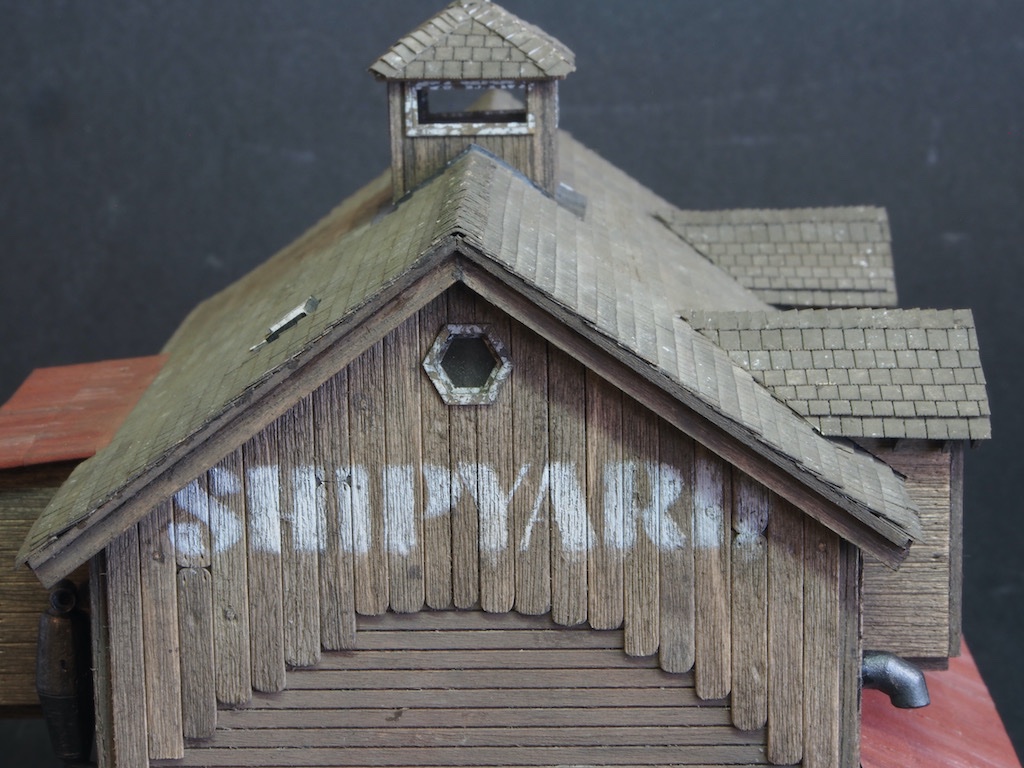
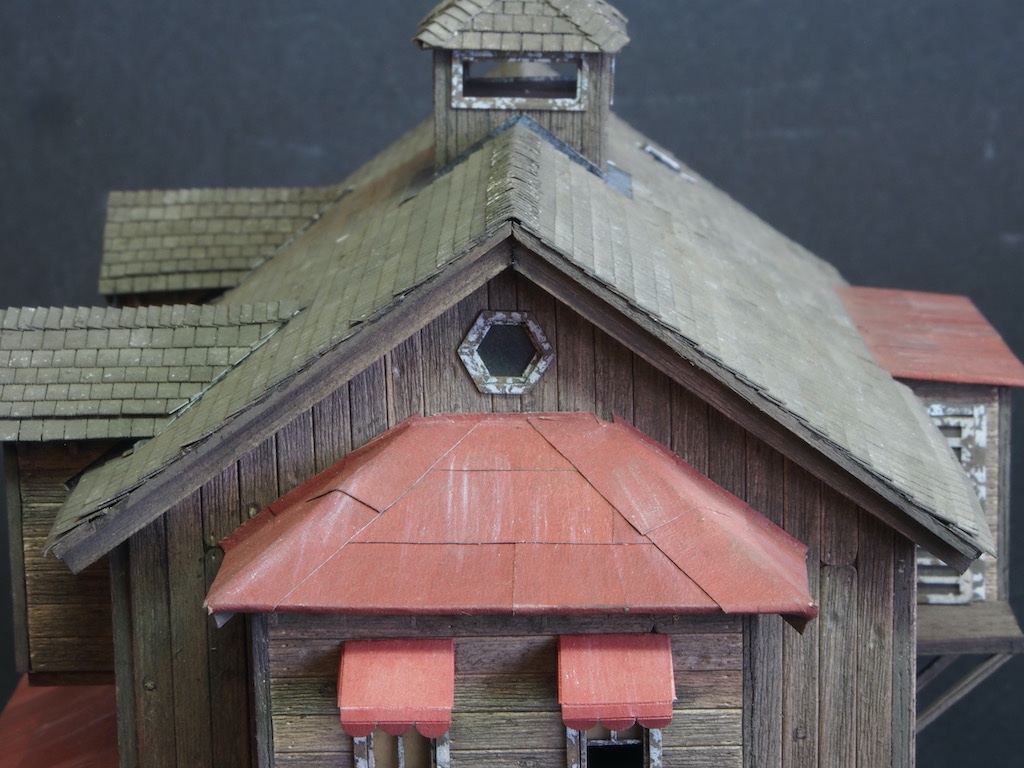
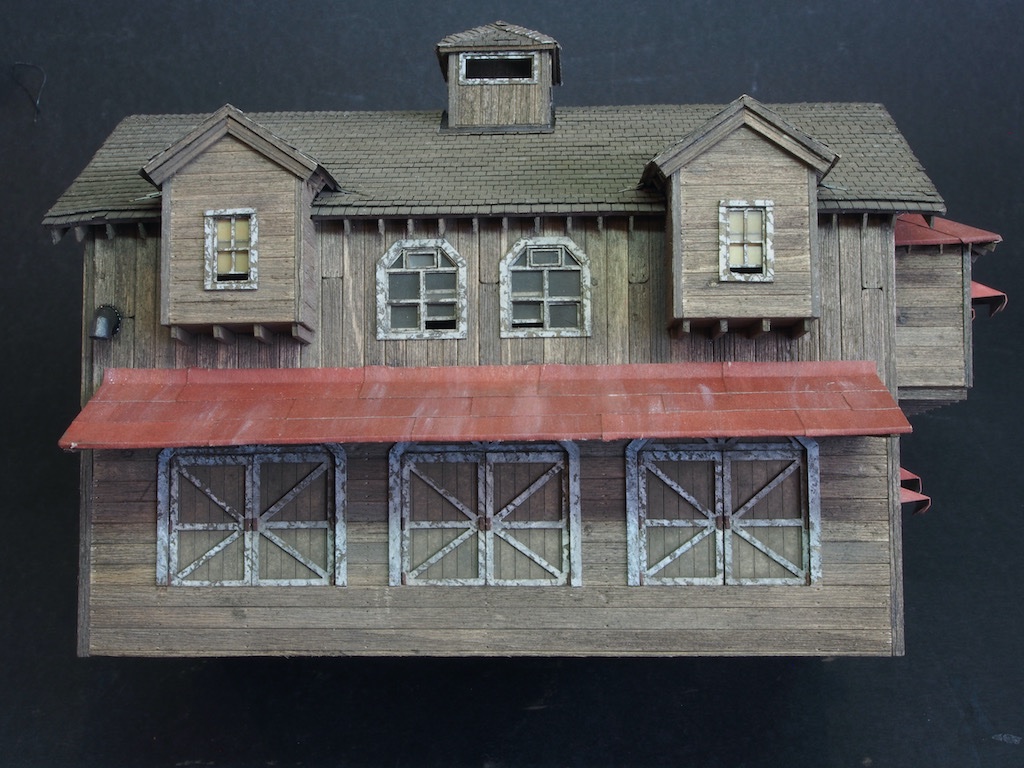
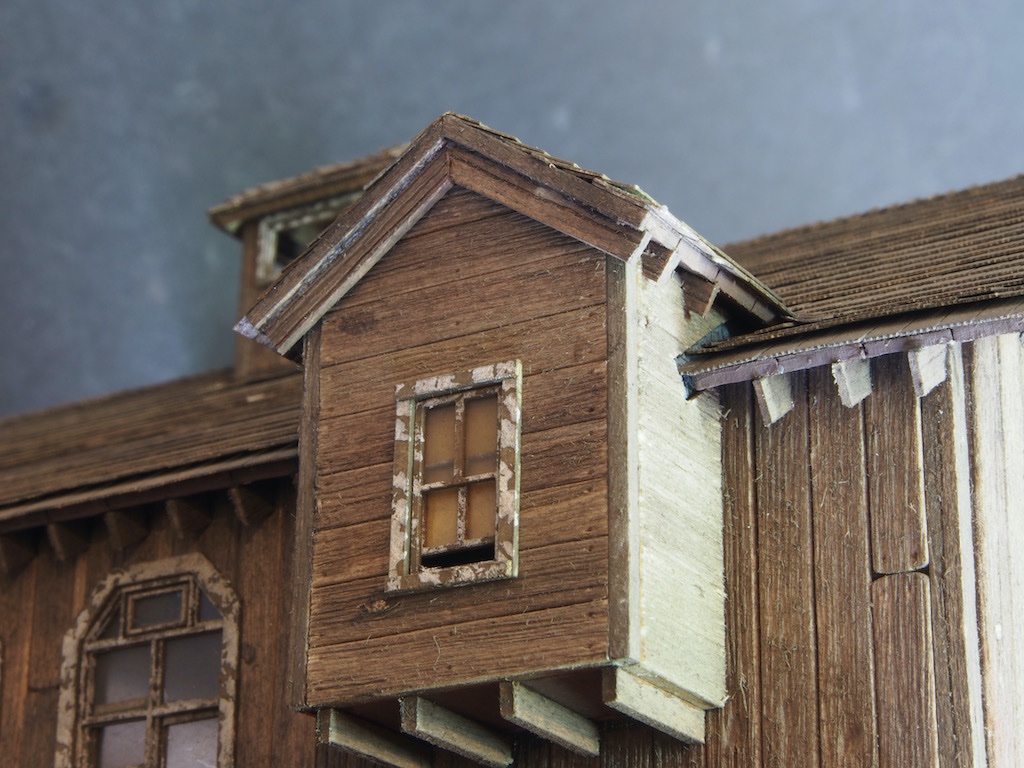
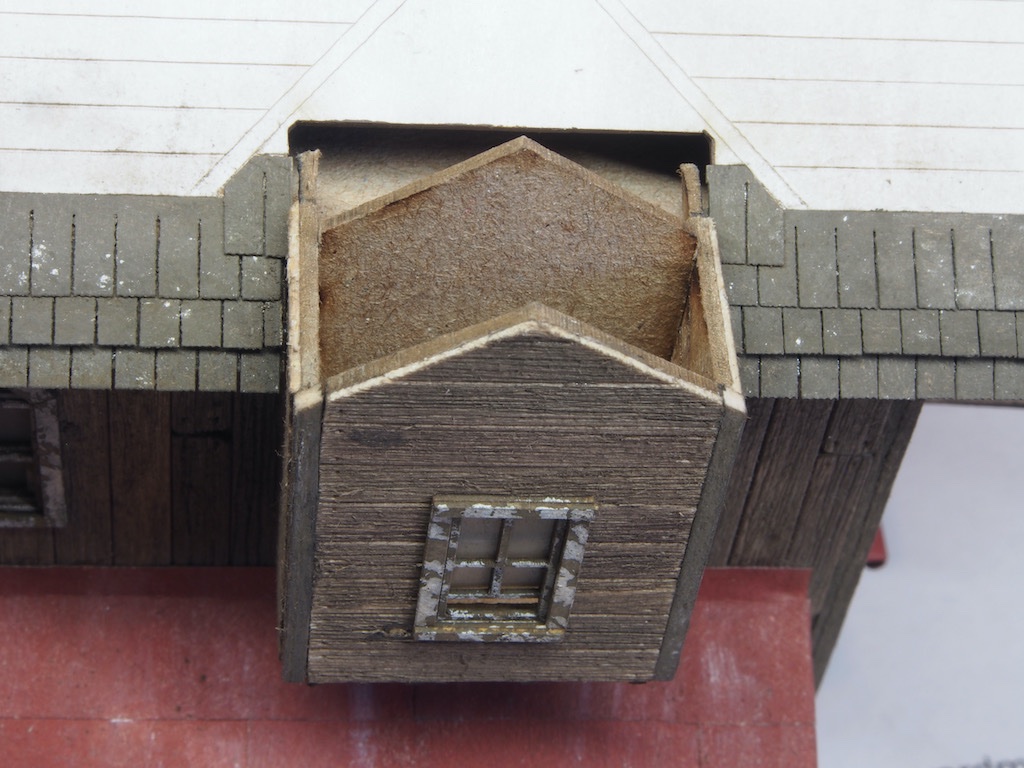
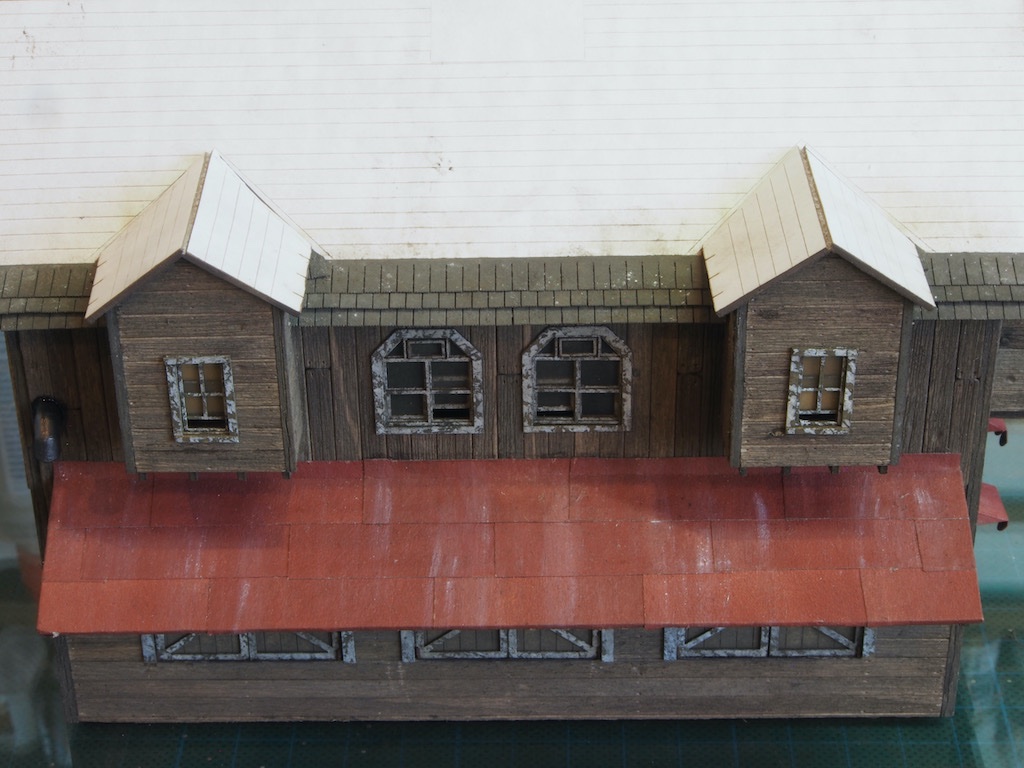
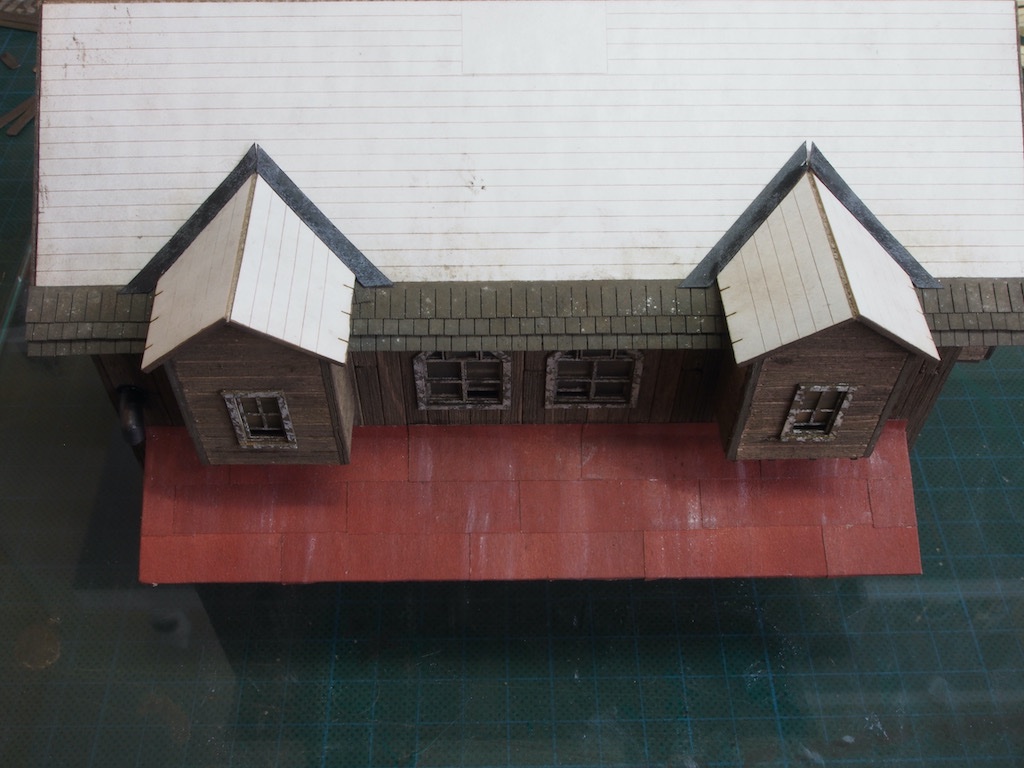
Thanks one and all once again for all the kind comments and likes. Progress has been slow but steady, so it's time for an update. The Yard Master’s Office The Yard Master’s Office introduces a slightly new technique for this build. Here we see for the first time the use of clapboard siding. (I believe that in Australia we call this simply “weatherboard”). To achieve this while still using a board-on-board construction technique, the kit designer has cleverly made use of laser cutting to provide a substrate with the correct angles pre-cut. It is then a fairly simple process to apply the boards (prepared in the same manner as previous boards) to the substrate in perfect alignment. Here is a super-close-up to show the design/construction process. In reality, this is so subtle that it wasn’t until I turned the substate end on that I realised what had been provided. Very clever! Here is another “in-progress” shot: And all three walls with siding applied and trimmed up. Some bracing is added to the interior side of the walls (to help prevent warping), and the inside front corners of the two side walls are then bevelled to allow a snug fit with the front wall. Each wall then has windows/doors and window shades applied in the same manner as previously described. The front wall also receives a cast resin vent, that is “rusted up” before gluing in place. Here is the completed Front Wall: The Left Wall (complete with Yard Master sign on the door): And the Right Wall: The walls are then glued up. The rear wall is simply a piece of laser-cut card as it will be glued up against the front of the Warehouse. View blocks are also added. A pre-cut roof substrate is then added, and the ends covered with a fascia board. The roof is then shingled in the same manner as the main building. It was at this point that I realised that I was going to run out of shingle material. I reached out to the kit designer/provider via email and received a response within 6 hours, saying that he would be cutting more shingles next week and would put some extras in the post for me then. Now that’s what I call customer service! Here is where I got to before running out of shingles: I have some more things that can be progressed while waiting for the extra shingles to arrive…
- 326 replies
-
- 20
-
-
-
Cider, Thanks for dropping by. IF you look back over my log, you’ll see a note I made about using an airbrush with this size of model - a “standard” airbrush is really too small for the larger panels of the body work, although fine for the smaller parts and details. If you search YouTube for Paul Budzik, he has a range of great tutorial videos on airbrushing and types of airbrush/mini spray guns. The Vallejo Metal Colours are a separate range of Vallejo paints. If you do a search for Vallejo Metal Colours, you should find the range. As for primer, I generally used the Vallejo grey primer. That said, next time around I would not use acrylic paints at all. For my next Pocher model, I’m planning on using either Lacquer or Enamel paints. The Zero brand of paint do a huge range of colours based on actual car colours (although mainly more modern cars). For clear coating, next time around I would use a 2K clear coat over that. It’s nasty stuff, so needs a lot of PPE, but it gives an incredible gloss finish. Hope this helps and please start a build log here when you are ready. It’s the best way to get help and advice.
-
Thanks Elmer, And a Happy New Year to you and yours as well.
-
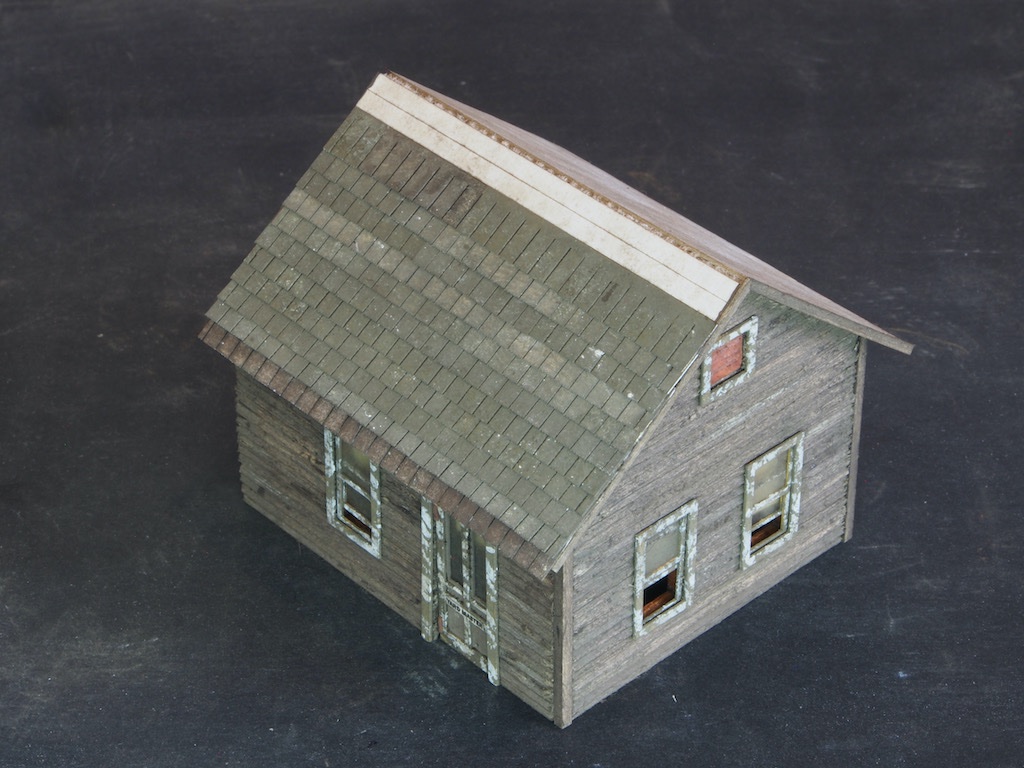
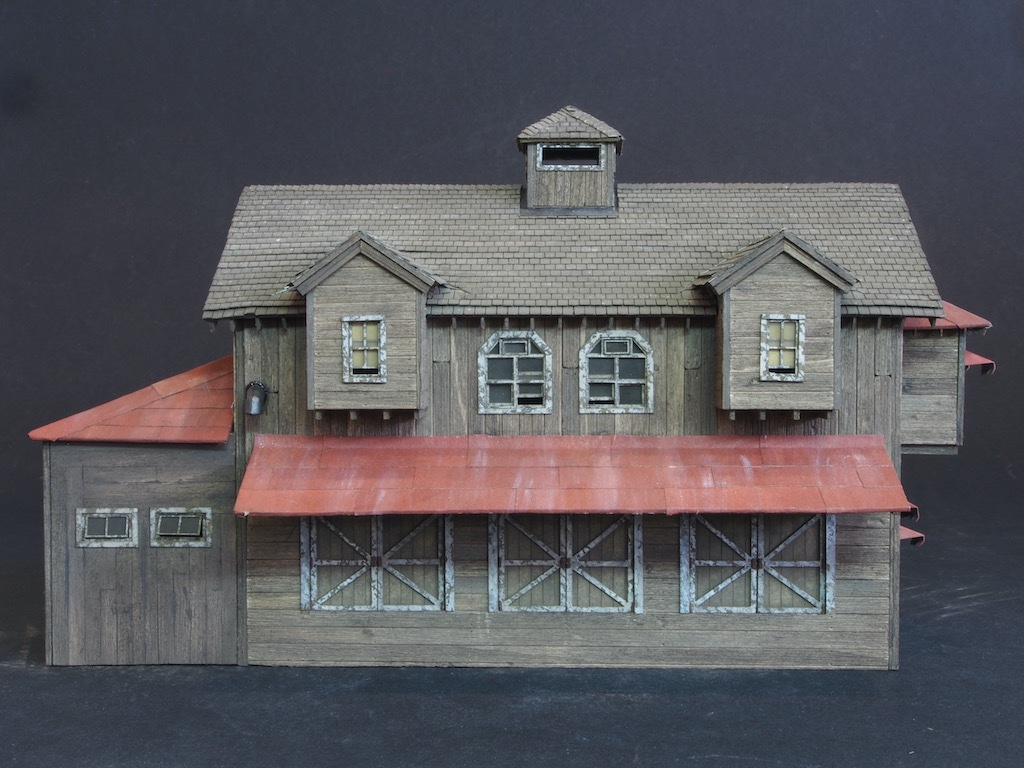
Thanks again for all the kind comments and the likes. The Warehouse Not much work in the Shipyard over the Christmas break, but back into it now. The next order of business is the construction of the Warehouse, which is attached to the front of the main building. All of the techniques used in the construction of the main building are repeated here, so I won’t go into detail. The exception is that the Warehouse doors are steel, so a good rust covering is achieved by applying a combination of two orange chalk powders (one light, one dark) over the brown base. The effect seems to be quite realistic (at least to my eye). I didn’t appear to have any of the stained strips left over from the main building, so had to raid my stash to find some substitute timber. I found some of the correct width, but a little too thick. That was soon remedied by passing them through my thickness sander. Of course, even though I applied the same technique, this batch came out a little differently to my first batch. Unfortunately, I wasn’t as careful as I should have been in the application of glue, and I ended up with a number of glue stains on the walls. I gave them a sand, some further treatment with a wire brush and applied more chalk/alcohol mixture and that made them a little better. Subsequent to this photo being taken, I gave them another go with a wire brush to bring them closer in tone to the main building. Here is a close up of the left wall with the rsuty steel doors. The walls were then glued together and the whole assembly glued to the front of the main building. The roof was tar papered in much the same way as the rear dormer and the roof was fitted after a view block had been inserted. Here are few overall shots to show progress to date. Rear Wall: Right Wall: Left Wall: And Front Wall: The gap is where the Yard Master’s Office will go, and that is next up…
- 326 replies
-
- 22
-
-
-
EURYALUS 1803 by Peter6172 - 1:48
gjdale replied to Peter6172's topic in - Build logs for subjects built 1801 - 1850
Good decision Peter - you won’t regret it. -
Absolutely wonderful Glen! From design concept through execution to final display - just a masterful piece of work. You can be justifiably proud of a job well done. Time to splice the main brace. Just one question - where are your buccaneers? Oh that’s right, under your buckin’ hat! 🤣🤣🤣
- 134 replies
-
- 4
-
-

-
- Captain Kidd
- bottle
- (and 3 more)
-
I think you would have a ready (and substantial) market for that one Chris. There have been many, many members seeking such a kit over the years.
-
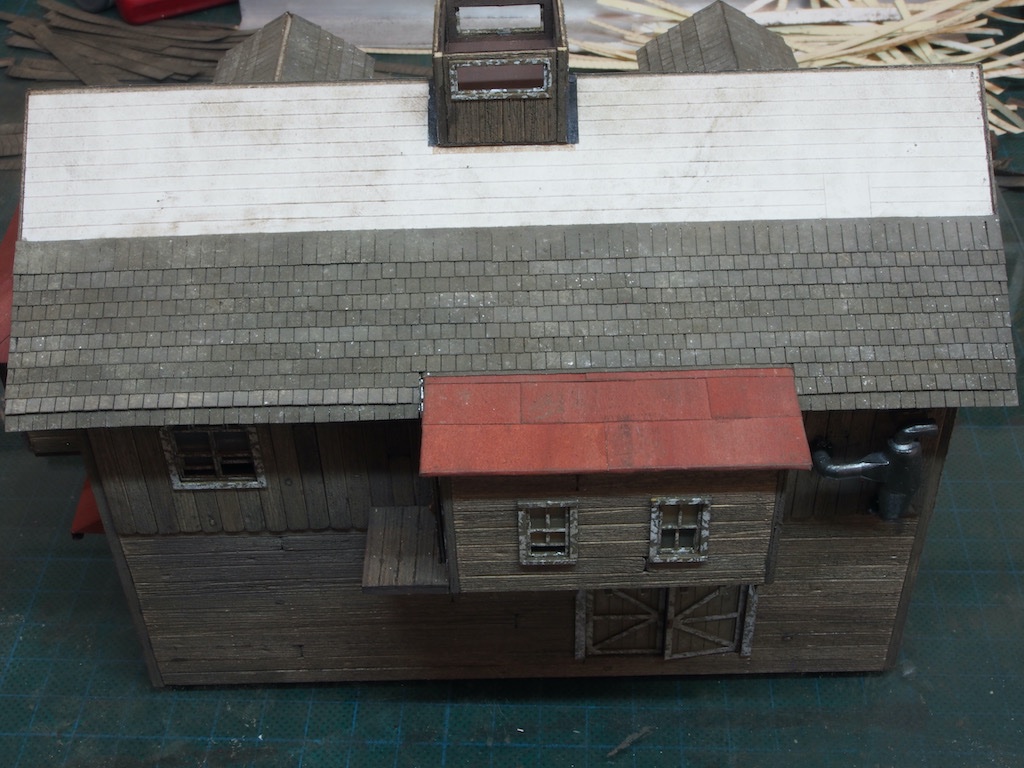
Thanks again for the kind comments and all the likes. Roof Construction (continued) Shingling continues…. The first task for the other side of the roof was to complete the Dormer roof with Tar Paper and glue into position. In this photo, I haven’t yet finished the weathering of the tar paper. Shingles were then placed as per the previous side, up to the level of the chimney. The Chimney was then placed temporarily in position while the flashing was added on the top and sides of the chimney. The chimney was then removed while flashing was added to the lower side. Shingling then continues, working around the flashing, up to the level of the Cupola, where the lower flashing for it was added. And shingling continued up to the ridge line, again with a special row added along the top edge. In the photo below, you can see that some additional weathering has also been added to the dormer roof. Ridge capping was then added to the main roof and the two dormer roofs. The Cupola roof was also built and shingled at this stage, but I was so engrossed in what I was doing that I forgot to take any pictures of the construction process. Rafters were then added to the two large gable ends, and to the two dormer gables. Rafter “tails” were then cut and added to each side of the main roof. As well as to the sides of the dormer roofs. That completes work on the roof for now. There will be more details added a little later in the build, but for now we turn our attention to the construction of the Warehouse and the Yard Master’s Office….
- 326 replies
-
- 21
-
-
-
EURYALUS 1803 by Peter6172 - 1:48
gjdale replied to Peter6172's topic in - Build logs for subjects built 1801 - 1850
Great to see you start the build log for this Peter. I know you will do this build justice. Mark, I can attest to this being a full scratch build from Alan Yedlinsky’s 2-volume book set. (I assisted with the transfer of the model from Russell to Peter). -
Great job again Glen. I think Keith may have been right. Perhaps you should change your story to, “in a rare moment of brilliance, I decided to add the boats separately”. 😉 I look forward to seeing the final display.
- 134 replies
-
- 5
-
-
-
- Captain Kidd
- bottle
- (and 3 more)
-
Great work Glen! Loved the video too - must have taken a lot of editing to remove all the swearing and cursing…………… I’m glad it was only 4 minutes long though - I don’t think I could have held my breath much longer!
- 134 replies
-
- 3
-
-
-
- Captain Kidd
- bottle
- (and 3 more)
-
Thanks Henry, The capping rows for both the dormers and the main roof go on last, once the other side of the main roof is done.
-
Thanks Glen and also for all the likes. Shingling continues, albeit slowly… Once past the dormers, it is plain sailing up to the cupola. The cupola is constructed in much the same way as the main building - a laser cut substrate with weathered boards and end trim attached, and then windows with peeling paint. Some additional trim is added to the base to lift it off the main roof a little to assist with placing the flashing. Flashing is then added and the shingling up to the ridge line is completed. The final row is comprised of a special set of smaller shingles. Now to turn the opposite side of the roof…
- 326 replies
-
- 15
-
-
-
Looking great Glen! Had you considered using SilkSpan for your sails? It would overcome the “problem” (if you can call it that) of the relatively open weave of your current sails. Regardless, this is an outstanding build.
- 134 replies
-
- 6
-

-
-
- Captain Kidd
- bottle
- (and 3 more)
-
Roof Construction (continued) It’s been almost a month since the last update, so thought I’d better show “proof of life”! Of course, it’s been the usual excuses of life getting in the way, but it has been a fairly busy month for things other than modelling. Amongst that was two weeks spent on a Furniture Design Course – my other hobby, 1:1 scale modelling! A great course taught by Canadian furniture maker Michael Fortune - except for the part where we all came down with a particularly nasty Gastro virus (the Noro Virus) on the Thursday of the first week. Fortunately, we were all better again by the time Monday came around, so we didn’t lose too much course time. I finally got back to the modelling bench today and was able to progress with roof shingling. The first task was to insert two odd-shaped pieces around both of the Dormers, underneath where the flashing will go. The Dormer roofs were then installed. Then the flashing was installed on both Dormer roofs where they meet the main roof. These were simply cut from paper templates and painted/chalked as previously done for the Dormer walls. Shingles were then placed from the roof edge to the Dormer roof, overlapping the flashing. These were continued up to the 10th row, just shy of the peak of the flashing, and the side of the Dormer Roof was shingled in the same way. The whole process was repeated at the other end with the opposite Dormer. Next will be to complete the shingling between the Dormers up to the same level. Applying shingles is a little bit like tying ratlines – it seems to take forever, but eventually we’ll get there….

- 326 replies
-
- 21
-
-
-
Rest In Peace Bob. You were a good friend and an inspiration to so many.