Mike40
-
Posts
97 -
Joined
-
Last visited
Content Type
Profiles
Forums
Gallery
Events
Everything posted by Mike40
-
I can relate to your story William. I have been into many different branches of woodworking from turning,furniture,marquetry, carving, etc. and I have enjoyed them all and I always finish my projects, but I cannot keep my enthusiasm up long enough to master any one area. This has been somewhat frustrating, but after 20 years of this I finally decided that I will never master any one part of the craft because at heart I am more interested in exploring new disciplines to keep my motivation up and also to learn about the history and culture related to those subjects. Of course I have managed to keep this within the general woodworking area, especially since I am tooled up for that and have many transferable skills. My point is that I think it helps to understand the dynamic of your motivation in order to keep your work satisfying.
- 241 replies
-
- 13
-

-
 It's looking very nice Robert. I still haven't found your mistake. Guess I am dazzled by all the parts that aren't mistakes!
 -
Here is a link to a site I have subscribed to as I am new to ship modeling. The subscription is a one time only fee which is not exorbitant. There are video tutorials on just about everything. That is not to say that everything is done the best way or the only way, but if you are new to scratch building you can at least find an acceptable way on this site and there are some pretty clever techniques shown here. http://www.shipmodeling.ca/subs/ Once on the home page you can just scroll down and there is a table of contents on the left side and small video icons for tutorials besides the subject which you can click on.
-
Great progress Joe, and a nice fix on the notch.
-
Galley Washington by Mike40 - 1:48 - POF
Mike40 replied to Mike40's topic in - Build logs for subjects built 1751 - 1800
Thank you Nils. There have been several excellent build logs of Washington here on this site. Here is a link to the list: http://modelshipworld.com/index.php?app=core&module=search§ion=search&do=search&fromsearch=1 I chose this ship as my first model for it's relative simplicity to learn some of the skills I will need for more complex builds in the future. -
A fully functional submarine from Spain 1858
Mike40 replied to dgbot's topic in Nautical/Naval History
What a great find David. I love the idea that the first submarines were made out of wood. I recently read a novel series 'Fletcher and the Mutineers' where a wooden submarine was an important part of the story. The three books claim to be based on the diary of an actual person. All 3 books were a fun read, especially the part with the submarine. https://www.amazon.com/s/ref=nb_sb_ss_ime_i_1_10?url=search-alias%3Ddigital-text&field-keywords=john+drake+fletcher+series&sprefix=john+drake%2Cundefined%2C235&crid=MGPYFEK373WW&rh=n%3A133140011%2Ck%3Ajohn+drake+fletcher+series -
Galley Washington by Mike40 - 1:48 - POF
Mike40 replied to Mike40's topic in - Build logs for subjects built 1751 - 1800
Much thanks Zoltan. I have bookmarked the links. -
The deck planking looks great Bryan including the pencilled tree nails and the outside planking too. Putting aside purist thoughts, the tree nails do look nice. When I was a kid my parents bought a new house that the builder was originally intending for himself. The beautiful wooden floors were all ebony pegged looking much like your model, and as much as we all admired them my mother wanted wall to wall carpet.
- 52 replies
-
- 2
-
-
- panart
- posto di combattimento
- (and 1 more)
-
It couldn't be better Johann!
-
Seeing the current state of your build it is obvious that your striving for perfection is really paying off Mike. Using templates is a great idea too. I will try to remember that when I begin constructing the transom on my own model.
- 969 replies
-
- 5
-
-
- hahn
- oliver cromwell
- (and 1 more)
-
The binnacle looks real good Jesse and the bell turned out quite nice too. Great tip on the ca glue. I'm looking forward to learning about soldering. I have done just enough of it to know it isn't all that easy and I expect especially when soldering such small items for models.
- 1,306 replies
-
- 7
-
-
- syren
- model shipways
- (and 1 more)
-
HMS Naiad 1797 by albert - FINISHED - 1/48
Mike40 replied to albert's topic in - Build logs for subjects built 1751 - 1800
Incredible work on the wheel Albert. The detail is nothing short of perfect. -
Wonderful work Nils. I wish I could be your apprentice to learn metal work.
- 2,625 replies
-
- 4
-
-
- kaiser wilhelm der grosse
- passenger steamer
- (and 1 more)
-
Galley Washington by Mike40 - 1:48 - POF
Mike40 replied to Mike40's topic in - Build logs for subjects built 1751 - 1800
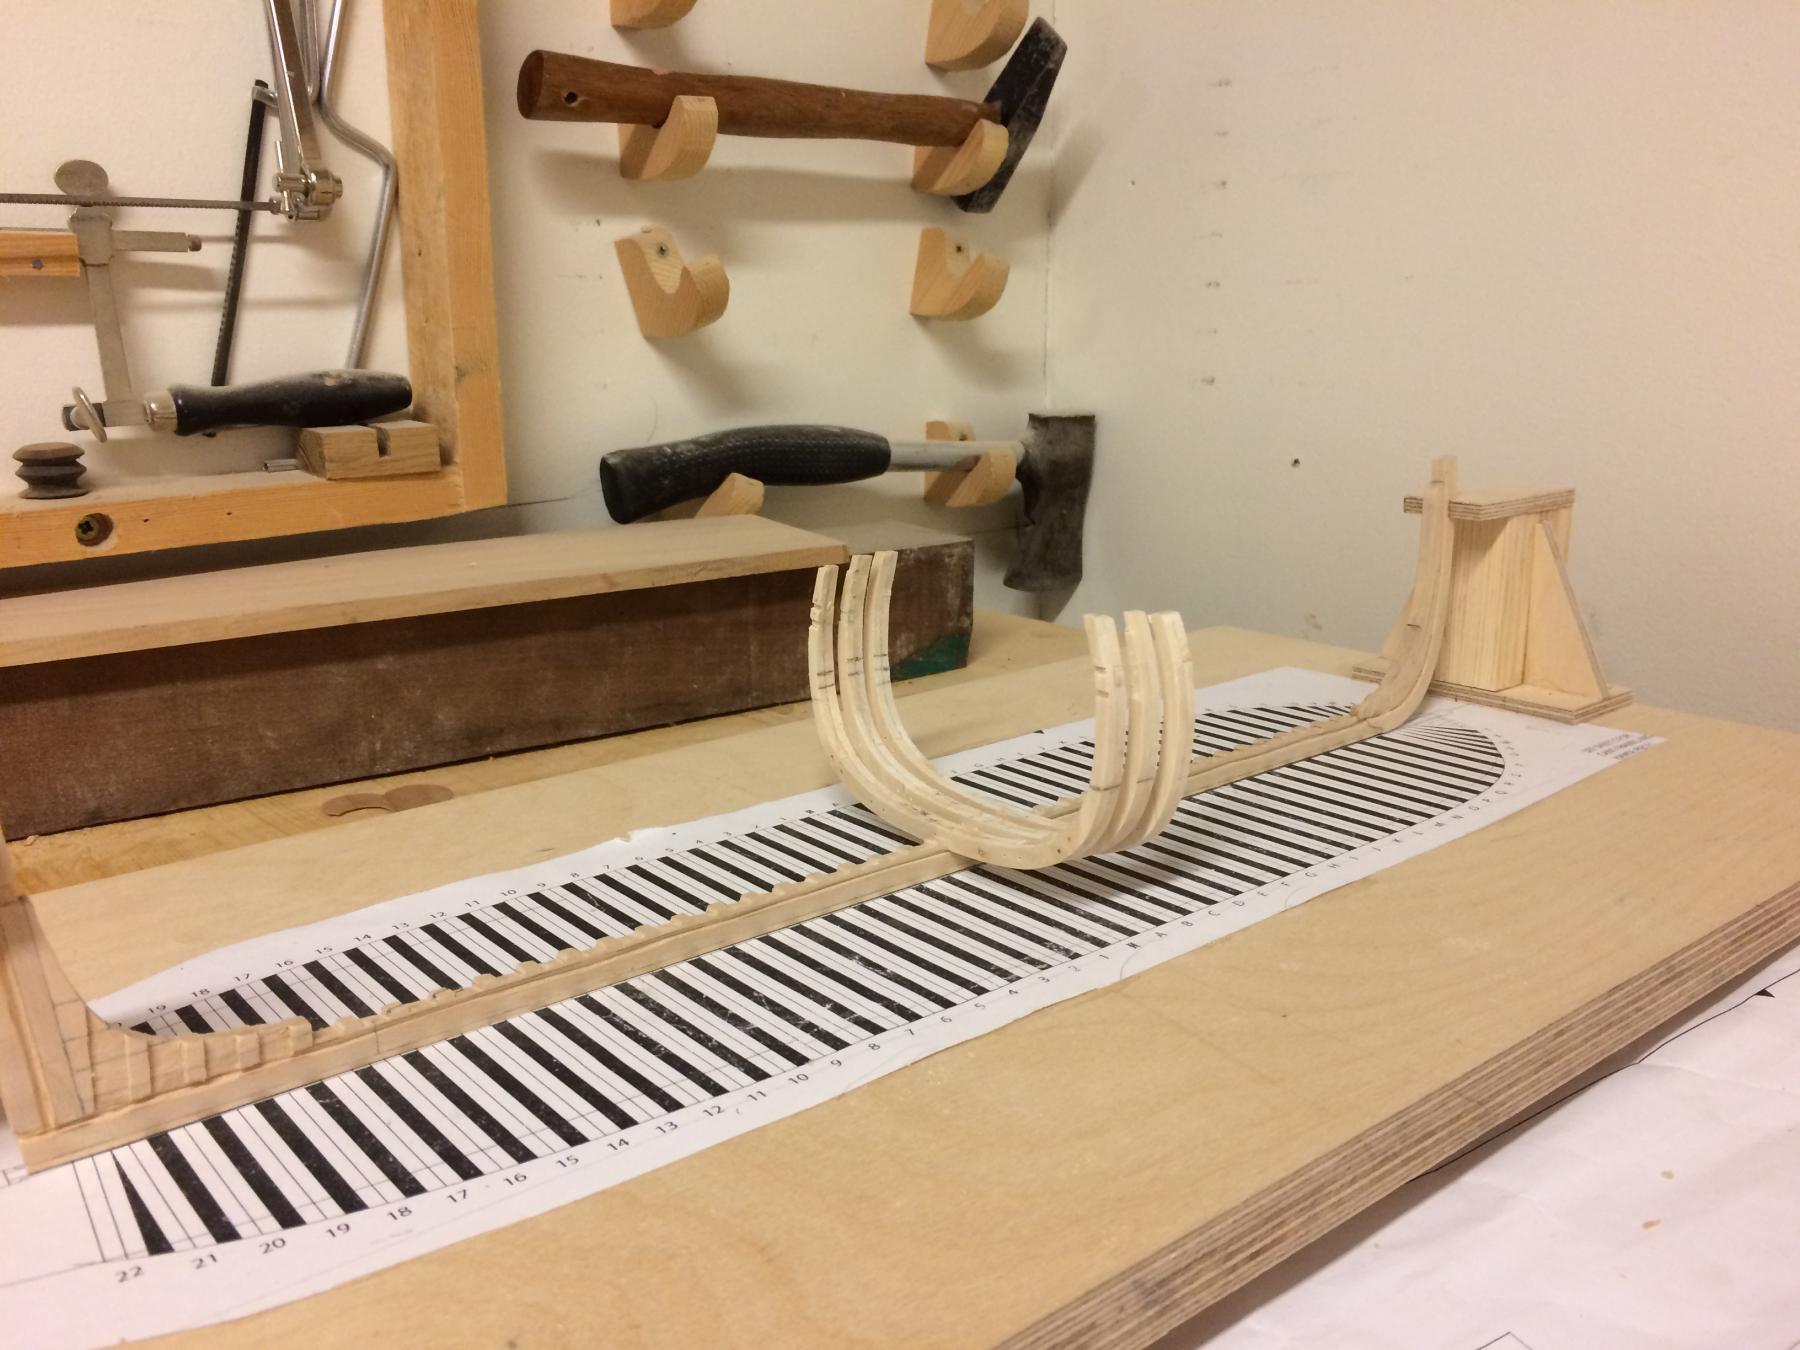
Thanks guys for the positive comments and the thumbs up too. I only plan to use the axe if no other tool will do the job! I'm really enjoying myself now that the frames are going smoothly. I expect things to get a lot more challenging when I get to the cant frames, maybe they should be spelled 'can't' to go with my skill level. One thing that makes it easy to produce the frames is my scroll saw. I think every woodworker/model maker should have one. The first 3 double frames took me about 2 hrs. each to make while the next 2 took about 45 minutes each (the glue is still drying). I haven't tried to go faster, but my routine is better now and the scroll sawing has speeded up quite a bit too as it always does after not using it for awhile. I won't be installing the frames permanently until I can find some black monofilament fishing line to use for the bolts. My biggest problem with woodworking and model building where I live in Norway is finding the materials that are needed for any but the most common types of work. This is due to our very small population here and the lack of market demand. The smallest drill bit that can be found locally is 1mm dia. That is slightly oversize for the bolt holes, but only by a small margin, so 1mm will have to do for now. I am planning to order some other tools and supplies on the web, probably from Germany or England as modeling is not exactly widespread here! If anyone can recommend a good German web store for modeling supplies I would much appreciate it if you could send me a link.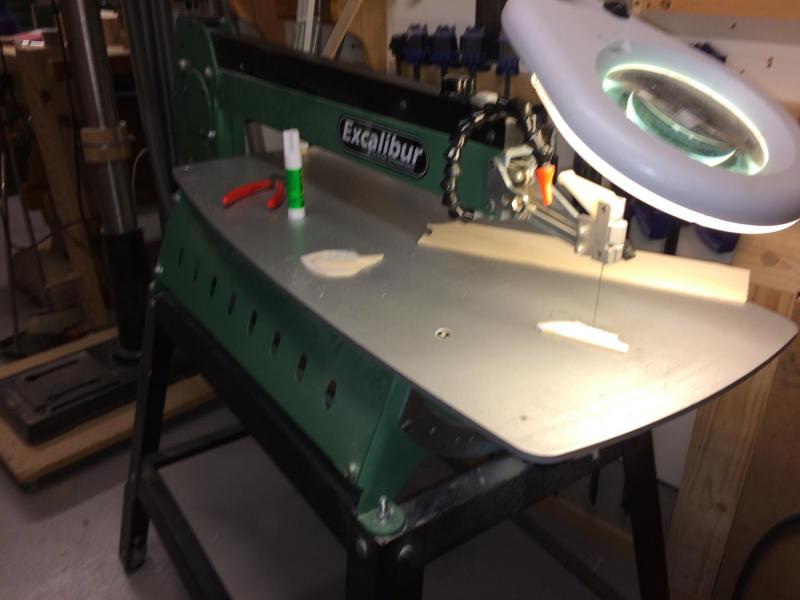
-
Galley Washington by Mike40 - 1:48 - POF
Mike40 replied to Mike40's topic in - Build logs for subjects built 1751 - 1800
Thanks Tom. I have a lot to learn, but I am having fun now that the frames are no longer so difficult. -
Galley Washington by Mike40 - 1:48 - POF
Mike40 replied to Mike40's topic in - Build logs for subjects built 1751 - 1800
My latest progress. At least a start. These frames are not glued in yet. I am surprised at how long it takes to make to make the frames, but at least I have a good process now. I expect things will speed up a bit with experience, but the main thing is to enjoy the work and so far It's been fun, especially when problems are overcome. Having support from members on the site makes all the difference. I n the future I will try to show more of how I am doing the work and provide better close-up photos to make the log more interesting. Any suggestions or criticism is welcome.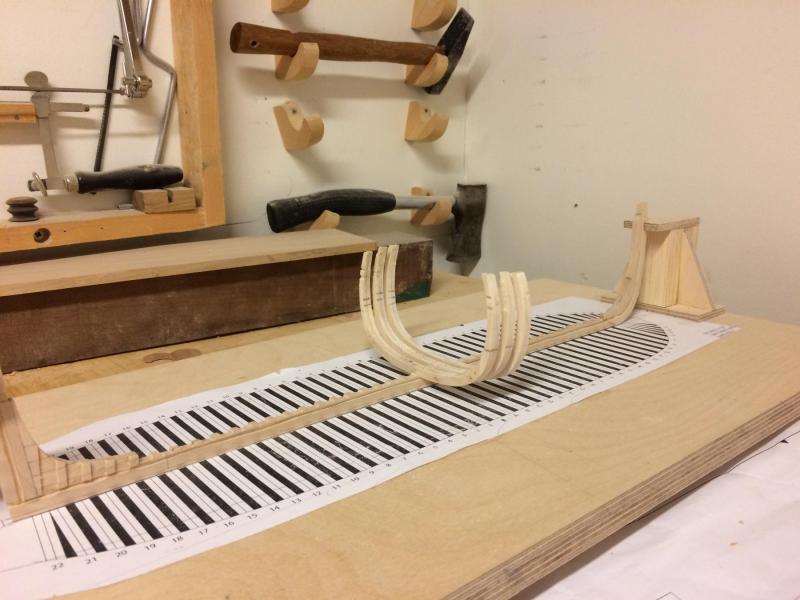
-
Galley Washington by Mike40 - 1:48 - POF
Mike40 replied to Mike40's topic in - Build logs for subjects built 1751 - 1800
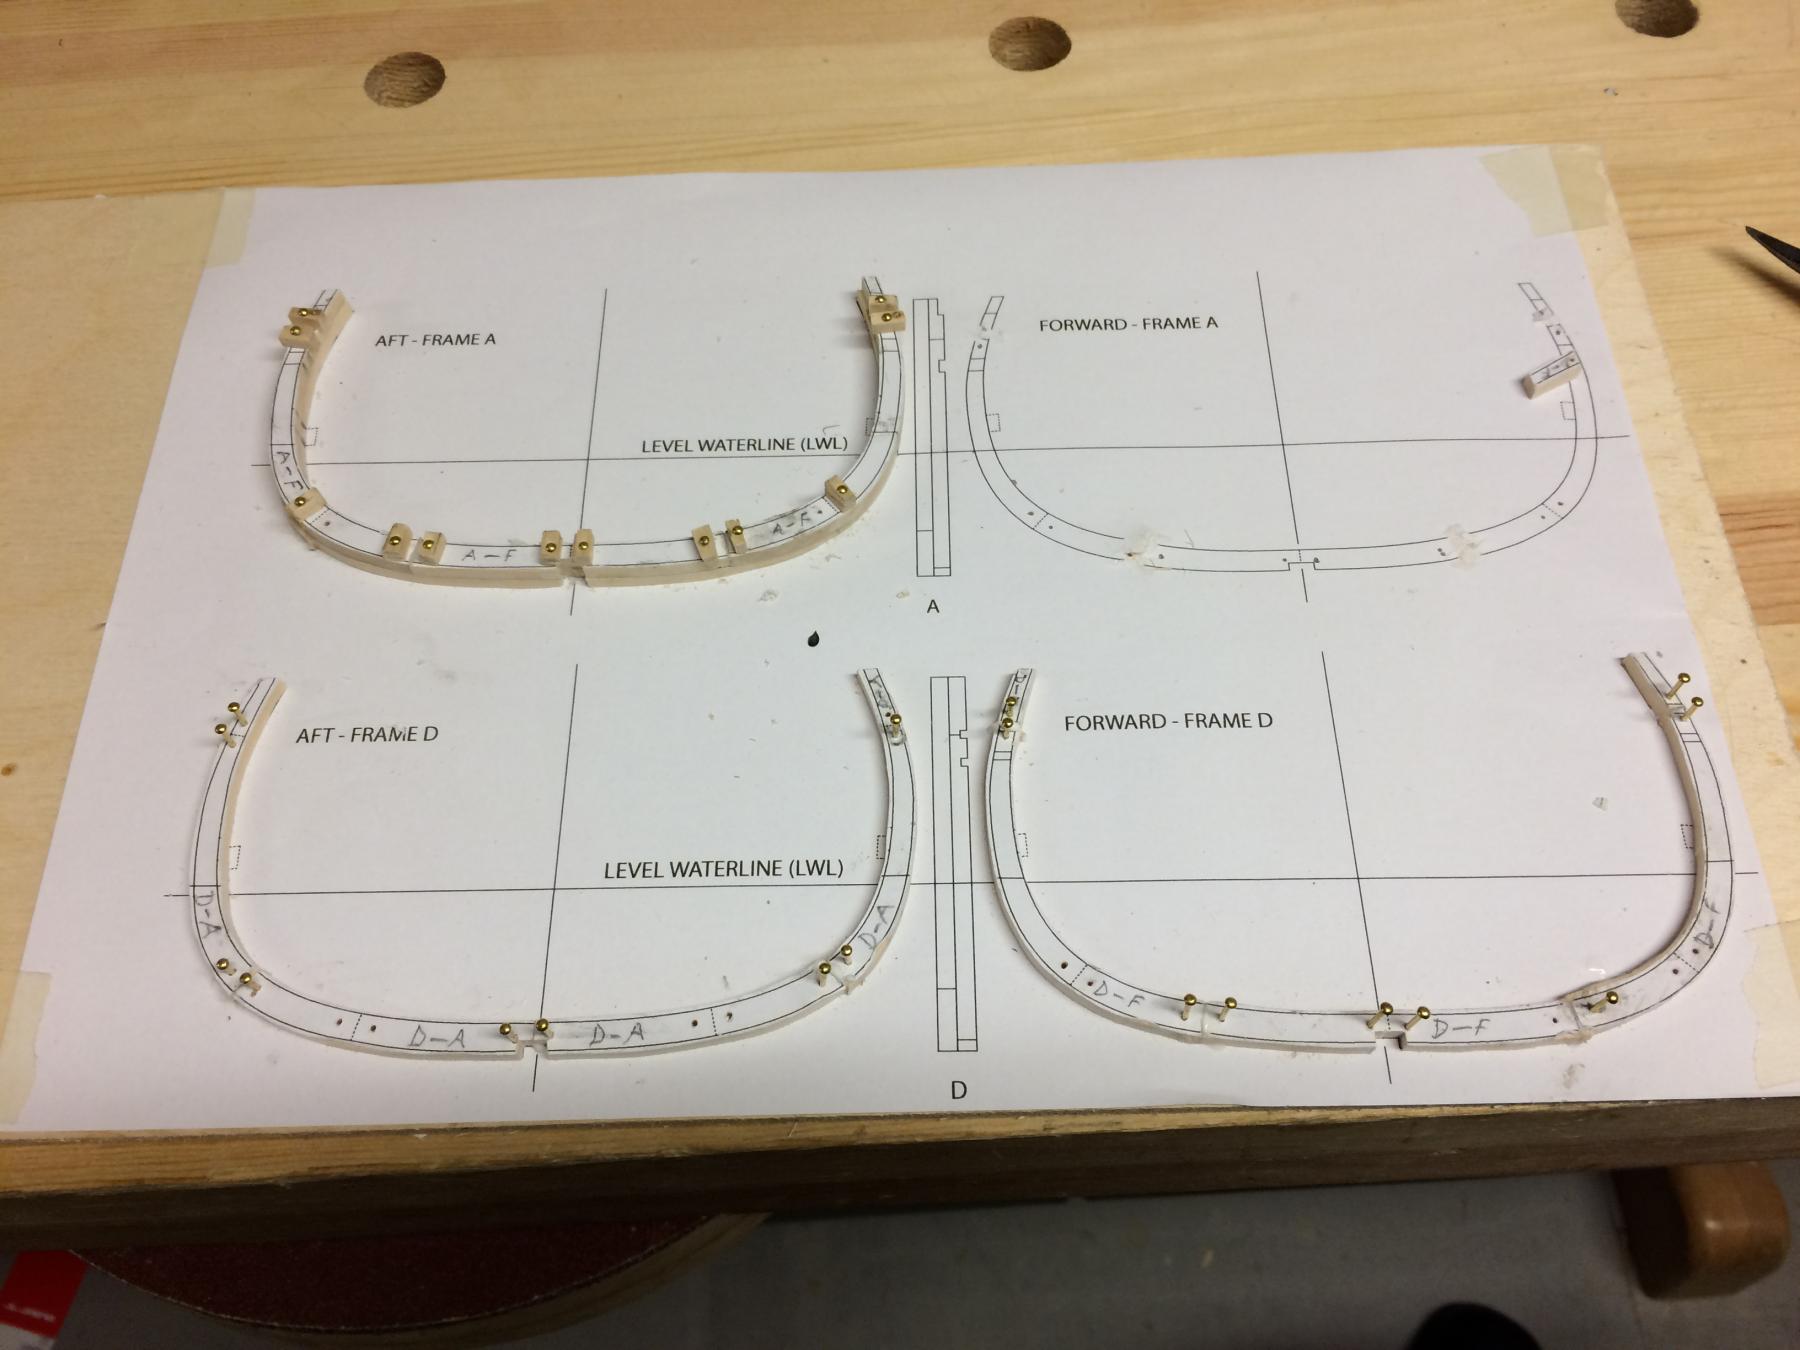
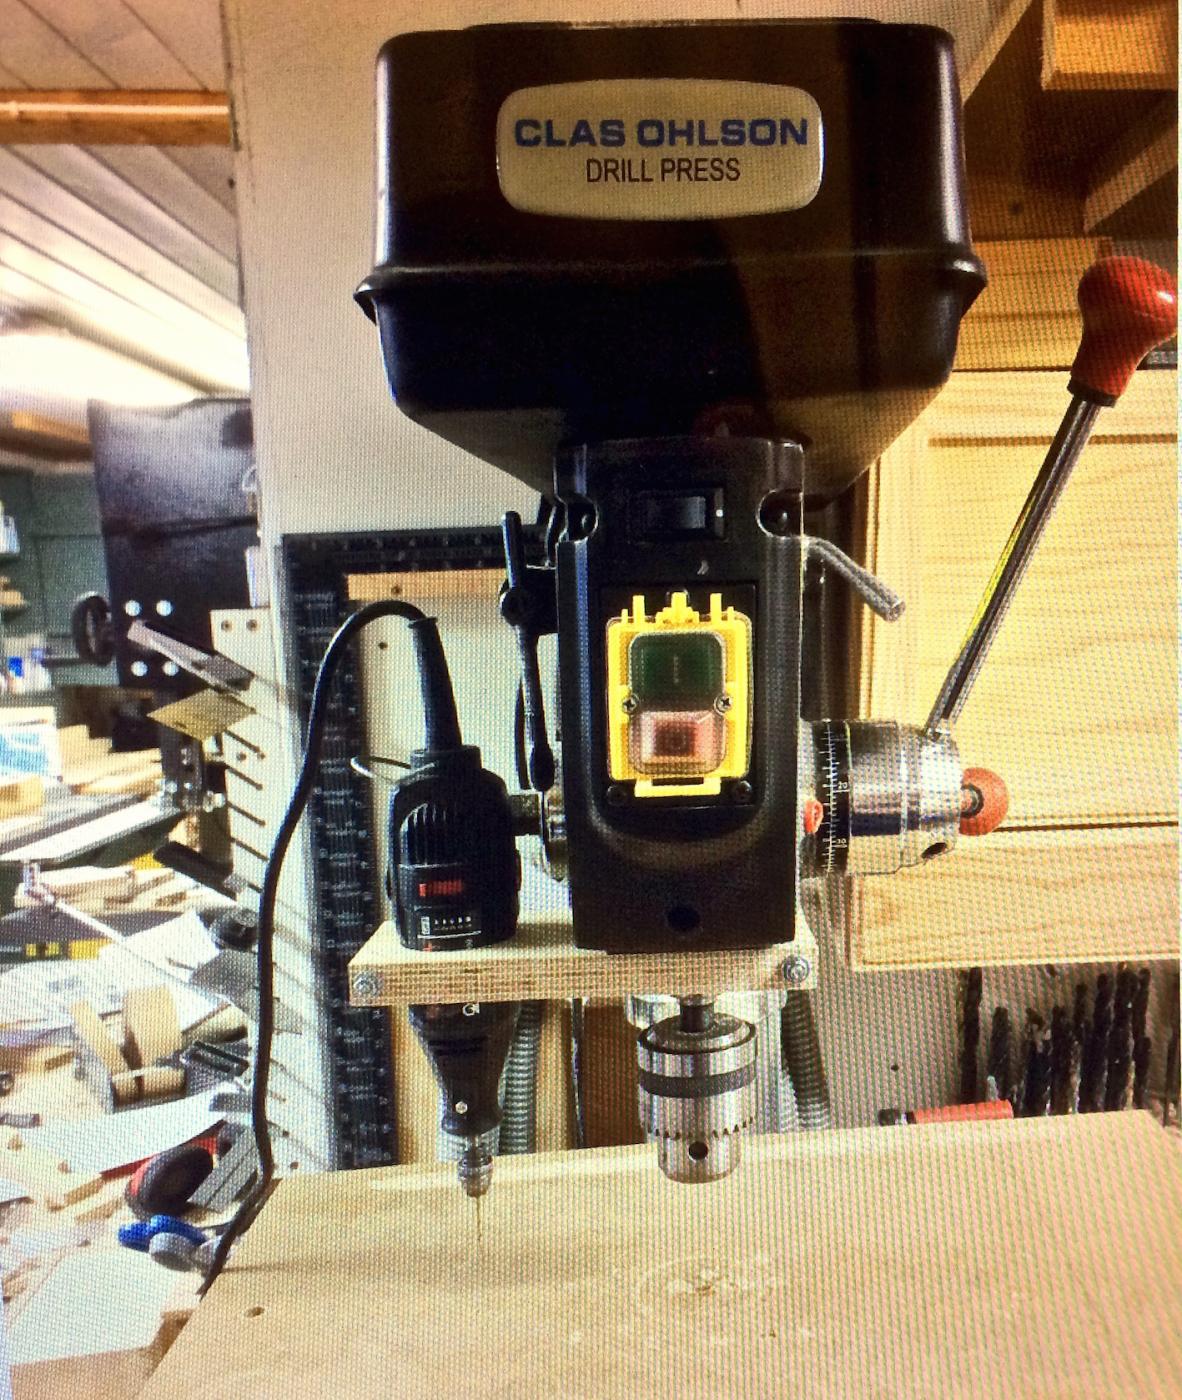
It's been awhile since this log was started and even though I haven't made any significant progress since, I thought I should at least show a sign of life to let you know that I haven't given up. I started making some frames after getting the keel, stern and bow finished and mounted on my building board, but I was not happy with the results because I lacked a method to insure the accurate gluing together of the forward and aft frame parts. I did finally find a build log, EDT's Young America build with the answer to my problem. So many thanks EDT! Another problem was having the ability to drill straight holes into the frames. This was solved by mounting my Dremel on my large drill press, another idea I found on this site, but cannot remember who posted it. I did post a photo of it on the the tool forum if you want to see it. So far I have only managed three frames, one finished, and two almost finished. Not very impressive progress, but other things took up my time last month. Here is a picture of the method where small nails are used to connect the drilled holes in the forward and aft frame parts, first to let the glue joints set and then to glue the two completed parts together. This method really works well and I now feel confident that my frames will be pretty darned accurate. I will be leaving some extra material, about 1/32" to allow for fairing. Not sure if that's enough, but I think I read that others do the same. I expect to see some real progress this month. Right now each frame from start to finish is taking a couple of hours. Pretty slow, but accuracy is more important than speed, so I hope to finish a couple of completed frames each day with the time I have available.
-
Shop Made Dremel Drill Press- Not my idea
Mike40 replied to Mike40's topic in Modeling tools and Workshop Equipment
John: It won't have to be rechecked for square so long as the mounting bracket stays attached after removal of the Dremel. I just need to eye the end of the bracket mounted to the DP to make sure it hasn't change position on the DP quill. The bracket doesn't interfere in any way with regular drilling operations. The only problem I've had so far is that I sometimes turn the DP on or off while stupidly expecting the Dremel to go on or off ! -
Shop Made Dremel Drill Press- Not my idea
Mike40 replied to Mike40's topic in Modeling tools and Workshop Equipment
It is usually hard to find the originator of a shop made fixture or jig of any kind in woodworking. I have 'created' many things including jigs and fixtures in my shop only to find out later that they had already been invented, probably many times over. For example woodworkers have been attaching their routers to drill presses for a long long time and it's only logical to think about doing that with a Dremel, although many of us, like myself, might not think about it. That said I do think it is proper to give credit to the one who inspires you, even if he isn't the originator. I also think it is great to take the time to pass on these good ideas for everyone's benefit. -
Shop Made Dremel Drill Press- Not my idea
Mike40 replied to Mike40's topic in Modeling tools and Workshop Equipment
Thanks for the heads up Carl. I didn't notice the 2nd link in Mark's comments, but now I've seen it. It wasn't Jay's that I saw earlier. The one I saw was mounted to a drill press similar to mine. -
Shop Made Dremel Drill Press- Not my idea
Mike40 replied to Mike40's topic in Modeling tools and Workshop Equipment
jud: Yes it does look a bit canted in the photo, but it drills a perfectly vertical hole. I checked it by drilling holes and cutting them in half to checked it with my very accurate square and they were right on. I'm a tool nut, but I'm trying to avoid buying more power tools. My shop is already crammed full of regular woodworking machinery. MTaylor: Not sure what you mean about the mill Mark. HMS Bellisle: Good point. I do have a small bit chuck for my DP, but the DP has a slight bit of runout. Not a problem with my normal woodworking, but not precise enough for modeling. -
Shop Made Dremel Drill Press- Not my idea
Mike40 replied to Mike40's topic in Modeling tools and Workshop Equipment
Thanks Bob. Technically you are correct, but the ply is working very well as I started with a very tight fit and there is very little tightening involved to get a good solid grip on both the quill and the Dremel, and yes, the depth stop can be used in the normal way. Luckily the quill on my DP is proud about 3/4" when at the 'zero' position, but even so I could still use it if it weren't. -
My thanks to whoever posted a photo on their building log showing how they attached their Dremel rotary tool to their drill press on the quill. I tried to find you to give you the credit but couldn't remember who's log I had seen it in. Having read part of EDT's Young America log I learned of his great technique for for gluing up his frames accurately. which I wanted to copy. The only thing standing in my way was having an accurate way to drill with very small diameter bits. This problem was eloquently solved by copying the idea of attaching my Dremel to my drill press. I thought this would be a good post to have in the 'tools' section as I'm sure many others could benefit from it as I did. My only other easy option was to buy a Dremel drill press, but reviews on it haven't been particularly positive and from what I've read it is not very accurate, so this solution saved me a lot of grief and expense. Testing shows my set-up to be very accurate and there is no need to take off the Dremel bracket when it's not in use and it's simple to take out the Dremel when I want to use it by hand.

- 18 replies
-
- 18
-
-
Drill Bit Sizes Appropriate for Ship Modeling?
Mike40 replied to Mike40's topic in Modeling tools and Workshop Equipment
Thanks Jaager. Great answer, Thank you. As for the drill press, I have just finished making a mount for my Dremel to my big drill press. An idea I got from someone's log on the site here, but darned if I can remember who it was, so I don't know who to thank. I will be testing it after lunch to see how accurate it drills. I really don't want to invest a lot in modeling machines, much as I would like to have them. I already have a shop full of full size woodworking equipment so I find it hard to justify the expenditure for the very few models I will be able to complete at my age. -
Chris, I don't think any of us are disagreeing with you. Your original post was thoughtful, and excellent advice. I think the discussion since then has been more about the exceptions that abound due to human nature and not a debate about how right or wrong you were. Maybe we are just enjoying ourselves exploring the subject.