Mike40
-
Posts
97 -
Joined
-
Last visited
Content Type
Profiles
Forums
Gallery
Events
Everything posted by Mike40
-
 Thanks Mike. I will have to try that. The penciling is kind of messy. I know what you mean about computer fatigue. I hope you enjoyed your vacation.
- 175 replies
-
- 3
-

-
- washington
- galley
- (and 1 more)
-
I suppose many do try to build models and then give up when they find it is beyond their skill level, but I don't believe that one rule fits all. Yes, some get discouraged easily while others rise to the challenge and learn what they need to know as they progress. It all depends on what someone new to modeling brings with them in terms of relevant experience/skills/expectations. I expect many newcomers with no skills see a model they love and want to building it, and anything less would not inspire them, while others might see they are in over their heads and put it aside and try a simpler model in order to develop skills. Their are always lots of people trying new things that they abandon when they find out it is not as easy as they thought it would be.
-
I just started reading your log from the beginning Ed, but I skipped to the last post just to say how I much admire the inspiring work you have done on Young America. Your log is very much like a 'how to' handbook from which I have already learned so many techniques that will allow me to work much more accurately. I am in process of making frames for my first POF model and I found your way of pinning the frame components for gluing and locating to be extremely helpful, especially since I have been having mixed success with my frames so far. I know there will be many more of your ideas used as my build progress.
- 3,618 replies
-
- 5
-
-
- young america
- clipper
- (and 1 more)
-
Wonderful work on the decking and winches Nils. It must have been wonderful sailing on those old vessels.
- 2,625 replies
-
- 6
-
-
- kaiser wilhelm der grosse
- passenger steamer
- (and 1 more)
-
Hi Jesse. Your Syren is really looking sweet after all the excellent work you have done to get it there. I am a newcomer to the site, but I have read your log from the beginning and I really appreciate all the great photos you took and your explanations of the ongoing work. Invaluable to a beginner like myself and also just fun to see.
- 1,306 replies
-
- 9
-
-
- syren
- model shipways
- (and 1 more)
-
Your model is really fantastic and inspiring Mike. The wood is beautiful too. Wonderful idea with the framed full sized ship. Thanks for sharing it with us. Nice to see you working with hand tools and making a good job of it too. It is a much more enjoyable way to work and except for production runs it saves a lot of time as well since you don't have set up machines and do trial runs, etc. I have a nice drum sander which is great for larger runs, but I also have a sanding board for individual parts that is much used. I can also smooth and fine tune the thickness of pieces with it. When doing edges where a 90 deg. angle is essential I run the workpiece against a wooden block placed on the sanding board to keep the workpiece at the correct angle.
- 968 replies
-
- 7
-
-
- hahn
- oliver cromwell
- (and 1 more)
-
Galley Washington by Mike40 - 1:48 - POF
Mike40 replied to Mike40's topic in - Build logs for subjects built 1751 - 1800
Thanks Mike and welcome aboard. Yes the basswood is pretty soft, but strangely enough it does behave a lot like other hardwoods. It is fine for ship modeling, but not as nice looking as boxwood, pear and other species like you are using. I carve figures with it and it takes the smallest details and is surprisingly strong, so it is ideal for modeling from a technical standpoint. I will be treating it with a sanding sealer of diluted hot hide glue which should take away any fuzziness tendencies and leave very smooth surfaces after light sanding. Some parts will also be stained in golden tones to provide better color tones. I will also be using some nice hardwoods on different parts of this model to provide some contrast to make it more interesting. -
Galley Washington by Mike40 - 1:48 - POF
Mike40 replied to Mike40's topic in - Build logs for subjects built 1751 - 1800
Yes Kurt, after all the milling work I had to do to get my materials ready for the build I will surely be saving even the smallest left overs. I hope they will be a lot more useful than the cut-offs I've been generating the last 20 years! Glad you will be watching. Please feel free to pick on me anytime you see me making missteps. BTW I found that the frame plans weren't so hard to use after all and I didn't need a lot of extra copies either. My bad. Thanks John. I am quickly becoming addicted this type of work. I love the small fiddly work even though I'm not very good at it yet. -
Photos from Viking Ship Museum in Oslo Norway
Mike40 replied to Erik W's topic in Nautical/Naval History
Yes, they are wonderfully built ships and very sea worthy. I visited the Viking museum in 2001. While there we also visited the Fram museum nearby. If you ever get back to Norway I suggest you go see it if you haven't already done so. Thank you for sharing your great photographs, they really catch the essence of the ship. I lost my own when my computer crashed a few years ago. -
Galley Washington by Mike40 - 1:48 - POF
Mike40 replied to Mike40's topic in - Build logs for subjects built 1751 - 1800
Thanks Bob. As an old woodworker I am very happy that I will no longer have to deal with all the 1:1 scale cut-offs I have always created along with my projects. I'm anticipating having to redo a lot of work, especially on this first model. I don't mind, it's all part of the learning process and otherwise doing the work as good as I'm capable. -
Galley Washington by Mike40 - 1:48 - POF
Mike40 replied to Mike40's topic in - Build logs for subjects built 1751 - 1800
Thanks Albert. I will have to get a lot more experience before I can satisfy myself, especially after seeing all the very skilled detail work done by yourself and others on this site, but it helps to know what kind of quality I am dreaming about. I may never get there, but I will enjoy the journey! -
Looks like you aced it this time Brian. The deck looks great Now! Looking forward to your next progress report.
-
Galley Washington by Mike40 - 1:48 - POF
Mike40 replied to Mike40's topic in - Build logs for subjects built 1751 - 1800
Thanks for your comments Brian and Joe. My next post will include more detail. I was so focused on just getting the keel, stern and bow together that I forgot to take photos along the way. I'm looking forward to starting on the frames today, so hopefully I will have some more progress to show soon. It will take me awhile to get the hang of posting a better log. -
I have a set of Flexcut chisels. They are very nice for small work, but not too useful for figure carving, which I normally hold in my hand while carving. I always use a protective glove on my holding hand and a thumb guard on my knife hand. I normally use basswood because It's very nice to work with. It cuts easily and holds even the smallest details quite sharply. The first thing to learn for anyone wanting to get into wood carving is how to properly sharpen and hone their carving tools, as a razor sharp edge is essential for success. As for the kind of scroll work relief type carvings seen on the stern of larger ships, these can just be cut from a pattern on the scroll saw and detail added with carving chisels afterward. The Flexcut chisels would work really well for that kind of work. This method might not appeal to someone who wants to carve the scroll work directly into ships planking, but personally I could live with just gluing it on.
- 71 replies
-
- 10
-
-
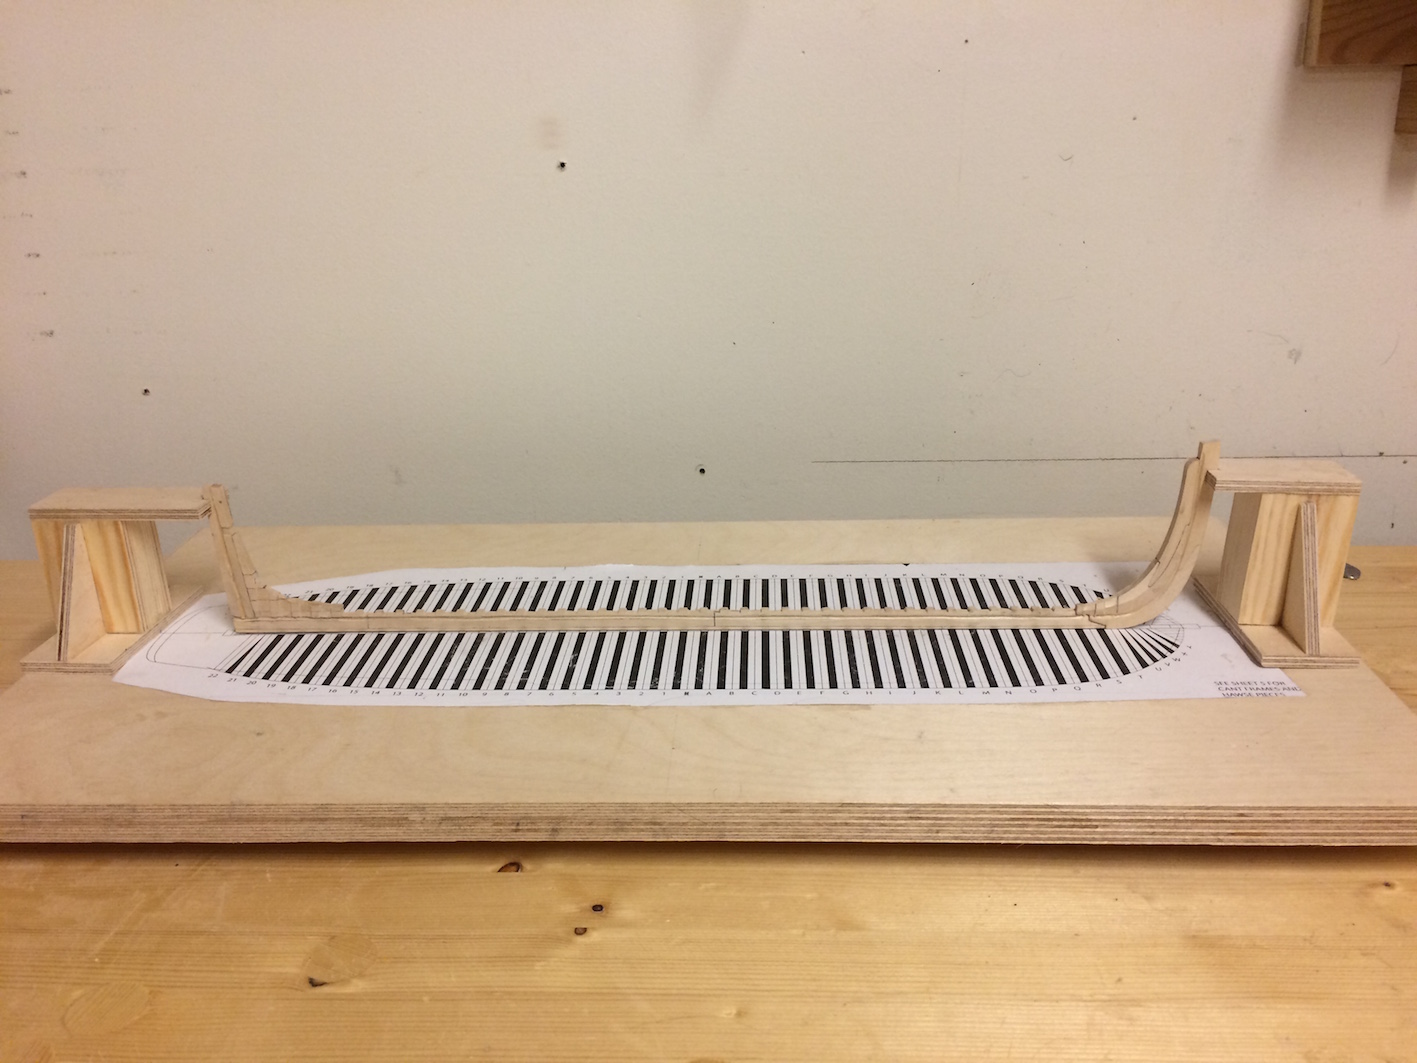
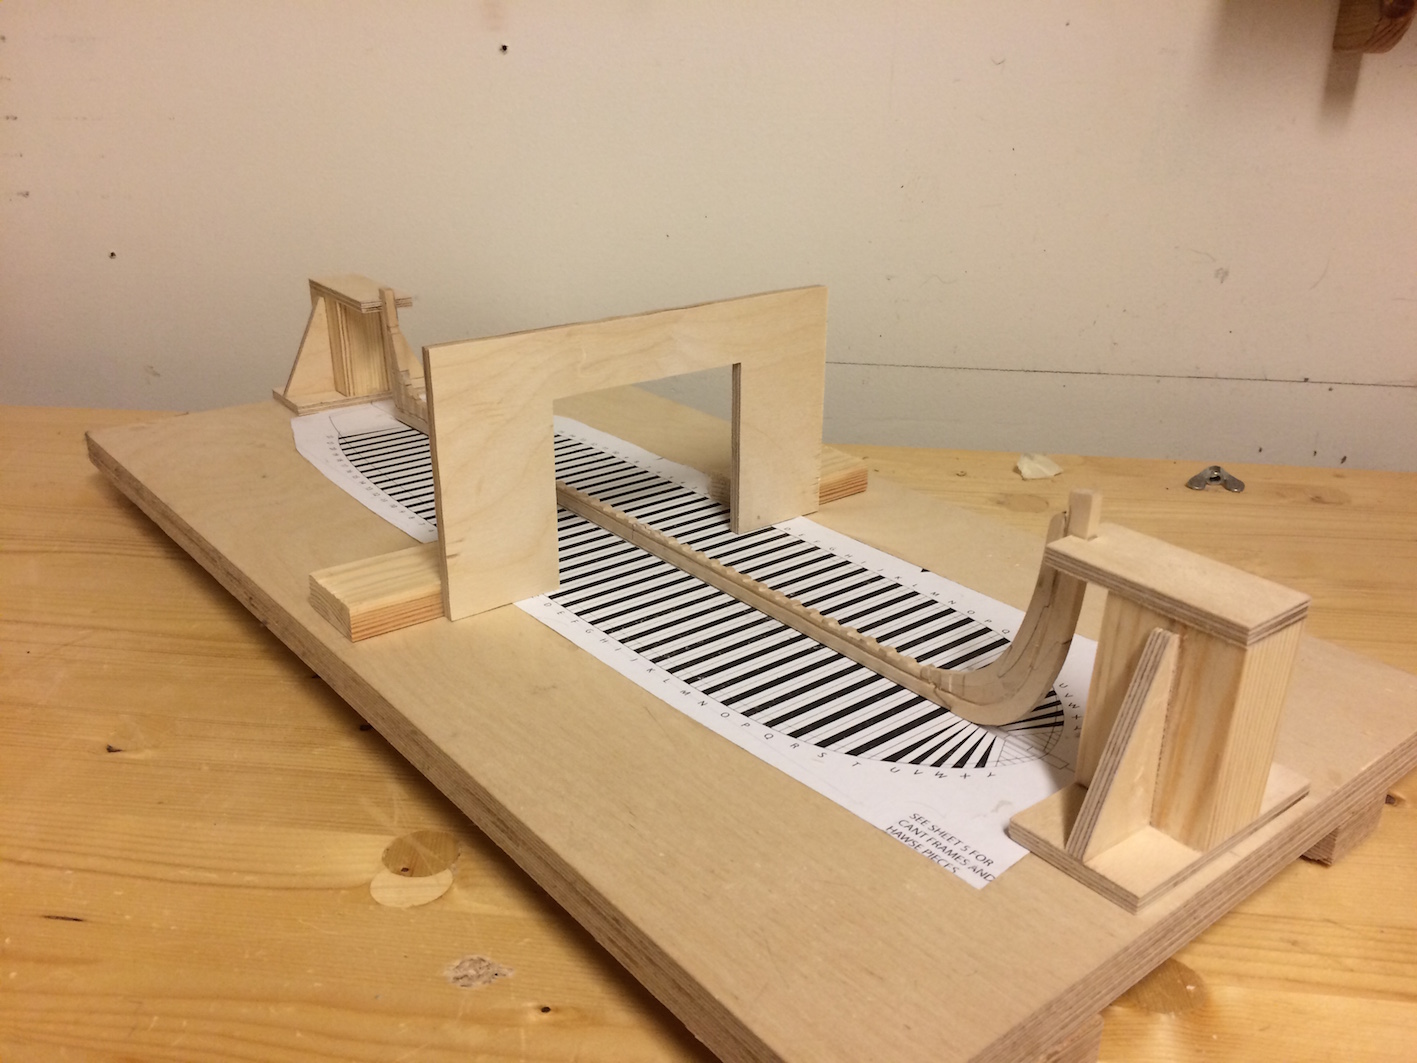
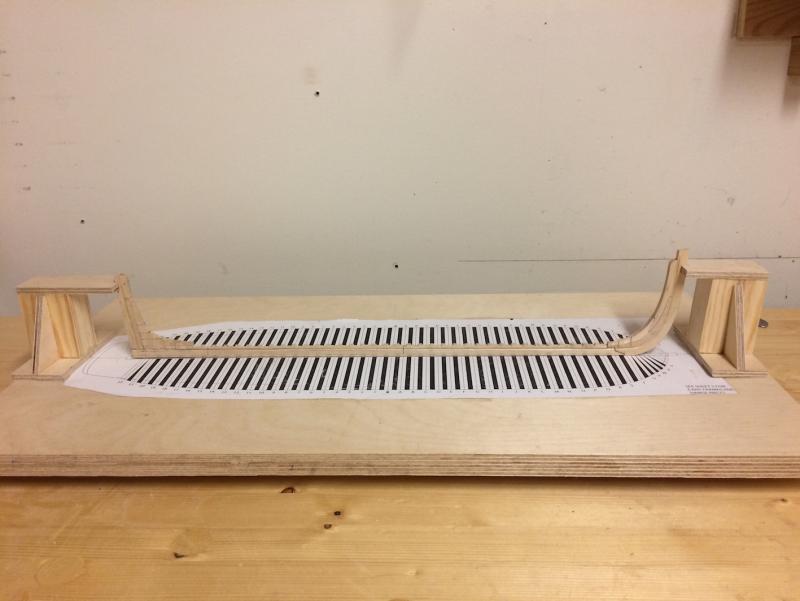
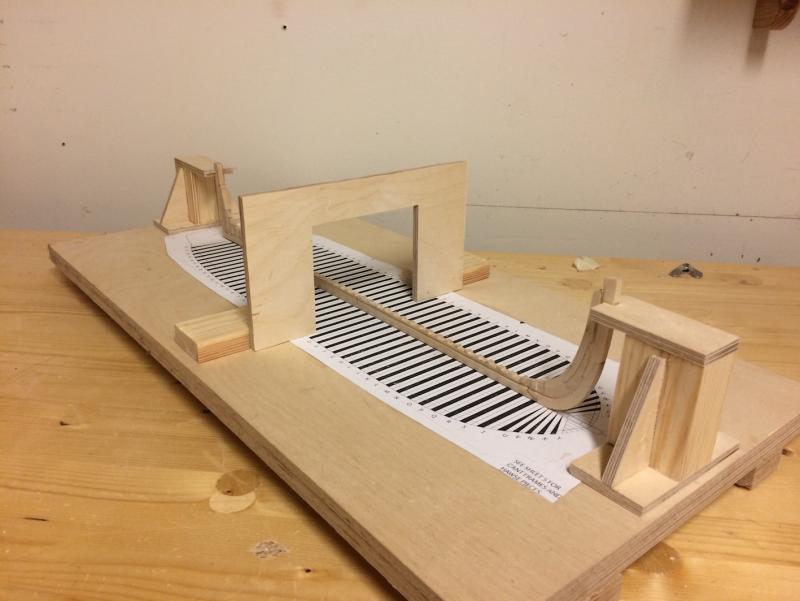
The galley Washington will be my very first ship model build. I decided to start with a scratch model as I know I will enjoy making everything myself. I'm sure there will be a lot trying and failing, but that's part of the learning process, and It will just make it a little more challenging. I bought the NRG plans and they are very thorough and nicely done. I would have preferred the frames to have been shown as parts rather than drawn as complete to save making so many copies for the patterns, but it's no big deal and I am quite happy with them. I downloaded the excellent free practicum to guide me through the build and also the material list. I had some planks of basswood) that I use for figure carving and so I decided to use those for my main building material. I have some other species for trim, wales, etc. I have gotten all the materials dimensioned and sanded, so I am ready to go. So far I have made the keel, bow, and stern and mounted the construction on a building board. I followed the practicum for the building board set-up. It was great to learn that the work was very enjoyable and with the added advantage that I can do most of it while sitting down, which is an advantage at my age. I hope to start with the first frames tomorrow. You might notice my first mistake in my progress photos below. I extended the rabbet all the way to the to the back of the stern post instead of stopping it where the stern post meats the deadwood. Luckily I can fix this, so I don't have to do the whole keel over again! Any comments, including criticism, are very welcome. I would also like to point out that the POF build logs you folks have posted have been a great help to get me started, including the several wonderful Washington build logs. I wouldn't have tried ship modeling if it weren't for the massive amount of know-how available on this site.
-
Tool for Shaping Brass Strip
Mike40 replied to mikiek's topic in Metal Work, Soldering and Metal Fittings
Oh, oh. I know what you mean Mike. I may have to read it, try out what it says, reread, try again, reread it and maybe I will get it eventually. That's the way it usually goes for me. Maybe I'm not alone. -
Hi Robert. I just found your log and read through from start. Wonderful work so far and I'm looking forward to it's continuation.
-
Your time has been time well spent over the years you have been building this ship Johann. You have my utmost admiration for the quality of your work. I would also like to compliment you on the quality of your log. It is extremely well documented and photographed and lastly a thanks for all the effort you have made to show not just what you made, but also how you made it. Just reading your log has thus far been a great learning experience and inspiration for me and it will continue to be a very valuable resource for my own modeling efforts.
-
Tool for Shaping Brass Strip
Mike40 replied to mikiek's topic in Metal Work, Soldering and Metal Fittings
Late to this post, but very relevant to me. As a beginner modeler I realize that I will have to learn about making metal parts from brass and that those parts will have to be well made if I want to build a quality model. My thanks to Bill (Reklein) for the book link. I just ordered it and it will be fun learning to make those small parts. Meanwhile I will continue admiring the metal work done by so many on this forum. -
Your technique sounds very interesting Ulises. I will have to experiment with it.
-
Very interesting discussion. Being new to ship modeling, at first I liked the treenail look with high contrast, but after seeing so many out of scale treenails I have changed my mind, as to me it makes the deck planks seem too narrow. Also, if the treenails are slightly misplaced it is very apparent. Having discovered from reading all of the comments here and other places, and learning that treenails were never used and that plugs used to cover the countersunk spikes were cut from the same long grain boards used for the decking, I've decided that I really don't like high contrast treenails anymore. For those of you who like and use high contrast treenails in their decking (I'm sure that is probably most of you) please do not feel slighted by my remarks as my opinion is really of no consequence in the greater scheme of things, plus I have the utmost respect for the model work being done, including the treenailing work. One interesting thing is that when I built my workbench top I eliminated a few knots by drilling them out with a Forstner bit and plugging with the same long grain material as used for the bench top and orienting the grain to line up with the bench top grain to make it as discrete as possible. When my shipwright friend saw this he said that the plugs grain should be positioned at a right angle to the bench top grain in order to keep a good seal all around the plug, as the plug will tend to shrink over time. This of course makes perfect sense to me, although as my friend said, it would probably be just fine the way I did it since it wouldn't be exposed to the weather. This makes me wonder how it was done back in the day. I'm thinking that most if not all of the decks on the historic ships have been replaced or at least repaired in modern times and perhaps the grain of the plugs have been aligned with the deck grain just for the sake of appearance. So has anyone seen historic documentation about the approved practice when these ships were built? I think it is kind of significant because the right angled plugs would have shown up pretty well, and as such would make a difference to the deck appearance on a model if one wanted to be purist about it. In spite of my too many words on this subject I realize that it may be difficult to cut long grain plugs. Maybe a sewing needle bit would work, but the grain direction would likely be invisible at model scale anyway, so perhaps irrelevant. So what, it's Sunday and I have a lot of time on my hands!
-
HMS Naiad 1797 by albert - FINISHED - 1/48
Mike40 replied to albert's topic in - Build logs for subjects built 1751 - 1800
Amazing work Albert. Those scarf joints in the deck beams must be in the master class, along with all the other work on this wonderful model. -
Nice work Bryan. Being new to ship modeling at first I didn't see the value of small cross section models like this, but after hanging out a bit on the site I began to realize how interesting it is to focus on a particular part of interior of the hull to see how it was constructed, outfitted and used.
- 52 replies
-
- 4
-
-
- panart
- posto di combattimento
- (and 1 more)
-
This is a beautiful build Robin, especially considering the small scale of a relatively small vessel.
- 473 replies
-
- 4
-
-
- greek bireme
- dusek
- (and 1 more)
-
Drill Bit Sizes Appropriate for Ship Modeling?
Mike40 replied to Mike40's topic in Modeling tools and Workshop Equipment
Thanks Mark. Good to hear that my tool free chuck will work. I would not like going back to using collets. I still can't imagine drill bits under 1mm. I have broken quite a few 1-1/2mm bits and even larger in the past.