Hubac's Historian
-
Posts
3,308 -
Joined
-
Last visited
Content Type
Profiles
Forums
Gallery
Events
Everything posted by Hubac's Historian
-
 Thank you Wefalck and John! I also often wonder at the immense effort at making the ships functional and “pretty” again, after battle. There are a number of highly detailed VdV grisaille drawings that attest to the carnage. That is, in large part, what draws me to this period, and particularly to the French; these ships were floating cathedrals and/or castles upon the sea. The best and most exuberant sculptural artists of France were employed to decorate these ships (and the cathedrals and palaces) - each of them knowing exactly how ephemeral their creations were. That there was an intrinsic willingness of the crown to replace and repair such losses is, frankly incredible to me.
- 2,699 replies
-
- 7
-

-
- heller
- soleil royal
- (and 9 more)
-
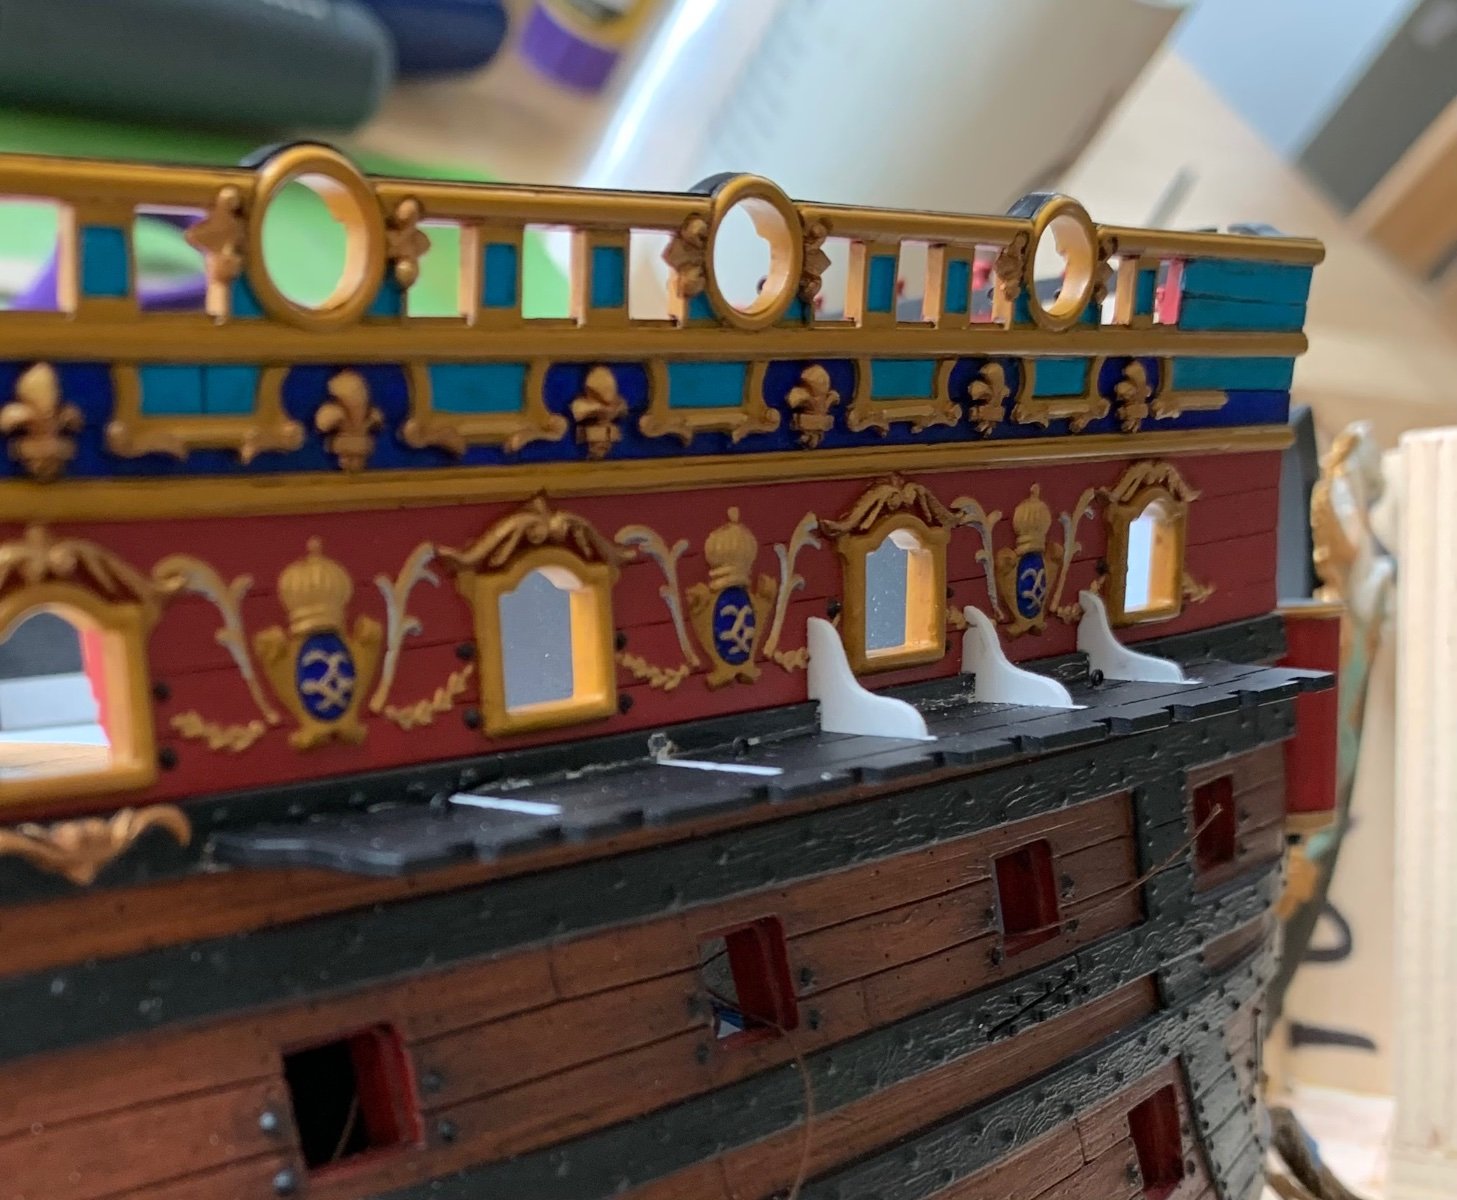
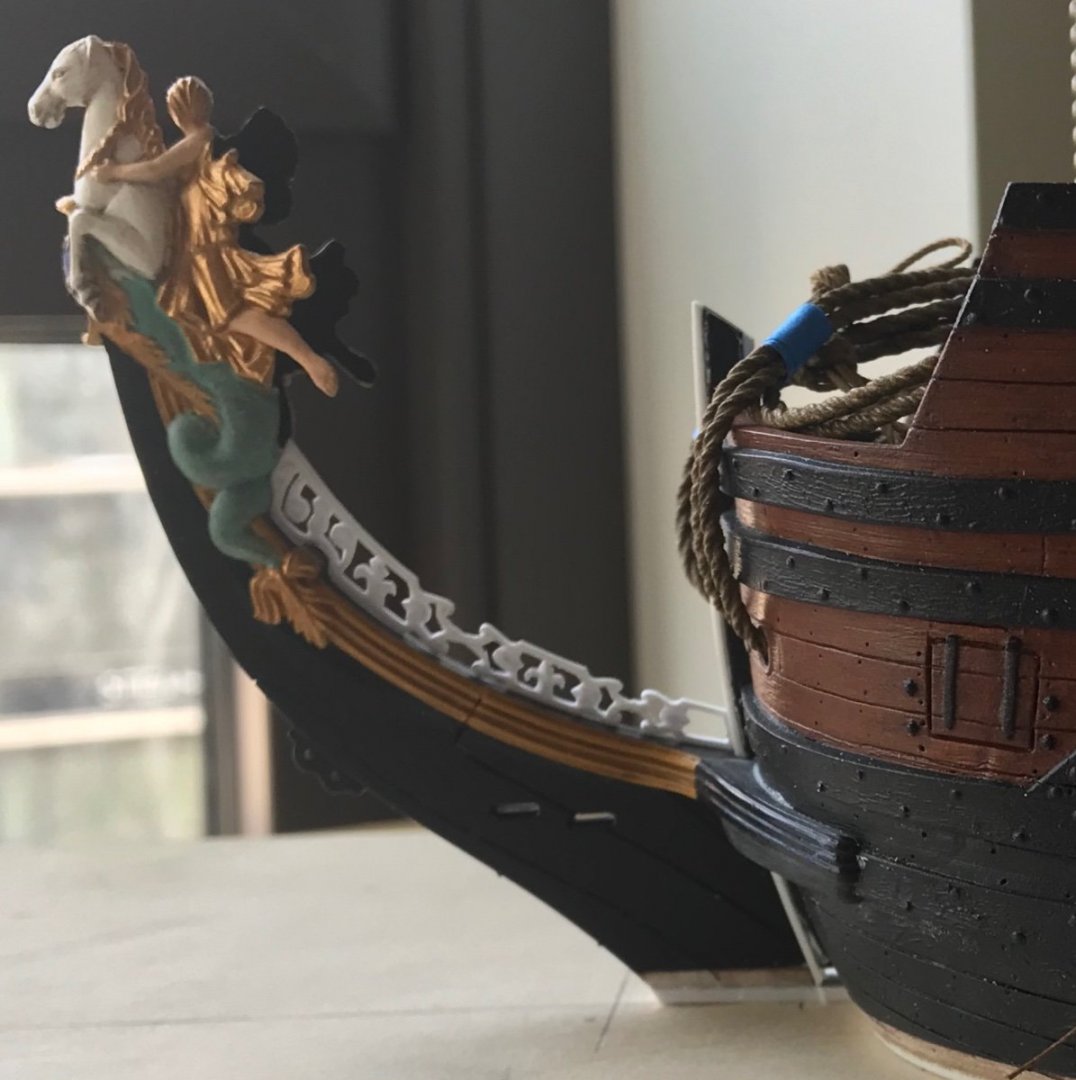
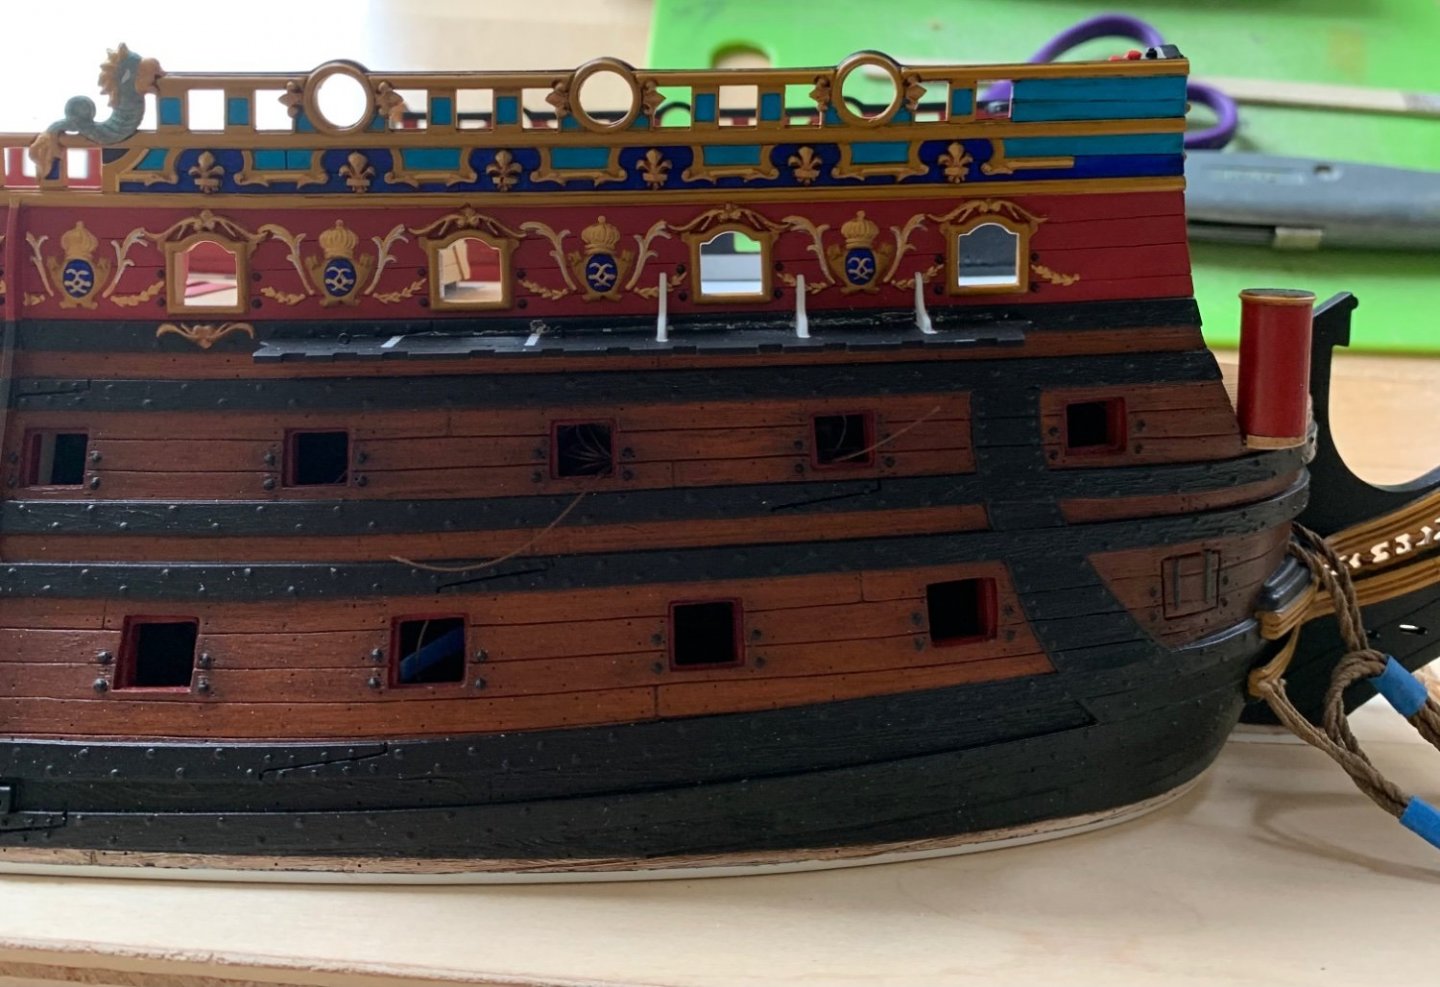
Thank you, Ian! Yes, my argument is that such an enormous surface area as the figurehead would not have been fully gilt, by this point in the 17th C. After trying a few different schemes, I discovered that I really liked this grey wash over the white of the horse. There is something reminiscent of ancient marble, in its appearance, and I have decided that the flesh areas of the four seasons figures will receive the same treatment. While I am sure that some observers of this project take silent issue with aspects of my color scheme, which is their right, of course, oftentimes these stylized choices are intended to highlight the remarkable beauty of Tanneron’s sculpture work. The grey wash, for example, really picks out the finely molded facial features of all of the figures in a way that doesn’t translate as clearly through gold paint. In fact, the colors I have chosen are color-coded to specific features of the ship in a way that delineates the many layers of detail and ornament that are present on the model. Whether the actual SR was quite so vivid I can not say. I suspect, though, that there was a more extensive use of color than previously believed.
- 2,699 replies
-
- 6
-
-
- heller
- soleil royal
- (and 9 more)
-
Personally, I know I can always rely on David, in particular, to know what everything’s name is. He has increased my vocabulary tremendously, these past five years.
- 2,699 replies
-
- 5
-
-
- heller
- soleil royal
- (and 9 more)
-
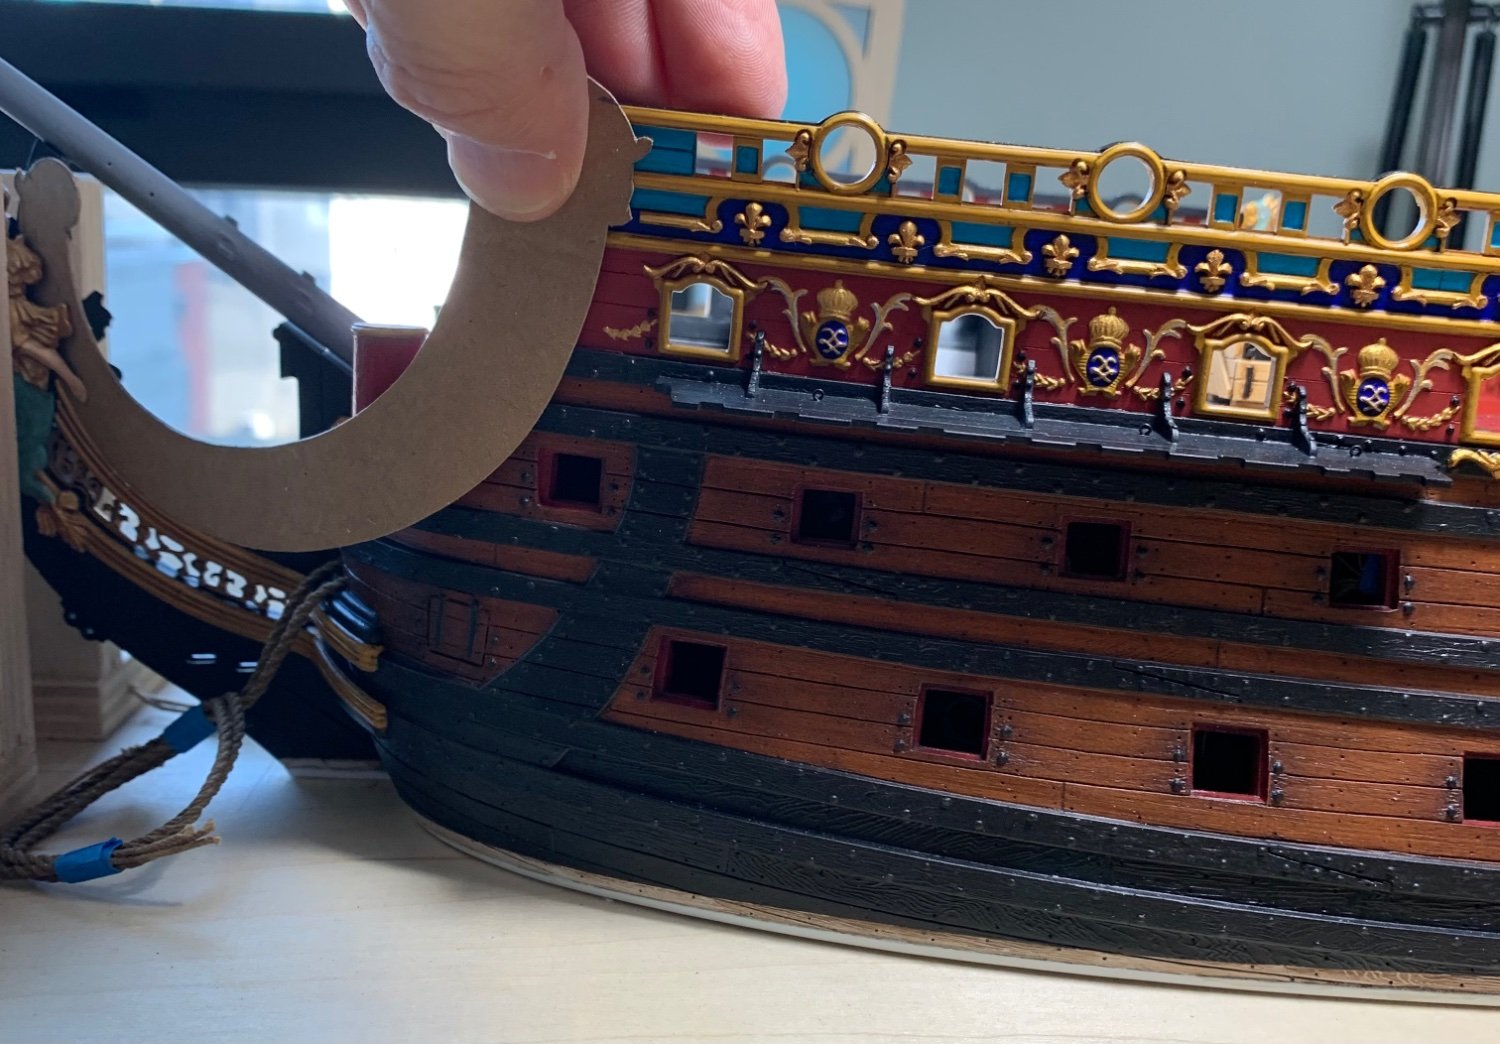
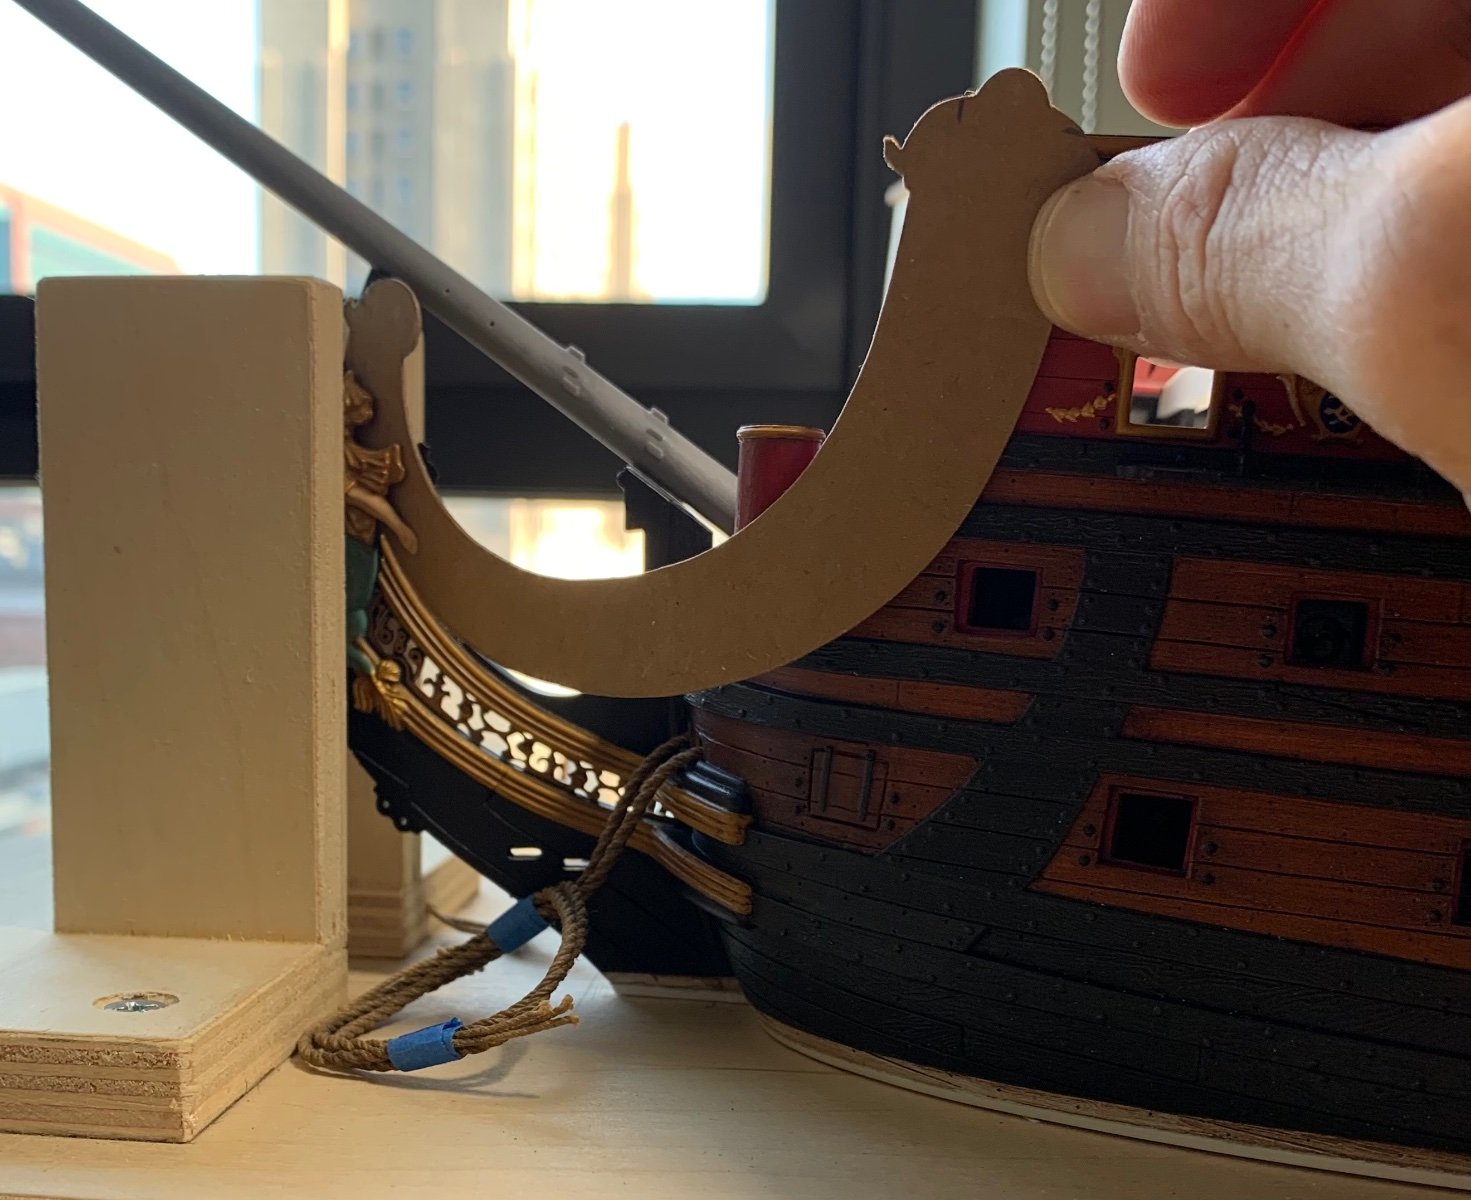
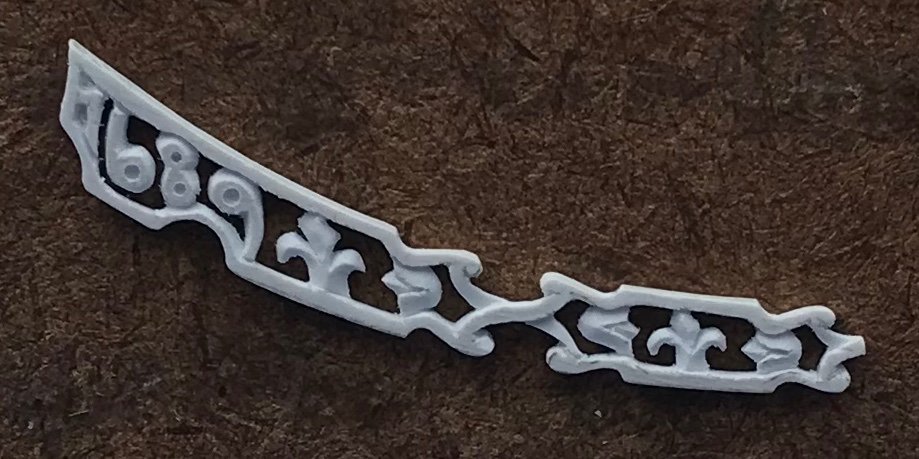
I’ve completed and am in the process of painting the stern archway brackets. The channel standards are coming along, slowly, after a little excise and replacement. I have continued to tweak and play around with my new headrail design. The bottom rail width still requires a little tweaking, but the symmetry and taper are already an improvement over the stock rails. Here are the carved elements that I can definitely recycle: When I re-incorporate stock carvings, I like to undercut the carvings with the tip of a #11 blade, in order to give a better sense of relief; the idea is similar to the process of metal chasing brass castings, for example. The carvings end up looking crisper, overall, and it is an easy thing to achieve with backward scrapes of the blade point, heal first. The pilasters have been re-spaced. I wanted them to neatly correspond with either the fleurs of the Xs of the trailboard, but the abbreviated design of the trailboard made that an impossibility. It just occurred to me, as a matter of fact, that I will have to re-check my tentative pilaster layout to ensure that it does not intersect with the run of the gammoning. On the stock kit, this consideration is moot because there are no ‘thwartship supporting timbers that the gammoning must pass between. Here, though, those supports will align with the pilasters. I have decided that I will design the aft medallion to closely follow the Berain drawing. The stock medallion is nice, but it interferes with the horse and pixie sculptures in ways that are un-tennable. As always, thank you for your interest and for looking in.
- 2,699 replies
-
- 19
-
-
- heller
- soleil royal
- (and 9 more)
-
I'm sure Cutty had mousetraps, i.e. scale kitties. Everyone loves a good ship-cat, especially in England where the figurehead of choice was almost always the King cat.
-
I think that this is what I find so interesting about Kevin’s work. He has found a way to make a much better mouse-trap that is worth his time and attention. The choices of where to use or upgrade kit components offers a tremendous freedom to a creative mind.
-
Fascinating article, Shipman. I believe today’s tech opens the door for new and exciting modeling subjects that may just spark the interest of the younger generations. My generation (X) was probably one of the last where plastic model-making was still a common thing for young boys. Gen Y, less so, and after that - model-making becomes very niche, among specialty outlets like WarHammer, where there’s a strategy game connected to the hobby. My kids watch me pour all kinds of time into my projects. My son has made one plane and started a car, but he isn’t drawn to it as we were at the same age (10). Perhaps the new path is something akin to what Kevin is doing, where the young people learn to design their own models on the computer and print them into assemblies of their own engineering. I like to believe there will always be something intrinsically appealing about models, and that people will always find the interest to continue making them.
- 444 replies
-
- 2
-
-
- Cutty Sark
- Revell
- (and 2 more)
-
Thank you for the kind words of encouragement, Cap’n Steve, and for taking the time to look-in!
- 2,699 replies
-
- 2
-
-
- heller
- soleil royal
- (and 9 more)
-
There is certainly the issue that Henry raised, which I wasn’t even considering. My trepidation with raising the steeve of the the bowsprit has to do with a cap block that I glued to the middle deck to receive the end of the bowsprit. This block is made of poplar, which is the same stuff I made the dummy carriage blocks from. The idea of drilling blind, through the beakhead bulkhead into two dissimilar materials (wood and plastic), where the existing entry hole overlaps with the new hole center, just makes me queasy. There are numerous opportunities for this to go very wrong, and the reward just isn’t worth the risk for me. I thought I still had pictures of this block, but amazingly I do not.
- 2,699 replies
-
- 4
-
-
- heller
- soleil royal
- (and 9 more)
-
I’ll have to search through sold old pics, Dan, to find the problem that you literally can’t see, anymore. I’ll be back in a bit.
- 2,699 replies
-
- 2
-
-
- heller
- soleil royal
- (and 9 more)
-
I love the table, Gary! And, in my estimation, you are no slouch with the camera, as well. Really great interior shots of the ship, which is looking very crisp. One particularly interesting aspect for me is the patination of the finished framing; it has a dark, rich color as though the timber has been oxidizing for hundreds of years. It really looks great! Michelle Padoan creates a similar effect, but I would say yours is more convincingly “antiqued.”
-
What so you (metaphorically?) mean, Shipman?
-
There’s no doubt, Bill, that the speed of your build has been pretty astonishing! Your standing rigging looks very crisp and taught - CONGRATULATIONS on this major milestone!!
-
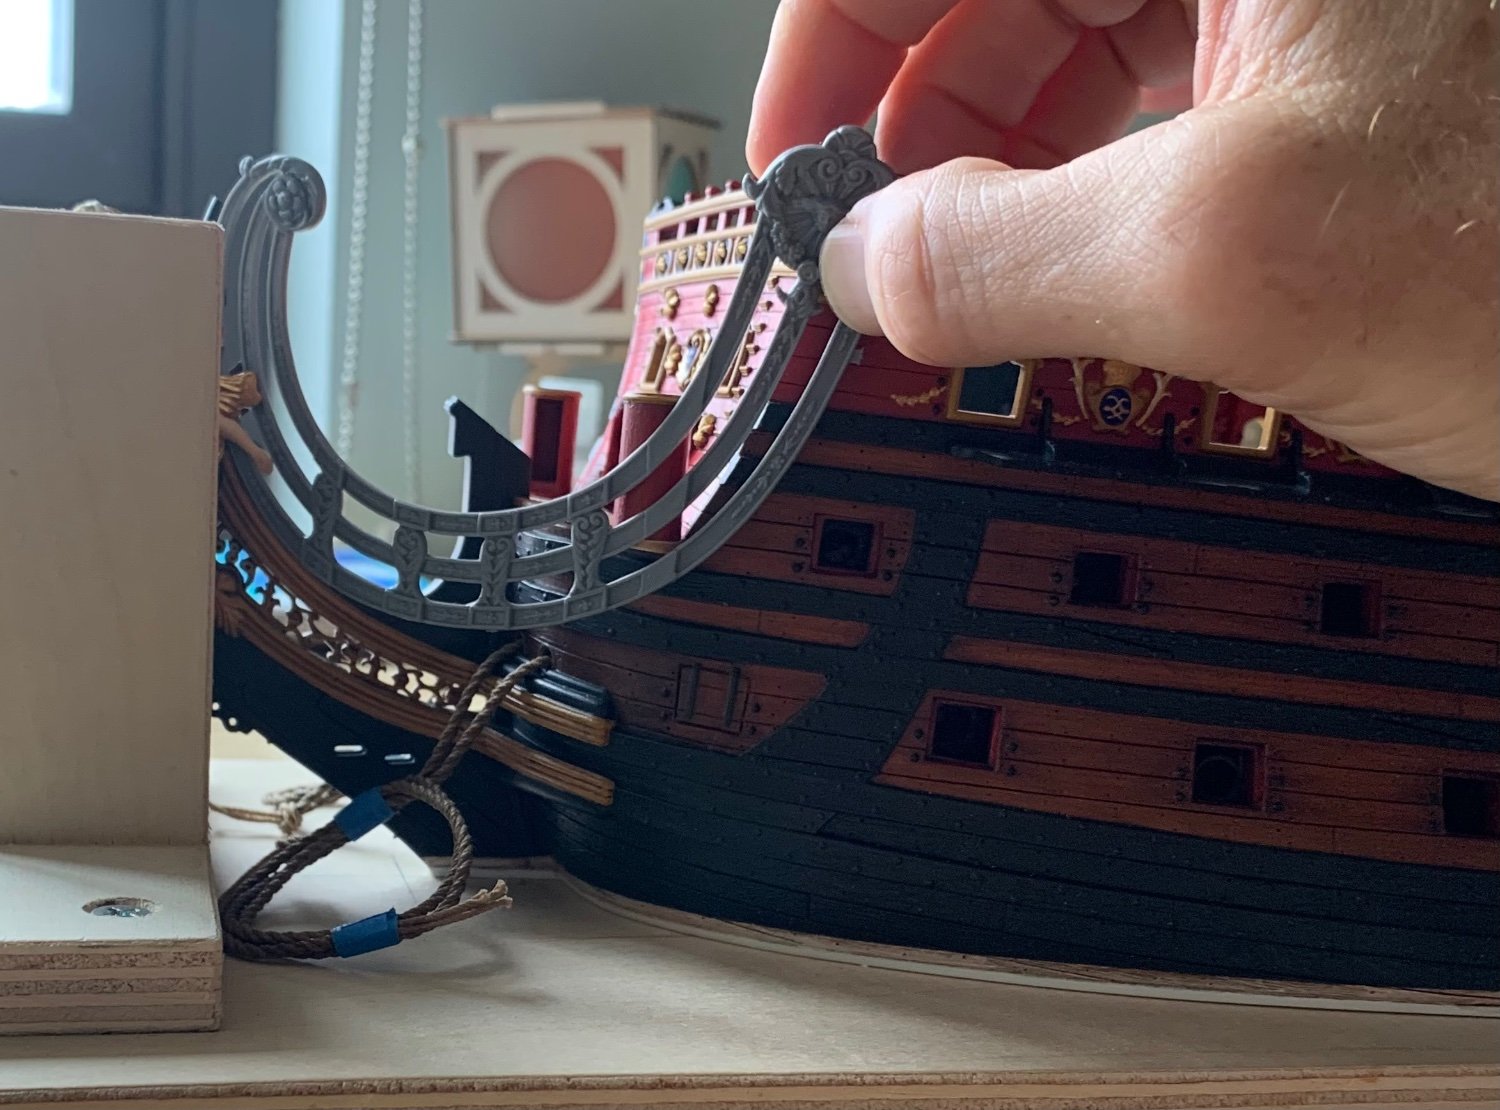
Hi John! Thanks for the kind words. Yes, that is the primary problem with the kit head; the sprit-mast angle is too shallow. I have seen one builder I know correct the angle, in the first place and then all of these gymnastics were not necessary. Unfortunately, this did not occur to me until it was too late to do that. I’m not disappointed, though, as I thought the headrails could do with re-working anyway. I never really liked their sweep, even though they closely follow the Tanneron model. Lastly, even the supporting knees on the SP monograph are at a rather shallow angle, so I think my mods will present well, in that regard.
- 2,699 replies
-
- 8
-
-
- heller
- soleil royal
- (and 9 more)
-
MONTAÑES by Amalio
Hubac's Historian replied to Amalio's topic in - Build logs for subjects built 1751 - 1800
Good evening, Amalio. Will your model ultimately be on public display at a museum somewhere? -
She’s coming along beautifully, John! Let me know whether you come up with anything for scale figures.
-
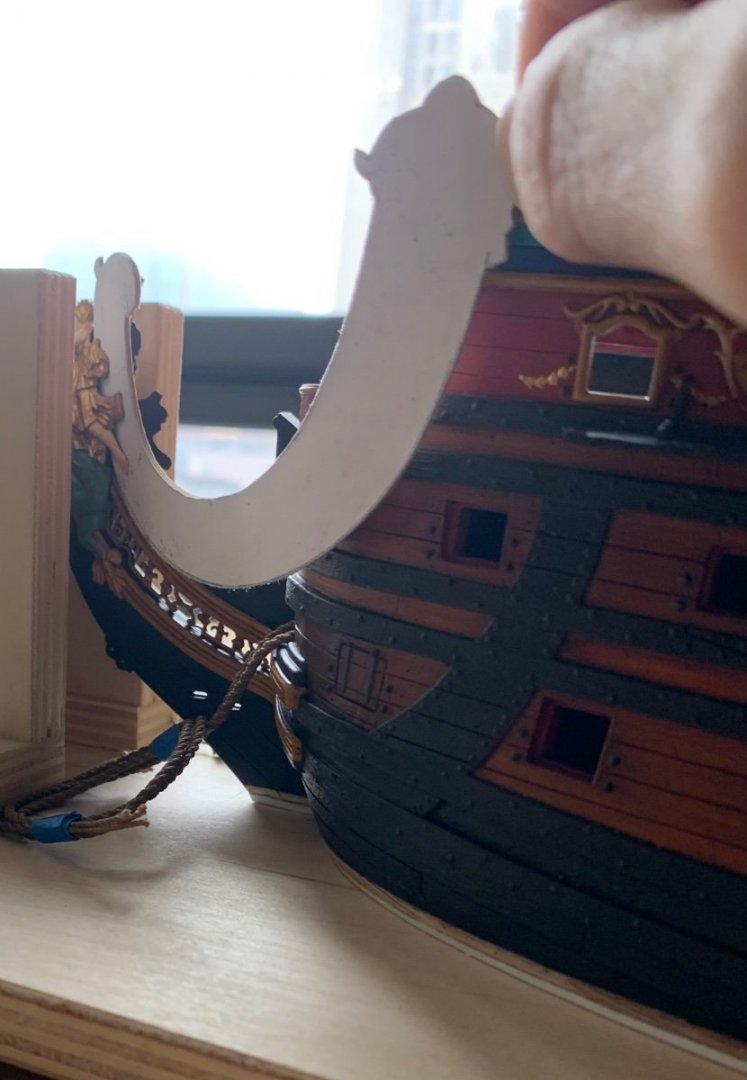
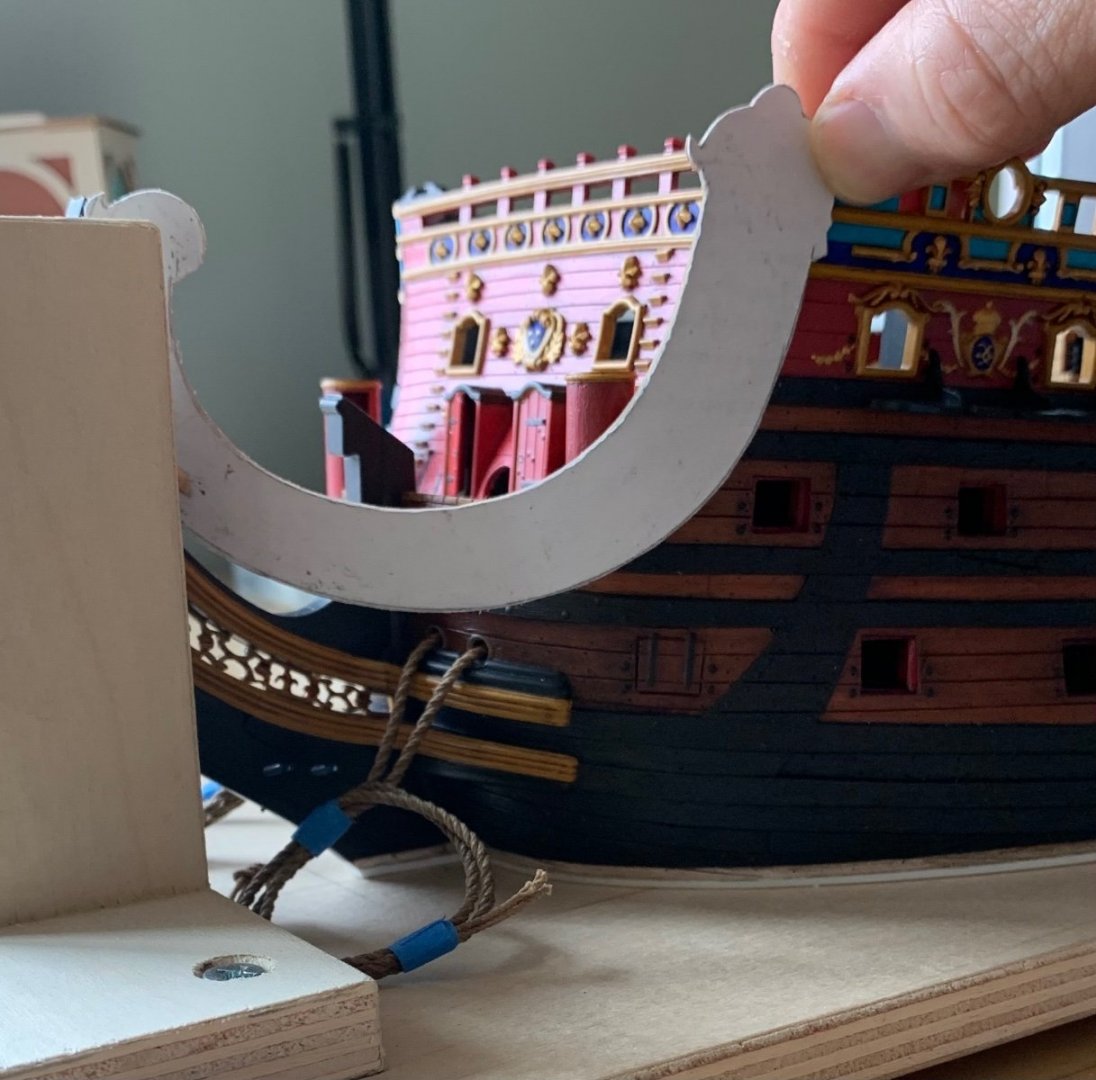
As always, David, your perceptions are right on! For one, the following pic is more representative of the space available to me: I would like to have more space, but then I’m compressing the width of the three headrails, between the upper cheek and the beakhead grating. The three headrails also require interspaces; slightly less than a half inch at the forward end (after revision) isn’t a lot to work with. The fact remains, though, that this design process remains fluid, because I haven’t even gone to the vellum, yet, to delineate the rails and position the stiles and figure out what to do with the aft medallion. As always, this kind of feedback is welcome!
- 2,699 replies
-
- 16
-
-
- heller
- soleil royal
- (and 9 more)
-
I’m beyond words, here, Kevin! Simply incredible! You may not think so, but I certainly do.
- 444 replies
-
- 1
-
-
- Cutty Sark
- Revell
- (and 2 more)
-
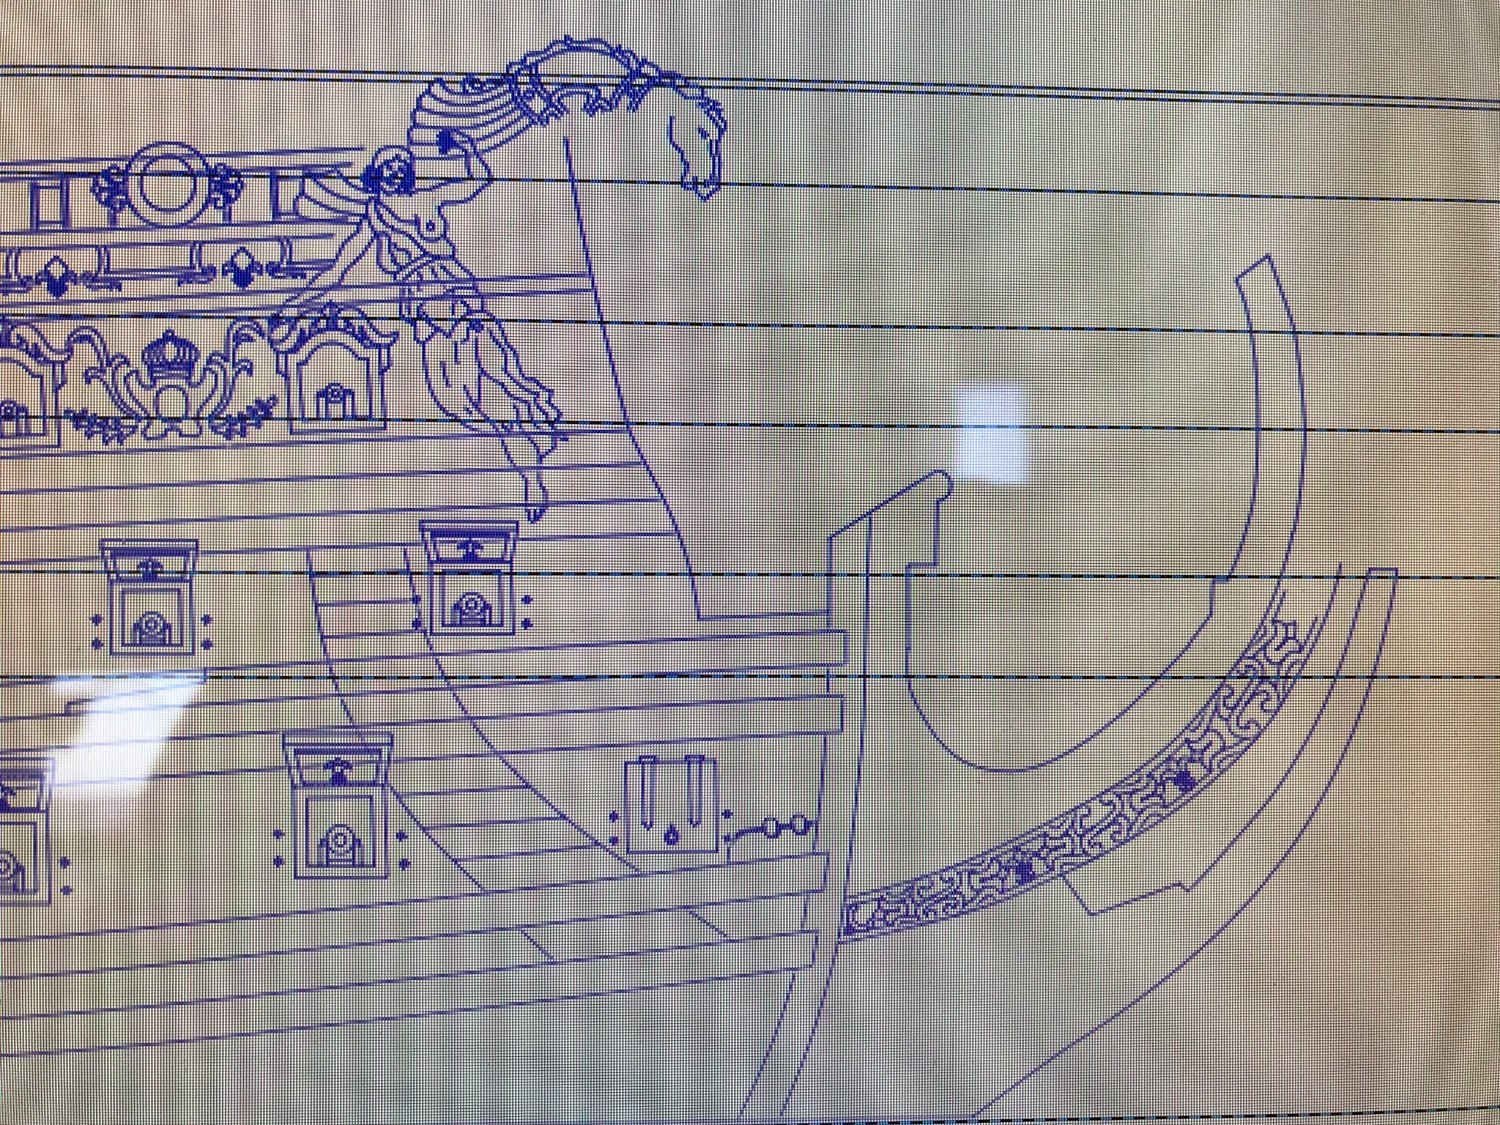
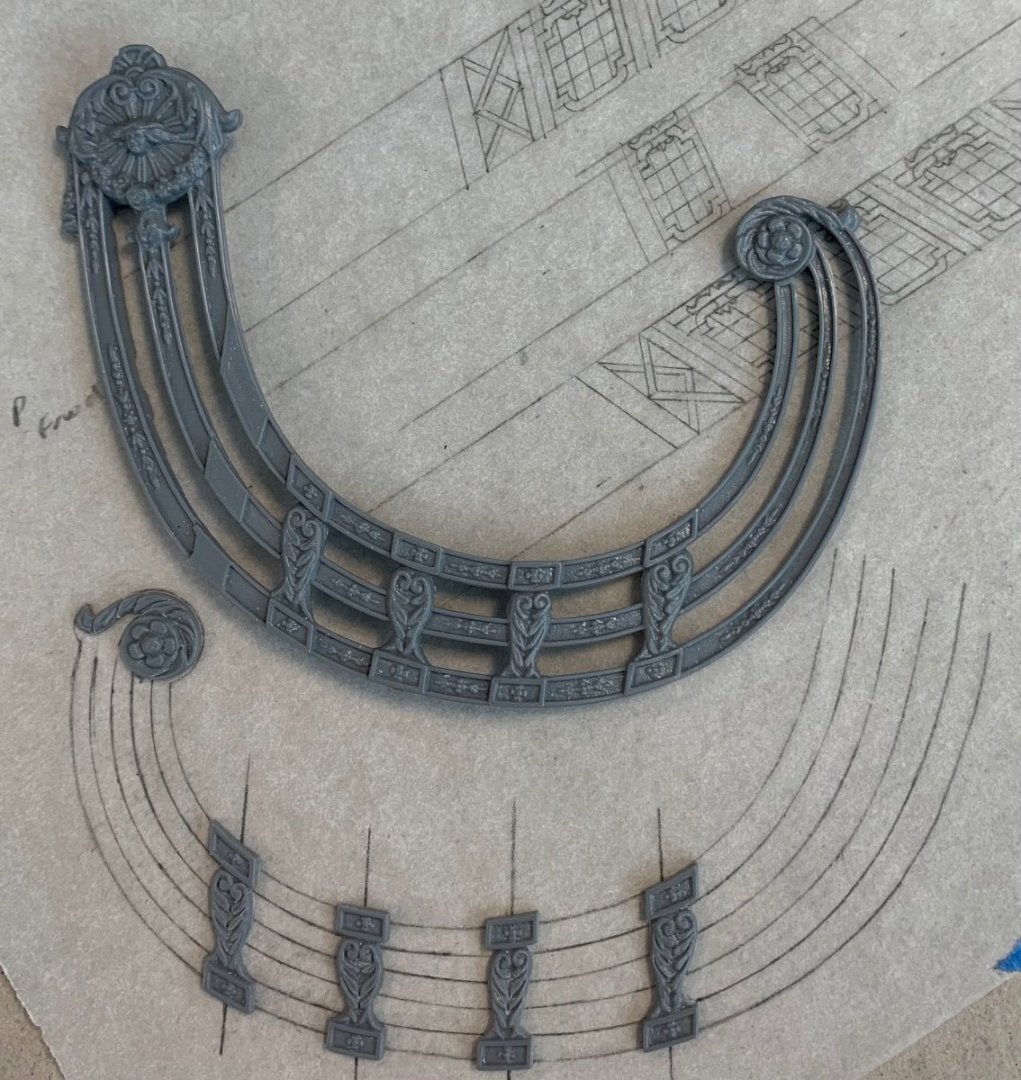
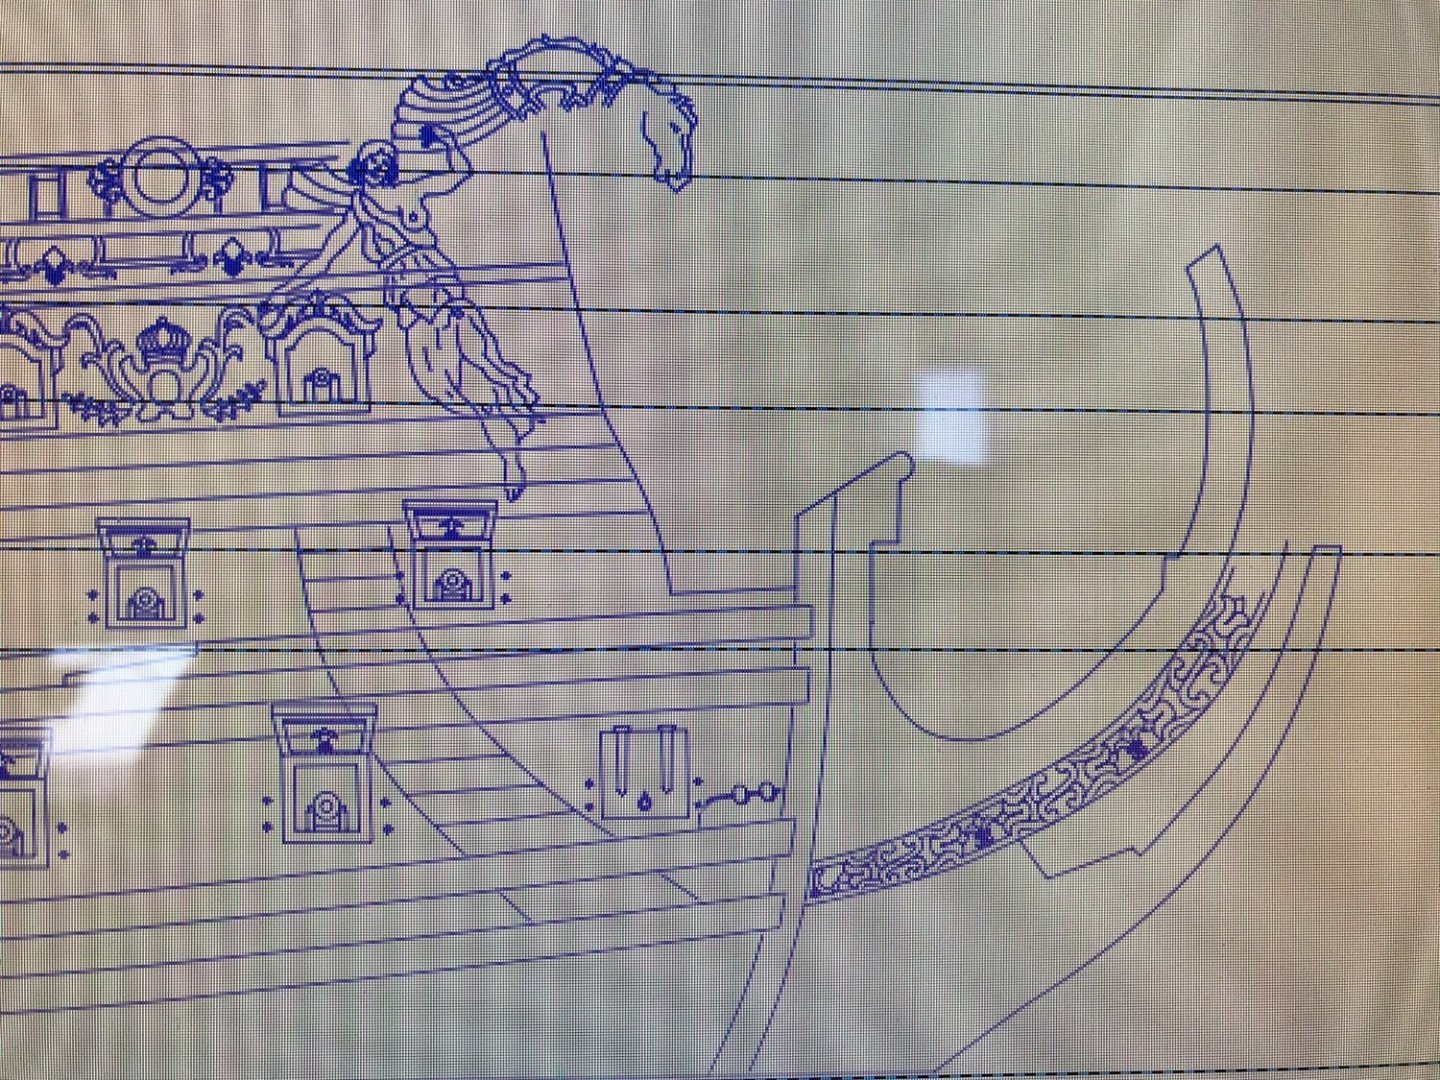
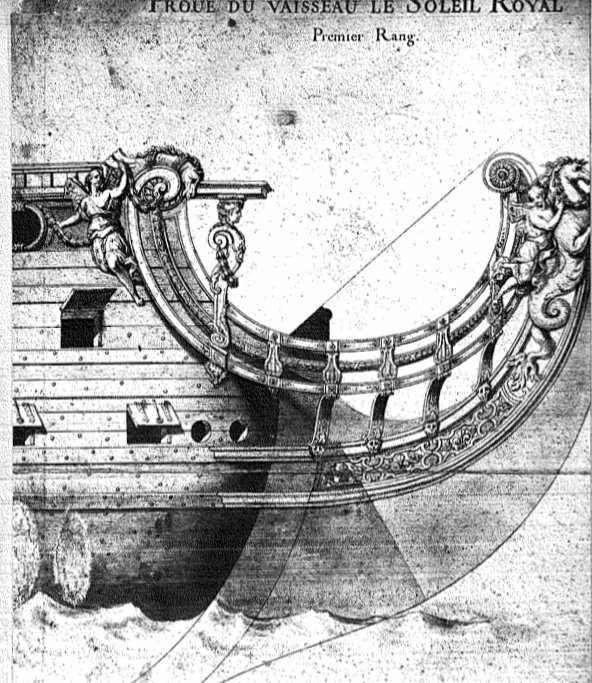
I had a series of epiphanies in the grocery store. First of all, the exact positioning of the aft medallion matters a great deal, because it determines whether the cathead timbers will clear the headrails. Last night, when I was positioning the stock headrail to take a measurement at the figurehead, I was looking at it from the outboard perspective; I had failed to consider that one of the modifications I made was to recess the beakhead bulkhead into the upper bulwarks, so that there would be an “actual practice” plank overlay of the beakhead bulkhead. When I got home, after putting away the groceries, of course, I positioned the stock headrail piece where it actually needs to be. I discovered that the shortage is much closer to 5/16”, rather than the heavy 1/8”th I had previously based my pattern on. It also dawned on me that I had not even bothered to place the sprit-mast to even see whether the forward medallion was actually now below it. What was I thinking?! Anyway, these were not difficult alterations to make. Here is headrail pattern 2.0: The other important consideration is that the beakhead grating has to flow into the headrail on a steady incline, so the top edge of the headrails can’t dip below the line of the grating. Of course, the next question is whether I will have room for the pixie figure that I drew, just aft of the headrail: I’m not sure about that: Although, it could simply be a matter of re-scaling the figure. When I drew her, it still had not dawned on me that the Berain bow drawing does not account for the forecastle deck. The figure I drew is “stretched” in order to accommodate that reality: Perhaps she can be somewhat reduced in scale to fit comfortably between the headrails and that first port opening. I may, ultimately, need to alter the aft medallion to copy the actual Berain design because the Heller version adds width to this critically tight spot. That’s a problem for another day. At least I have the length and sweep worked out.


- 2,699 replies
-
- 15
-
-

-
- heller
- soleil royal
- (and 9 more)
-
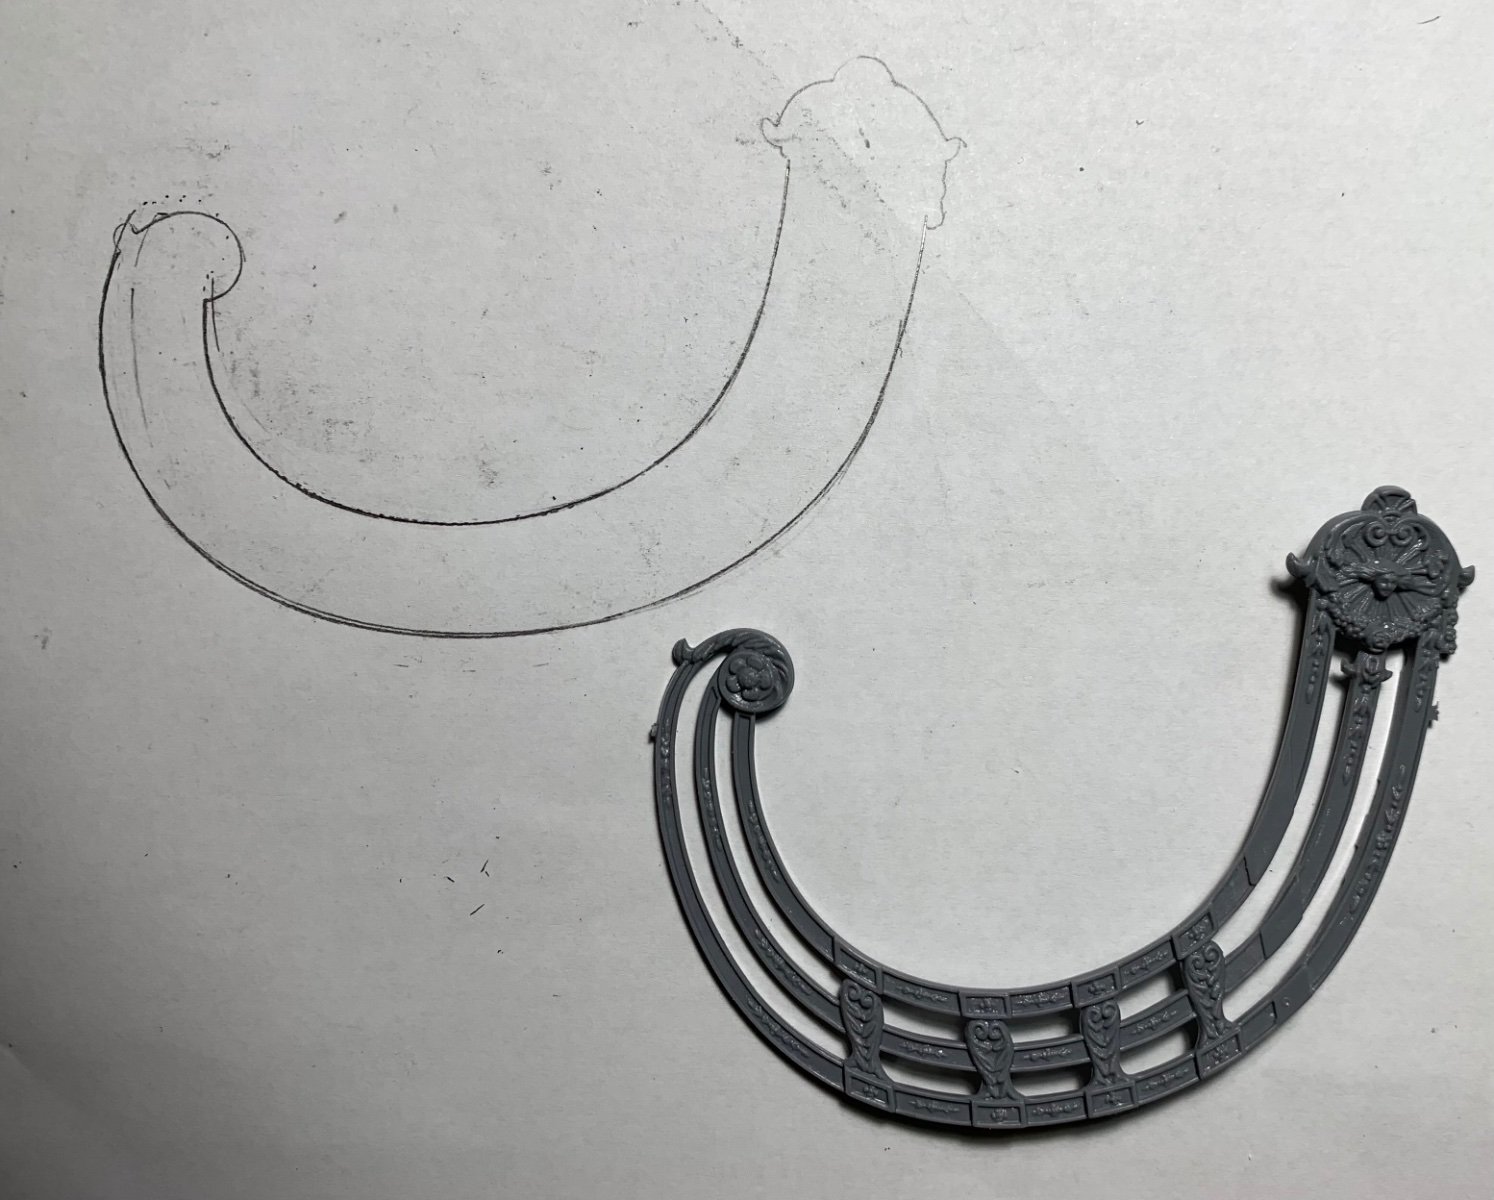
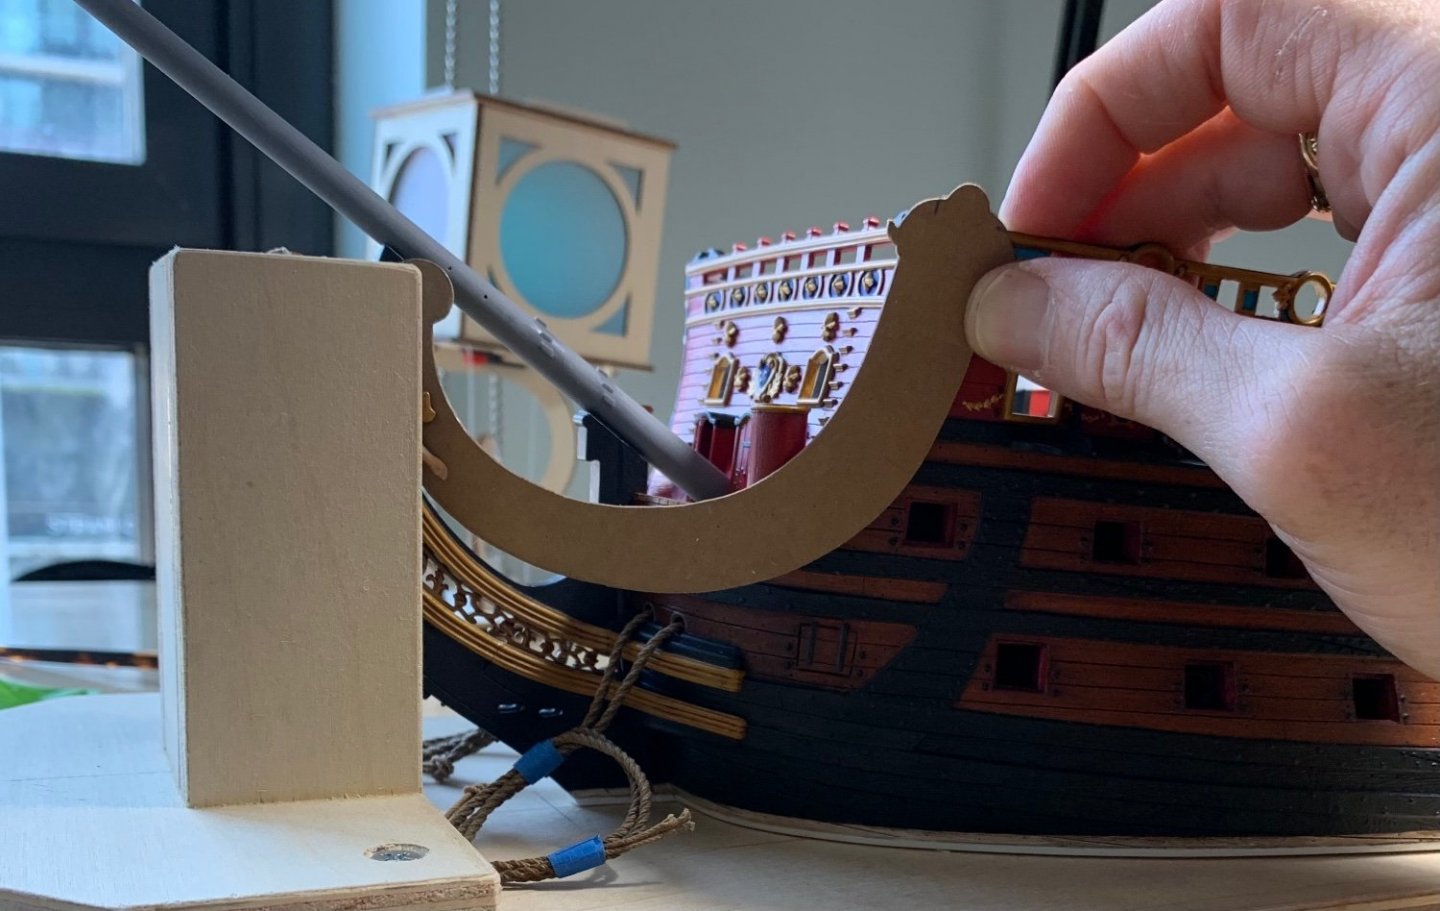
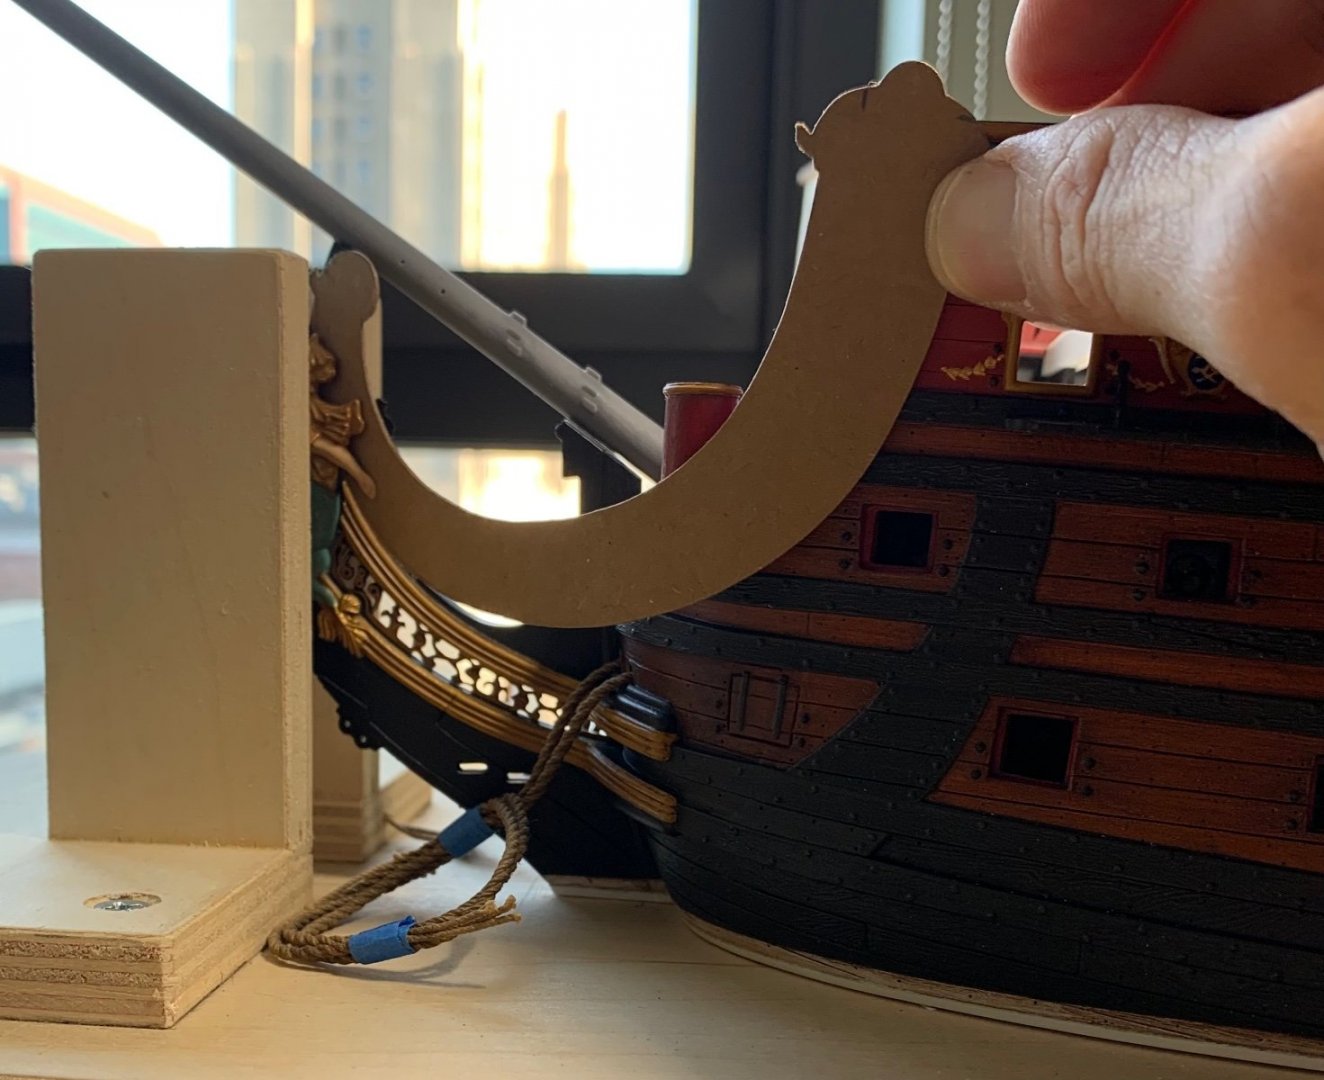
A lot of small odds and ends have been happening. I’ve smoothed-over and re-touched the upper bulwark joint. I painted and installed the starboard spirketting and the quarter deck beam. I’ve fitted and installed the last little piece of the frieze, where it bridges the bulwark joint. I’ve also installed all of the starboard channels. One aspect that has provided a series of mis-steps is the buttressing knees of the channels. First, I could not locate the card template I had made for the port side, so I made a new template. Then, the first knee I fitted was made from slightly thinner styrene than what I used on the port side. After the second knee, I found my original template! So, even though I will remove the first too-thin knee and replace it, I manually faired the first two knees to the correct profile. The third knee I installed was too tall! I decided to take a break from that frustration, for a moment. The port side gallery bracket is well-underway and coming along nicely. Last night, I was in the mood to take a stab at a pretty challenging re-design. As previously discussed, the kit head rails are now a generous 1/8” too short, after increasing the hull width at the stem. To attempt to use them, anyway, would result in a visual compromise that would only serve to draw heaps of attention to its wrongness. Even on the stock kit, there are numerous problems with the way these rails were designed. Most significantly, the forward escutcheon rises above the level of the sprit-mast, where it becomes an encumbrance to the rigging. Secondly, the low-sweeping arc of the rails makes it very difficult to craft plausible supporting knees, which the kit omits, in the first place. Since, I have to re-make the rails, I thought I’d try and solve these two additional problems, while also improving the grace of the arc. My plan is to extract the forward and aft medallions, as well as the acanthus stiles that connect the three rails. The pattern I arrived at, I think, does a reasonably good job on all of these fronts. The three rails taper, gradually, from 3/4” across the rails at the aft medallion, to 1/2” at the forward medallion: Arriving at this pattern was just a matter of holding the stock part to the model and taking a measurement for the increased length, as well as figuring out the point at which the arc could transition into a slightly more shallow curve (just aft of the cathead support). Then, it’s just a process of drawing and erasing arc segments with a set of French curves. The stock rails on the model: The sweep is so low, your supporting knees must be practically flat in profile. The forward medallion is also way too high: By contrast: There is, now, at least some elevation to create a cyma-curve for these supporting knees. I think the curves are more fair now, as well. There is a lot of work in these, to bring them to fruition, but I think this is a solid starting place.

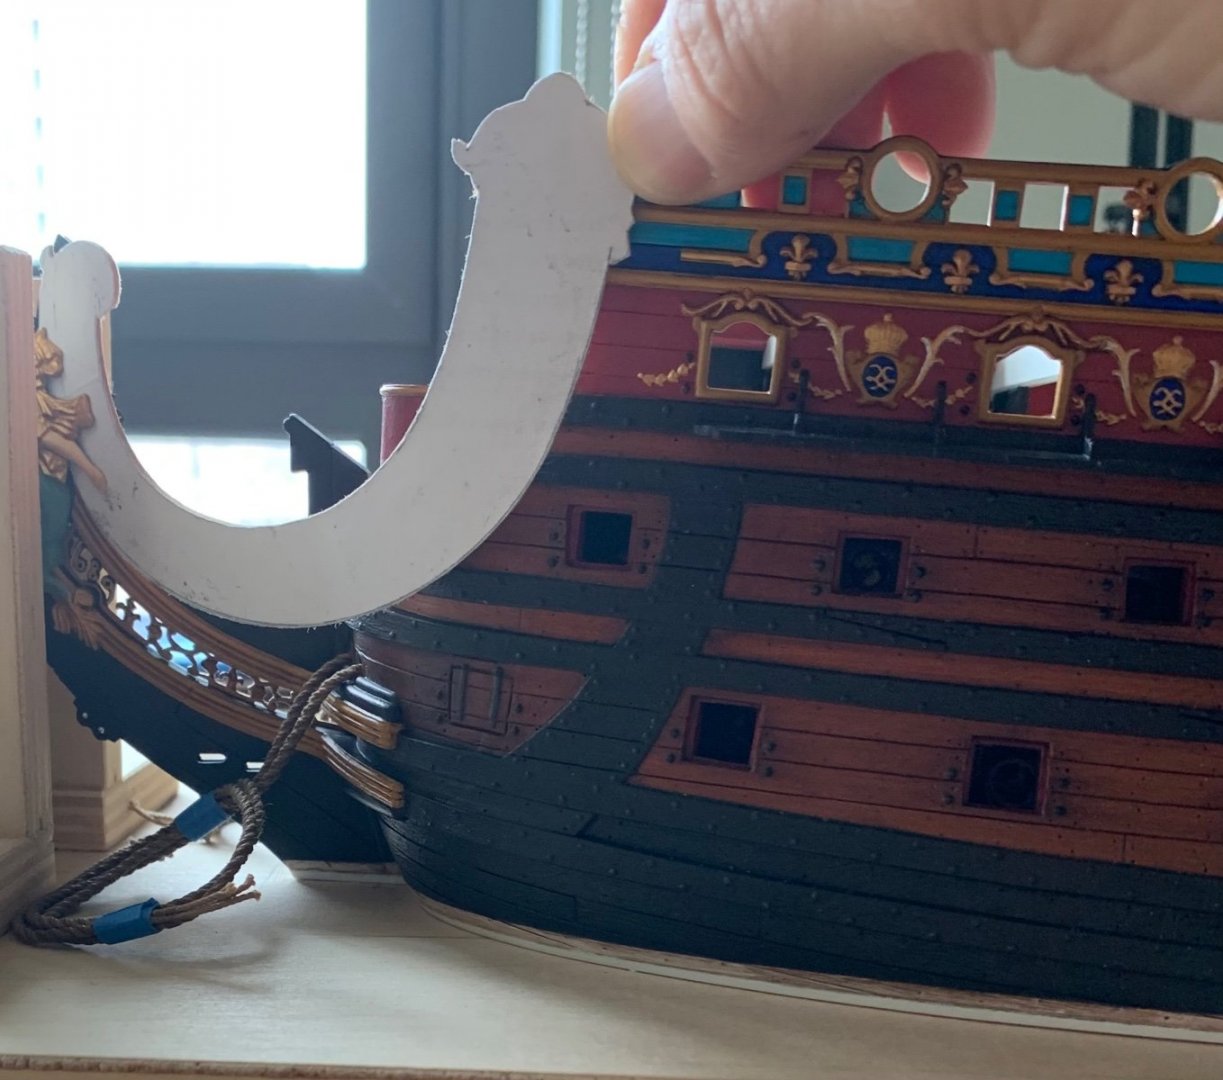
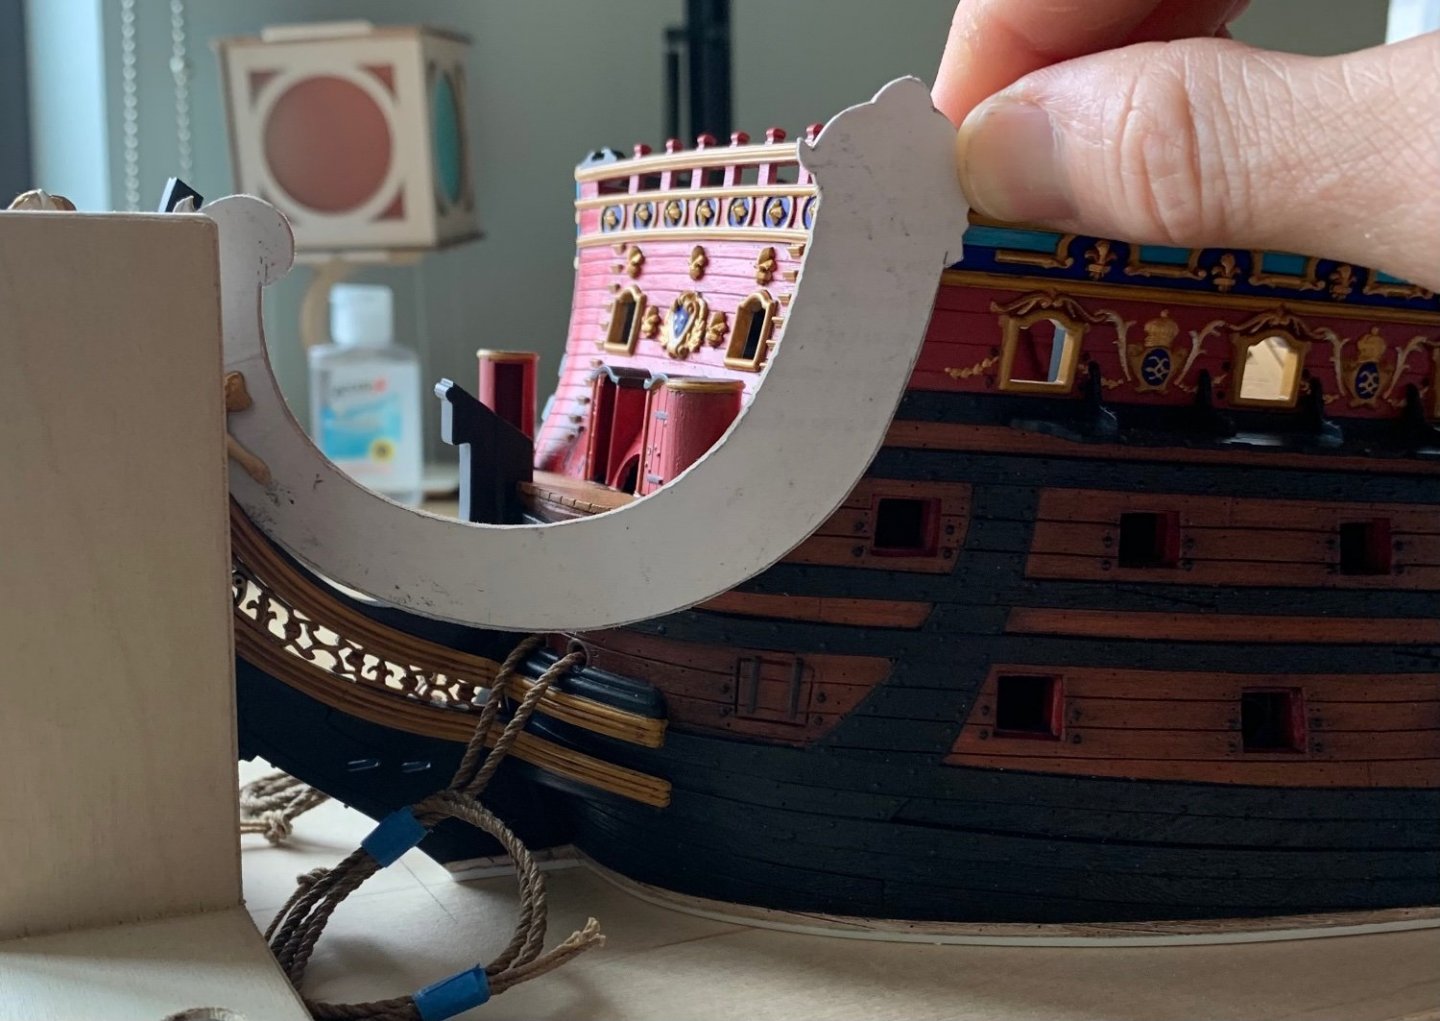
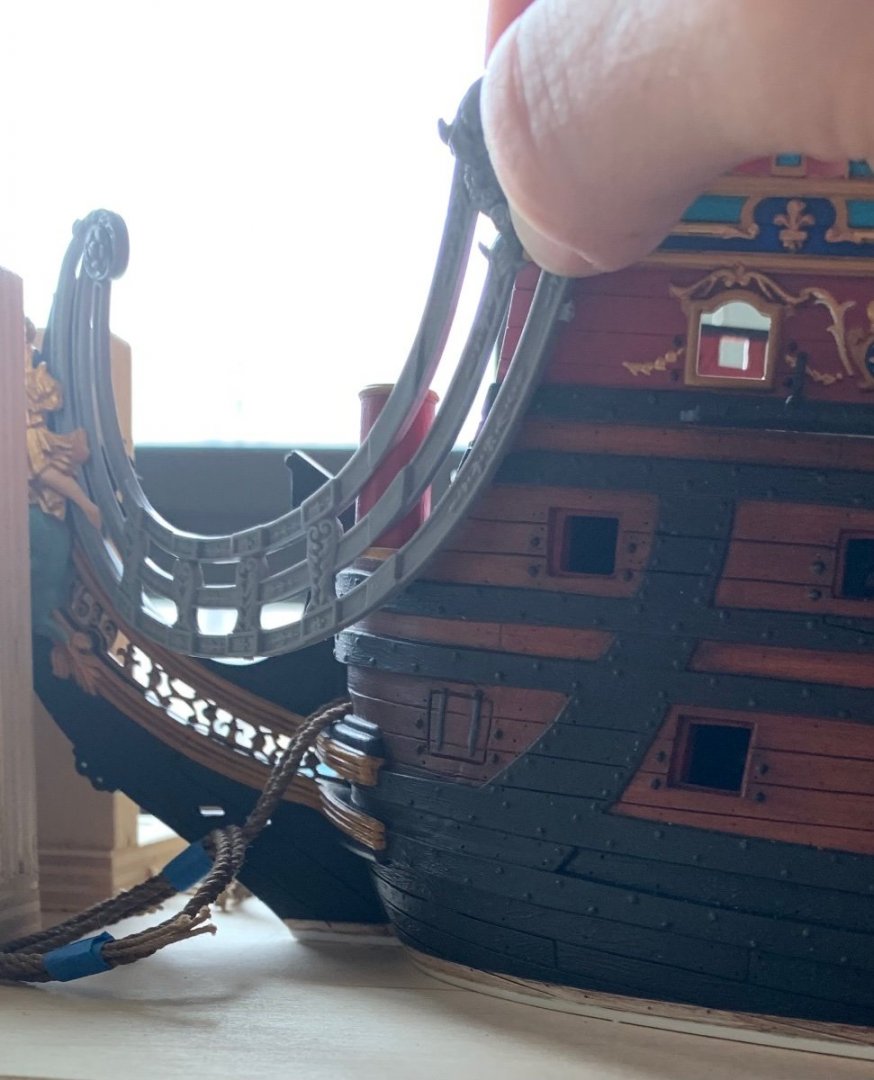

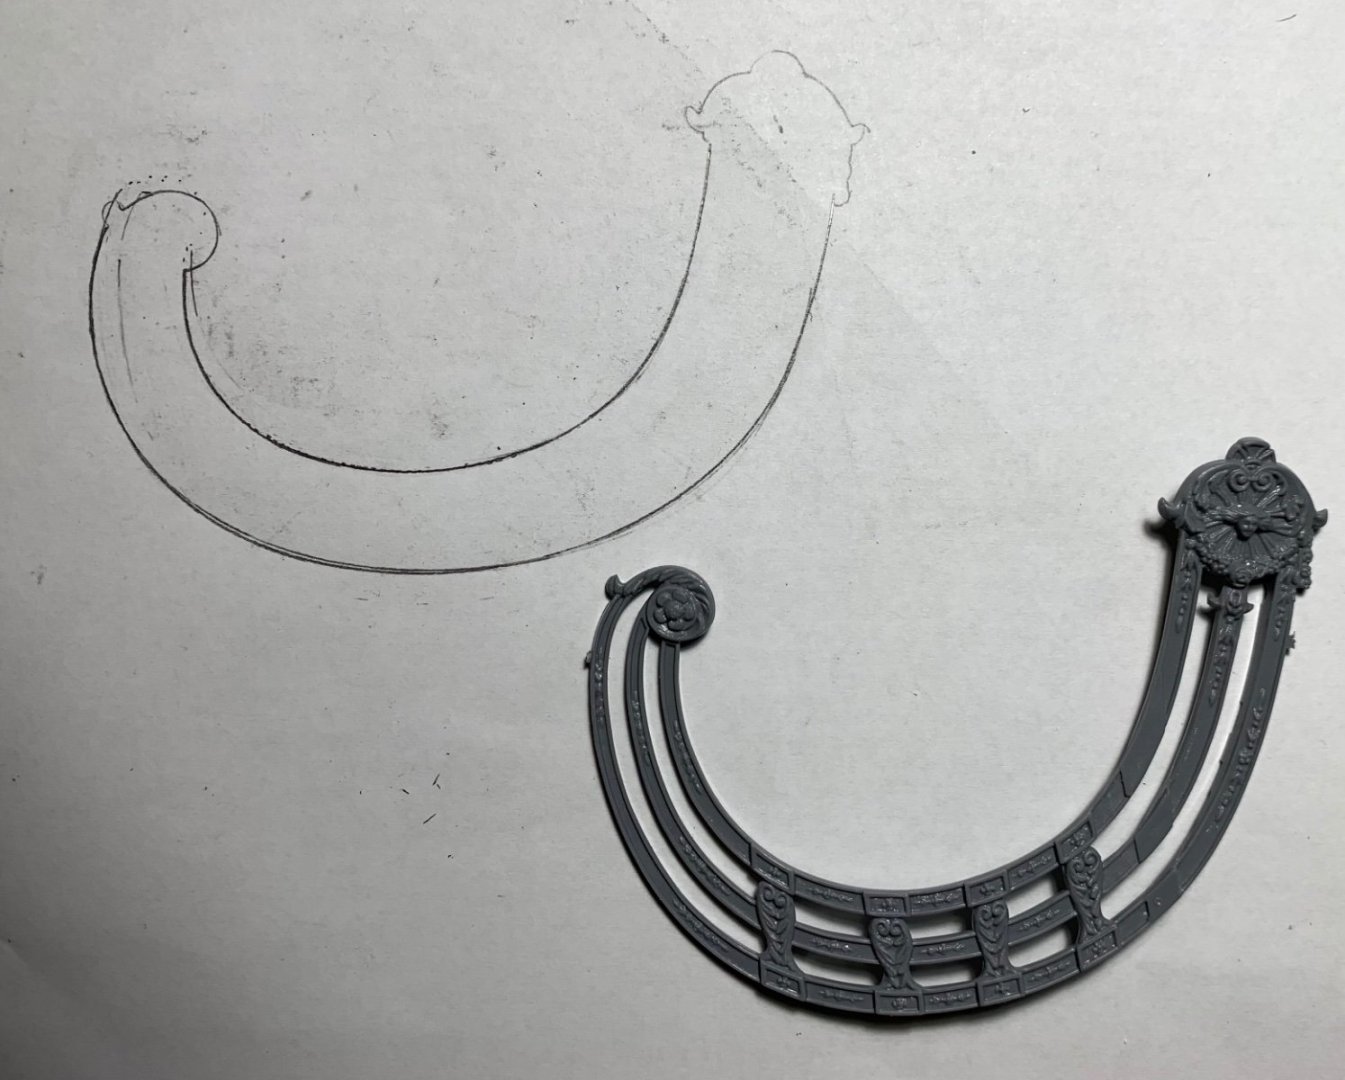
- 2,699 replies
-
- 15
-
-
-
- heller
- soleil royal
- (and 9 more)
-
HMS VICTORY 1765 by albert - 1/48
Hubac's Historian replied to albert's topic in - Build logs for subjects built 1751 - 1800
I am amazed that you have three full-frame builds happening, at once! -
This is brilliantly done and a fascinating insight to your process. Thank you for sharing!
- 589 replies
-
- 3
-
-
- le gros ventre
- cargo
- (and 1 more)
-
I would also like to know the secret, but I wouldn't necessarily mind if you made it for me. Lanterns = scale difficulty to 11.
- 1,784 replies
-
- 1
-
-
- winchelsea
- Syren Ship Model Company
- (and 1 more)
-
Perfectly well-said.
-
Tremendous job on the plating - the patination looks very good!