HOLIDAY DONATION DRIVE - SUPPORT MSW - DO YOUR PART TO KEEP THIS GREAT FORUM GOING! (89 donations so far out of 49,000 members - C'mon guys!)
×


Keith Black
-
Posts
6,644 -
Joined
-
Last visited
Content Type
Profiles
Forums
Gallery
Events
Everything posted by Keith Black
-
Herby, welcome to MSW. Glad to have you aboard.
-
Bill, their website indicates they have blocks in stock. https://modelexpo-online.com/blocks
-
 Ditto Jno's post, Tom. How are you doing and how goes the Sophie project?
- 341 replies
-
- 1
-

-
- Sophie
- Vanguard Models
- (and 1 more)
-
John, a very nice looking ship but it's taking up some valuable real-estate on your pool table.
-
Good to see this project back on track.
-
Brian, Gary, Bob, Pat, and Keith thank you for your kind comments and thank you to all for the likes. For those wanting to know a little more about Tung Woo lanterns please see the following...... Thank you to all for following my journey........Keith
-
New from Minnesota-MS Constitution
Keith Black replied to Minnesota.Tom's topic in New member Introductions
Tom, welcome to MSW. Glad to have you aboard. -
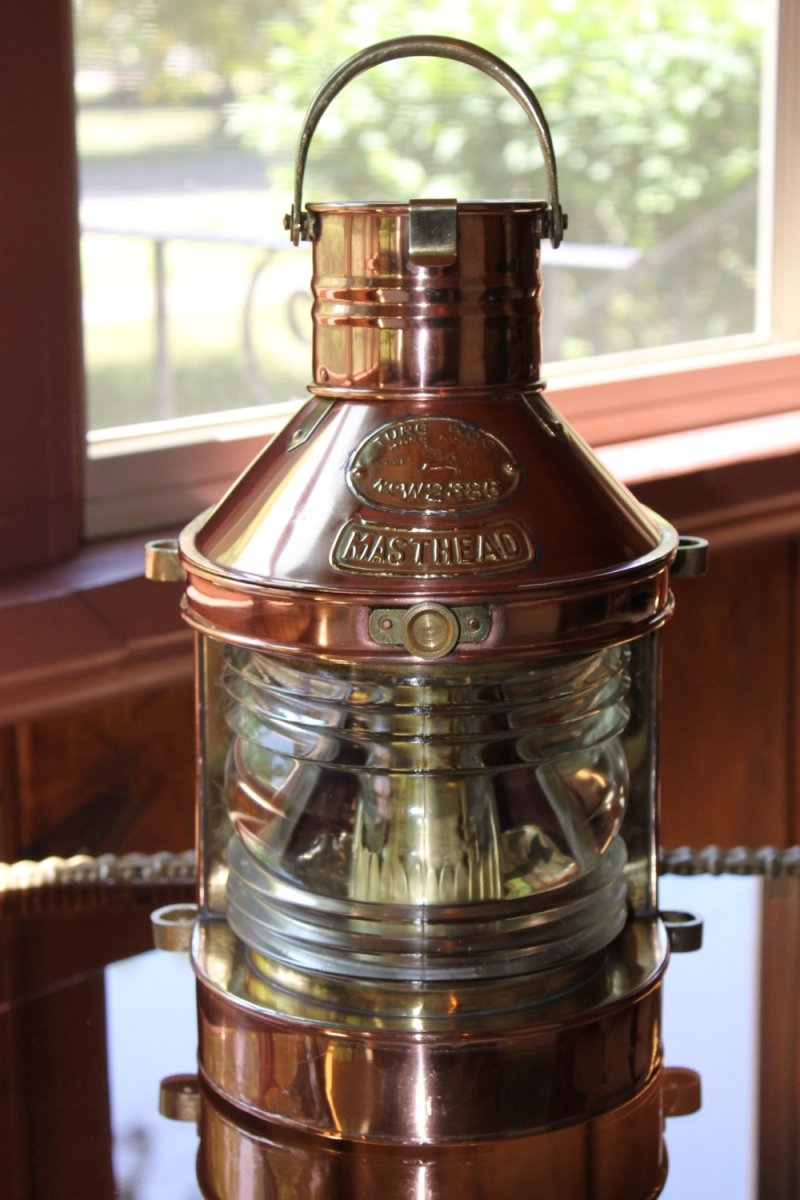
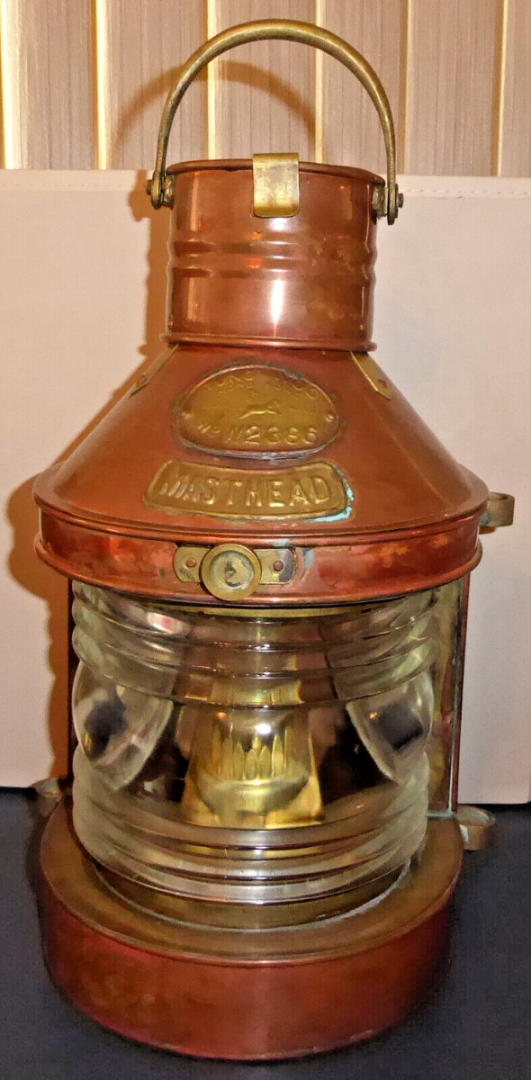
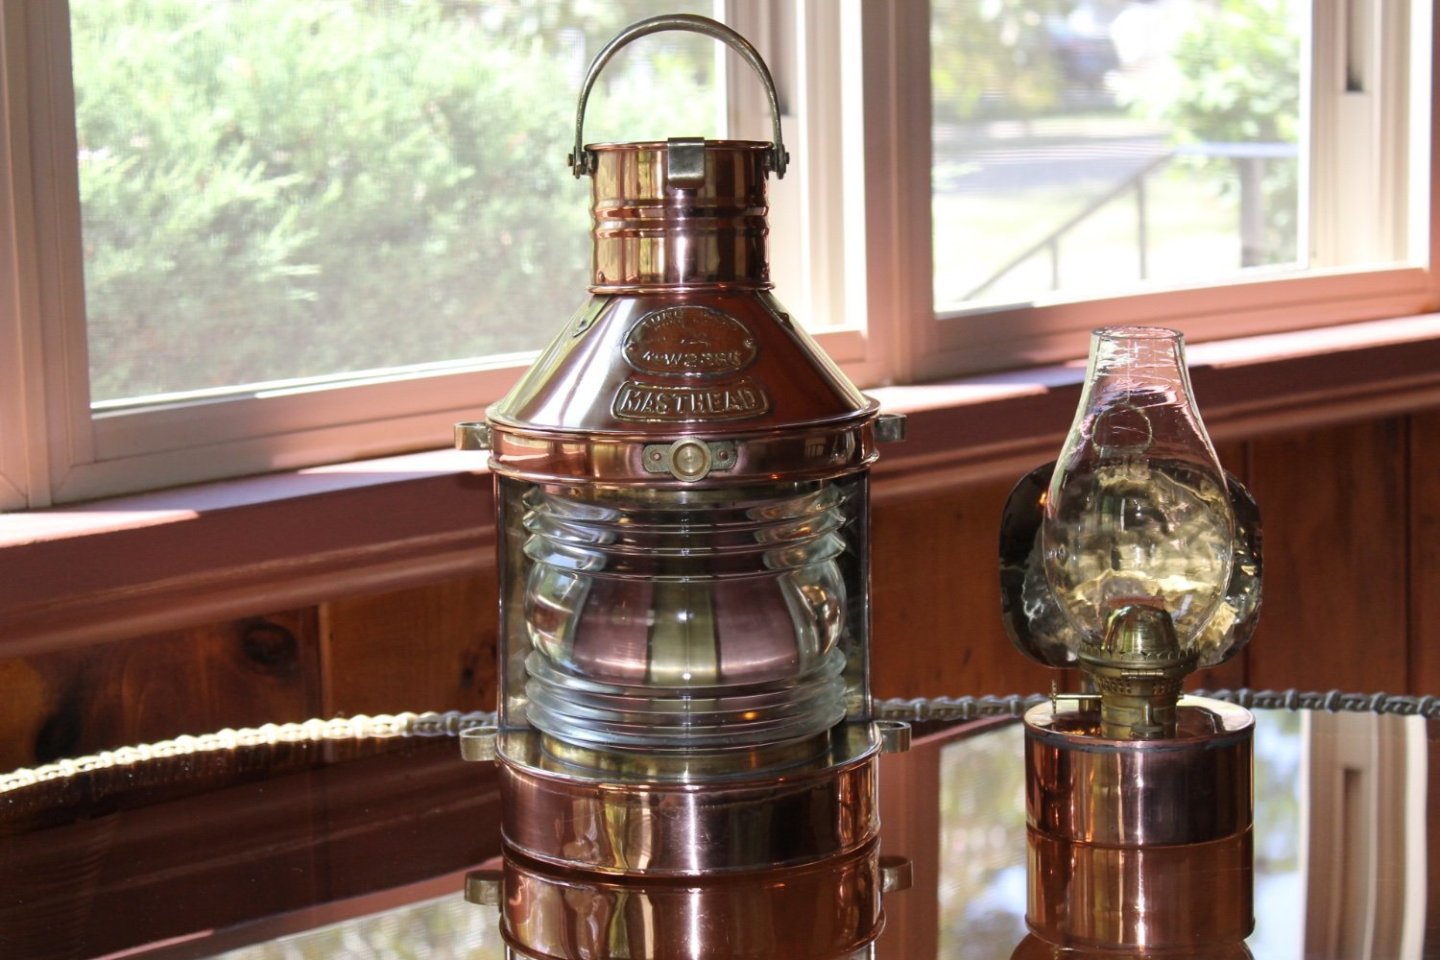
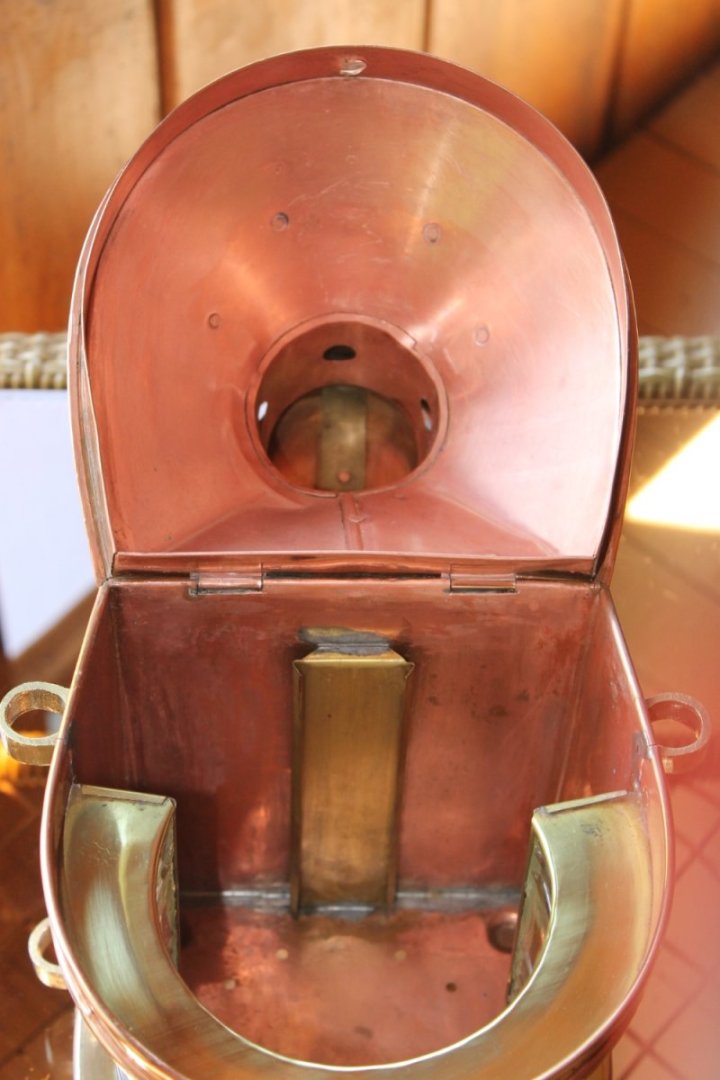
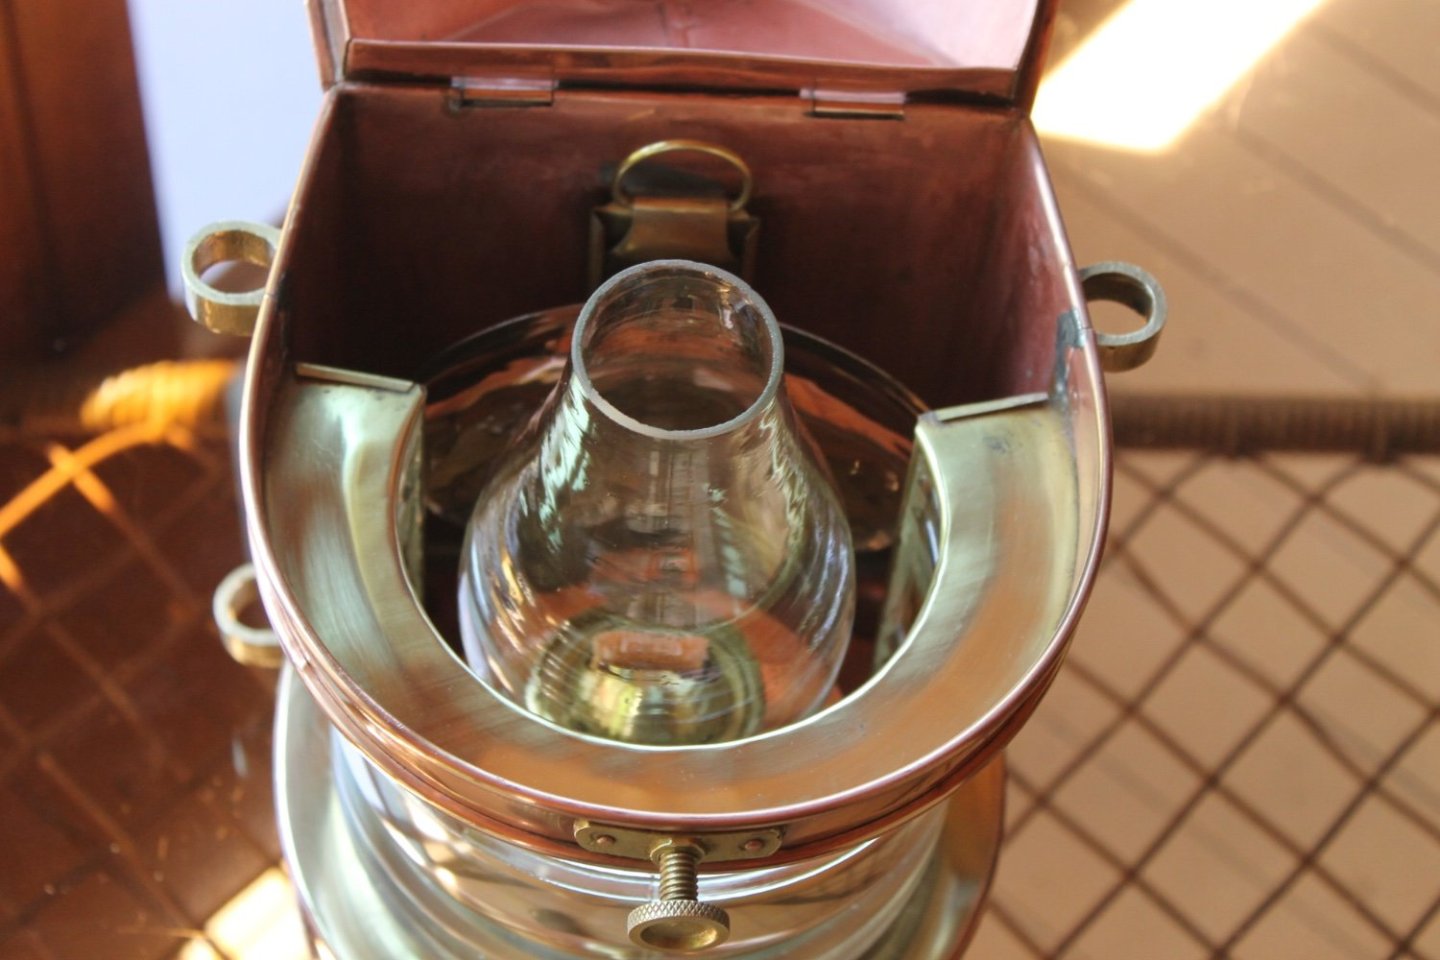
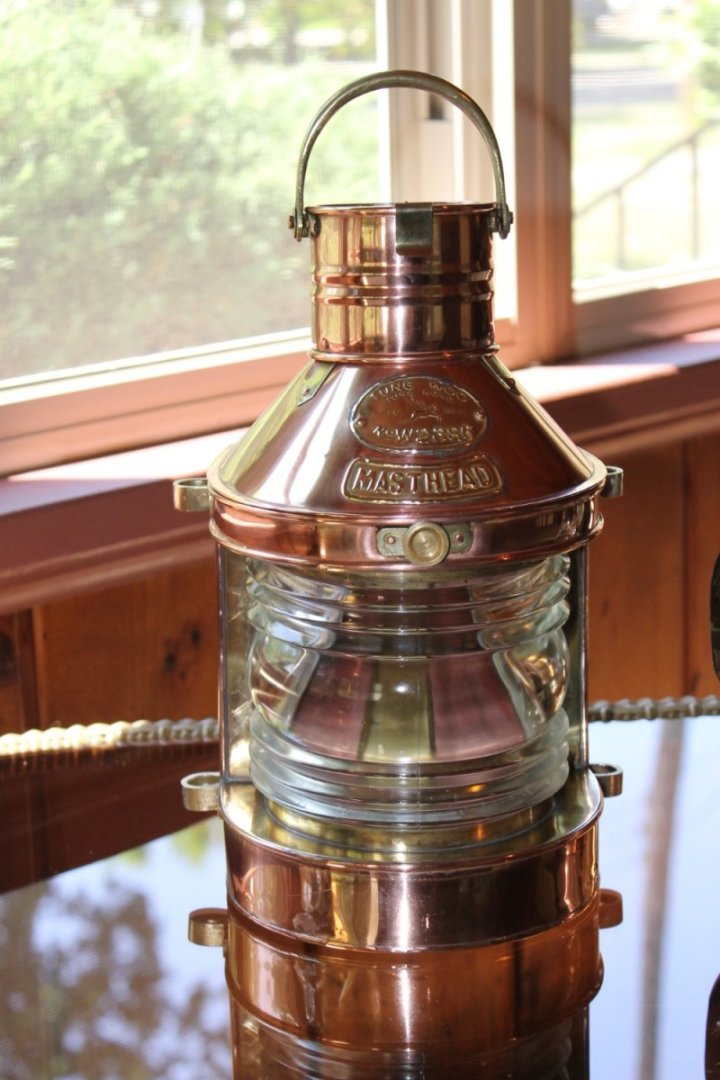
I had to knock down the spiderwebs when I came through the door, sorry for the delay in posting. As an excuse, it's summer with all the required summer duties and I've been spending a lot of time in the pool hall trying to find my stroke. I've not been totally idle on the Tennessee as every now and then I get a chance to strop more deadeyes. Thank you to all for the nice comments, the likes, and for following along. I thought I was done with the lantern rabbit hole but not so. After @Bob Cleek shared with us his lantern collection I thought "I need a Tung Woo too!" So I'd been watching the various auction sites and over Memorial Day weekend a Tung Woo masthead lantern came up on eBay for the buy it now price of $93.75 plus shipping. It looked to be in fine shape (new, never been lit) with the exception of years of tarnish. What intrigued me most was the fact that the lantern was complete with the burner, chimney, and reflector. It's a rare lantern comes up not only in good condition but also complete so I hit the buy button. This past Friday it showed up and I immediately sat about with Tarn-X and Brasso. I finished polishing yesterday and discovered a chore I dislike more than stropping deadeyes. eBay sellers listing photo. After polishing. Lamp removed. The lamp burner was made by Sherwood and Sons LTD, they quit using that name in 1920. They supplied burners to several lantern manufactures. There is no doubt the lantern and lamp tank were made at the same time but it's a bit strange in than the tung Woo badge seems to indicate the lantern body was made ca 1950-1980. I plan on writing something up in Nautical General Discussion on Tung Woo lanterns where I'll go into further detail. I didn't polish the inside, I just wiped down with Tarn-X Lamp inserted. Photo with the lamp removed showing the condition of the fresnel lens, no chips or cracks. Thank you to all for following along.......Keith

-
JC, welcome to MSW. Glad to have you aboard.
-
Hard to believe that mighty things come from that little space. Thank you for posting photos of your shop, Valeriy.
-
Uwe Schmidt, welcome to MSW. Glad to have you aboard.
-
Barncave Shipyard by mbp521 - Scale 1:1
Keith Black replied to mbp521's topic in Non-ship/categorised builds
Men don't need flushies.............. Microwave? Can't forget the microwave. I'd throw in a recliner just in case you got snowed in. -
Enjoy!
-
Barncave Shipyard by mbp521 - Scale 1:1
Keith Black replied to mbp521's topic in Non-ship/categorised builds
I tend toward the tan to mid brown colors but hey, that's why they make chocolate and vanilla. There's only one person that it needs to please and that's you! Now you're going to have a heater/AC and paneling making you feel all cozy.......are you putting a recliner and a TV out there too? -
Jackie, the eyelets/eyepins appear to be too big, IMHO. The eyelet ID is the same size as the deck plank width, it just doesn't look right. Were I you, I'd remove the eyelets, purchase or make new eyelets more to scale, sand the deck surface, fill if required, and paint/stain to match. If you change to a smaller eyelet size you'll have to drill new holes. You have to use a pen vise to drill, practice on scrape till you get a feel for how much pressure can be applied to drill a hole without snapping a drill. When you chuck the drill in the pen vise make sure you keep the drill length short. Too long and sure as heck you'll snap it.
-
Piotr, welcome to MSW. Glad to have you aboard.
-
Barncave Shipyard by mbp521 - Scale 1:1
Keith Black replied to mbp521's topic in Non-ship/categorised builds
Too funny and way too true, Brian. I'm not a big fan of paneling but the paneling you're using is interesting. If paneling was my only option I would certainly consider using it. If it was a bit lighter I'd be all over it. -
Marius, welcome to MSW. Glad to have you aboard.
-
Welcome to MSW again, Sam. Wishing you the very best with your Polaris build.
-
Sam, welcome to MSW. Glad to have you aboard.
-
Thank you for your service, Mark. From a former Marine.
-
I searched around, nada.
-
Where can I get small grommets?
Keith Black replied to Seamus107's topic in Masting, rigging and sails
I hope it works out, James. If it doesn't you have other options. -
Where can I get small grommets?
Keith Black replied to Seamus107's topic in Masting, rigging and sails
I'm not looking for thimbles, I was just trying to help James locate available stock. You send CS a email, you're the one who raised their hand saying "Crafty Sailor has small thimbles"