ESF
-
Posts
381 -
Joined
-
Last visited
Content Type
Profiles
Forums
Gallery
Events
Everything posted by ESF
-
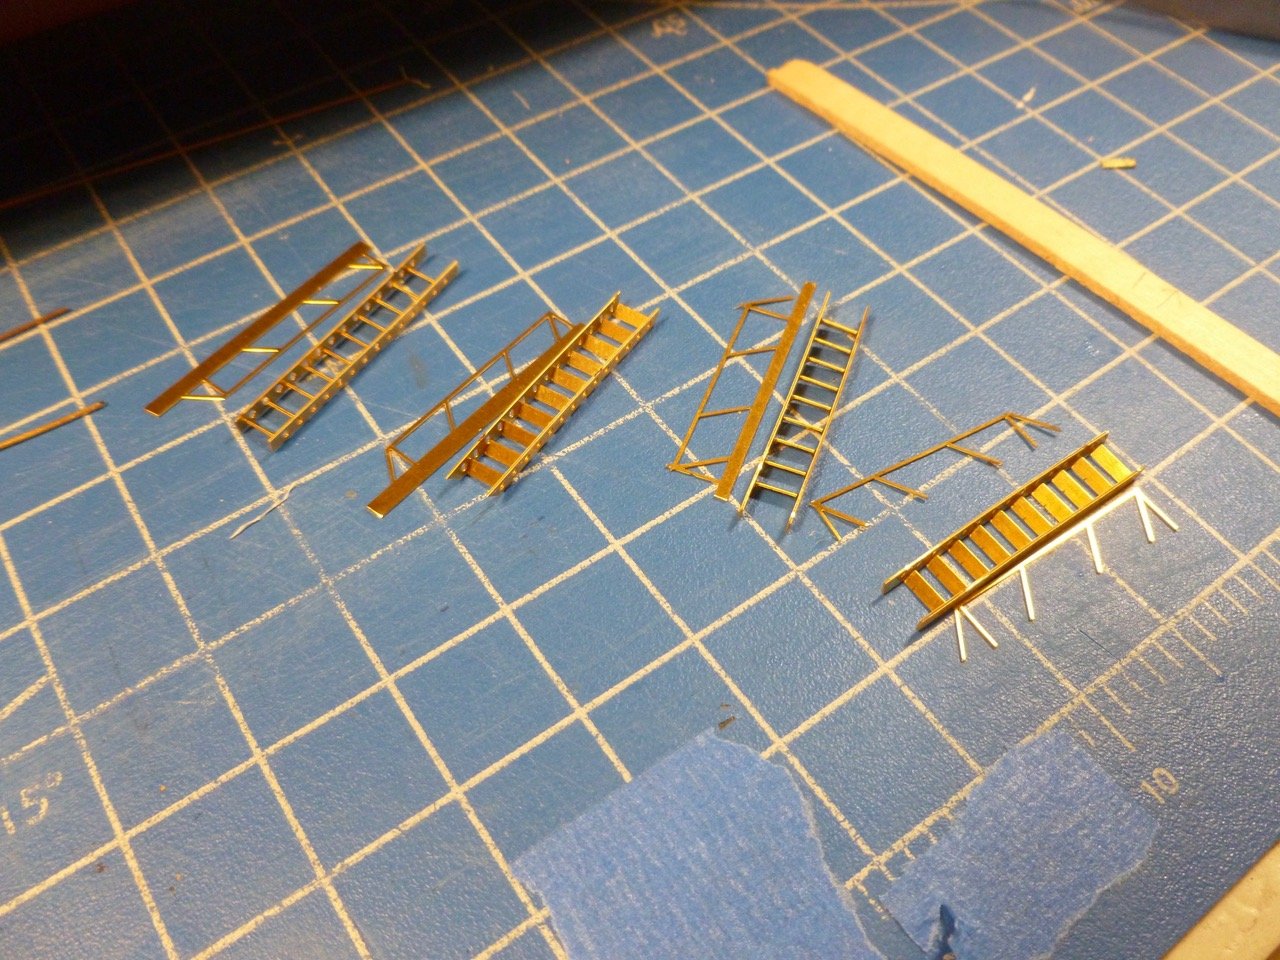
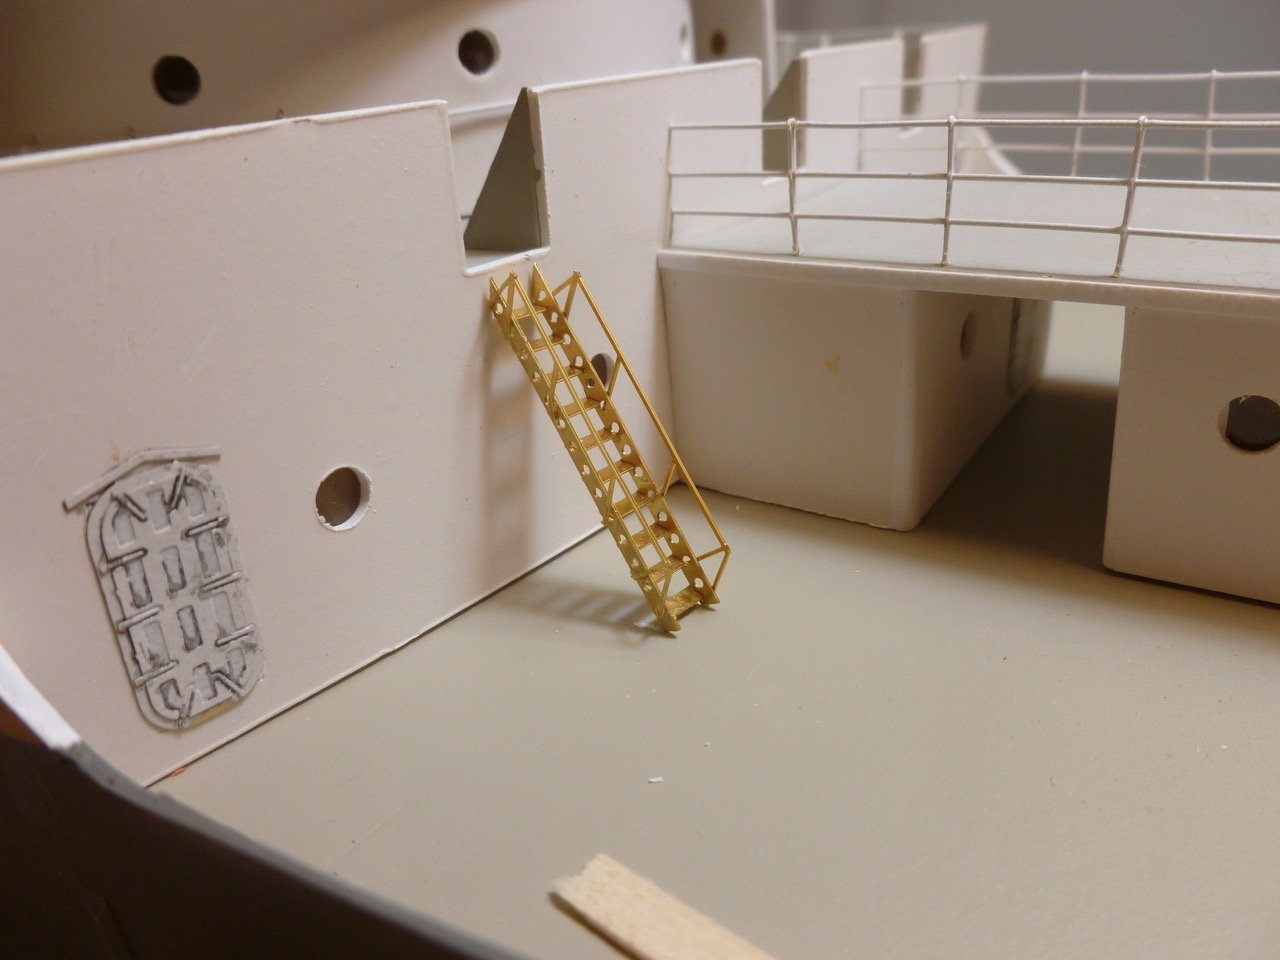
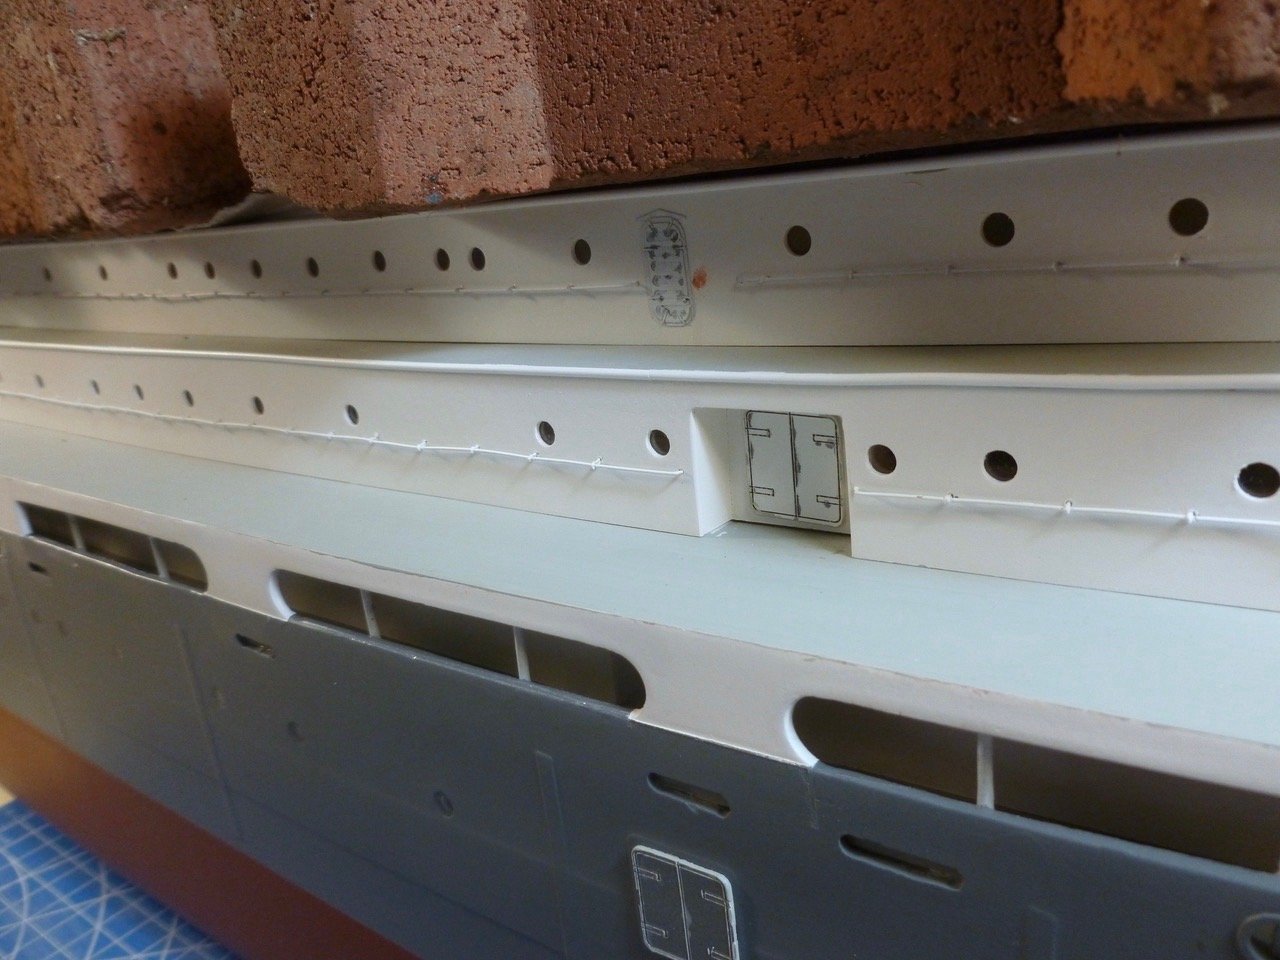
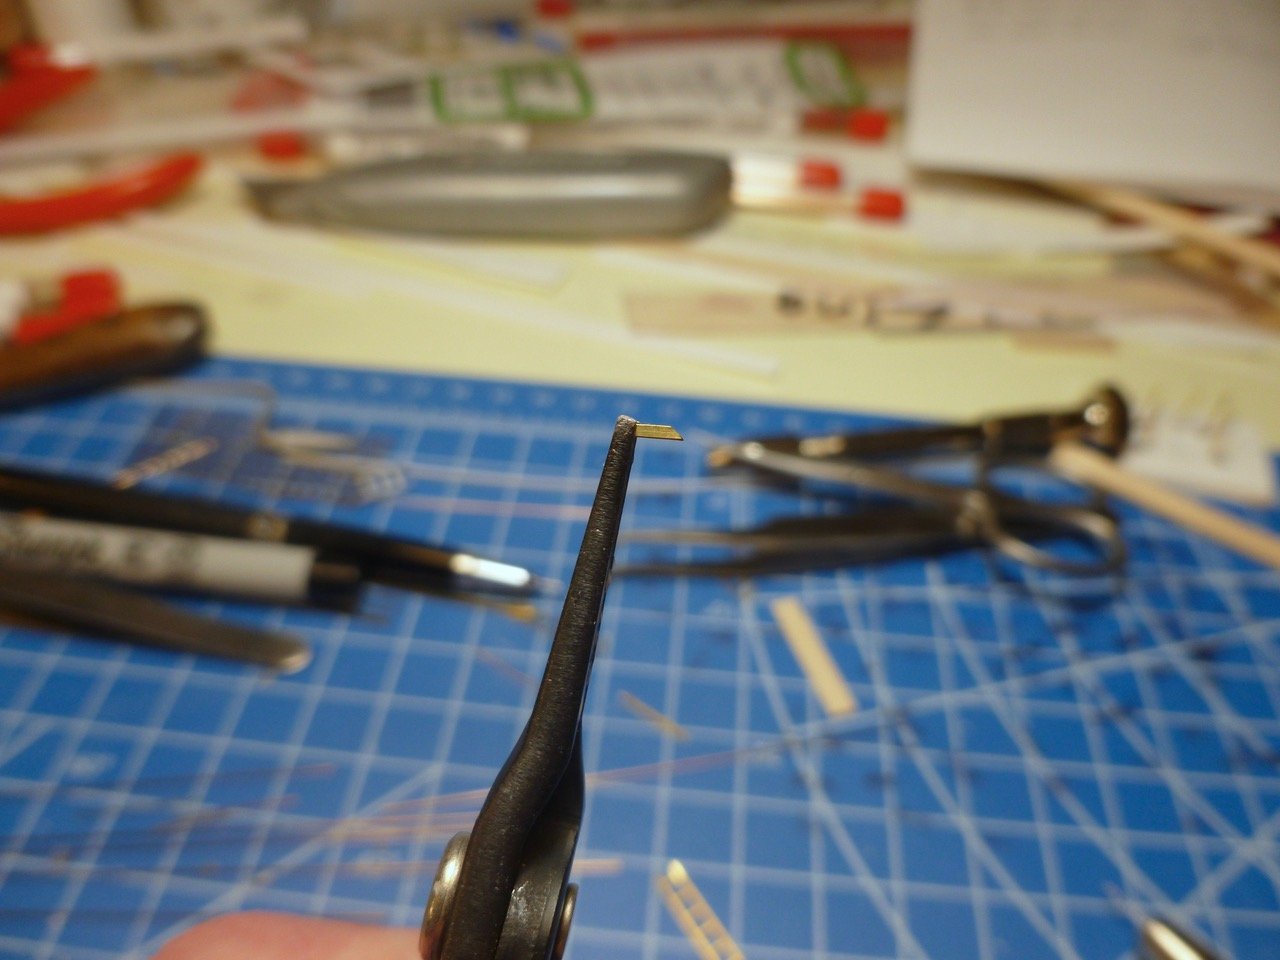
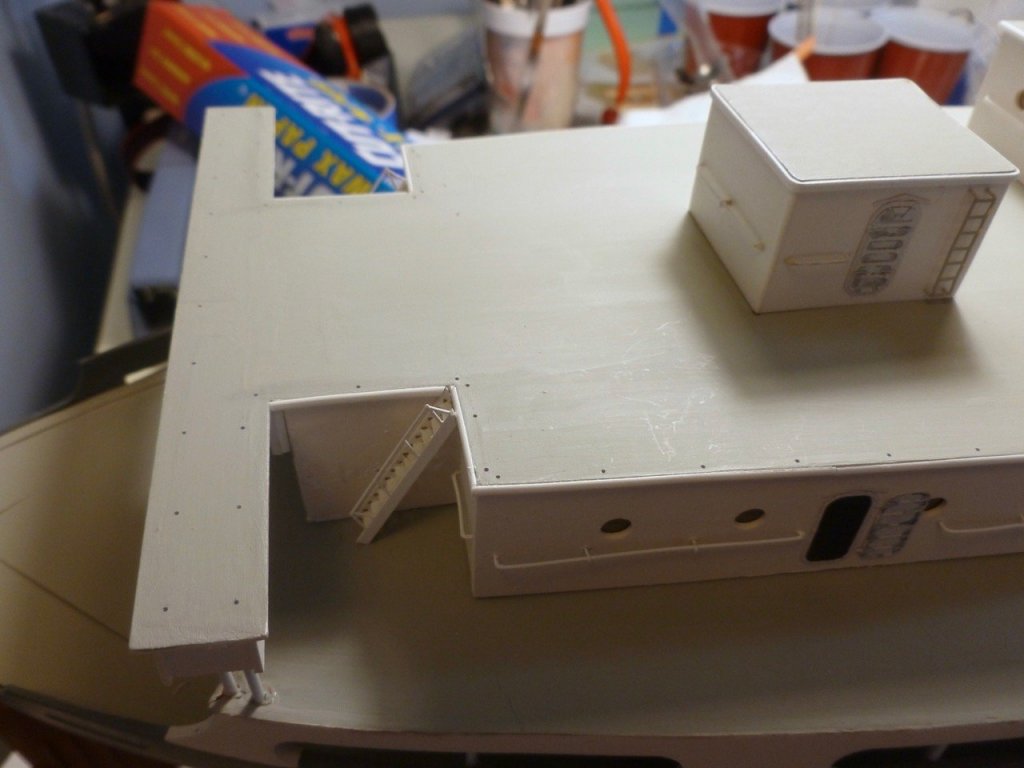
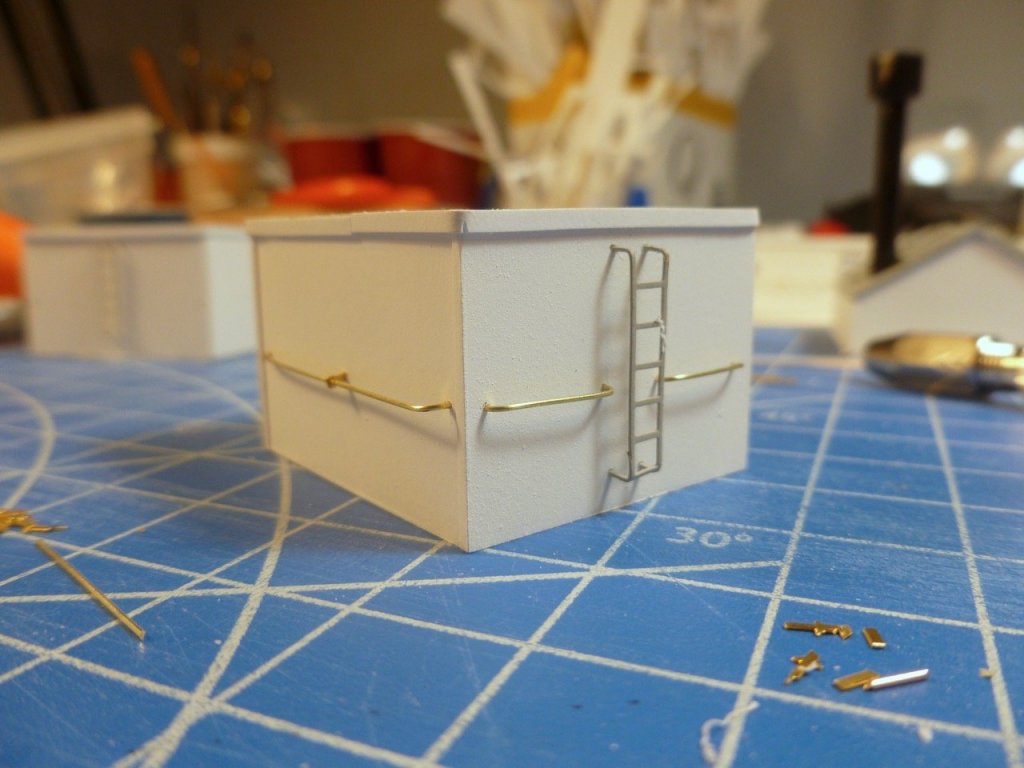
 To those who gave likes, thank you and thanks for stopping by. Patrick, thank you for your kind words. I feel like I’m working with jumbo parts when I see the work of the members doing 1/350 and 1/700 ships. Steve Stair-steppers rise to the occasion. Not a lot of work this week, between a milestone birthday celebration and simultaneously word of a bad scan for my nearest and dearest, after five years of good ones. Shipbuilding may be limited for a while but it is therapeutic when there’s time for it. I’ve been folding up the ship’s ladders. I fold the stringers by squeezing the stringer between tweezer nose pliers and folding the treads up with my fingers. The pliers only go to about the halfway point of the stringer so I bend a bit on one end, reverse the pliers and bend up the other. After a few rounds the stringers are in place. Once the treads are bent up I touch the underside of each tread on with thin CA on both ends to strengthen the stringer to tread joint. On a few ladders I found that the bottom tread on one side was connected to the stringer at both corners of the tread, which required another snip of the PE scissors to free up one corner. The PE sheet is short of double railings, allowing only one railing per ladder, but there are a couple of extra ladders so I could scavenge enough to allow two railings for each forward freestanding position. The other ladders go up against walls so a single rail, while not entirely accurate is at least less noticeable. The starboard ladders are fabricated and the wall railings are trimmed to allow a tight fit to the wall. I also notched the quarter round trim at the top to accommodate the stringer. The railings have no length adjustment to speak of so the slopes are slightly different to match the different deck-to-deck heights. I added a bit of plastic at the head of the lower ladder to give it a bearing surface but it looks like I need to trim it a bit to blend with the adjacent curved wall. At the forward ladders there is no sidewall for fastening so I added an L-shaped pin under the bottom tread to help secure the stair in place, after realizing that the small deck divots I added under the bottom of each stringer were contributing almost nothing to stabilization. I filed the top of the L flat to get a good bond with the tread. I thought the photo below looked good until I realized the right hand railing is glued lower on the stringer than the left so a repair may be in order. Too bad because the railings are very fragile and don’t take kindly to fiddling.

- 446 replies
-
- 7
-

-
- zebulon b vance
- deans marine
- (and 3 more)
-
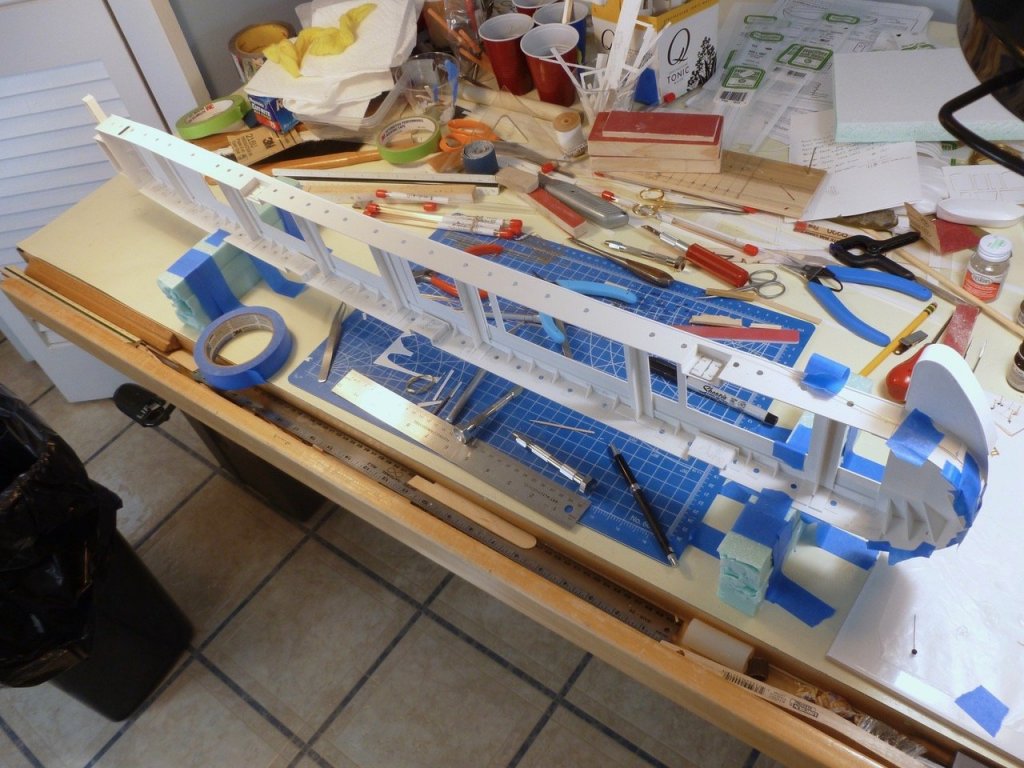
To those who gave likes, thank you and thanks for stopping by. Carl, after only a nano-second of consideration I agree that inside out is a better way to proceed. I’ve already knocked a few pieces adrift trying to reach over the ship. Carl, Jack, Rob and Kevin, I appreciate your suggestions on decals and lettering. Rob, I don’t have your skill at overpainting but I love your HMS Cottesmore badge. Kevin, thanks for the link to adhesive decals and for your compliments. I have adhesive red crosses but I’m not using them since I expect they were painted over along with the crosses on the sides when the ship came off hospital duty. I didn't realize they still made Letraset. I used a lot of it back in the day until architectural drawing went digital and our stack of sheets dried out in the drawer. It was a challenge to install Letraset on Mylar drawing film on a flat drawing board and I’m not sure I would want to try rubbing it onto a vertical curving surface. To make a long story just a little bit shorter I have abandoned white letters. I even tried light gray thinking they would look white against the dark background but they just faded into insignificance. So I wetted up a test bit of decal that had the wrong font and applied it to the wood that I had used to experiment with hull paint. The black gives a legible and reasonable appearance. Steve Every journey begins with a stanchion. While eating lunch at work I mulled over an earlier suggestion to use a jig for railing placement. After a quick sketch and visit to the hobby shop I made up a 1/4 x 1/4 inch plastic angle strip with some half round strips along one inside edge. The half rounds offset the half round deck edging to allow the angle to sit straight when taped to the deck edge. The inside view is below. The jig was the nuts. In short order I had all the holes drilled along the starboard side of the bridge deck. I had to set up a second line of jig holes for the aft bridge to push the railing inboard so the stanchion points would be hidden inside the fascia strip. I placed a ceremonial stanchion to signify the start of the 400 stanchion journey, but the trip won’t actually commence until everything within the railings is installed. A single railing the full length of the deck would be unwieldy at best, and most likely a folded disaster, when trying to fit, remove for painting and reinstall (no in-situ airbrushing here). I’ve also been thinking that a pieced railing needs additional support at the ends of each section but I’m reluctant to clutter the walkway with angle braces. A little knife work in a stanchion hole gives it just enough room to install a double stanchion, so the tentative plan is to build the railing in sections, then solder or glue the stanchion at each end of a section to the adjacent stanchion. Since the stanchion sections are flat the doubled up ones are barely distinguishable from a single one, but the doubling should(?) strengthen and simplify the connection between adjacent sections. The photo shows a test double (untrimmed) to ensure it would fit the hole. If anyone has tried this and found it not to work please raise a flag.

- 446 replies
-
- 10
-
-
- zebulon b vance
- deans marine
- (and 3 more)
-
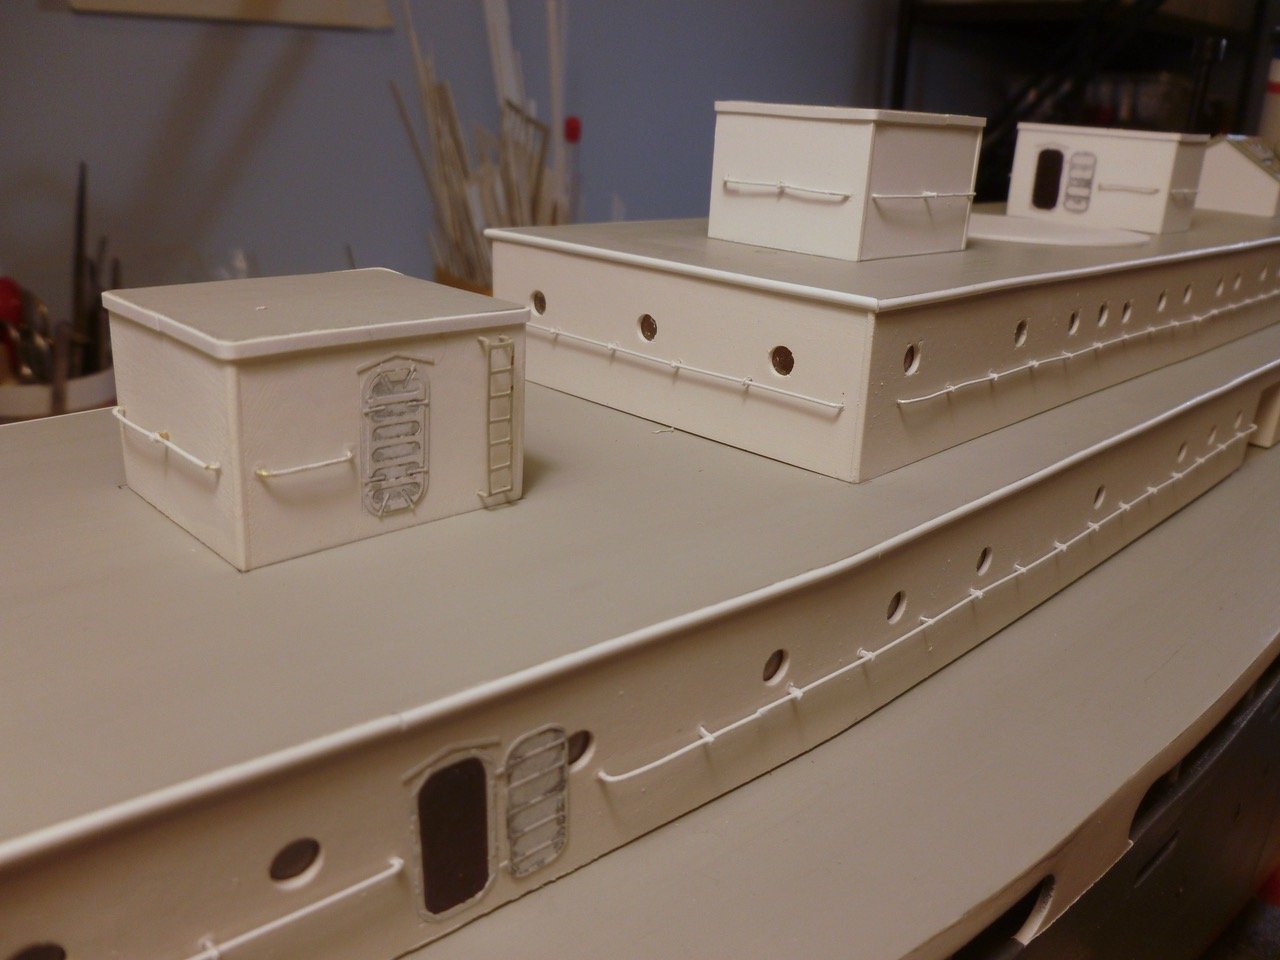
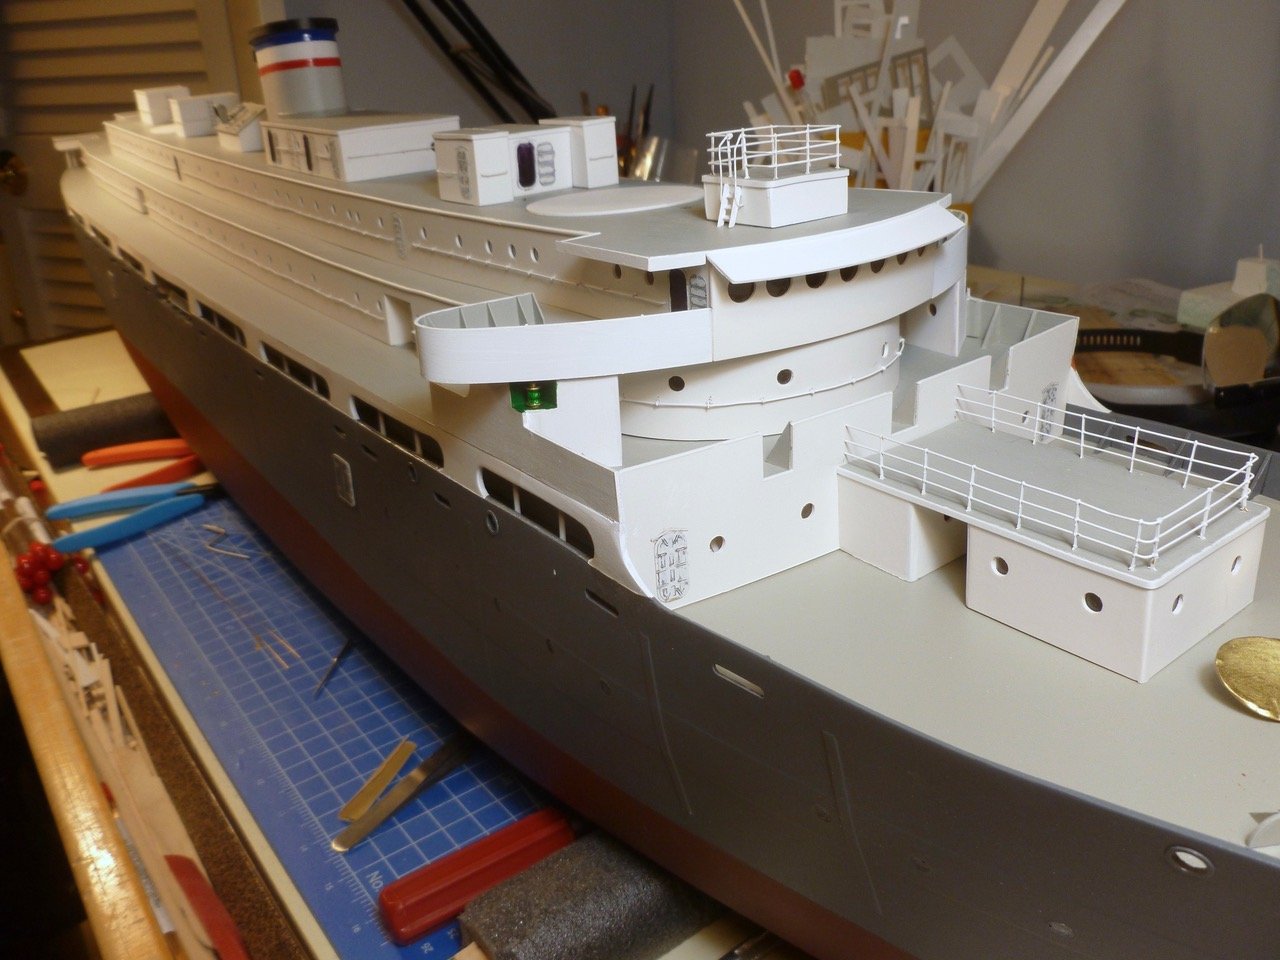
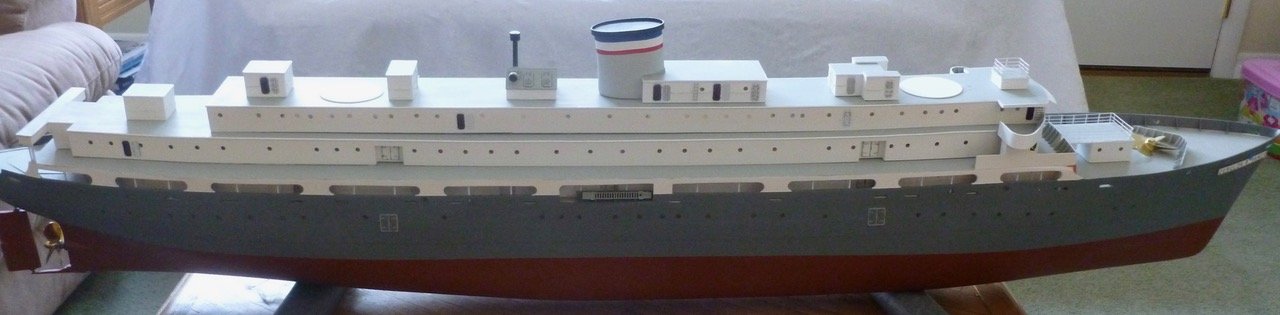
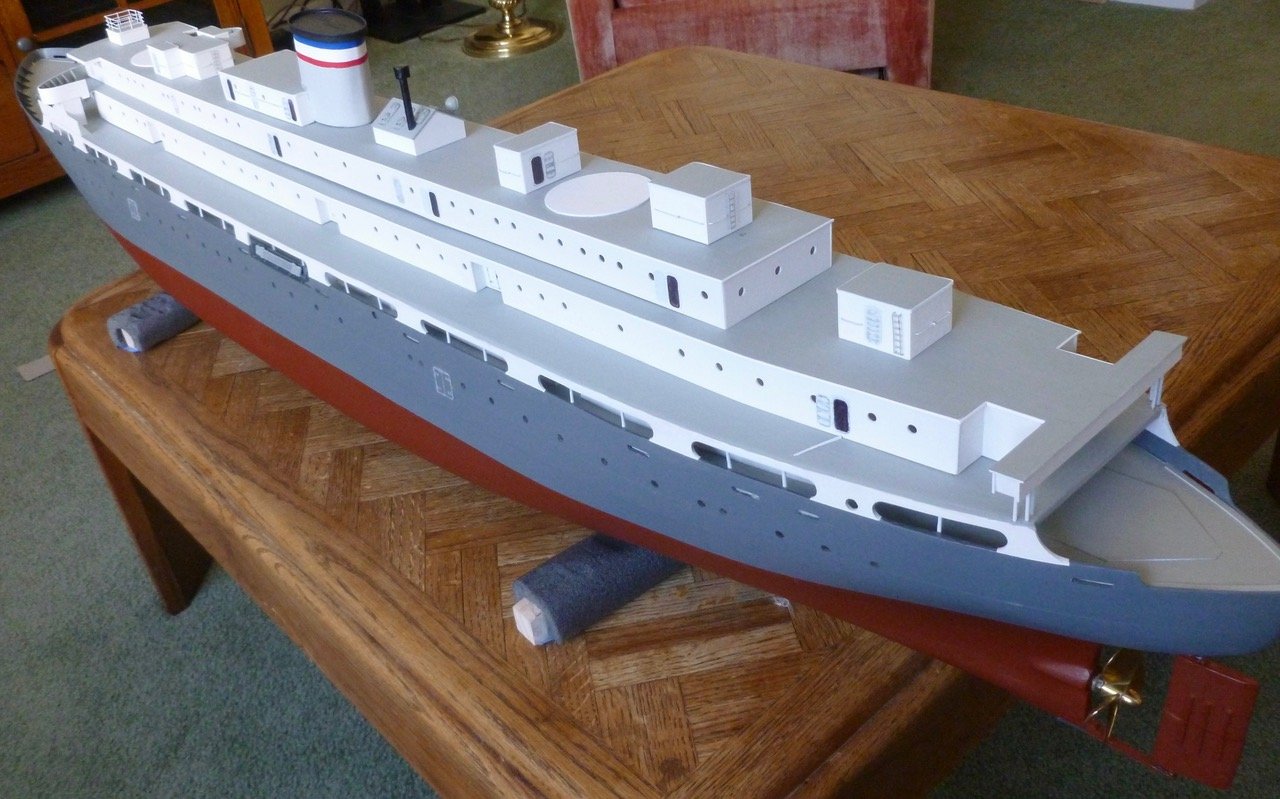
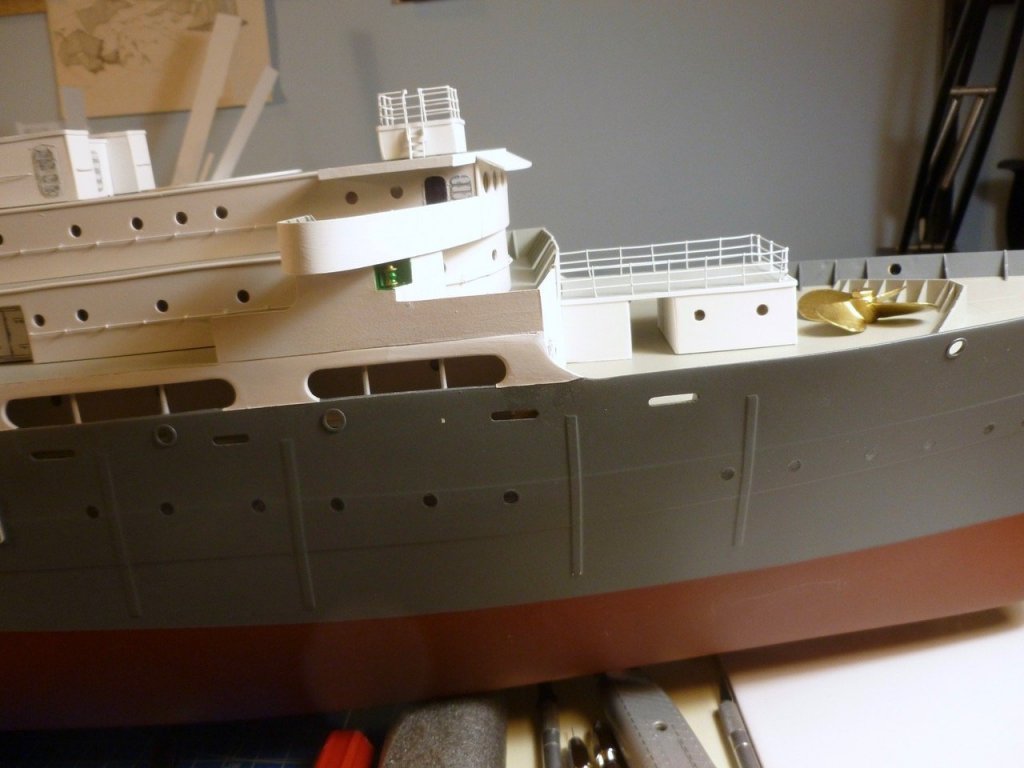
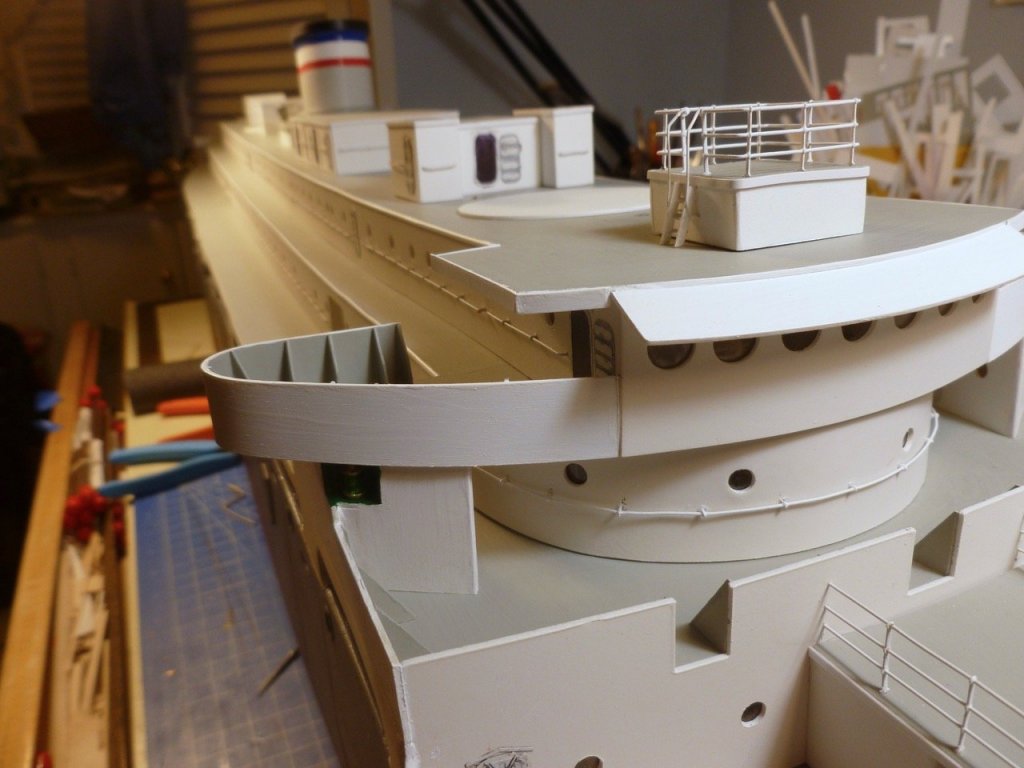
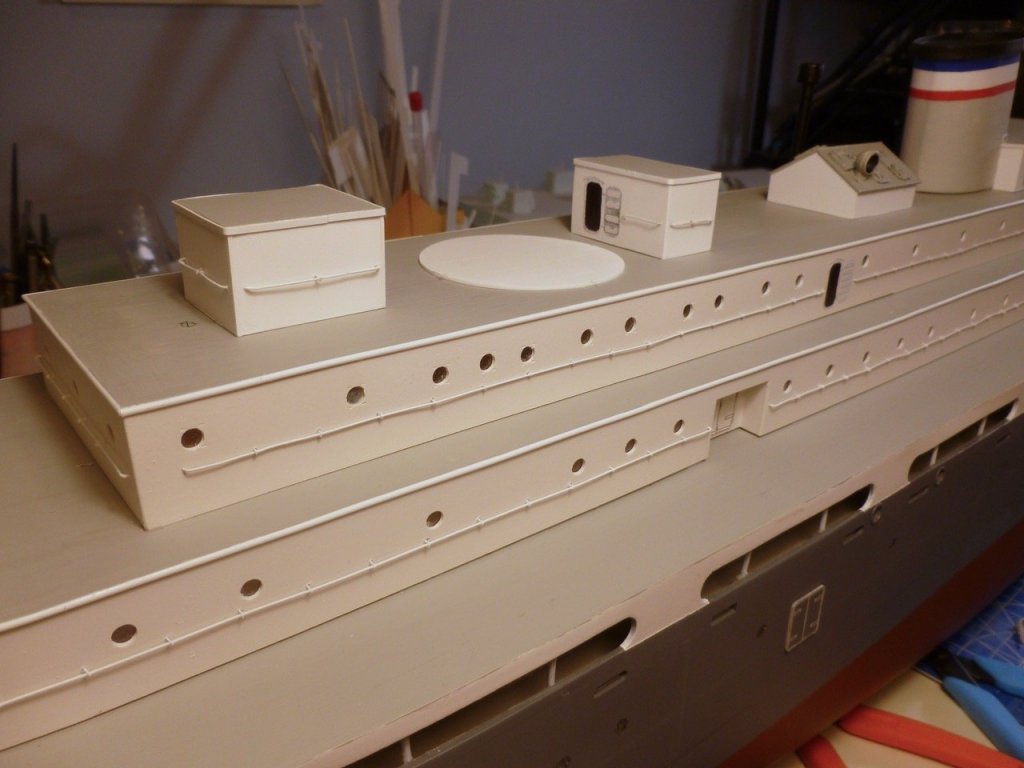
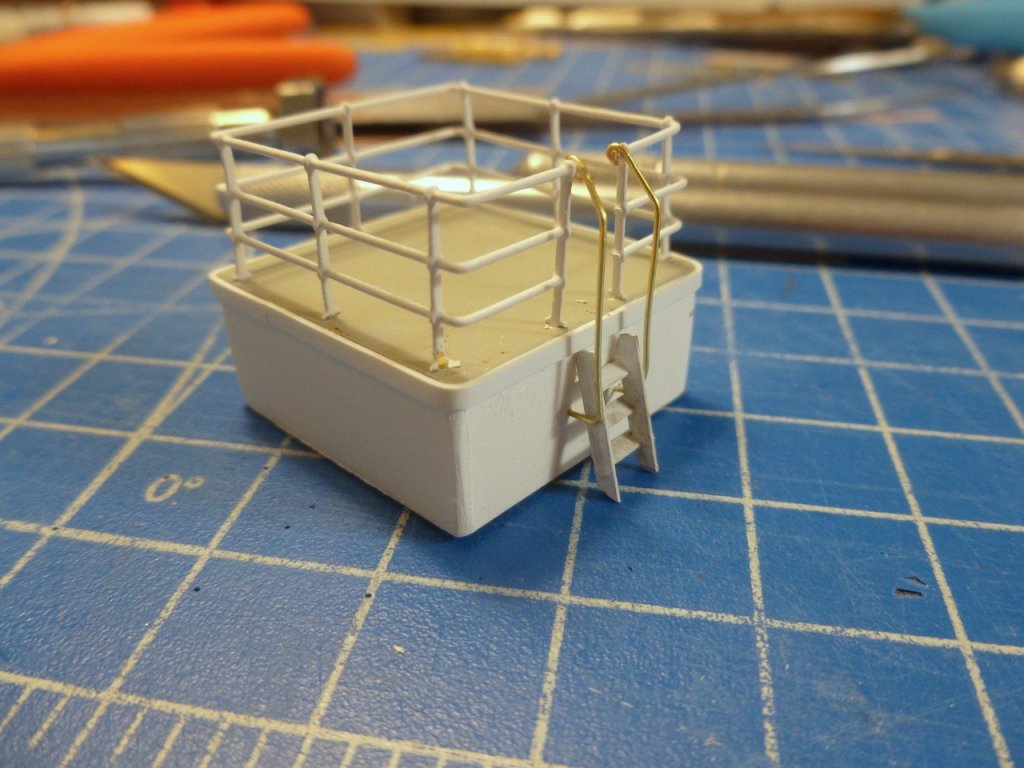
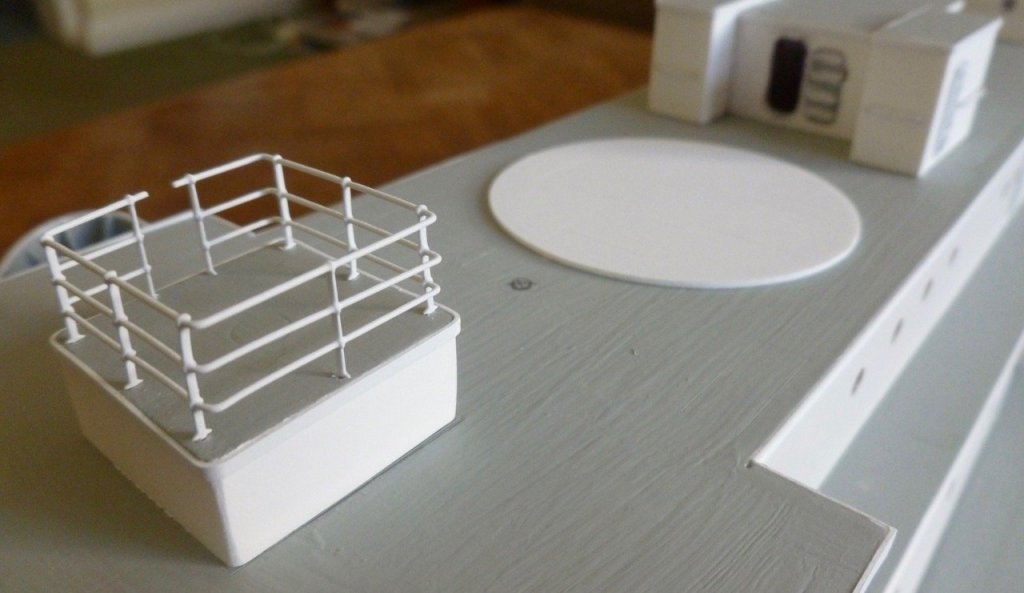
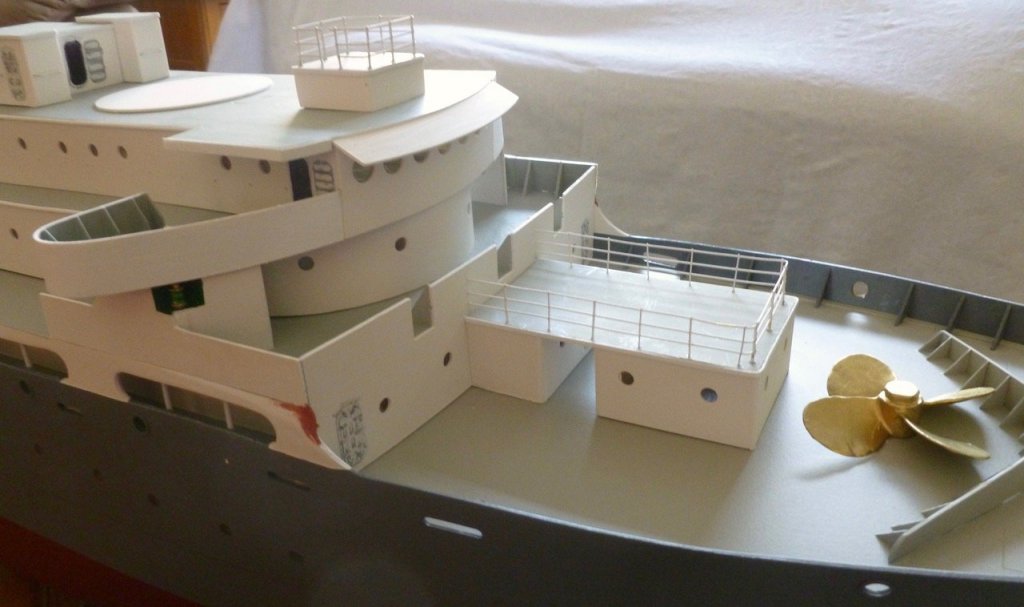
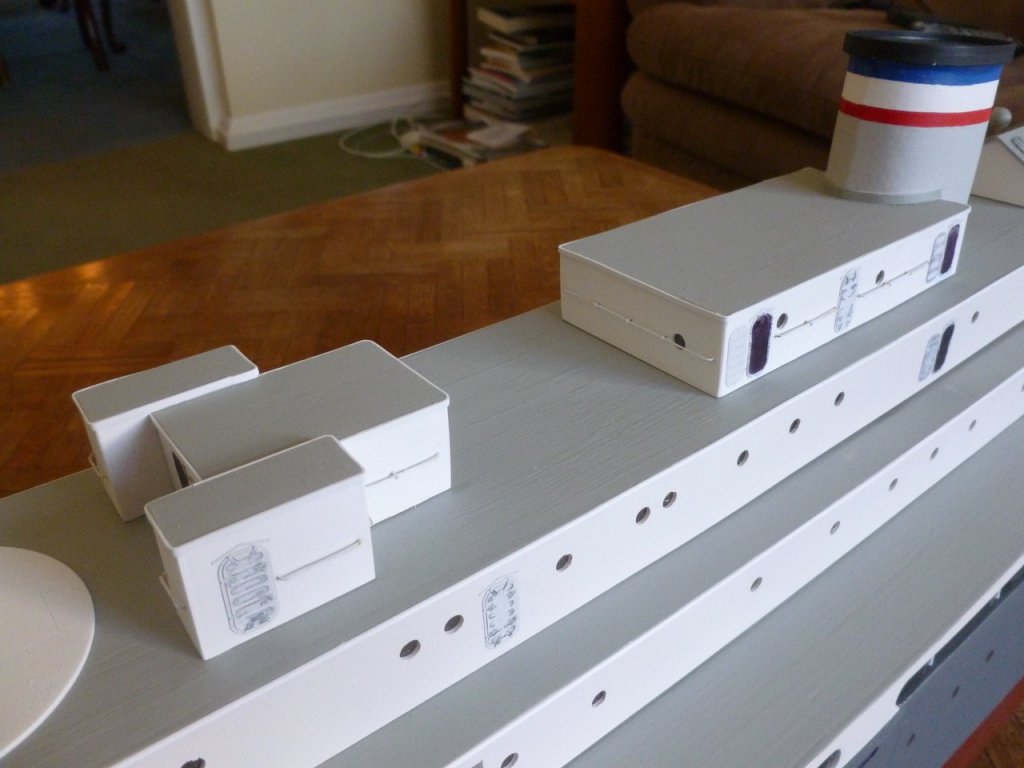
To those who gave likes, thank you and thanks for stopping by. Mark, thanks for the suggestion. I got some inkjet compatible decal paper through Amazon. A test piece went through the printer fine and I sprayed it with matte clear but not lacquer because I’m concerned the lacquer might dissolve the ink. The computer will make white letters but I’m trying to figure out how to find them after I print since the backing paper on the decal sheet is also white. I was thinking about putting a black line box or some black corner marks around the entire word or the whole column of depth marks so I would at least know where to look when I'm cutting up the decal sheet. Carl, thanks for offering to look into the mast and for your decal suggestions too. I have seen a bunch of photos that show multiple wires or ropes coming off the masts. It would be nice to know what they are for so I don’t mistake standing rigging or flag halyards for communication wires - I’d never live it down. I’ll keep looking too. Steve A blank canvas, sort of. The marriage between bridge and top decks was a success and the top deck cabins, compass platform and funnel are now firmly bonded to the parents. Below are a few pics of what now feels like a blank canvas, waiting not so patiently for MORE DETAIL. Starboard near midship Yes, I know it looks like a plastic imitation of an explosion over the radio room. Radio room looking forward The circles for the "painted over" red crosses seem forlorn and in need of a new task. One photo I saw had a railing around the circle, presumably to keep people from trying to store things on top of the red cross. But I don't know if they would have retained the railing after the red crosses were deactivated since it takes up valuable storage space. Bridge deck detail I sure hope a tipsy sailor doesn't try to navigate the aft bridge during docking. The gap between boat deck and cabin walls is where the superstructure separates for access to the motor room. Tried to show both aft ship's ladders Railings or boats, which will be next?


- 446 replies
-
- 8
-
-
- zebulon b vance
- deans marine
- (and 3 more)
-
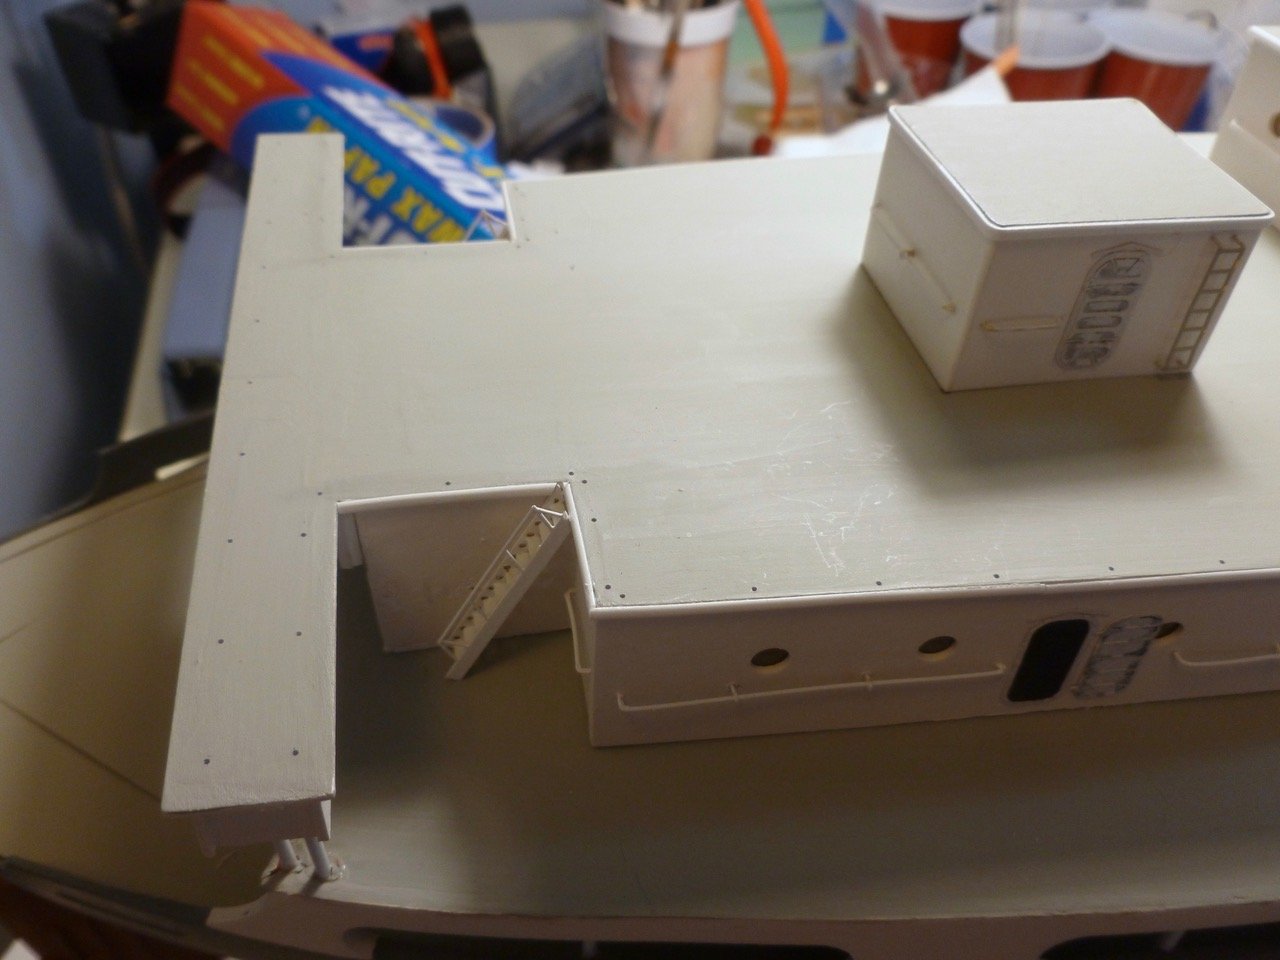
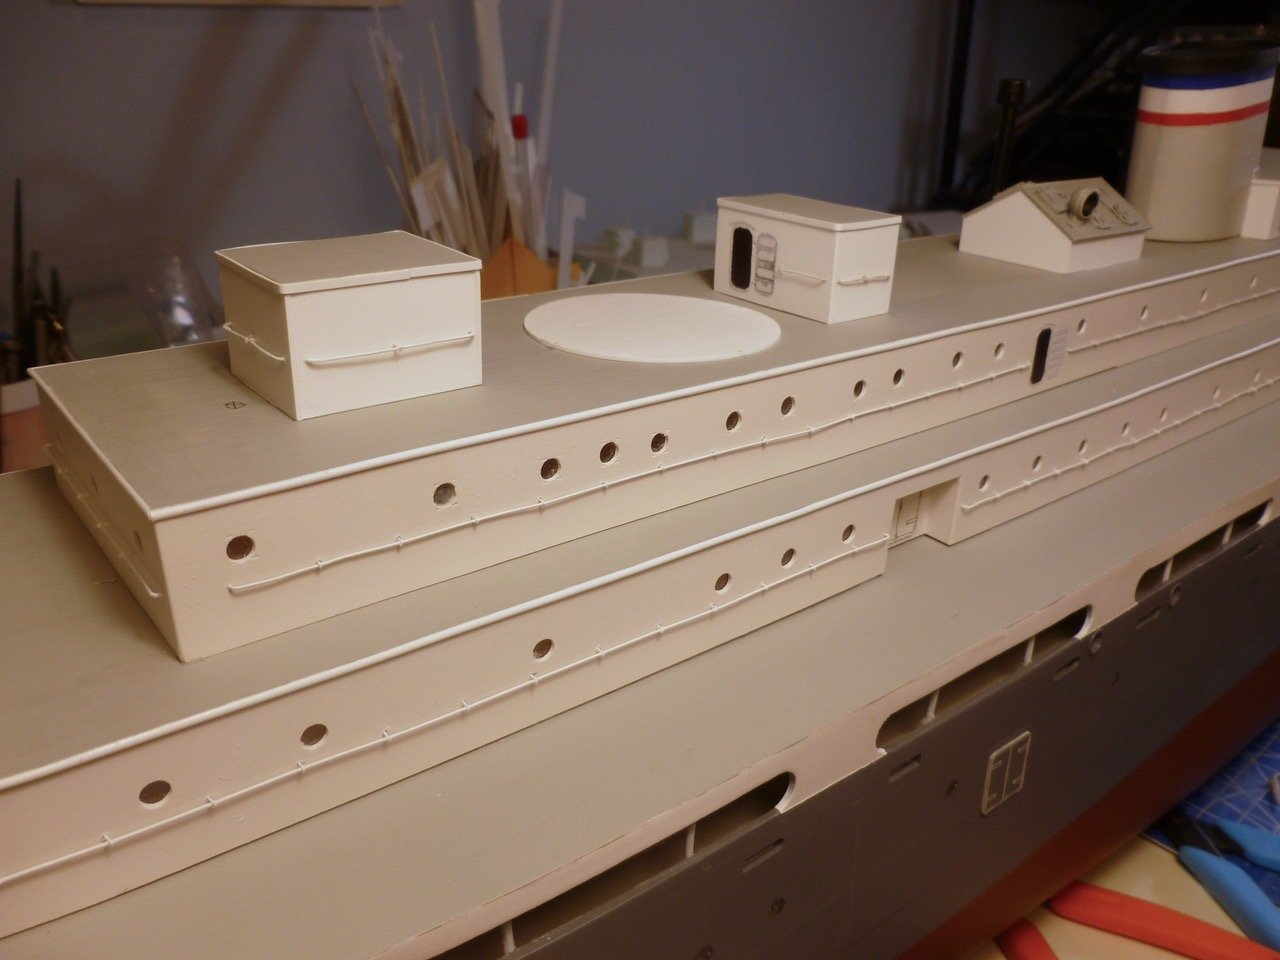
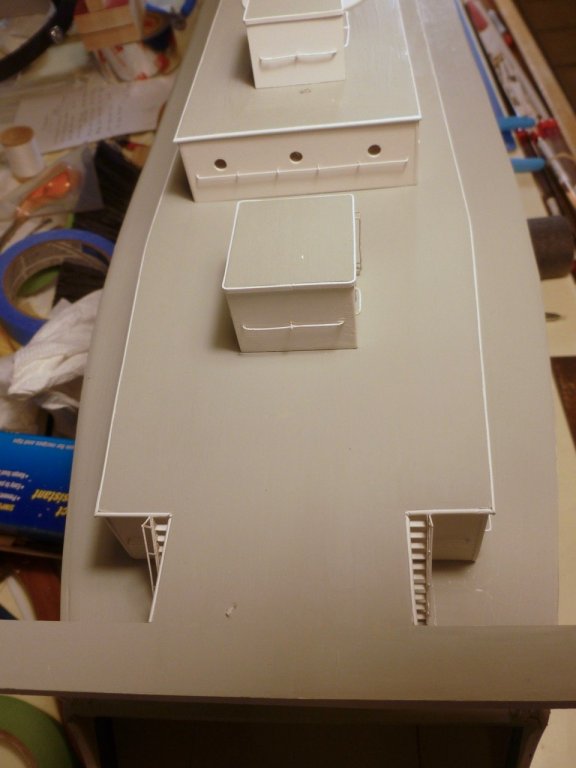
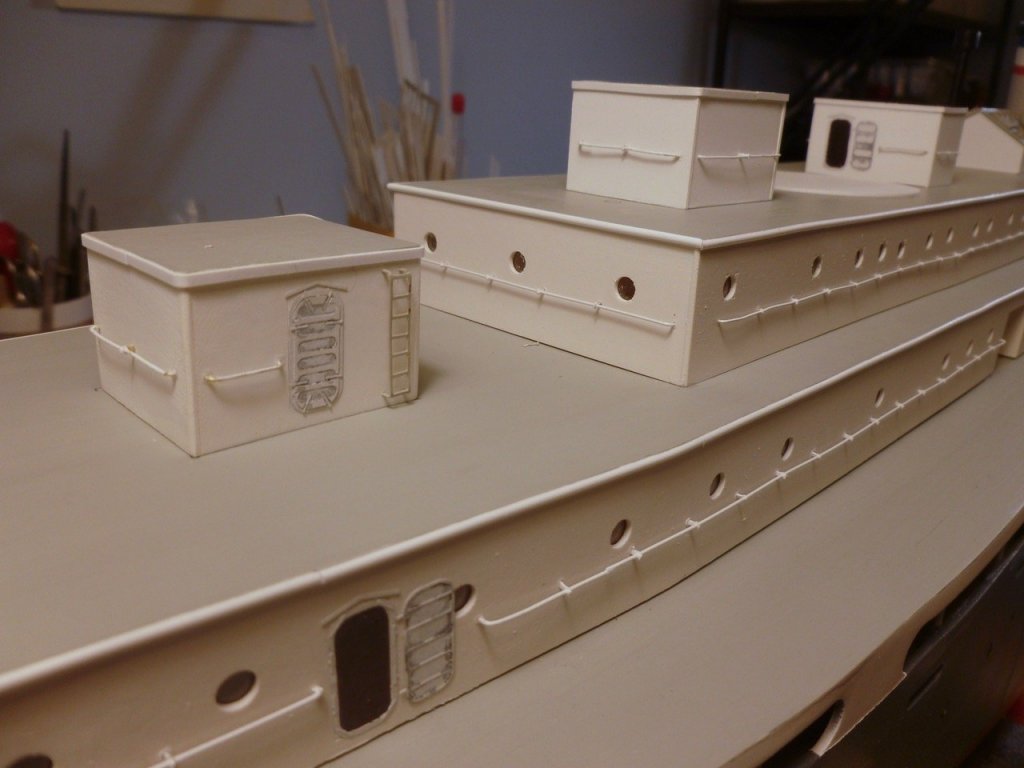
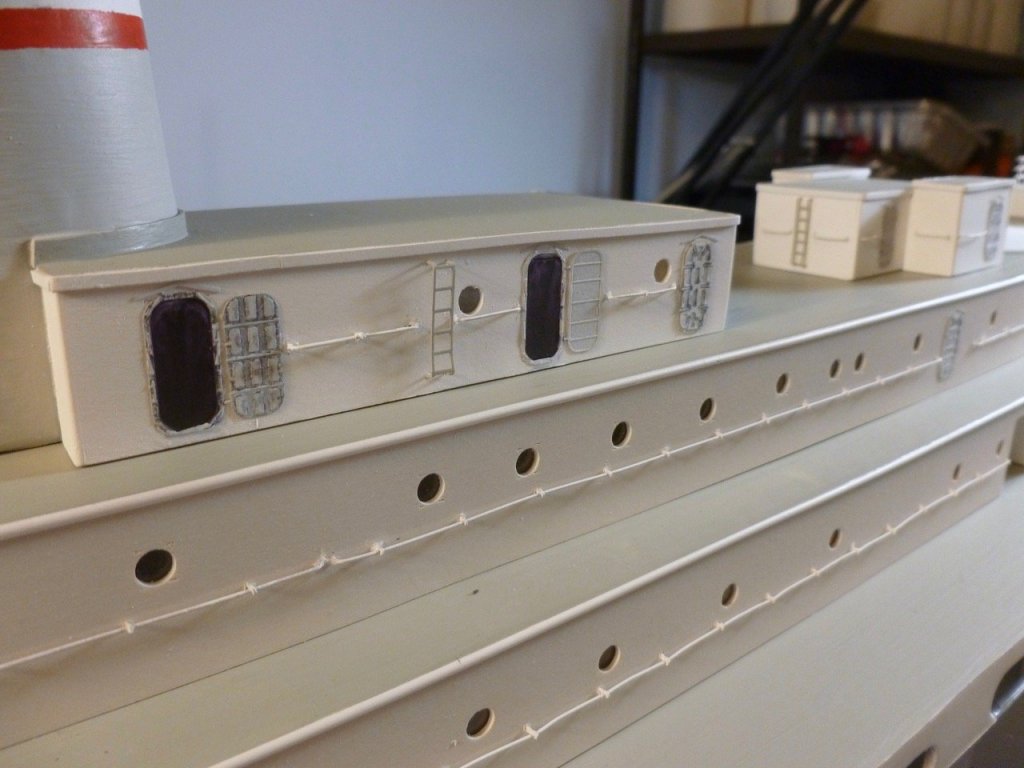
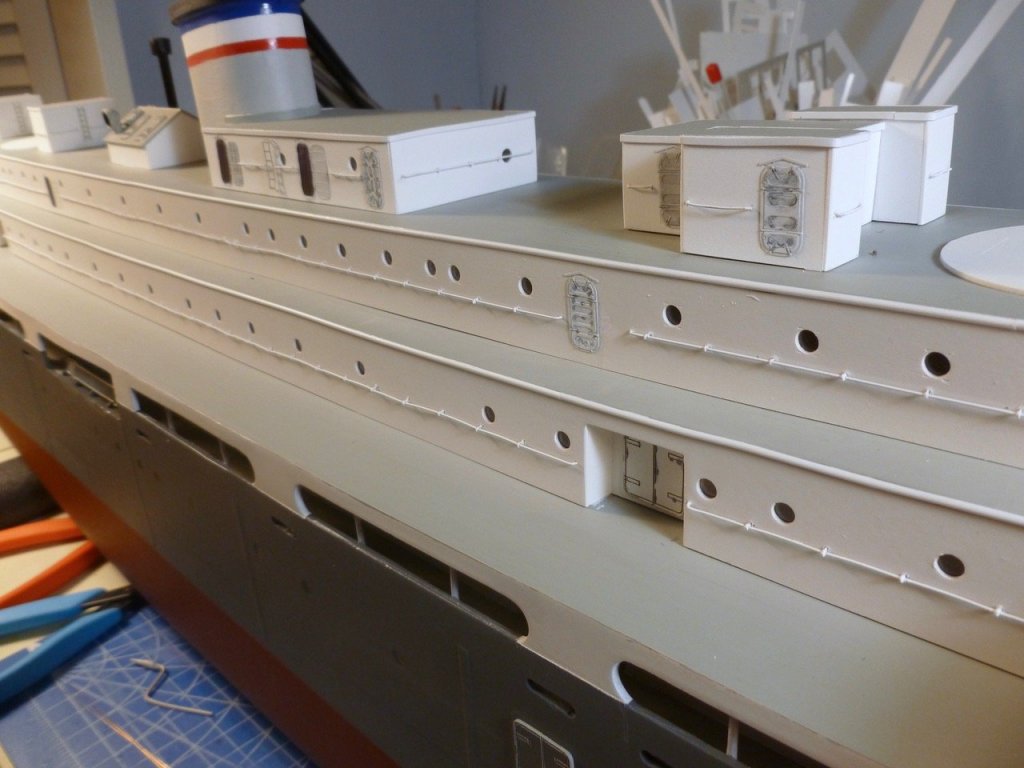
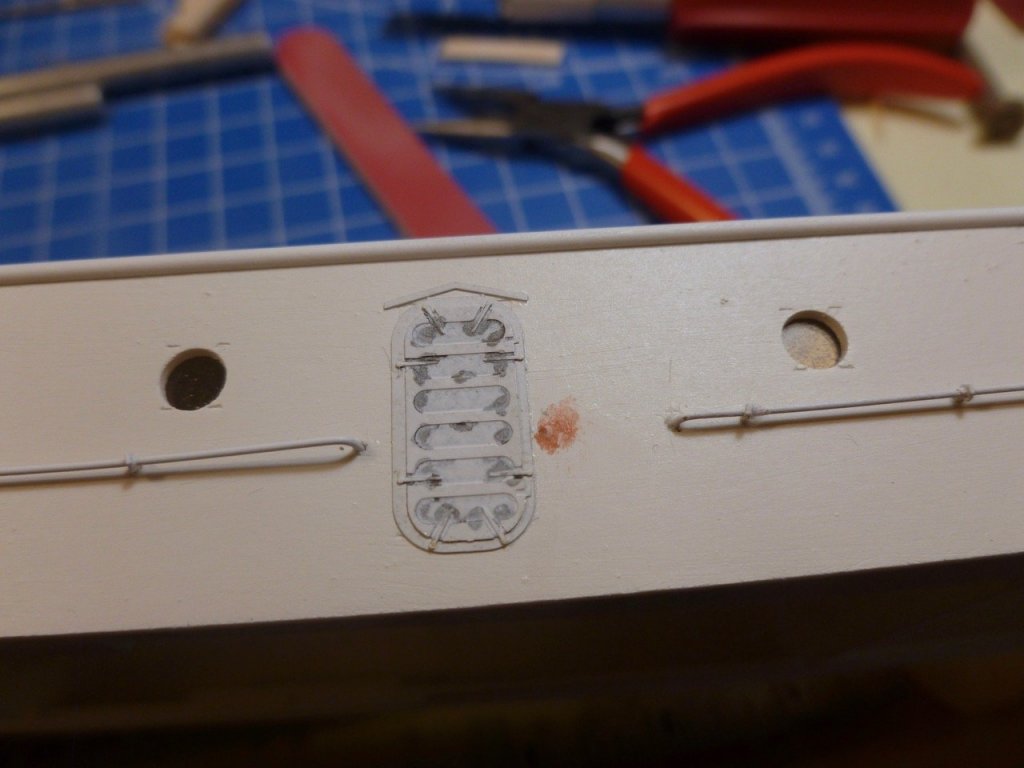
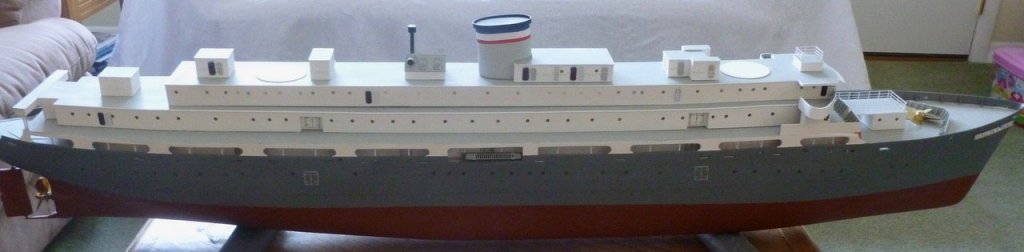
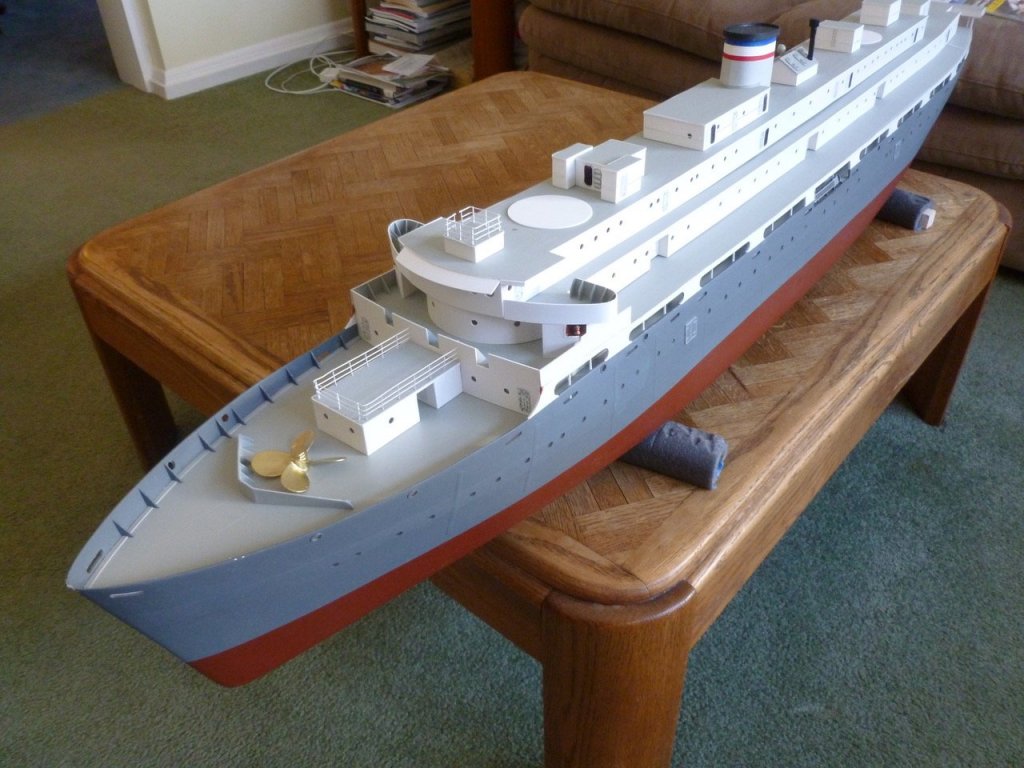
To those who gave likes, thank you and thanks for stopping by. Carl, thank you for your kind comments. If I build to a bigger scale I’d be relegated to the garage, which is packed full of snowblower, mower, firewood, old concrete patio pavers and other detritus. But the pavers had so much fun during the hull construction I decided to bring them back indoors for another visit. Steve A big day. All the wall railings are fabricated, painted and in place. I also strengthened the bracket connections from inside the walls (thanks again Carl) with dabs of medium CA. The short bits of railing that had snapped at the solder joints installed so tightly and in such good alignment that a bit of thin CA at the butt joints was all that was needed to stabilize the joints. So it was a big moment to finally marry the bridge deck to the top deck. The Bondo can appreciated being able to participate in a bit of clean finish work rather than its usual schmoozy supporting role. For you eagle-eyed, there are some holes for uninstalled railings in the small aft bridge deck cabin that I mistakenly drilled after forgetting that ladders run up the walls on both sides. After looking at the Vance name for awhile I'm getting more convinced it should be white text rather than black. The question is, how do you find white text on a white decal backing sheet? Guess? Put a black outline around the words? Next up are the top deck cabins, 10 stairs and perimeter railings, unless someone thinks I should hold off on the railings until all the deck furniture and fittings are in place. Or if I get in the mood I might redirect to the lifeboats and davits. If anyone knows of a guide on what is typically attached to the two masts on a ship like this please point me in the right direction. The instruction photo below only includes the forward mast, and only shows a pretty basic arrangement. It would be good to know what should be there for rigging (rope or wire?) and what I'm guessing are communication wires(?). The kit includes a few dowels, some ladder material and a crow’s nest. It also includes some heavier brass wire but I am guessing it is not intended for any of the mast work. Then again, if it is not I don’t know what it is for. Maybe RC'ers keep it simple since the masts are part of the upper deck areas that get removed and reinstalled to get the motor running.

- 446 replies
-
- 9
-
-
- zebulon b vance
- deans marine
- (and 3 more)
-
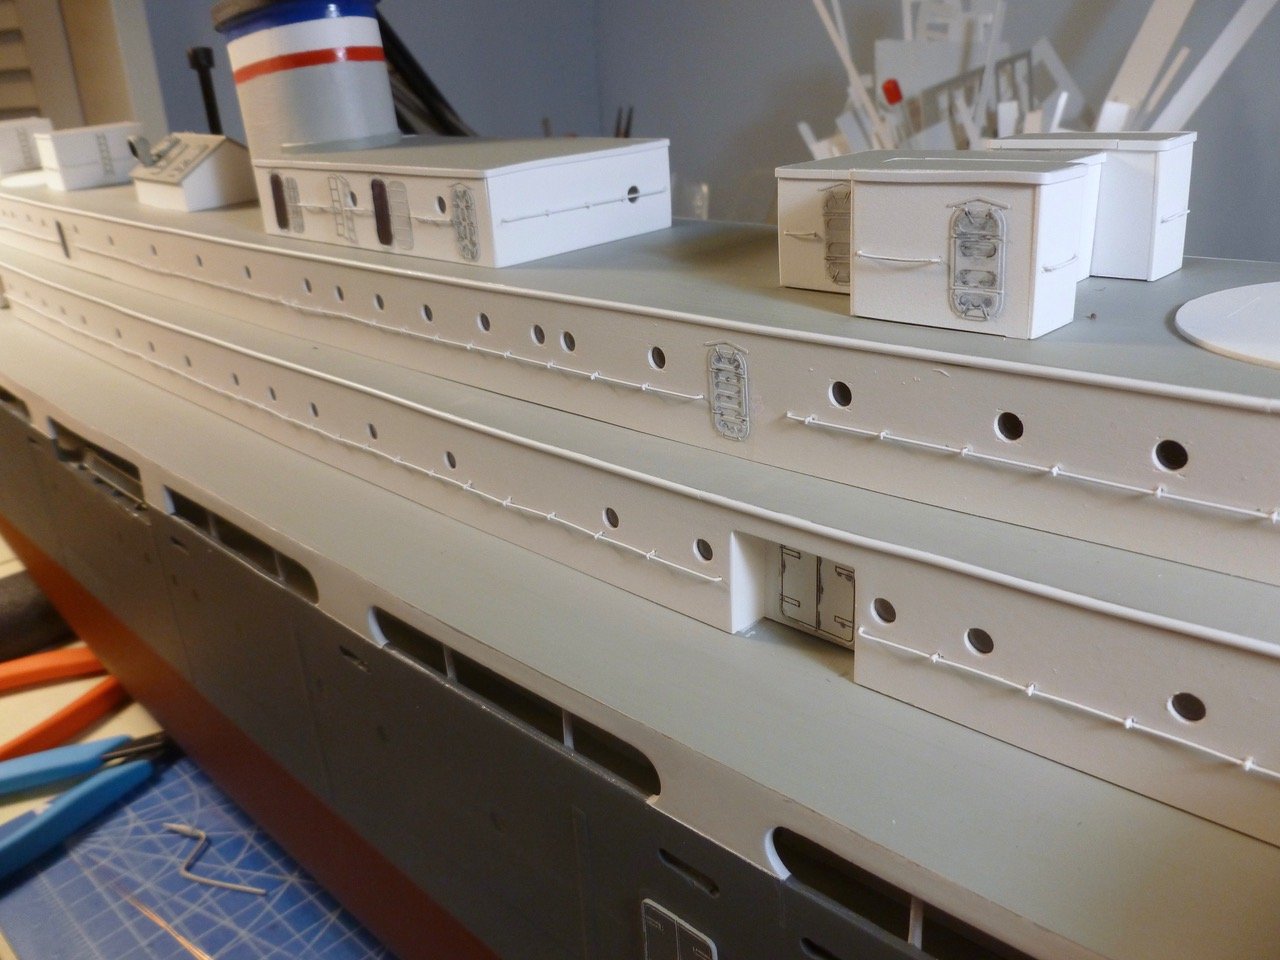
To those who gave likes, thank you and thanks for stopping by. Steve Short visit. All the boat deck railings are fabricated and awaiting cleaning and painting. I learned that an end-to-end soldered 0.020 railing is not particularly sturdy. The solder grips the railing very well but the actual butt between pieces is still weak and snaps off very easily. For one railing I ended up re-soldering it a third time, but in place rather than in the jig. The problem is I still needed to remove all the railings for paint and it ended up breaking again. So I gave up on it tonight and will revisit next session. Anyway, the pic shows the forward end where the railing wraps the curved wall. Seems decent for a first time effort and the paint should help it blend in. I’m not showing the other railings since they all look the same, but you’ll see them when the bridge and boat decks get glued together.

- 446 replies
-
- 7
-
-
- zebulon b vance
- deans marine
- (and 3 more)
-
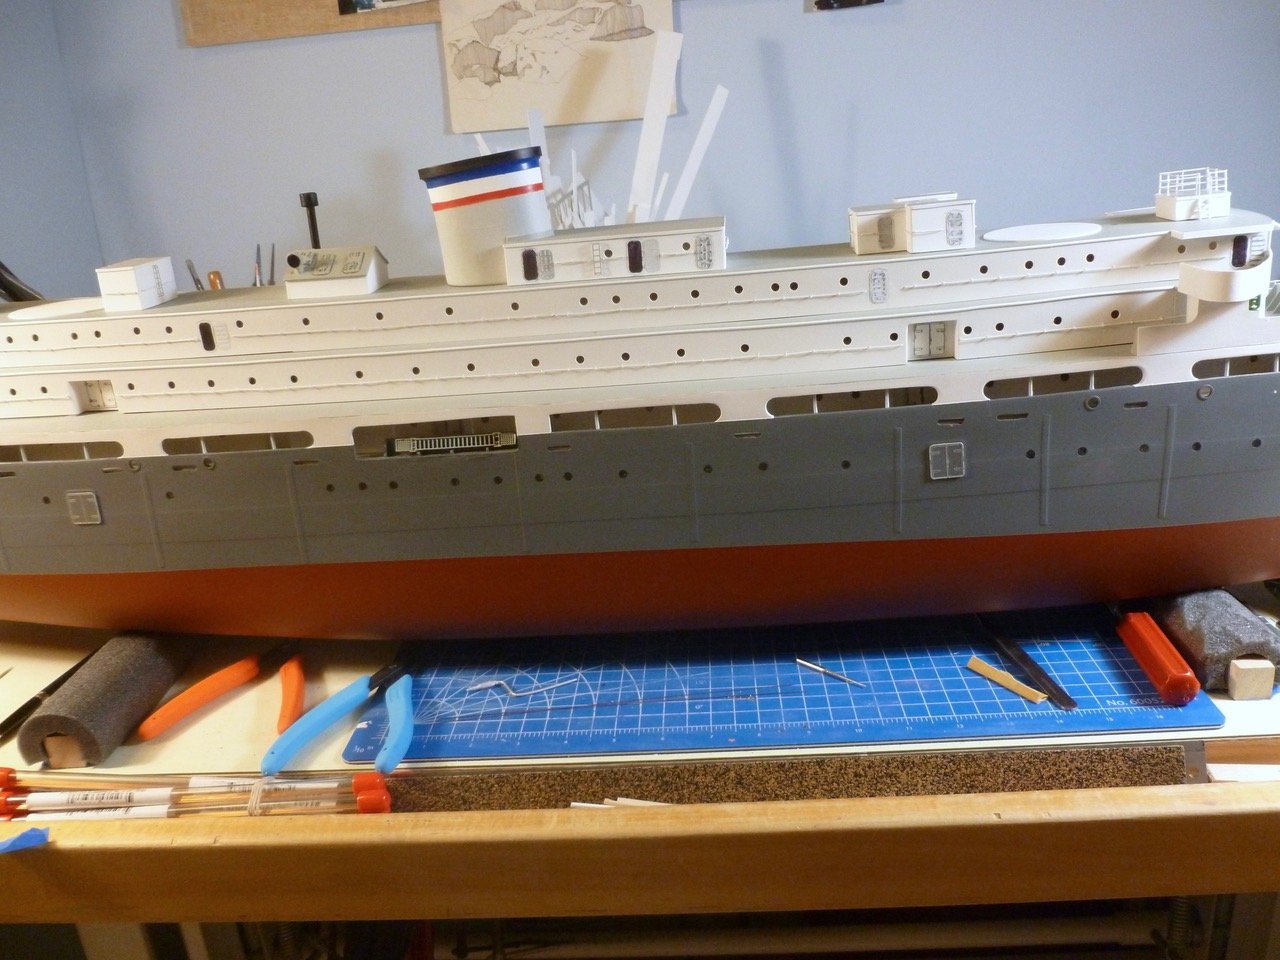
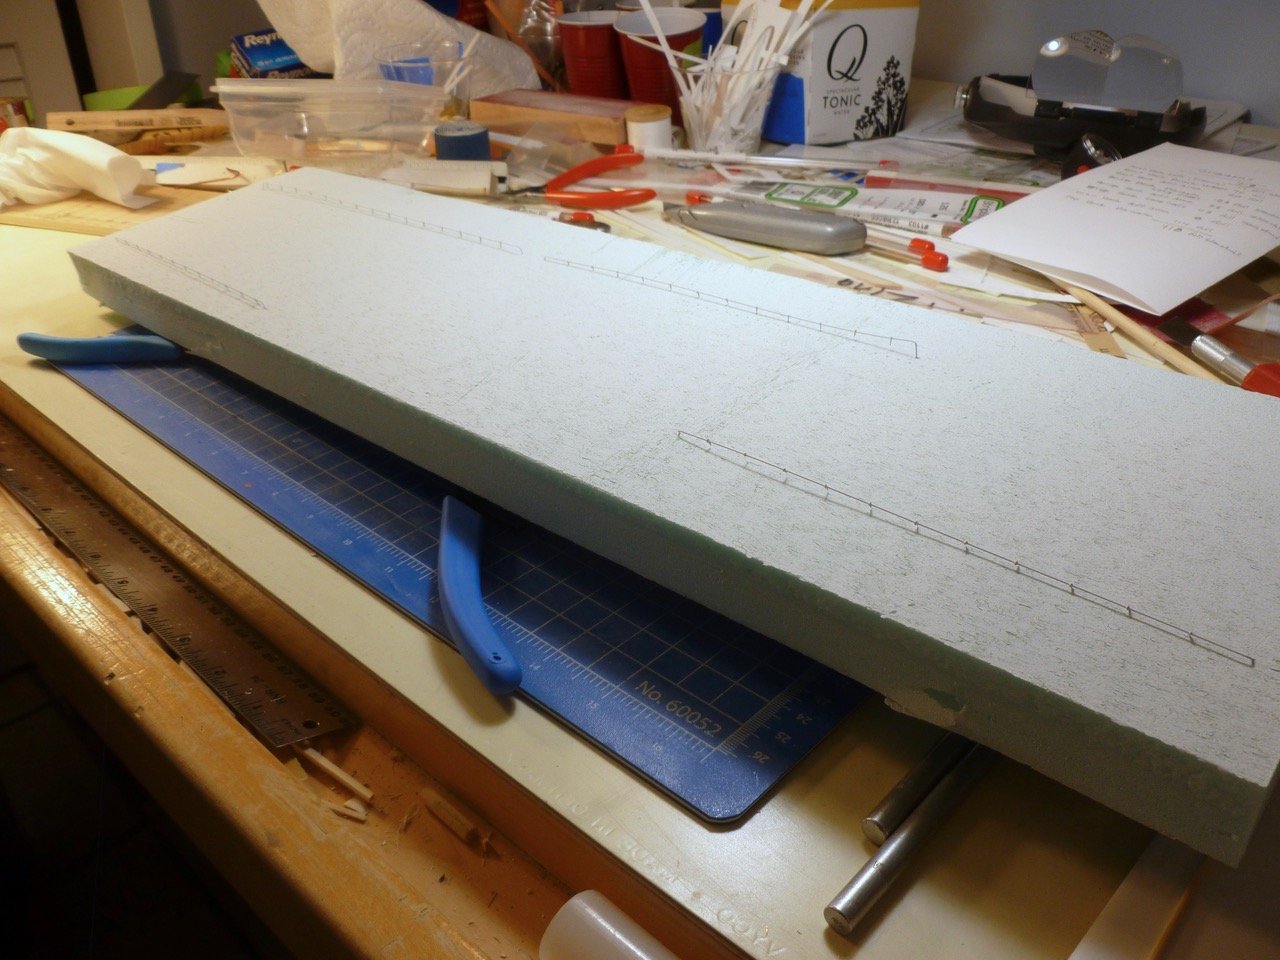
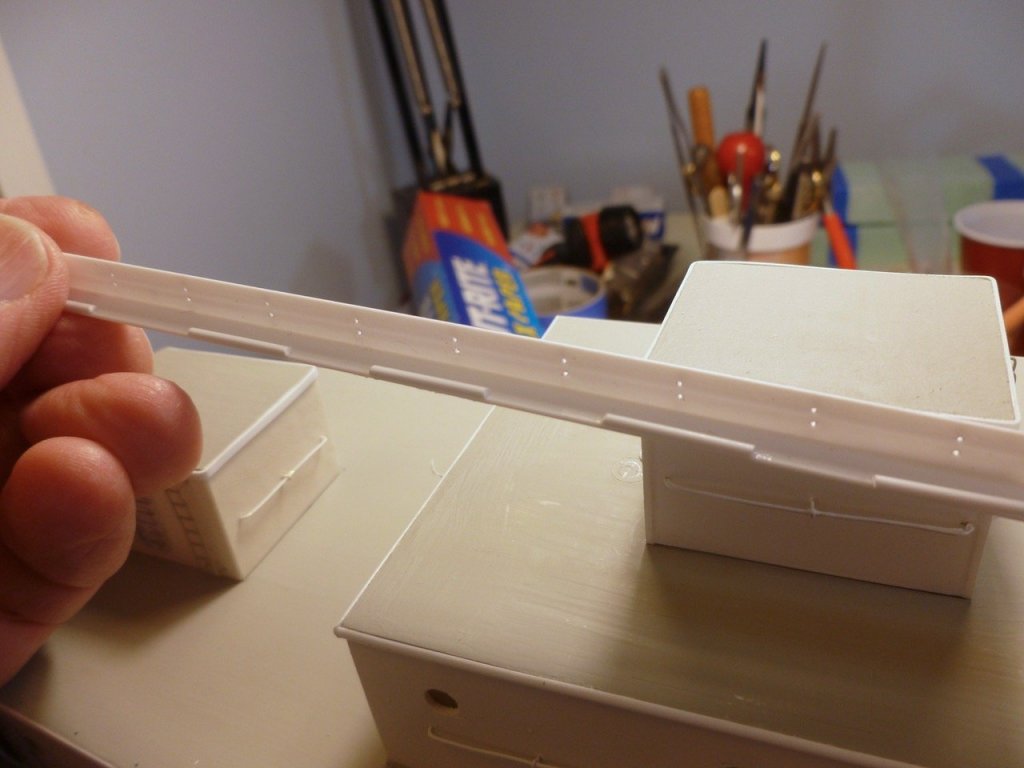
To those who gave likes, thank you and thanks for stopping by. Lou and Carl, I appreciate your spirited insight. I took a walk around the pond to enjoy the warmish (50 F) weather and to reconnoiter possible launch areas. Turns out there is barely any area with a gradual slope, and mostly stones or weeds near the shore. More thinking needed. I also realized early spring is not a peaceful time on the water. The ducks and geese have arrived and the ducks in particular are having intense battles to win favor, including beak grabbing, wing flapping and mad rushes across the surface. Certainly no consideration for the odd ship that may stray into their path - the nerve of them. Steve Moving downstairs After finishing the bridge deck wall railings (yay) I moved downstairs to tackle the even longer boat deck railings. The wings at the forward end made it awkward to set the deck on its side so I blocked up some rigid foam. The boat deck has a more pronounced sheer than the bridge deck so there was some extra layout time to ensure the railings follow the curve. The wall is curved at the forward end of the boat deck. Some model photos I have seen don’t carry the railing around the curve but it seemed a logical thing to do, and a little extra detail, so I decided to give it a shot. One challenge was how to work at the narrow end of a 40 inch long piece. The drafting board depth and the drafting work lights really come in handy. The next question was how to maintain a space between wall and railing around the curve. I’m not sure if this is a standard way of doing it but it seems to be working for me. There are several spots on the boat deck where the wall is longer than the length of the railing pieces. The clothes pin/vice soldering jig is crude but the wood is soft enough to bend a bit for horizontal alignment and the clamping surfaces allow vertical. Between the two it’s possible to get perfect alignment for 0.020 wire. I snipped off one of the legs on each pin. The longer leg goes into the vice and the shorter leg still operates.


- 446 replies
-
- 8
-
-
- zebulon b vance
- deans marine
- (and 3 more)
-
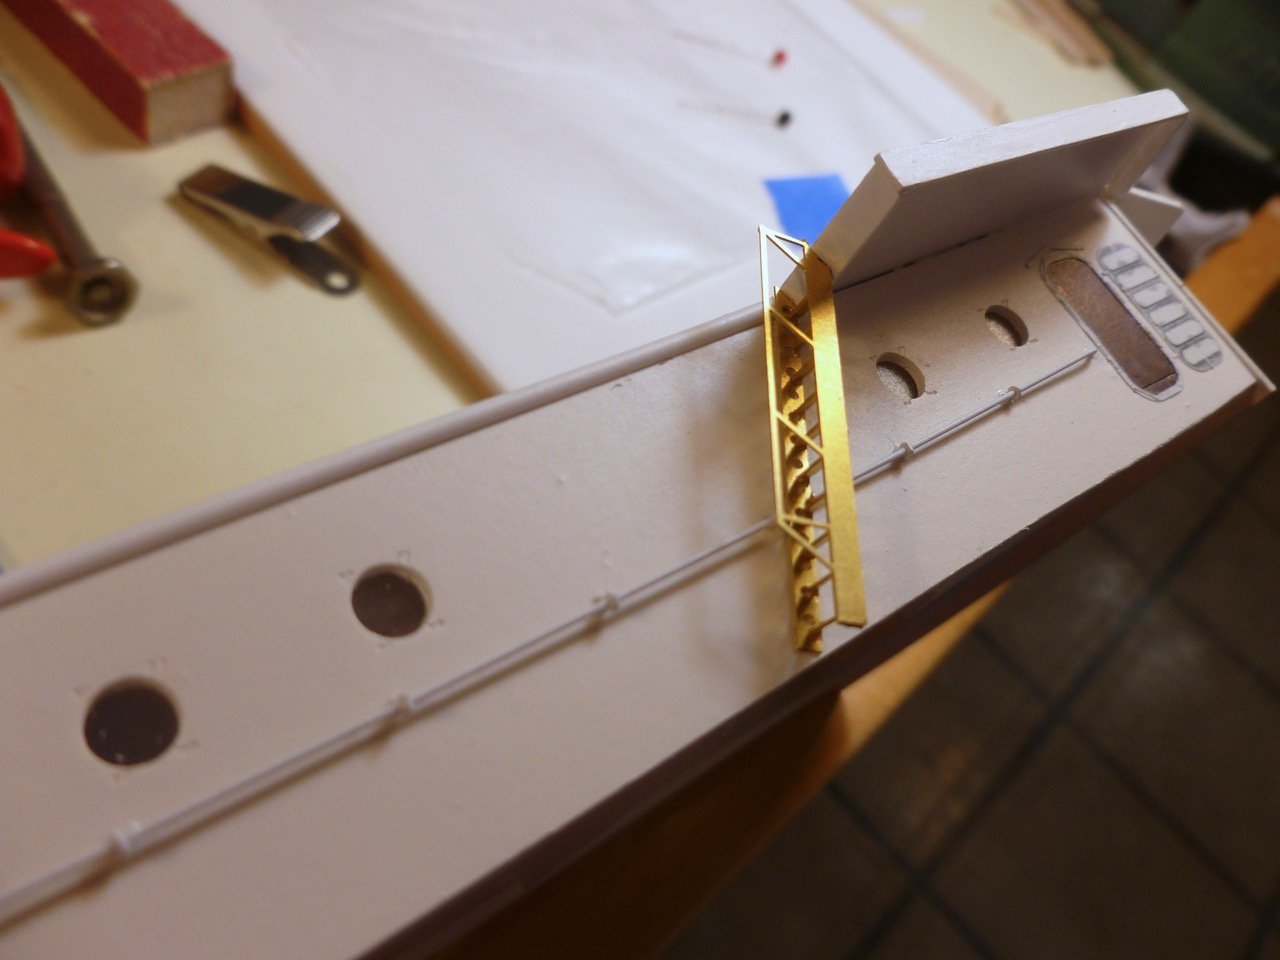
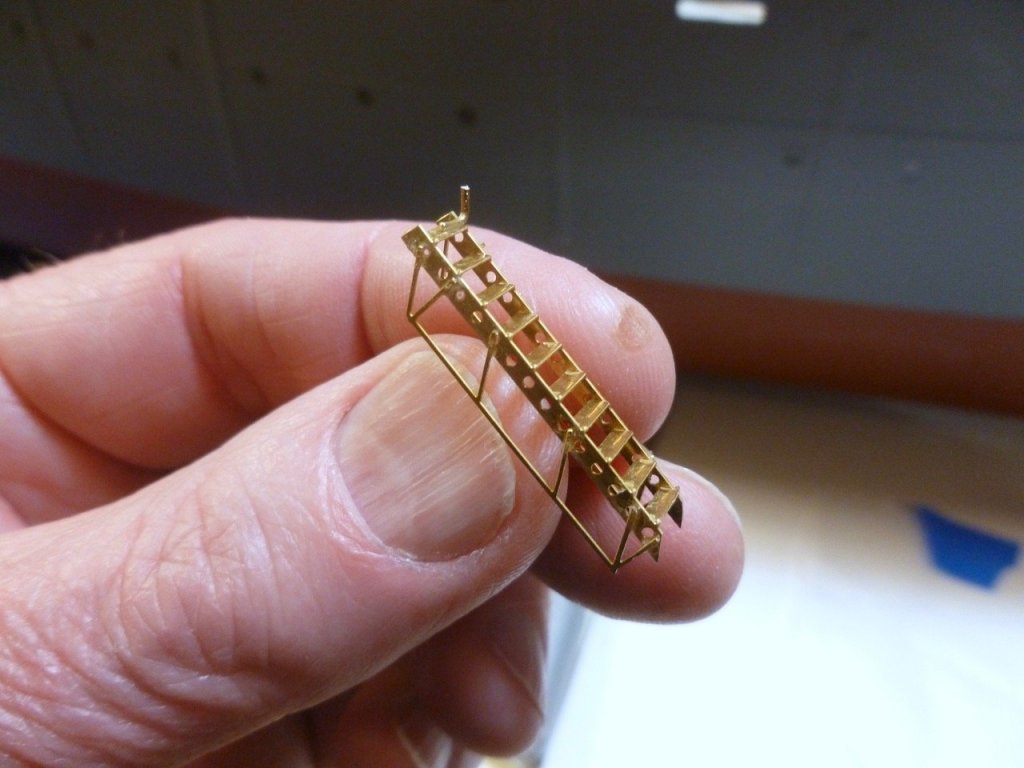
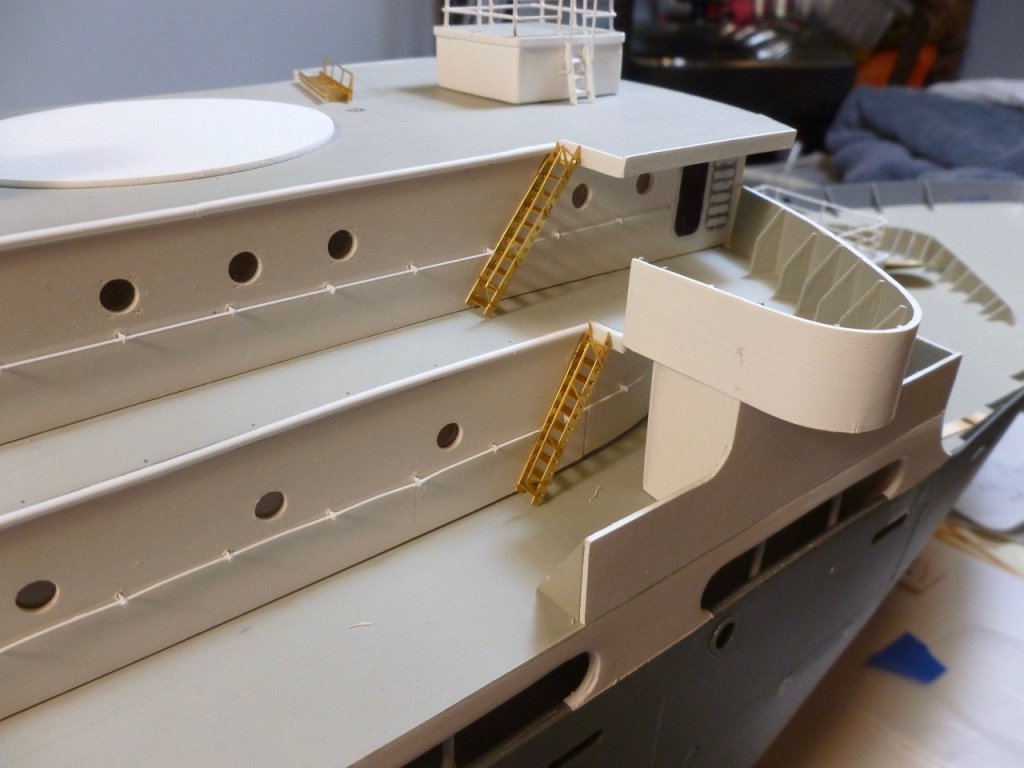
To those who gave likes, thank you and thanks for stopping by. Steve Door swing redux. Here’s the railing fix so the door can swing open and not stay bolted all the time. The painters are off for the weekend and will patch up the old railing hole next week. I know, it's probably still a little tight but I needed room to return the railing to the wall, and they can tie the door off to the railing if they need to. I knew part of the railing would conflict with the ship’s ladder between the bridge and top decks so I folded up the ladder, test fit it and trimmed where needed. While getting out the ladder pieces I noticed the three steps to the compass platform which were folded up and painted awhile ago. I hadn’t put them in place since the glue surface to the platform side is minuscule and I hadn’t figured out the railing. I decided I better do it before I lost the steps. This is the second try at the railing - after installing the first try something seemed odd and then I realized the railings were so high they would be in someone’s armpits, or hitting them in the side of the head if they were vertically challenged. Since the railings are anchored into the side of the platform they provide some support to the lower part of step stringers. Next time I'll leave the tails of the top platform railings long to make a nicer transition into the stair rails. Learning, learning, learning.

- 446 replies
-
- 10
-
-
- zebulon b vance
- deans marine
- (and 3 more)
-
To those who gave likes, thank you and thanks for stopping by. Carl, that's why I glued it shut😀. But thanks for pointing it out. You'd think I'd be more sensitive to door issues, particularly since I had to straighten out a problem in a very large project many years ago where the designers had specified doors so thick that the way they were detailed didn't meet code requirements for clearance between the door and jamb. And the problem wasn't discovered until after the heavy limestone surrounds had been installed at all the door openings in 10 buildings. Bit of a bugger, that one. Hopefully I can trim and reset the railing end without mucking up the lot. Thanks also for the CA suggestion. Steve
- 446 replies
-
- 3
-
-
- zebulon b vance
- deans marine
- (and 3 more)
-
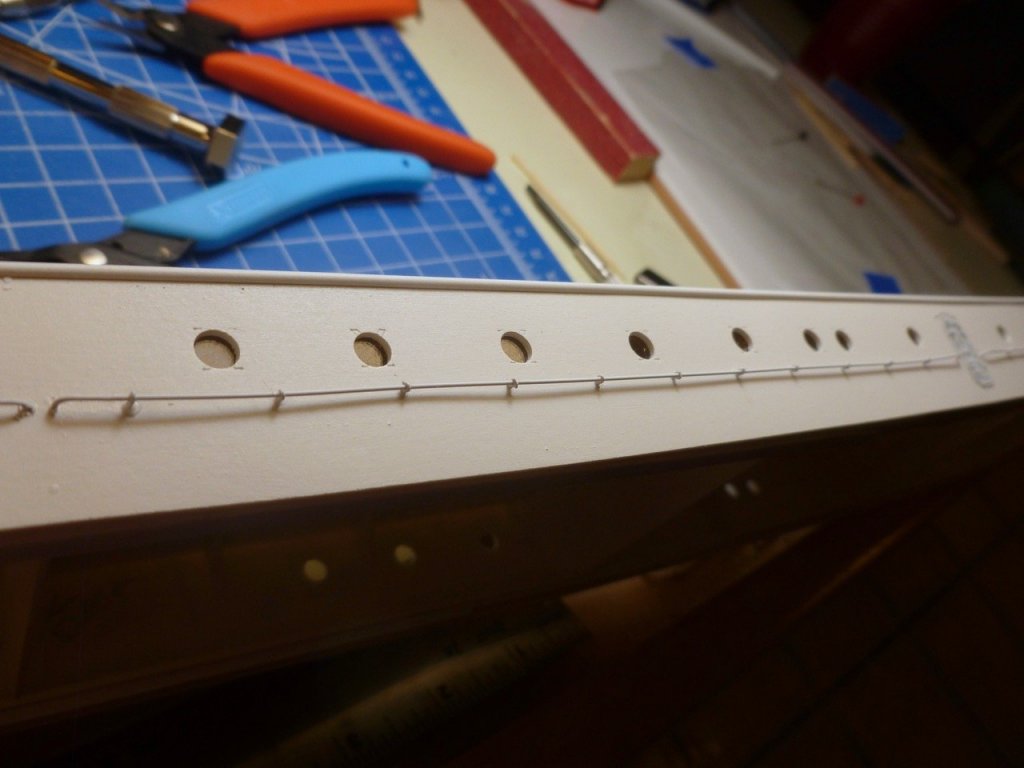
To those who gave likes, thank you and thanks for stopping by. Steve Wall railing success! A few shots of the finished bridge deck starboard wall railings. The overall length of the wall is about 800 mm (33 inches). The installation went easier than expected. For each railing section I worked gradually from one end to the other. To start a section I used a pinhead to put a drop of medium CA into three or four bracket holes, then a drop of thin CA on the rail end, which gave time to set that group before moving on to the next. The railing has enough flexibility to push aside without bending it, while putting CA into the next group of holes. There’s always room for improvement but I’m happy with the result. On this wall I stuck to a 15 mm spacing between brackets, starting at one end. This gave a short space at the other end in a few locations. On the port side railings, which are fabricated and in the paint shop, I adjusted spacing between the last few brackets on a run to avoid the shorts (full pants leg please). I think it may look better. The close up also shows how the laser etched porthole locator “x” was a bit oversized relative to the porthole diameter. I thought the wall paint might fill it better than it did. For some reason the “x” was bigger in some locations than others. Next up will be the boat deck wall railing but now that I have the hang of it, and with the brackets all cut ahead of time, the progress should be quicker. Maybe on the next ship I'll graduate to soldered intermediate supports to avoid the bracket heads cluttering the railing line but aligning all those little bits of wire was too much for me on this ship.


- 446 replies
-
- 5
-
-
- zebulon b vance
- deans marine
- (and 3 more)
-
Lou, I am very sorry for your difficulties and wish you and your family all the best. Our family has experienced multiple instances of "news" and we have learned to truly embrace living life one day at a time. Steve
- 446 replies
-
- 5
-
-
- zebulon b vance
- deans marine
- (and 3 more)
-
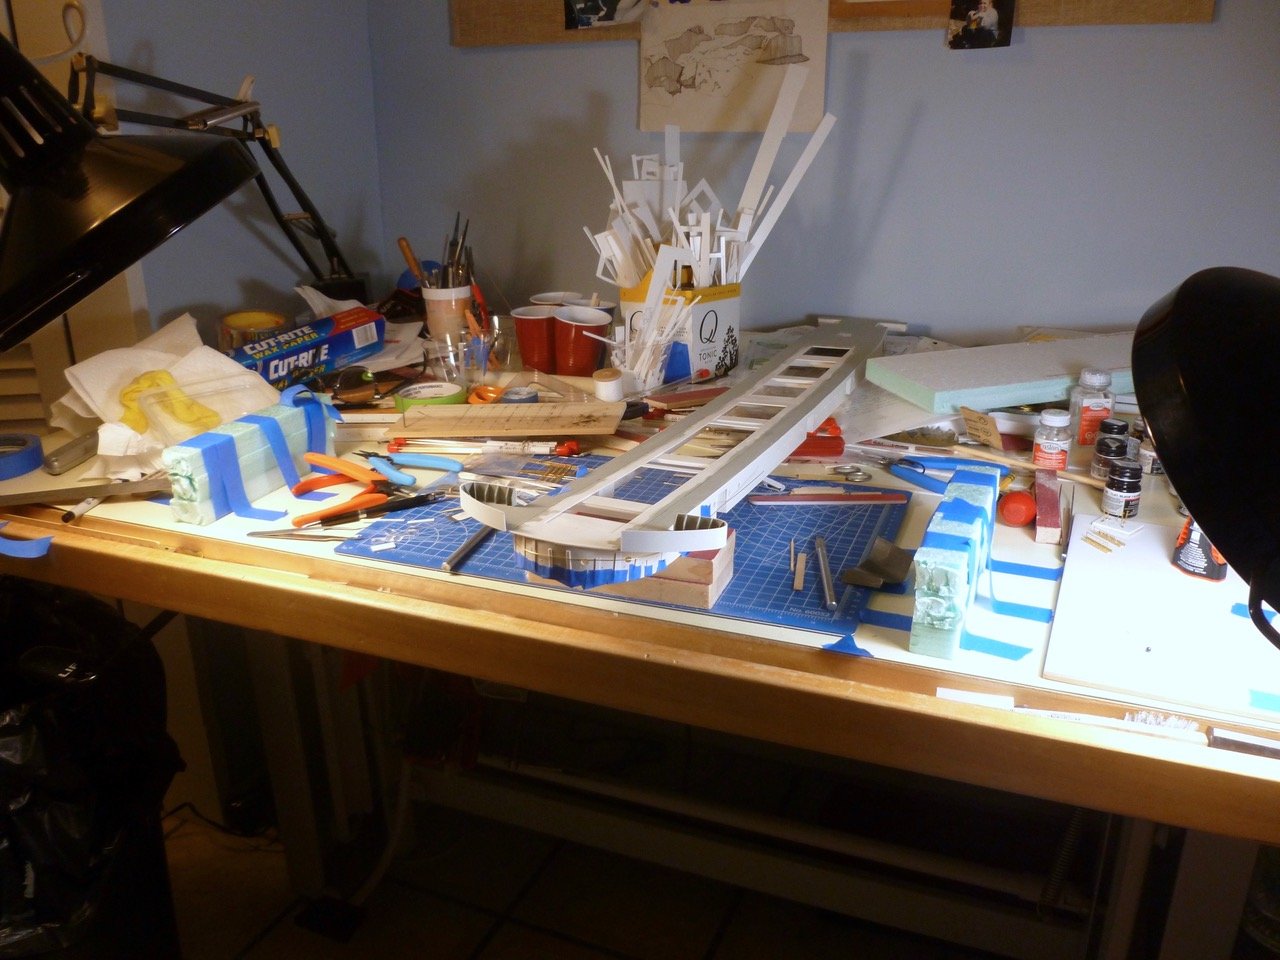
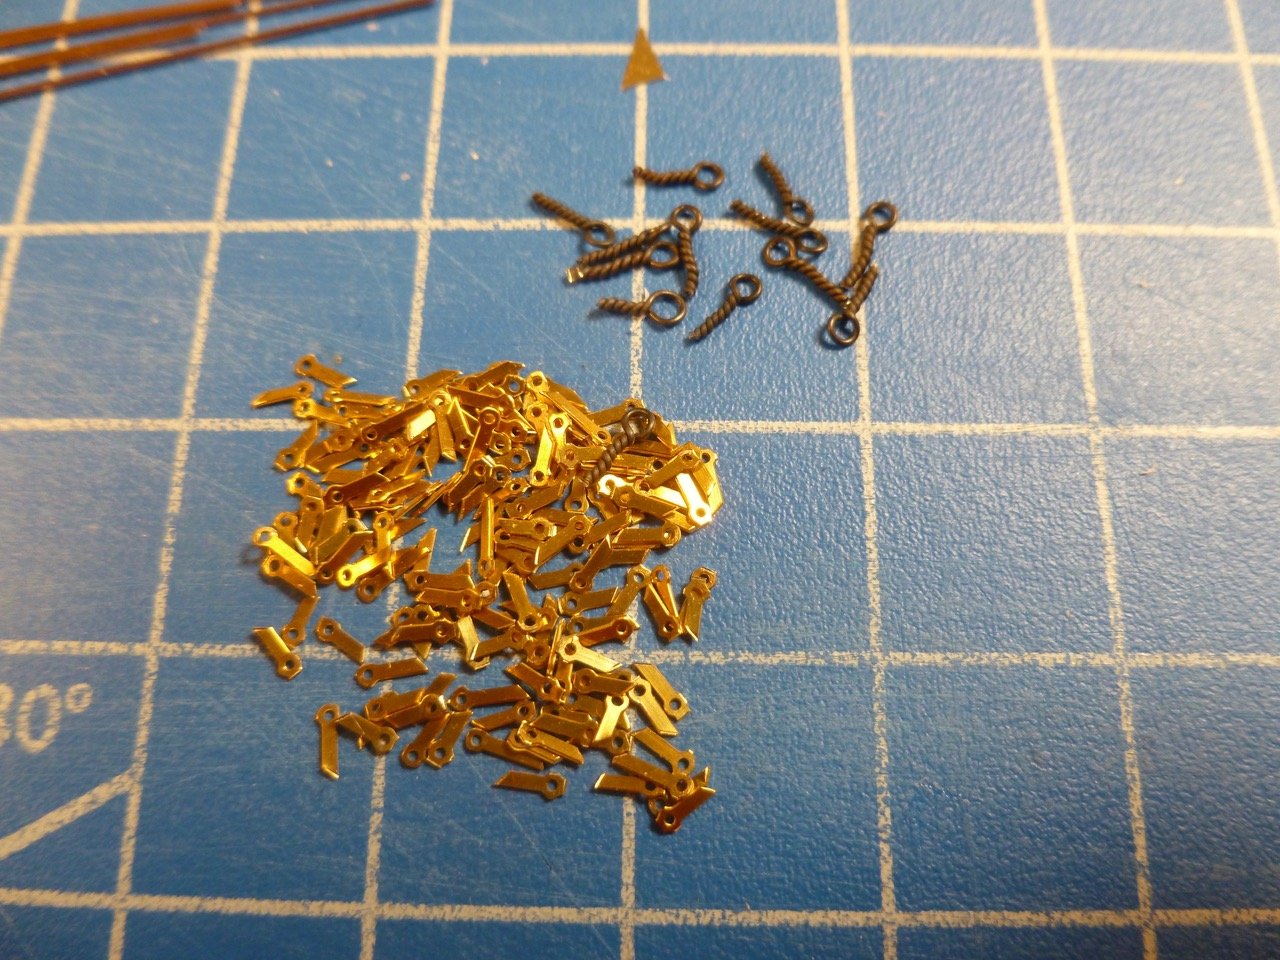
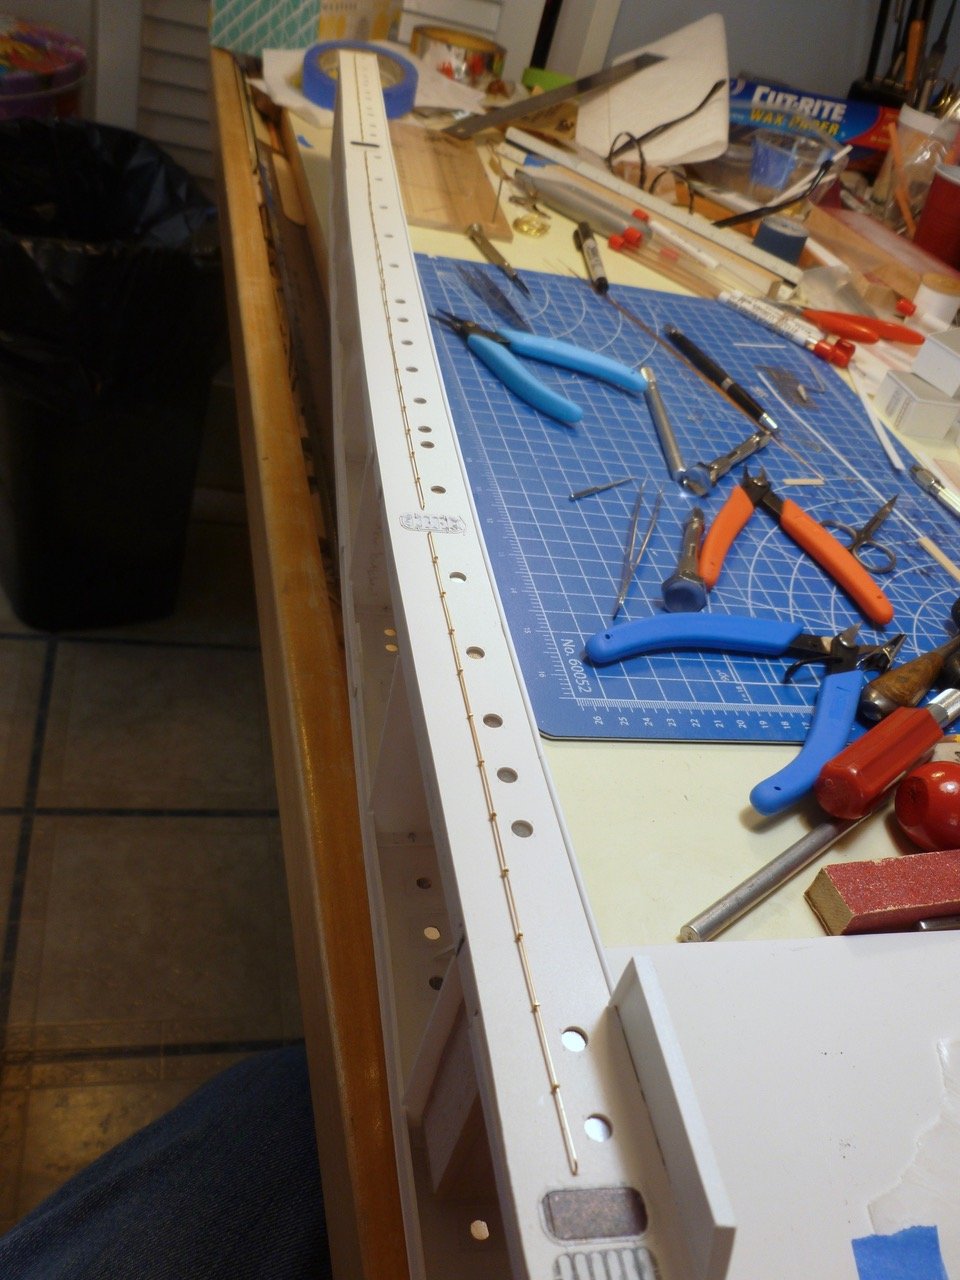
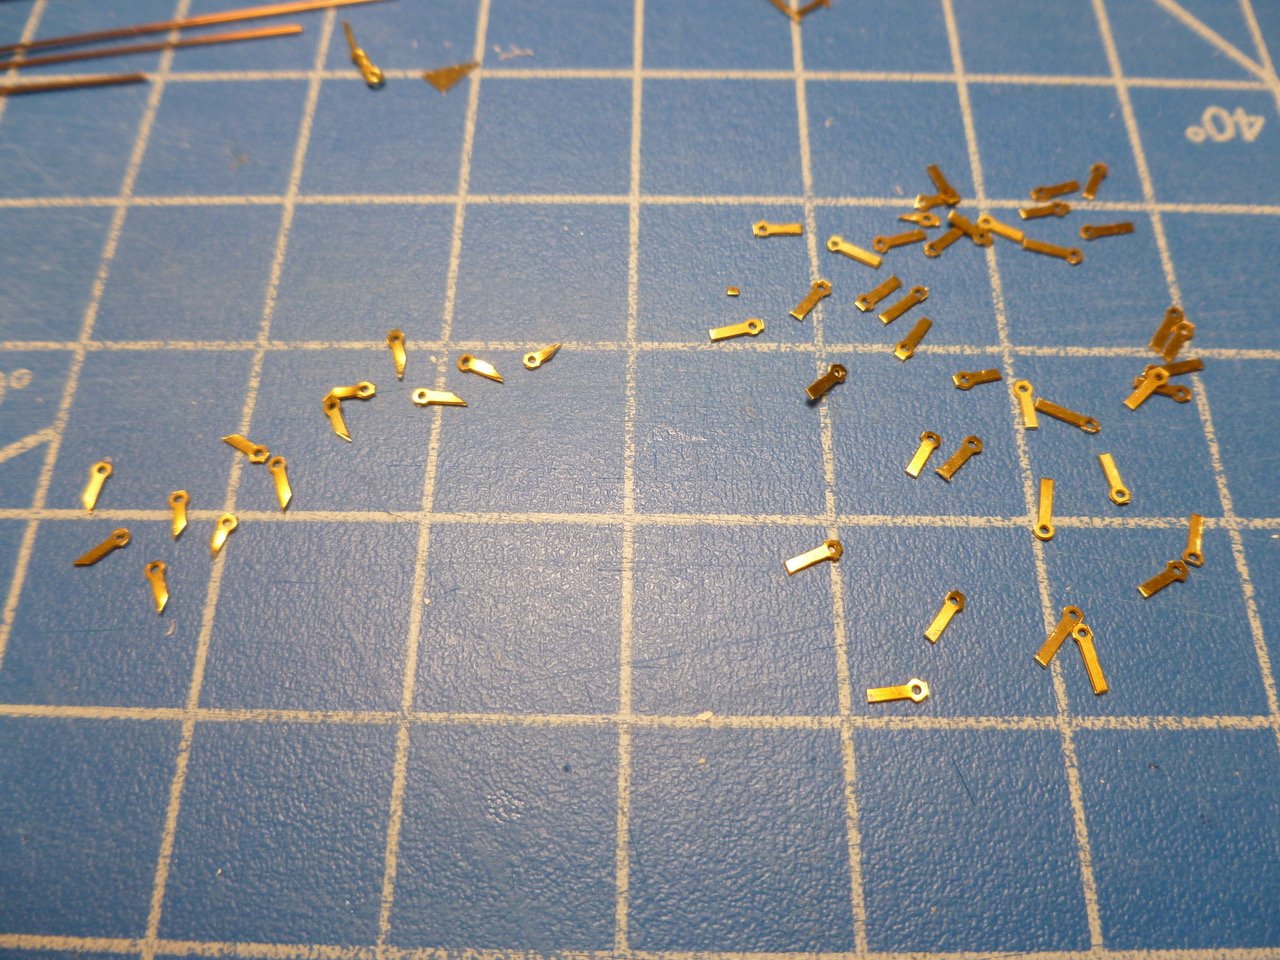
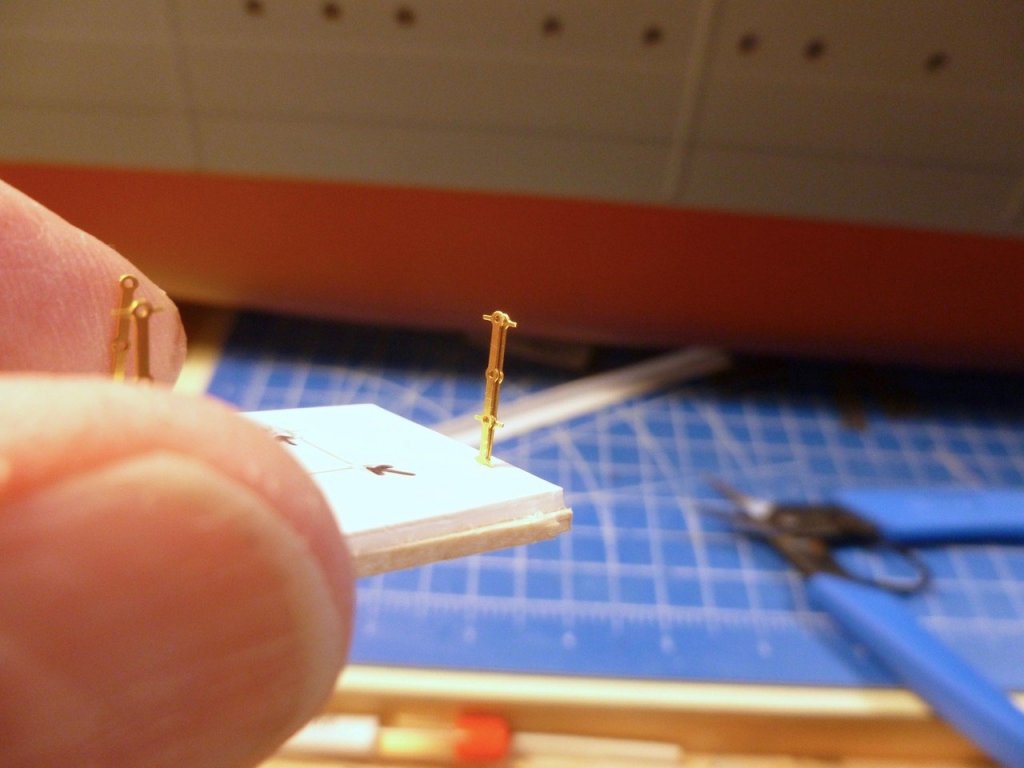
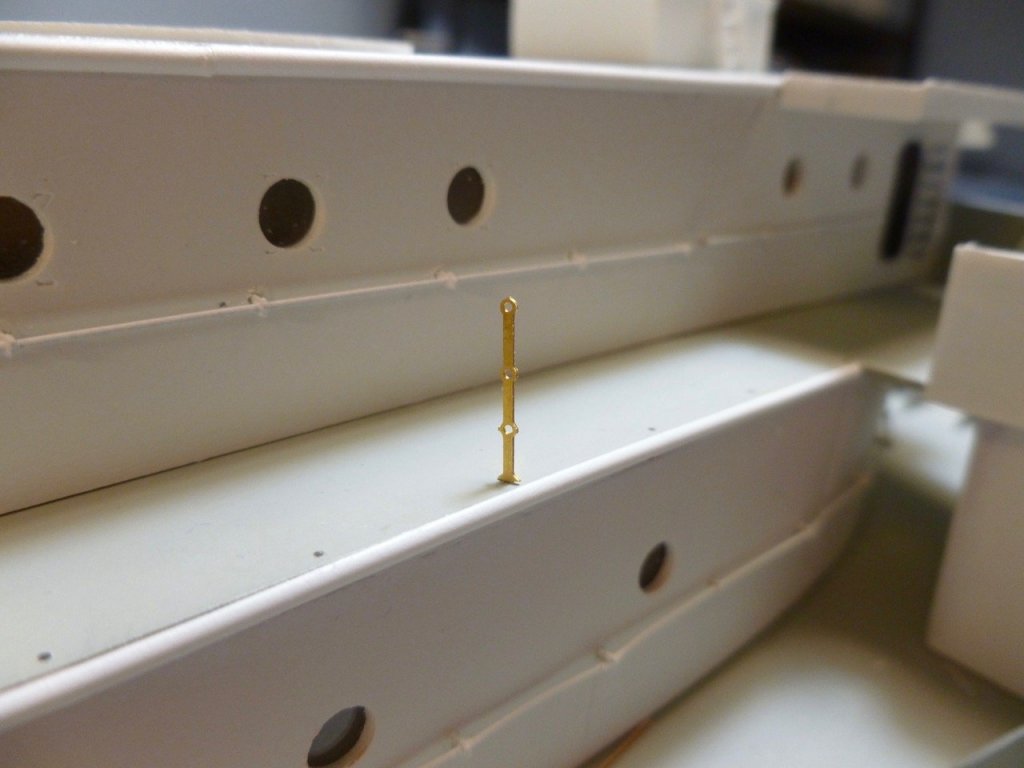
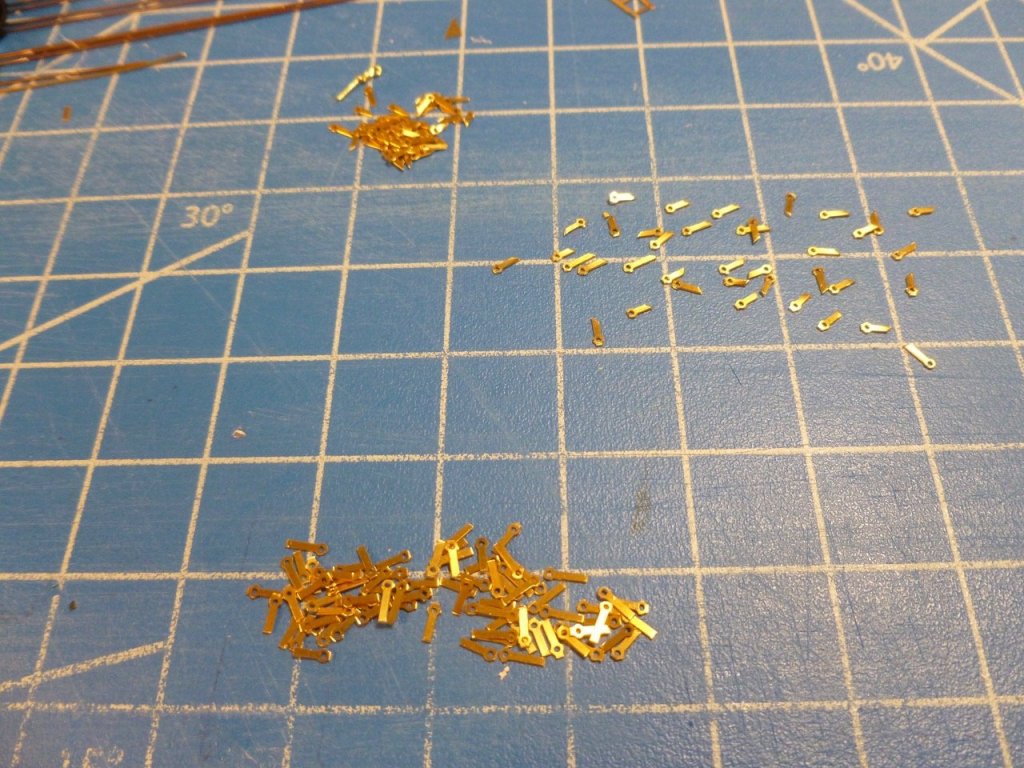
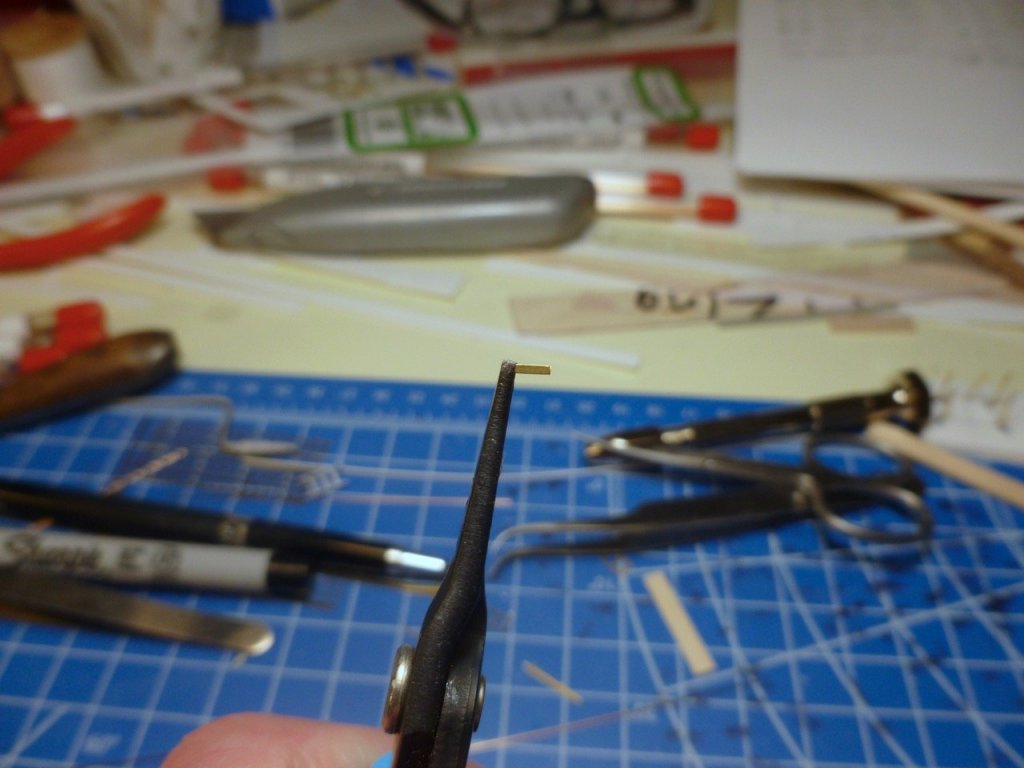
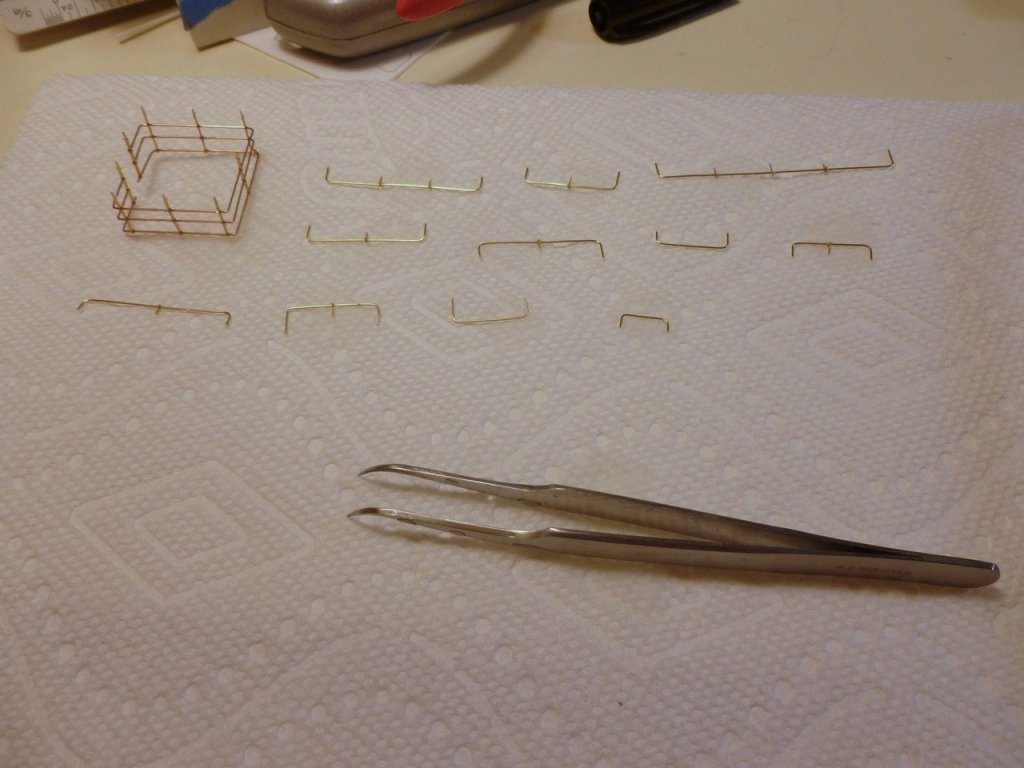
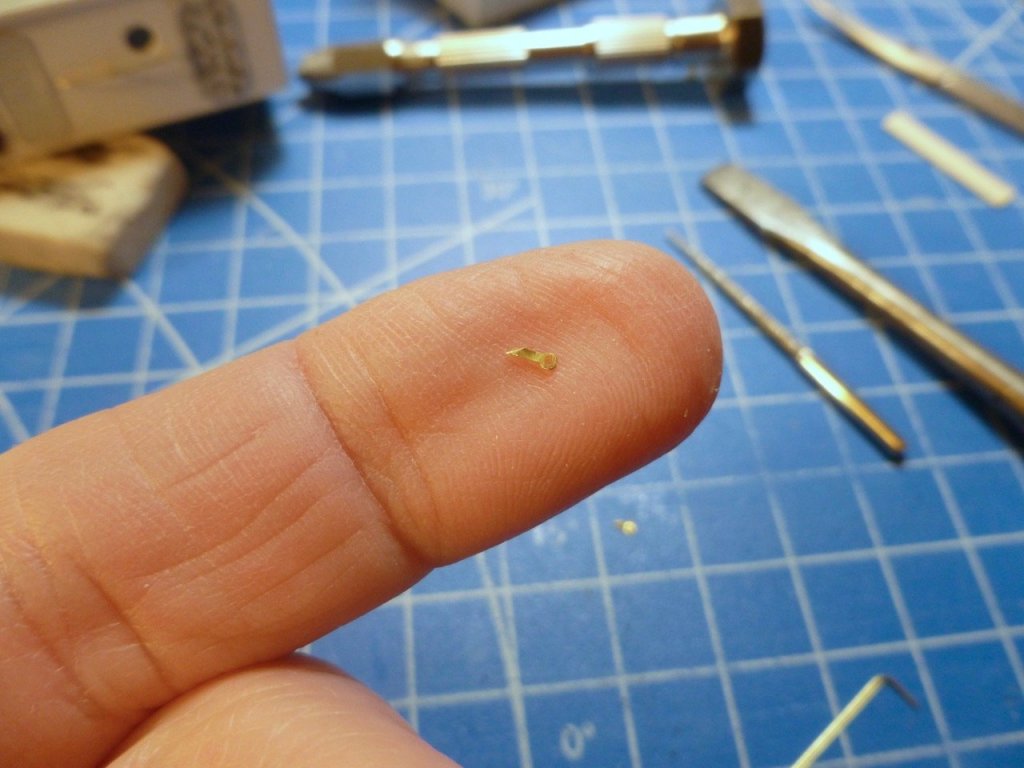
To those who gave likes, thank you and thanks for stopping by. Lou, thanks for your kind words. I still have two trays full of little bits and pieces, along with the 16 ship’s boats and 32 davits, so I expect I’ll be good and cluttered by the end. And now, ask and you shall receive. For Admiral Mrs. Imagna - LOU IS A GREAT MENTOR, and any guy who’d build the Titanic for his wife is worthy of everyone’s admiration. BenF89, thanks for your compliments. From what I understand the Vance was getting tired by the time of the war bride refit, but I have no experience with weathering and didn’t want to muck up such a big lump. Carl, thanks for the lat lesson. I was going to ask if that might be equivalent to lath over here but Rob beat me to it. Rob, thanks for your nice feedback. Lath I know about since I had many occasions to see it during a large renovation project involving over 400 old townhouses. The Dean’s kit is good but I have also seen some inaccuracies in areas I would not expect such as a few of the laser cut styrene sheets. Steve Tiny production. Fresh from the success of fabricating and painting the bridge deck starboard side wall railings I decided to count up the wall railing brackets I will need for the port side and both sides of the boat deck. Turns out I exaggerated earlier - I only need about 120 more, which equates to 40 stanchions trimmed, cut into three sections, with each section needing an angle cut across the bottom. So I set up a little production line, and three evenings later the pile was complete (the line only ran for about 2 hours a night). Since I was in tiny mode I thought I’d try making some twisted eyes, following the x-acto handle twisting technique described in several spots on the site. It was actually quite fun and I spun up a few in no time at all. Thanks to all who shared the method. I would like to give credit to the originator if anyone knows who he or she is.

- 446 replies
-
- 6
-
-
- zebulon b vance
- deans marine
- (and 3 more)
-
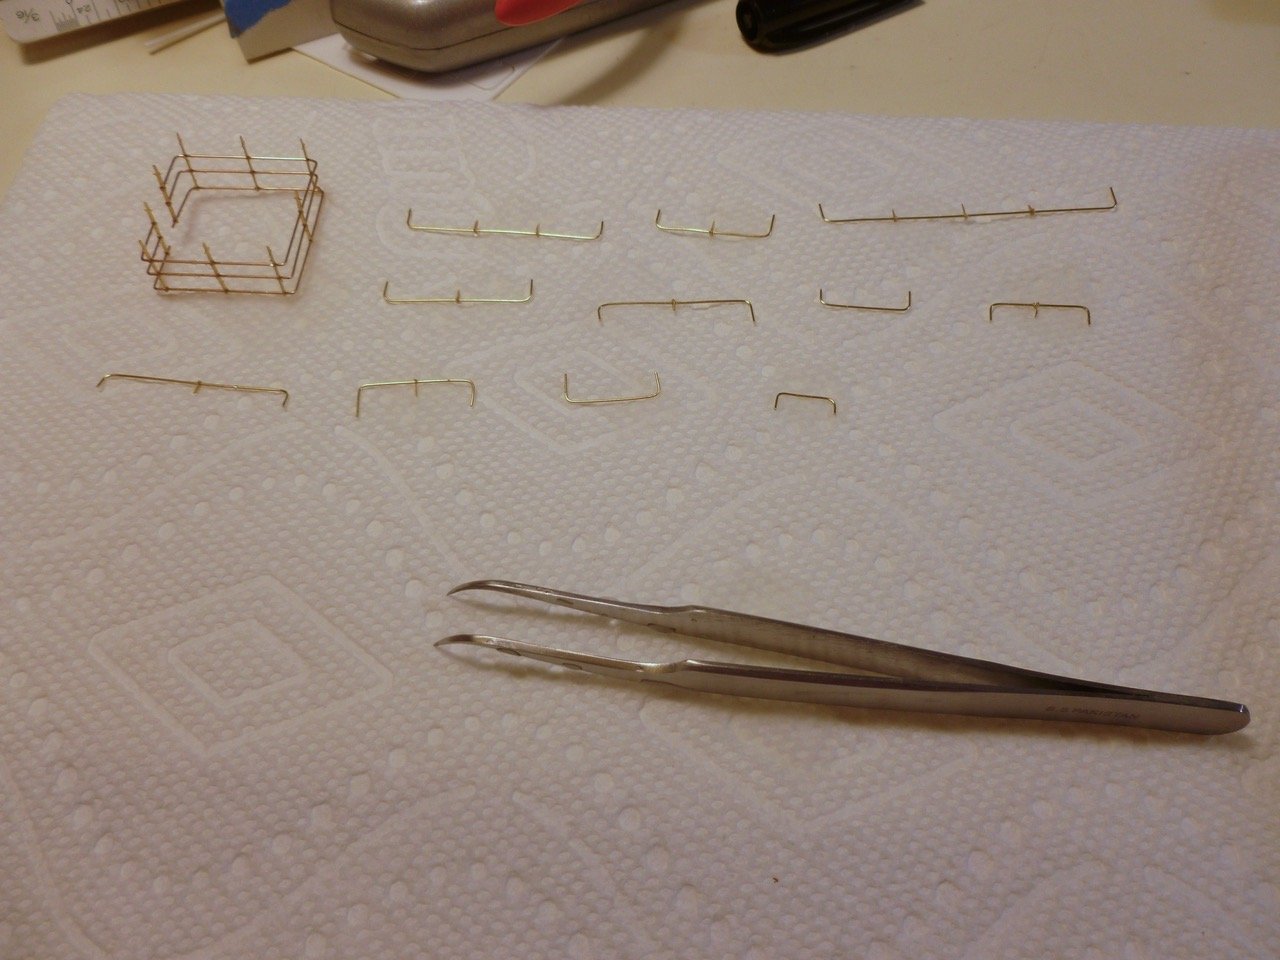
To those who gave likes, thank you and thanks for stopping by. Carl, I looked up blue tack so now I know what that is, but what is a lat? Steve Foamy progress. The small railings hanging by a thread painted up okay, but the threads spun from the force of the spray, leaving a few bare spots, and there was a bunch of fiddling to get the thread knot off each railing. I also lost the smallest rail to that great parts heap in the ether. But… Thanks Lou for the rigid foam board suggestion. Works great and the railing stays in place nicely while spraying. The railing paint pic showed the intermediate brackets. I need about 200 of them for the bridge and boat decks, in addition to the ones I used on the small top deck cabins. The starting point is the railing stanchion, shown below, which is snipped into three pieces. Then each piece gets another trim to angle the bottom, which makes it easier to install. The bridge deck port wall railings are fabricated, and now painted. But enough with the small stuff. It’s time for an overview of progress. It’s cold and windy today, so no outdoor pics, and the shipyard is occupied with railing fab, so the pics are in the best available room. Not much glued yet except some railings. And yes, the Kilroy porthole is still hanging in there hoping to make the final cut.


- 446 replies
-
- 9
-
-
- zebulon b vance
- deans marine
- (and 3 more)
-
Lou, thanks for the suggestion. It may be easier for the next bunch than the gymnastics above. Steve
- 446 replies
-
- 3
-
-
- zebulon b vance
- deans marine
- (and 3 more)
-
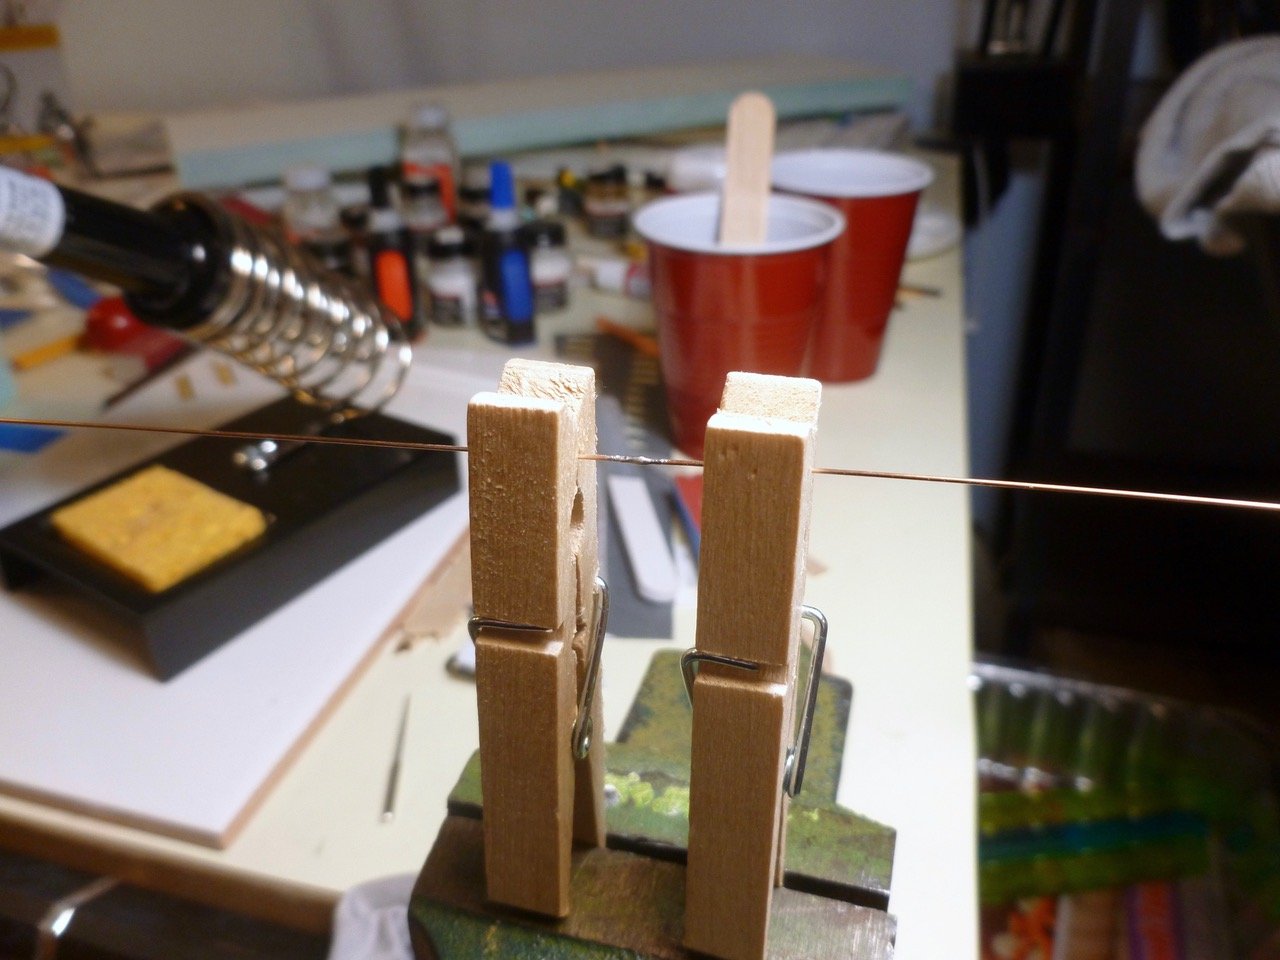
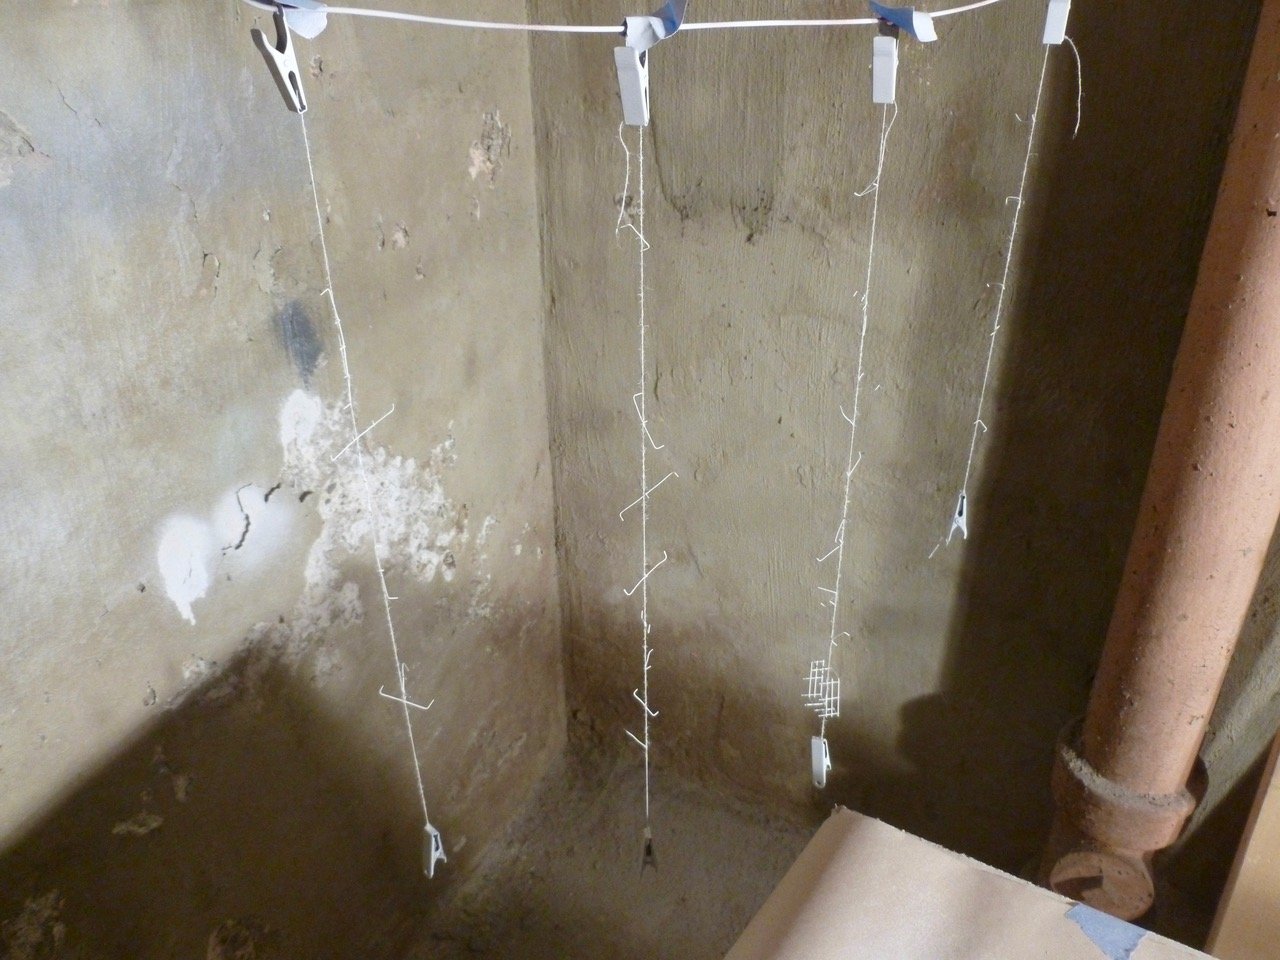
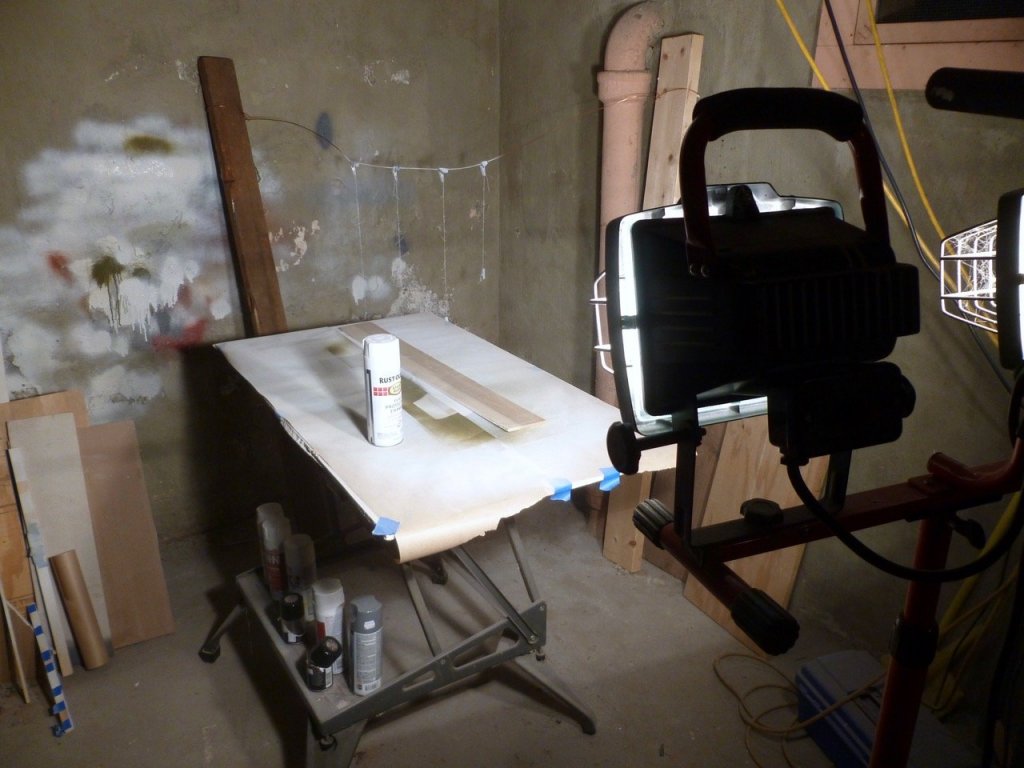
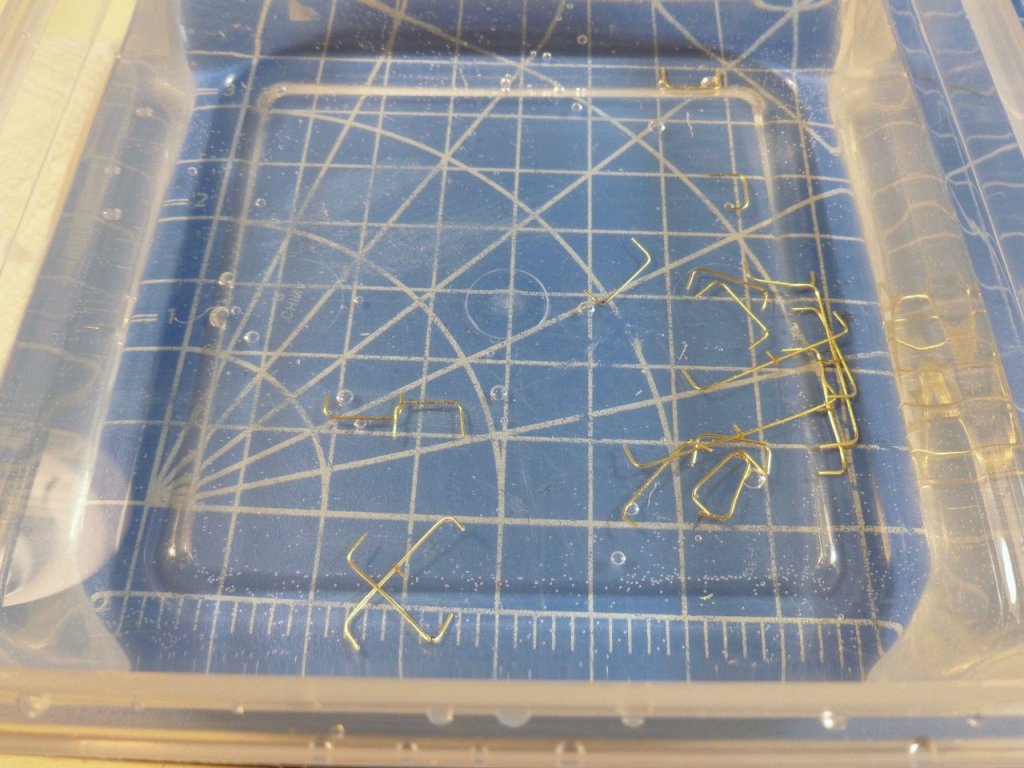
To those who gave likes, thank you and thanks for stopping by. Steve Hanging by a thread I had some time this afternoon so I scraped and sanded (sanded worked better) the paint flash off all the railings. I decided to try hanging the railing wires from plain white thread suspended between two clips. Certainly not original but new to me. The clips have holes that conveniently fit a piece of ground wire scavenged from a roll of house wiring. Not wanting to waste time on an elaborate gallows I wrapped the ground wire around some spare lumber (timber for those so inclined) so it hung across the corner of my paint area in the unfinished basement, the idea being to confine the spray a bit since I don't have a paint booth exhaust. The overall view shows the paint corner, which consists of an old Black & Decker Workmate, a piece of drywall covered in changeable paper for a work surface, and a light stand with two 1000 watt halogen lamps. An overhead light bulb provides some fill light to soften shadows. Crude but bright. The closer view is below. I found I needed to squeeze into the corner to finish all sides - the wires hanging by a thread were quite spinney but wouldn’t stay in position long enough when I tried twisting them so I could paint the back side from the front. Seemed to work - the proof will be in the drying. They'll all need touch-up but it's only a thread widths amount - it's a small price to pay if this gets the entire bunch painted in one go.

- 446 replies
-
- 7
-
-
- zebulon b vance
- deans marine
- (and 3 more)
-
To those who gave likes, thank you and thanks for stopping by. Lou, I know what you mean by aggressive. There’s a walking path around the pond. The geese have been coming back for so many years they are unflustered by passersby, nestling in the grass next to the path with their goslings. If you keep your head pointed straight, make no eye contact and stride purposefully along (remember Seinfeld - "No Soup for You!") they leave you alone, but if you stop to turn and look at the babies there is much harrumphing, hissing and charging by goose and gander alike. Kevin, thanks for checking in and for your kind remarks. BenF89, welcome and thanks for stopping by. I’m an RC newbie and am already benefitting from the experience of other members. Steve How not to paint tiny brass wires On my previous build, and parts of this one, I’ve had good luck painting smallish parts by sticking them to a reversed piece of blue tape and giving a quick rattle can spray. For multi-sided parts like small metal blocks, I would paint one side, wait to dry, flip and repeat. What led me to believe this would work for 0.020 wire railings I don’t know. When I started to peel the railings many were surrounded by paint flash, bent when I tried to take them off, or both. I resorted to a small X-acto chisel blade to break them loose. Now I have the pleasant task of cleaning all the flash before painting the other side. A friend who used to work in an auto body shop said they painted small pieces by hanging them off a wire or string. I’m not sure how this works with wire this small but I suppose it is worth a try if I use small clips mounted over a horizontal wire and clipped to the ends of the railings. If anyone has a different suggestion, short of buying an air brush which is not in the cards, feel free to chime in. By the way (I live with acronyms at work, but refuse to use them at home), the light makes the railings look orange yellow but they are actually white. Makes it easier to see the flash.
- 446 replies
-
- 1
-
-
- zebulon b vance
- deans marine
- (and 3 more)
-
A challenging build wonderfully executed Kevin, and especially challenging to those of us who might aspire to such craftsmanship. Your outdoor photos, especially the ones from low looking up into the sun and sky look for all the world like a real ship. Congratulations. Steve
- 1,319 replies
-
- 6
-
-
- caldercraft
- Victory
- (and 1 more)
-
very well done! A challenging build for a first go, particularly without the benefit of modern laser cut parts and castings. Welcome and best of luck on your next build. It's very easy to get hooked. Thanks for sharing. Steve
-
To all who gave likes, thank you and thanks for stopping by. Bill, thanks for another good suggestion. The ship is fitted with two 6-volt gel cells like they use in kids power toys, one for power and one as a spare and for ballast. Each one has a velcro strip on the bottom, as does the ESC unit. The gel cells are also surrounded by wood curbs to help hold them in position. My concerns at the moment are the reaction the ship may receive from the large flock of geese that spend the good weather in the pond near our house, and the two pond aerators that create big sprays and small waves. I may have to move the maiden voyage to a quieter pond farther away where the local RC sailboat club operates. Of course they may not like a long lumbering lump in their midst either. Beaks or boats, decisions decisions. Carl, thanks for the spiffy. I couldn't have done it without your guidance to tone them down. I actually worked on several apartment buildings doing electrical design, when the architecture business was in the slumps, and gained lots of experience with repetition (outlets, switches, lights, stoves - when would it end). No watertight doors, although one resident surrounded her door with bug powder to stave off a potential attack from an army that had invaded the slovenly apartment next door.
- 446 replies
-
- 4
-
-
- zebulon b vance
- deans marine
- (and 3 more)
-
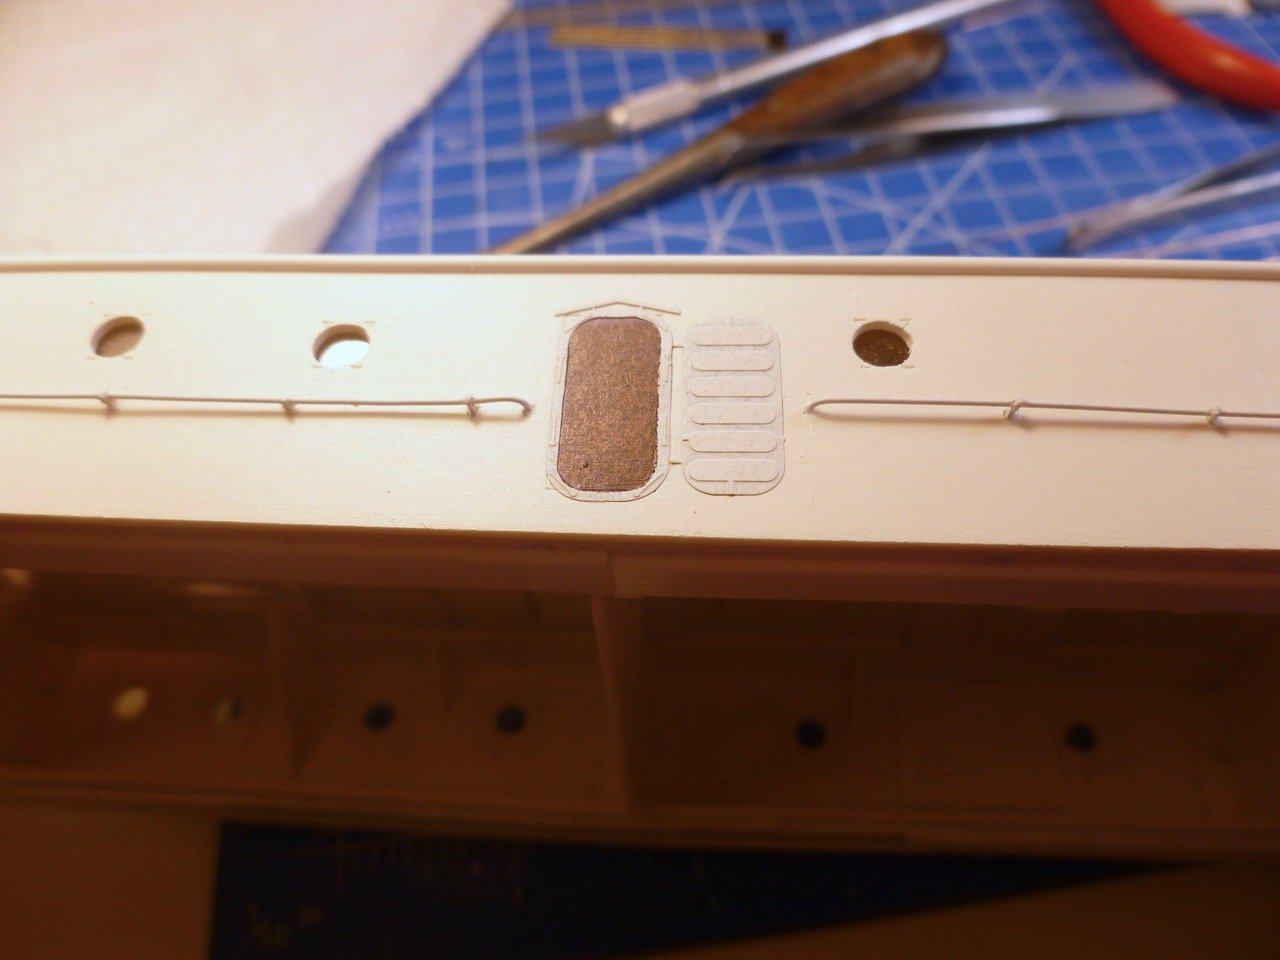
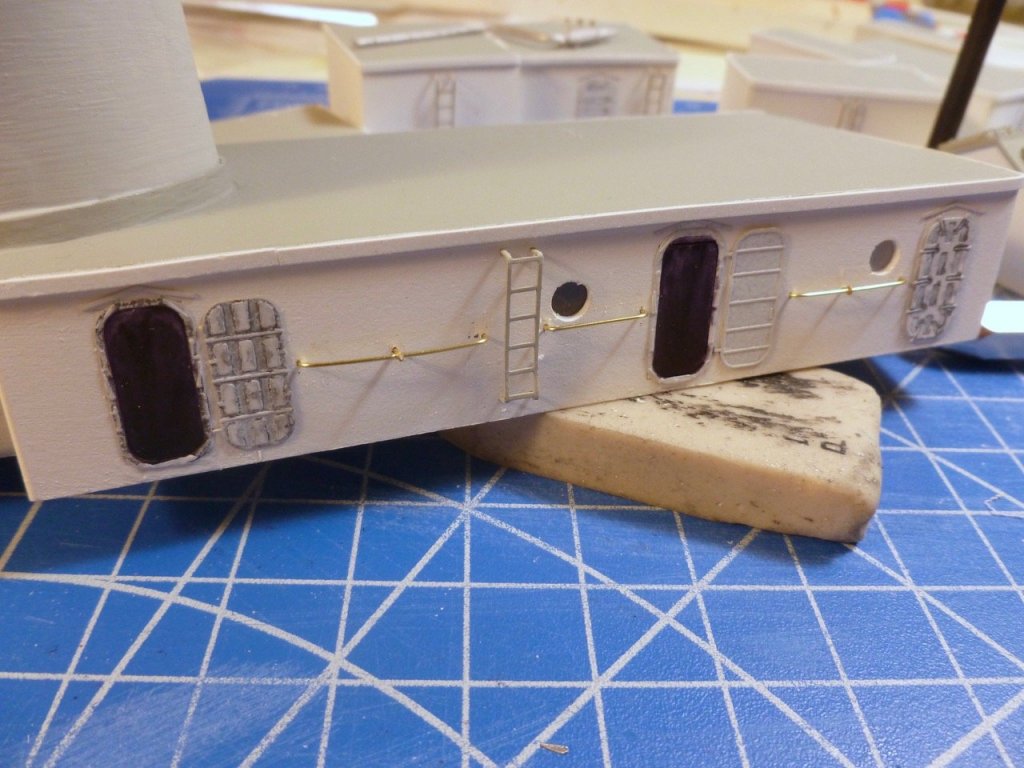
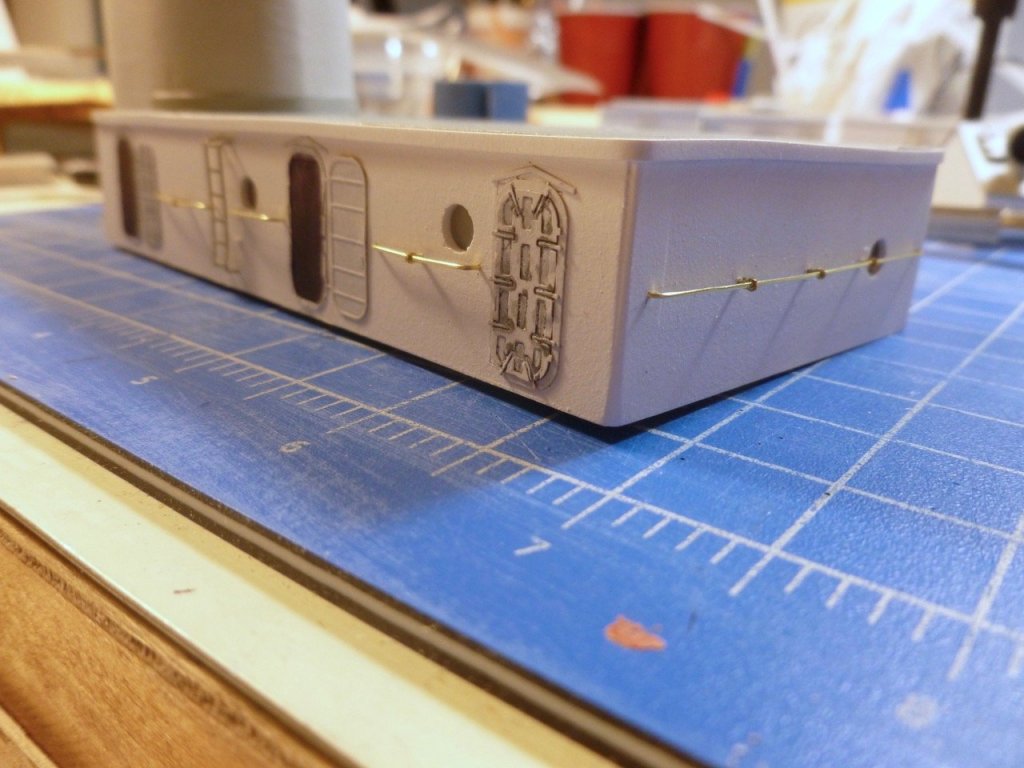
To those who gave likes, thank you and thanks for stopping by. Bill, thanks for the dewatering suggestions. I have a lot to learn about RC sailing and I guess I have been overthinking it and missing the obvious. It could also be what happens when I wait until late in the evening to write. A patch is a good idea too. I’ll let the different suggestions percolate a while before I take any steps. Carl, thanks for the stair railing suggestion. Of course I threw the primer on the compass platform railing before I read it so some sanding will be in order before fitting and soldering the stair rail. it’s interesting you mentioned the Blues Brothers. Just last week I watched a bit of the movie (again) and it’s just as great as I remembered it. Steve The railing construction at the top deck cabin walls is finished. The effort doesn't seem to match the few bits of brass on the paper towel. I gave them a bath in paint thinner followed by a water rinse, set them aside to air dry, and tonight gave one side a shot of primer. I’ll be enthusiastically watching paint dry over the next few evenings. I started fabricating the bridge deck cabin wall railings. Boy, I can’t do much of this with all those intermediate brackets before going bug-eyed. The picture is about 8 inches worth. I’m dotting the railing/bracket intersections with CA as I go, rather than trying to get all the brackets in place first (I tried it). Once all the railings are fitted I'll remove the sections so I can enjoy more paint drying enthusiasm. Sorry there's not more diversity at the moment but there's a lot of repetition.
- 446 replies
-
- 6
-
-
- zebulon b vance
- deans marine
- (and 3 more)
-
I'm trying to find the words but everyone else has beat me to the superlatives. If I was part of this group build I think I'd just shelve the kit and spend my days basking in the results of your bottomless well of talent. Well done. Thank you sharing. Steve
-
And 550 brides. Maybe I could make a little decal after shrinking a drawing....
- 446 replies
-
- 4
-
-
- zebulon b vance
- deans marine
- (and 3 more)
-
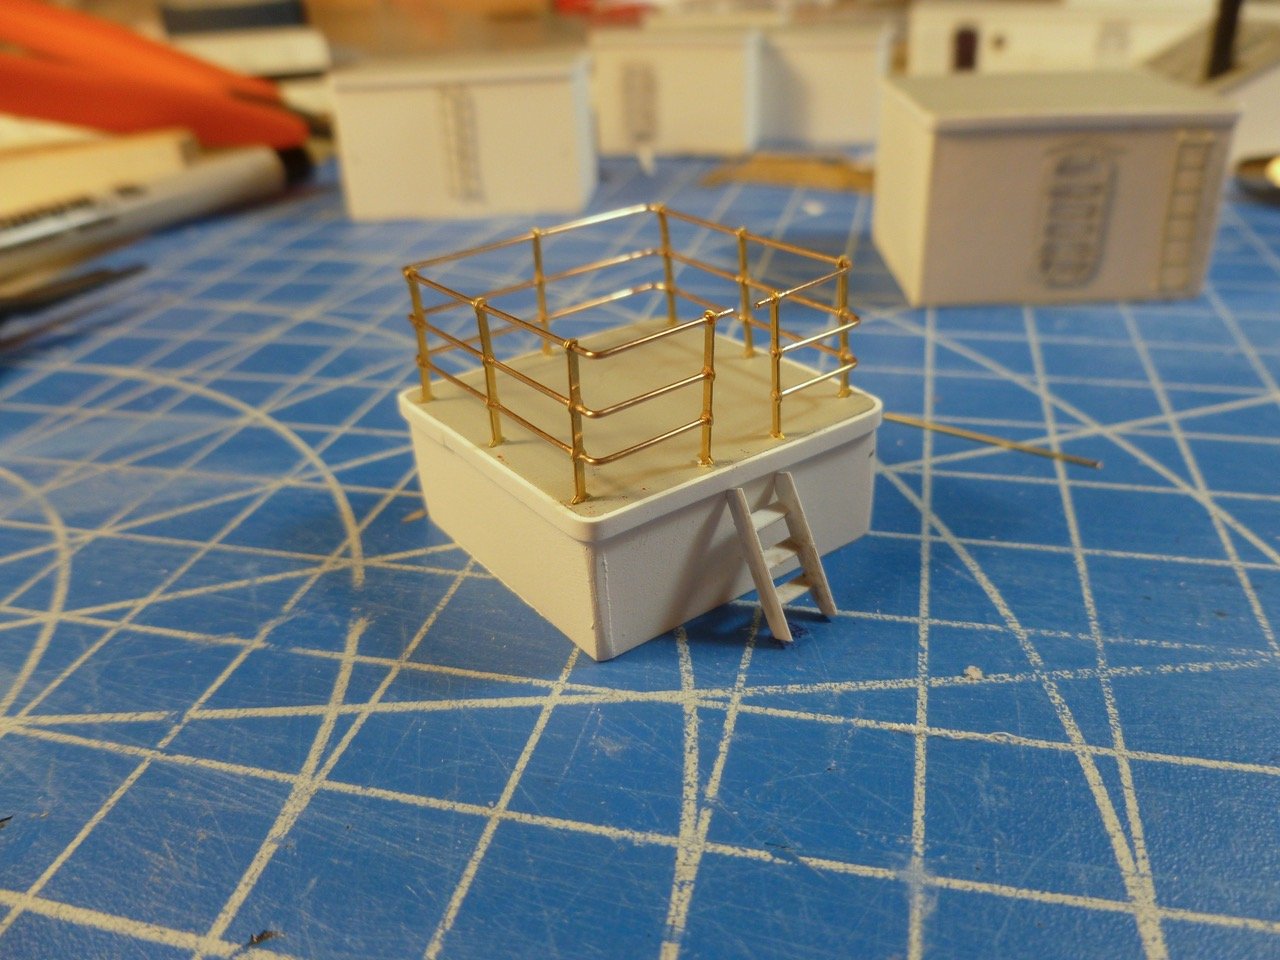
To those who gave likes, thank you and thanks for stopping by. Lou, if I could draw small enough I might do that. After all, the ship was nearing the end of its life by the time it did war bride duty and I imagine Kilroy might have popped up here and there. Carl, a few more bars and I could call it a tune….maybe Jailhouse Rock with a nod to the King, Elvis Presley. Steve I did more work on wall railings for the top deck cabins. I tackled the compass platform perimeter railing which I had also been dreading since it’s a small piece and the railing runs all around it. Each railing is a continuous piece around the four sides. I slid all the stanchions on the three rails first, then gradually worked my way around, first setting the stanchions in place without gluing, then fixing stanchions to rails with drops of CA. At the corners I bent the three rails around the tweezer nose pliers so I could progress without removing what had already been installed. I’ll remove and paint the assembly before gluing the stanchions in place. I’d like to install single handrails on both sides of the little stair, but I need to figure a way to anchor it in place first. I’m not sure if just CA’ing the top edges of the stair stringers to the platform will hold them well enough while working on the railings. Another learning opportunity. Or maybe the stair is small enough it wouldn't need a railing since someone could grab a stanchion.
- 446 replies
-
- 6
-
-
- zebulon b vance
- deans marine
- (and 3 more)
-
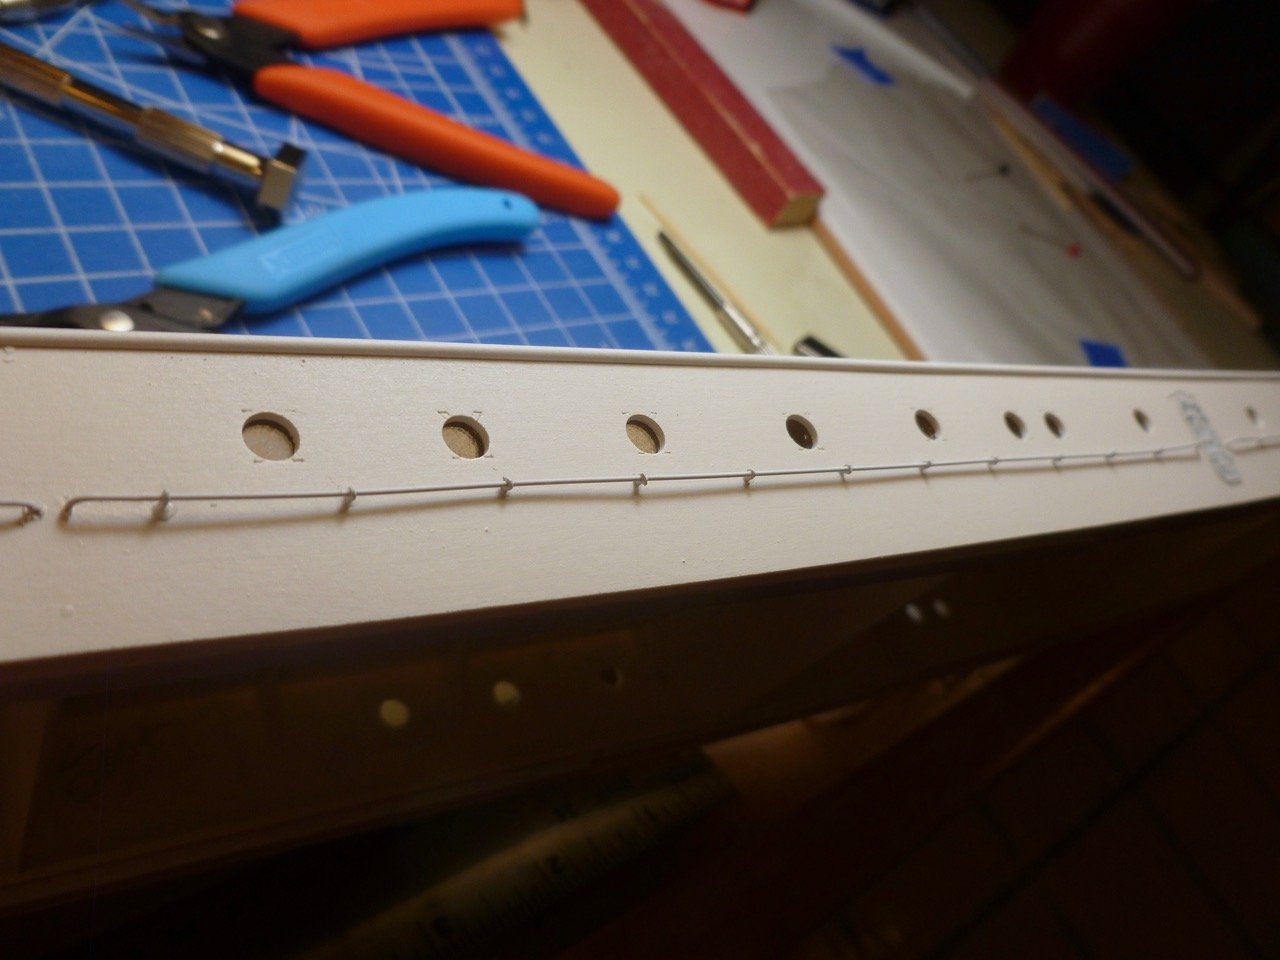
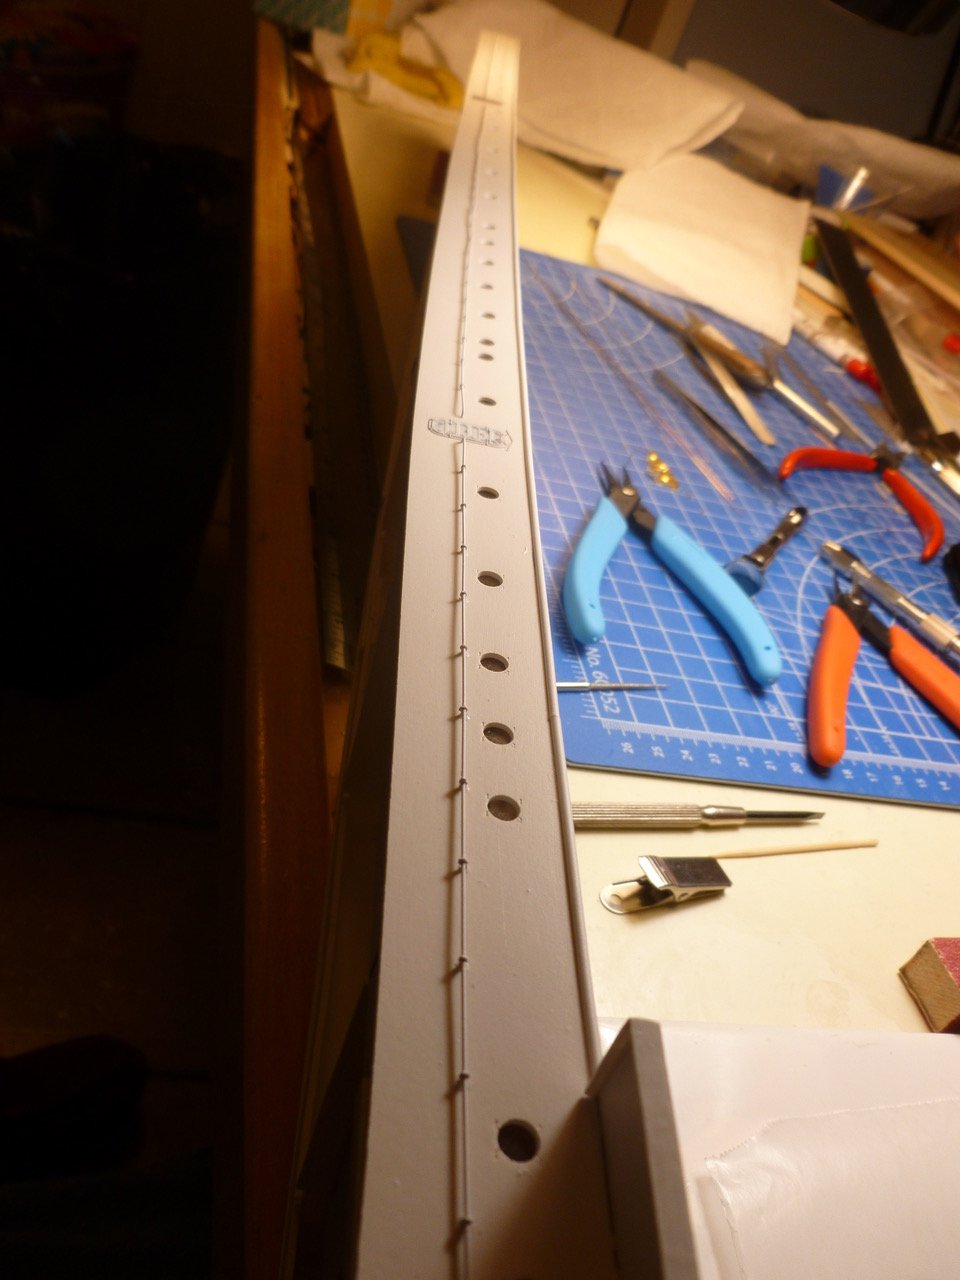
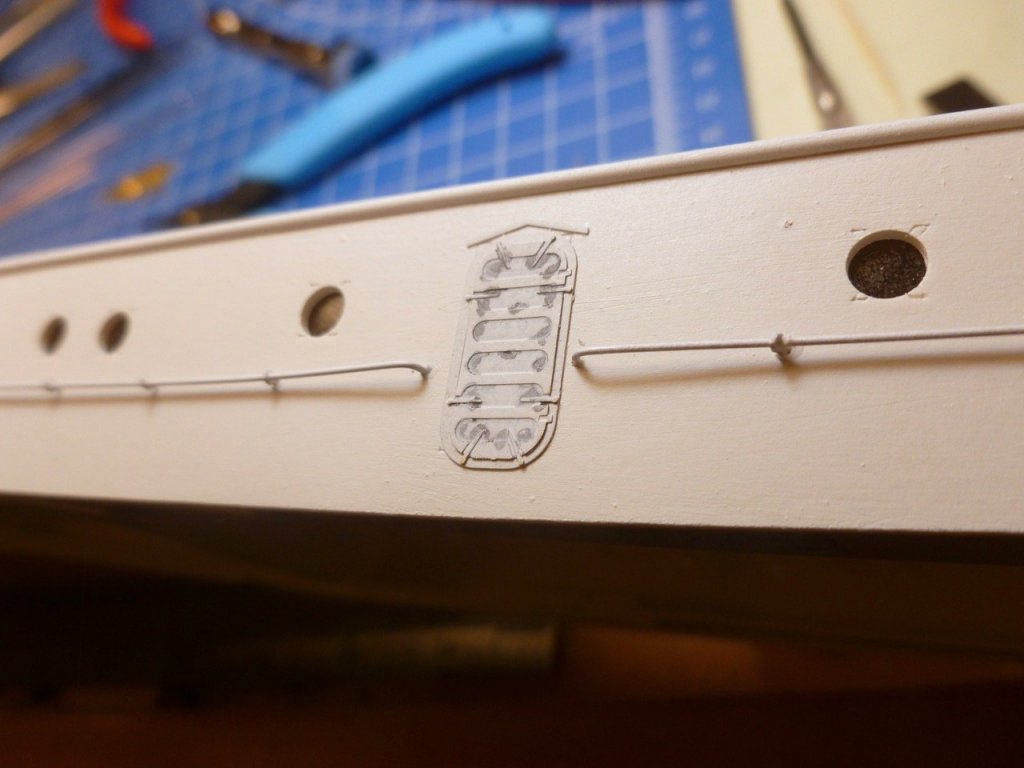
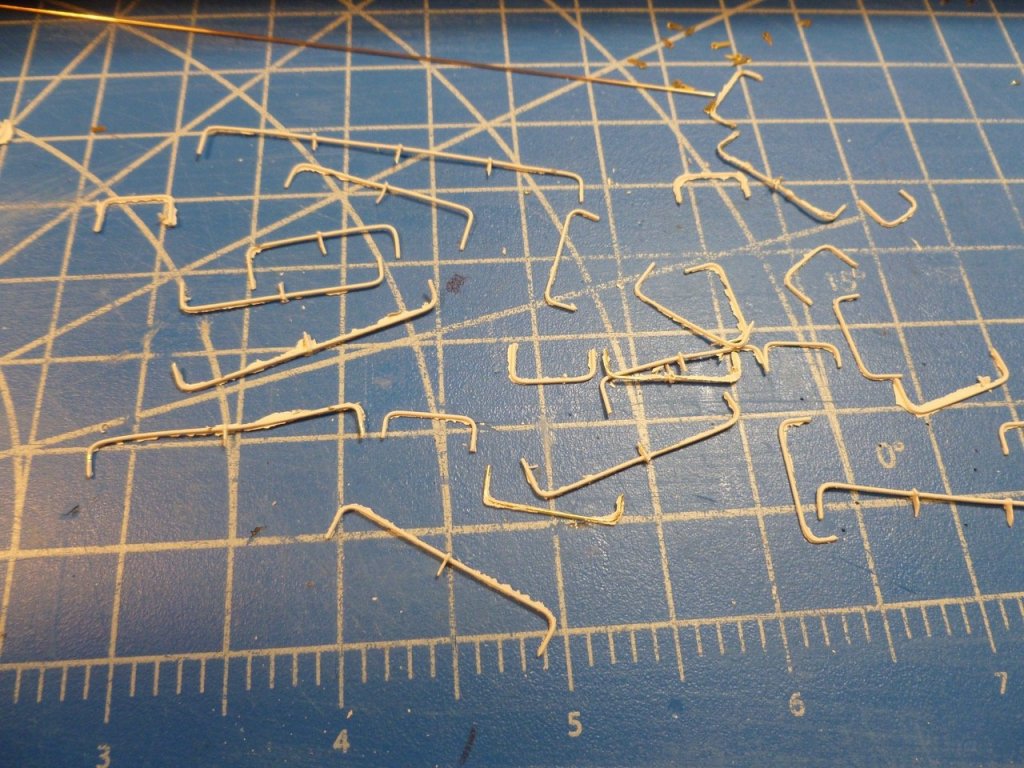
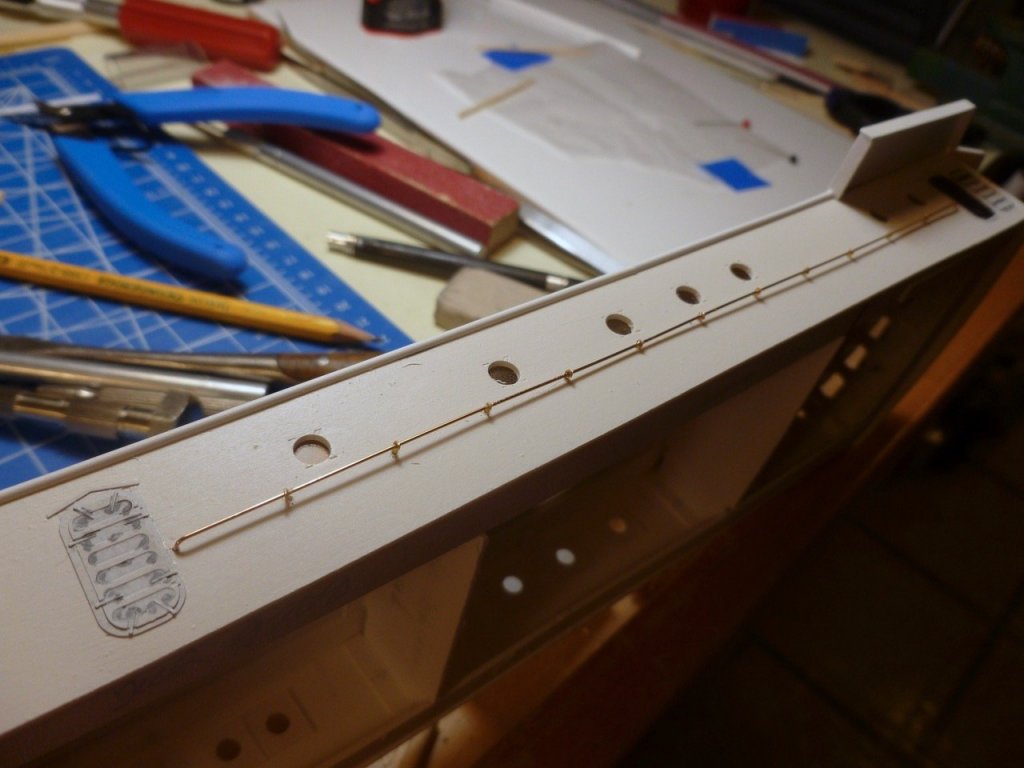
To those who gave likes, thank you and thanks for stopping by. Lou, a turkey baster - seems so obvious in hindsight - gobble gobble. I’ve got a lot to learn about RC sailing. Carl, all my problems (and all the upper decks) will go away if I turn her upside down. If sailing proves a disaster I may just try it Steve I cut all the remaining ship’s boats off the molding sheet and trimmed them to size. I had a post-bronchitis coughing fit after dry sanding a few, so I’ll put them aside for a few days until I fully recover, then use wet sanding and a mask. In the meantime I started wall railings which I have been dreading. The technique I’m using is to stretch/straighten a piece of 0.020 wire (I’m saving the straight wire for the perimeter railings), measure the available space, bend one end around a nail, mark the wire from outside bend to the available length, bend the other end at the mark, drill one hole, set one end of the wire in the hole, mark the other hole where the other end of the wire lays, drill the second hole and set the other end. Then I will remove the wire for paint and reinstall. For longer railings the instructions suggest cutting up stanchions into three pieces each. Talk about fiddly, and this is only 1:96. I have nothing but admiration for all of you doing the tiny scales. Once the pieces are cut up I trim the bottom of each at an angle so it slides into the drill hole better. Then I place the brackets onto the railing, adjust the spacing and drill, and then add a drop of CA to fix the brackets to the railing. Hopefully when I remove the railings for paint they will reinstall without further adjusting of the brackets. With the process worked out the longer piece across the end wall went a good bit quicker. For some reason the porthole in the end wall was laser-marked lower than the others which now creates an overlap with the railing unless I cut the railing short. If I was on the ship during a storm I’d rather have the railing and I wouldn’t give a hoot about where the porthole was. Maybe it's for someone sitting down in the radio room. I guess I’ll live with it. I also noticed that the railing is straighter than the roof edge. Too bad the "raised eyebrow" doesn't line up over the errant porthole. Then I could call it the "curiosity corner".

- 446 replies
-
- 7
-
-
- zebulon b vance
- deans marine
- (and 3 more)
-
Andrew, Very nice work. Sounds like you are flying along - I had about 200 hours in by the time I finished the Bowdoin's hull, and I didn't do the extra sheathing. Steve
-
For those who gave likes, thank you and thanks for stopping by. Roger, I truly appreciate your kind words and for sharing your knowledge of propellor replacements. I wouldn't have thought it possible to do it without a dry dock but your explanation makes perfect sense. I'm leaning toward open boats - the kit pieces are pretty decent once all the flash is trimmed off, which I did in a burst of enthusiasm this evening. I also did a bit of sanding cleanup but stopped when the leftover bronchitis gave me a coughing fit. Wet sanding is the way I'll go tomorrow - I've noticed that styrene dust is much more irritating than sawdust. Ouizel, thanks for the extra guidance. I tried a tissue this evening - for the boat, as well as the nose. It gave a nice, taught finish with just a hint of grain. A single layer is quite fragile, and I split the tissue in a few places when I did a test removal. I'm a little concerned about durability, particularly since I plan to sail the ship in spring or early summer (it's fitted out with RC), but I may try doubling up tissues if I go that route. I might even mix and match, with mostly open boats and a few covered. Now that prompts another thought. Perhaps I should put a few drain holes in each lifeboat so water from the sailing doesn't collect in them. Once they are mounted there will be no practical way to drain them, short of trying to insert a teeny weeny wet vac nozzle in each one! Decisions, decisions.
- 446 replies
-
- 2
-
-
- zebulon b vance
- deans marine
- (and 3 more)