ESF
-
Posts
381 -
Joined
-
Last visited
Content Type
Profiles
Forums
Gallery
Events
Everything posted by ESF
-
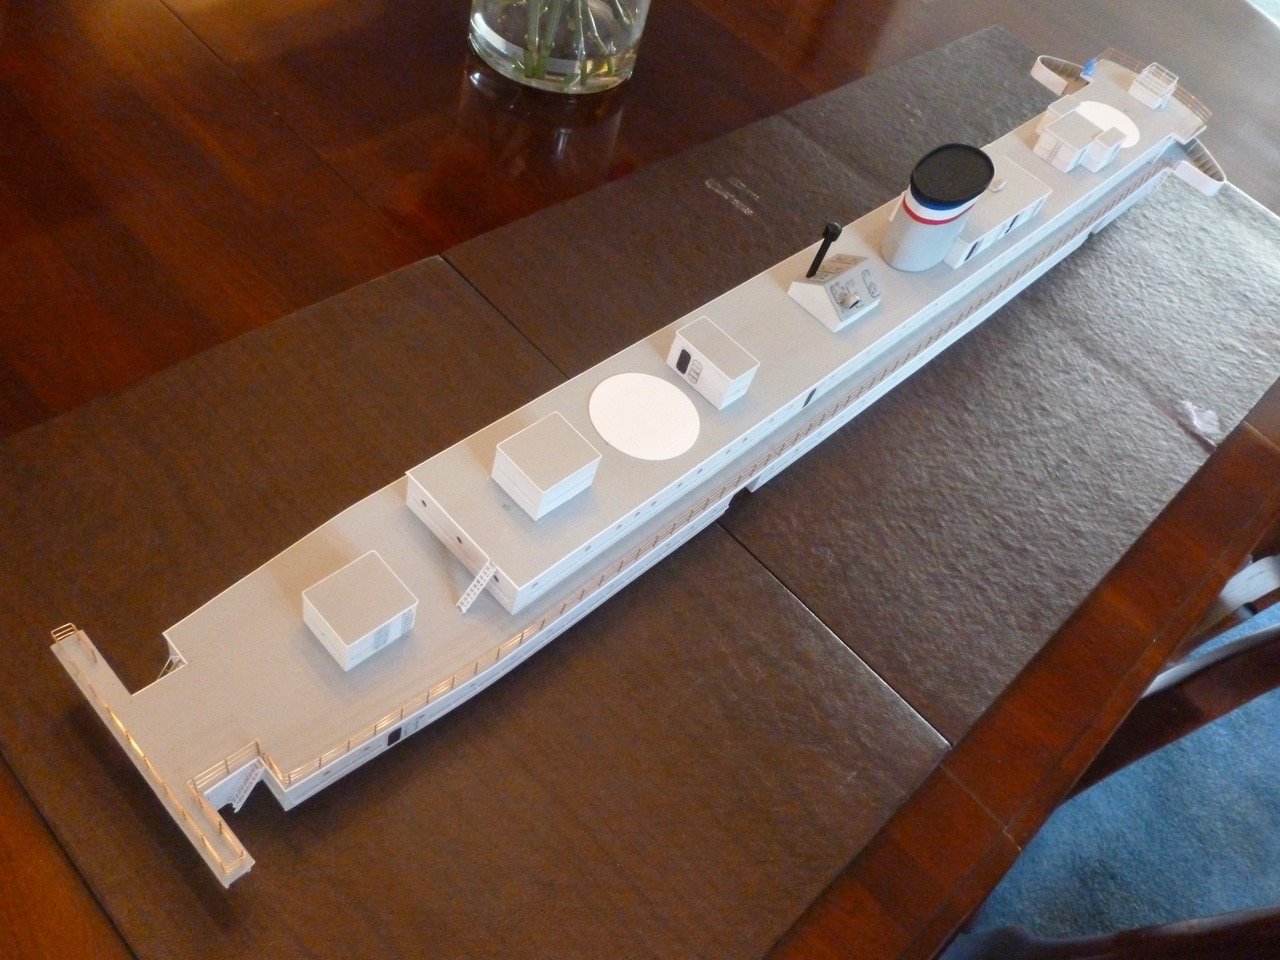
 To all who gave likes, thank you and thanks for stopping by. Carl, another apprentice hurdle? Okay, when I wasn't sweeping the loading dock I was loading grocery tractor trailers by hand. The measure was at least two 40,000 lb trailers a night. A packed load was more like 44,000. Since the empties were sitting in the yard all day the inside temp was about 110 to 120 degrees F. And frequently we squeezed in the unloading of a trailer full of toilet paper. So it looks like you and I are about even on lugging. Popeye (Denis), I'm honored you have stopped in. Love your build logs but I have usually lurked in the background since I didn't feel I had anything to offer in such weighty company. Thanks for your suggestions and kind words about the build and health. I will definitely check your decal experience - I've been putting off adding the Vance name and depth markings because I would really like them in white letters but haven't figured out how to do it yet. I've made some waterslide decals in black but they are just a backup that keep crying out to be installed. I tried making the letters very pale gray but that was a flop. Lou, coming to the rescue of a poor apprentice is much appreciated, whether it be Carl or me. Well, back to work work (as compared to fun (shipyard) work) Steve
- 446 replies
-
- 5
-

-
- zebulon b vance
- deans marine
- (and 3 more)
-
Carl, If sweeping is the measure I'm up there with the most experienced. I loaded trucks at night for a college summer job and one "opportunity" during a slow shift was sweeping the entire indoor loading dock, about 10,000 square feet worth. In another summer job I swept, stripped, scrubbed, waxed and polished all three floors of a junior high school, including corridors, stairs, classrooms and a 500 seat auditorium; aargh, aargh, aargh (nod to Tim Taylor the Toolman). Respectfully submitted, Apprentice 1
- 446 replies
-
- 3
-
-
- zebulon b vance
- deans marine
- (and 3 more)
-
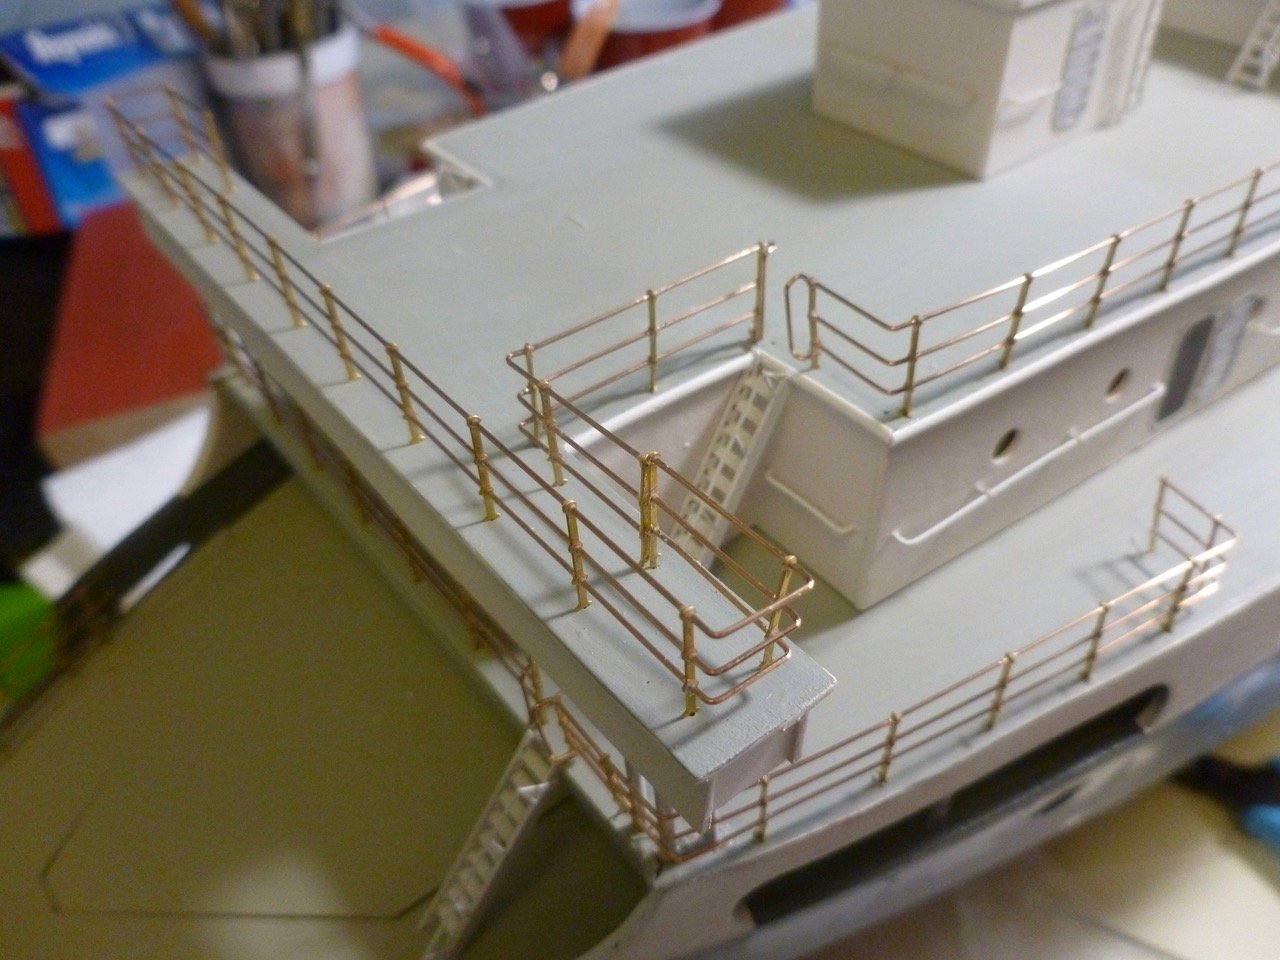
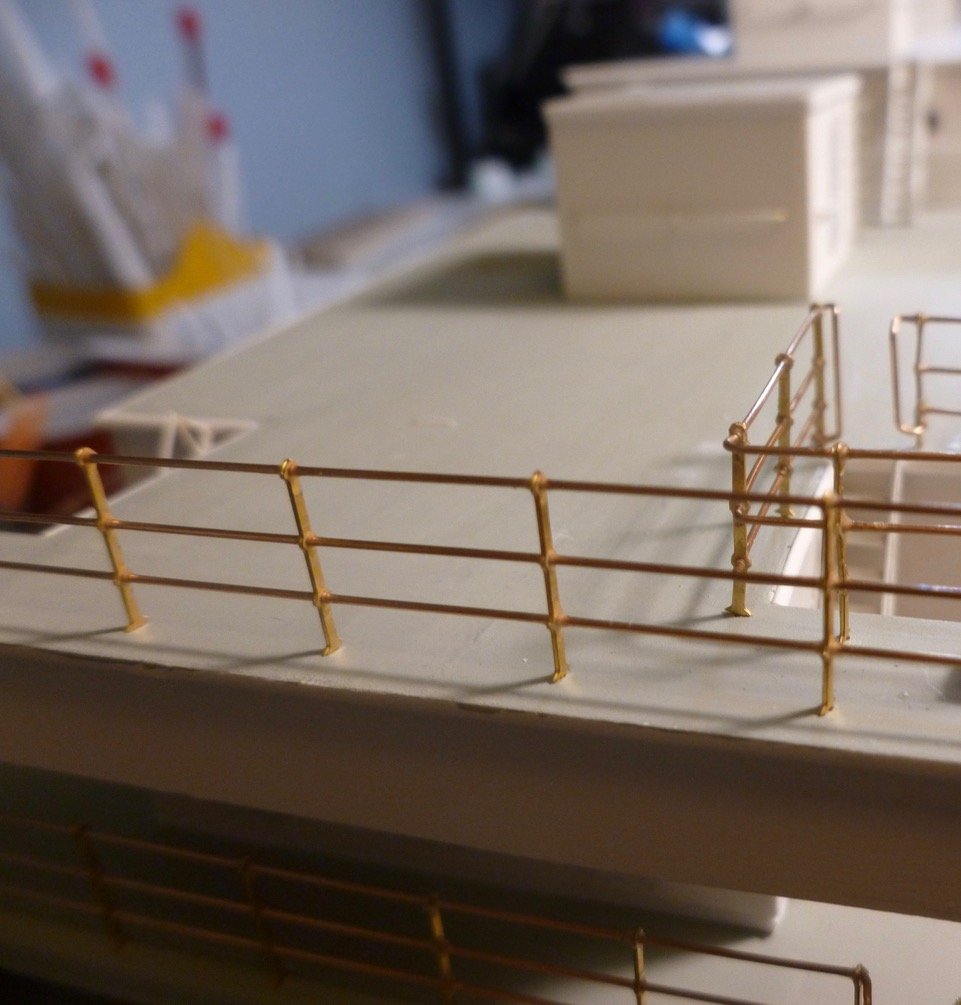
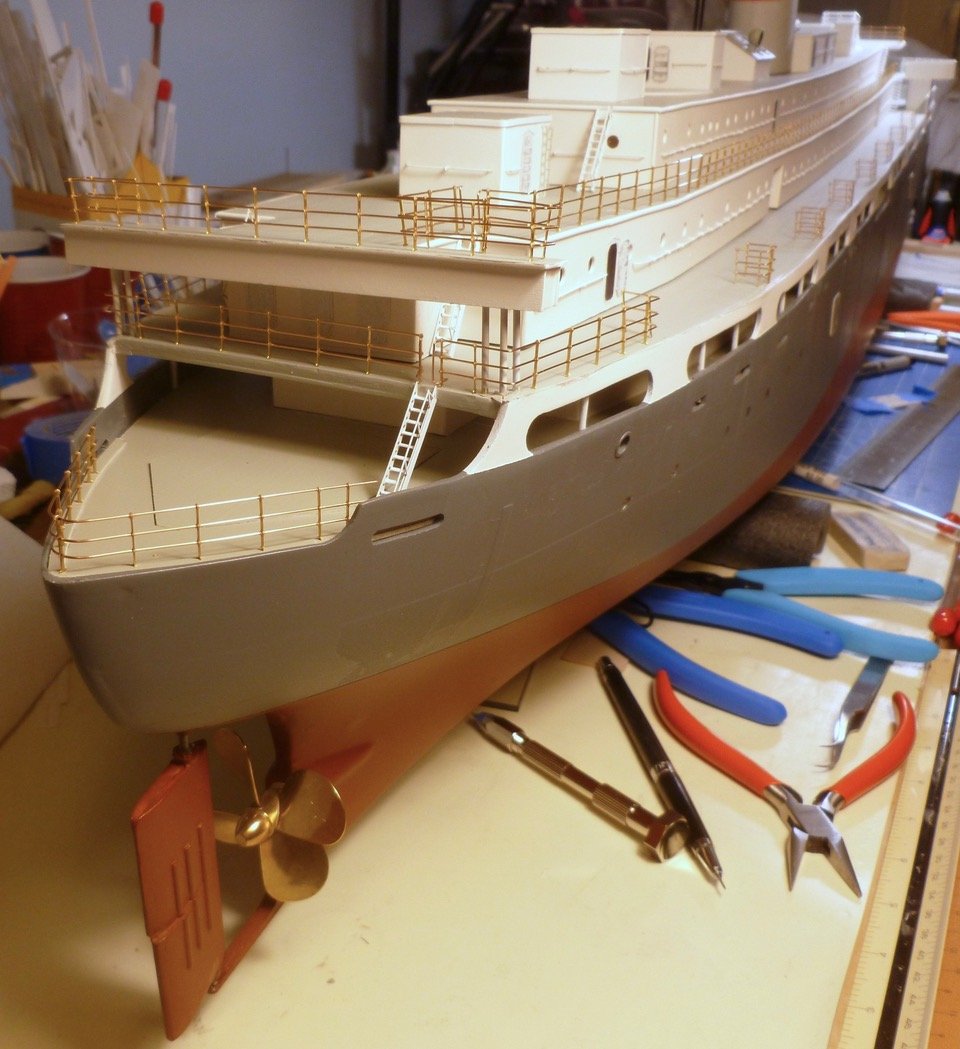
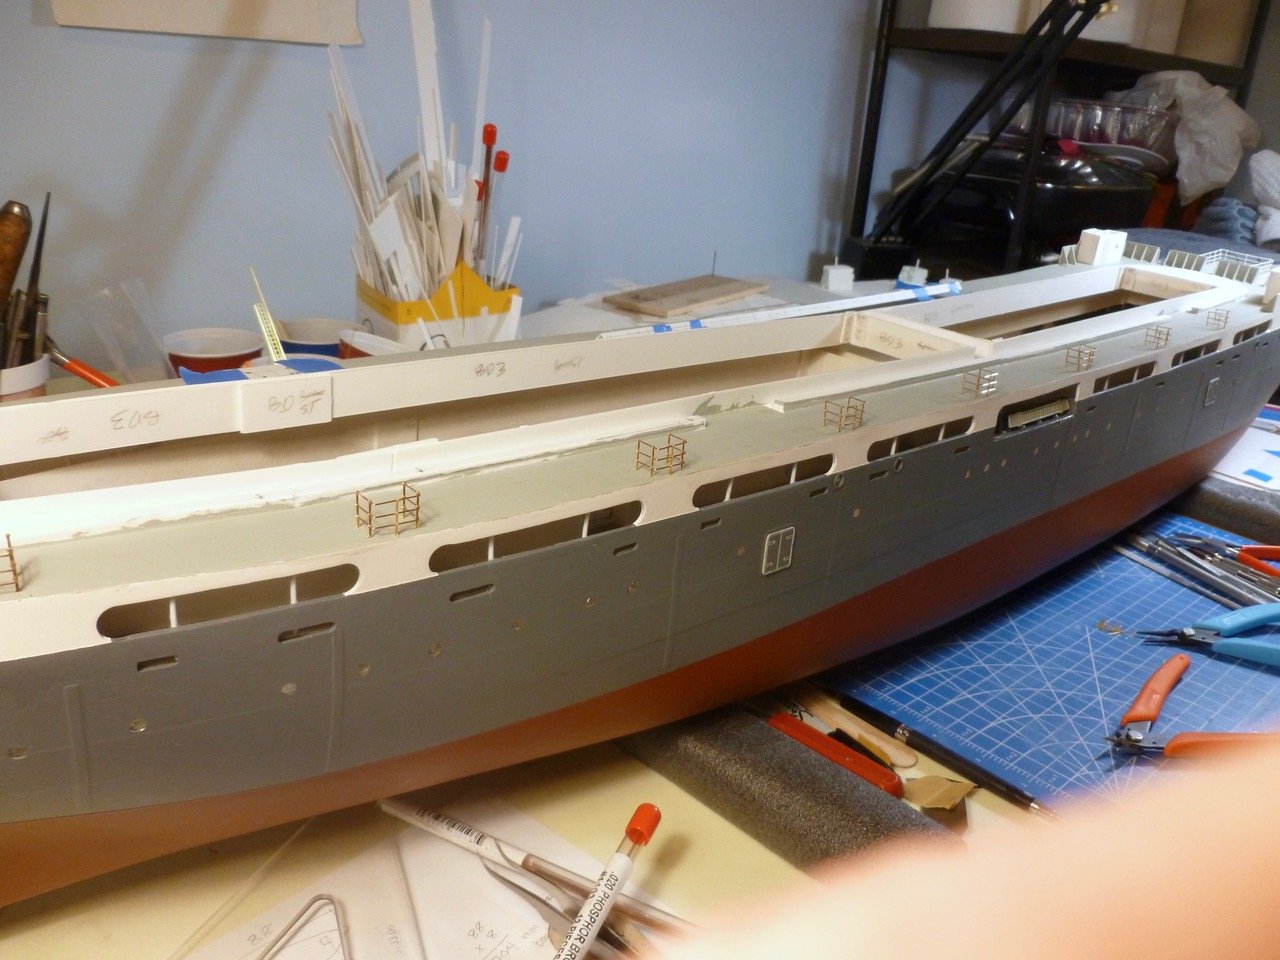
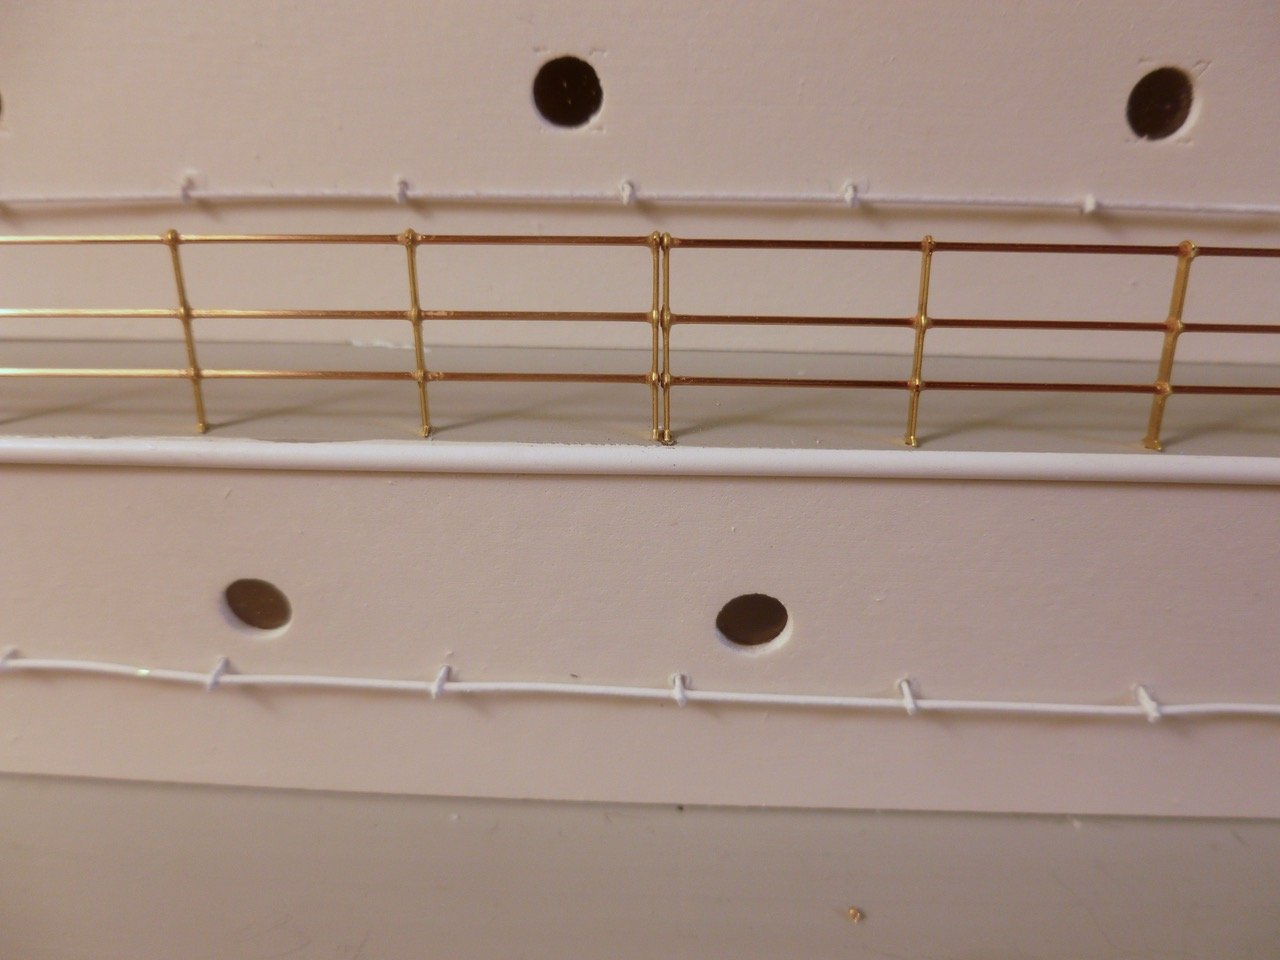
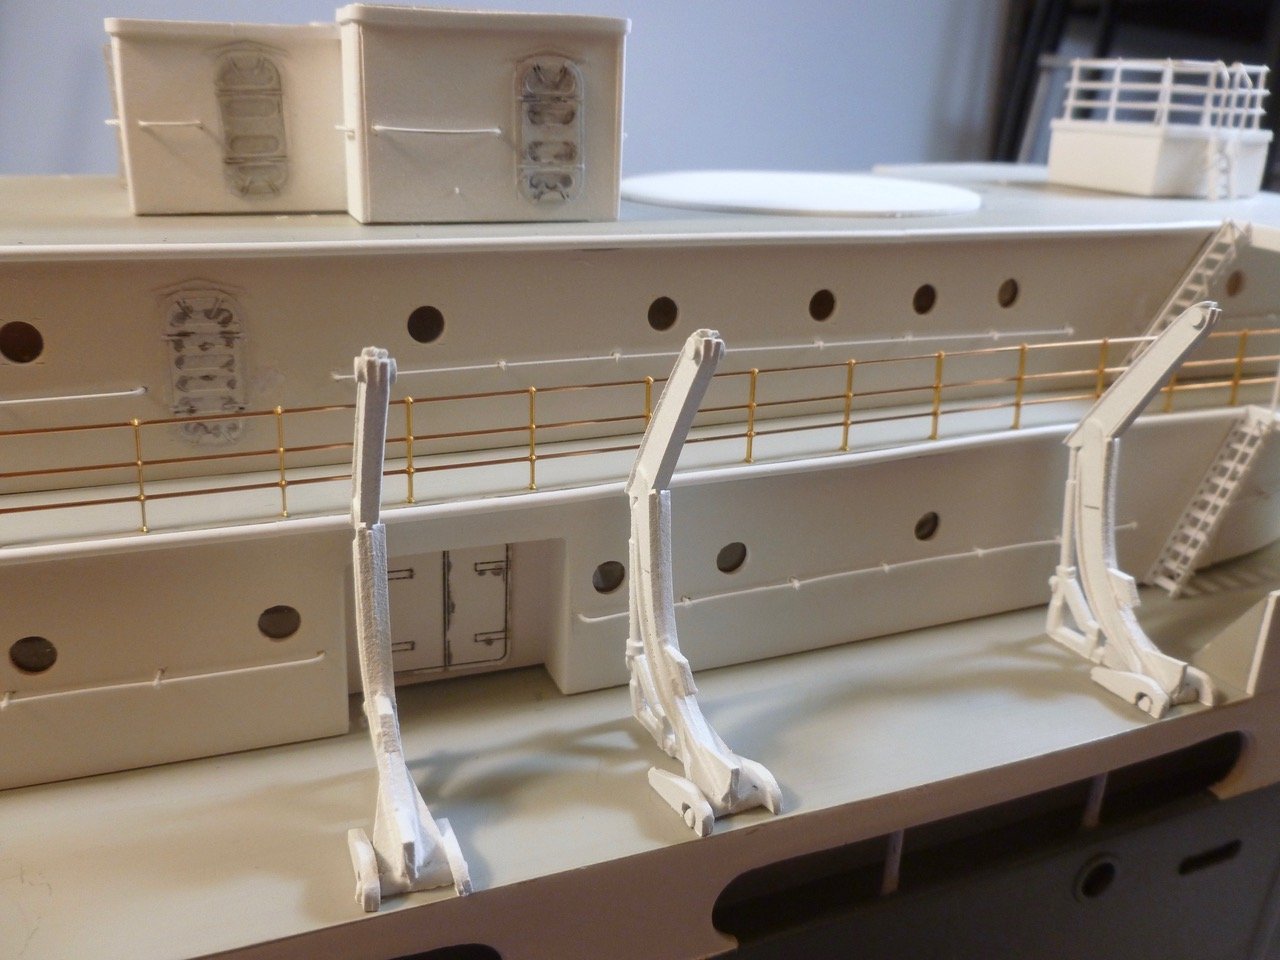
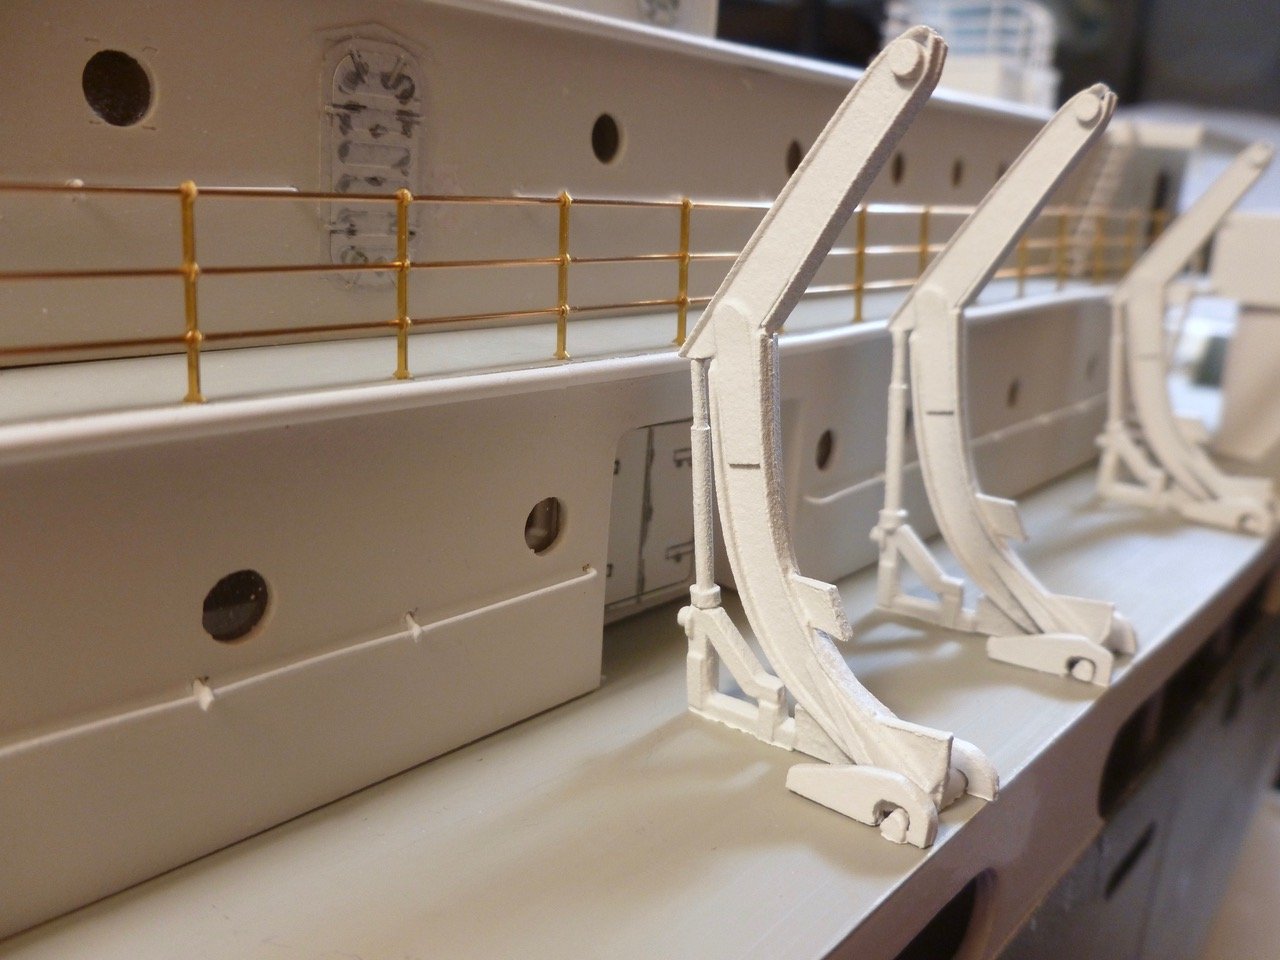
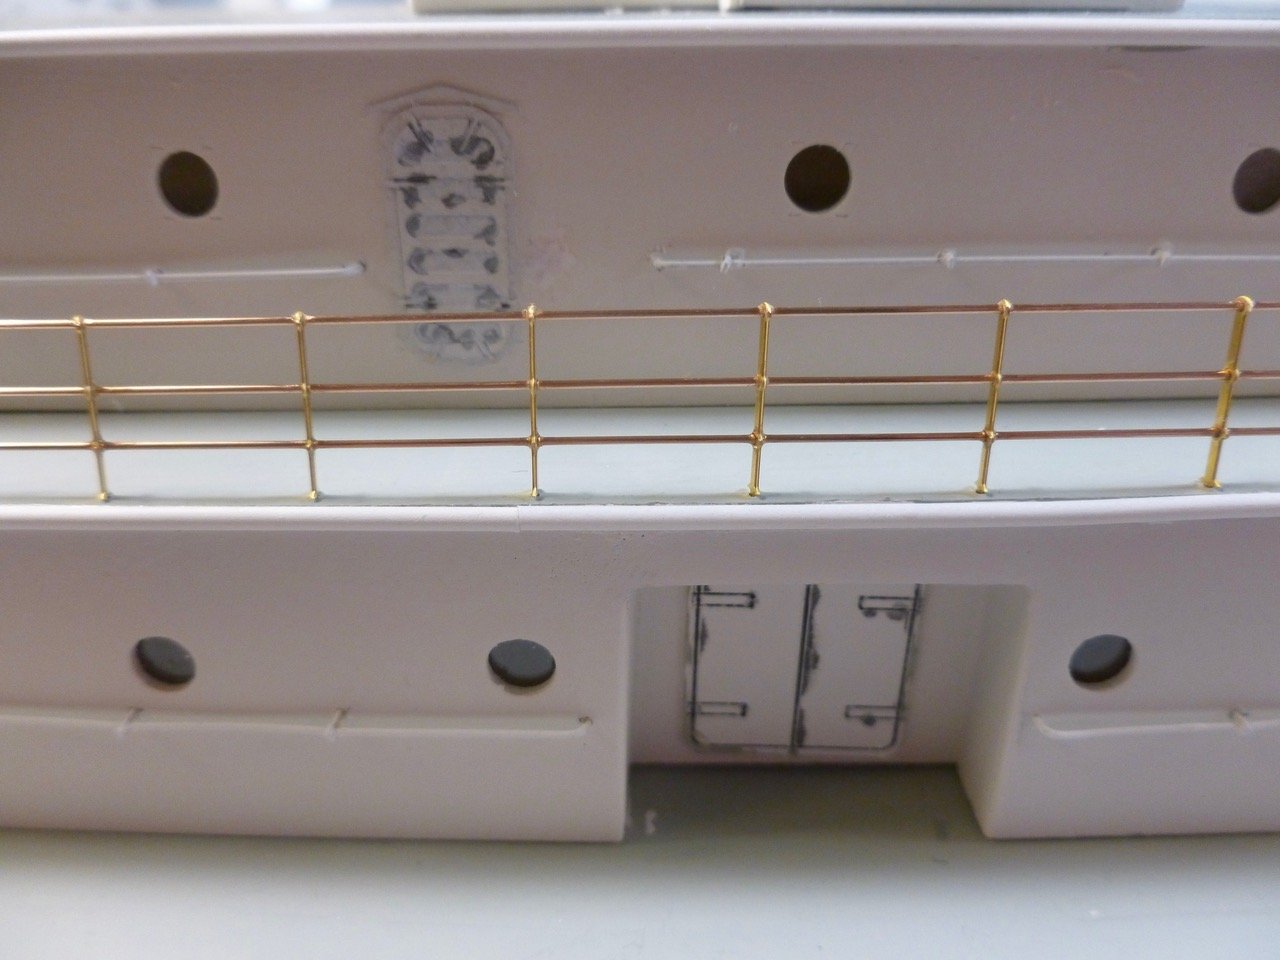
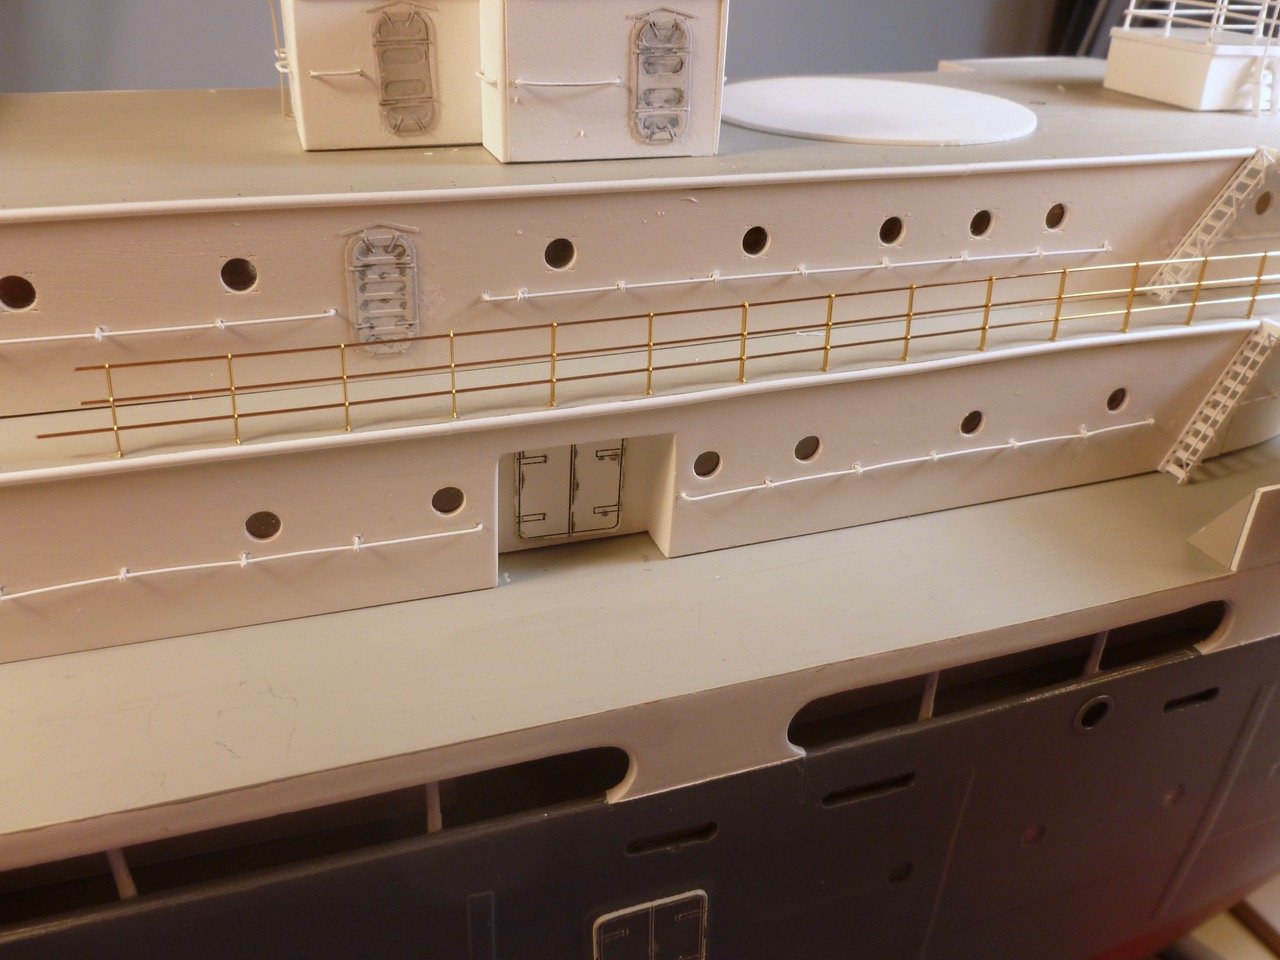
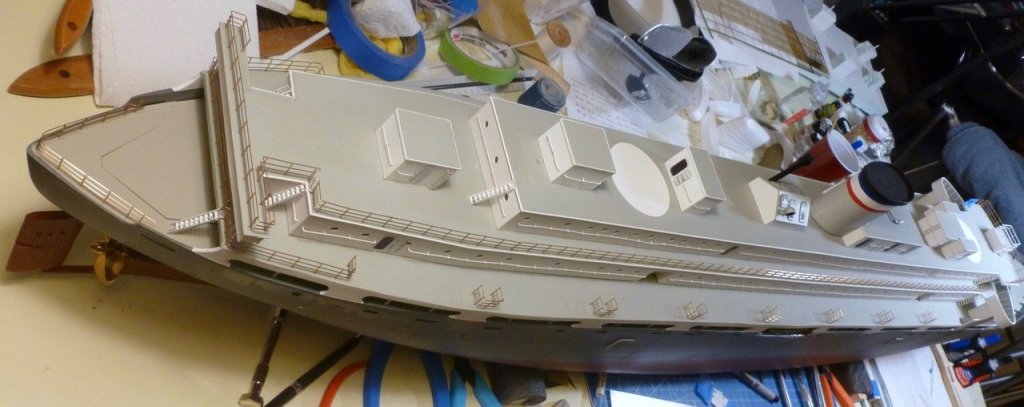
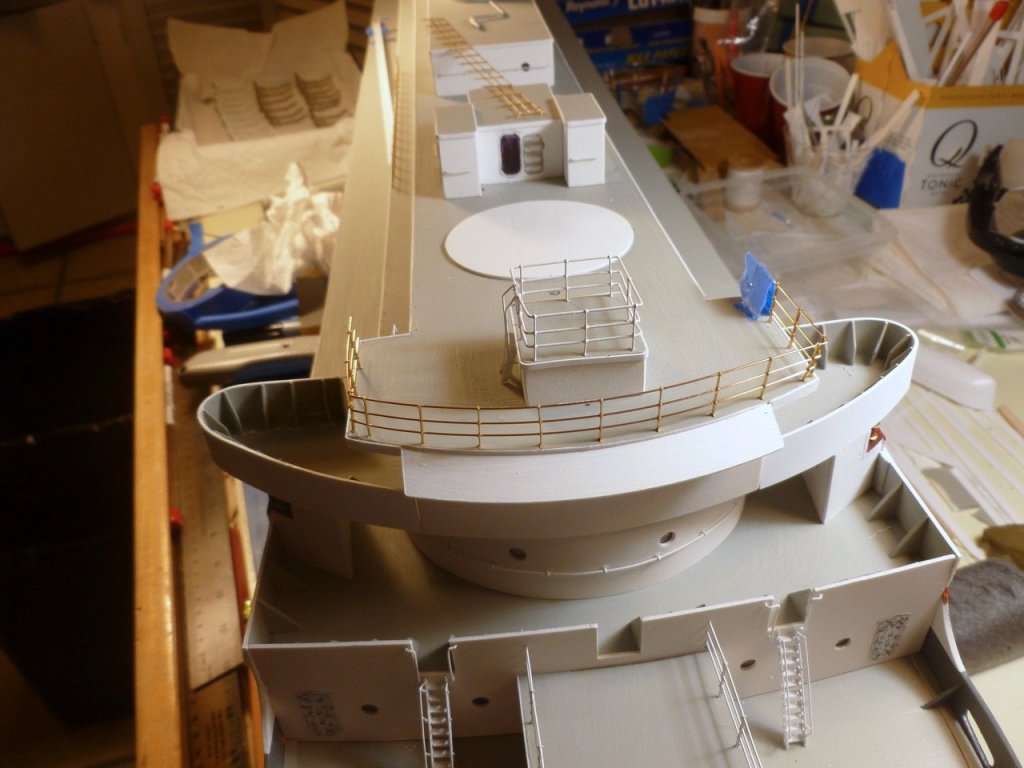
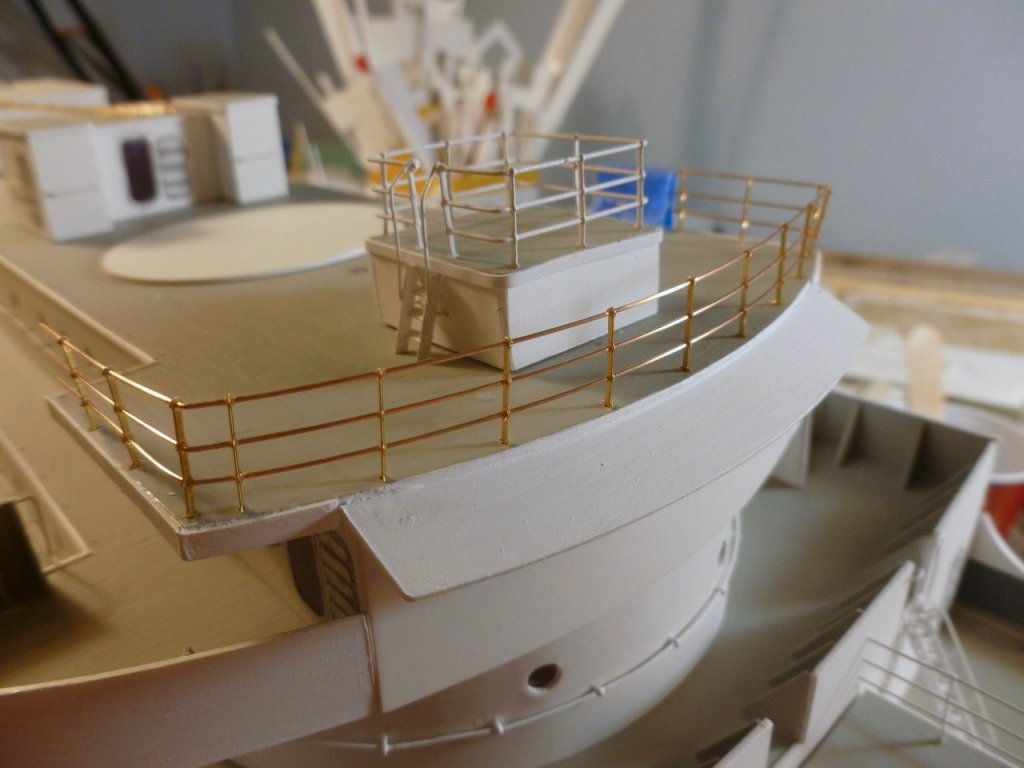
To those who gave likes, thank you and thanks for stopping by. Lou, sorry about the restaurant floor. Those walkers are nasty on uneven and broken up surfaces. Knee walkers are not much better, especially on salted winter parking lots which are plentiful around here. Mark, thank you for the offer of an upgrade. I was prepared to lobby Carl for Apprentice 2, but I’d gladly accept journeyman. You folks are the masters and I've got a lot to learn from all of you. Carl, would you grudgingly allow at least Apprentice 2 (I’m fearful of the feedback if I floated journeyman)? Steve Railings - apprentice 2 (pending) A closer look at the railing in Mark’s circle showed it was more cockeyed than I thought, and the error was through no fault of sheer or any other apprentice excuse. So I pulled the section apart. When I re-bent it and set it plumb I discovered that the railing ends at the joining stanchion were way long. I pried the joining stanchion off, cleaned up the ends, put on a new stanchion and trimmed the longies off. The result is below. The joining stanchions are not perfect because one end wants to sit proud of its mounting height when unglued. CA should fix it when I do the final installation. Still not sure about the railing extensions at the stairs. They seem more trouble than they are worth.


- 446 replies
-
- 8
-
-
- zebulon b vance
- deans marine
- (and 3 more)
-
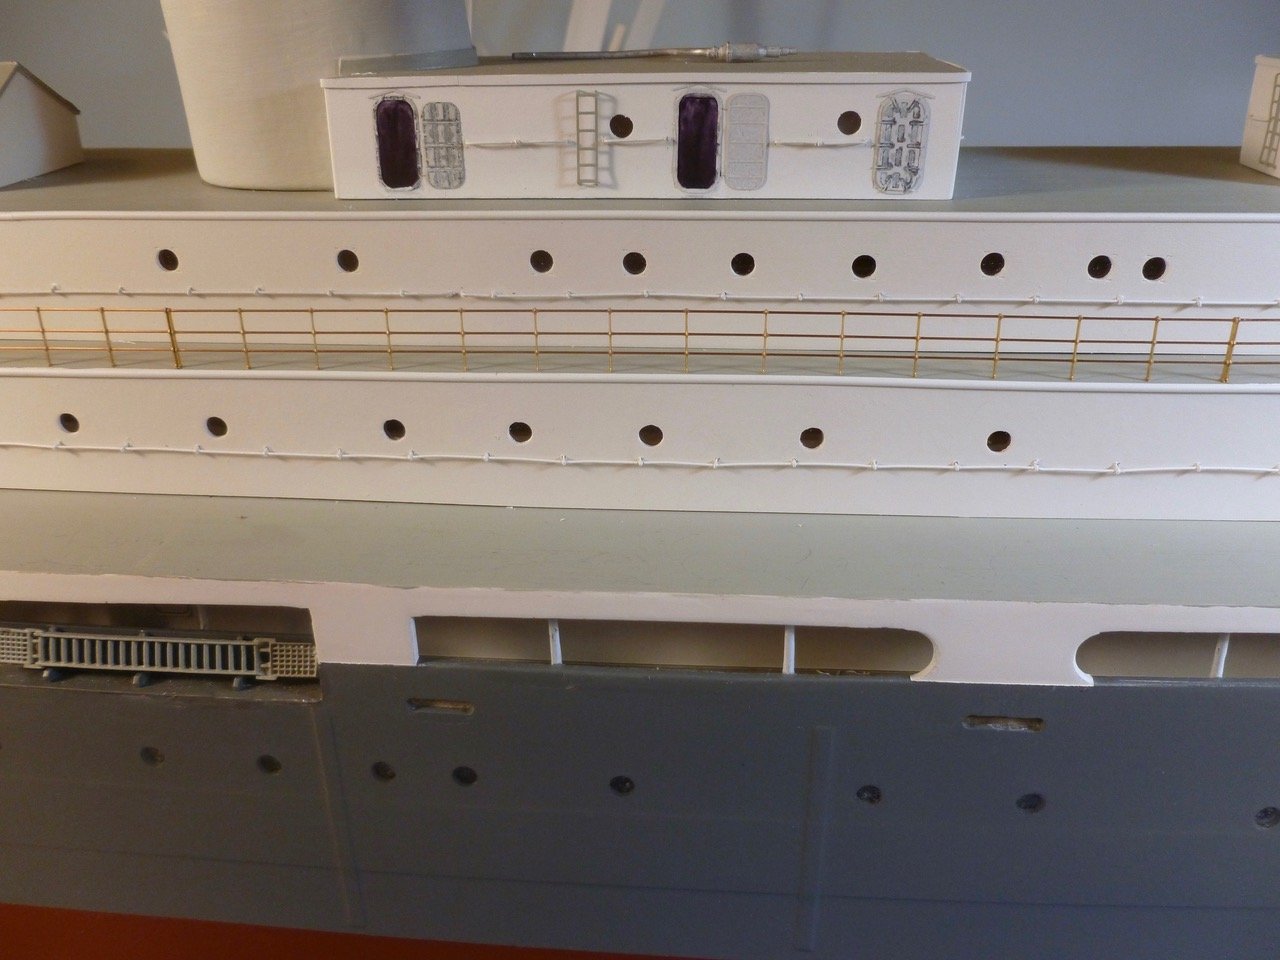
To all, thanks for your likes and for stopping by. The good news is that none of railings are glued in yet. I've had them in and out a few times during fitting and a few of them need the glue to maintain plumb. The spot Mark pointed out is a particularly challenging location because one of the three rails has a slightly different corner bend than the other two which pushes out the top corner, even though all three were bent as a group. Also there is some excessive sheer in the build, right around the circled area, which is compounding the challenge as the railing changes direction from on-sheer to off-sheer. I think gluing will take the curse out of most of it but it certainly has been a learning process - I figure I've made it to junior high school so far. Steve
- 446 replies
-
- 5
-
-
- zebulon b vance
- deans marine
- (and 3 more)
-
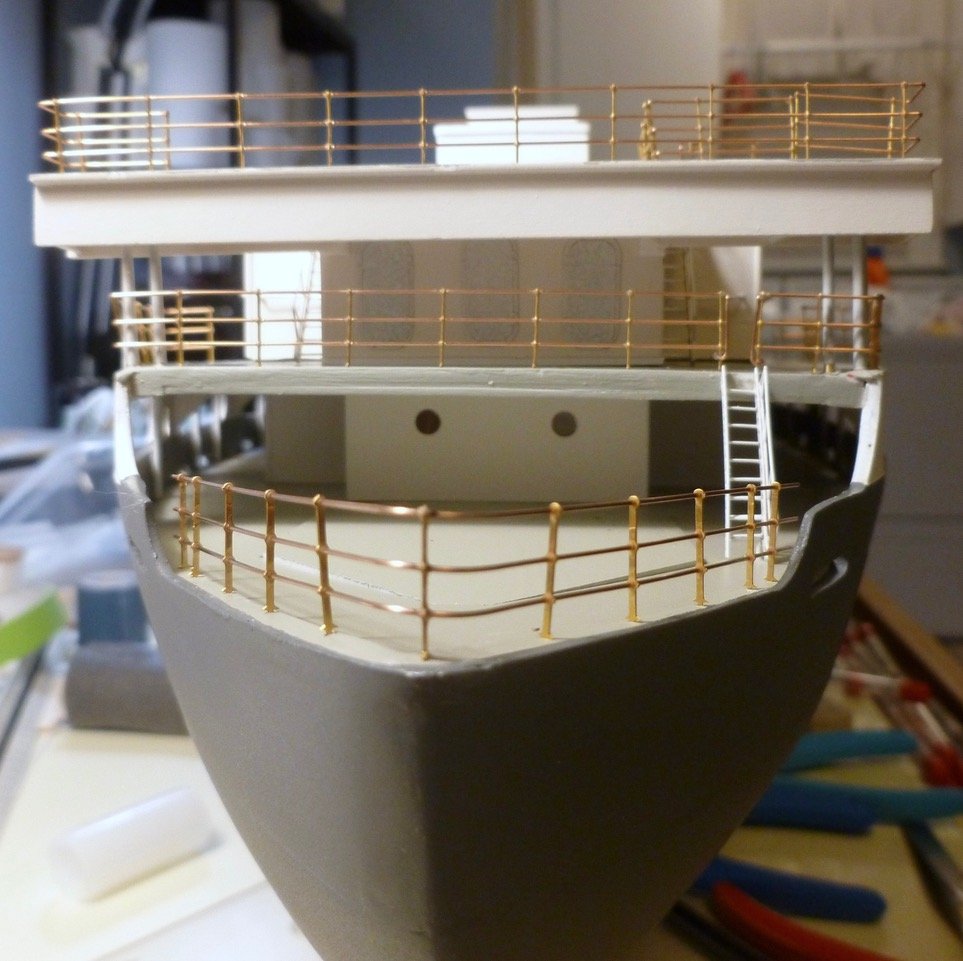
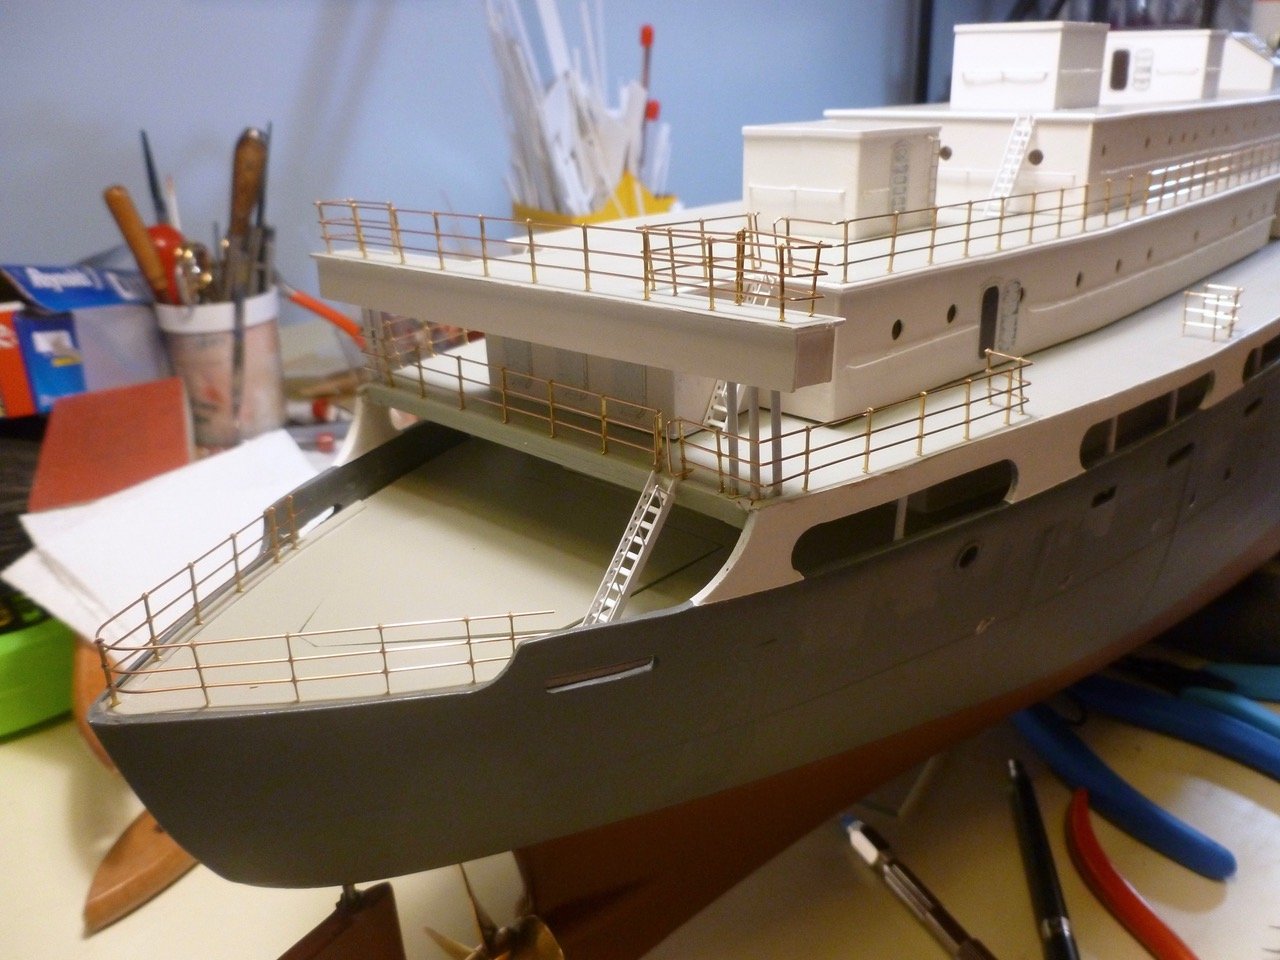
To those who gave likes, thank you and thanks for stopping by. Mark, good catch. I had a painful lesson in center of gravity when trying to navigate off a curb while using a knee walker, and it was only a 6 inch curb. Lou, congrats on the win. I should probably send you the walker railing template…. Steve Railings - the saga continues After the walker race finished I worked up the aft railings at the boat and main decks. Then I plugged the upper decks back on for an overall look at progress, starting aft. Next up will be the top deck perimeter railings.


- 446 replies
-
- 9
-
-
- zebulon b vance
- deans marine
- (and 3 more)
-
Looks like a good, honest, well-used working deck to me. If there are too many reflections from glossiness you might use a matte clear coat to flatten it out. If what look like reflections are some splotchiness I'm sure others could give guidance on blending or weathering techniques, but I would hope you wouldn't paint it. The deck really adds to the character. Steve
- 9 replies
-
- 2
-
-
- corel
- Chesapeake Bay Flattie
- (and 2 more)
-
Another masterwork in the making. Jeez, I wish I had your speed (and skill, and painting ability, and research.....) Steve
- 345 replies
-
- 4
-
-
- graf zeppelin
- trumpeter
- (and 2 more)
-
To those who gave likes, thank you and thanks for stopping by. Carl and Lou, I hope you’re ready to race. Steve Railings - take your mark…. The “walker” railings are lined up and ready to run, so get yourself in position, preferably with two hands on the bars (I became quite familiar with a regular walker, crutches and a knee walker while I was recovering from foot and ankle surgery, including a less than graceful end-over-end trying to step off a curb). The course is one lap around the shipyard, a short stop at the refrigerator and first one to enter the paint shop gets to fabricate all of them on the port side. The eye in the sky awaits the chaos of the opening lap….

- 446 replies
-
- 8
-
-
- zebulon b vance
- deans marine
- (and 3 more)
-
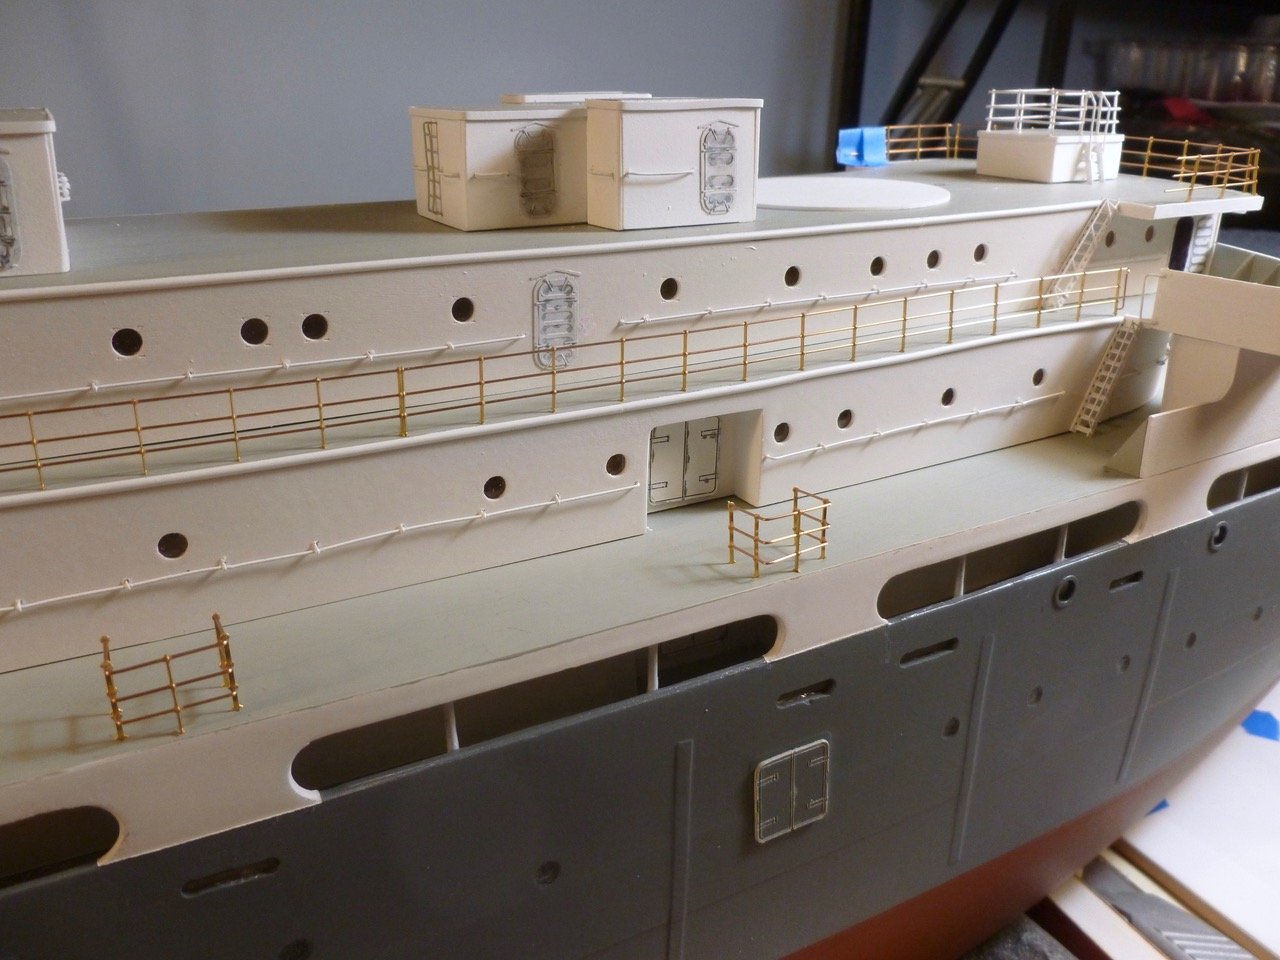
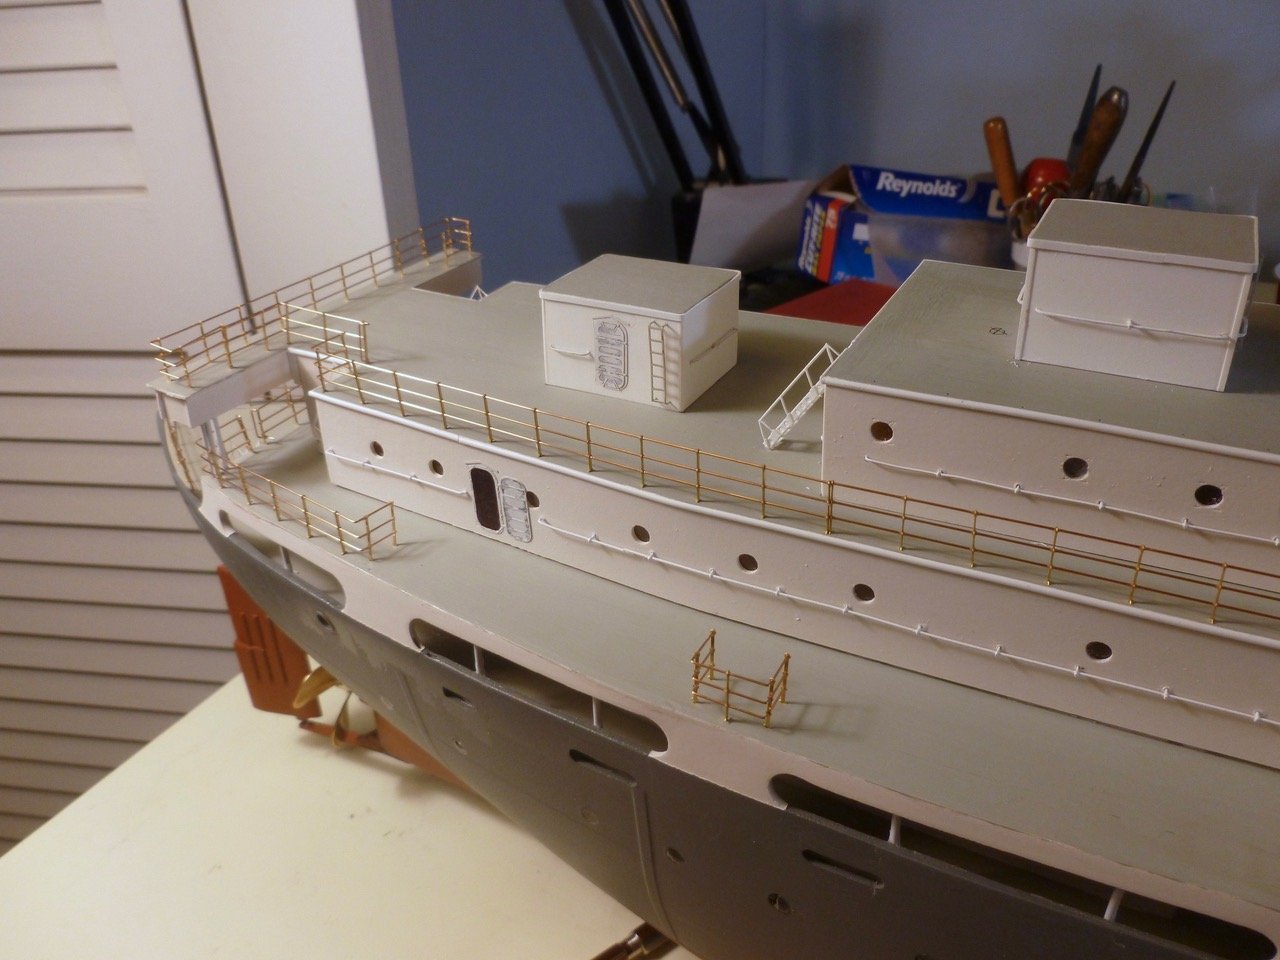
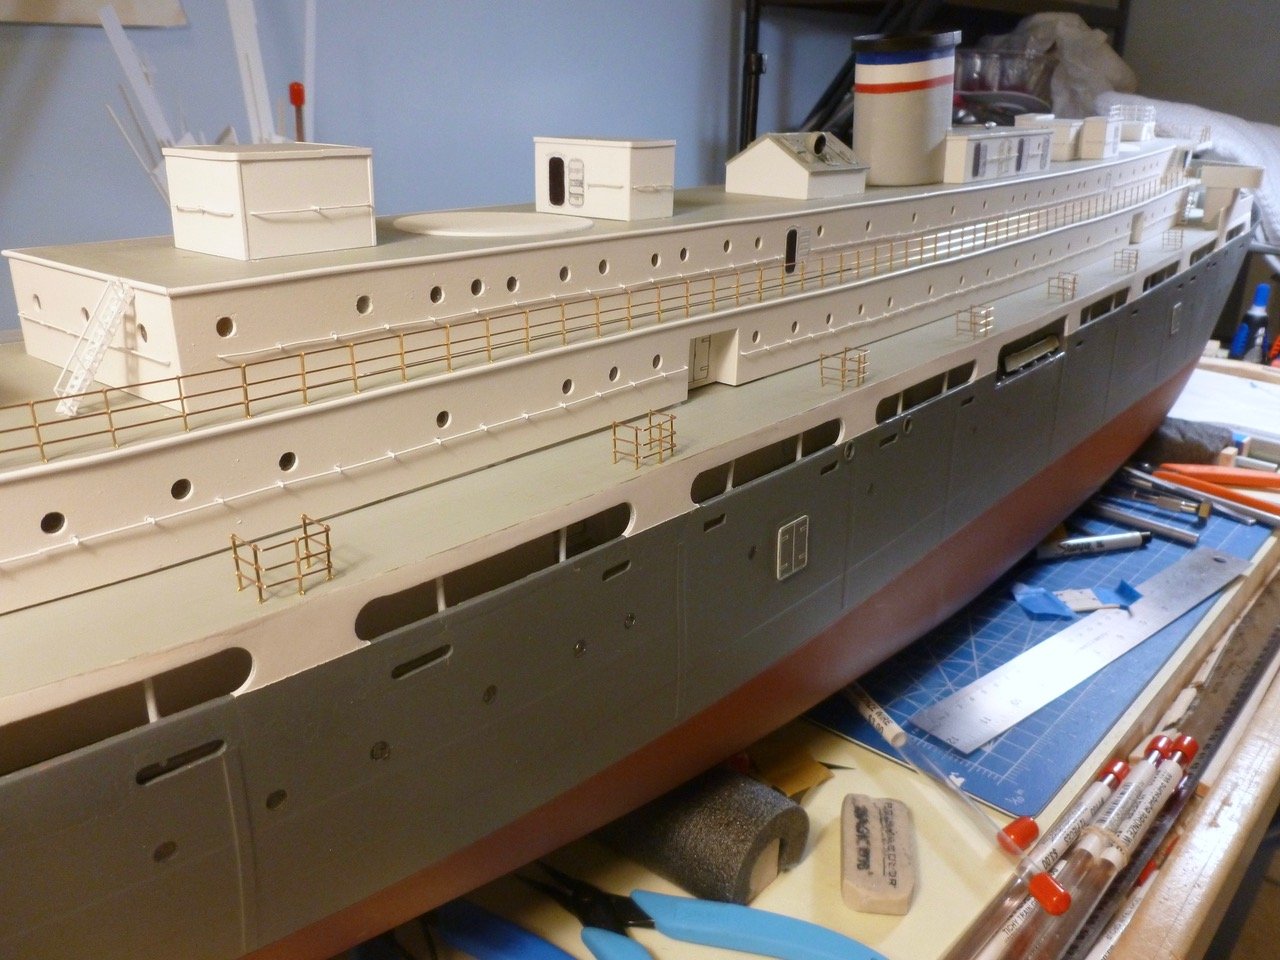
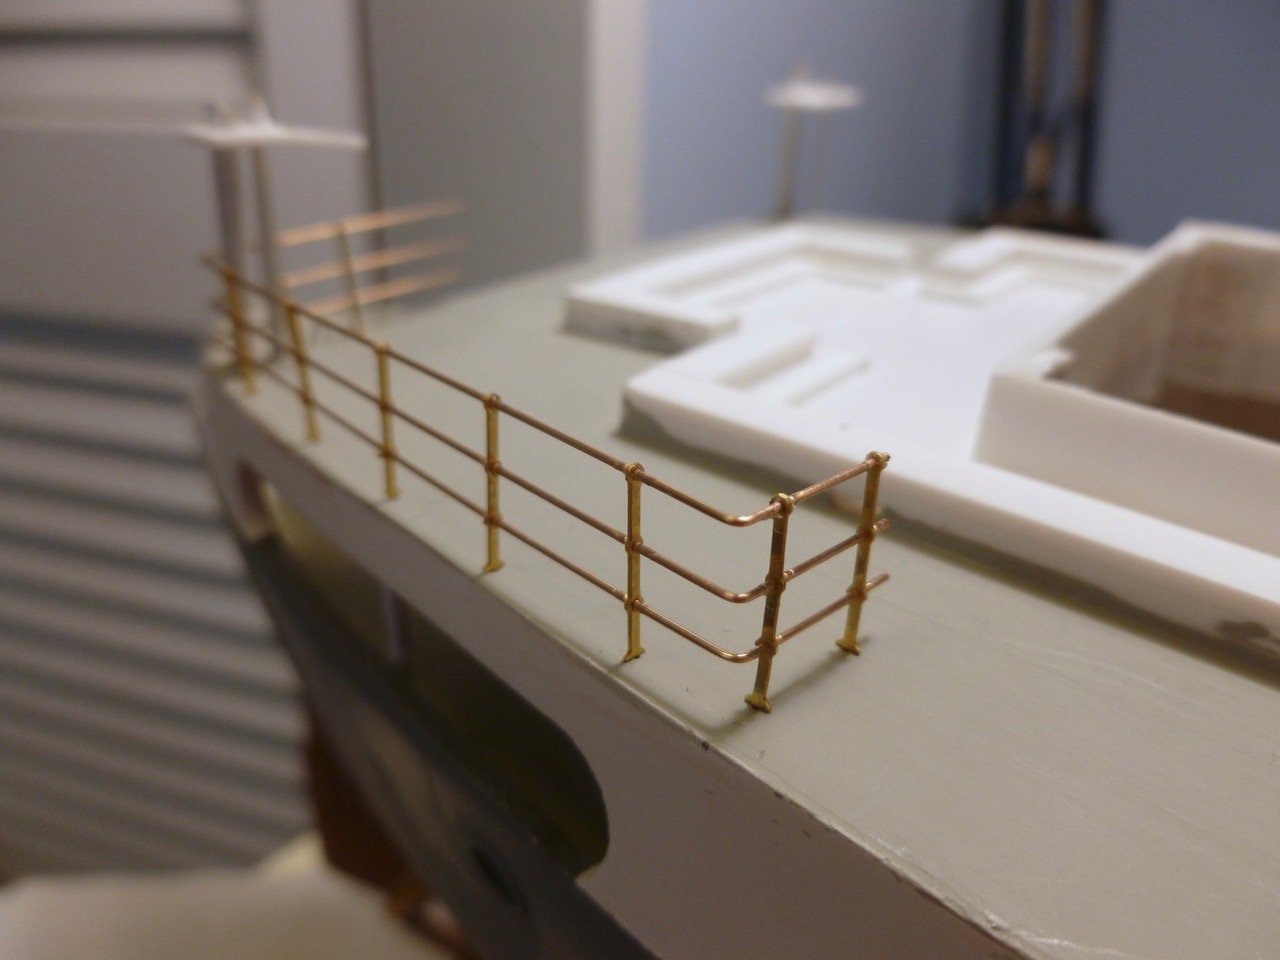
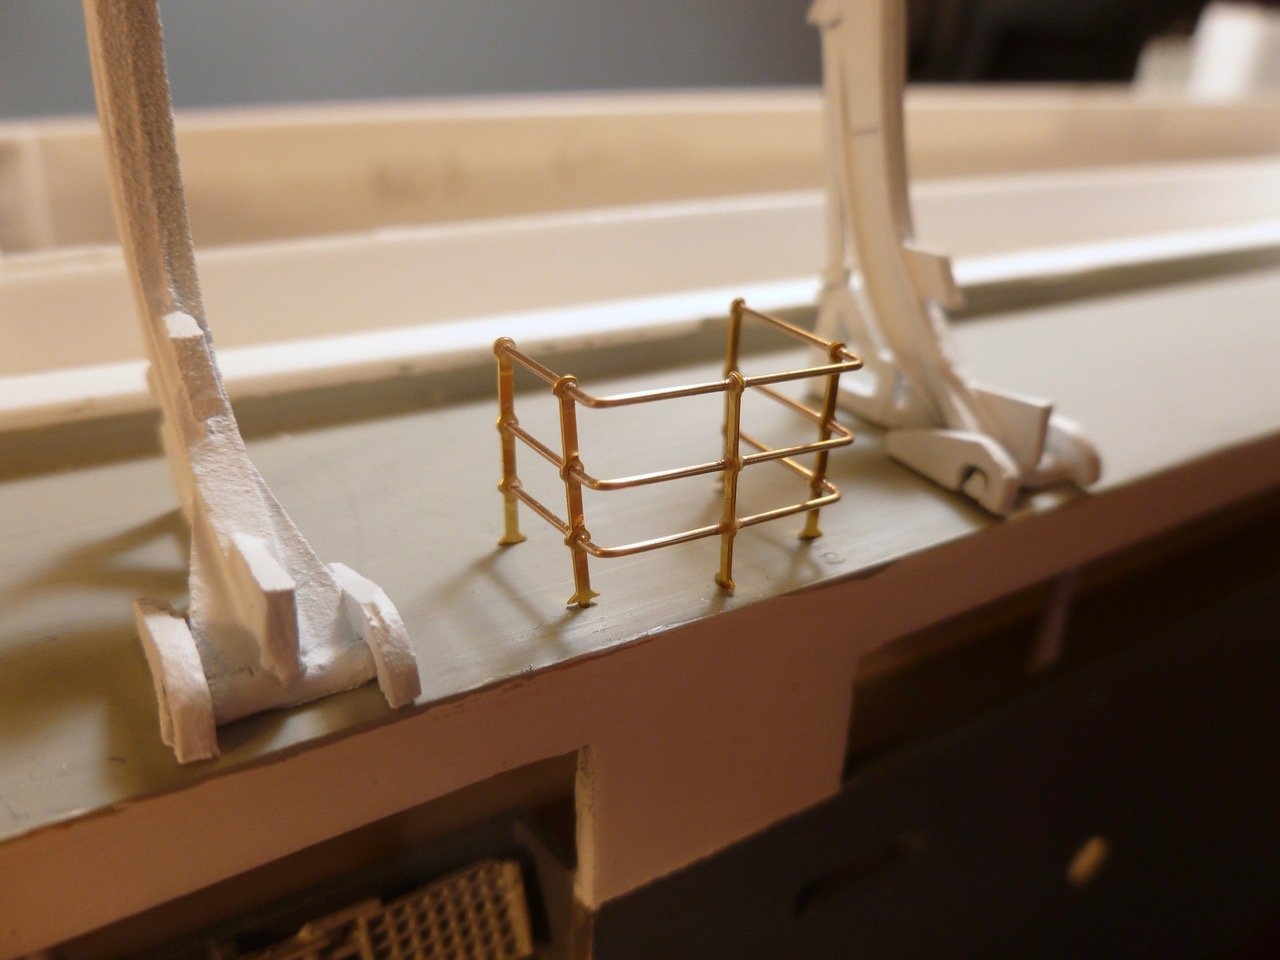
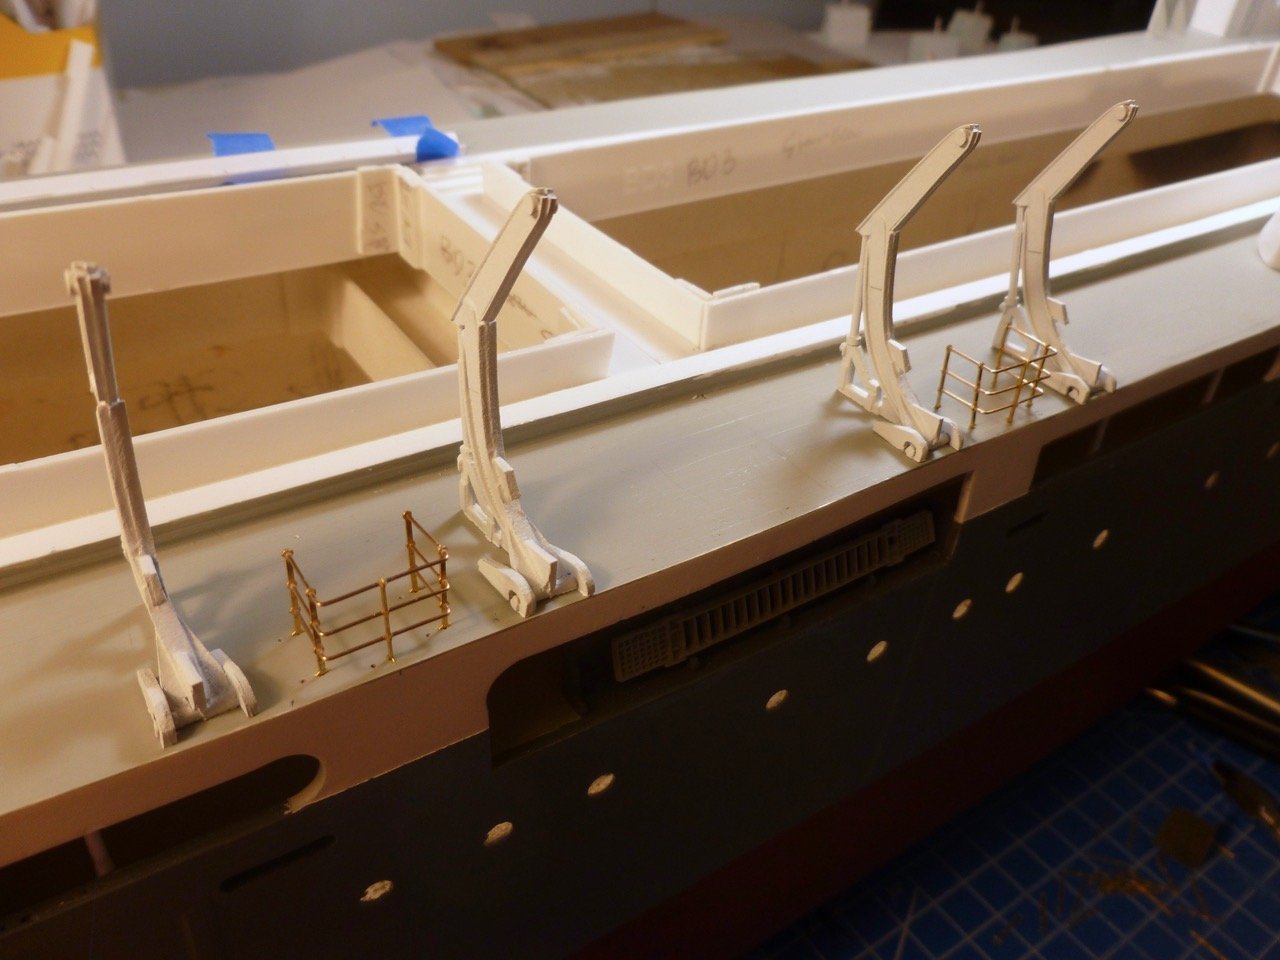
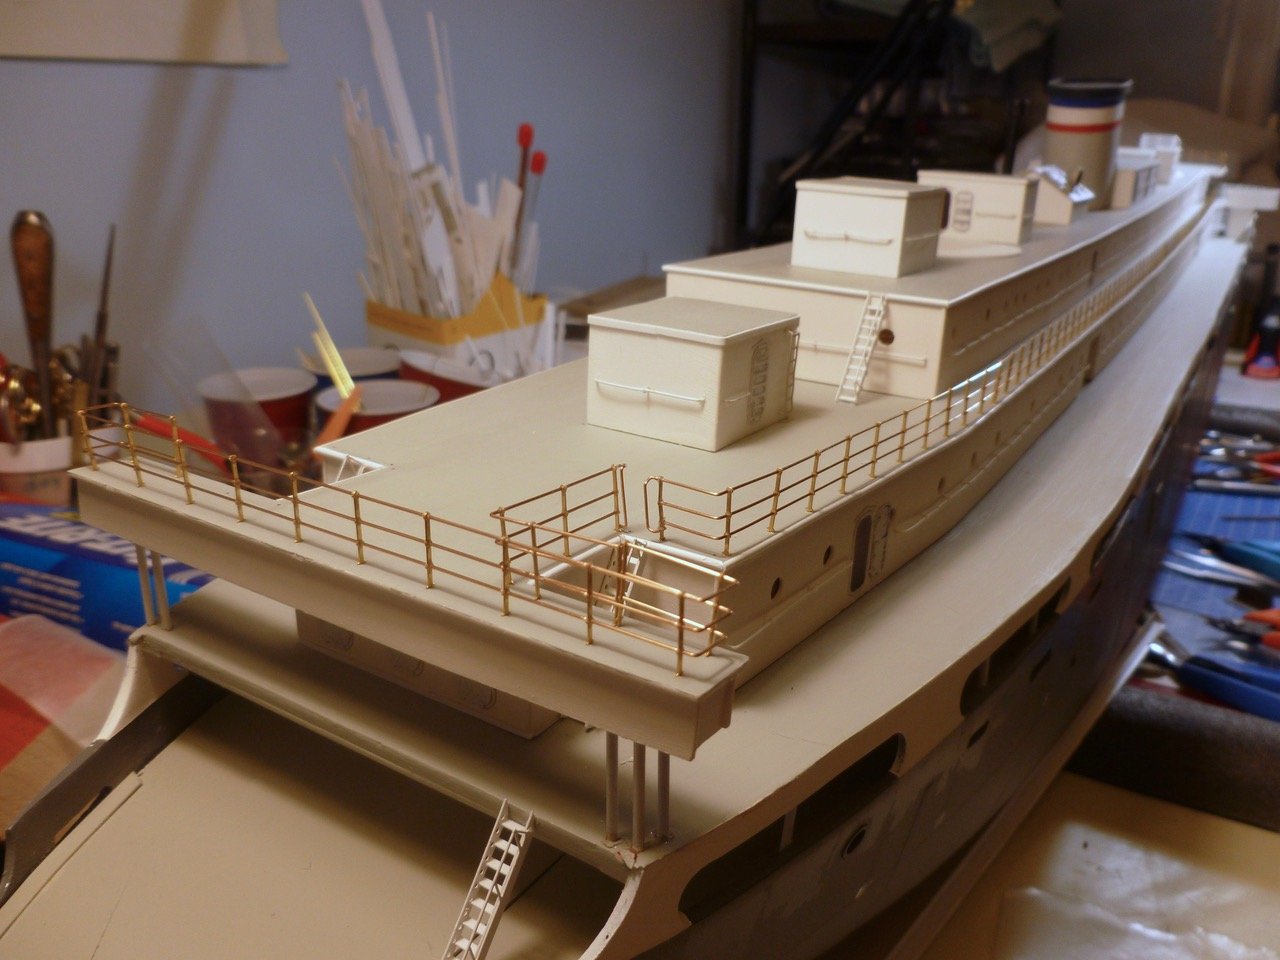
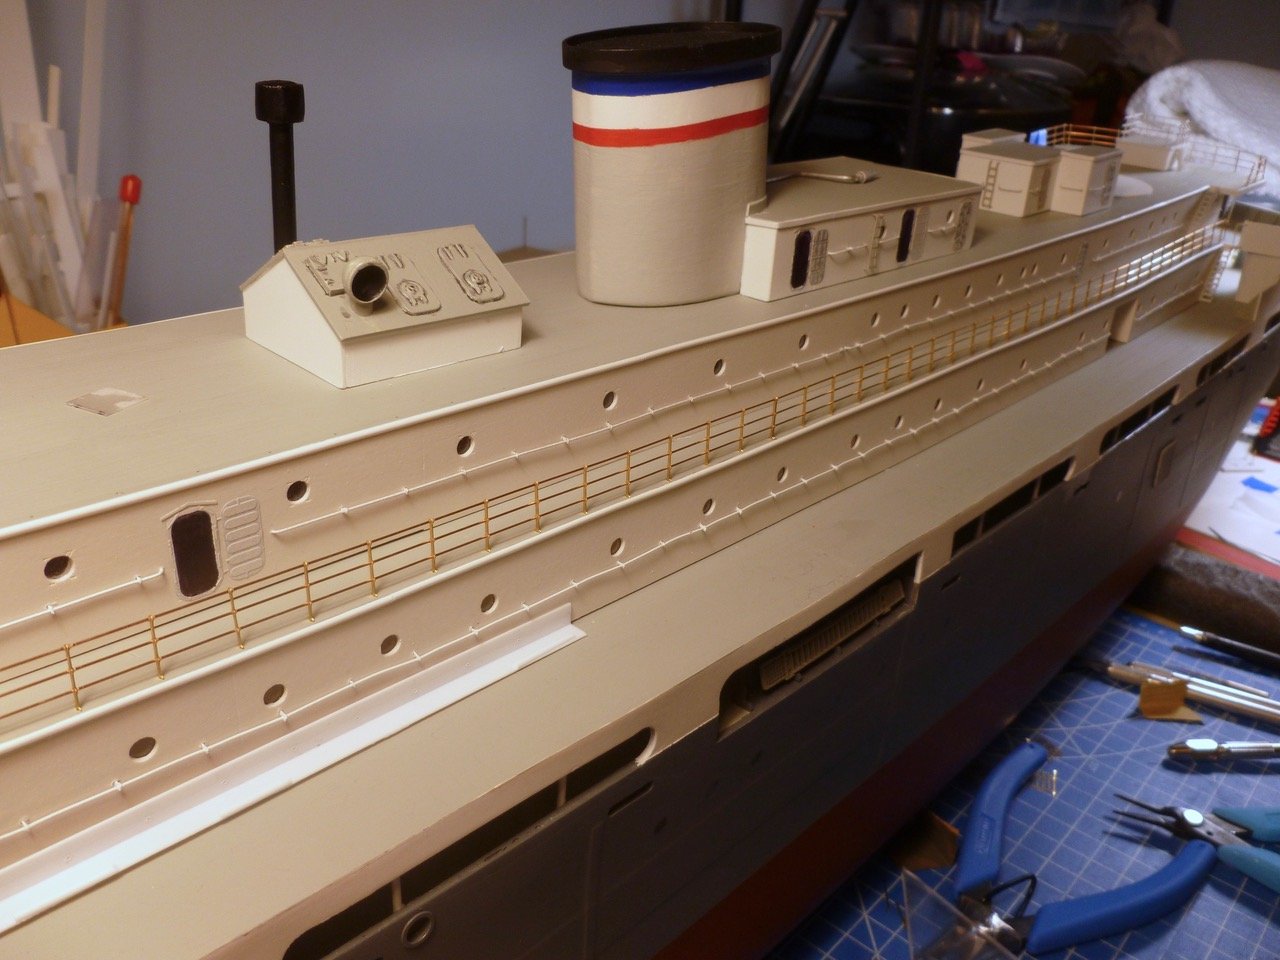
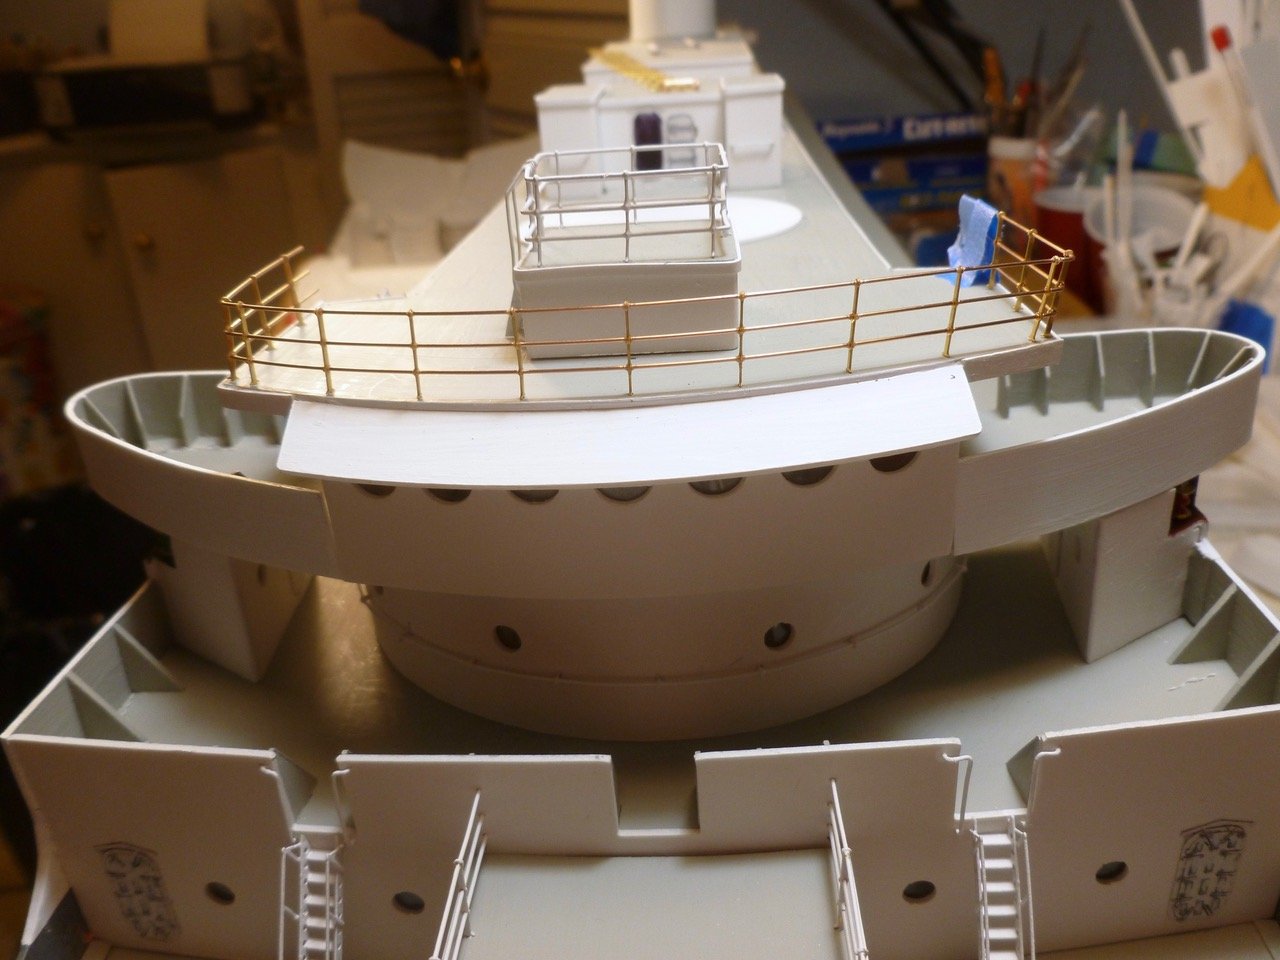
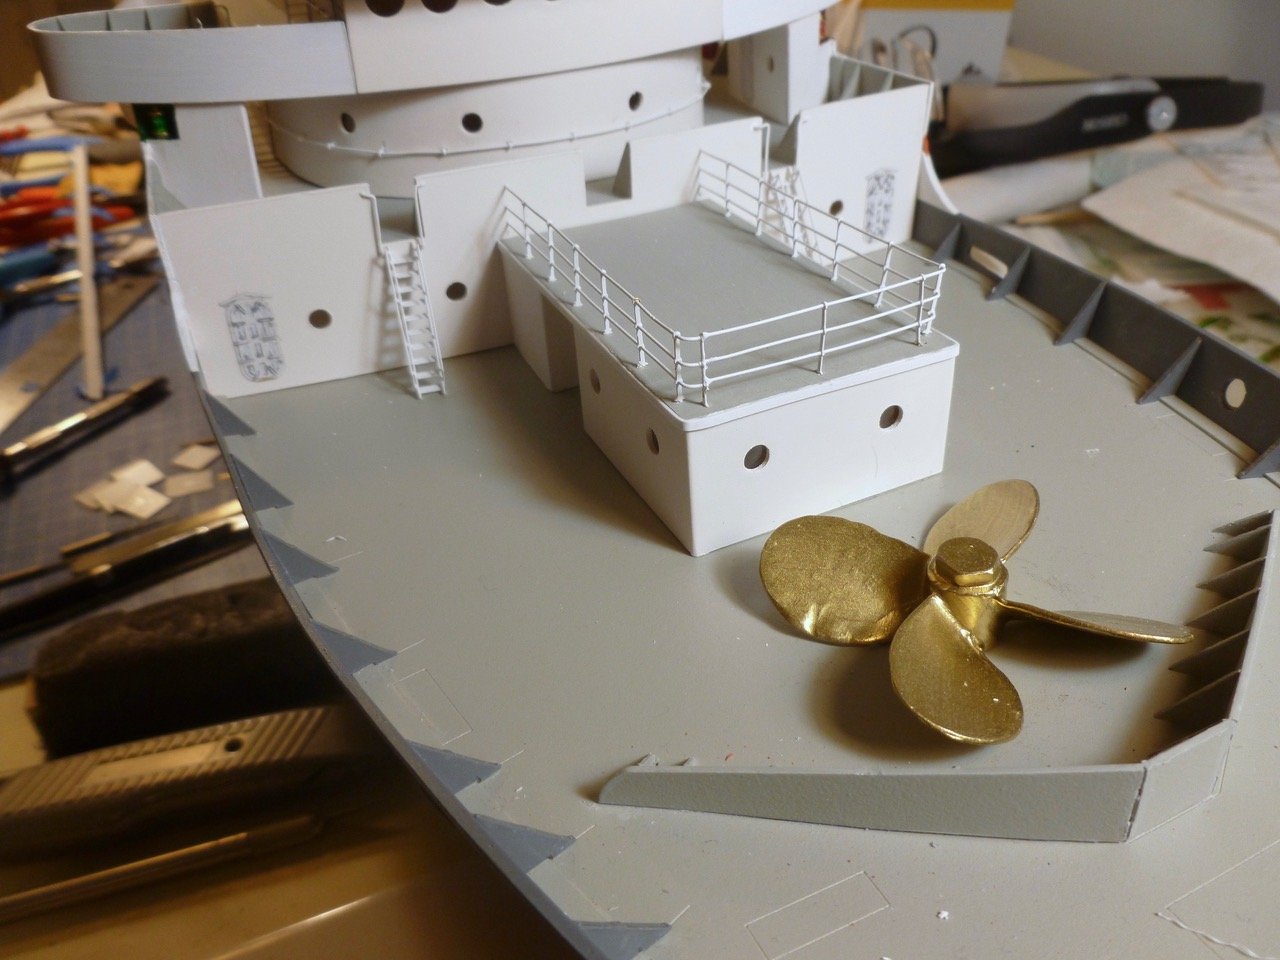
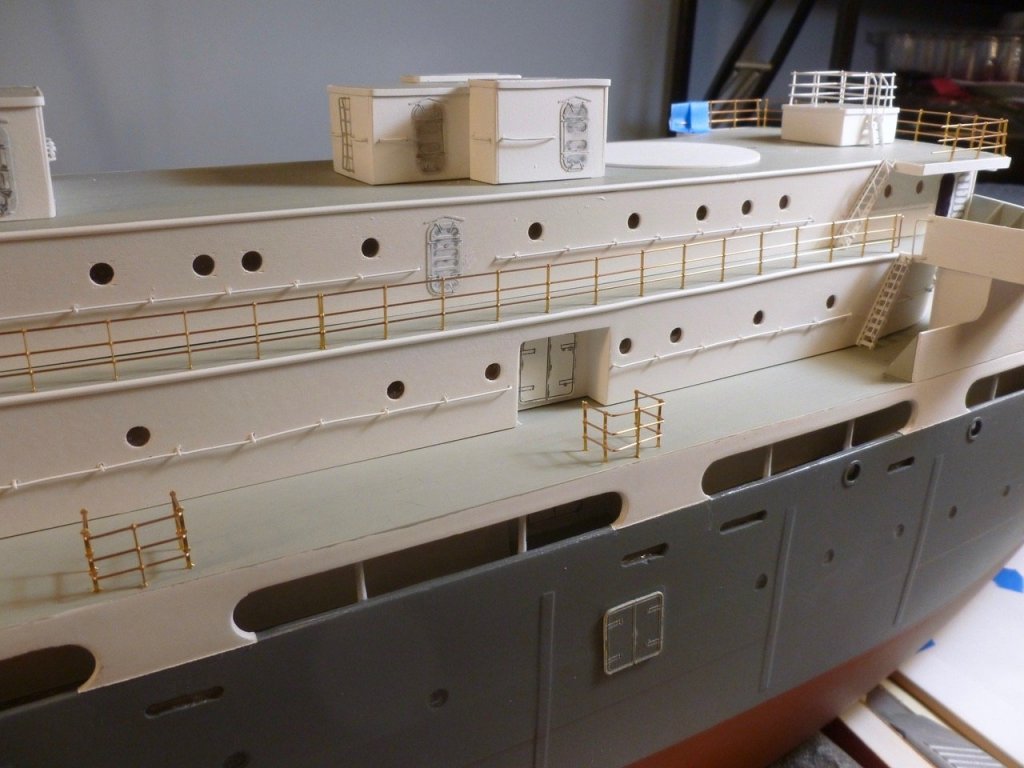
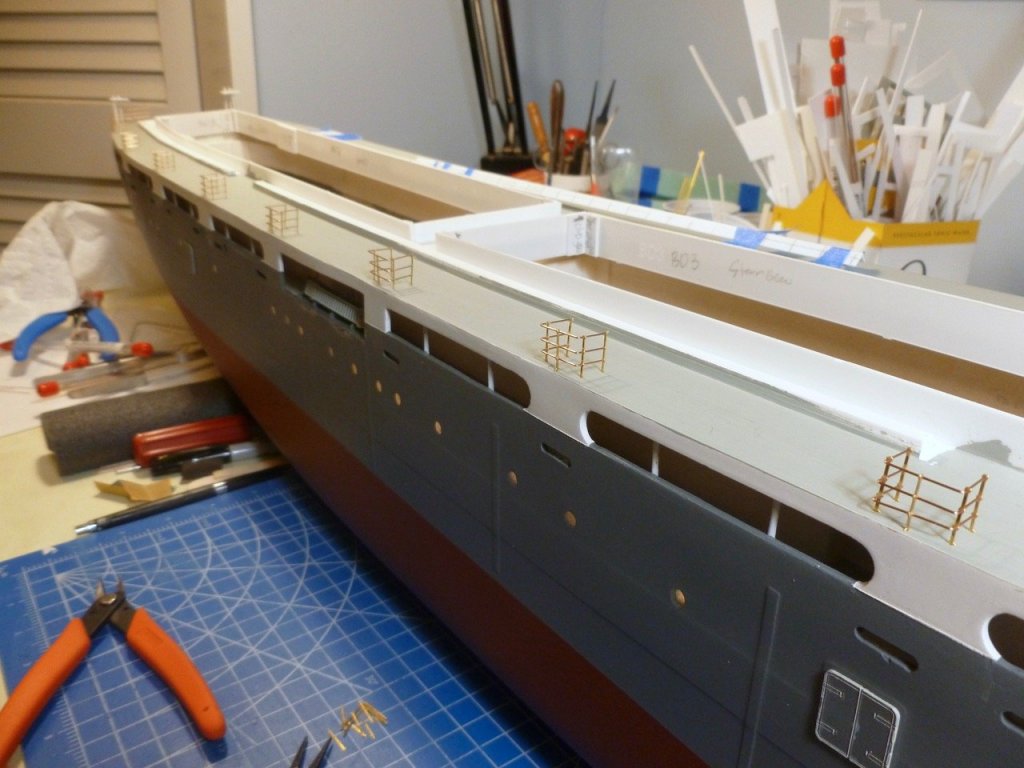
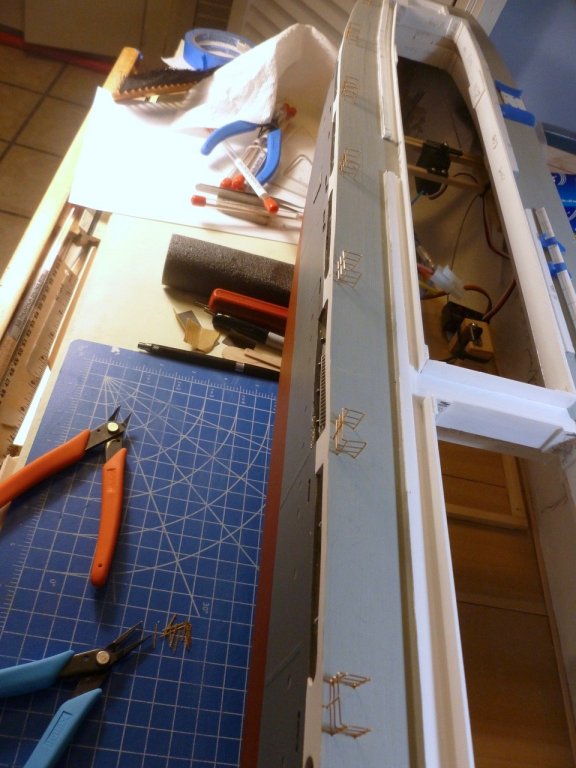
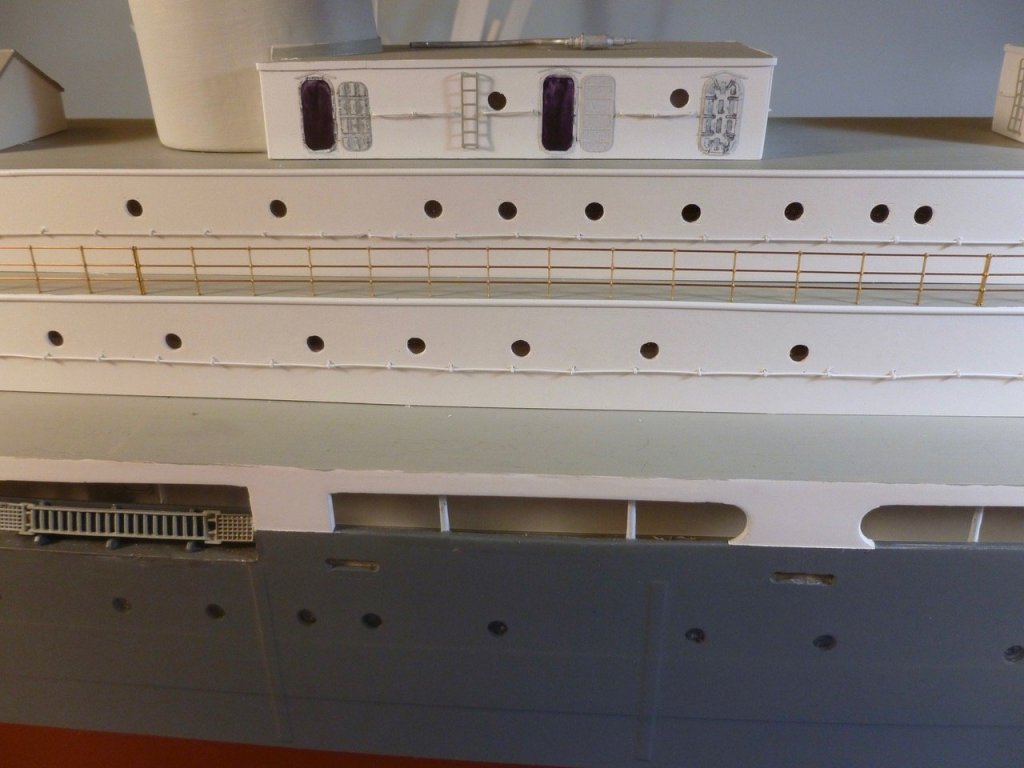
To those who gave likes, thank you and thanks for stopping by. Lou, not even an air brush in this shipyard, let alone something as exotic as a hole mobilizer. Mark, this ship is going in the water. If it made the trip from England without sinking a pond should be a walk in the park (he said out of complete ignorance). Carl, thanks for the idea. Do you think I need that much for a hole that’s not much bigger than 0.020? I was thinking just a smear of body glazing putty. My railing access is okay now that the upper decks are away on holiday. Steve Railings - bridge and top decks enjoying Mother’s Day I swallowed hard and lifted the bridge/top deck assembly off to get access for the railing fab at the aft boat deck. Turned out to be no big deal but I need to remember to be careful not to squash the wall railings during removal and replacement. They are nice grab bars but don’t tolerate fat fingers. The aft railing terminates at each side of the aft boat deck stair, terminates at the other ends with a short return near the davits and wraps around the aft bridge columns in between. To get the location of the return I set all the boats in place to determine the available spacing between boats. The other reason for knowing the spacing is to install the short railing sections between boats. A photo of the short sections shows them about 8 feet wide but I had to reduce it to about 5 ft since the kit boats appear to be a bit long compared to the real. I fabricated a couple of short sections and set them in place with a few davits to see how it will look. Of course I managed to add to my stash of extra holes when I set the drilling template too far aft for one of the short sections. By the time I’m finished I’ll probably have enough extra holes to do the next ship without any drilling.


- 446 replies
-
- 9
-
-
- zebulon b vance
- deans marine
- (and 3 more)
-
Carl, looking great. Glad to see you return to building. Might take some of the heat off the rest of us😎 ...although I'd miss your guidance and zingers. Steve
-
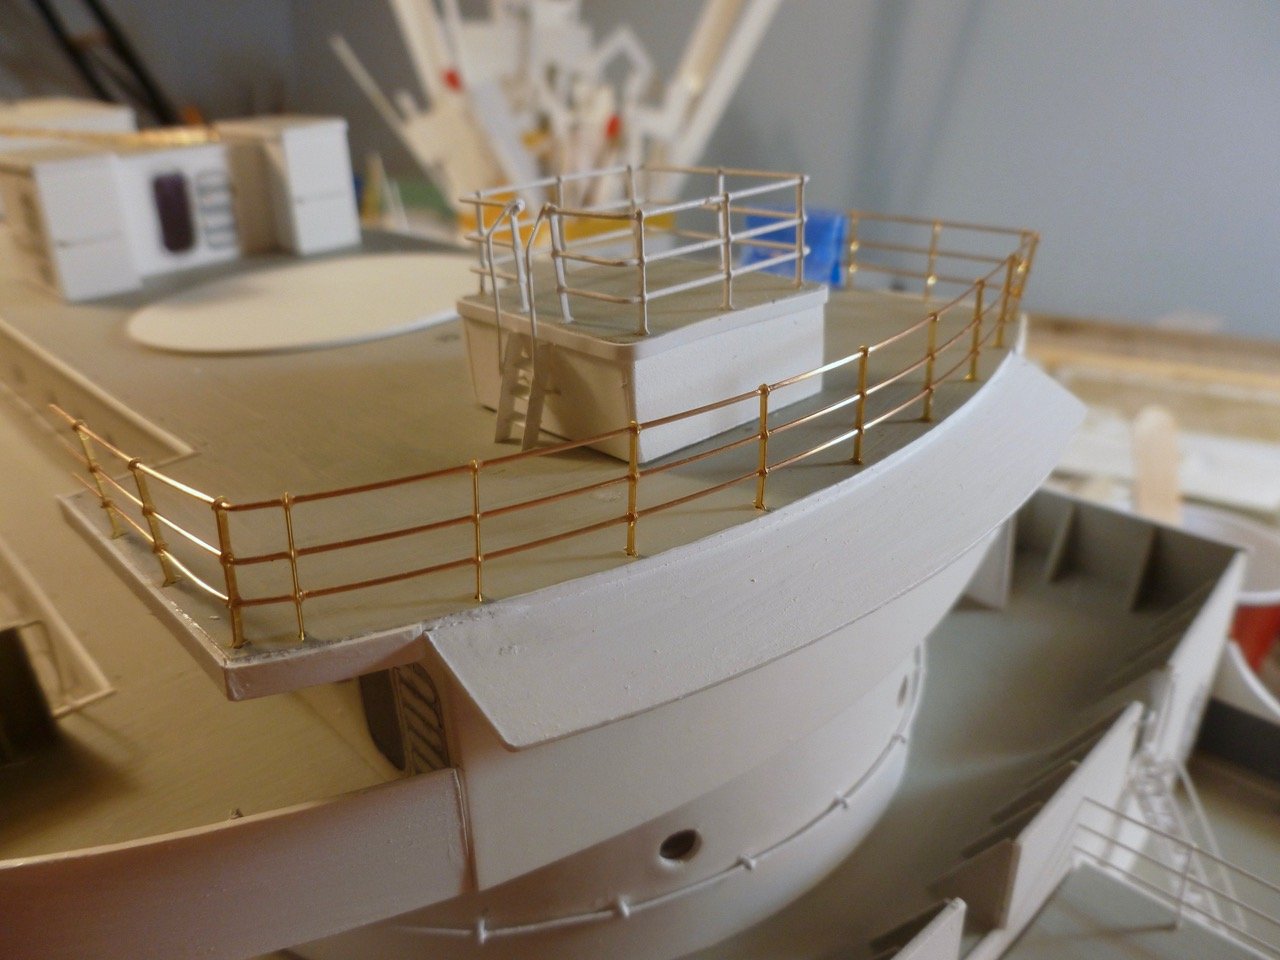
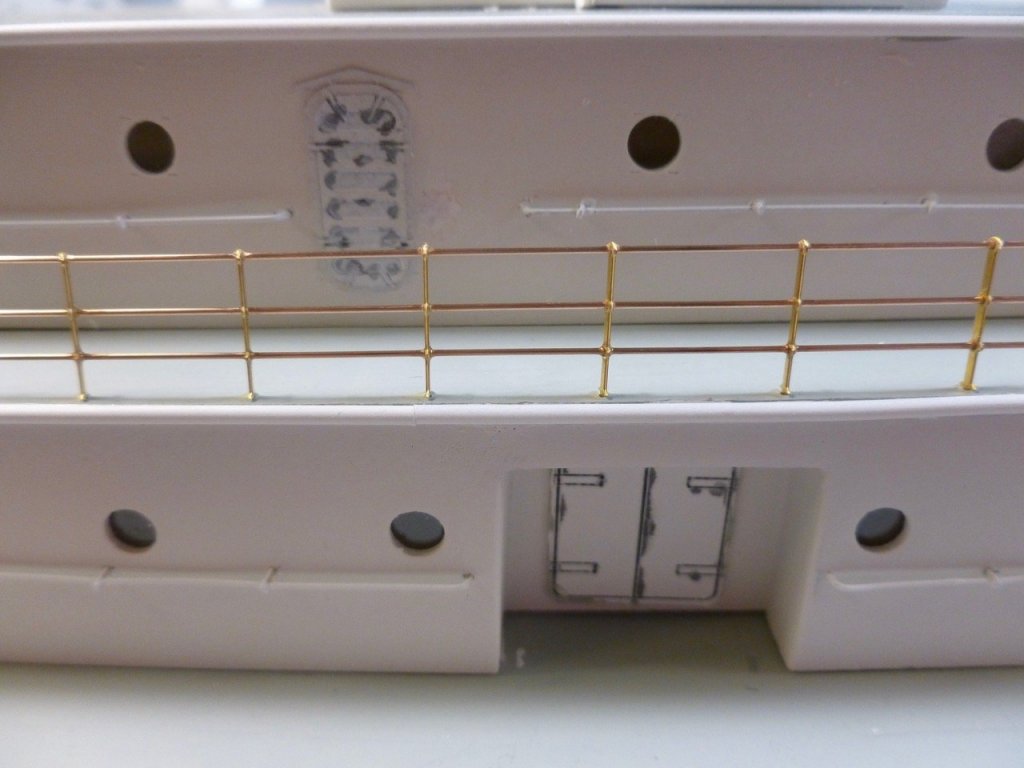
To those who gave likes, thank you and thanks for stopping by. Lou, Carl, Kevin and Mark, thanks so much for your support and kind feedback. We really did a happy dance when we got the news. The video clip is just what I was feeling after being dumbstruck. Carl, I’m not sure I have the skill to scarf the railing through that little stanchion hole. I found that even the slightest burr on a railing end is enough to prevent it from going through and I wouldn’t be surprised if a layer of CA within the scarf would be enough to block passage. Lou, I like the idea of railing plates but I’m finding that maintaining the full length end stanchion helps to keep the three railings in good alignment with each other and with the adjacent section. Steve Railings - the aft bridge joins the fray I’ve worked my way through the starboard bridge deck railing fab, and around the aft bridge. The jury is out on the railing extension on the starboard side of the aft stair and I’m wondering if I should snip it off. The stanchion is close to the stair anyway, and the change in stanchion direction between the port and starboard sides of the stair makes the starboard extension feel awkward opposite the port extension which looks like it belongs there. See below for a closer view. And oh, by the way I drilled too many mounting holes (one near the stair and one at the outside corner of the bridge deck). One stanchion per corner is plenty. And I also forgot to drill stanchion holes across the aft end of the boat deck, wrapping around the columns at each end, which means pulling the whole bridge/top deck assembly to allow access. If only I could magically relocate the extra holes I've drilled here and there to the boat deck...now that would be a happy dance on its own.


- 446 replies
-
- 7
-
-
- zebulon b vance
- deans marine
- (and 3 more)
-
Just a short non-ship update. My wife's suspected lung tumor turned out to be more like scar tissue, perhaps as a result of severe bronchitis a few months ago. No surgery needed. Our sincere thanks go out to all who expressed concern and offered support. More ship news to come. Thank you again from the bottom of our hearts. MSW is truly a wonderful community in so many ways. Steve
- 446 replies
-
- 7
-
-
- zebulon b vance
- deans marine
- (and 3 more)
-
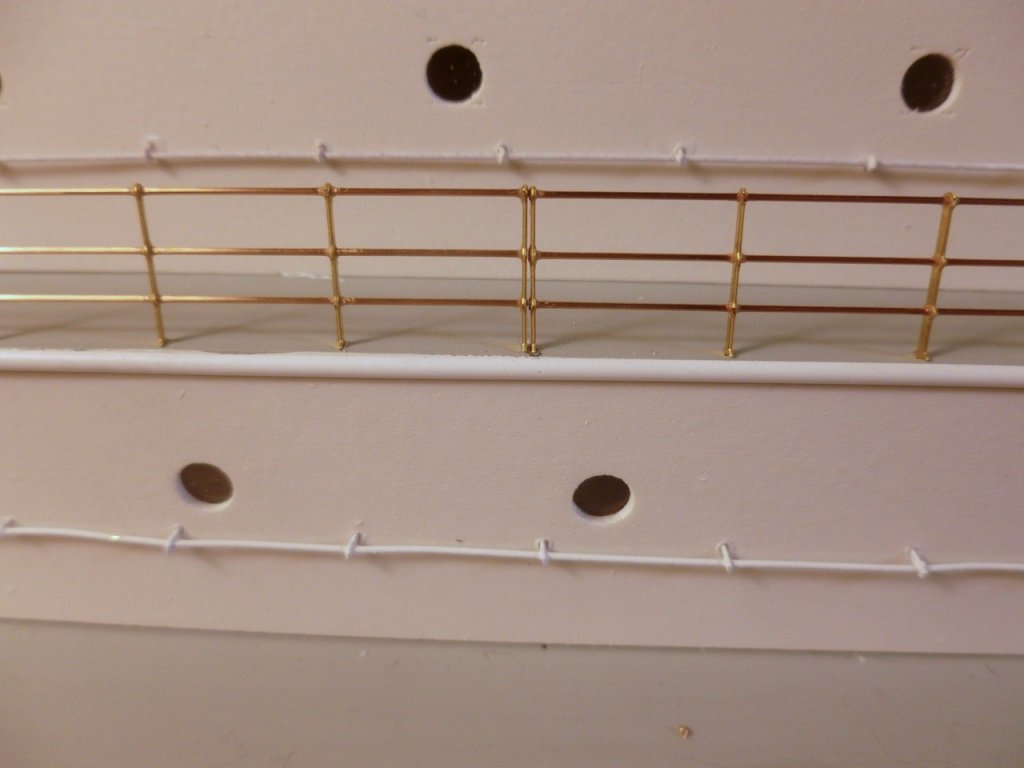
To those who gave likes, thank you and thanks for stopping by. Carl and Kevin, thank you for your kind feedback. My wife's biopsy was summarized as a true negative, a much welcome surprise. We meet the doctor next week to discuss next steps. Thanks again to all who expressed concern. We really appreciate it. Steve Railings - the other hand fights back…. While in the thinking position, which seems to be a good spot for mulling over ship stuff, it occurred to me that I was trying to force a bad idea by trying to push two railing stanchions into the same hole, and there was no way I could build one section, take it out, build another section starting in the same hole and expect all the holes, stanchions and railings in both sections to align properly. So I did the next best thing - I clipped the mounting pin off the bottom of one stanchion. Then I assembled the next railing section, aligned the stanchions, except the cut off one, with their mounting holes, and slid the railings in and out until the railing ends were just touching the last stanchion on the previous section. After gluing all but the end stanchion to the railings the railing position was fixed, and I could slide the cut off stanchion until it butted against the end stanchion of the previous section. A touch of CA fixed the stanchion to the railing but I was careful not to glue the two end stanchions together so I can remove the sections for painting. The double stanchion stands out in the very close view above but the extra thickness blends in reasonably well in the more distant view below. Here are three railing sections test fitted and ready for the paint shop. Each section has some stiffness for handling, even out of the mounting holes. It bodes well for the remaining railings.

- 446 replies
-
- 8
-
-
- zebulon b vance
- deans marine
- (and 3 more)
-
To those who gave likes, thank you and thanks for stopping by. Carl, thank you for your kind comment. Ship shape makes me feel really good measured against the MSW artisans. Mark, thanks for your nice feedback. Kevin, I have a number of photos of the davits on several of the sister ships but as in the model the boats and davits are close to the cabin wall so there is no view behind them. Steve Railing accomplishments, but on the other hand.… I dug up some courage and decided to try fitting the curved railing at the forward end of the top deck. The railings were long enough to extend most of the way down each side so the difficult part could be done in a single piece. I’ll trim them back to the last stanchion and fit in a corner piece on each side. I’m so pleased I couldn’t resist popping in a few more pics. I also built a railing return at the stair, to match the wall grab rail on the other side. I thought that might deserve a few pics too. I made up another straight section of railing to I could test my idea of doubling up the end stanchions. To build the second section I marked the hole location for the last stanchion in the first section, then removed the first section and placed the first stanchion of the second section in the marked hole (you probably see where this is going). I aligned all stanchions for the second section and glued the railings to the stanchions. Then I reset the first railing after sanding the railing stubs off the last stanchion. But when I went to place the second section I realized that I had placed the last stanchion of the first section in exactly the same place in the deck hole as the first stanchion of the second section. I couldn’t push the stanchion to clear the first section without messing up the alignment of all the second section stanchions in their mounting holes. So now I have some close quarters trimming to shift the second section first stanchion one stanchion width aft, or abandon the double stanchion idea and solder the railing ends to the first section, assuming I can trim the railings tightly enough to butt against the stanchion. The good news is I discovered the multiple stanchions create a stiff railing section, even before final gluing into the deck, so maybe my concern about wobbly railings was unfounded. Live and learn. Or is it learn, live a little, learn, live a little.......


- 446 replies
-
- 6
-
-
- zebulon b vance
- deans marine
- (and 3 more)
-
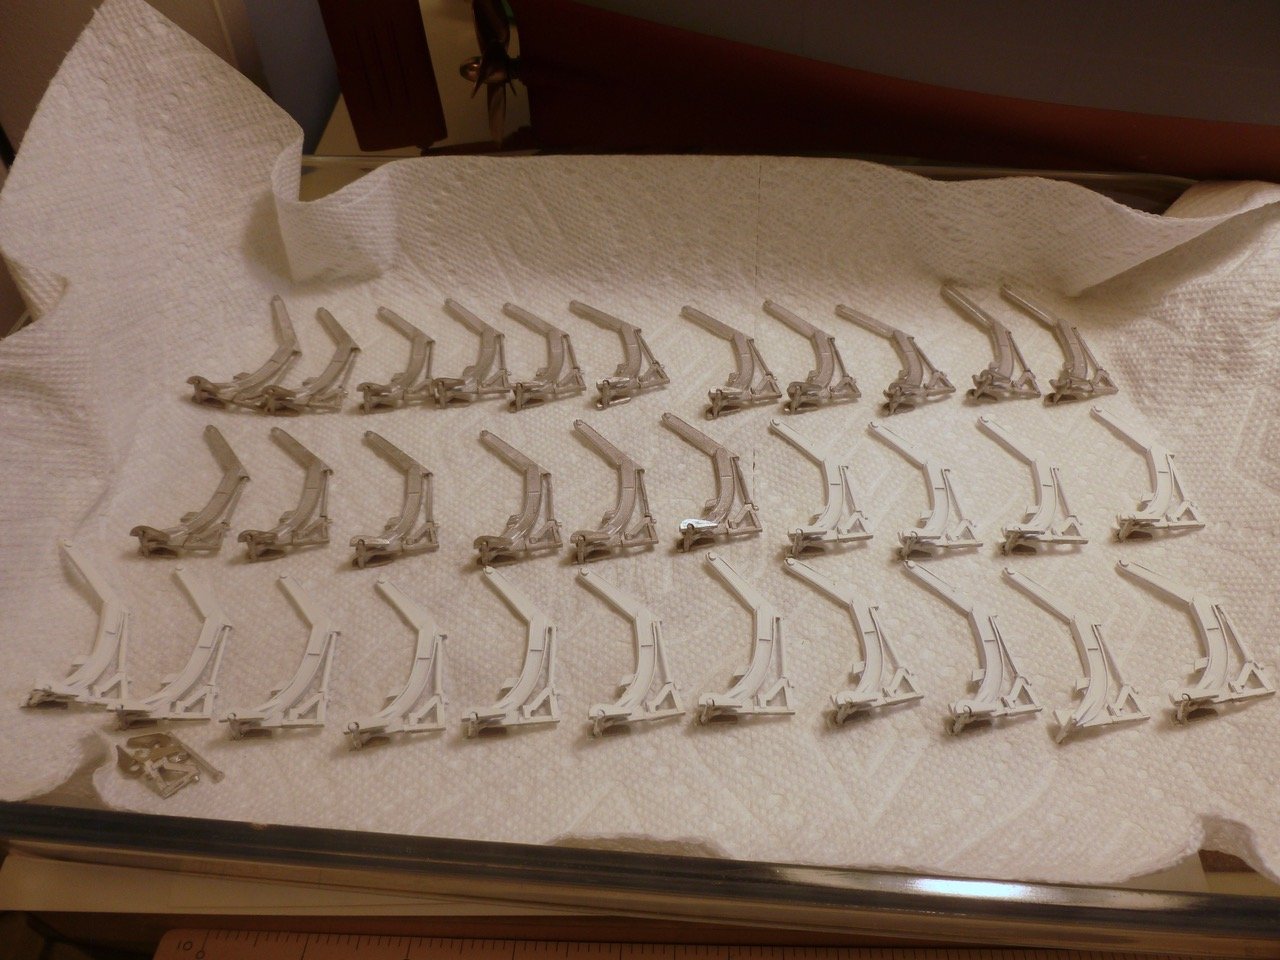
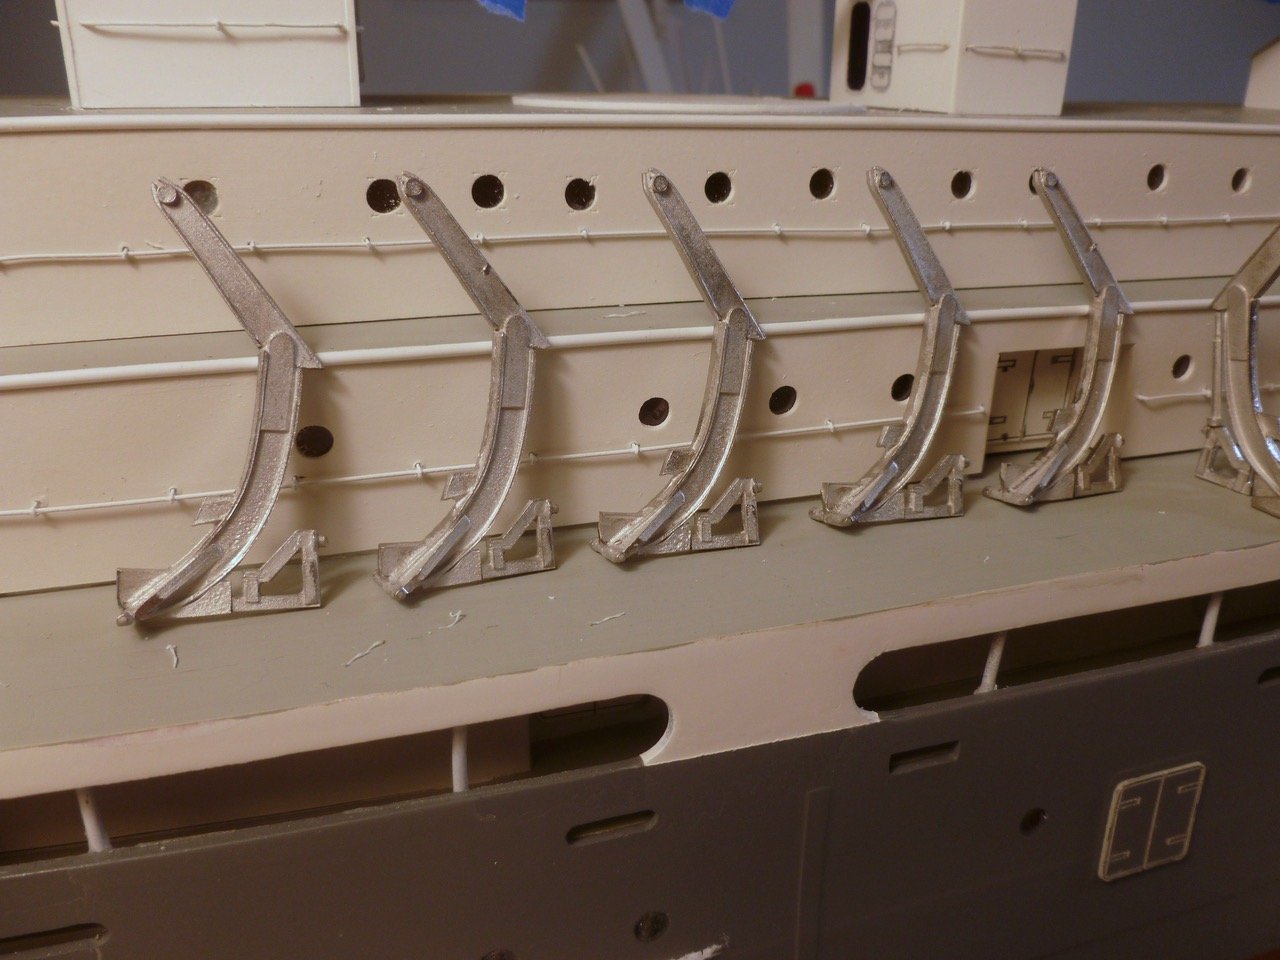
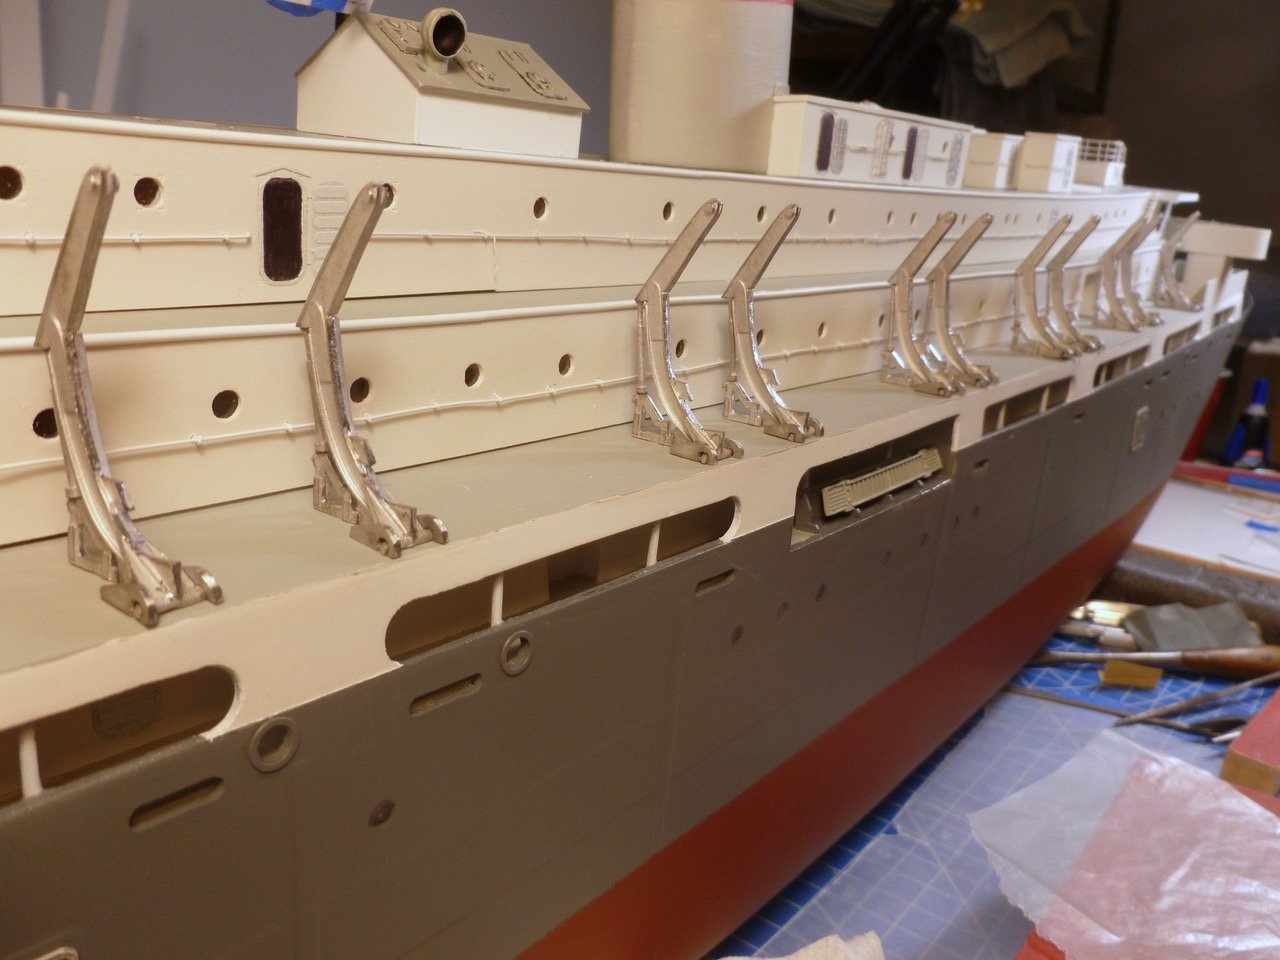
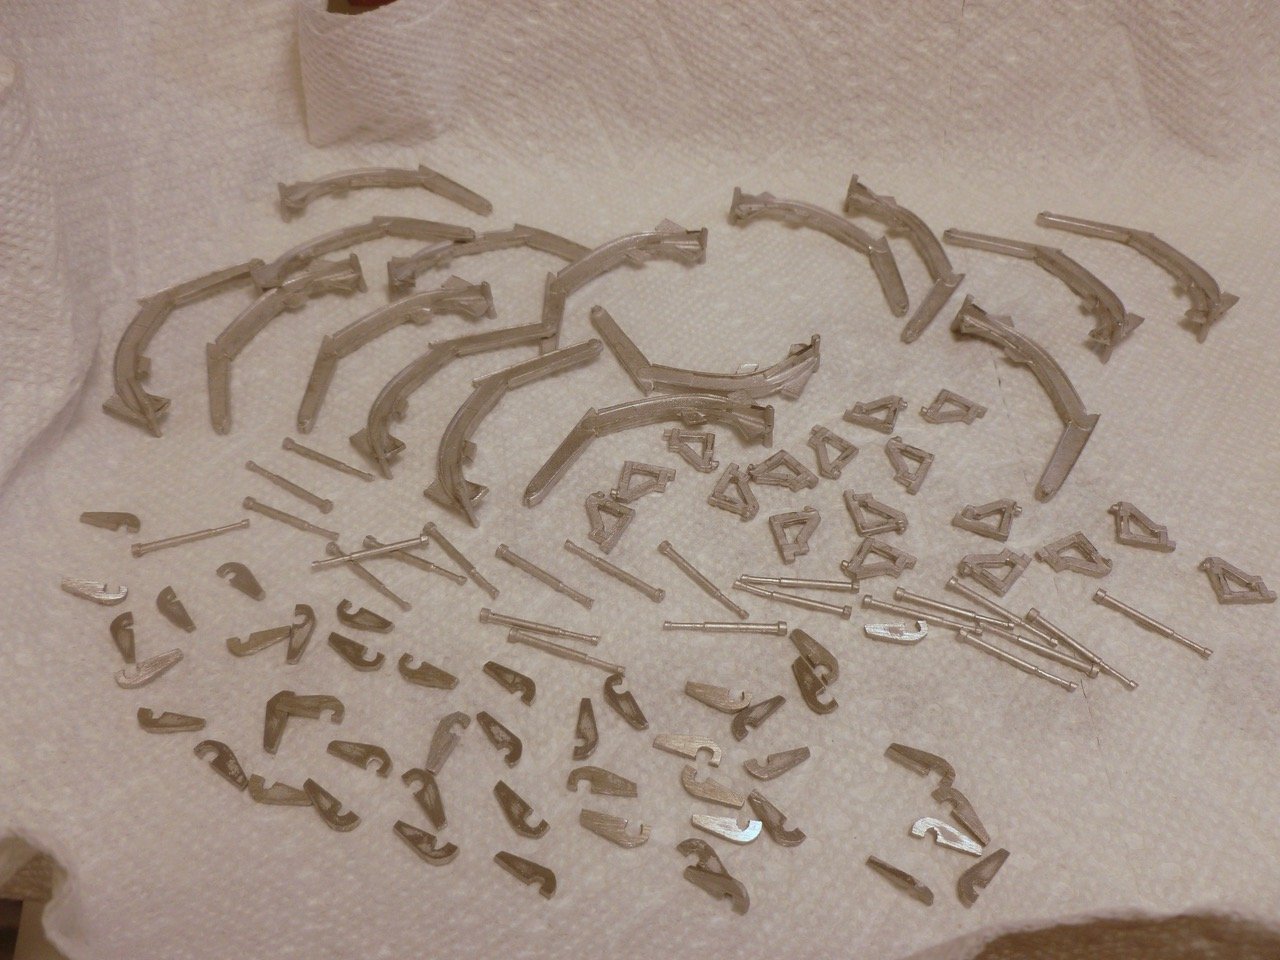
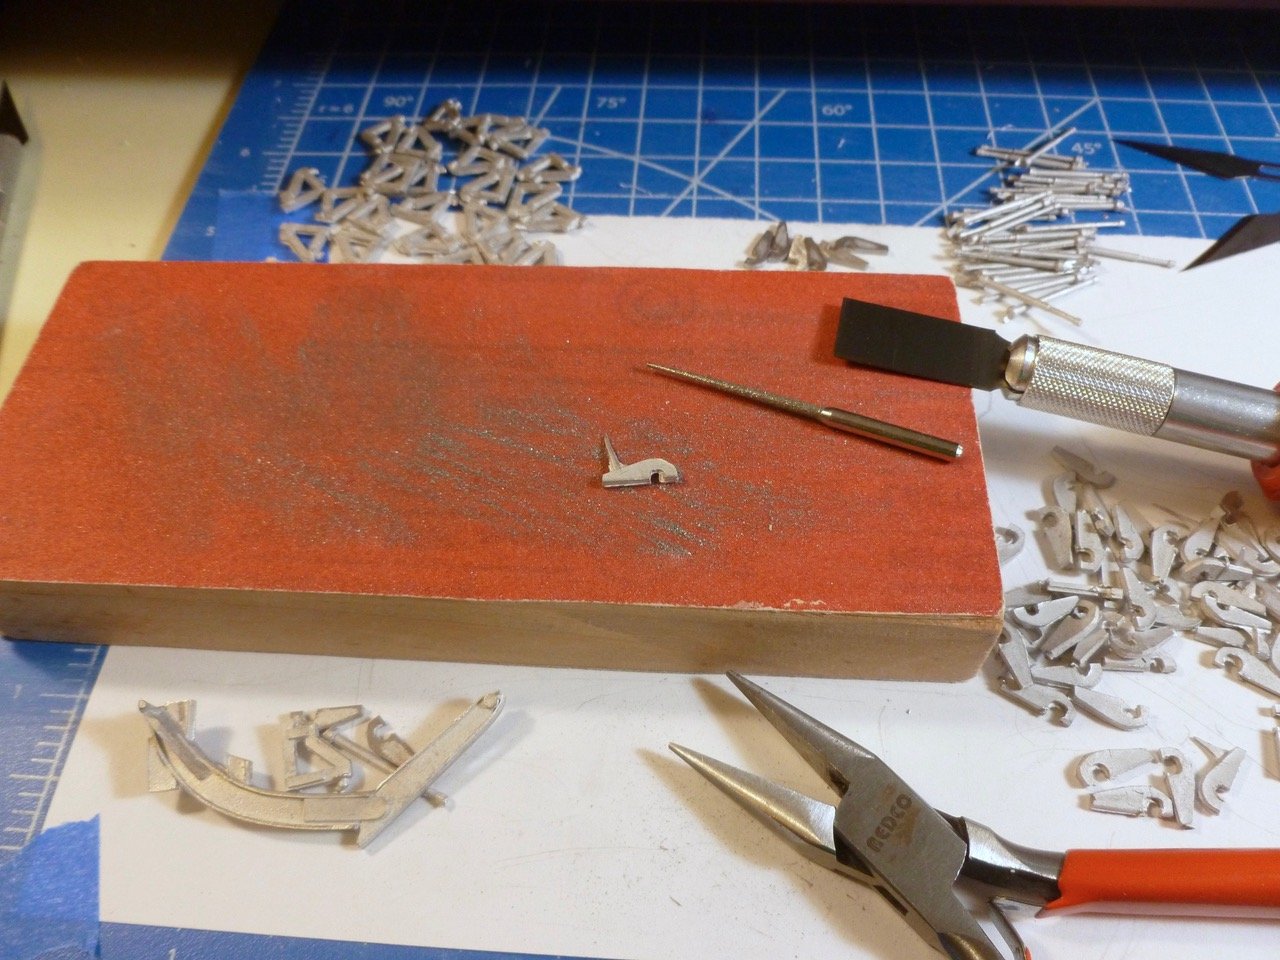
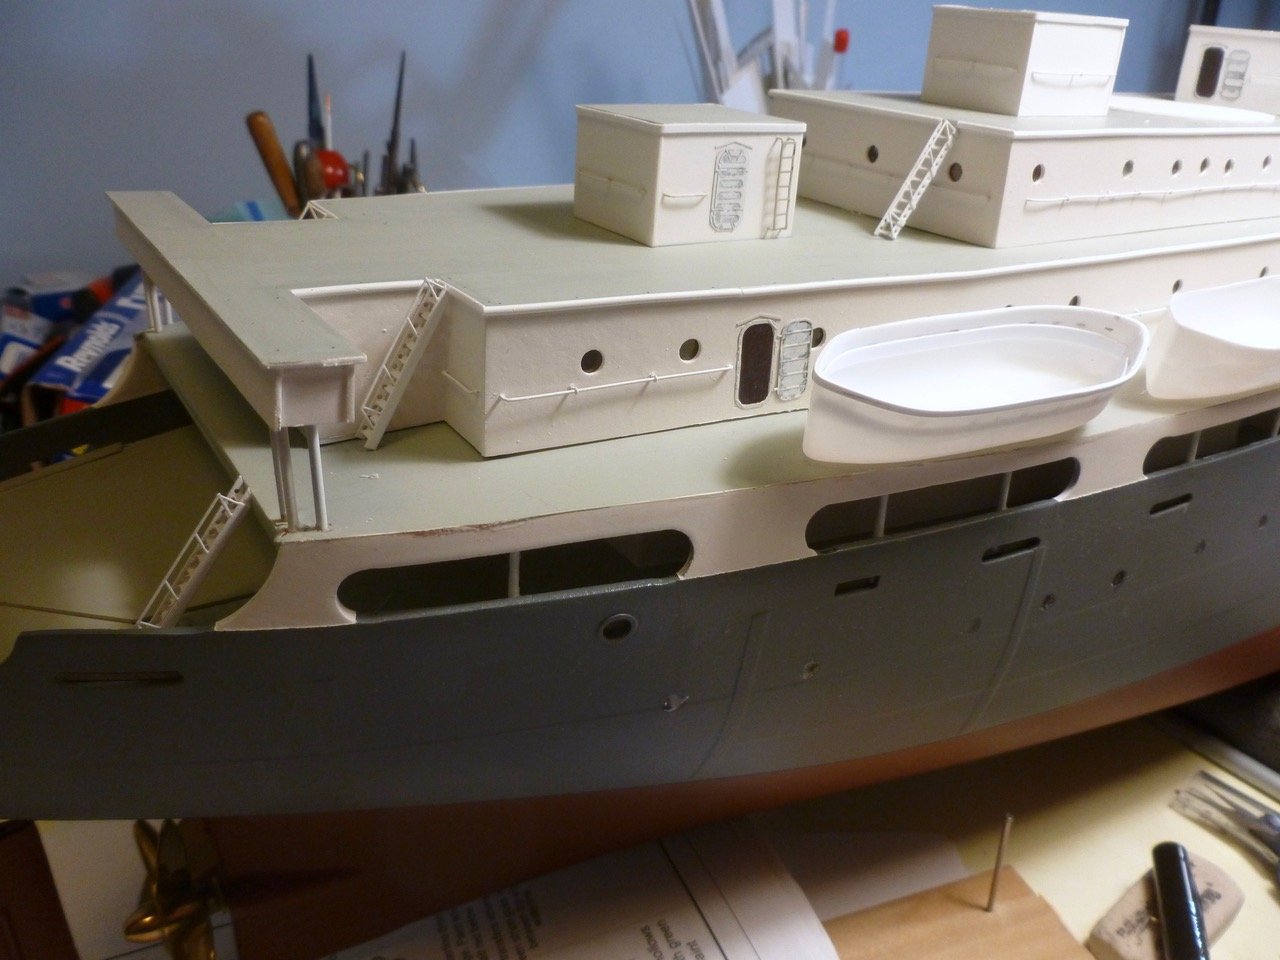
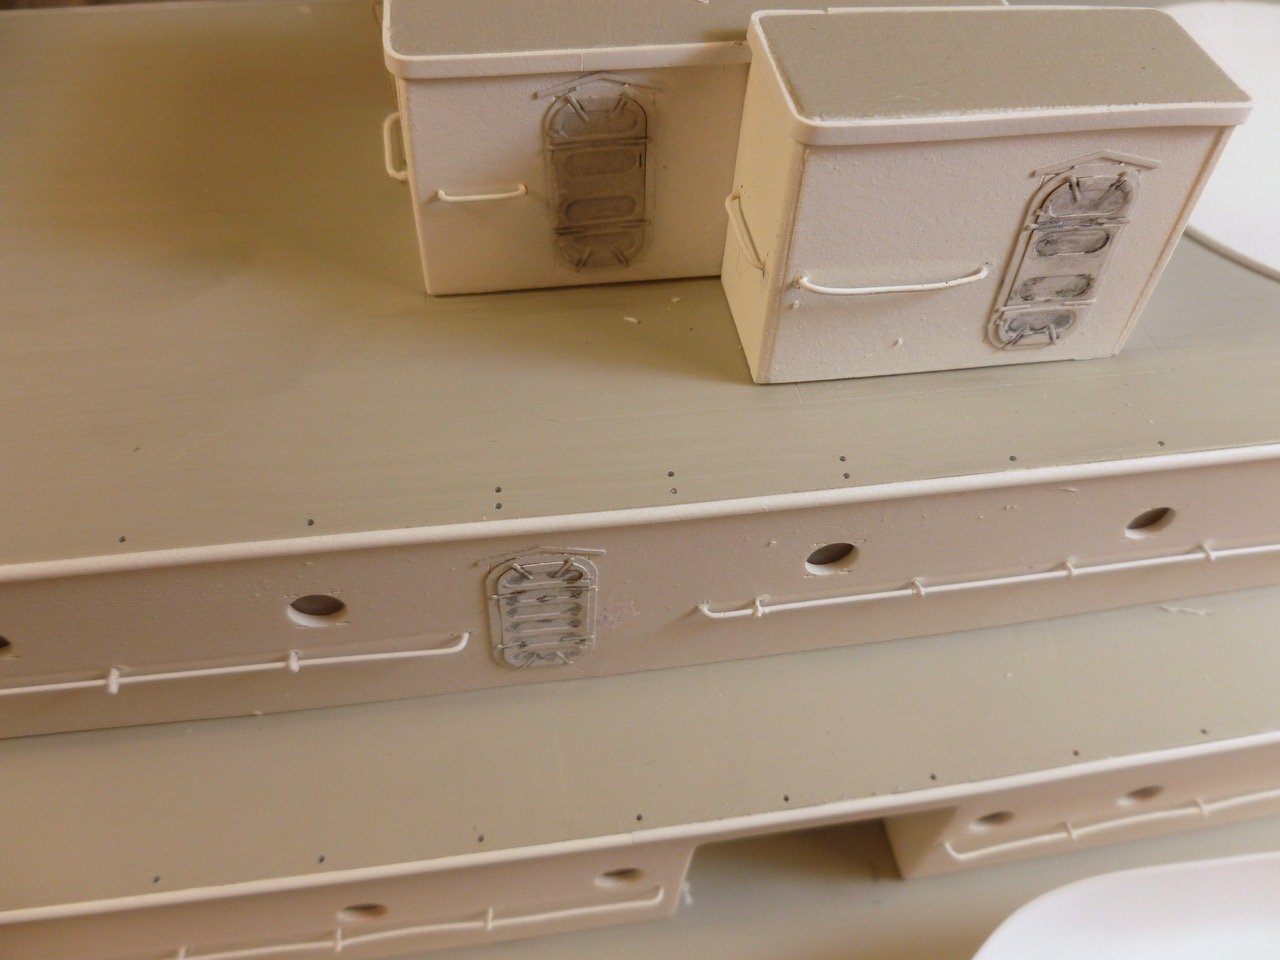
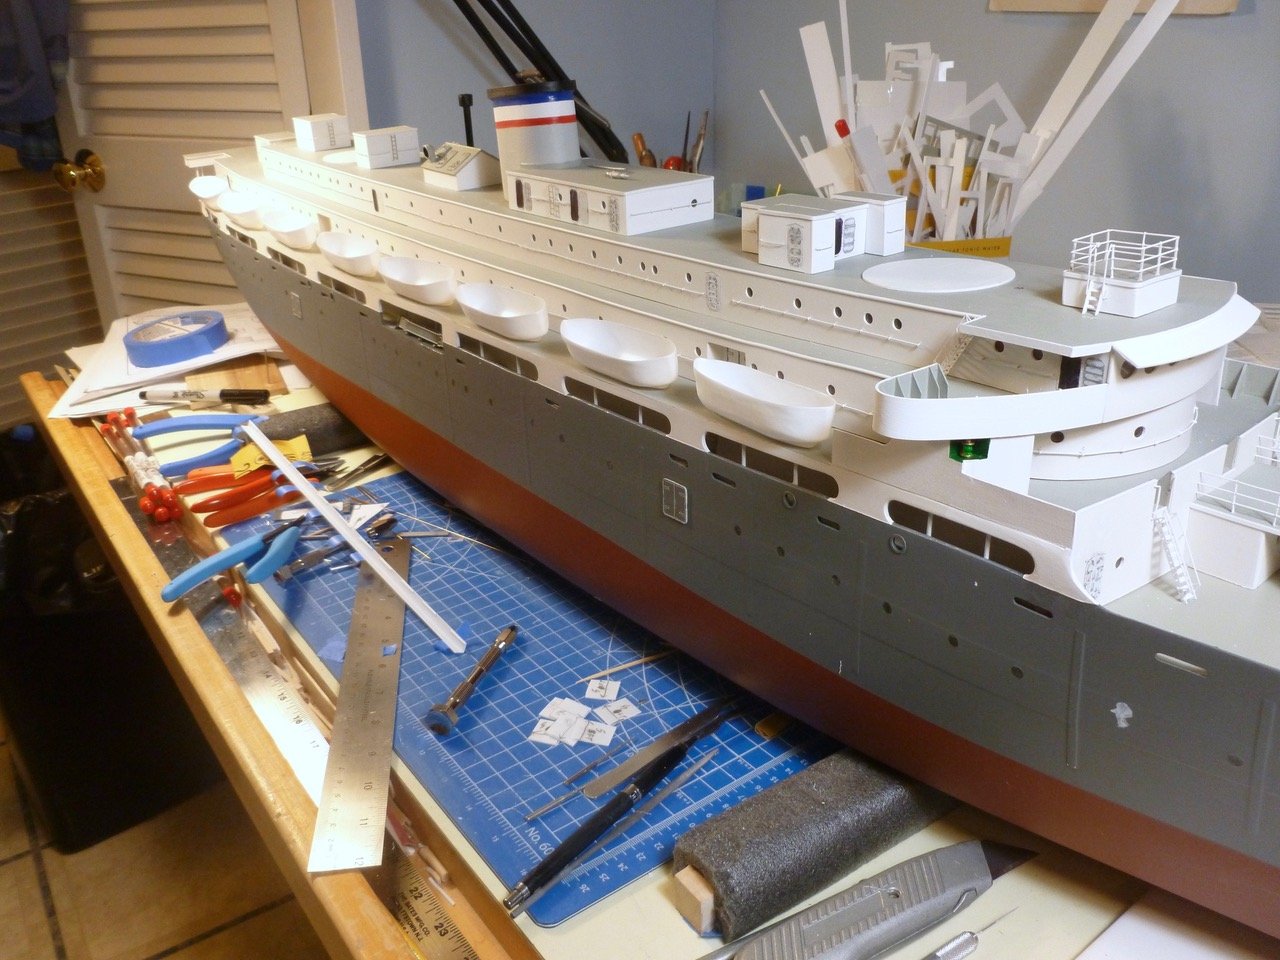
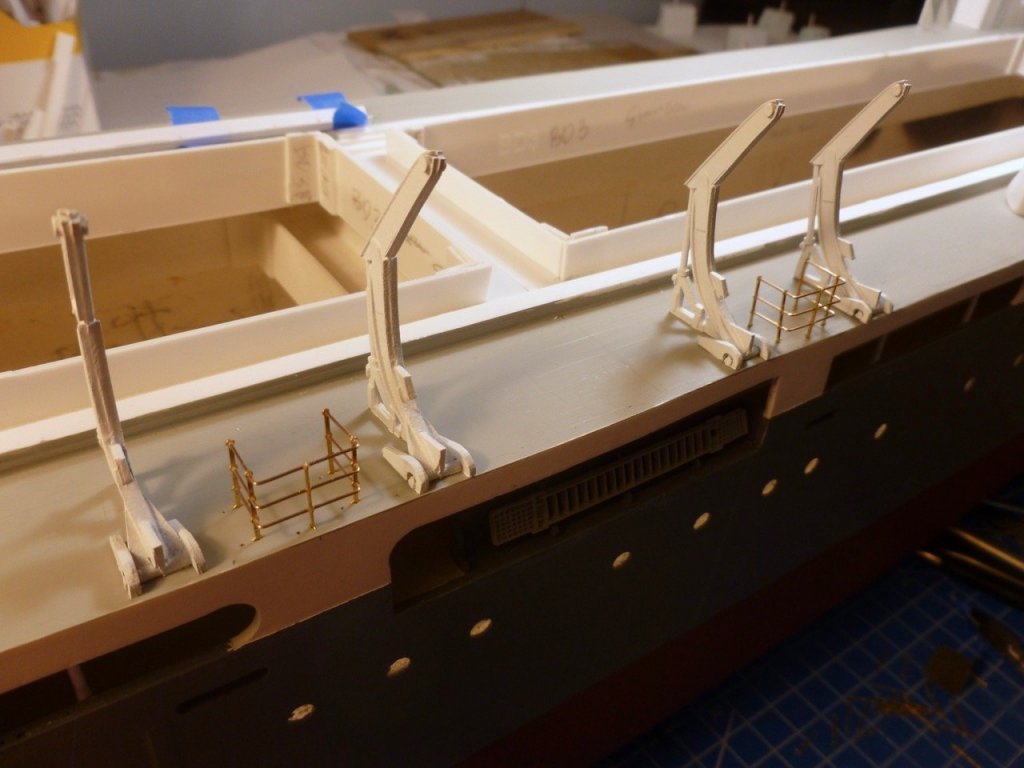
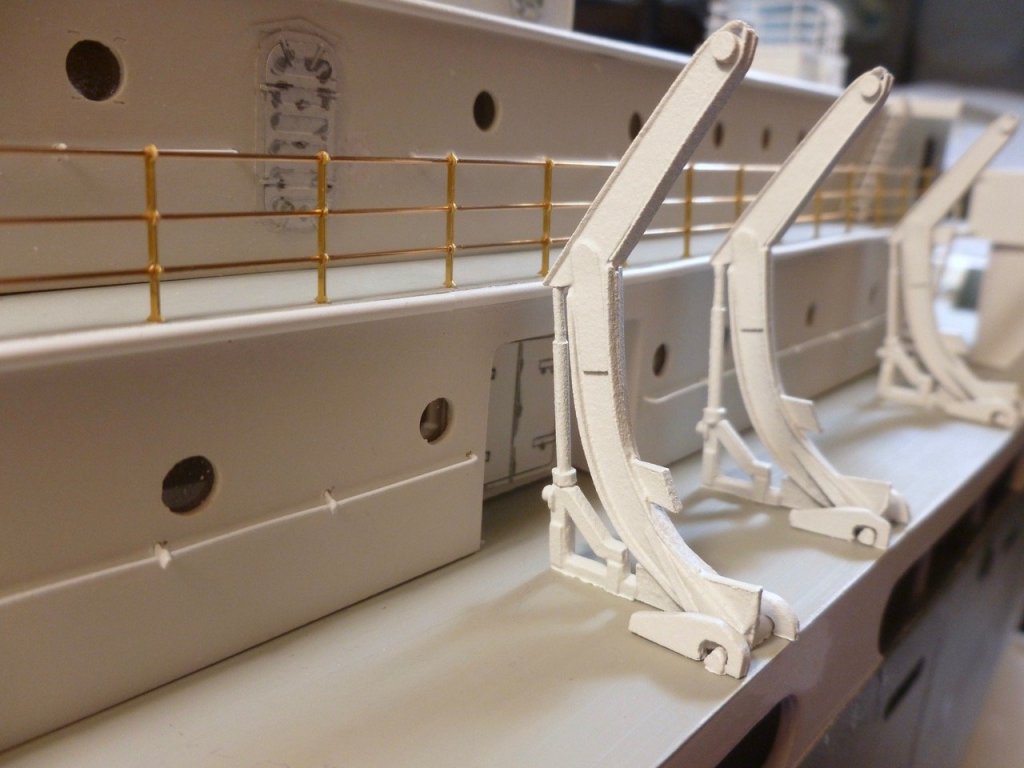
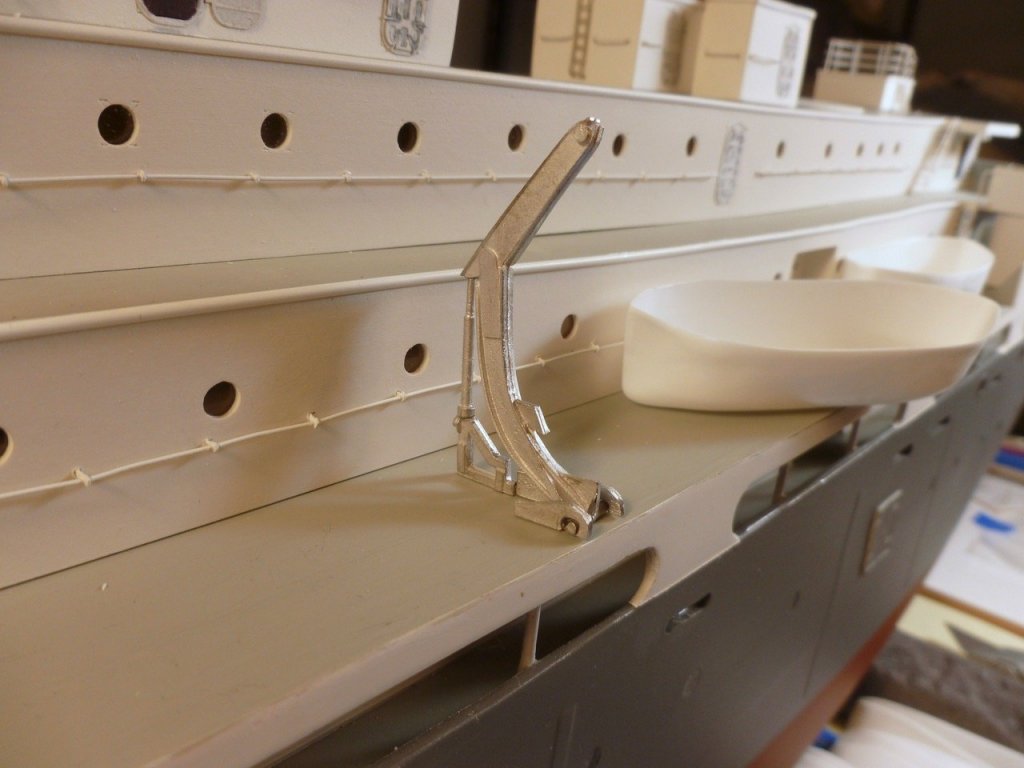
To those who gave likes, thank you and thanks for stopping by. Carl, thank you for your thoughts and caring. I measured the space between davit and wall and it scales almost 3 feet, so plenty of room to walk by. Steve Davit progress and a near oops. I ground through the davit construction and now have a full stash. I painted half and let them dry while finishing up the rest. I settled on installing davits first, then rigging the boats, but while I was doing a rough placement it occurred to me that if I set them I would have no room to install the railing at the bridge deck and would need quite a stretch to set the top deck railing. A guaranteed recipe for broken davits and bent railings. I plan on installing the top deck bits and masts from the port side. So it’s off to the railing races, starboard heat. Trim stanchions, thread onto top rail, stack stanchions together, slide mid and bottom rail in, re-space stanchions in deck holes, add CA at each joint, wait until tomorrow to remove, paint and reinstall permanently, then move on. A few pics follow including some davits to get a better idea of the overall look. The davit painting resulted in a little texture which I’m not unhappy with since they were probably showing some wear after years at sea.


- 446 replies
-
- 10
-
-
- zebulon b vance
- deans marine
- (and 3 more)
-
Jon, Congratulations. A wonderfully innovative diorama that really captures Bowdoin as the arctic explorer. Thank you for sharing. Steve
-
Jo, Very nice job so far. You have plenty of coaches but on the very small chance it is not mentioned be aware that even softer wood like basswood won't take much of a bend without some coaxing with your plank bender, or with other plank bending methods favored by others. Steve
-
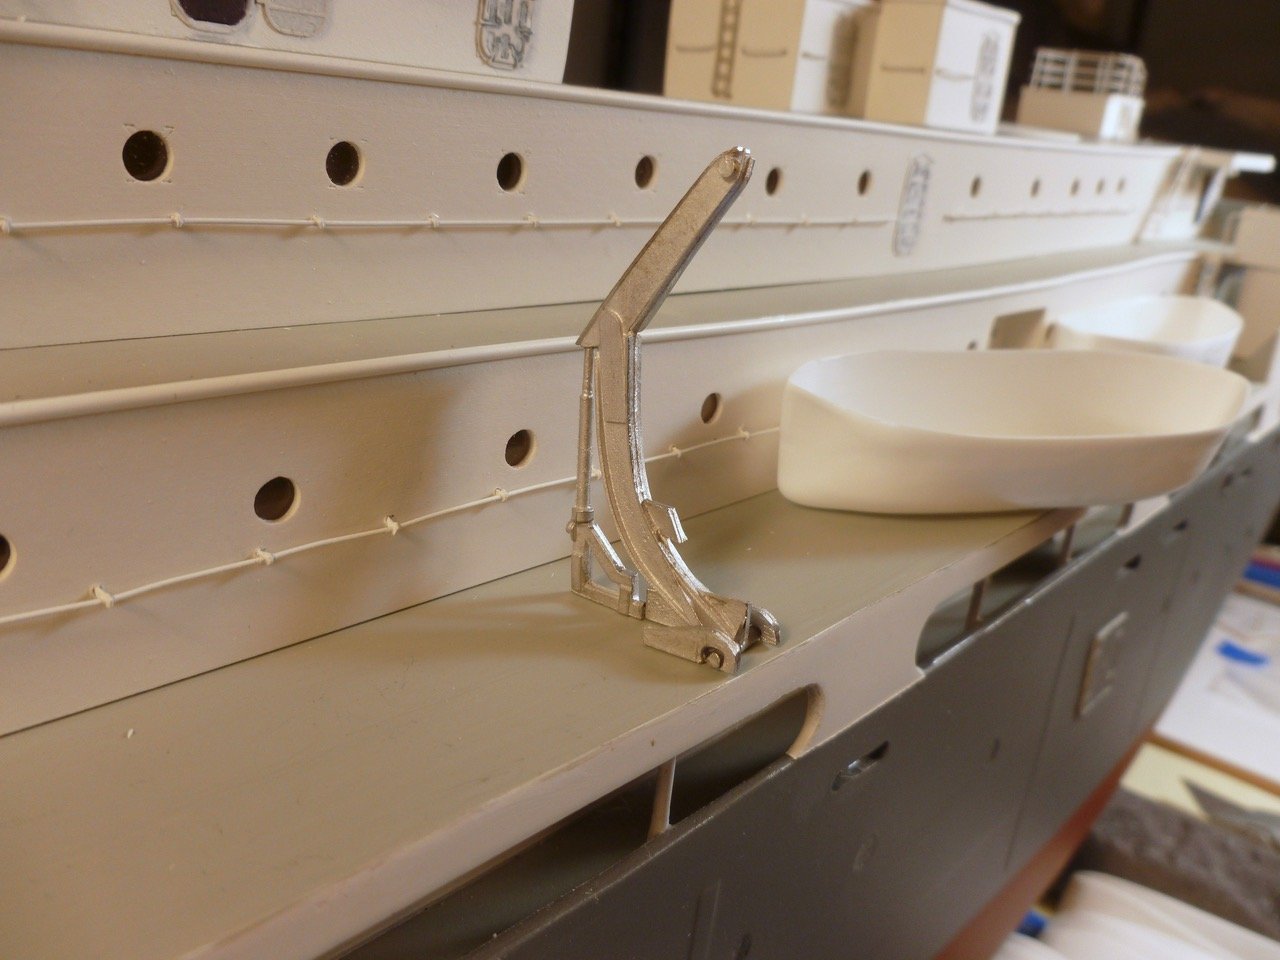
To those who gave likes, thank you and thanks for stopping by. Steve Davit therapy. Not a whole lot of work this week due to much anxiety about my wife’s CT-guided needle biopsy, which fortunately was completed without incident. I learned that the tumor is close to the lung surface which hopefully could make it easier to remove without having to take so much lung tissue. We get the results and the plan for the next step in about a week. After sanding, the davit parts were rough cleaned in paint thinner, then washed in soapy water, rinsed and air dried. The pic shows about half the parts remaining after some assembly work. I thought I was all ready for (relatively) quick assembly but I discovered that using small metal files on the joining surfaces in soft metal smoothes everything out so much that it doesn’t take medium CA well, so I re-did the join areas with a few swipes of 180 grit sandpaper on a stick which seems to give a better tooth to grab the CA. The little butt joint between the davit and the rear bottom bracket needs plenty of drying time to withstand the fitting of the lifting piston between the bracket and the top of the davit so I glue a bunch in the evening and then wait a day before fitting the piston and shoes. The mockup is encouraging and daunting (there’s that darn word again) at the same time. A question is whether to glue the davits in place and then fit the rigging and boats, or make up whole assemblies (davits, rigging, boat, and cross-rope between davits with coiled hand ropes attached) and glue the entire unit to the ship. If I do it as a unit I’ll need a jig, or maybe just some tape(?) to support the davits while rigging, but then how do I hold the whole assembly while trying to glue the pair of davits in place at the same time? I suppose if the boat is glued to the davits it could lock the whole thing together. The sequence could also be glue davits to deck, glue boat to davits, install rigging and cross rope. Time will tell. It's curious that the davits are so close to the cabin wall. It doesn't seem to leave much room to walk behind them.


- 446 replies
-
- 5
-
-
- zebulon b vance
- deans marine
- (and 3 more)
-
Great job to date. Congrats on getting through the scuppers. It's nice to see you were able to bend the mahogany roof - I split mine thinking it would take the slight bend without soaking. I re-made it in basswood since it was to be painted anyway. I don't recall a double camber in the main roof - is it possible the center section was pushed flat during glue-up? Steve
-
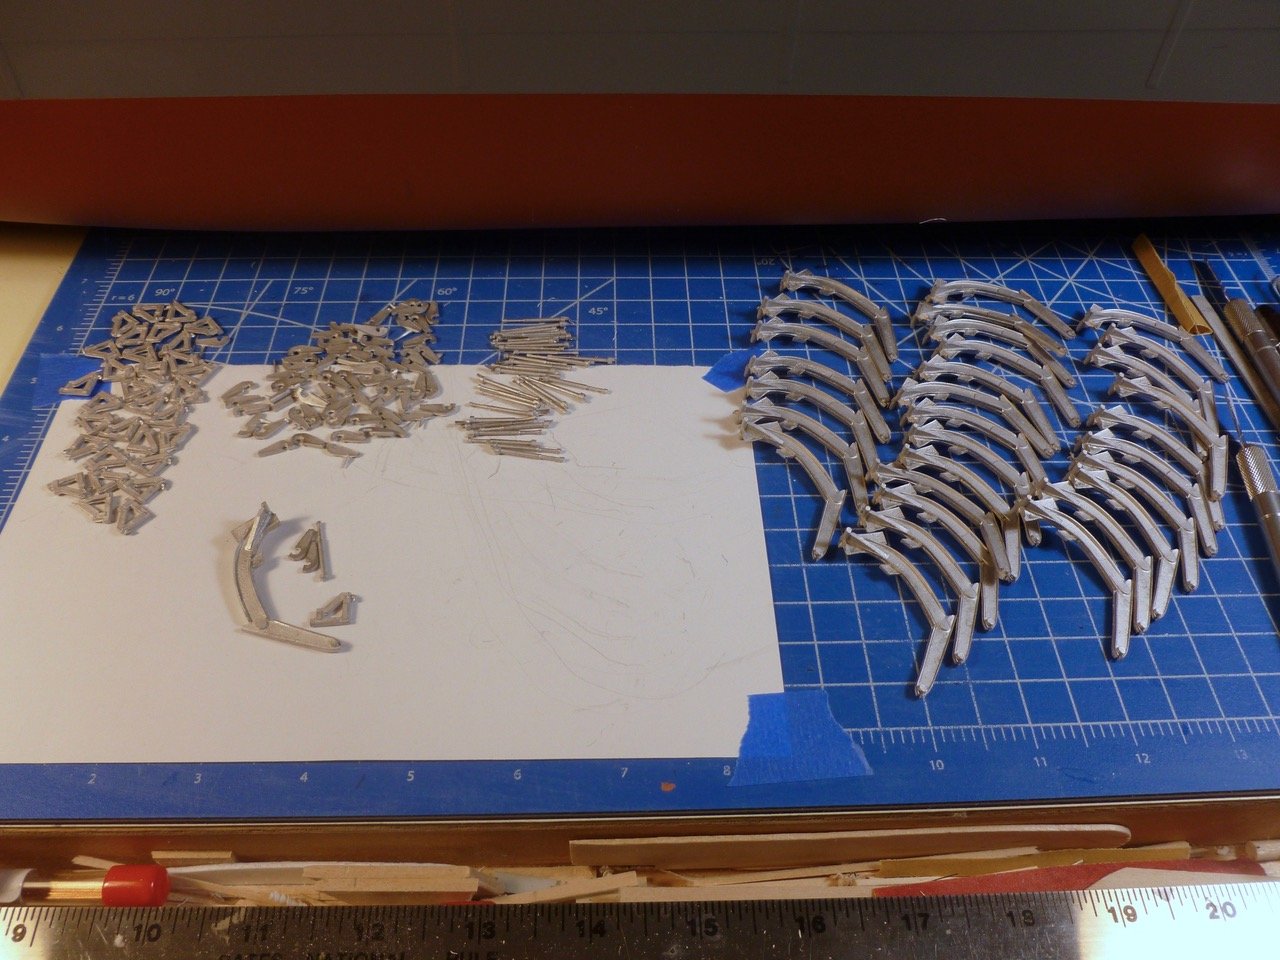
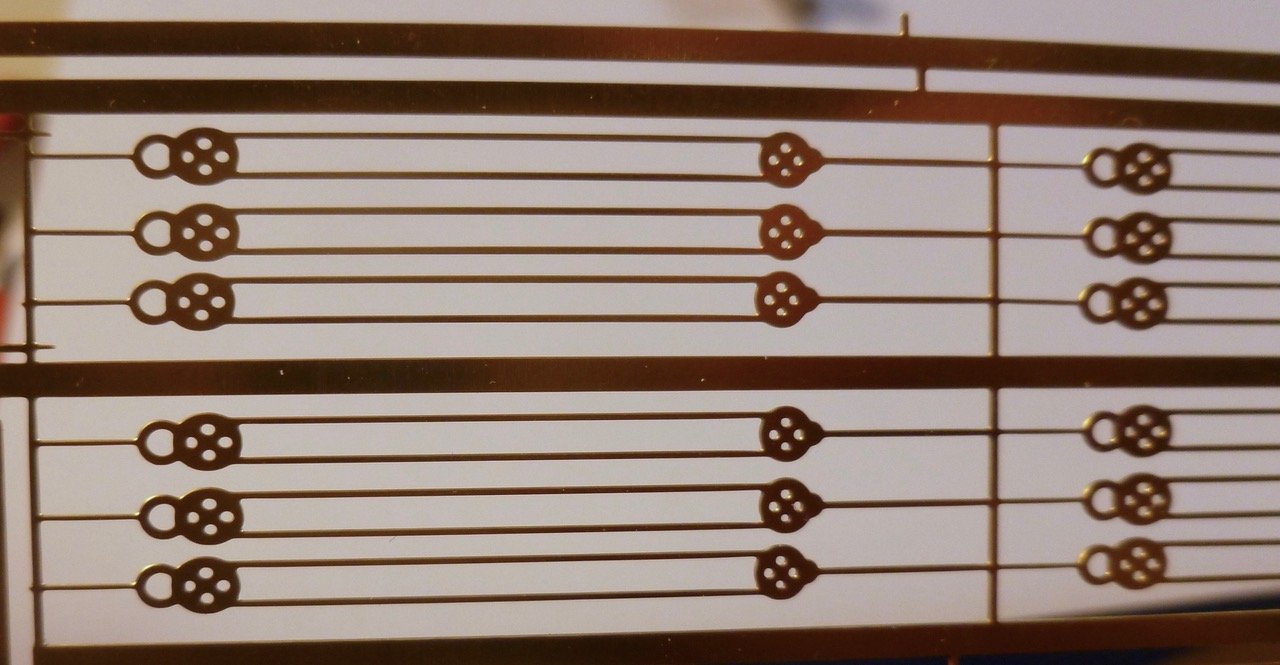
To those who gave likes, thank you and thanks for stopping by. Lou, thank you for your kind comment and suggestions. We’ll see if the Rosie’s are attracted by the awning frame. I decided to bite the awning bullet so I picked up some brass rod at the LHS. Bill, thanks for your feedback. I’ve decided to stay with the PE boat falls. I plan to add a cross rope between davits, with hand ropes as shown in several pics of the ship. Hopefully the clutter will draw attention away from the skinny falls. Kevin, thanks for your kind comment and your suggestion. We appreciate your concern. My ankle and foot were last year. They have healed well and I’m back to walking for exercise. Carl, I never had experience with lunchboxes, but lots with a plastic sandwich ziplock in a paper bag, including to this day. My typical lunch has been referred to as a slam sandwich (two pieces of bread with a piece of meat slammed between them). Steve The davit workshop. This is the davit workshop. With 32 davits to assemble I thought it would be easier to gather all the parts together, figure a standardized filing and sanding sequence for each part and then prep all parts of same type together. These are the tools for the 64 davit shoes. A pair of davit shoes, before and after prep. The narwhal spike was only on a few shoes. The good news is that all 64 shoes have been run through the prep line. Next will be the 32 rear davit supports.
- 446 replies
-
- 9
-
-
- zebulon b vance
- deans marine
- (and 3 more)
-
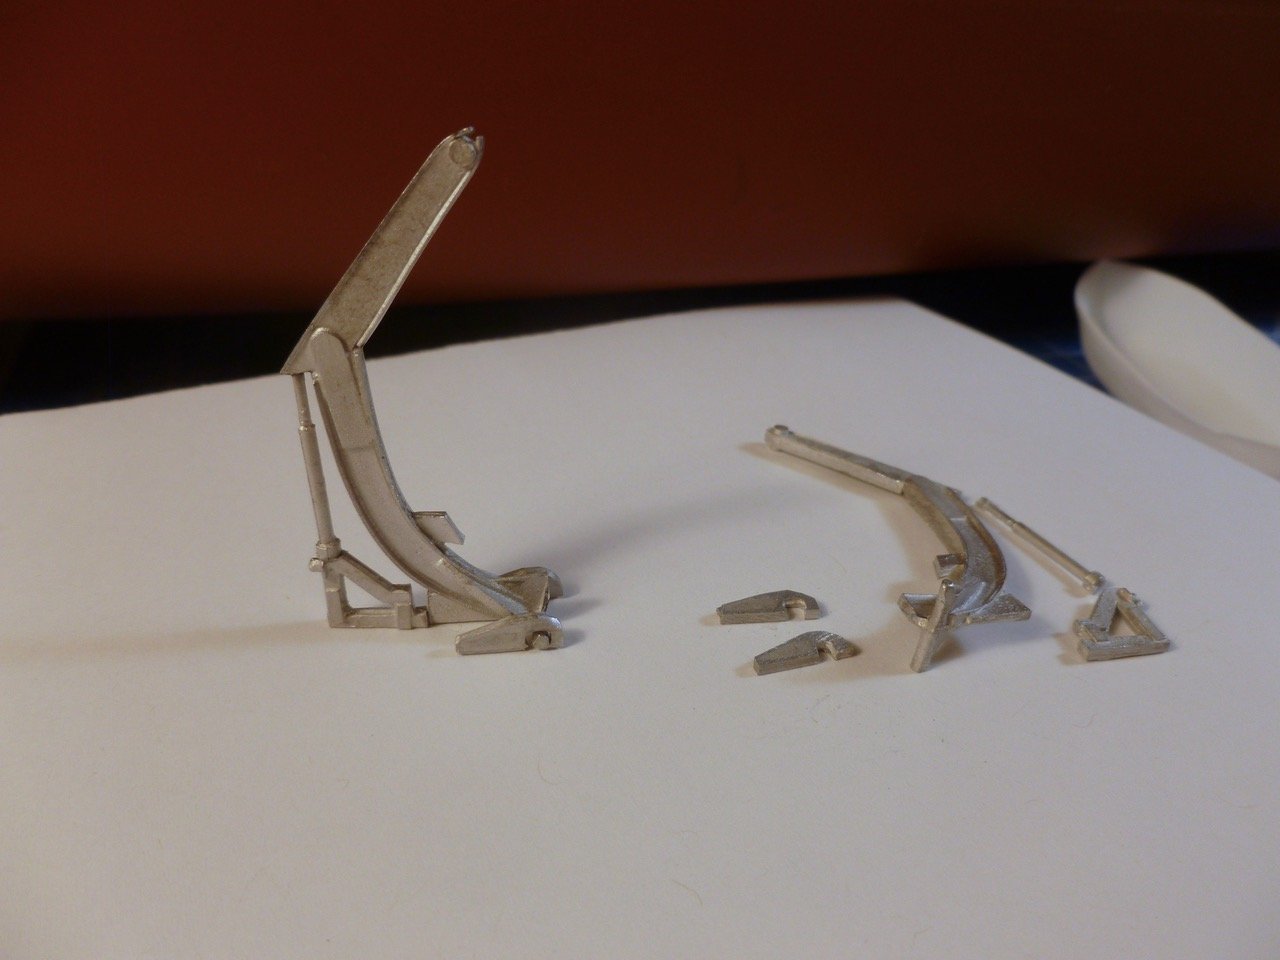
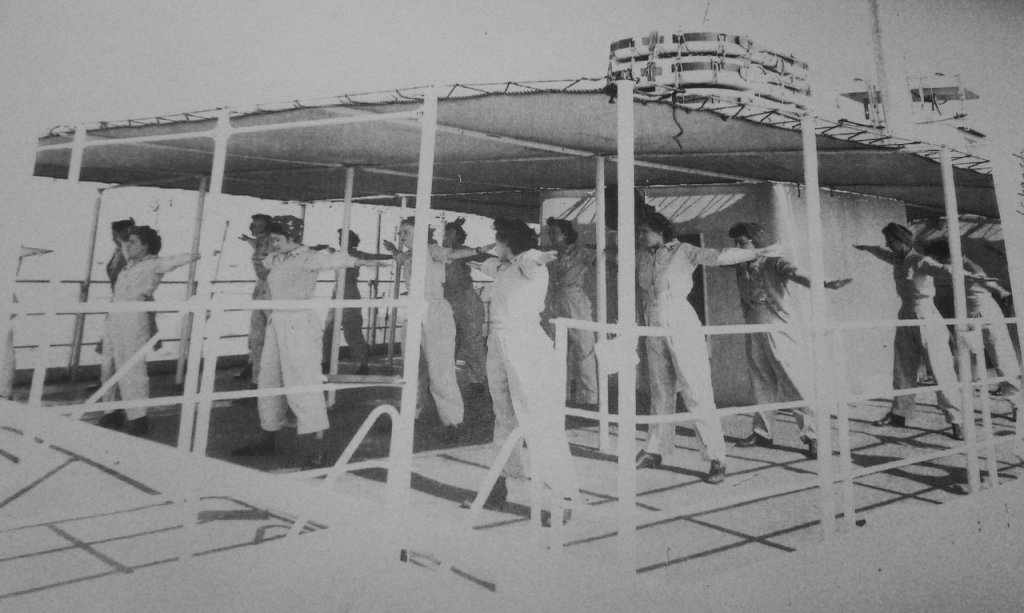
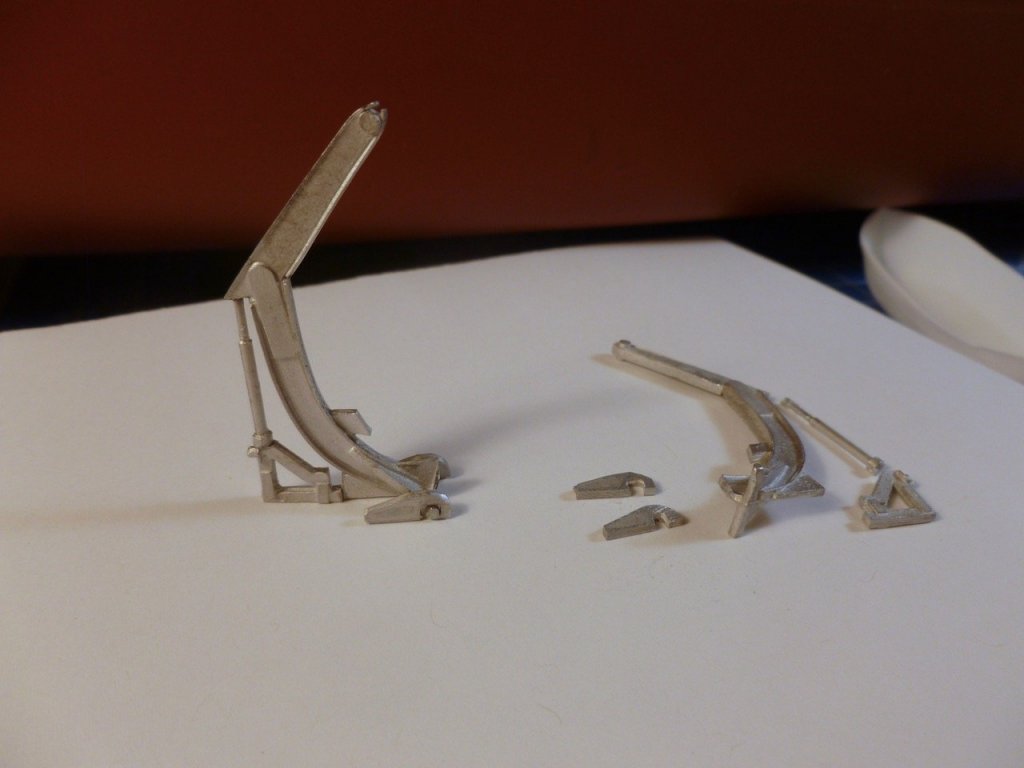
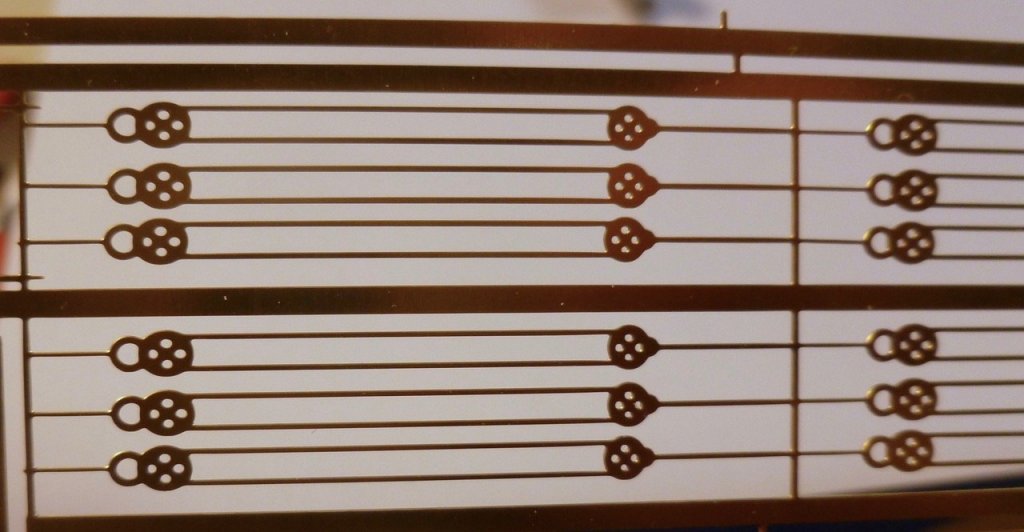
To those who gave likes, thank you and thanks for stopping by. Lou, it is unfortunate you and I and our spouses seem to be sailing in the same boat. I had foot and ankle surgery last year due to an accumulation of injuries that started in high school, exacerbated by a foot with a very high arch. But I’m walking well today and I’m sure you will too. Our thoughts are with you and your wife and our prayers are for continued good news. Mark, thank you for your kind comment and expression of concern. We really appreciate it. Carl, thank you for your words of comfort. You’ve been with me since the beginning of the build and I’m sorry to be dragging you through our stormy seas. Hopefully there will be sunshine ahead. I should have made the lunchbox roofs removable for easier storage of snacks before the voyage. I think I’ll leave the extra row in the stanchion template uncovered to force me to think a bit. Steve Davit plus. Since the lifeboat adventure is on the horizon I thought I would experiment with the davit construction. Five pieces per davit, flash to remove on every piece plus filing and sanding, plus butt joint gluing, times 32 davits was daunting, a word I’ve unfortunately used quite a few times on this build, not so much for the complexity but more for the quantity of each operation. But no more whinging. It wasn’t so bad once I realized that medium CA is better than thin if the metal surfaces aren’t perfectly flat after filing, and one tiny drop is much better than more on metal to metal if you want it to set up. Here’s the davit in its approximate location. With the feet glued to the davit sides it is reasonably stable which bodes well for final fitment, although the castings are a bit cockeyed relative to plumb and require some careful twisting and bending to achieve a reasonable alignment. If all the rest go as well as the first one it will only be about 50 hours of effort, not including paint and rigging the boats. Which brings up another thing. The PE sheet includes faux rigging for the davits. The instructions say to tie the looped end of the rigging set (on the left in the left hand group of the photo) to the davit arm, and to heat set the other end into the lifeboat interior. Has anyone seen PE rigging before? I’m almost inclined to get some blocks (pulleys?) and rope to make up my own, but that will be 64 blocks and blah, blah, blah. And another forward looking consideration…. The photo, kindly furnished by Dean’s Marine from their archive when I purchased the kit shows a pipe frame with fabric roof over the aft bridge deck. It could be fun to solder up (he said) but I’m wondering if the fabric would hold up during the pond voyage. Alternatively I could just leave the fabric off which is what they may have done at sea. More decisions.
- 446 replies
-
- 6
-
-
- zebulon b vance
- deans marine
- (and 3 more)
-
To those who gave likes, thank you and thanks for stopping by. Carl, thank you for your kind comment. My wife had two lung cancer surgeries six years ago, and had five stable scans since, but unfortunately the latest scan indicated a new nodule in a new location. We’ll know for certain after a biopsy but it looks like another surgery may be needed. Steve A moment’s inattention. All the ship’s ladders are painted and all but two are installed. I have also sanded and washed all the lifeboats so they are ready for fit out, and set some in position to feel good. When I need a break I drill more stanchion holes. With the template it’s mindless work - well not quite mindless as a moment’s inattention resulted in a few holes using the wrong template row.


- 446 replies
-
- 6
-
-
- zebulon b vance
- deans marine
- (and 3 more)
-
And boy, did I hate to cut those railings after all that work.
- 446 replies
-
- 4
-
-
- zebulon b vance
- deans marine
- (and 3 more)
-
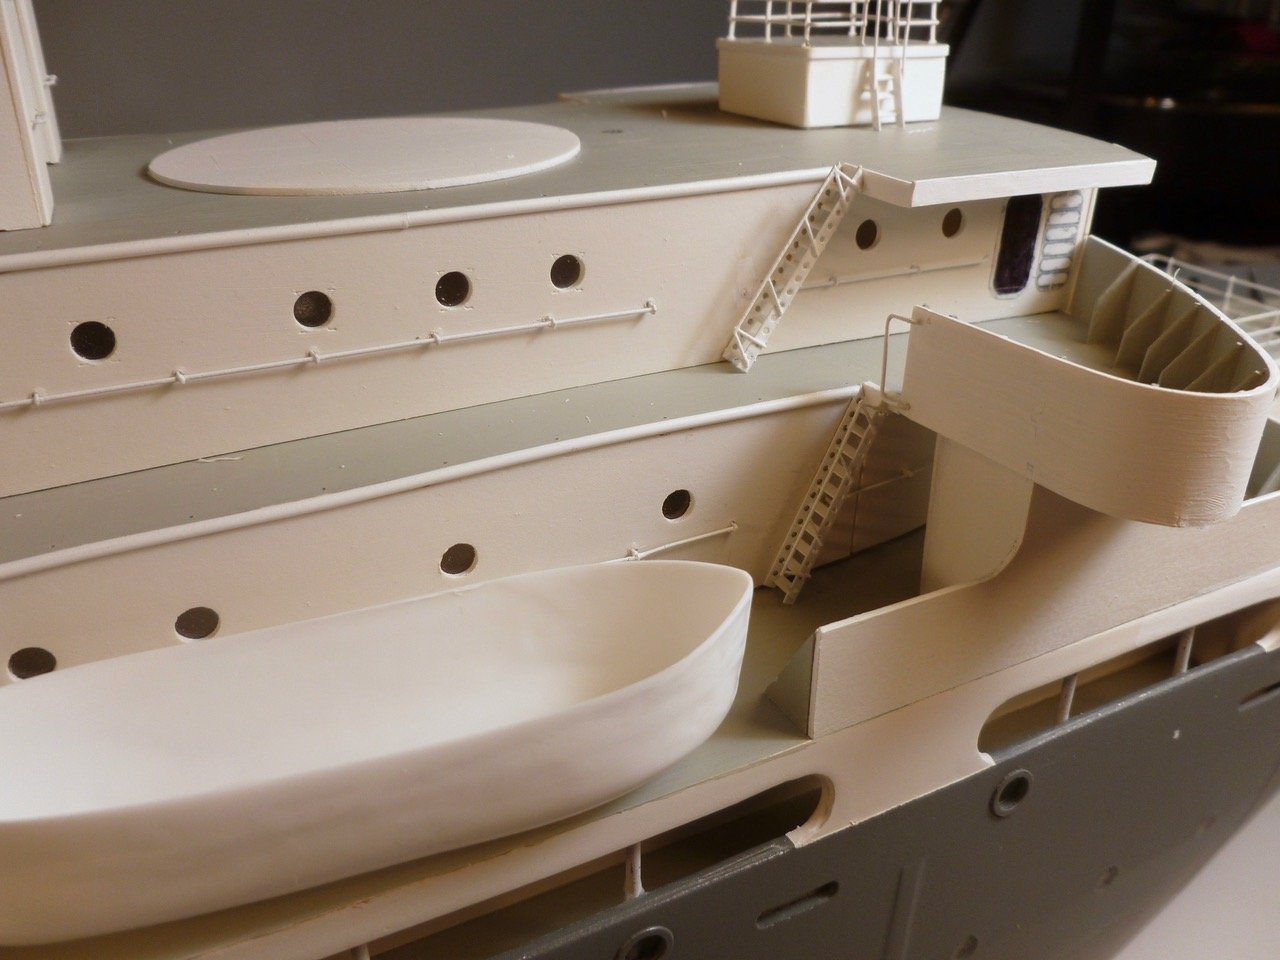
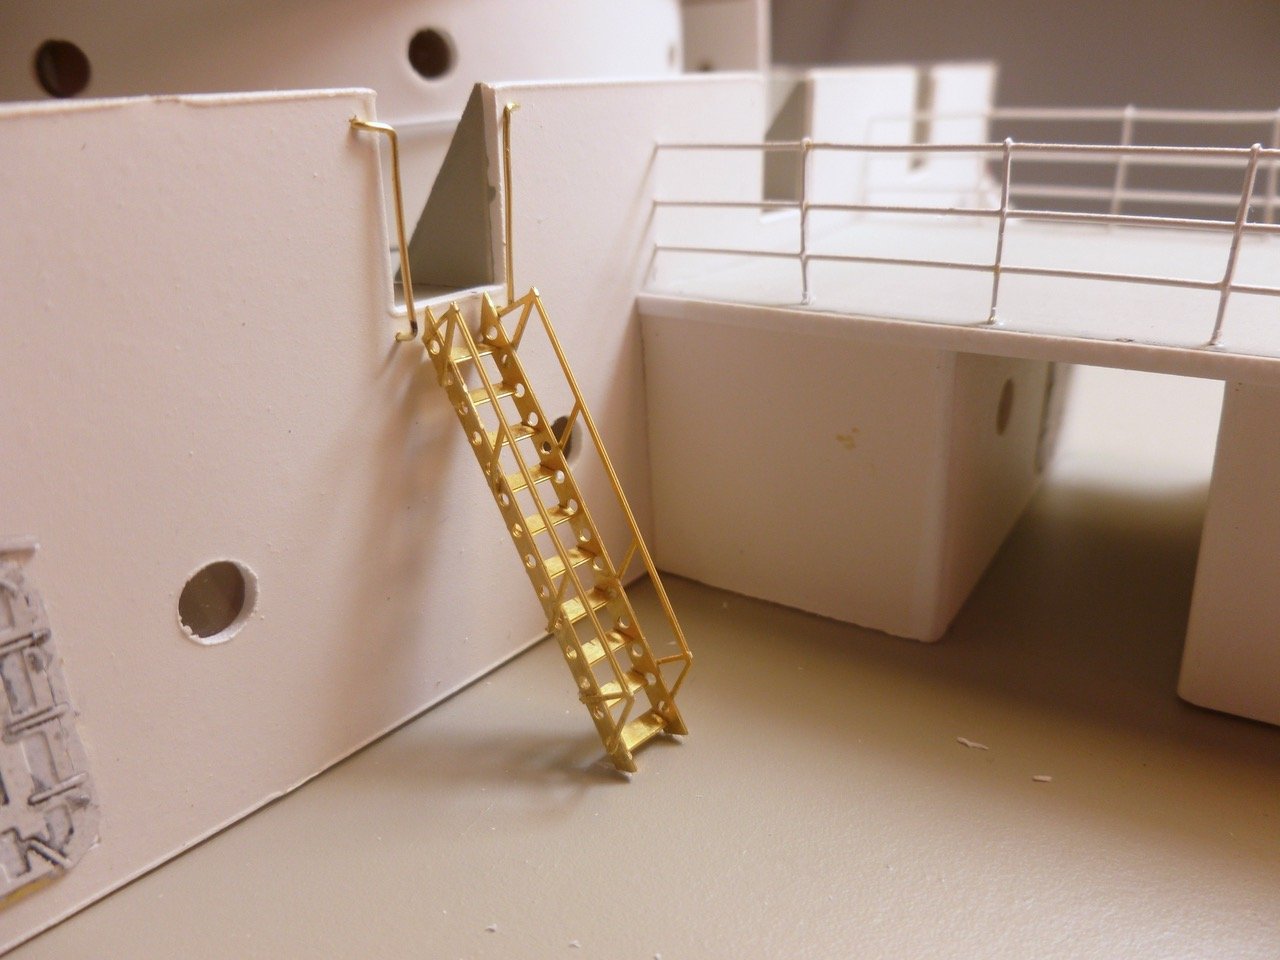
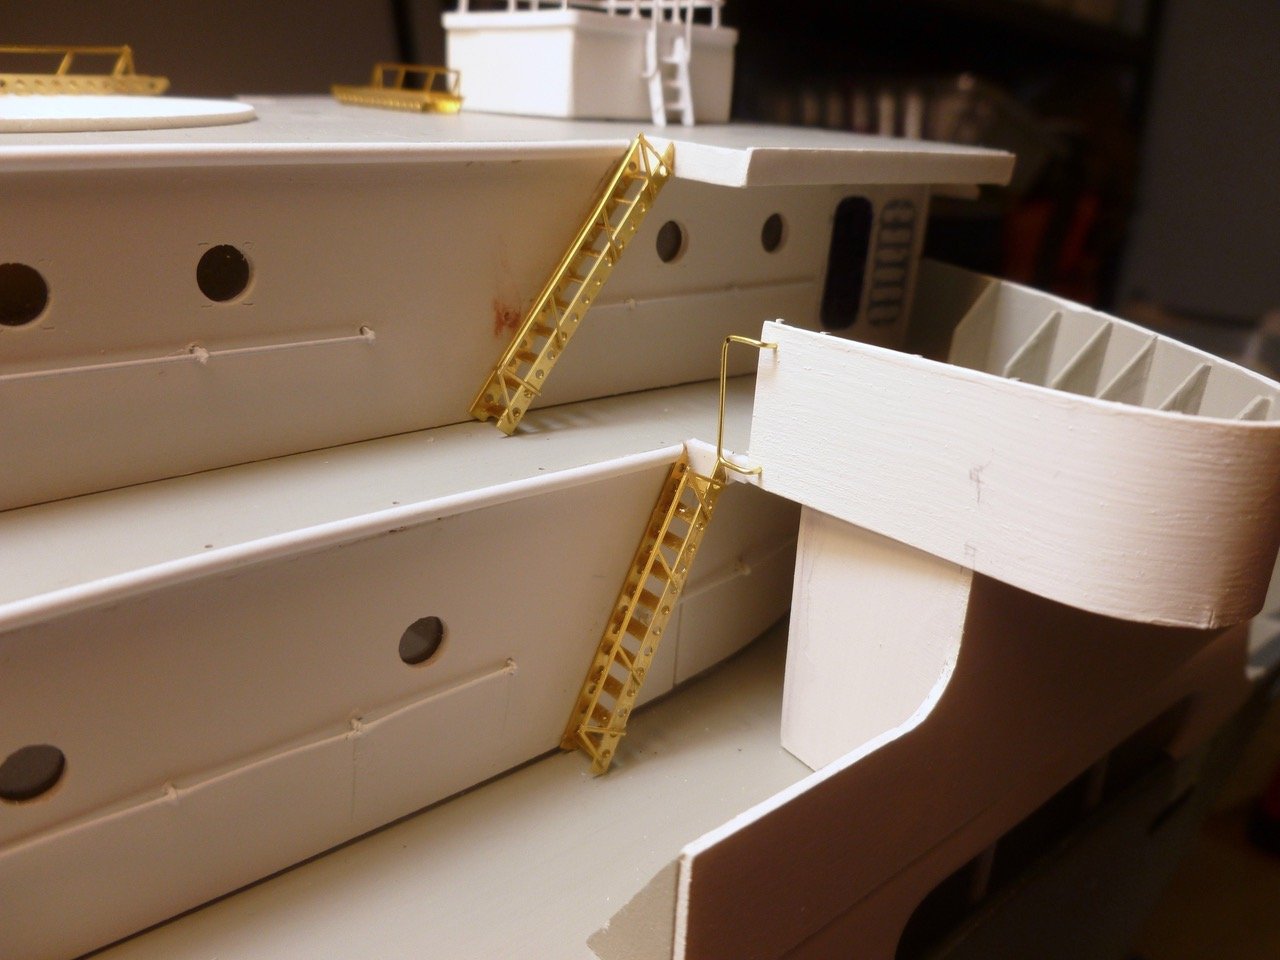
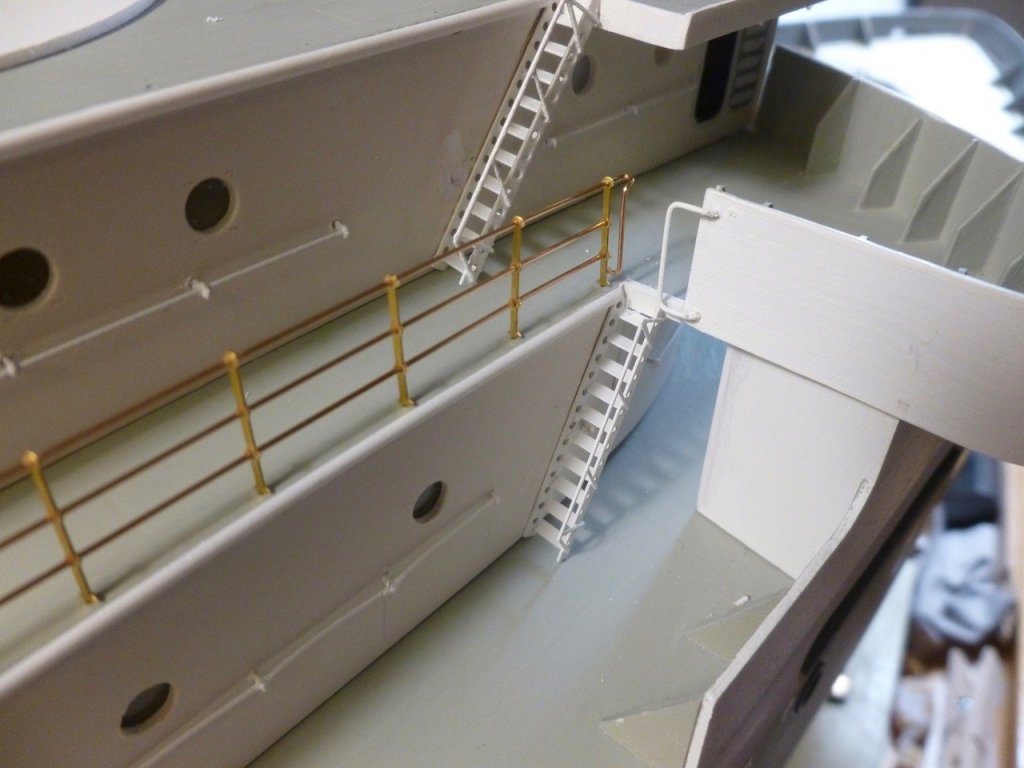
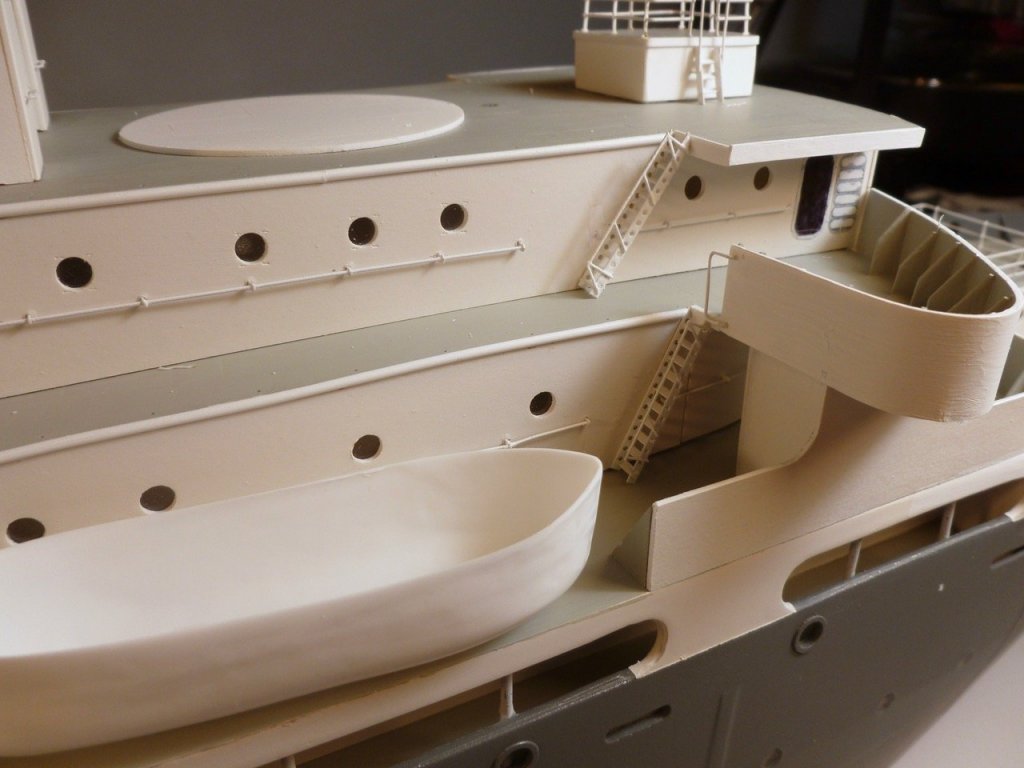
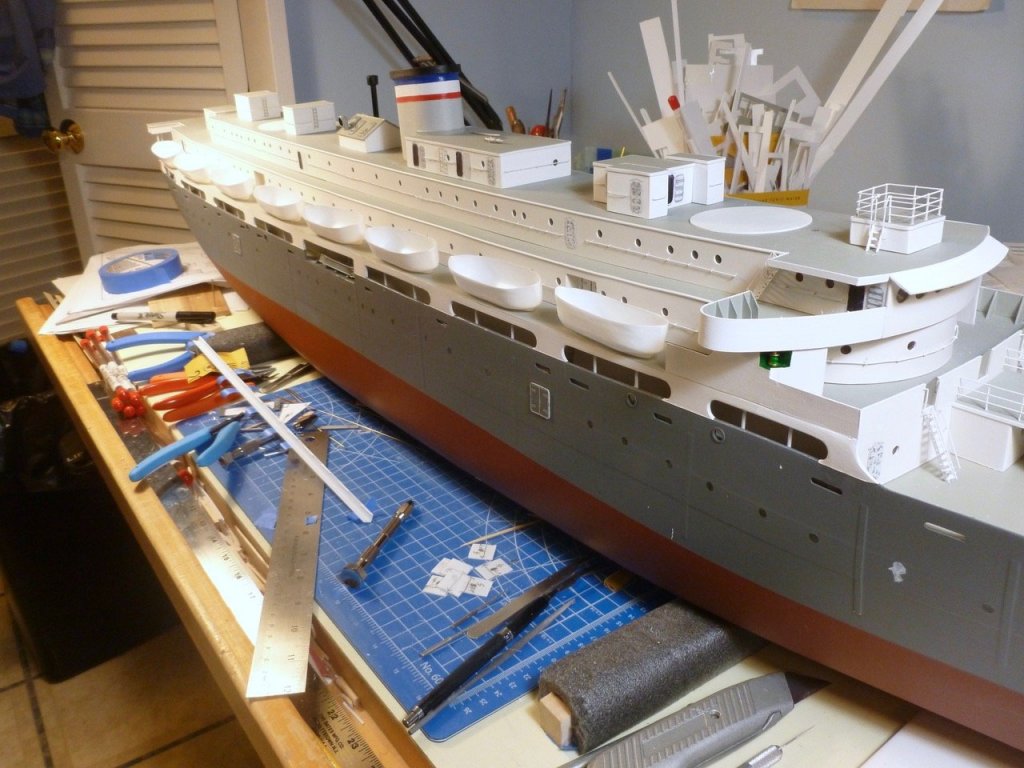
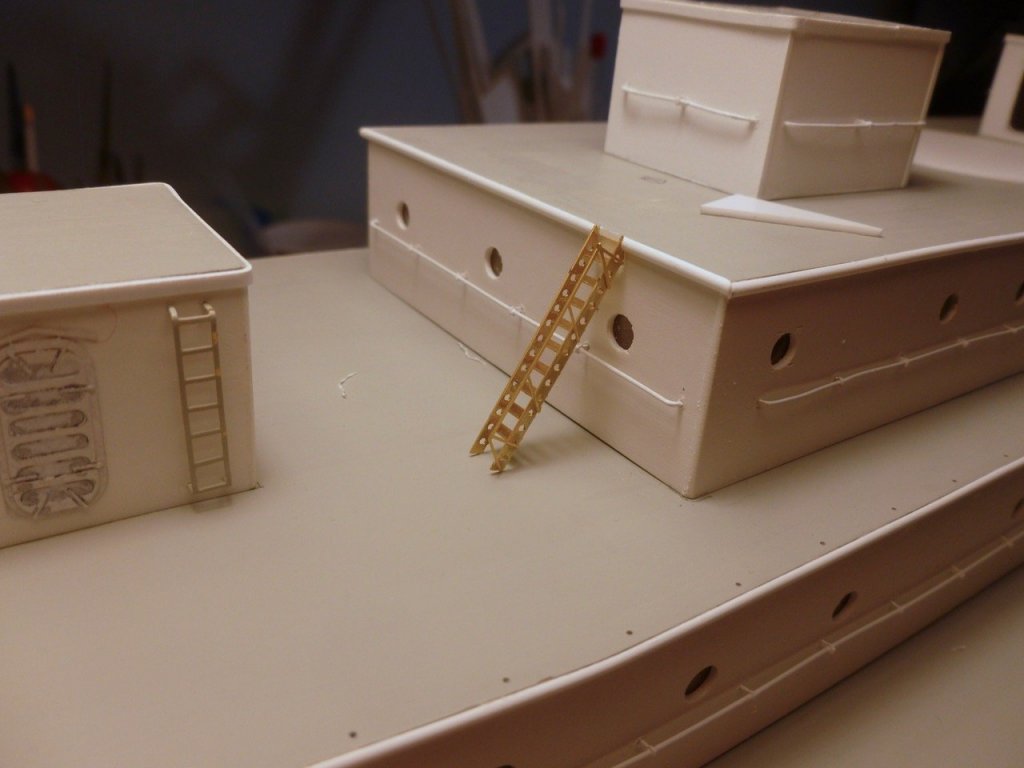
To those who gave likes, thank you and thanks for stopping by. Steve Ladder redux. I re-drilled the mounting hole for the forward ladder base pin to make the ladder more vertical, reset the right hand railing to better align with the left and added grab bars to pick up where the railings leave off. Now it looks like you could actually get up and down the ladder without falling off. The aft ladder leading to the top deck. That's where I'll be short a rail. They'll just have to be careful. The white triangle is my home made 30-60-90 triangle to help with ladder alignment, although I'm the last one to say any of them are a perfect match. At the starboard ladders I trimmed the wall railings to provide more clearance when ascending the ladders, and added a grab bar to close the gap between the ladder and the bridge deck wing wall. The jury is still out on that piece. Maybe it needs the mounting points pushed in almost flush with the wing wall. Anyway, this finishes up the fabrication of starboard ladders, plus a few to port, so now they can go into paint. I plan to do as much as I can on the starboard and top sides before rotating the ship to work port side. The more stuff that goes on the harder it is to make the swing so I only want to do it once more. Probably wishful thinking...


- 446 replies
-
- 10
-
-
- zebulon b vance
- deans marine
- (and 3 more)
-
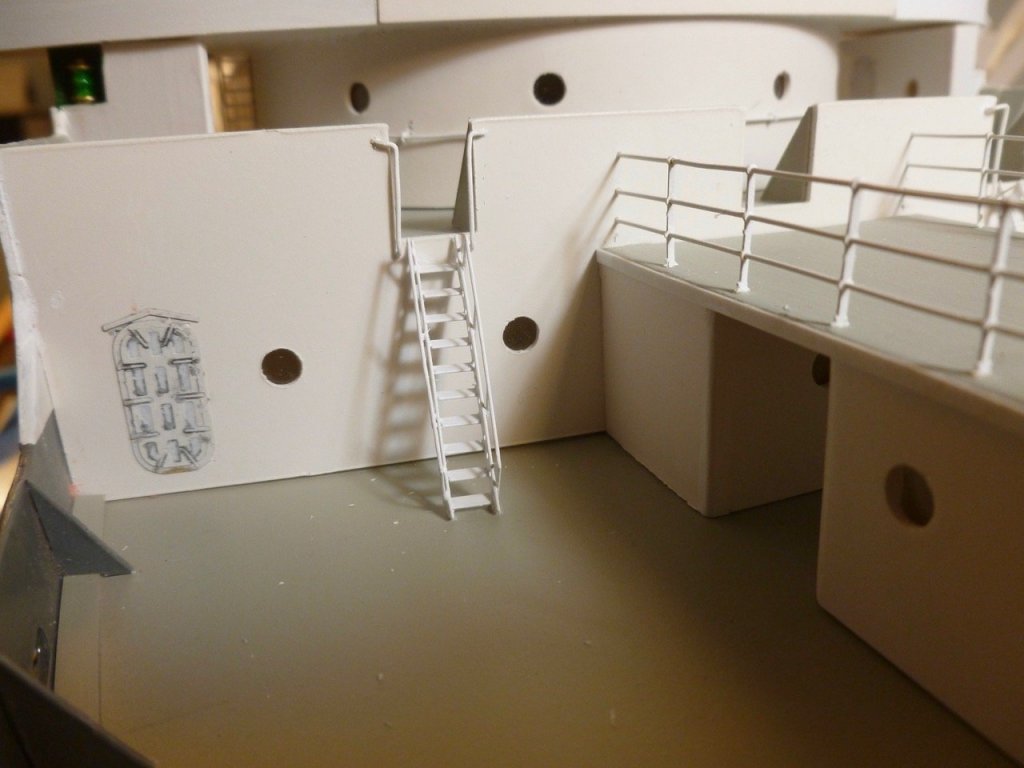
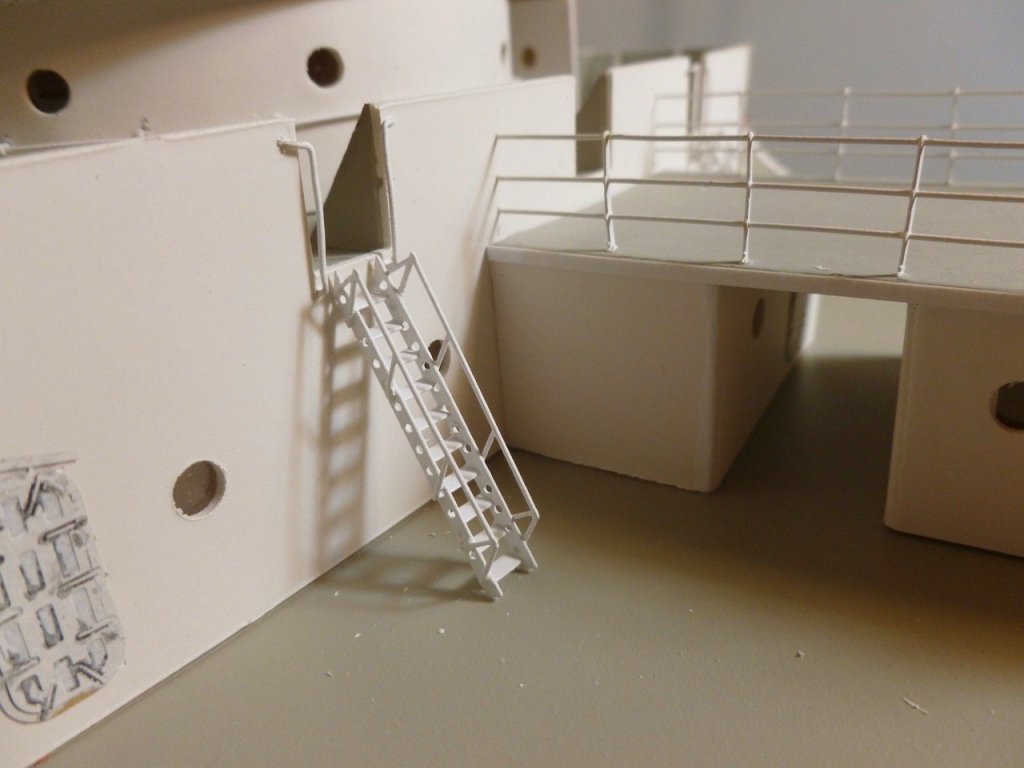
Thanks to all who gave likes. Lou, thanks for stopping in and for your ongoing interest. Carl, I set the ladder too flat. I propped up another one in the same location, but more vertically oriented and it should look much better. I'm working on a little 60 degree template to see how that compares to the new alignment. My tendency is to want the ladders to look flatter since stairs in buildings have a much shallower aspect, more like 7 vertical to 11 horizontal, but online drawings of ship's ladders have them at 60 degrees which is much steeper. Soooo, patch the deck divots and hole and move the ladder in. The handrails are another issue. The supplied ones are PE flat which makes them a challenge to blend into the round deck rails. The good news is that a photo of the ship shows the ladder rails independent of the deck rails, closely aligned at the ends but not touching, so the current plan is to fab the deck rails in a similar manner to avoid trying to blend round to flat. Jack, thanks for the suggestion. I liked the hold and fold type of tools but I have very limited PE to fold up so I'm going the cheap way out. At this scale the tweezernose gives an acceptable sharpness to the inside corner, at least at the ladders. I figured I would use utility knife blades if I need anything sharper. Steve
- 446 replies
-
- 3
-
-
- zebulon b vance
- deans marine
- (and 3 more)