JerseyCity Frankie
-
Posts
1,338 -
Joined
-
Last visited
Content Type
Profiles
Forums
Gallery
Events
Everything posted by JerseyCity Frankie
-
Another factor in which sails to furl and which to leave set and drawing is based on the concept of sail balance. the "center of effort" of the sails will shift to the bow or the stern depending on which sails you set. You will note that there are a bunch of fore and aft sails on the bowsprit and jibboom. If all of them are set it makes the rudder less effective since the rudder is acting on the opposite end of the ship: If the wind is blowing from the West and I am sailing North with all my sails set, and I want to turn in a North West direction, the wind filling the headsails is going to be opposing the rudder forces I exert with the steering system. I may have to take in some of the headsails if I need good rudder control. But if I am running before the wind with the wind at my back, I will need more sails on the front of the ship to keep it pointing downwind. If I had all my sails on the after side set, with the wind at my back, the stern of the ship will tend to want to swing around like a weathervane. So I need to imagine where this "center of effort" is at all times and adjust its fore and aft location via setting and dousing sails depending on my point of sail.
-
Since you are building an existing and well documented ship, I would rely on photos of the actual ship! Constitution and other three masted square rigged ships would have all some or none of their sails set depending on the captains intention and the sea state and wind conditions. Picture all sail set: This is only possible if the weather allows for it. leaving all the sails up as the wind increases in force is going to make the ship sail faster, but it will mean the possibility of damage to the spars. A prudent sailor reduces canvas as the wind increases. The sails are furled from the highest point first. The lightest and smallest uppermost sails are furled first as the wind increases- you will never see a ship furl a topsail BEFORE furling the sails above it. The larger lower sails are on stronger parts of the rig and can take the force of the winds better and remain in use longer. So you can chose which sails are going to be furled, but only furl a sail if all the sails above it are going to be furled too. (the exception being the lowest square sails, the Courses, which were furled independently of the rest of the rig from time to time) Someone mentioned the removal of sails from the yards. To my knowledge this doesn't happen. If the ship is sound and in commission and not undergoing an extensive period of repair, all sails are going to remain on the spars at all times. Occasionally sails will be swapped out for heavier canvas as the ship changes latitude or the sails need repair, but they are never struck below to save on wear and tear, they remain on the yards. As with most things there are exceptions to most of the above. For instance some topsail schooners will set a small uppermost square sail from the deck- with the yard too- and then strike the sail and the yard it is on back to the deck when the weather forbids its use. And then there are Stunsails, which Constitution had. And the Crossjack Yard seldom has a sail bent to it although its possible to find examples that do.
-
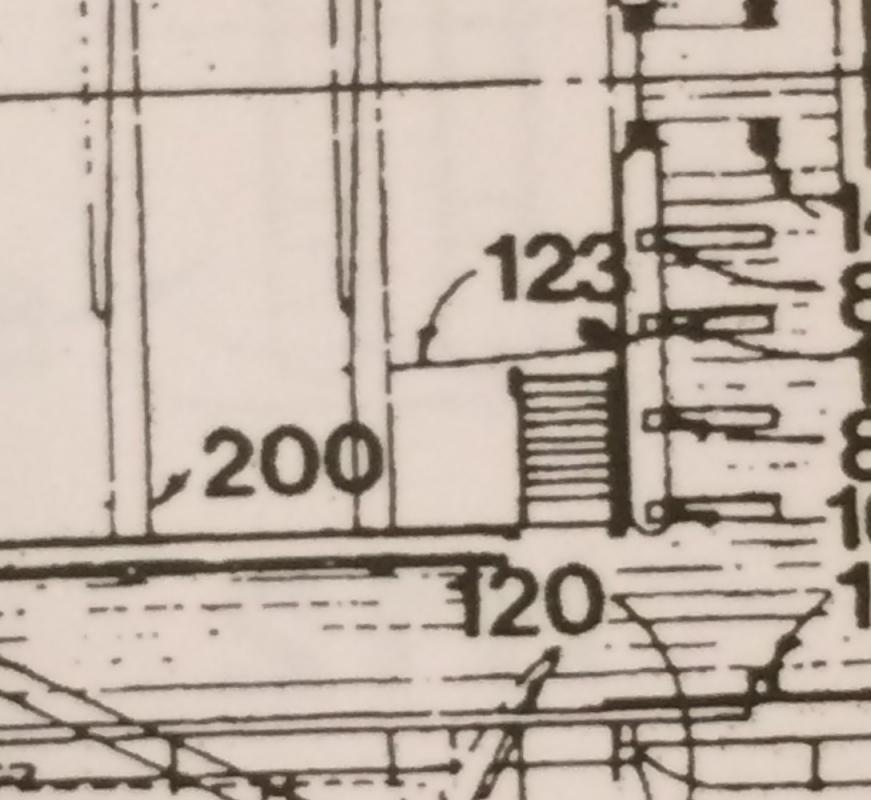
Thats the boltrope and it IS sewn to the sail on an actual ship. However the way it is done on a real ship is that for each stitch the needle is passed through the canvas within a half inch or 1/4" to the edge of the sail, then through the rope, then back through the sail. It NEVER goes AROUND the boltrope, it goes THROUGH the boltrope. The needle is passed THROUGH the rope in such a way that it will emerge from the rope from inside one of the grooves between the three strands of the rope (called the Score). It is then led back down to the canvas to form the next stitch. What is really important to understand is that the needle is led DOWN THE SCORE of the boltrope to pierce the canvas again. When the next stitch is heaved tight, the bit of sailtwine that is coming up out of the bultrope is snugged down deep inside the score.The waxed sail twine used is thicker than sewing thread but much much thinner than a shoelace. I give this elaborate explanation to make it clear that the thread holding the boltrope to the sail is nearly invisible as no part of it is exposed to view. And I make this point to explain why I do not think boltropes on models of any scale should ever be sewn on with actual thread. Glue the boltrope on if you want it to look like the real thing. MANY people include the stitching on their models, and the stitches are very visible. Depending on your concept of "accuracy" you will have to decide for yourself if "accuracy" means the stitches must be on the model. The stitches ARE on the actual ship and that is why people include them on their models.But on the actual sail they are invisible to the eye at any distance greater than five feet or so.
-
Shrouds on Navy Ships of WW II
JerseyCity Frankie replied to captainbob's topic in Masting, rigging and sails
Late stage sailing ships of the Ocean Carrier faze used them too. I think they are likely wood. I'm not an expert on the period but I know they were wood leading into the WWII era and I can't imagine why steel would be chosen. "Ratboards" is a term I see in use for them but they are still under the umbrella of "Ratlines". They are 2" X 2"or 1.5" hardwood and they are attached to the shrouds with square lashings with a bit of overlap on each end. -
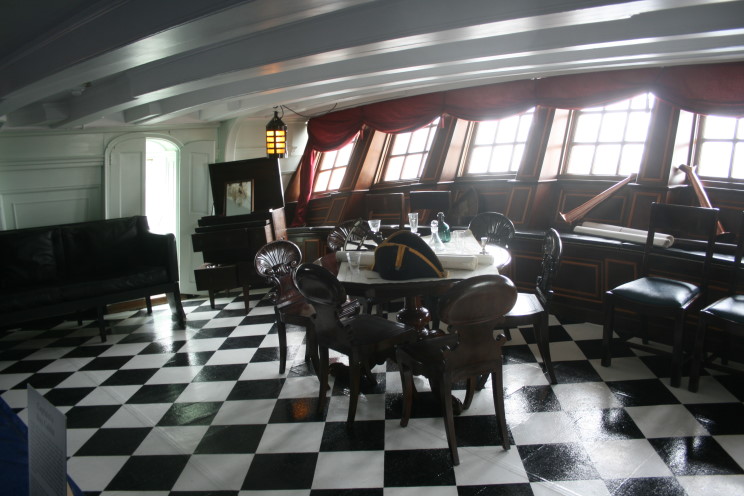
Here is a shot of painted canvas deck covering from HMS victory, this is what is meant when there is discussion of painted canvas on a deck. Its an exclusive interior space and its intended as a decorative flourish, not as a practical coating to prevent water getting in. And most importantly its in an interior space. To my knowledge the painted canvas is used nowhere else aboard Victory.
-
Belaying of Reefing Tackles Query
JerseyCity Frankie replied to BANYAN's topic in Masting, rigging and sails
If you are sure they belay in the Top, and this sounds plausible to me- I would suggest a shroud cleat on the inboard side of the topmast shrouds. -
I'm still skeptical there is evidence of anything unusual about the deck to be found in the painting. The portion of the deck visible in the painting (aside from the red cabin top) is a very narrow strip. The fact that it is appearing in a painting should not be forgotten, it could be that there were reasons for making it appear grey in the painting that do not reflect reasons it would be grey on an actual ship. Its plausible, in my opinion, that the artist went with a greyer color merely to help the eye distinguish between the other nearby painted elements of the ship, in order to make it clear to the viewer that the parts that were grey were horizontal and the other parts are all vertical surfaces. But if you were being impartial and looking for evidence of a color painted over the deck, the painting is making it quite clear the color used is red, not grey. We are told this is a new ship and this tells me the deck would be tight with all the seams caulked and paid with pitch, not a leaky deck requiring a canvas covering. As I like to end many of my posts with the words "but I could be wrong" I hope everyone will read this as opinion and not criticism.
-
Pickle rigging question
JerseyCity Frankie replied to bigcreekdad's topic in Masting, rigging and sails
Are these the usual pendants that go over the masthead first, and all the shrouds go on top of them? these are used for slinging heavy loads ect and when not in use they either simply dangle in space or are tied against the inner face of the shrouds so they dont sway and bang into the mast. There has been discussion of their disposition elsewhere on Model Ship World and probably people see them in different ways. I think most agree there is no tackle attached to them unless they are in use lifting a heavy object or used as a purchase for setting up the shroud lanyards. I myself have never understood their necessity yet they are seen on all ships. But I can imagine that if there was a need for a purchase above the deck in this location, the top or the masthead itself could serve as a place to attach tackle, and a pair of dedicated lines with oversized eyes on them would not be needed all the time. On the other hand you cant argue with the historical record so they must have been worth the trouble to have them there. -
The ship certainly had an odd deck arrangement, its such an odd layout with that-what would you call it?- a midships house? In the painting the "midships house" deck appears painted red, which is also odd. in photos of this model you can see there is an after stair leading to this red deck so we know it could be trod upon: http://www.modelships.de/Royal_Caroline_III/Photos_ship_model_ROYAL_CAROLINE_close_views.htm The deck on the "house" is red in the painting so one would GUESS that the rest of the decks elsewhere on the ship would be red too, but there is the grey color.
-
I would love to see a shot of the entire painting, is there one online someplace? There sure is a lot of detail in the details you have presented. >EDIT< oh I see there is one on wikipedia: https://upload.wikimedia.org/wikipedia/commons/5/55/John_Cleveley_the_Elder_-_The_'Royal_Caroline'.jpg
-
Happy 4th of July! And you will remember that the film takes place over the 4th of July weekend: The town of Amity is going to have its summer tourist season RUINED because of that big shark out there, forcing the sheriff to close the beaches! Better get into the Orca and hunt that shark! I try to re-watch Jaws every July 4th now and this year I will be thinking of your model when I see all the scenes featuring the Orca.
-
H.M.S. Victory Fore Topsail Braces
JerseyCity Frankie replied to JerseyCity Frankie's topic in Masting, rigging and sails
I have no idea why this topic winds up under "Building and framing" when it should be under "rigging". could a Mod switch it over or should I delete it and start over? >EDIT< Thanks mods for moving it! And thanks mtaylor/Mark for explaining the "report" button.- 4 replies
-
- 1
-

-
- HMS Victory
- rigging
- (and 2 more)
-
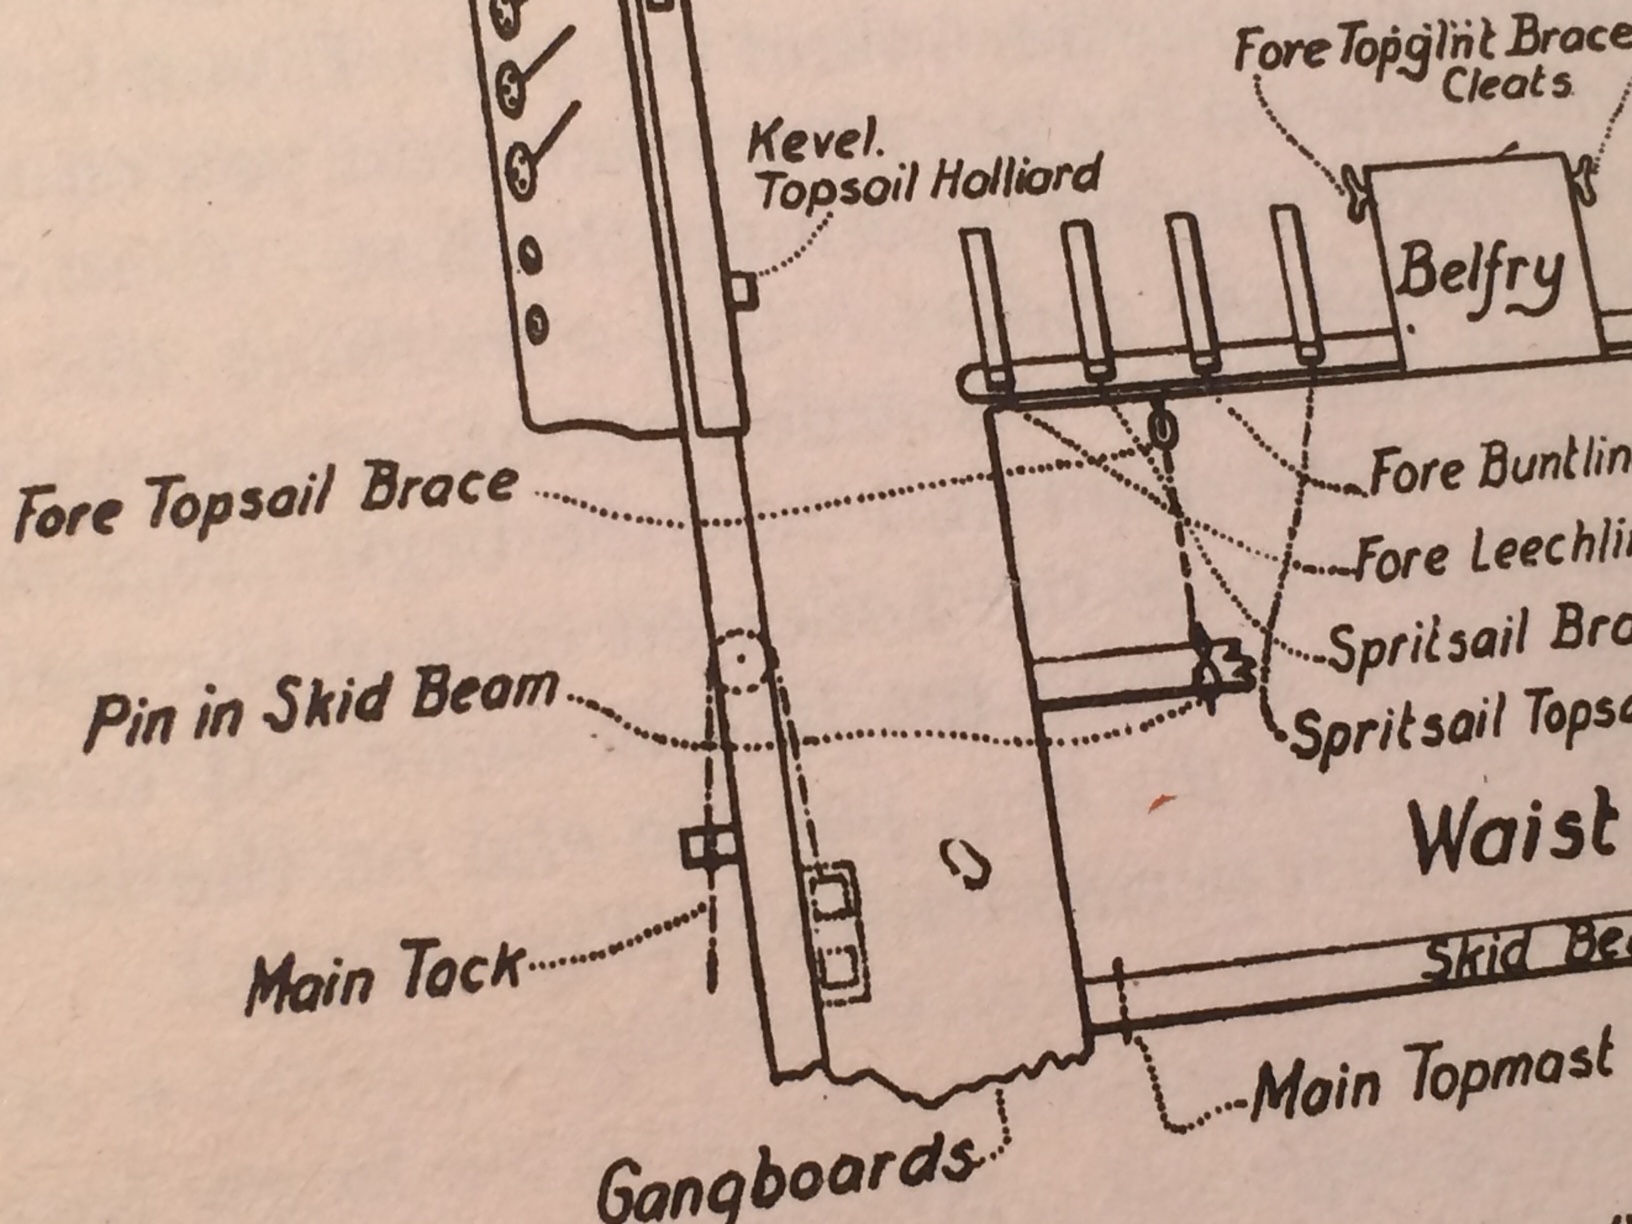
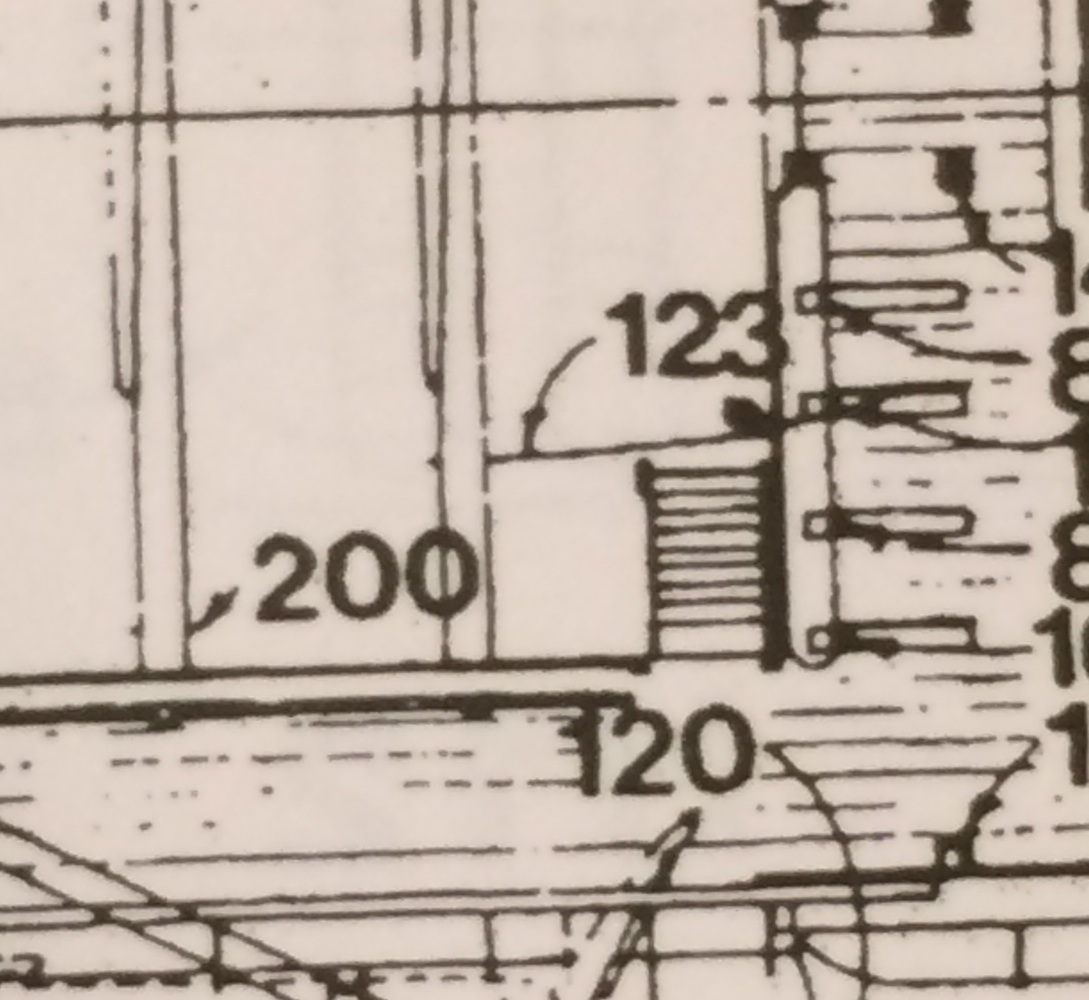
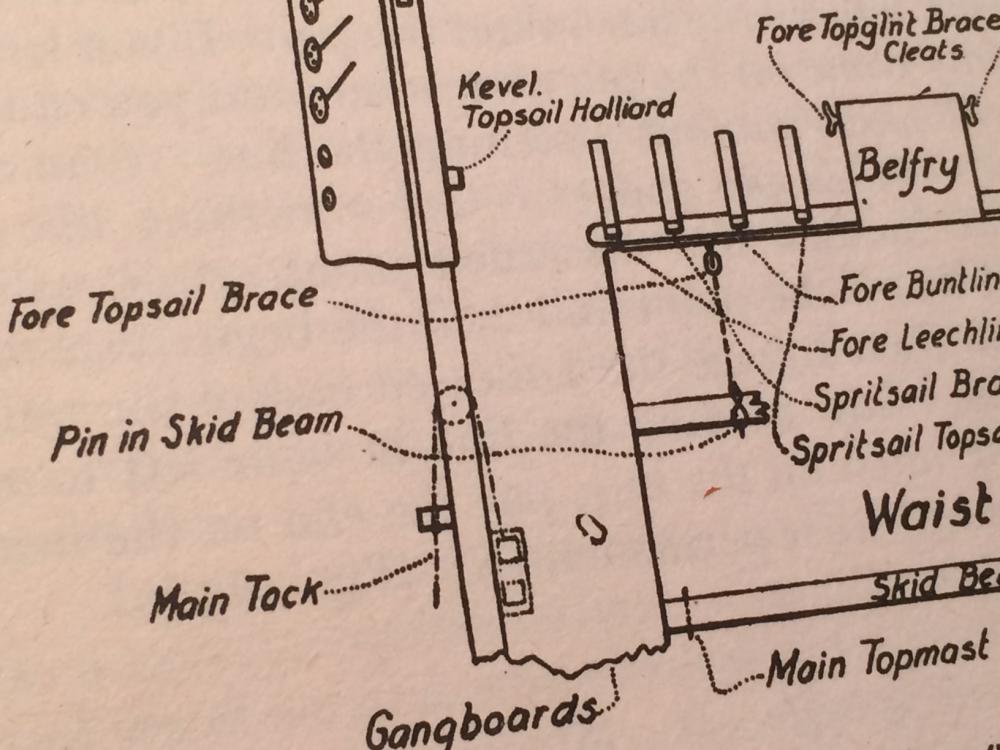
I'm getting nearer to finishing my Heller HMS Victory and I am at the stage where I am literally tying up loose ends. I had installed all the running rigging but most of it was left dangling and not made off to anything so I could have flexibility and access to the deck. Now I am belaying the lines going from fore to aft. The foremast looks great and the bow area is now clear of Irish pennants and lose ends.. , But I have come across something I find odd: the Fore Topsail Braces belay to the second skid beam. This strikes me as an odd and awkward and hard to access place to put these frequently used lines. There are many lines of running rigging on a ship, but the Fore Topsail braces are on the short list of lines you will be using all the time. And they are lines which will be under a LOT of strain and which will require a lot of crew to take up on. . John McKay, Longridge and the Heller instructions themselves have them belaying in this odd place (although the kit instructions may indicate the rail at the forward edge of the hatch, the kit has a molded on pin where the others say the lines belay). Lees doesn't specify where they belay in his section on Fore Topsail Yards. . The lines begin on the main stay close to the main mast then run to the blocks on the yardarms. From there they come right back to lead blocks on the stay, close to where they originated. From there they run forward down the stay to another pair of lead blocks on the stay above the belfry, and from there to a lead block on the forward edge of the hatch (or a fairlead in a timberhead there?) then belay to a fore and aft pin which pierces the second skid beam. The references I have that show the pin show it several feet away from the gangways, not within easy reach of someone standing there. . The only way this makes sense to me is if the crew were intended to handle the line from the gundeck below. Which makes me wonder then why it wouldn't belay on a big hefty cleat on the bulwarks there. Why above their heads in a place difficult to access? Why not on one of the timberheads at the forward edge of the hatch? The way it is rigged it zigzags through space quite a bit and I believe it could have been lead nearly anywhere with the resources it is using. So why is it 1/4 of the way inboard on a skid beam, which I believe would be a difficult place for anyone to manage it?
- 4 replies
-
- 3
-
-
- HMS Victory
- rigging
- (and 2 more)
-
On my HMS Victory model I used some ordinary sewing thread and a needle. I sewed through the sail then tied the thread around the yard, puling the sail snug against the yard and I used a clove hitch to tie the ends. A drop of diluted glue or cyano, then when its dry I snipped off the ends as close to the knot as I could manage. The Victory model was 1/100 scale, a human figure would be 3/4" tall on this model so the roband has to be as small as I can manage it in order not to be out of scale. Figure how small the finger on the hand of the crewman would be and then match that diameter with thread. I chose a thread color that looks plausibly like rope but not a color close to the color of the yard since I want the robands to be visible if anyone is looking for them but not such a contrasting color that they are visible from across the room. There are a range of sandy, brown and black colored threads available wherever they sell thread. You can see my sail construction in my HMS Victory build log the link to which is in my signature below this block of text.
-
I cant imagine a need for all those eye splices between the spar and the sail, certainly not in a ship model where they will only serve to create a huge gap between the sail and the spar, and/or bizarre lumps. I believe there should be two robands in each cloth of the sail and if you are using thick thread you are going to wind up with a yard that looks ribbed. Err on the side of very thin robands. On an actual ship the line used for robands would not be thicker than your finger. If you use heavier stuff than that you will have the wrong look. You don't mention what ship you are building or what scale. On a model of such a scale that the yard is 12" wide or more you would have to show details- again, in my opinion. On a smaller scale ship you don't even- in my opinion- need to actually have the robands pierce the sail, they can simply be a turn around the yard and when you glue the sail over them they will look legit. On a really small model you can simply spiral a single piece of thread from yardarm to yardarm, spacing the turns appropriately and glue the sail on over it.
-
I'm amazed at how many poorly shaped belaying pins turn up on great models. The manufacturers can not turn out accurately proportioned wood pins in the numbers needed so they give you the best they can manage, and its always a poor sad offering- bulbous pins that look like light bulbs. HUGE cartoonlike light bulbs. I will second the notion of painting the brass pins you have as I am skeptical you will find wooden ones with a more accurate silhouette. Also I will add something I have said before: With lines on the pins, the eye can not notice much about the nature of the pins unless they are the aforementioned huge wooden bulbs. A perfectly formed wood pin will not look much different than a cylindrical treenail or peg with no curvy shape,
-
I had this problem but the pieces I had to replicate were only a 1/4". I found some bone decorative carvings at a jewelry supply house in New York City, they were intended for earrings or necklaces but they were perfect for me since they were clean and seasoned and I was able to cut what I needed out of them.
-
I think if someone were building a Bluenose from scratch they would not use actual wire these days, but your mode did and I think that means you should stick with wire in the restoration. But that is my opinion and I could imagine others saying wire has no place on a model. I once took a bunch of wire off a very old ship model I was restoring, but only because I determined the wire was not original to the model and was part of a slipshod restoration that had taken place in the past. Also I think if you elected to remove the old wire on your model and replace it with heavy thread, nobody would fault you for it. Wire has the drawback that once it gets a kink in it, the kink is hard to remedy and calls attention to itself. I like the look of the model you have, it has a LOT of character plus it has the family history. Congratulations on restoring it!
- 24 replies
-
- 1
-
-
- three sisters
- schooner
- (and 1 more)
-
My advice-which runs counter to the strict "Museum Restoration Protocol"- is to replace all the rigging if its not strong enough. Grasp a sample piece of rigging between your fingers and pull lightly. Does the line snap easily? if so I would recommend replacing all of it, since all of it will likely be in the same condition. If it doesn't break, use as much of it as you can! A museum restoration professional's agenda is to preserve as much of the artifact as possible. But as a practical matter its best to complete the restoration in a way that ensures the ship model will last as long as possible into the future. If the rigging is still weak and brittle after you have restored the model its only going to be a high maintenance artifact for the foreseeable future, requiring frequent restoration.
- 24 replies
-
- 1
-
-
- three sisters
- schooner
- (and 1 more)
-
RIGGING THE ROYAL WILLIAM
JerseyCity Frankie replied to piratepete007's topic in Masting, rigging and sails
Anyway, to get back to the white football shaped object on your drawing: Now that I look at the drawing again I can see the two heavy lines of the Truss Pendant depicted passing around behind the mast, they are just under the white object and you have circled them in blue going around the mast and in the rightmost blue circle you see the eyes for the falls to run through. But the pointy part of the white triangular object appears to be intersecting the same areas where those eyes are located and I can't help thinking this makes the white object part of the Truss Pendant assembly. -
RIGGING THE ROYAL WILLIAM
JerseyCity Frankie replied to piratepete007's topic in Masting, rigging and sails
I cant put my hand to any "good diagram"s showing the Truss pendant in use. Harland covers the use of the tackle briefly in Seamanship in the Age of Sail (page 29) and points out it was a concept born in the days when the lower yards were ALWAYS hoisted when sail was set, then transitioned into the age when the lower yards remained more or less fixed, then finally was supplanted by the Iron Truss at the late stage of sail. When you are running before the wind the yard would move out ahead of the mast if the Truss was not there to prevent it. And if the truss was too long in this configuration the yard could swing in and out farther with the pitching of the ship- with possible damage if it was allowed to repeatedly bang into the mast- so keeping it tight into the mast wouldn't allow it to swing forward and aft very far. But when sailing towards the wind you have to brace the yards around. Lets say you are on the Port Tack. To sail as efficiently as possible towards the wind you have to brace the yard around as far to Starboard as the rig will allow. By slackening the Truss Pendant (and easing the lee Lift) you allow the yard to move off to the side of the mast a bit and now it can brace up tighter before it rubs up against the lee standing rigging. If you had not made the adjustment to the Truss Pendant, you would be denying yourself a bit of range of motion for your yard and as a result you could not sail as close to the wind as you could if you had slackened the Truss Pendant and braced up that little bit more. -
RIGGING THE ROYAL WILLIAM
JerseyCity Frankie replied to piratepete007's topic in Masting, rigging and sails
I think this is a Truss Pendant but one that does not have a running portion that goes abaft the mast, I think the white triangle represents a horizontal sling that goes around the after part of the mast. My guess- a pure guess- is that the triangle represents a lot of non-running parallel smaller line fanning out from two points points at the slings of the yard and widening out as it goes abaft the mast then tightening back up on the opposite side of the slings of the yard.-something like a hammock, but maybe something like a sword mat, it may even be covered in canvas? In my imaginings there will be eyes at the points of the "hammock" through which the running portion of the Truss Pendant will run. The area in which the Truss Pendant lives is a funny part of the ship isn't it? And the hardest to make a diagram for. The "one size fits all" diagram showing ALL the running rigging always gives this part of the rig short shrift on any ship plan because of where it is located its buried under everything else. In my opinion the Truss Pendant is among the least understood bits of running rigging on the ship. But if you look at the size of the gear it is made up of and the position of the line where it belays on deck, you see that its intended to run, its intended to be adjusted and to do so when powerful forces are at work. In essence it is a hinge, a hinge that can me made longer. It keeps the yard in tight against the mast, but it can also be eased to allow the yard to move farther away from the mast. This is, I believe, so that when bracing up hard, the center of the yard can be allowed to swing out away from the mast and off to the lee in order to clear the futock shrouds. -
Reef point spacing ?
JerseyCity Frankie replied to Senior ole salt's topic in Masting, rigging and sails
I think through the seam makes more sense but there is a lot of documentation showing a pair of them in each cloth, not in the seam. Through the seam makes for a stronger grommet hole since it goes through more layers of fabric on a seam. The bottom line will be the spacing since the goal is to gather the canvas and allow the reefed sail to set with a smooth unpuckered foot with a reef tucked into it. -
I think everyone is going to ask you to provide the image so we can see it. Are you sure you are seeing canvas in the artwork? Actual decks on real ships are a grey color from use and weathering. I have heard of canvas on decks in the great cabins of ships but these are interior spaces and the canvas is painted to look like tile. Canvas underfoot on an exterior deck is something I never heard of or seen before in a painting or a model. And from a feasibility standpoint it does not make much sense to me, its going to wear into rags pretty quickly while at the same time holding moisture in the wood deck. Also, even if painted its going to become absolutely filthy in a short time. Wooden decks were routinely (sometimes daily) hollystoned to keep them looking clean and this is much more likely for a royal yacht, in my opinion.
-
Advice needed for tying blocks
JerseyCity Frankie replied to heksanol's topic in Masting, rigging and sails
I second the above. And I second the above the above, the part about not having eyebolts on the the yards on a wood spar. But if you have to have them, and your going to use the blocks as configured in the photo you provided, I would use a large package needle and sew the end back through the seizing, after you passed the "tail" through the eye of the eyebolt.. If this wont work (thread too thick?) You could be sneaky and unlay the strands of the "tail" of your block and cut two off as close to your seizing as possible then use that packing needle to sew the remaining single strand back under your seizing after you pass it through the eyebolt. If you ditch the eyebolts (which I would encourage you to do) you could pass the unclipped tail around the spar and THEN do the "sew it under" trick. This would mimic actual practice to some degree and keep unwanted bulk out of the overall rigging appearance.