JerseyCity Frankie
-
Posts
1,338 -
Joined
-
Last visited
Content Type
Profiles
Forums
Gallery
Events
Everything posted by JerseyCity Frankie
-
Model Shipways Bluenose, Sails or not
JerseyCity Frankie replied to Worldway's topic in Masting, rigging and sails
But you did ask about the Bluenose in particular, not sails on models in general. Personally I'm in FAVOR of sails on all schooner models. Why? Because of the nature of the schooner rig. With no square yards schooners like Bluenose look particularly desolate with just a pair of naked sticks poking high up above the deck. From across the room, a Bluenose model with sails is going to look great and draw the eye. The huge volumes of space above the deck will be DEFINED by the sails. A bare-poled Bluenose will be hardly visible at all from across the room, and may actually appear to be incomplete. Also, rigging the Bluenose with sails is going to be relatively easy compared to rigging something square rigged, all you need to do is attach the halyards (which you would have to rig anyway) and put the sheets onto the headsails, you would already have sheets on he Fore and Main with bare poles. -
Model Shipways Bluenose, Sails or not
JerseyCity Frankie replied to Worldway's topic in Masting, rigging and sails
Controversial issue! I have seen people on MSW opine that sails actually ruin the model. Very often they will say that sails block the view and the viewer can't appreciate the model fully. They will tell you that you can never get the material to scale properly and it will always look wrong. I don't think I'm putting words in anyone's mouth here, there is a strong and vocal anti-sails contingent! And to be fair to them, sails on models ARE an excellent way to ruin a model by undoing all the carefull hull work with crude sails above it. Sails are very difficult to get right, they are deceptively troublesome. If you look at Completed Builds it's hard to find even very popular kits like the Pride of Baltimore or HMSVictory or Niagara with sails on them. I have not looked lately but at one point I could find only ONE Victory with sails on her in the Completed section. I'm going to say that deciding to add sails on a square rigged model, and try to get them right, adds an ENORMOUS amount of time to the build, perhaps weeks of work. Plus if you do the sails, now you are obligated to do all the running rigging, and understand it too. Many reference works don't even touch on the running rigging of particular ships. -
The kit is likely wrong if it's indicating a second block at deck level, in my opinion. To fly the ensign a line ( the lightest line on the entire rig) runs from the rail, up to the gaff peak then right back to the rail. Both ends of this line are on deck when no flag is hoisted. To fly the ensign,You tie the two ends to your ensign at the upper and lower corners of the hoist of the flag and then haul away on only one leg of the halyard, the one that makes the flag ascend right side up.- if you haul on the wrong part the flag ascends upside down. When the flag is fully hoisted you now treat the two ends of the halyard as a single line and belay them together either on a pin or with a simple knot such as a clove hitch to any convenient point that is as far aft as possible and will also keep the halyard clear of any other lines. The second block at deck level would only be handy very briefly at the middle stage of this process -and only if the gaff remained in one predetermined position-but would instantly become a hinderance when you tried to belay the two ends of the halyard. The reality is that the gaff moves quite a bit in relation to the deck and the length of the halyard-which must remain taught so as to keep the ensign flying properly-changes by several feet on every tack and must be constantly adjusted. You could try to rig a lead block on th boom and have a pin or cleat accessible to those on deck farther inboard on the boom, but now the halyard will effect the shape of the sail and suffer continuous chafe. The schooners I sail on solve all this by simply bending the ensign directly to the leach of the sail, avoiding the halyard completely. But a ship of war would need options for ensign visibility that this would not allow.
-
You will find in us an eager audience who will be happy to offer ideas about the collection of ships. Also we just love ship models so I'm sure we are all looking forward to seeing photos of the models! Most model builders work in isolation (beyond our family and friends of course) and for the most part our models are never seen by the wider world. Here at Model Ship World you have a platform that allows the entire interested world to see the models.
-
Guidance for interpreting plans
JerseyCity Frankie replied to Heronguy's topic in Masting, rigging and sails
My advice is to do a web search for "schooner topmast" "schooner Triatic stay" "schooner spring stay" , "schooner rigging" etc. then sift through the photos you find. You will find conflicting approaches sometimes but on the other hand traditionally rigged schooners are the most prevalent and numerous tall ship in all the oceans, and you WILL find helpful information. -
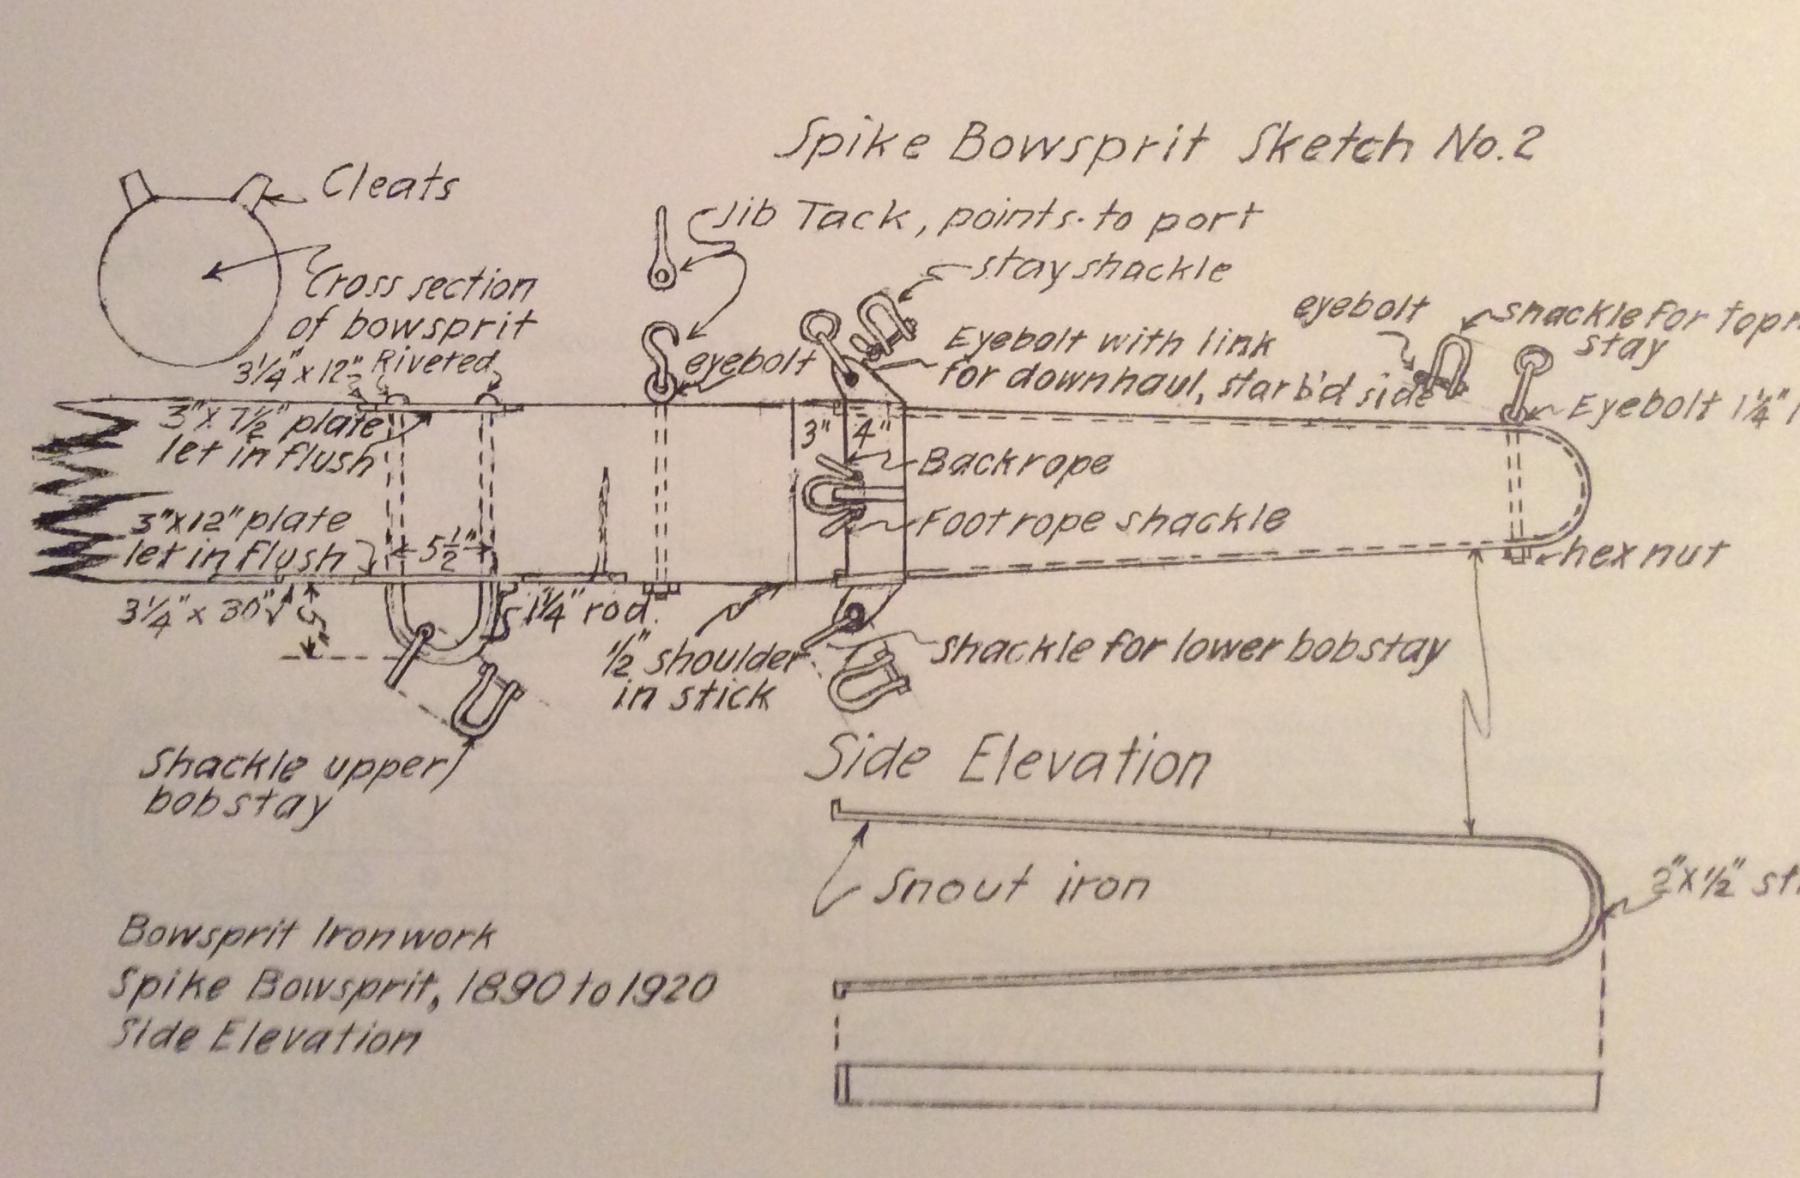
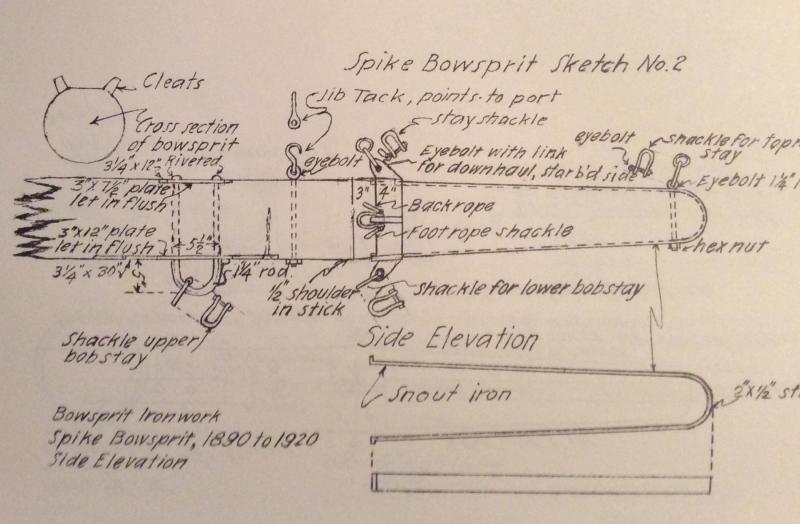
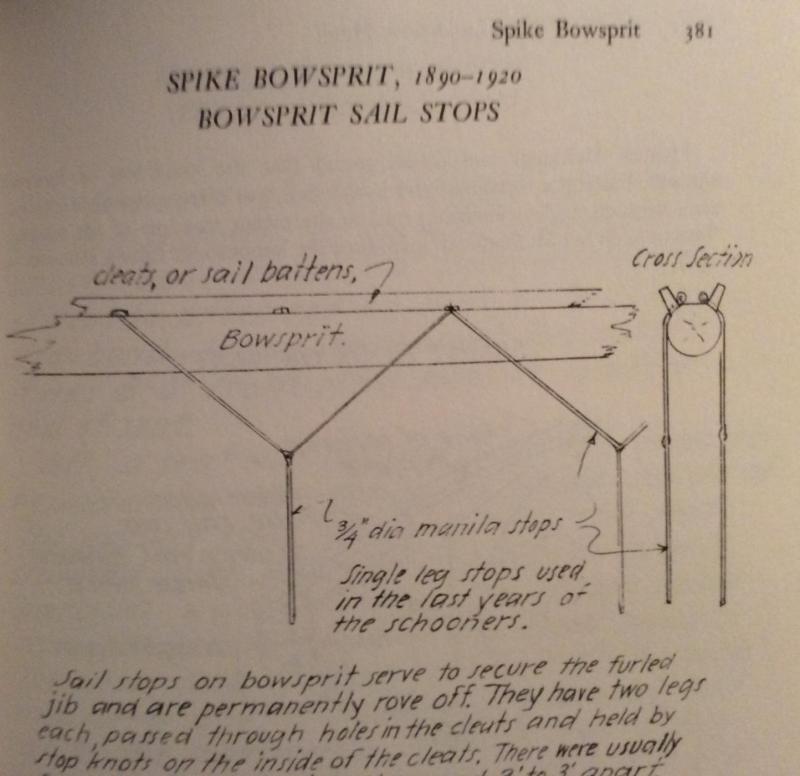
No stirrups on footropes is my guess, I believe the footropes would run from the hull out to the Cap Iron and be otherwise unsupported. I did find a drawing in Howard Chapelle's American an Fishing Schooners showing Sail Stops hanging vertically from the bowsprit and I have not seen your documentation but I can very easily believe you could be seeing Sail Stops and thinking they are Stirups hanging down. Sails Stops DO GO UNDER THE battens as shown in the diagram. They are simple bits of line attached only on one end and when the sails are set they just dangle under the bowsprit in pairs. They are used to secure the sail when the sails are furled, each leg is just long enough to go up and over the furled sail with enough extra with which to tie a reef knot.

- 1 reply
-
- 2
-

-
Would love to see a photo!
-
Which pre-built ship to buy?
JerseyCity Frankie replied to jmartin2288's topic in Wood ship model kits
Wow. That $300,000. Constitution is a joke. But it illustrates the problem of finding an existing model that is of reasonable quality yet affordable. The Constitution shown at the link above is NOT "museum quality" but most people have not immersed themselves sufficiently in ship model culture or nautical history enough to be able to make an informed judgment. I would value the above model (as long as it still had its case) at well under $500. But the guy selling it is delusional, or exceedingly unscrupulous. Here is my advice if you want a reasonable model for your mantalpiece: put an add in the paper. Or on Craigslist. Say how much you are willing to spend and then sit back and wait. Keep the add running. It's possible you will find a perfectly presentable model this way. Maybe it's a little dusty. What's most likely though is that someone has a broken model that is very dusty in the attic or basement and you should buy this model after negotiating an even lower price. Don't offer more than $75, be prepared to walk away from delusional people that think they have a priceless heirloom. This strategy is the same as buying a car that no longer runs then investing in repairs. You can wind up having paid less for what you wanted this way, but it's more trouble for you to make the repair. On the matter of a repair, I would suggest trying it yourself-depending on how far gone the model is.if all the masts are completely broken off, maybe you can clear everything off and display it as just the hull? -
Gold leaf is certainly very thin, but I have never heard of copper leaf. CAN copper be hammered as thin as gold can be hammered? If it could be made nearly as thin as gold leaf I think THEN you would have a material that was in scale. But you would still have the issue with nail visibility if you were then planning on literal nails in each plate.
-
This issue, like tree nails and sewn on bolt ropes on sails, illustrates where the literal collides with the figurative. I feel that a literal interpretation on a miniature very seldom leads to an accurate scale appearance. What I mean by "literal interpretation " is the slavish duplication and use of materials and practices found on actual ships which are then applied to a scale model with no alteration of material or practice. The resulting effect is usually out of scale to one degree or another. It's why you dont use actual oak to represent oak on the model. The material can't be scaled down. It is nearly always an issue having to do with fasteners though and the degree to which they wind up being visible on the model, or in the case of hull plates the degree to which they distort the material they are fastening. I think it's better to think outside of the box when it comes to selecting methods to represent elements of the model you are building and NOT be literal. For instance a carefully considered and applied coat of paint is more likely to be a convincing scale representation of copper plating on a model, as opposed to an out of scale ACTUAL, literal, series of individual copper plates. I don't think anyone in favor of actual copper plates realy believes they can ever be perfectly in scale. But on the other hand the appearance of even the best coat of paint (even though it is in scale) can never realy be as truly convincing as actual copper is. Copper looks so distinctly different than any other material it's not as easy as switching out actual oak in favor of a tight grained wood to mimic oak to achieve a convincing substitute.
-
Sail design for 18th-century longboat?
JerseyCity Frankie replied to Cathead's topic in Masting, rigging and sails
I too find the horse and tiller arrangement to be flawed. The point of the horse is to allow the sheet rigging to tack from one side to the other when going about, as the boat passes through the eye of the wind and comes onto the other tack, the sheet will slide across the horse to the other side. the arm of the tiller is clearly directly in the way of where the sheet will always be moving past.sure the arm of the tilller is removable, but on the short list of times where one CAN NOT remove the tiller would be while tacking. In my view this is an impossible arrangement. I did go over to the National Maritime Museum's online collection page and there you can see a model from their collection that has this exact same arrangement. I would really like to know more about this model in particular and this whole topic in general. I find this to have the potential to be a realy absorbing mystery and I hope more people will weigh in on this as I think it's a very worthwhile topic to ponder. -
Has anyone mentioned the San Felipe yet? That's my favorite fictional ship, I started a thread here on MSW about her a while back. I forget how I stumbled onto the idea she was spurious but I wound up searching the web for details about her an noticed that all the add copy for the, various glitzy gift shop models of her, for sale in different websites all over the internet, was all nearly identical. It has all been cut and pasted from an apparent single source. Later I found this blurb on the internet: ohttp://www.modelships.de/San_Felipe_1690_authenticity/San_Felipe_1690_authenticity.htm

- 66 replies
-
- 3
-
-
- resolution
- hunter
- (and 2 more)
-
Cruizer-class Brig-Sloops of the Royal Navy
JerseyCity Frankie replied to molasses's topic in Nautical/Naval History
Is this the model that has its t'gallent sails set and nothing else? There is a model on display I recall, with that very odd configuration. One I do not think is ever seen in actual practice. -
Books for historic rigging reference
JerseyCity Frankie replied to pshrynk's topic in Masting, rigging and sails
I'm happy to answer! No need to use your real name at all, many of us do not. To your question, I don't think there is really ONE book since the subject expands in complexity the deeper you dig into it. The two best books though, in my opinion, are Seamenship in the Age of Sail by John Harland, and The Masting and Rigging of English Ships of War by James Lees. The first title may be the best for you since it goes into theory and practice a great deal. THe second covers the multitudes and dispositions of the lines themselves but does not touch on theory or use. Sadly both are expensive and I can't think of any cheaper books that even come close to covering the subject as well. -
"Gunnery notes" from William Rivers (*1755, †1817)
JerseyCity Frankie replied to dafi's topic in Nautical/Naval History
I think it says the canvas was "kept wet" until they commenced firing. I think the canvas and hammocks would represent the most likely fire hazard as the guns were constantly spitting fire just under them from fore to aft along the length of the ship. If wetted down they would be less flammable and also denser and thus able to absorb more energy from incoming munitions. There are many recorded instances of the cannon fire starting fires that day. -
HMS Victory 1:72 with sails or not?
JerseyCity Frankie replied to yangliyuan's topic in Wood ship model kits
Many people leave the sails off and are happy with the bare pole look but I always prefer sails on any model and all my models have them. But it's a lot of work and adds a lot of time to the entire build. Also if you want sails you should UNDERSTAND sails: if you put sails on you will likely also need to understand the running rigging and all the lines the sails use and this is a significant amount of information to process. Another problem is finding the documentation. I was surprised tha I couldn't find a decent sail plan for HMS Victory already available online, she's such a famous ship I had assumed there would be a lot of sail diagrams to chose from but I would up having to buy more books. Rigging sails on a schooner is comparatively easy but a big square Rigged ship is going to tax your patience so you have to mentally prepare yourself for a lot more work. -
Burton Pendants Guidance Please
JerseyCity Frankie replied to markjay's topic in Masting, rigging and sails
The reference photo above is for the LOWER shrouds. I have never seen burten pendants on Topmast shrouds,I do not think there is such a creature. You CAN get an odd number of shrouds, you just use the cut splice for your odd shroud. For five shrouds you need two pairs of shrouds with a seized eye ( and both legs come down to the same side of the ship) and one shroud with the cut splice (in which each of the two legs go to opposite sides of the deck). -
I took Dafie's advice and got a copy of Voices of the Battle of Trafalgar and I'm reading it now.The book is a chronological presentation of relevant text quoted directly from contemporary sources and in each case participants in the battle. SO you are getting eyewitness first person accounts, about one every page, with contextual commentary from the author Peter Warwick. The narrative begins 1803 so you are getting insights into the build up leading to the battle. I had THOUGHT that I had already read this book from a lending library fifteen years ago, it reads EXACTLY like the book I had read long ago and has the same format. But in perusing the books bibliography I came across a title written in 2002, so it could not be the book I had read 15 years ago so now I wonder which book that was? Anyway, I fully agree with Dafi that this is a great book for getting an overall picture. I would also recommend John Keegan's book The Price of Admiralty. That book is broken up into several essays on naval combat in general and has only about 1/5th of the book dedicated to the battle, but I recommend the book on the strength of that 1/5th, its a very good summery of things, the best I have read on the subject.
-
Burton Pendants Guidance Please
JerseyCity Frankie replied to markjay's topic in Masting, rigging and sails
I don't think I'm being too hard on anyone. I feel it's our place to point out mistakes or misunderstandings in the context of this website, and I hope MY mistakes and blunders will be pointed out too. I will be great full for it.i will also add that I very rarely say in effect " I know you're wrong", I always say, in effect, here is why I THINK your wrong and then I explain my point of view. >Edit< I have just had a look st the Niagara plans and the only reference to the burton pendants I could find was this sketch in the corner of the main rigging plan. The sketch could certainly have been more clear about how the pendant is made, they only illustrated half the bit of rigging the pendant is made of which as we see is creating confusion.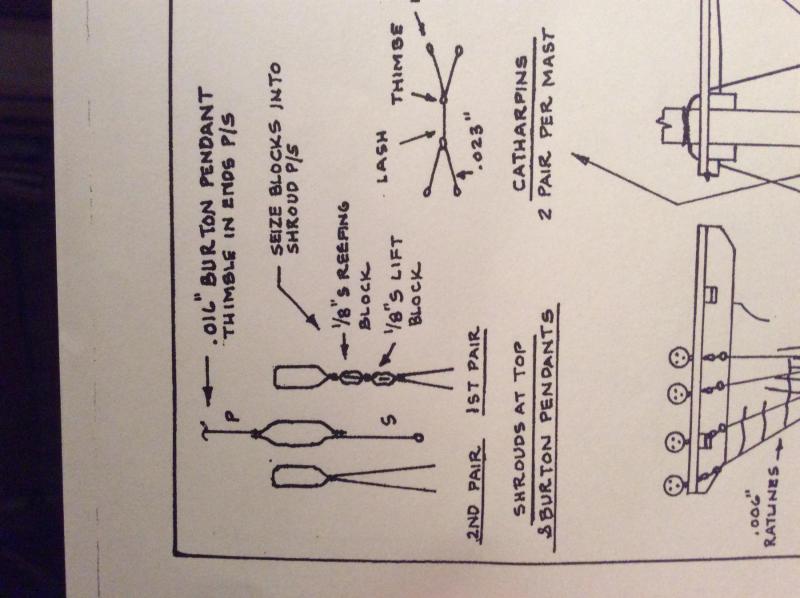
-
Burton Pendants Guidance Please
JerseyCity Frankie replied to markjay's topic in Masting, rigging and sails
I'm skeptical a burten pendant could be one leg of a shroud as shown in the above photos. It won't matter in terms of usage on a model and will be buried under the rest of the shroud gang, but I can not believe a shroud and a burton pendant could be on the same bit of line. Shrouds are under constant tension and the lashing forming the eye would not, in my opinion, be strong enough to allow you to turn your back on it. It would render over time on a real ship. -
This is on my mind as a good candidate for a build, it's got a little of everything and the ship has a good long history with a varied career afloat. There is a pretty comprehensive Wikipedia article about her which I was just reading this morning. Good luck with the build!
- 258 replies
-
- 3
-
-
- harriet lane
- model shipways
- (and 1 more)
-
So glad to see you are onto the rigging now! I imagine this will become my favorite part of your already highly enjoyable log.
-
I too have noticed bizarre fluctuations in the price of the anatomy of the ship books being sold online. I think you have to adopt the strategy of waiting and watching, keep going back to your online book resource and check the price as it fluctuates over time, and this will give you a better picture of the "going market rate". Clearly there is a species of mental delusion that grips some selllers and they believe they have a treasure of incalculable value when in fact they are selling commonplace stuff that should go for about $20.
-
I think it depends on the size of the spar you are making. If its above a certain size its probably best, for the sake of accuracy, to start with square stock and, by using cutting tools, get the spar to eight or sixteen sides and taper at that point. With the hard geometric edges you can better judge the proportions and bring a little science into how you taper. BELLOW a certain size the taper can be best accomplished through sanding alone- either with sanding sticks or chucked into a rotary tool of your choice or both. This method is better for smaller stuff since you can remove material SLOWLY and gradually approach the taper you want. Trying to shave off slices with a knife or plane at a smaller scale, you are more likely to mess up by removing too much material in one pass. What size determines the method? I would say it depends on your ability to control the amount of material your plane or knife blade can remove.
-
Im curious about this topic too since I know acrylic modeling paste is stable and a viable material for building up thickness in artistic painting. On the market and available in stores are a LOT of products that do the same thing: Spackle, wood filler, rock hard water putty, and many more. The acrylic though appeals to my sense of "archival" meaning its been formulated for painting -and thus longevity-and can meet standards of ph neutrality. But on the other hand as far as I know it was never designed to be sandable and never dries to a very hard surface- the nature of the acrylic base is that its always going to be a little bit rubbery. I wind up using it in very small quantities for filling in very small gaps and fairing over joints I want to be smoother. But above a certain size of gap I dont think its the right material to select due to that rubbery factor and its sandability issues.