JerseyCity Frankie
-
Posts
1,338 -
Joined
-
Last visited
Content Type
Profiles
Forums
Gallery
Events
Everything posted by JerseyCity Frankie
-
I have been checking out the many Niagara logs and a few things came to mind as I looked at all the photos. One of them was the capstan and its placement between the two hatches. Faithful duplication of the MS kit plans calls for little houses or dog houses over each hatch adjacent to the capstan, the upper surfaces are very nearly flush with where the capstan bars would swing and I can not imagine this as a practical way of doing things. I know the hatches can be opened and these dog houses set aside, but I just didn't buy them as "real". I looked into it and the current Niagara does have them and the capstan bars are just long enough to allow one man on each bar, but I still have a hard time swallowing this even with the real world example. Anyway this is a long way of saying I am glad to see this historic model has gone with gratings over the hatches, which looks and feels correct to me.
-
There are some photos of furled sails on my build log of my HMS Victory model -still ALMOST done with this model- and a lot of written verbiage about my opinions about the subject. I think a lot of ship modelers overlook the complexity of the subject and the results on their models often fall short of the quality of the REST of their models. Its hard to get comprehensive understanding of all the subtleties of what is going on with sail handling but you can not go far wrong by looking at photos of actual sailing vessels. Even though, as mentioned above, methods have changed on how sails are handled over the centuries, you cant beat an actual photo or video of an actual sail being used in real world practice. Fortunately we live in a time where there has never been so many photos and videos of real sailing ship stuff being recorded by actual sailors on their smart phones. Now we can go online and see almost every evolution of sail handling if we just search long enough. Few of todays tall ships dont have a facebook page FULL of photos uploaded by actual members of the ships crew who participate in the daily operations of the ships. Most modern tall ships use modern materials but some of them use traditional rig and the first few that come to mind are Le Hermione, Pride of Baltimore II and Brig Niagara. Also check out Picton Castle.
-
Oxidized. You could go with very dark grey or any sort of dark brown. The bright shinny brass pins seen on many models cant represent a real world belaying pin, nobody is going to be polishing all those pins all of the time unless its an obsessive yacht owner. And if you think about what a belaying pin does and what it is for, a gleaming frictionles surfaces is NOT going to be helpful for belaying a line so it will stay where it is put. The whole point of a pin is to fix the line in place at a specific point on its length and not allow this line to move at all. If the pin is supper polished the line on it will be much more likely to render, as if it had been greased. Its true that three turns on ANY pin should fix the line in place by utilizing its OWN friction- the degree of friction caused by the pin should not matter. But in getting the first two turns on the pin the sailors are NOT going to want the line to freely render so easily.
-
The problem with being literal and folding an actual scale sail which is made of fabric and the correct size and shape, is that due to the nature of the woven material it can never be folded as tightly or make as small a bundle as an actual sail on a real ship. The fabric can not be compacted down to the scale size and the wrinkles you get will also be hugely out of scale. I suggest tissue paper moistened with white glue and water and then formed into the correct size bundles then painted or lightly stained to look like sailcloth. When dry this stuff is very convincing as it has the organic look of an actual fabric bundle and it even has tiny little wrinkles.
- 37 replies
-
- 10
-

-
R.C. Anderson goes into this briefly in Rigging of Ships in the Days of the Spritsal Topmast on page 136. This is the fixture at deck level that corresponds with the Ramshead Block, used for hauling yards. Mounted singly and asymmetrically offset from the centerline for a fair lead that avoids the stays. I just went back and checked Anderson because I thought the fixture at deck level was the "ramshead" and the block above was the Ramshead Block. But Anderson does call the fixture at deck the Knight, and the block above IS the Ramshead Block. He points out the ring on the side of the Knight is for the dead end of the hauling part of the tackle and that the fourth sheave in the knight is for the toprope- meaning its not going to have a line rover through it in daily use.
-
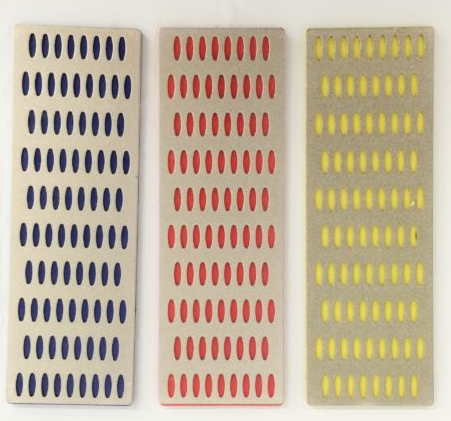
http://www.ebay.com/itm/3pc-Large-Diamond-Sharpening-Hone-Set-Stone-Whetstone-Block-Kitchen-Knife-/142010731085? For all the other sharpening I do I use one of these Three Plate Systems. I guess it is some kind of diamond abrasive bonded to the plates in three degrees of coursenes. I bought a very cheep set off ebay and it sharpened everything I threw at it amazingly- much better than any whetsones or Arkensas stones I had used all my life up till that point. Now I am never going back, the three plate system is superior in every way. Since the ones I purchased were very cheep I did not expect the abrasive surface to hold up very long but it has. Over a year later I'm still getting sharp edges with ease. As to the idea that you can sharpen exacto blades: Other people claim to be able to do it but I believe most rational voices will tell you that whatever results you get it can't be worth the trouble and you will never get those blades to be as sharp as when new. They simply are not intended to be resharpened.
-
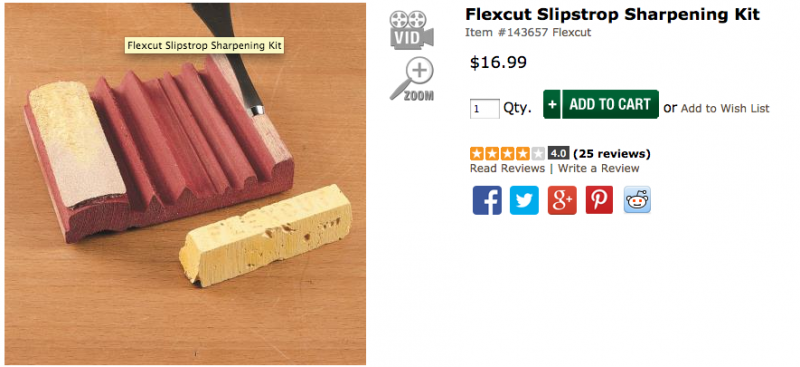
http://www.woodcraft.com/Product/143657/SLIPSTROP.aspx?gclid=CjwKEAjwwOvABRC08aedoZ_lnTMSJACs_cbu-tRPVbRzOb7_XRi0KCTJ78vQ5d9vYC3a_jQGhfhV4xoC1RHw_wcB I found this product to be the best at sharpening small gouges. I don't know what the brownish/red block is made of, it isn't a stone its some kind of hard foamed plastic with a coating that is abrasive bonded to it. I had tried to sharpen my gauges with slip stones with no real success- success measured by weather or not I could get a razor sharpness and I could not- but this product does the job with MINIMAL EFFORT.
-
Hint about razor blade scraping: File down or grind the corners of the blade first. Scraping is a GREAT way to take off material but the corners of the blade- if you use a razor blade-tend to dig into the wood and you get characteristic gouges, especially on the curved surface of a deck.
-
The cannon technique is REALLY clever, hats off to you! I'm totally going to use this method in the future. I'm too cheep to mail order decent cannons and the only time I had to replicate cannons was on my cutter Le Renard. The kit came with carronnades only and I wanted two long gun bow chasers, which I carved. Had I known this clever technique of yours I would have had an easier time of it AND the two guns would match better than they do now. Thanks for the tip!
- 10 replies
-
- 1
-
-
- Sherbourne
- Jotika
- (and 5 more)
-
Came across this on Amazon, not yet published but it looks like it will be the next book in the "A History in Ship Models" series that is being issued by the National Maritime Museum. The titles issued in the series are thus far The Ship of the Line by Brian Levery, The Sailing Frigate by Robert Gerdiner and Warships of the Great War Era by David Hobbs. I have the three currently available and I am excited to get my hands on this new offering as soon as it becomes available. The books in this series feature dozens of excellent clear very sharp photos of great representative models from the Museums collections, used to illustrate the history of the subject. The text is pretty good if brief, the editors wisely erred on the side of good glossy illustrations and the text provides the historical overview with enough detail to satisfy but without overburdening readers like myself who are really just there for the rich imagery. https://www.amazon.com/dp/1473894808/sr=1-47/qid=1476528251/ref=olp_product_details?_encoding=UTF8&me=&qid=1476528251&sr=1-47
-
Wood masts for a plastic model... Tips?
JerseyCity Frankie replied to SomethingIsFishy's topic in Plastic model kits
Bamboo is the way to go, I'm on team bamboo too. But test it yourself: Make yourself a spar from bamboo and then another duplicate form any other wood, make the two of them the same diameter you want on your model. Don't bother tapering them or anything fancy, just get them close to the diameter of your models spars. Then break them in your hand and see for yourself which one is most resilient. -
I have talked with some sailors who have sailed with Lateen yards and I always ask them how this thing worked. Usually they tell me that they sail with it on one side or the other and they do not tack it across the deck when the ship goes about, they just let the sail blow against the mast on the "dirty tack" and on the other tack they get the good sail shape they prefer to have. I'm pretty certain the forward part of the spar would stay inboard of the shrouds, you would want the sail close to being fore-and-aft when going to windward and when running before the wind you wouldn't want it boomed out too much or it would cause the ship to "weathervane" and make it harder to steer.
-
Help! Need to redo topmast shrouds...
JerseyCity Frankie replied to jdbondy's topic in Masting, rigging and sails
Nail polish remover is easier to find in stores and does a fine job of dissolving super glue. -
Thinking outside the box, you can create moldings with wire or other round stock. Glue two pieces of naked wire of slightly different diameters, shoulder to shoulder, up against the edge you want the molding on. Not so good for corners. but easy to get quick results as long as you plan on painting the surfaces involved.
-
I will add that one need not be "literal" with coils on models. You can install your cannon and glue the tail end of your miniature rope onto the deck and snip it off at that point. NOW you can form your coil off the model using any method that suits you. When you have your coil the way you like it, you can simply glue it to the tail end of the line you had snipped off the cannon. Thats what I meant by using the word "literal": the line that makes up the coil does not need to literally be the SAME line that is in the tackle on the cannon.
-
A VERY good book about whaling and practices used aboard whalers is The Yankee Whaler by Clifford Ashley. Ashley sailed on a whaling voyage and was also a prolific and talented artist and his book is full of lively illustrations taken from his own life experience. It delves into the history and culture of whaling and leaves no aspect unexplored. Ashley will always be remembered though as the author of the Ashley Book of Knots, still the best book ever written on the subject.
-
clipper close hauled question
JerseyCity Frankie replied to keelhauled's topic in Masting, rigging and sails
I'm glad to see other people building square rigged ships with yards braced around. I think its a much better look than yards square to the keel and the resulting model not only demonstrates the ability to move the yards around ( which I believe a LOT of people are not aware they can move) but it also makes for a model that takes up less space. -
The size question for Horses has always interested me. As you note, they vary in width from ship to ship. I have noticed the ones in the bow for the headsails are usually as wide as the deck will allow. The ones at the stern are usually far more narrow than the deck space would allow. Often these after ones are so short that it makes me wonder what exactly they are doing for the rig, the point on deck from which the sheet will lead off these very short horses is spread over such a small area one wonders why all the bother, why not just a fixed point on deck for the sheet? For instance, The USS Constitution has a tinny little horse for the spanker, its just wider than the centerline stern chaser port.
- 1 reply
-
- 1
-
-
I would replace the entire Topmast. Just cut out the old one and make a new one. This is the third time your mast has suffered damage so I would make the new mast as strong as possible by pre-drilling and pinning it at its base with the longest metal pin I could manage to insert. Note though that an unbreakable Topmast is just going to make something adjacent break when a force is applied to it. If you glued on your standing rigging with white glue you should be able to soften it again with alcohol. If you can get the eyes of the standing rigging off, you will be able to insert the new spar right back into those eyes. Soak a cotton ball in alcohol and pin it over the rigging with a clothes pin and keep it saturated with alcohol, the glue will give up and let go after a few hours- depending on how thick it is. This technique could blow up in your face though if it also softens the glue holding the eyes together. You could paint the splices with acrylic paint before you apply the alcohol? Maybe that would keep the solvent off the parts you don't want to let go? If you used super glue you could try the same technique with nail polish remover but I have never tried the cotton ball trick against cyano and do not know how it would work.
-
Crowsfeet and euphroe block
JerseyCity Frankie replied to simon porter's topic in Masting, rigging and sails
I have never understood the need for this bit of gear on the ships that have it. At some point in history it gets dropped entirely and is not seen on ships which still have nearly identical sail/mast/top arrangements. So I guess people collectively decided it was not needed? I understand it would keep the foot of the topsail out of the area under the top, and maybe it helped stiffen the forward are of the top itself? Why would it need so many legs?Wouldn't a single small block fixed at the same point on the stay with a single line leading through it be enough to do the same job the regular euphro is doing with all those legs? What am I not understanding here? -
Thinking things through: Some bits about the bitts
JerseyCity Frankie replied to dafi's topic in Masting, rigging and sails
I find it odd the height of the pins above the deck is so low. Longridge indicates mostly buntlines bowlines and nave lines and stuff like that will hang on these pins, and these are lighter thinner and shorter lines. But he also has t'gallent halyards on them and these would be very long lines, impossible to coil in such a way that they would hang from pins set so low. That is, if you did not want the coils to touch the deck, which is what I believe is the standard criteria for a hanging coil. When LeHermione was in town last year I noted that her longer lines were made off on pins on the fife rails, but the coils were then hung adjacent to their pins on the mast itself. In that way the larger coils were off the deck and not hampering access to the fife rail. Still I can't imagine why the builders of the Victory wanted the pins so low. There is enough room on deck for higher rails. Why so low? -
The two ends are cow hitched. Its possible to laboriously reeve the line all the way through the entire tackle, but in this case all they did was take the hooks off, cow hitch, then put the hooks back on. But let me share my opinion about using photos of museum ships as reference: Little kids love to play with the rigging on museum ships and if allowed to would cast off every coil and tangle all the lines. So museum ships do things like the technique shown in the photo to keep the lines secured. This is NOT how an actual carronade would be found rigged on a working ship. Also that whit line hanging down is poorly coiled, a real sailor would never allow the coil to touch the deck.
-
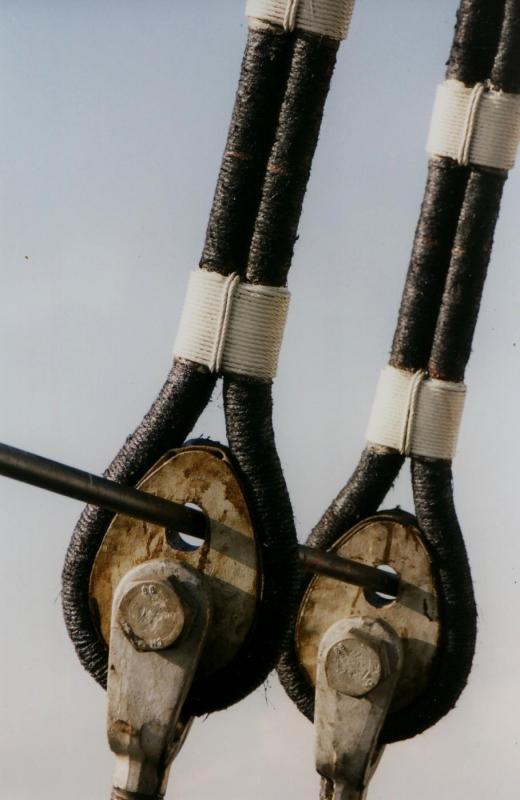
Here is a very unambiguous shot of a shear pole holding two shrouds in the proper alignment to one another, you can see the turnbuckles at the bottom of the shot and the poles pass through the solid metal thimbles inside the eyes of the shrouds. This shot was taken on the bark Glenlee as she was undergoing comprehensive restoration and re-rigging in the 90's. Its taken from Jamie White's excellent website on the subject: http://www.thesquarerigger.com/glenlee_photos_page_9.html I find it odd that the ship in the link above, the Danmark, is not utilizing the holes in the thimbles for shear poles but is instead using flat bar stock lashed to the turnbuckles. It could be that they simply lacked steel rod of the proper diameter?

-
Sure the shear pole is used as a step to get onto the ratlines proper, but its real job is to keep the eyes of the shrouds all in the same disposition. Without a shearpole running through the eyes of the shrouds, the ends would turn as tension was applied to them via the turnbuckles or bottlescrews, and all the shrouds would twist to greater or lesser degrees. So you may see extra shearpoles lashed onto or passed through the bottlescrews or turnbuckles themselves to be used as an interim step for people climbing the rigging, you are ALWAYS going to find them threaded through the eyes on all the shrouds and backstays since this is their primary function. Shearpoles on fiber rope shrouds are going to be lashed to the outside of the shrouds with a square lashing at each juncture with a shroud. The ones I most often see are right above the upper deadeyes.
-
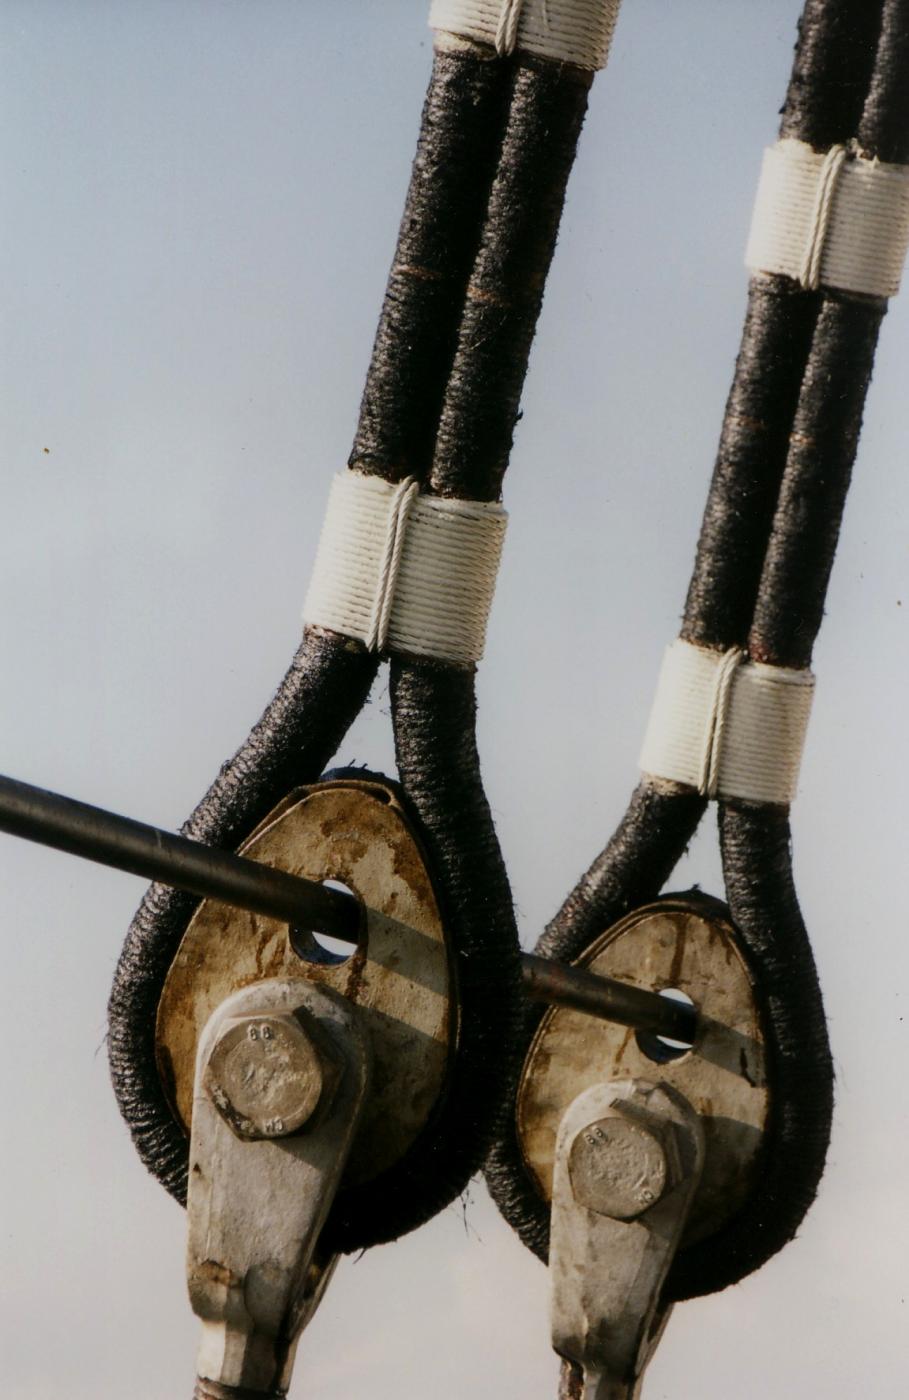
Actual serving stuff was made up aboard from old rope that had been reduced to its constituent yarns and then twisted up again, with tar added, to form a cordage that was as thick as a bootlace. After the service was put on it was once again painted with tar, which will soak in and leave some of the color of the original rope its made from, a dark brown. After it had been on the ship for a while, it would receive more coats of tar, eventually forming a crust, which was black in color. The service was put on as tightly as possible and the coats of tar tended to fill in the valleys between each turn of serving so in a scale model the serving should not look too much like a line with ribs along its length, so use thread that is not too thick. If you go too thin with your serving thread, you won't see it at all since it will be quite small.