JerseyCity Frankie
-
Posts
1,338 -
Joined
-
Last visited
Content Type
Profiles
Forums
Gallery
Events
Everything posted by JerseyCity Frankie
-
Someone must have a spreadsheet showing each manufacturer and the list of their kits showing scale and date of inception? If not, we should make one! I have been wondering about the history of the hobby. It should be possible to fit every kit ever issued onto one spreadsheet, its a finite number and a low number compared to other types of kits like tanks of aircraft.
-
Attaching Parrels to the gaff
JerseyCity Frankie replied to Telp's topic in Masting, rigging and sails
Each of the two jaws on the spar has a vertically bored hole through their extreme end. Each of the two ends of the parrel rope pass through one of the holes on each jaw and each then has a stopper knot tied in the end so it may not slip out. The parrel rope is not tight at all, if it was tight it would cause friction and raising and lowering the sail would be much more difficult, its only function is to keep the jaws around the mast. The beads are just rollers to limit any friction and prevent the rope from wearing. -
The Shrouds are a huge part of the hobby itself. It must be in the top three issues most often talked about when people discus their ship models. Also it always represents a milestone in the construction of a ship model: Everything you build BEFORE tackling the shrouds are usually woodworking projects. Nearly everything AFTER the shrouds becomes a rigging project and little woodworking happens after this point. So the topic always becomes an issue, and many model projects stall at this point and are never completed. I say this to warn you that if this is your second model you must prepare for a difficult and time consuming job ahead. But everyone on Model Ship World will be happy to help you when you have questions.
-
I wonder who will present the first "revised paint" Victory here on MSW.
-
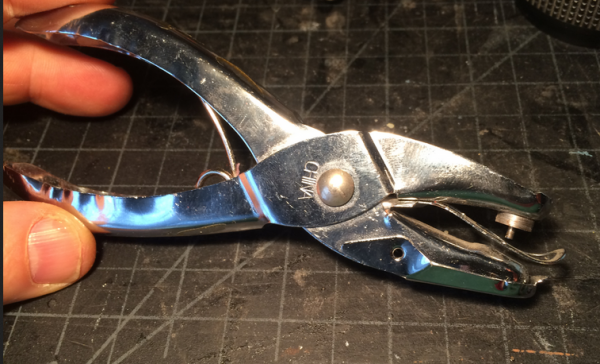
I wound up purchasing the Micro Mark punch set. And it is kinda crappy for the price. But on the other hand it does the job on thin stock and there are CERTAINLY times when you really need fairly small discs of varied sizes. I am always on the look out for a better method and more variety in diameters and there is that leather punch gizmo that has a wheel on the end with six points with punches ranging from 2mm up to 4.5mm. Also I found at the craft store this variation of the school paper hole punch, with a 1.5mmpunch and I also have another that is 3mm. The pink plastic handle sleeves have broken off but here is a photo. This thing comes in pretty handy I have to say, but will likely not punch through anything but thinner stock. I only use it on paper. But on the other hand, with objects this small, substituting paper is not going to be glaringly noticeable to the viewer.
-
liquid hide glue comments
JerseyCity Frankie replied to rtropp's topic in Modeling tools and Workshop Equipment
I have NEVER understood Duco Cement. What is it good for? But back to Hide glue: I was always curious about it. I have a fine art background and the classic way to prepare a canvas was to paint it first with Rabbit Skin Glue, which one purchased in dry flake form. It looks like thin brownish chips and requires cooking on a stove- I guess with water?- in order to apply. Then later I became curious about Fish Glue for ship model building because Donald McNarry mentions it often in his books under the brand name Secotine. Which I was able to determine was Fish Glue and not available in the United States under that brand name.I was able to get my hands on some anyway and when I tried it I did not see a significant improvement over PVA glue. The chief benefit as mentioned above is that it has a longer set time and allows for adjustment of the glued parts prior to it setting up. But for me this is not a plus, I would rather the PVA itself set up faster! I had read that TightBond or Weldbond ( I forget which) have a Hide Glue that remains stable on the shelf like PVA and I am curious about it and will buy a container when the day comes I see it on the shelf at the hardware store, but I will not seek it out with any urgency. But on the off chance it will appeal I certainly want to try it. -
Rope Making Basics
JerseyCity Frankie replied to mikiek's topic in Rope Making/Ropewalks's Discussions about Rope Making
The basic principle is that Right Hand Laid strands (threads, in model rope making) will lay up into Left Hand Laid rope- also called Shroud Laid or "S" laid. Full size running rigging line is always Cable Laid -also called Right Hand laid or "S" laid. If you don't want to use Shroud Laid Rope (Left Laid or "Z"laid) on your running rigging (which would be inaccurate difficult to notice) you have to start with strands that are Left Hand Laid. But you can never find Left Hand Laid thread. What you can do though is make your own Left Laid thread. Its laborious but it is possible to UNLAY thread, spin it in the opposite direction of its lay. Maybe you can do that to three strands at once on your rope walk? If you cant, use a reversible electric drill, chuck a hook into it, tie one end of one strand of thread to a chair and put the other end on the hook on the drill. Stand in a place that keeps the thread tight but not too tight. Turn on the drill, reversing the lay. The thread gets longer as the twists come out. You will reach a point when the thread is entirely untwisted. Keep going and lay the thread up in the opposite direction. There is no good way to know when you are done twisting, this will take trial and error. Now you have gheto Shroud Laid thread and this can now go on your rope walk to lay up into Cable Laid Rope. There is a facbook group called "Ropemakers" which is worth a look see. -
The original question seams to be about in what direction horizontally do the three turns go on across the width of the barrel. If the barrel didn't taper it wouldn't matter. But this one does and so do most other winch barrels. Here I am fuzzy but I think, in my gut, the drawing above is wrong. Here is why I think this: One turn, if it were put on the barrel as far inboard as it could be-around the thickest part- will want to slip outborad to the thinner part. So if I put on three turns going from thick to thin-as in the drawing- the first turn is going to want to slip outboard and gang up against the second turn. The worst thing that can then happen is a "Wrap" where the incoming anchor line takes a turn OVER one of the other turns, locking it in place. Anyone who has done any modern sailing with winches for the sheets has experienced a Wrap on the winch. It locks the line in place preventing you from tailing any more line off the bitter end and you have to ease the line back out-if you can-to get the wrap off the lower turns. With tremendous strain on a line you have to ease the hard won line back out of the ship to try to get the wrap off the other turns. Its possible the wrap could be avoided if there was a guy with a handspike making sure the incoming line wrapped fair on the windlass, then this issue would not be a problem.
-
As in all things relating to friction being applied to a line, there are always three turns around the objects the line is being belayed to. There will never be more than three turns on a windlass or a capstan. Never less then three either. Three turns around an object provides just enough friction to halt the "crawling" of a line under strain. Something with a tremendous amount of stain will need to be Tailed and this means someone is assigned to keeping the bitter end of the line under strain too- to keep friction on the first turn while the line is being hauled. In the drawing some seizings have been clapped on to hold the turns.
-
The direction of how the line is lead around the barrel of the windless is determined by where the Pawl is set. In the drawing above there are two Pawls conveniently labeled "C". They are hinged where they are attached to the bits or samson post and gravity keeps them flopped over to the deck. They are long enough to fall into the square holes cut into the barrel of the windlass (marked "M" on the drawing). With the Pawls in place the windlass can only turn in one direction as the pawls in the square holes will prevent it from turning in the opposite direction. THIS determines which way the line will be lead around the barrel. Pawls are also found on Capstains where they perform the same function. The line will lead across the top and toward the viewer in the drawing above.
-
Yah the step Jim is talking about is the Ferrule mentioned above, sometimes anglicized to "Funnel"- its a point on the mast where the diameter shrinks suddenly, leaving a radially symmetrical shoulder, or step, that a properly sized eye splice slips down onto but can not slip past to the wider diameter. Maybe that is a Ferrule under the bundle of rigging at the top of that white tapered spar ( the mizzen truck masthead?) in a horizontal position in the center of the right hand side of the photo? Or it could be an iron band ON a Ferrule, which is often done for obvious reasons.
-
I do not know Endurance intimately but certainly she was a very well photographed ship! I know she was of wood construction and her masts were wood too. She had steel wire rope rigging. Endurance used a lot of patent equipment. For instance her Topsail yards were roller reefing, so even though made of wood she was fully embracing modern equipment. In this photo you can see many iron or steel bands on spars with eyes on them to shackle the rigging onto. Its possible some Ferrules were used on the wood masts to support the eye spliced standing rigging, but I can't see examples in this picture of the wreakage.

-
Take the time to put a link to your build log onto your profile, it is not too hard and the instructions on how to do it are in the "how to use the site" topic at the top of the main page. As it stands now, anyone trying to find your build log will have a few steps of searching to go through before they can find it.
- 15 replies
-
- 2
-

-
- HMS Harvey
- Ringle
- (and 1 more)
-
I love Jaws, I make it a point to rewatch it every 4th of July. Its amazing how well you have matched the colors and degree of weathering of the film version of the Orca. I know the film well enough that as I look at the detail photos in your build log, my mind goes right to the specific scenes in the film that featured the components in the model. As I look at your photos, I start to hear the score from the film in my head.
-
Oh dear I hate to be the bearer of bad news, but those deadeyes on the shrouds are upside down. The centerline holes on the upper and lower deadeyes should be the two farthest apart from each other in the vertical plane, you have them 180 degrees rotated the wrong way. Fortunately it would be an easy fix to remove the lanyards, rotate the deadeyes, and re-reeve?
-
Recently Acquired Antique Shop Models
JerseyCity Frankie replied to vmax's topic in Wood ship model kits
The metal fittings on the model, and their condition (pretty good!) raises the point of lead corrosion on old models. . http://www.navsea.navy.mil/Home/WarfareCenters/NSWCCarderock/Resources/CuratorofNavyShipModels/LeadCorrosioninExhibitionShipModels.aspx . Lead was used in ship model kits in the early days of the hobby, and decades later these lead parts usually corrode into white powdery flakes-ruining the models they were put into. At some point in the past Britannia Metal - an alloy mostly of tin- was introduced by kit manufacturers as a substitute with more longevity. Notice I don't quote any dates here. But the point is that I THINK your models metal parts couldn't be lead since they exhibit no corrosion. Which means they date from a point farther into the 20th century than the early Teens. I could be wrong about the timeline I lay out above, but on the other hand it has always been my understanding that Britannia Metal came in later and replaced lead. I wish I could tell you when the new metal supplanted the lead parts, maybe someone here knows? -
Internally stropped blocks
JerseyCity Frankie replied to allanyed's topic in Masting, rigging and sails
Philip Reed has some amazing models and written some how-to books. He uses hollow oval shaped punches to knock out identical blocks. He says he makes the punches himself on a lathe. His work is much smaller than 1:48 but I imagine the technique would work on a larger scale? I suppose he drills out the centers to some depth then tapers the round stock to meet the hole and then sharpens. He gets them oval by tapping them on two sides with a hammer. (Page 85 Period Ship Modelmaking) I would LOVE to have a set of oval punches but I doubt I am ever going to have a lathe. -
Internally stropped blocks
JerseyCity Frankie replied to allanyed's topic in Masting, rigging and sails
Logic would suggest to me that you should go with the sandwich method as in actual practice? But you said you tried that and didn't like the results. what was the down side to building up the blocks from individual pieces? -aside from the time it takes. -
Recently Acquired Antique Shop Models
JerseyCity Frankie replied to vmax's topic in Wood ship model kits
Beautiful models! Looks like they were pretty dusty before the real trouble started. if they are as old as you think they are it is likely their rigging was very brittle anyway and they would have needed extensive work even before the two year old went to work. I really like the ships boats on that one model, I think its the lowermost one in the photos. Really nice work in evidence. -
I built three O'Brian ships! I love that series of novels, they really helped a great deal to spark my interest in ships of the period. The only problem is that when you finish reading them all a few times, all that is left is a bleak empty landscape of nautical fiction that is not and can never be as good. I think you are free to interpret Ringle any way you like in terms of rig and deck layout. Taken into the service there would certainly have been some Royal Navy influence at the outset then subtler changes when Jack had her. He certainly did whatever he wanted with his ships, regardless of the Royal Navy's agenda for such ships. I do recall, in reading the novels, the chase guns were nearly always described as being cast in brass. Apparently O'Brien liked the way that looked on the page and visually it would set the guns apart on the model if the long guns were shiny brass and the rest of them dull iron.
- 15 replies
-
- 2
-
-
- HMS Harvey
- Ringle
- (and 1 more)
-
The shackles on your rigging are very impressive, did you make them yourself or are they commercially available? Your shackles are very convincing.
-
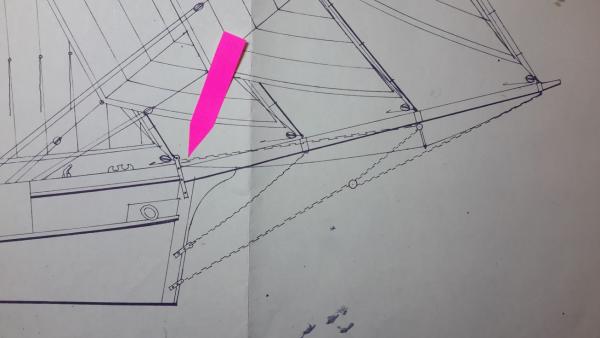
I clicked on your build log since I too am building a 1:48 Ketch! (edit Oops, not a Ketch, mine is a Yawl) This gives me some perspective on what a great job you are doing on the deck fittings and furniture. You should include a ruler or a coin in the photos so people will grasp how small these beautiful objects are. Concerning the rigging on the bow, I think that curved line on your drawing is a Footrope. If I am correct it would not be a line that would ever be adjusted and would simply have a spliced eye on each end made to ringbolts on the hull and Jibboom. Typically there will also be overhand knots along its length to give the feet of the sailors something to fetch up on when they are out furling the headsails. I find it odd that your plan appears to show it made midway along its length to a Martingale. The Martingale on the plan has no other lines on it and I find this odd too, it certainly would not be needed for the footrope. UNLESS the footropes splits into two footroopes (port and Starboard) from this point aft, which would make sense. Another note I will add, and I could be wrong, is that I believe all the standing rigging would have turnbuckles on them for tuning the rig. I realize they are not indicated on your drawing but I have a hard time believing there wouldn't be some way to control tension on the stays.
-
Its not every day on the internet that you see the CEO of a company step in personally and address the complaint of one of the companies customers! And even on the rare occasion we see this happen, seldom do you hear more than some platitudes and vague generalities. Its refreshing to see this kind of response, an actual precise explanation from a person that could have very easily pretended not to know about a problem. Model Expo has been an important part of this hobby and I wonder how many of us would be making models today if the company had not been there over the years offering tools and kits? I wish all hobby companies were as attentive to their customers.
- 18 replies
-
- 23
-
-
where can find this Awesome model ??
JerseyCity Frankie replied to mahmoud sabra's topic in Wood ship model kits
I shudder to recommend . www.gonautical.com . but they WILL sell you a less expensive full rigged ship model. Keep in mind though that these are low quality ship models built for sale in gift shops. They may claim to be "museum quality" but in fact they are made quickly and cheaply and seldom accurately- the rigging and all the fittings are there just for show, they are not going to reflect the work of an actual dedicated ship model builder. But on the other hand, they are affordable. To buy a REAL Museum Quality full rigged first rate ship of the line you are going to have to part with tens of thousands of dollars- if you can find one. -
The soft iron spheres on modern binnacles are used to compensate for the metal that makes up a modern ship. A metal hull will cause problems with the magnetic compass and the iron balls can be adjusted to compensate for the magnetic field. You won't see them on a wooden ship since they are not necessary. Your old fashioned binnacle will be a piece of wooden furniture with the compass housed within a glass box at the top, which would also contain a light. Within this box would also be stored the sounding lead and the traverse board and maybe a chart or two. On the exterior its just going to look like some cabinetry with a window on top.