HOLIDAY DONATION DRIVE - SUPPORT MSW - DO YOUR PART TO KEEP THIS GREAT FORUM GOING! (89 donations so far out of 49,000 members - C'mon guys!)
×


Tector
-
Posts
62 -
Joined
-
Last visited
Content Type
Profiles
Forums
Gallery
Events
Everything posted by Tector
-
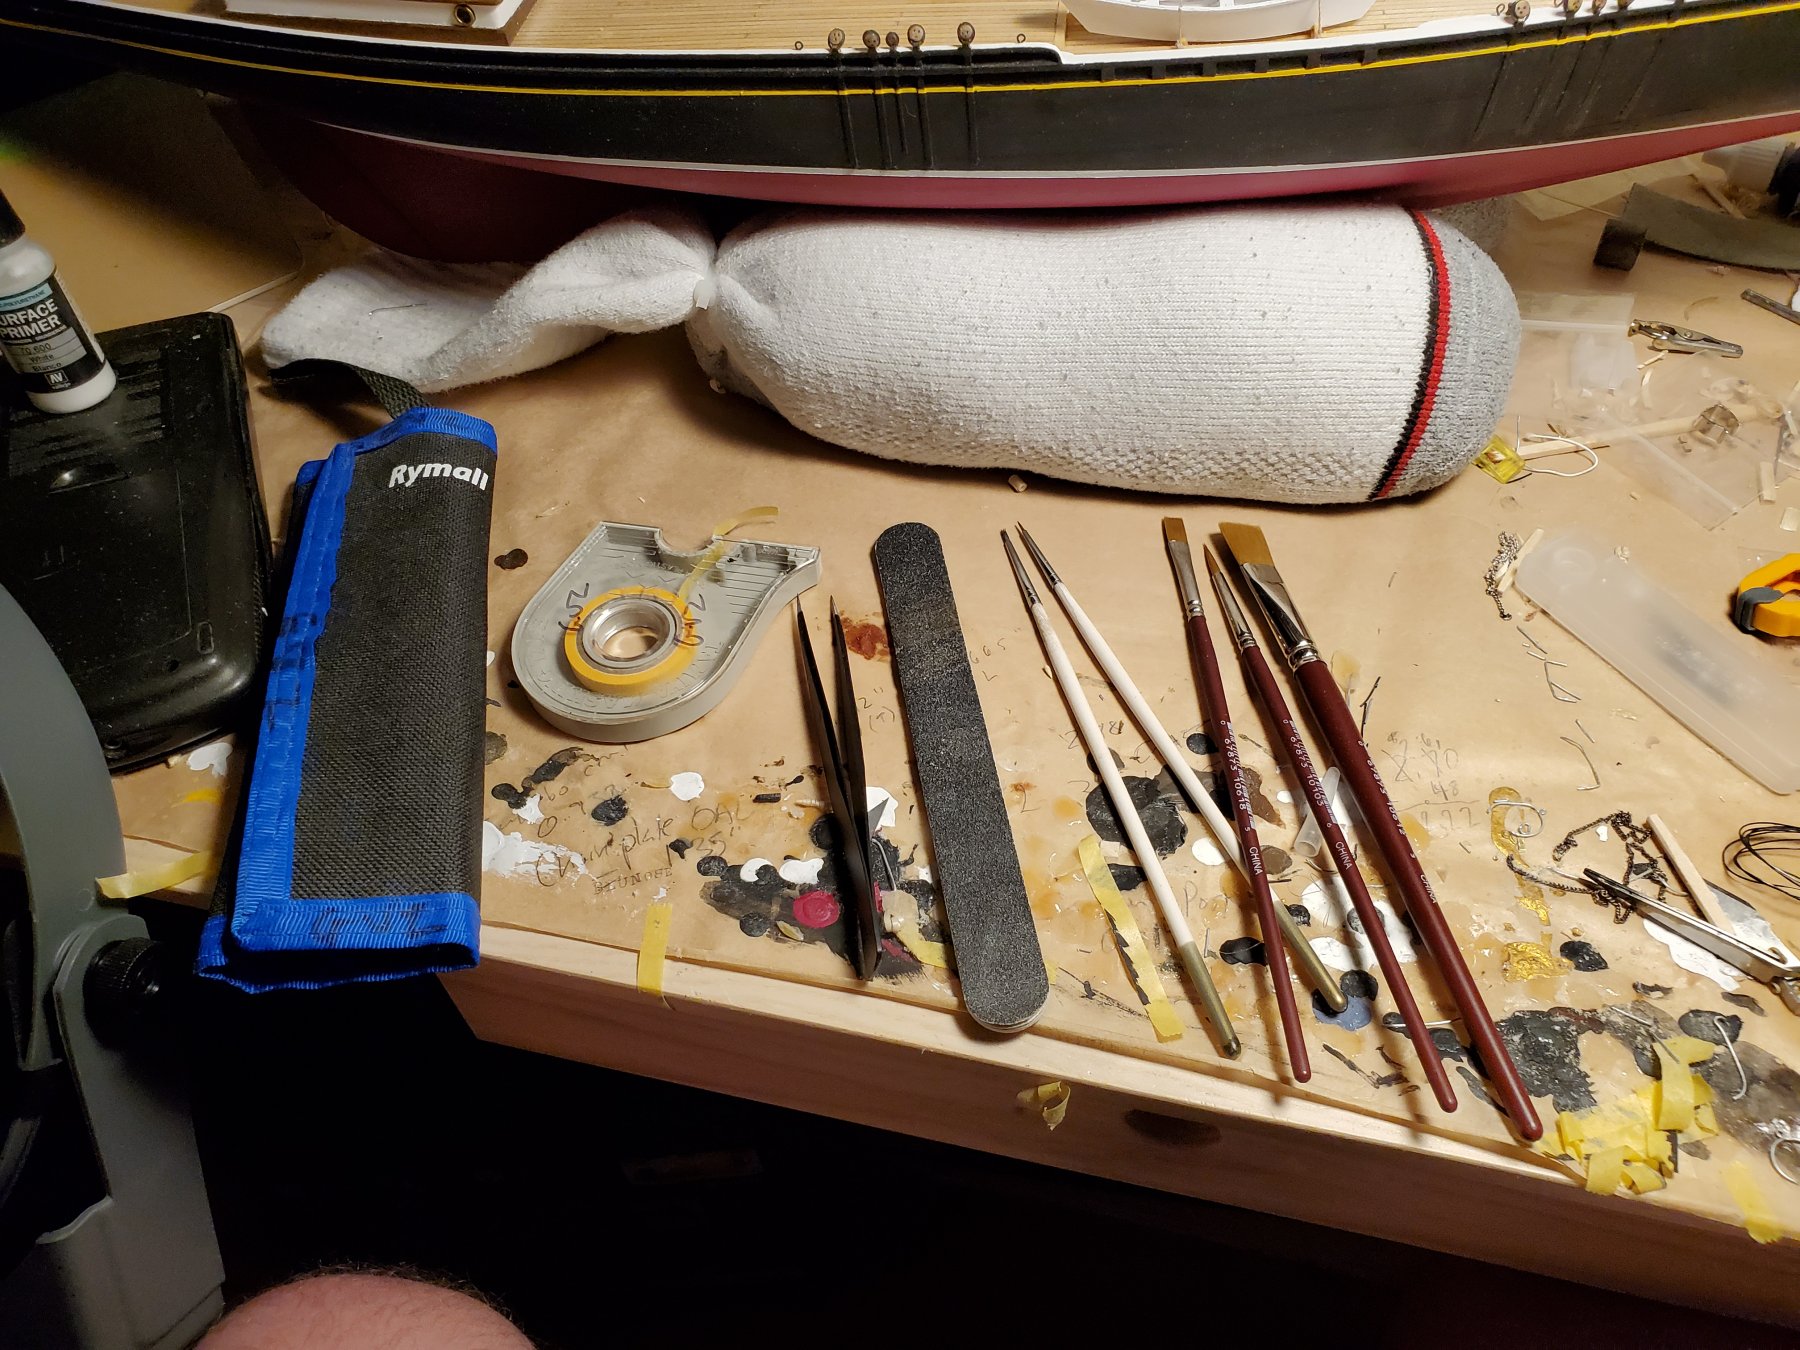
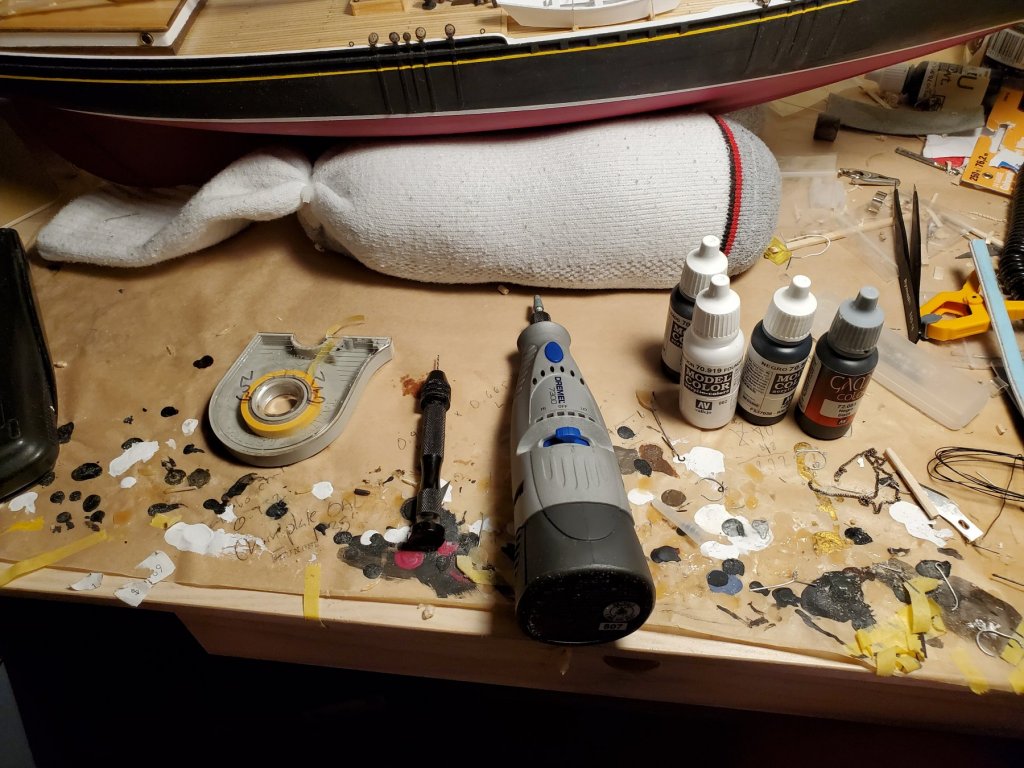
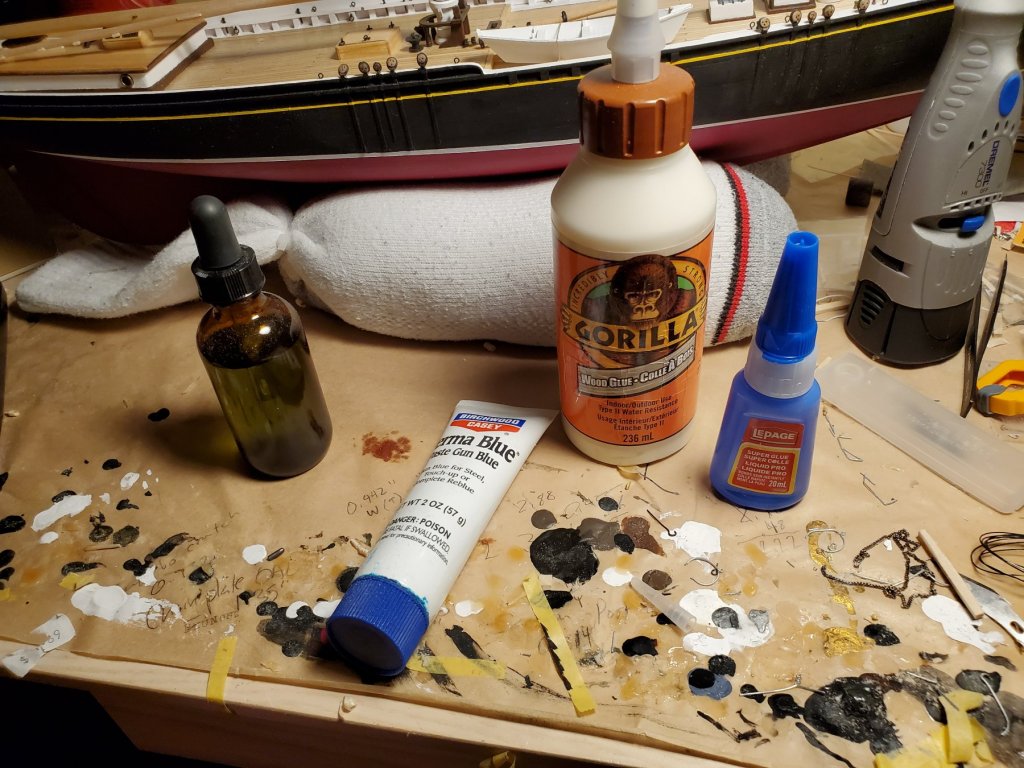
 That sounds like a really neat resource-- I wonder how closely Bluenose II's internal arrangements mirror her predecessor? All that being said, for those that are relatively new to the hobby and not as well established as some of the more experienced builders around here I will present a quick run through of some of the tools that I have been using. Some are more specialized or weird than others, but all have been useful. Many are produced by model companies, but quite a few have analogs outside of the hobby that are often far less expensive. From left to right are a pair of Xuron micro shears, for cutting brass and mild steel wire. There are less expensive variants out there sold in a lot of electronics shops-- all of which are capable of cutting soft metals and plastic cleanly. Next is a parallel ring making pliers, which can be used to carefully form small rings in wire or strip with little waste. I cannot overstate how incredibly useful this tool has been. After this is a pair of parallel pliers, which have been immensely handy for pressing metal rings (like mast fittings) back into a flat shape, and also for re-flattening metal that didn't bend quite right. Lastly are a basic hobby knife and a razor saw. I've got an aluminum miter box for the latter that has been a godsend. Also visible is a sock filled with rice. Two of these can make an inexpensive and effective cradle for a model ship while it is being worked on. In the black and blue case is a set of electronics tweezers. These can be had on Amazon for about $20 and are excellent for handling very small delicate parts-- eight pairs of varying shapes and sizes are in the case (the tweezers in mid-image are from that set). Next is a roll of Tamiya tape. This is my go-to for masking, and I have found that when properly burnished it makes for a very good edge seal with little leaking. For small abrasives, I usually "borrow" some of the emery sticks that my wife has for her nails. Lastly, I keep a selection of brushes handy for painting. Prior to moving out west, I did commission miniature painting for people and had an airbrush set-up, plus a huge array of brushes. I've kept things significantly smaller since the move but did make a point of springing for some decent large brushes for painting wide areas like a hull. From left to right (after the Tamiya tape), I have a pin vise and a cheap cordless Dremel. The former is a given-- every builder should have one of those, and I have found that the latter has been a godsend for sanding down large amounts of material, shaping metal and so on. I have since also augmented it with a Proxxon rotary tool that is rather more flexible. Finally, there is some of the paint I have been using. I've been a big fan of Vallejo paint for years, starting with the Game Color range, but for what we do the Model Color range tends to have a better color palette. The VGC range usually gets you good coverage and has a special additive in it to make it more durable, but the colors tend to be more vibrant and saturated than the VMC range and some can dry with a semi-gloss finish. Lastly, from left to right I have a bottle of Birchwood Casey brass blackening liquid (which I transferred into a dropper bottle for easier use). This has been very useful for treating brass prior to paint, or just blackening it in its own right. Next to it is a tube of gun blue paste, which works nicely on steel. And finally there is glue. I use wood glue and CA with great frequency on my work, depending on the task at hand.
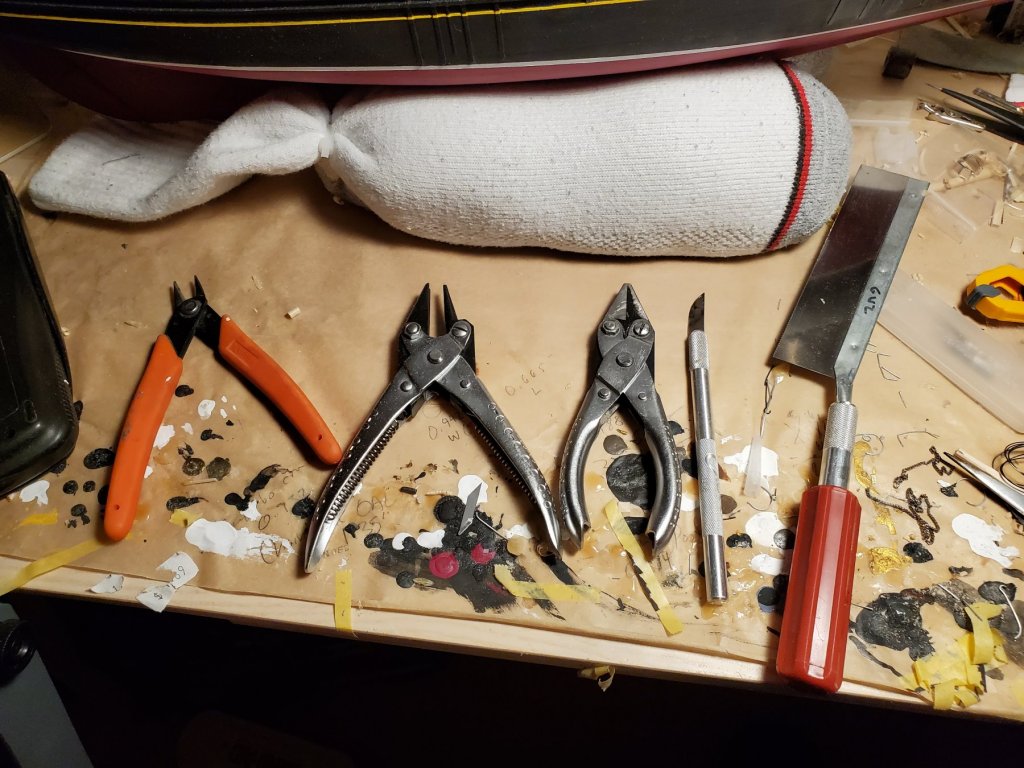

- 38 replies
-
- 2
-

-
- bluenose
- model shipways
- (and 1 more)
-
They can certainly be overwhelming. I didn't go down the route of the practicum, but rather followed the same broad process as the 18th Century Longboat kit I did before, but informed heavily by the various sheets of the plans. What I have found is that quite a bit of cross referencing becomes necessary when you get to the finer points of the necessary hardware that has to be attached to the masts in particular. The various sheets of the plans are inconsistent on this score and it really takes some digging to get it right. I did not fully appreciate this until I started my editing pass and found that I have some fixing to do.
-
Many thanks. I've been paying close attention to a lot of other Bluenose builds on the forum (including yours) as there seem to be quite a few going on at any given time (and I think it's easy to see why-- she's a beautiful subject). I'm going to do a tools and paint post next I think, in the hopes of assisting those coming after who might be new to the hobby.
-
Thank you for the kind words. More will be forthcoming as it gets done-- I am hoping to have the rigging completed by this fall (but we shall see). I've got to order a bunch of new flags, including a new Canadian red ensign. For reasons I do not understand, MS included a Maple Leaf with the kit, which was only adopted in 1965-- nearly two decades after Bluenose sank off of Haiti after being sold into cargo service.
-
Great work so far; I think your work on your deck in particular is lovely. There is a curve to the stern, it's rounded on the top (or at least that's how I have interpreted the plans). And I would broadly agree with others who have expressed that the real instructions in a MS kit are the plans-- the main exception being Chuck Passaro's tutorial in the longboat kit, which was very rich with information (and which I kept).
-
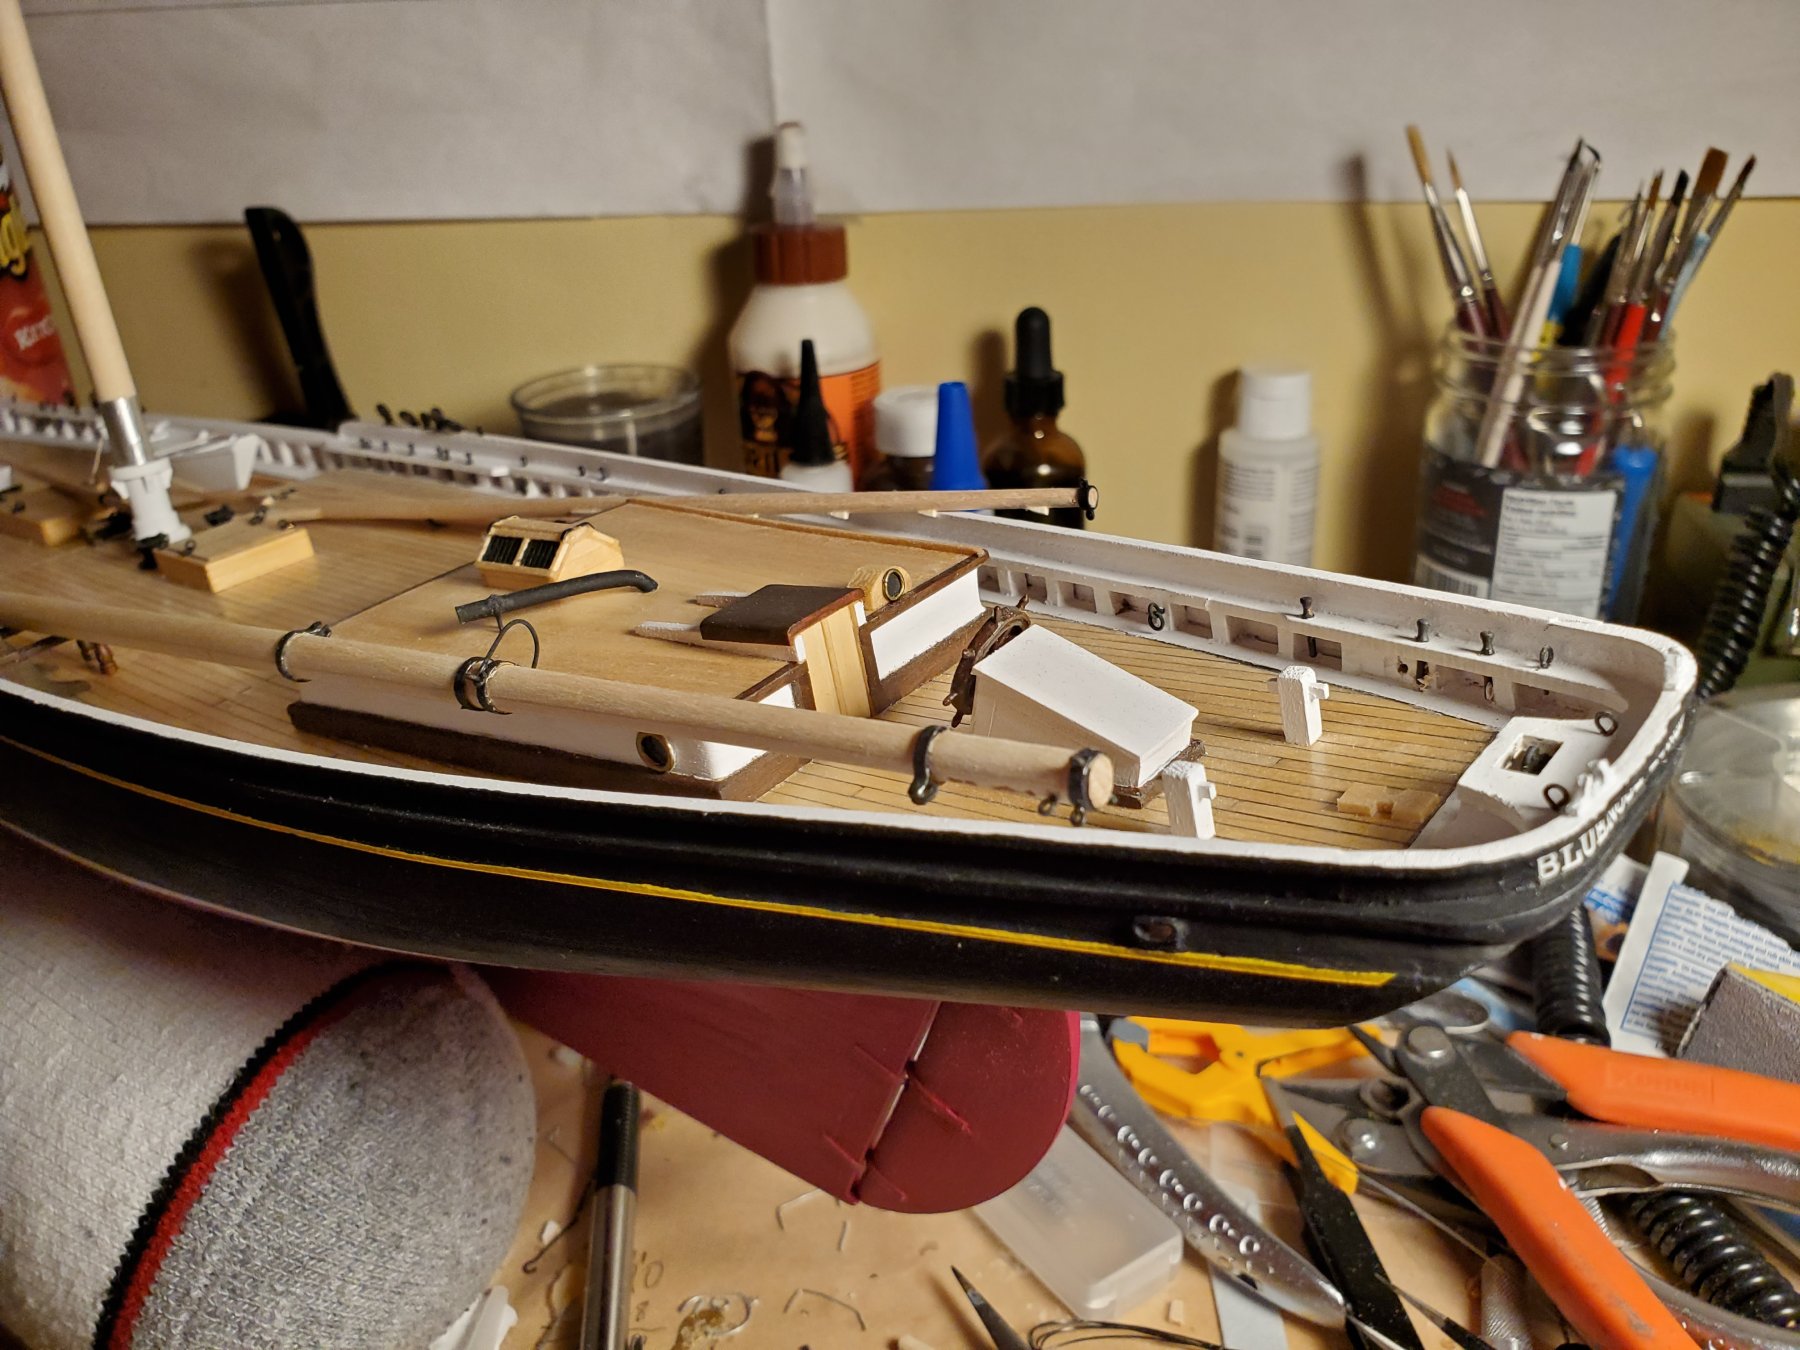
My wife and I were expecting to be spending the next few weeks finalizing a move-- finding a place to live in Vancouver, BC, is a nightmarish experience. This being the case, I made plans to prepare to box up Bluenose again and get ready to move her. I suspended the build as I did not like the idea of moving a half rigged model. Happily, circumstances unfolded in such a way as we were able to remain at our current place and so I have been back at work. All major construction is done. All the masts and spars are finished now and so the process of rigging is beginning. I'm starting by comparing the plans to the model to ensure that every eyebolt and belaying pin is installed and more or less where it needs to be. After that, I intend to progress to installing all of the blocks on the spars and masts, before preparing the sails that will go on the finished model. I have a specific image of Bluenose after a race in mind that will have a mix of set and furled sails, plus signal flags aloft. More times than I can count I have had reason to give thanks for having a wife who makes her own jewelry. Usually this means I can "borrow" all sorts of neat tools that also work really well on building model ships, but it's also given me access to a remarkable array of fine chain that is very handy too. Regarding the nameplates: I opted to print some decals for these rather than paint them on by hand. I tried doing this on the transom and gave up after several attempts-- I do not possess the requisite steadiness to do this, and the work piece was rather awkward for that purpose. In real life, the difference in shade between the nameplate and the yellow stripe is nowhere near so profound, but I may go back in with a brush and try to do something about that. I've kept a substantial personal build log on this model so far to assess various techniques and as a way of helping to wrap my head around what had to go into each individual piece. This is my first large-scale wooden model that has progressed to this point. I have approached it as a learning experience and have allowed myself to fail and struggle as I went along, accepting that this was all part of the learning process. There are a great many features on it that represent the best ideas I could come up with at the time, but subsequent experience and thought would further improve those solutions. To me, this is especially apparent in the masts and spars. The mainmast was completed first, then the lessons learned applied to the foremast, which went together far easier.

- 38 replies
-
- 6
-
-
- bluenose
- model shipways
- (and 1 more)
-
She's coming along beautifully. Bluenose has such elegant lines that getting the hull planked and starting to put down paint is a huge rush.
-
Is it just me, or does that trireme look like she's hogging a bit?
- 122 replies
-
- 2
-
-
- greek bireme
- scale-1/35
- (and 2 more)
-
I'm glad I caught this. It's always a treat to see model galleys under construction.
- 122 replies
-
- 1
-
-
- greek bireme
- scale-1/35
- (and 2 more)
-
Sadly, I think you are quite right. I'm a social worker and my jobs have brought me into contact with an alarming number of young people who have been trafficked.
-
I'd imagine the owners would have wanted something that could move fast to stand a better chance of evading coast guard and anti-slavery patrols. I cannot imagine many things uglier than treating human beings as chattel.
-
The first round of planking smoothed out nicely, and it looks like you're already applying the lessons learned from that process on the second. Keep up the good work, and remember-- the only person you are competing against here is yourself. It's useful to look around and take notes about how other people are doing things, particularly if they are working on the same subject, but at the same time it's important to let your build reflect your own choices and style.
-
I just want to take a moment to register how much I appreciate this build-- for the clear craftsmanship, obviously, but also for the subject that is well off the beaten track. Please keep up the wonderful work.
-
Words of wisdom, here.
-
Have you considered pinning the bulkhead extensions where they would have originally been on the bulkheads themselves? This will allow you a greater degree of strength when you work to fair them and the other false extensions, and also when it comes time to plank that section of the hull. As for adhesives, I used a general purpose Gorilla wood glue on mine and found that to be quite sturdy... I think when I was fairing, I only had a couple work themselves loose.
-
Preparation is key, but planking is one of the best parts of a build. Hello and welcome from a fellow Nova Scotian too. I grew up outside of Truro.
-
It's not bad. Everyone in this thread has been where you are at one point or another (the garboard strakes on my first build were an absolute horror show)-- gaps can be filled with putty or even stealers/slivers of wood and then smoothed out with a bit of sanding. The important thing is to allow yourself to make mistakes because they're going to be the best teachers you'll get. And if you can do that, you'll be able to look back on this model and appreciate its flaws because they made the next build better.
-
The great thing about wood is that there are very few sins that cannot be fixed with sufficient sanding, glue and putty. And then hidden with a couple of coats of paint!
-
You will find that the planks will look a bit rough at first as they are being laid down. This is ok; you'll probably have a sanding and filler pass to come yet and this will erase a great many sins. That being said, it looks good so far-- planking is an enjoyable process, and you're doing great!
-
I love the build as a whole, but that deck in particular turned out beautifully.
-
Warspite landed some telling hits on Lutzow and possibly Derflinger as well. Her and her sisters could have made a far greater impact had Beatty bothered to communicate with that squadron properly (and had he bothered to communicate with Jellicoe properly as well-- though Jellicoe's own signal officer should have been shot for his nigh-treasonous performance). My sense has always been that Jellicoe handled the Grand Fleet capably but was consistently let down by his signals officer and Beatty's gallant but incompetent performance. The latter's PR campaign in the months and years after the battle is especially heinous when one considers how poorly he led his squadrons, but it certainly matches his aggressive personality.
-
The British battlecruisers were also lost ultimately to a poor understanding of their role and the doctrine governing their use. Hunting down German light cruisers in the South Atlantic was an ideal application for them: they could outfight anything they couldn't out run, by orders of magnitude. But going toe to toe with peers in a line of battle situation was absolutely the worst possible scenario for the battlecruiser as designed and built by the RN. The other thing that is important to note about Jutland is that Beatty's squadron missed out on several gunnery practices that were held with a mind to improving gun-handling and accuracy in the year prior to Jutland. This lapse had a clear and deleterious impact on his squadron's performance during the battle, and also led to it allowing at least a couple of their counterparts in the German battlecruiser (well, grand cruiser if you use the KM's designation) squadron to remain uncovered during their gunnery duels and optimizing their chances of scoring hits (which they most certainly did). In addition to this, the RN's AP shells were also criminally deficient. Post-war damage surveys showed that the standard of gunnery in the Grand Fleet itself was generally very good, but unless their shells struck perfectly perpendicular to the target's armour, the caps of the AP shells had a tendency to snap off and the shell would either bounce or detonate outside of the armour. I've seen estimates that indicate something like upwards of seven German battlecruisers and dreadnoughts very likely could have been lost to hits on their magazines and other vitals had British AP shells functioned properly.
-
HMS Audacious was lost to a mine, but suffered a magazine explosion as she sank as well. It is believed that one of her HE shells fell as she capsized and detonated the stored shells and powder.
-
Beautiful work. I really like where you're going with this.
-
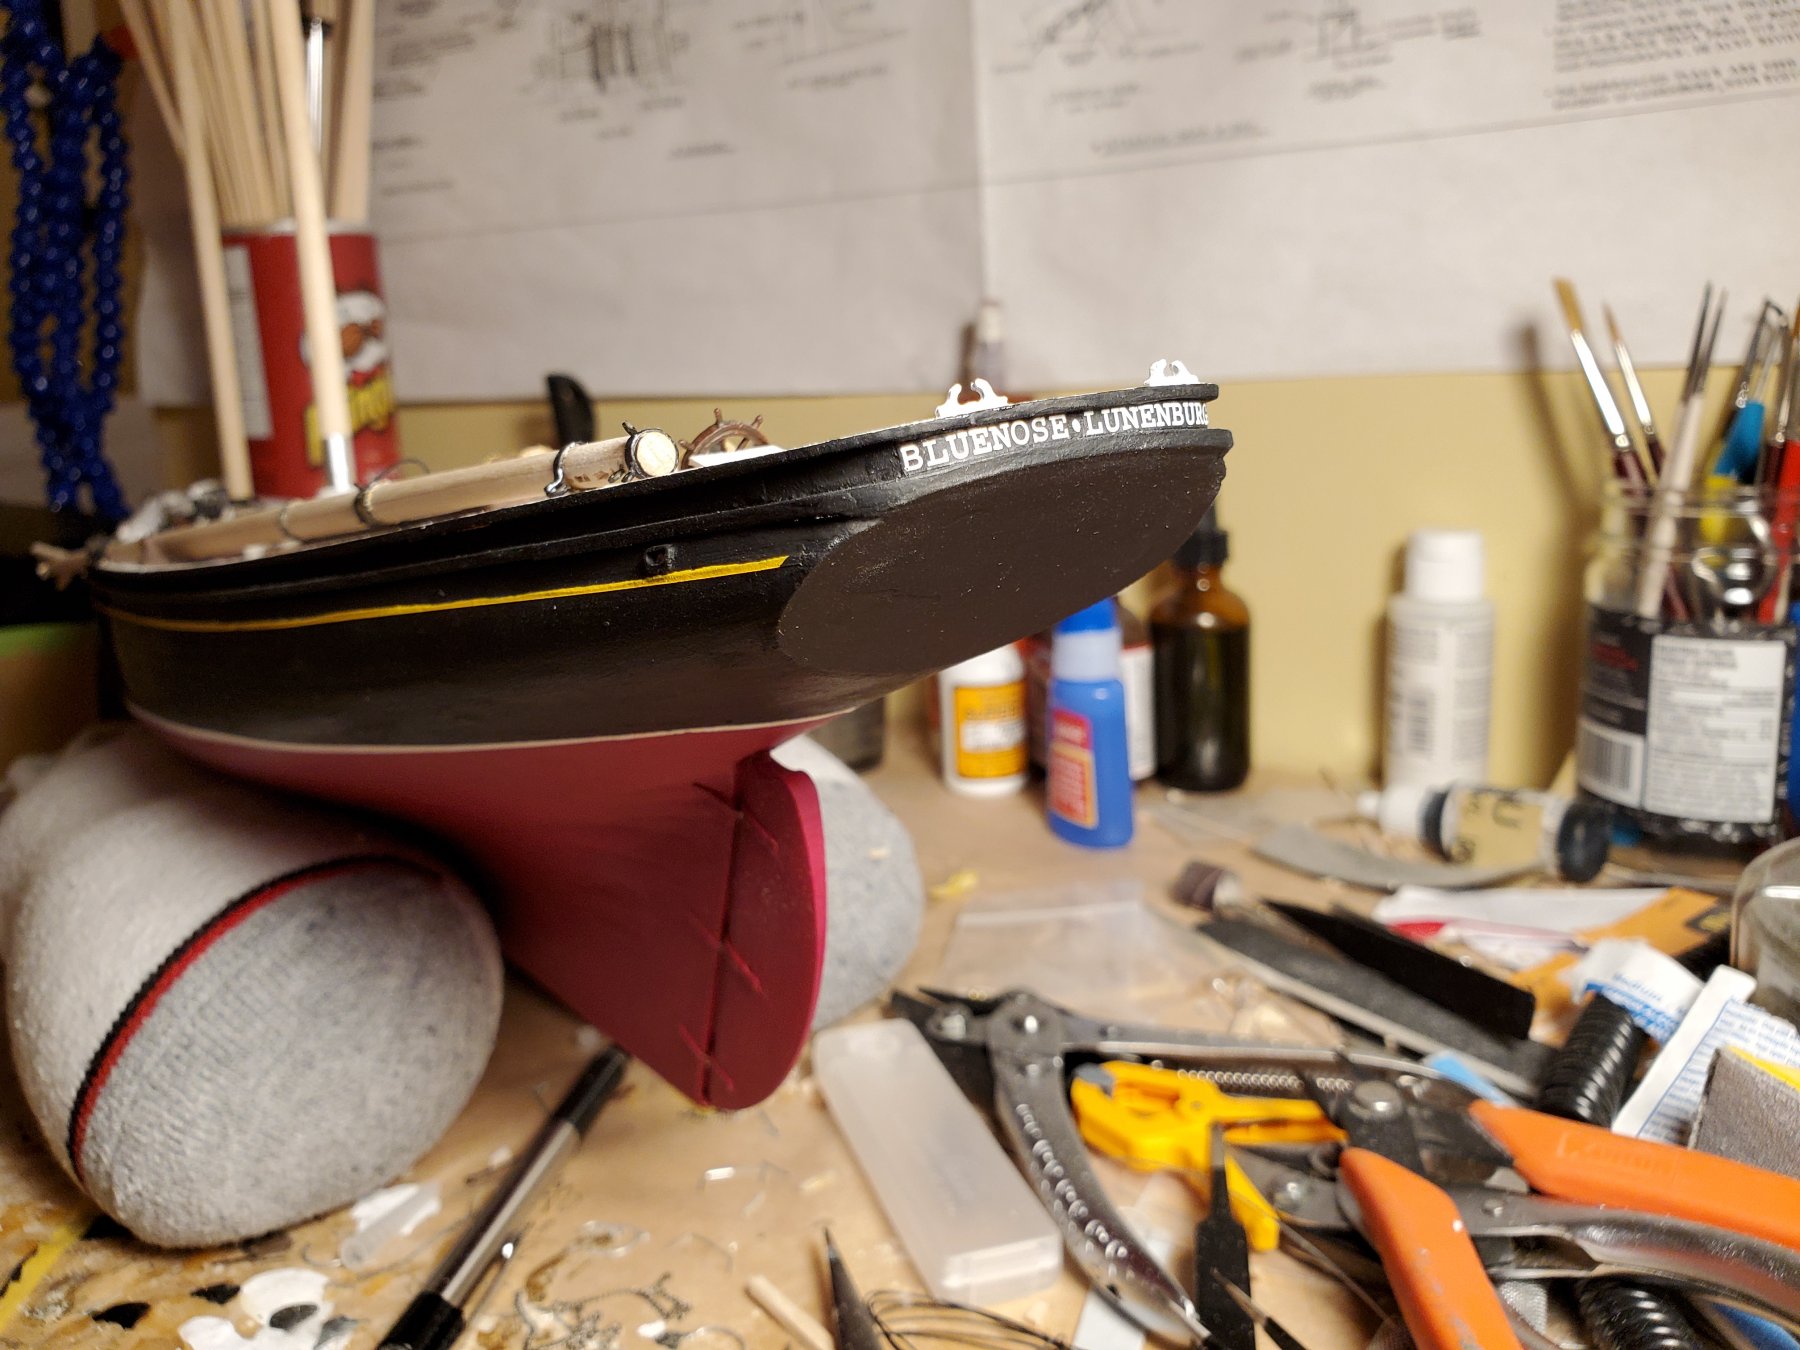
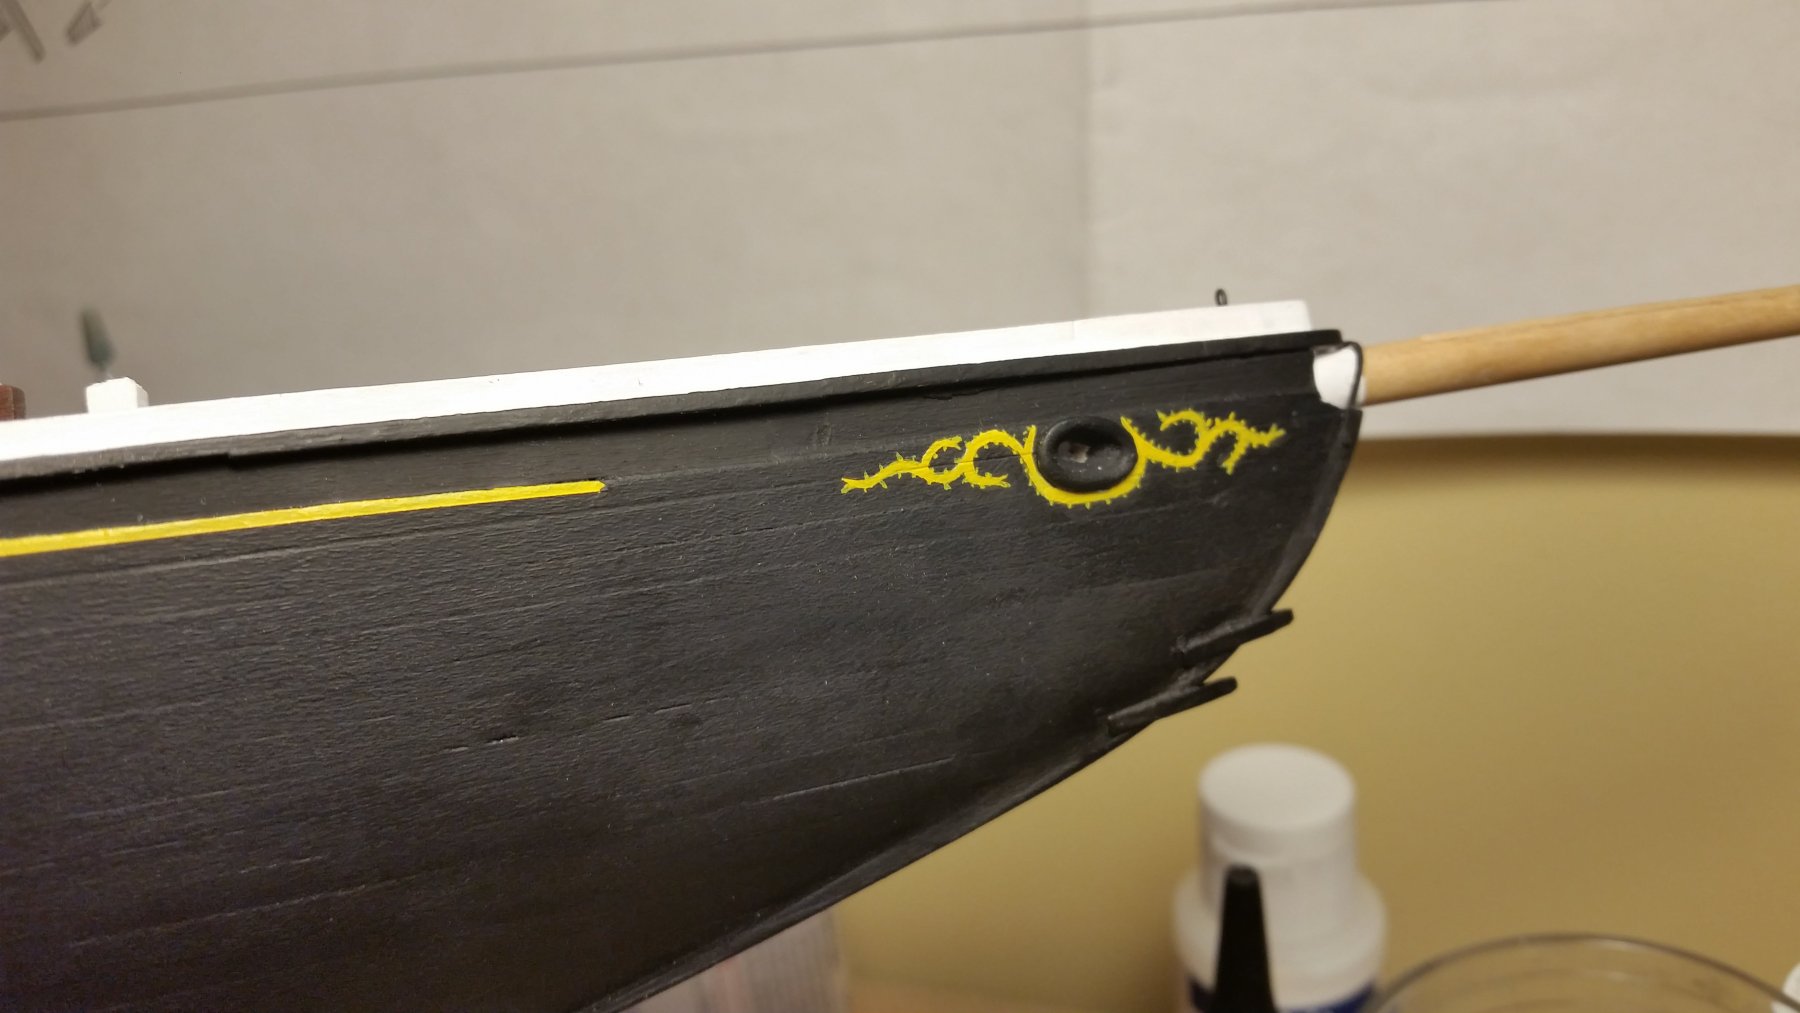
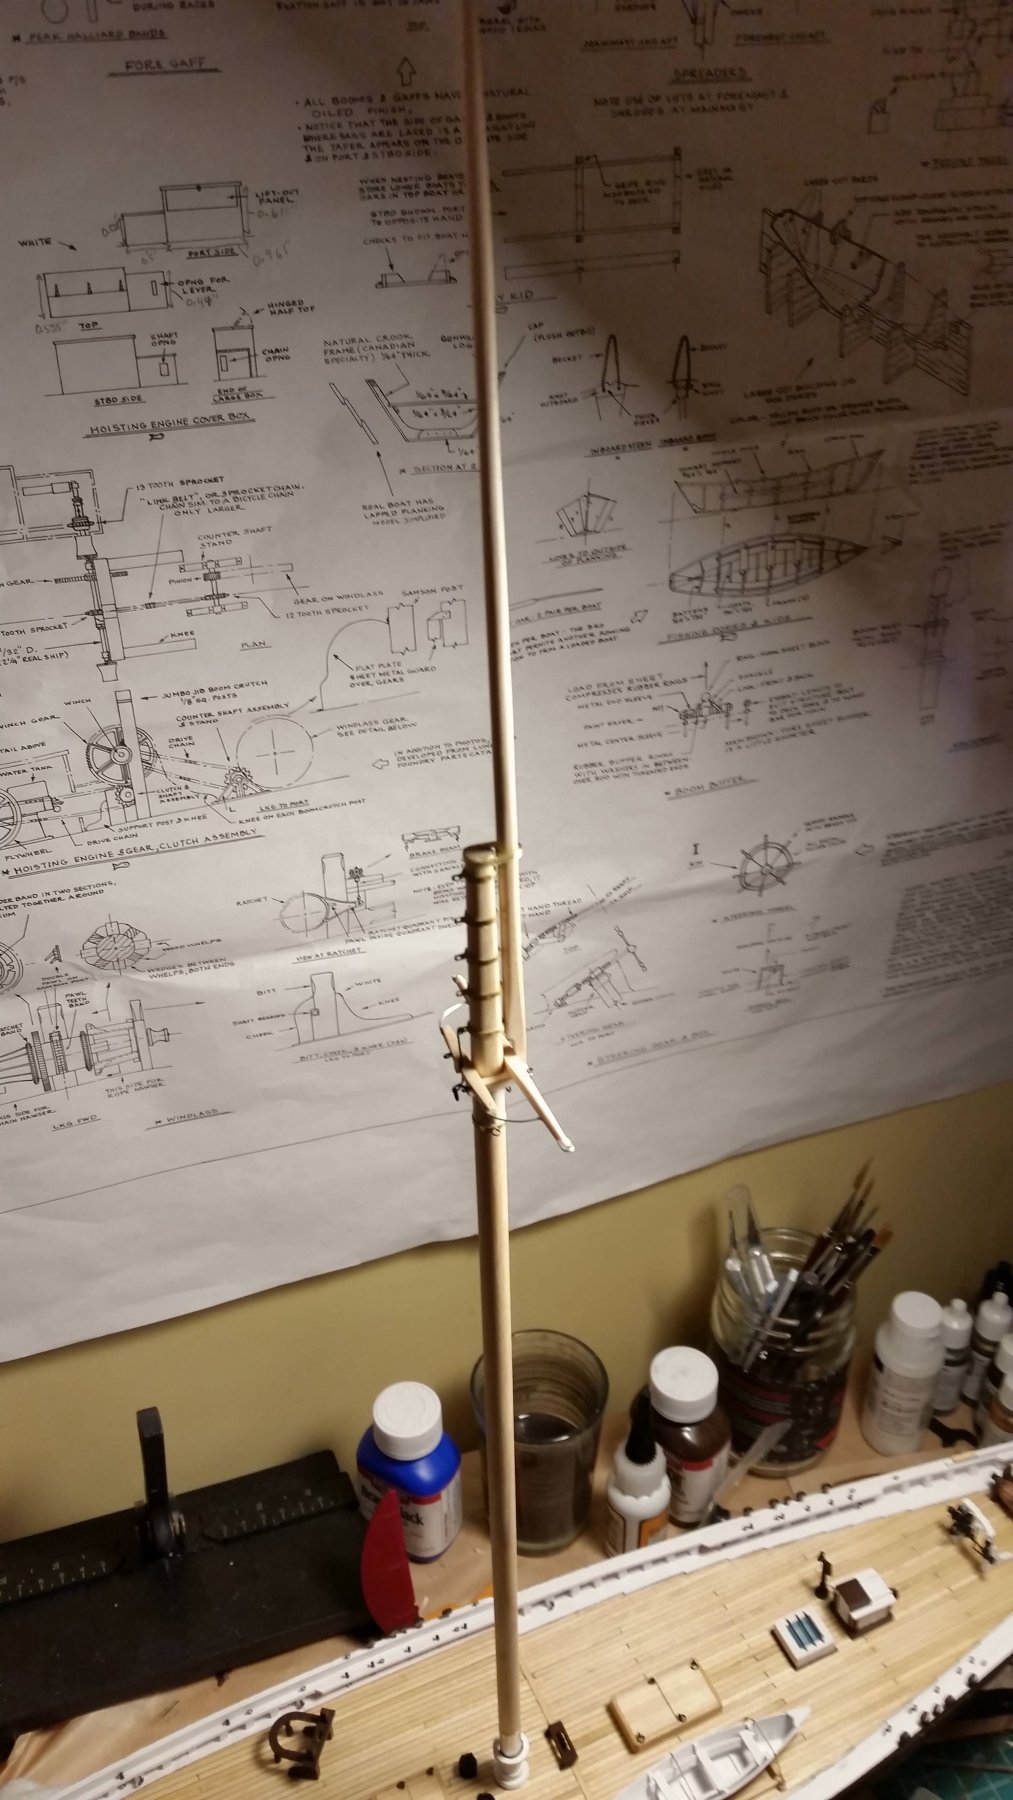
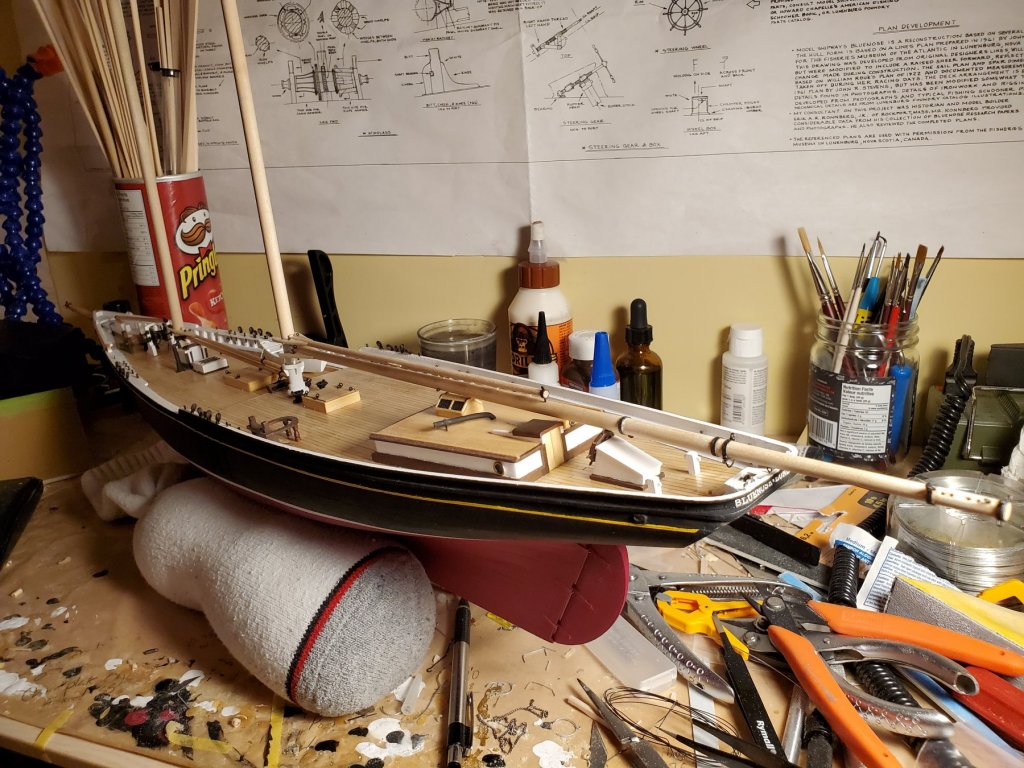
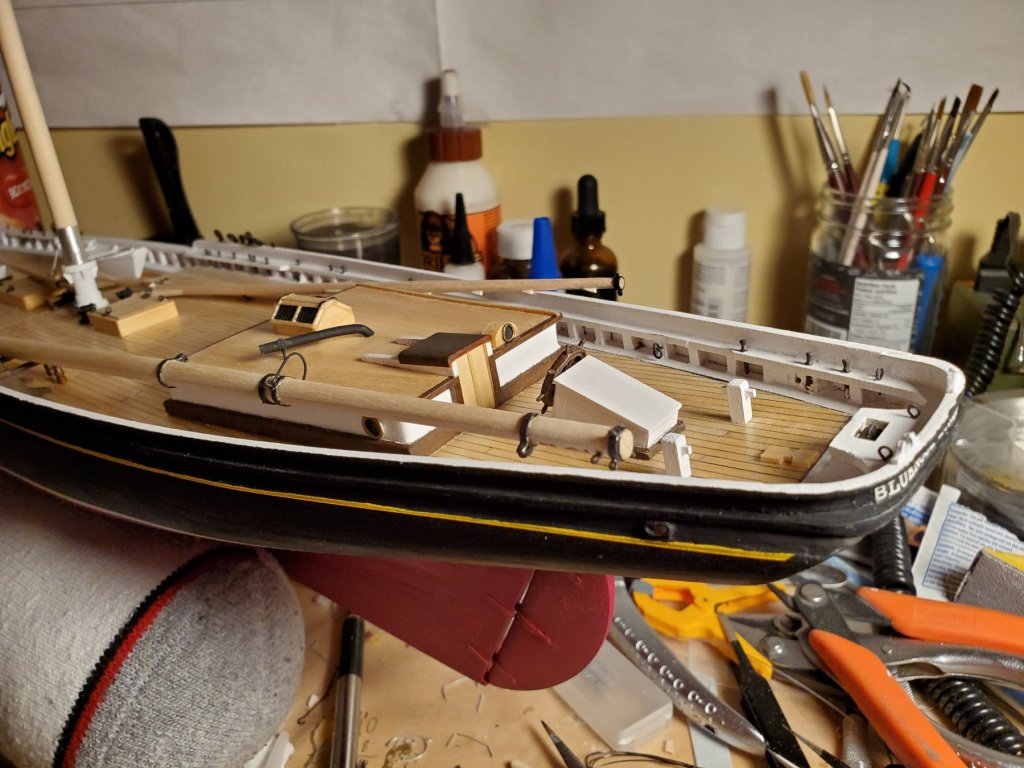
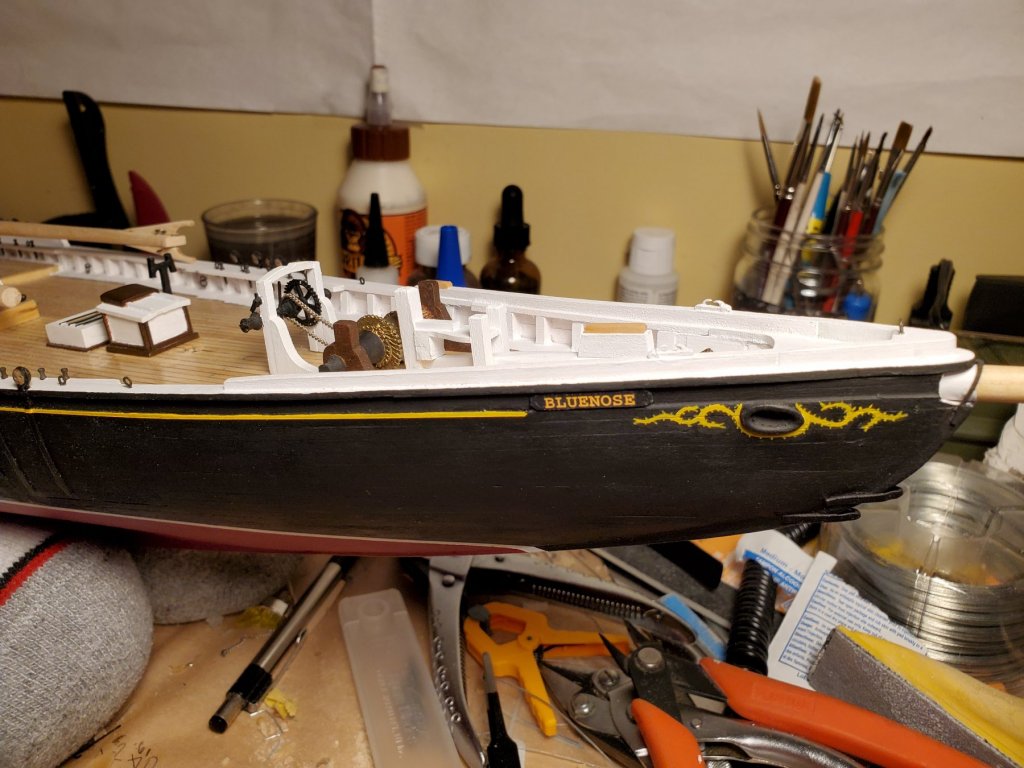
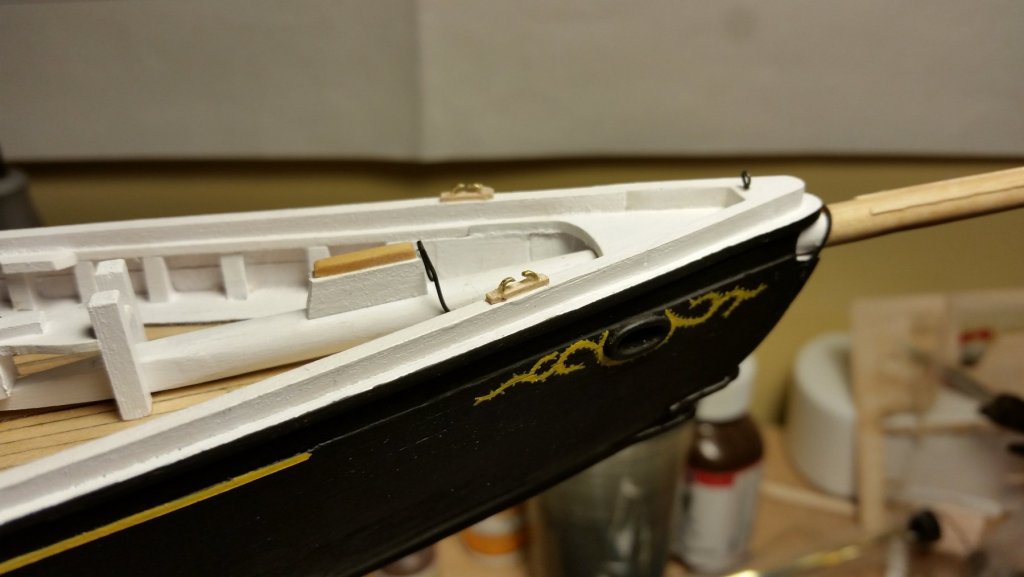
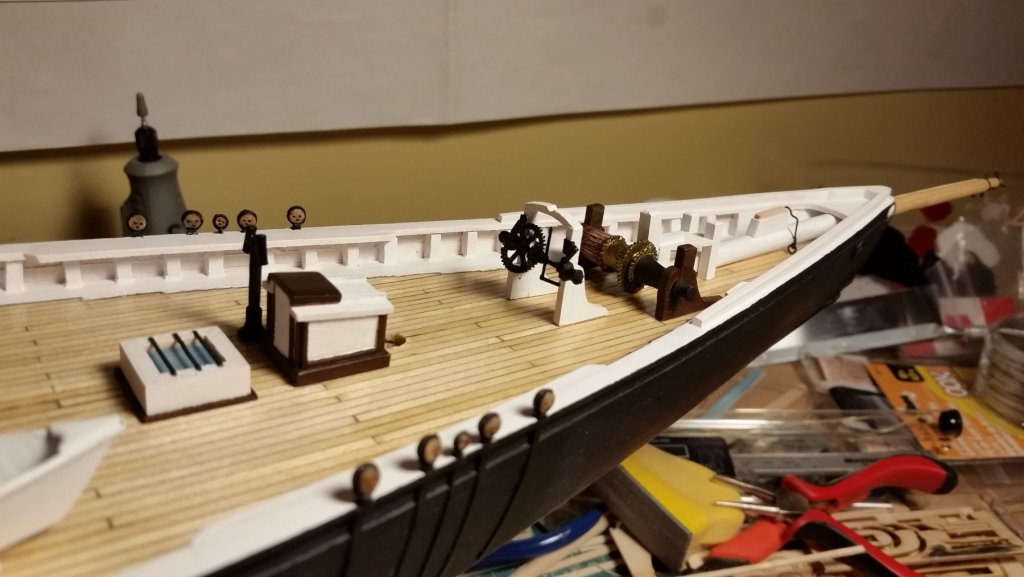
Here we have a closeup shot of the bowsprit. The ports for the anchor chains will eventually be provided with covers—footage from the 1938 race shows her with some sort of red covering. I’m not entirely sure what they might be made of, but I kind of suspect some sort of wood cover held in place through the ports themselves through torsion. It’s how I’d do it if I wanted something to keep the sea out and that was relatively sturdy. Here is some shots of her bow with the yellow stripe and details painted in. The stripe was added in much the same way as the waterline—a burnished Tamiya Tape mask and touch-ups (or is that touch-oops?) as necessary. The scroll work follows what is on the plans and was done free-hand over a pencil drawing. I added nameplates via printed decals later on. I tried many times to paint them in free-hand but never got satisfactory results (partially because of how hard it was to get a supported position with the model in a vise or on the table) and so I accepted my limitation and moved on to a less frustrating alternative. This is a shot of the for’ard half of the vessel. Various major bits of furniture have been installed, though the companionway was recently removed to re-site it in a better location for the placement of the foremast. The nibbing turned out ok, but it’s a process that I definitely could have handled better. I’ve also been over the plans three or four times to ensure that I have all the eyes and belaying pins needed for the rigging, but I won’t be shocked if I have to add something later. When I packed up Bluenose for the move, I carefully gathered all the white metal bits into a baggy to make sure they made it safely. I distinctly remember putting both of the forward mooring chocks into that baggy but when she arrived in Vancouver, they were nowhere to be found. I cannot for the life of me explain this so rather than trying to tax my possibly already frayed sanity by looking for an explanation, I just made some new ones out of some scrap brass and wood. They match each other nicely, and are even close to the ones already installed on the stern. And here’s the mainmast under construction. This was right around Christmas time and I was working as a model builder for an architectural modelling firm—so my output on my personal projects slowed to a crawl. You can see the rudder upside down in the background. I have both the boom and the gaff for the mainsail built now and everything has been painted. I've since been able to find work in my actual professional field so now Bluenose is how I de-stress after a long day at work. The foremast is now the project and soon its booms and gaff will be as well—so rigging is fast approaching!


- 38 replies
-
- 8
-
-
- bluenose
- model shipways
- (and 1 more)