


Dowmer
-
Posts
378 -
Joined
-
Last visited
Content Type
Profiles
Forums
Gallery
Events
Everything posted by Dowmer
-
 Of course the wonderful cedar smell doesn't hurt either. 😀 It will perfume the whole room.
- 421 replies
-
- 3
-

-
- medway longboat
- Syren Ship Model Company
- (and 1 more)
-
Chuck, Just my .02 for whatever that buys you 😊 If you were building a Captains barge or Pinnace which denotes status and indulgencies, then I would probably put some kind of extra molding work on the edge. However, a longboat is predominantly a working boat (albeit the Medway LB is a bit fancier with the paintwork). I personally would go with the standard flat edge since these boats would take quite a bit of abuse and I doubt they would dress them up that much to only be damaged. But then again, it is personal taste and I don't think anyone will fault you if you wish to "doll" it up a bit with a molded edge. It will be beautiful either way. 👍
- 421 replies
-
- 6
-
-
- medway longboat
- Syren Ship Model Company
- (and 1 more)
-
@Kurt, You ain't kidding. Chuck must have super-human modeling skills or he is building this thing 1:1 and telling us its 1:24 😁 My stuff looks good until you zoom in like that and then all I ever see is glue marks, smudges, wood fuzz, rounded edges and lint. How does he do it! The edges are so crisp and clean. I'm assuming the type of wood helps (apart from Chuck's incredible skills). I've worked with Alaskan Yellow Cedar on models for 20 years. Wonderful stuff to use.
- 421 replies
-
- 4
-
-
- medway longboat
- Syren Ship Model Company
- (and 1 more)
-
Pandora by marsalv - FINISHED - 1:52
Dowmer replied to marsalv's topic in - Build logs for subjects built 1751 - 1800
Masterful, Congratulations Marsalv -
Sail design for 18th-century longboat?
Dowmer replied to Cathead's topic in Masting, rigging and sails
Mark, This was already discussed a few posts back. Possible but not advisable, with potential disastrous consequences (going swimming). But no one knows exactly how they actually sailed 250 years ago. Brian, I don't think there is any historical precedence for modern adaptations such as this. Not for the 18th century anyway. Cheers -
Shipman....I like what you are thinking. That would make a good name for an Ale! 😀 I agree that inside the ships they probably whitewashed. Whitewashing was a coating mixture of chalked lime that was used to quickly give a uniform clean appearance to a wide variety of surfaces and had minor anti-microbial effects. The discussion of the Spanish Brown was for internal bulwarks on the exposed weather decks or even possibly for outside the ship depending on the nationality and use (merchant etc).
-
Sail design for 18th-century longboat?
Dowmer replied to Cathead's topic in Masting, rigging and sails
Thanks Roger. I think we all agree that there are issues with the way the gaff is rigged, for better or worse but there is historical precedence for whatever insanity drove them to it. I agree there probably wasn't a dedicated bobstay for the bowsprit. We covered that already, but there is a block on the stem for a purpose and it’s documented in other plans as well. So do you agree that the outhaul should reeve through this and provide some stability to the bowsprit like in the plan shown? By the way Roger, do you have a build thread of your longboat. I’d love to see a picture or a thread for it? cheers -
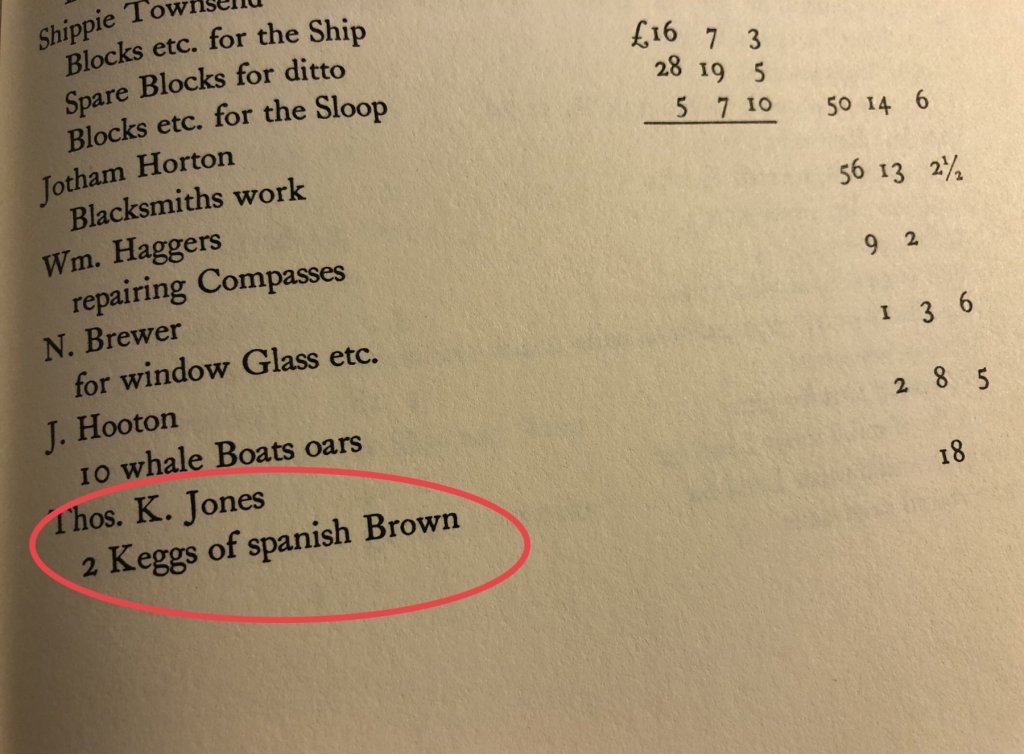
Thanks el cid, I figure the same but some of the contemporary 18th century models have fairly bright red. However, most are pretty muted. But who knows if that is from time and dirt or originally like that. Below is an excerpt from the Log of the Columbia being repaired for sea in 1790 in Boston. You can see a Mr Thomas K Jones was paid 18 shillings for 2 kegs of Spanish Brown. Since this isn’t enough to paint a whole ship I’m assuming it is for touch ups for the voyage. Later it shows 4 hogsheads of clay and linseed oil and turpentine. So I’m guessing they were mixing it as they needed. I don’t know what else they would have used that much clay for? Later it lists £33, 4 shillings for painting the ship but they don’t mention what colors or where. A considerable sum of money for the time.
-
Sail design for 18th-century longboat?
Dowmer replied to Cathead's topic in Masting, rigging and sails
Interesting hypothesis Chuck. I believe the tiller arm is designed to slip in and out of the rudder head. So it is possible, but I would think tacking or jibing while essentially unshipping your rudder control is a recipe for disaster. But stranger things have been done. If I was in a boat rigged in this confounded way, since the boat is relatively small, I would probably start the turn, as the wind comes off, loosen the sheet with enough slack to pull it around the tiller with one hand, then snug it up again as it passes through and catches the wind again. But that’s just me “spit balling” 😬 😀 -
Sail design for 18th-century longboat?
Dowmer replied to Cathead's topic in Masting, rigging and sails
Druxey, I think you, Chuck and me have the same opinion. Perhaps I didn’t explain myself very well. That the outhaul is rigged through the stem block. As it is hove taught it probably acts similar to a bobstay, holding the end of the jib boom down. Remember, the jib probably isn’t used in anything but light to medium breeze anyway. Like chuck says, there is other evidence and he doesn’t know why the Medway model isn’t rigged that way. Lots of stuff happens to models over centuries. If you look closely it appears there is damage. The metal work has come loose holding the bowsprit to the stem. The bowsprit probably came loose at some point. They put it back on and didn’t reeve the outhaul through the stem block. That’s my guess anyway. -
Sail design for 18th-century longboat?
Dowmer replied to Cathead's topic in Masting, rigging and sails
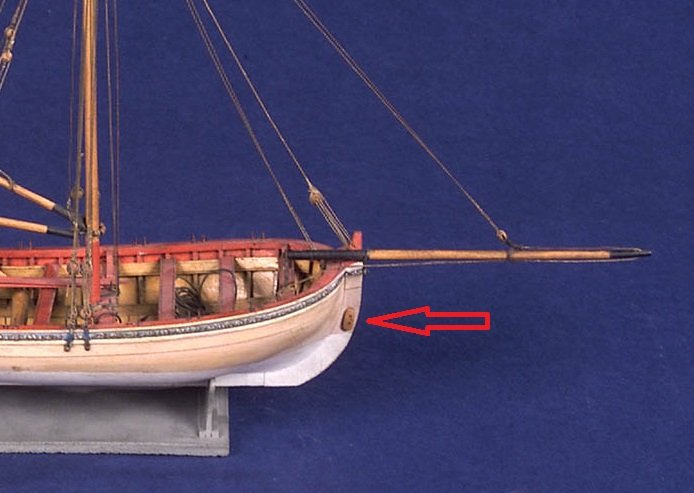
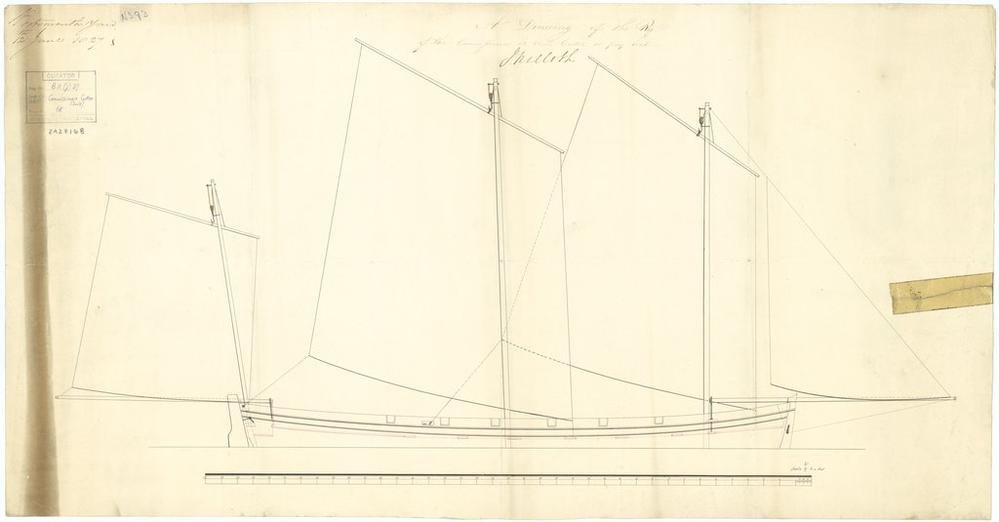
I know this is an old thread, and there was a very heated debate about the working of the tiller with the strange horse arrangement, but i just could pass this sail plan up when I saw it on the NMM website. I know both travelers are correct as we have discussed, and I agree with Chuck on his version, but perhaps the comment about "they learned later to change it" never happened everywhere. Here's another example of the impossible version below the tiller in a drawing as late as 1910 from Scotland!!! This impossibly difficult sailing rig still baffles me, but here it is again. Someone must like it? Another point that I would like to bring up that I don't think anyone has addressed. It's the absence of a bobstay for the jib. You would thing that there would be considerable pressure on the jib pulling it up and something would be needed to hold it down. I read in Lees Masting and Rigging that mentions that longboats carried a bobstay. But the models don't seem to show one. Then I looked closer at the picture of the Medway model that Chuck shows for the inspiration for the 18th century longboat. See below, it has what appears to be a sheave attached to the stem for rigging a possible bobstay or jib tack.. And then I found a sail plan in the NMM (albeit a slightly later plan circa 1800) of a cutter/longboat with what appears to be a bobstay or possibly the sail rigging through something similar on the stem. Perhaps a bobstay could have been rigged on the Medway model but was damaged and fell off over the centuries. Better yet, I think the rigging from the sail is supposed to reeve through the block on the stem thus acting like a bobstay holding the bowsprit down when it is pulled tight. I think the line on the Medway probably reeved through this block on its stem. If not, then why would they put it on? Who knows, but I find it interesting nonetheless. Just more options to consider.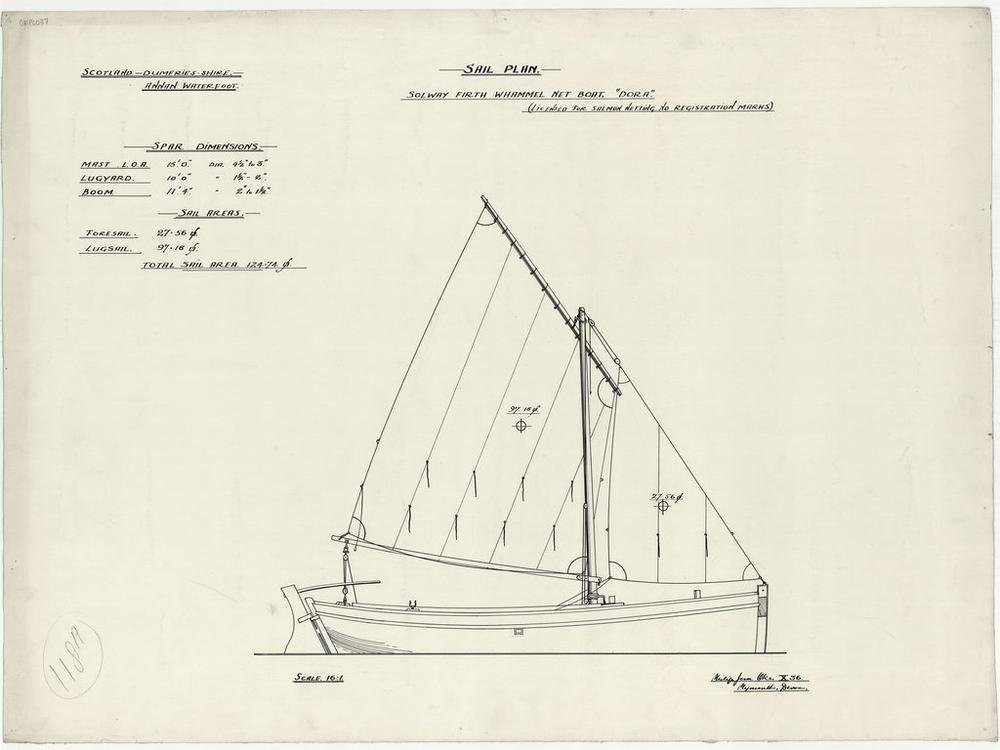
-
I know this is an old thread but I thought I would add a bit of information. I believe what Roger was referring to above is a paint called "Spanish Brown" which was very common from 16th to 19th century. Presumably it was used early on by the Spanish (hence the name), but that is an assumption. It was red clay or oxide (dirt) mixed with a binding agent (linseed oil). It was used because it was cheap (literally cheap as dirt), but had a pleasing brownish red color. The color is prevalent on old surviving historic houses such as those in Colonial Williamsburg. I've gone through chandlery supply records on ships out of Boston in the 18th century and you can see quantities of "Spanish Brown" in their inventories along with lamp black. I think it was more predominant with merchant ships later in the 18th century. Since paint was expensive, it doesn't surprise me that they would have used a cheap preservative such as this as paint on ships along with tar. Here's a picture of a home in Williamsburg with Spanish Brown. It takes on different hues depending on the amount and type of dirt that was used but is usually some version of dark reddish brown. Anyway, I thought it was an interesting tidbit. I'm doing some research on a merchant ship I'm building dated 1788 and I'm trying to figure out the colors (especially the bulwarks) and this paint was listed in its supplies. I'll probably post something more specific in the paint forum section later on to get more opinions and info. Cheers

-
Using a moulding scraper tool?
Dowmer replied to alde's topic in Modeling tools and Workshop Equipment
Al, One other thing. I know this is very obvious but just to make sure the strip of wood you are trying to shape is the width of the profile. If not then it will wander since the sides cant keep it within the profile shape. (see pic below) I know you are probably already doing this, but just stating the obvious. Like Chazz and Druxey said, the edge should be sharp and light strokes. I personally recycle my xacto blades (which I have plenty). Cut the profile you want with a file or my personal fav...abrasive Dremel wheel, and I have nice control since it is in the xacto handle.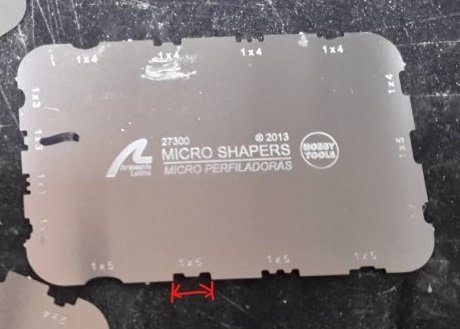
-
That's what I do. Use tape to mark a straight line on each side of the frame for the holes. Then I use a small awl or pointed tool to make indents where I want to drill. This keeps the drill bit from wandering and allows you to see how everything lines up before you drill.
- 574 replies
-
- 1
-
-
- cheerful
- Syren Ship Model Company
- (and 1 more)
-
Nice planking BE. I know sometimes it must feel like planking is like running a marathon, but it feels so good to see those curves and planks in place. Nice job.
- 574 replies
-
- 3
-
-
- cheerful
- Syren Ship Model Company
- (and 1 more)
-
Chuck, any updates on this build? Are you still building her?
-
Chuck S, True, plus if you over bevel then on the inside of the boat (which is visible in an open boat such as this) will have ugly furrows between the planks where there was too much space created. Better to knock off just enough of the inner edge to get a tight fit. Chuck P, I like your idea of having templates for your spiles. Then a less experienced builder can look to see what the shape should look like (for those visual learners such as myself) but still be able to hands on create their planks. I think you have a reasonable balanced kit offering. Enough hand holding for those that need it but not too much so a builder can still learning by doing. Besides, every model with have slightly different spiles depending on creeping errors you you mentioned earlier. 👍 Man, what’s with all the Chucks! 😆
- 421 replies
-
- 7
-
-
- medway longboat
- Syren Ship Model Company
- (and 1 more)
-
Chuck, I agree wholeheartedly about modeling properly. A small kit in a larger scale like this is perfect for those learning planking since the size isn’t as daunting as something like a frigate. I would vote vote for a kit option with no spiled planks. Saves time on your Laser and allows the builder to plank the way they should if they choose to do so. Pre-spiled planks, although convenient, are a bit of a crutch as you are approaching more of an assembly type kit like you said earlier about plastic models.
- 421 replies
-
- 6
-
-
- medway longboat
- Syren Ship Model Company
- (and 1 more)
-
Ok, sounds good. I was just suggesting perhaps take a couple measurements one from each end of the ship from known points on the model and make sure they match on the plan or vice versa. To give you a warm fuzzy that everything is aligned and correct and you will get correct marks when you measure off. Looking good and a nice idea mounting the plans like that. Cant wait to see the new planks. 👍
-
Al, Just make double sure that the upside down plan of the hull is exactly the same distance and angle from the table as the ship hull is off the table.
-
See, just an opportunity to excel and hone your skills
-
Syren Rope Rocket
Dowmer replied to DelF's topic in Rope Making/Ropewalks's Commercial sources for ropewalk machines
That’s great Toni, could you share your results with the DMC?- 42 replies
-
- 4
-
-
- ropewalk
- rope rocket
- (and 1 more)
-
Al, I know it was tough, but like you said, it will be better in the end. Carefully measure out the sheer and rails where they are mid ships and where they terminate at the stern and stem on the plans. Also measure the distance between each section to make sure the width is correct with the right number of strakes. The bend or sheer created by the wales should set this up pretty well as they look to be parallel.
-
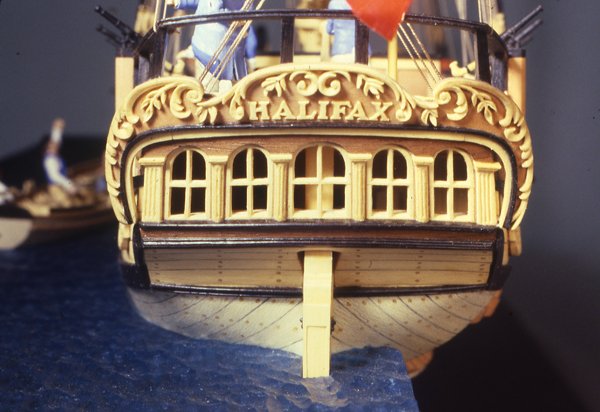
Al, I guess I don't understand the issue. Here's a pic of the stern of the Halifax Under the windows are some decorative molding strips and counter planking. Also, look at where the stern post enters under the windows on the counter. It looks fairly close to what you have. The wales seem to end in about the same place as well. What am I missing? If you are talking about the planking above the decorative stern, it looks like the model has an open rail aft on the quarterdeck and you planked the rail. Is that it? The more I look at your planking, the more I think you have your sheer rail in the wrong spot along with your planks too wide. Look at where the planks and rails terminate at the transom compared to yours. The Wales look OK and the decorative resin stern piece could possibly move up towards the taffrail slightly but the other planking and rails seem to be out of place. I'd get some more opinions first, but if that is the case you will need to remove the planking above the wales and reset the sheer and re-plank with correct width planking.
-
Syren Rope Rocket
Dowmer replied to DelF's topic in Rope Making/Ropewalks's Commercial sources for ropewalk machines
Thanks Rafael, that is very helpful. Its nice to find sources of thread that produce a nice sharp layup in suitable color and quantities that's is also inexpensive. The DMC Cordonnet comes in large spools in multiple colors and sizes which is nice and is available at local shops. I just need to figure out which thread number (10, 20, 40 , 80 etc) corresponds to what actual size. I think the larger the number the smaller the diameter. I've seen DMC thread as small as size 100 which is pretty small.
- 42 replies
-
- 4
-
-
- ropewalk
- rope rocket
- (and 1 more)
