Dowmer
-
Posts
378 -
Joined
-
Last visited
Content Type
Profiles
Forums
Gallery
Events
Everything posted by Dowmer
-
 Thanks Lou, great to hear from you. This little project was something to wet my appetite to get back into ship building. It did its job. 😀 I'm really enjoying it. The best part is learning all the different and new techniques on this website. Over course the motivation aspect of seeing all the incredible work by the masters here help as well. I wish I had this resource when I started 30 years ago. It would have prevented a lot of head scratching. 😟
- 48 replies
-
- 2
-

-
- 18th century longboat
- model shipways
- (and 1 more)
-
Thanks Chuck, I did a little research and found a reference to the use of toggles. At this scale for the boat I’m making at 1:48 it was a pain but it sort of worked. I love your method of using tissue paper. It does the trick.


- 1,051 replies
-
- 10
-
-
- cheerful
- Syren Ship Model Company
- (and 1 more)
-
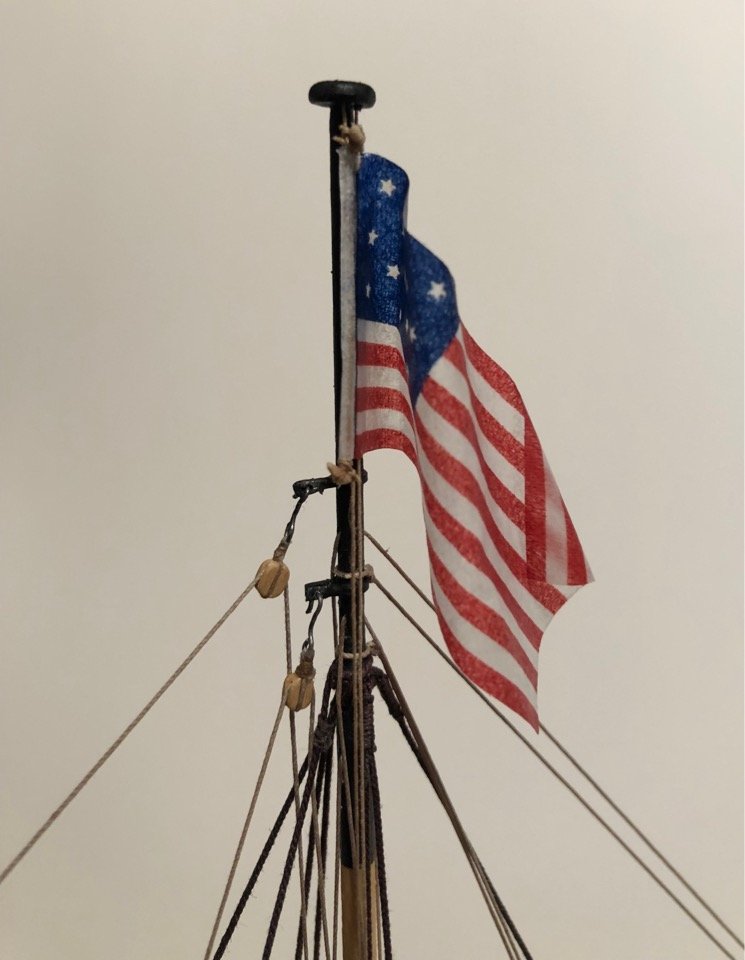
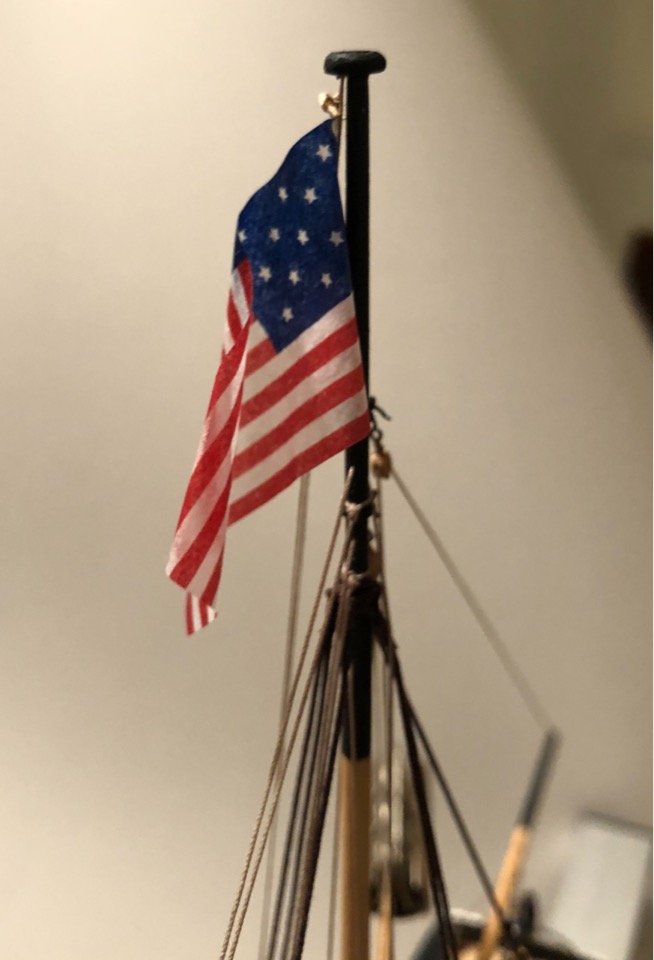
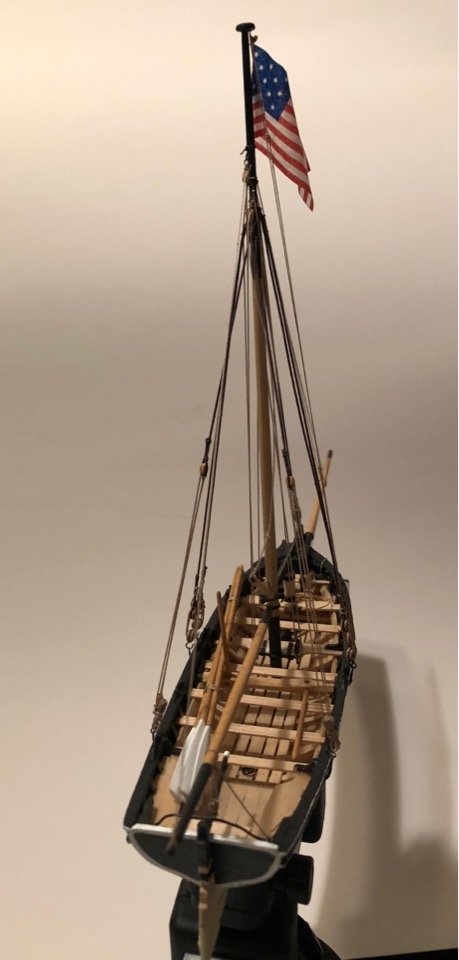
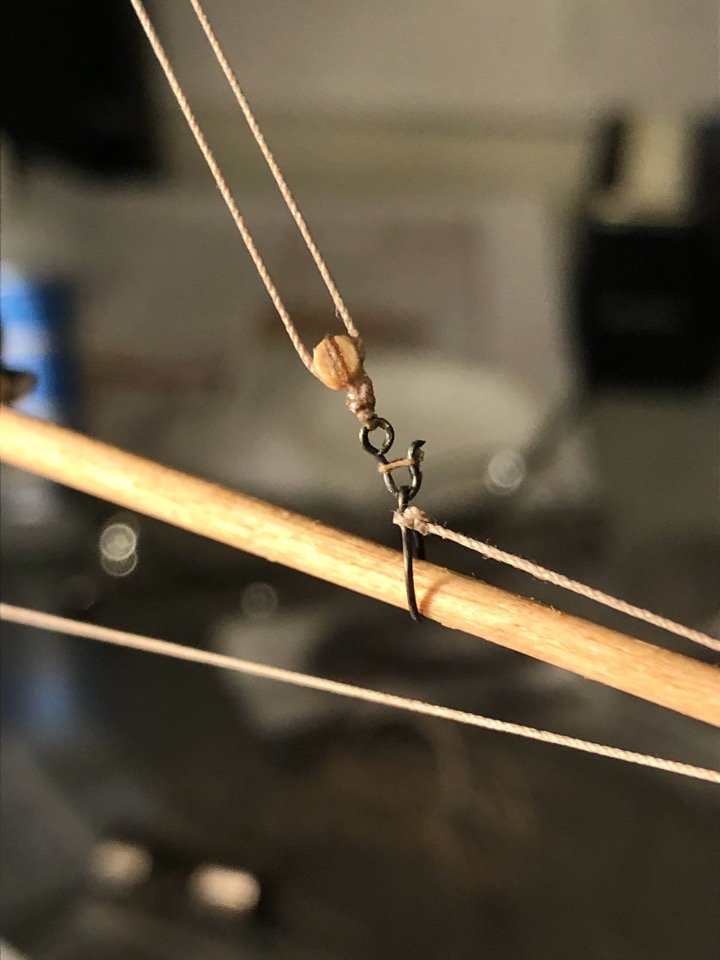
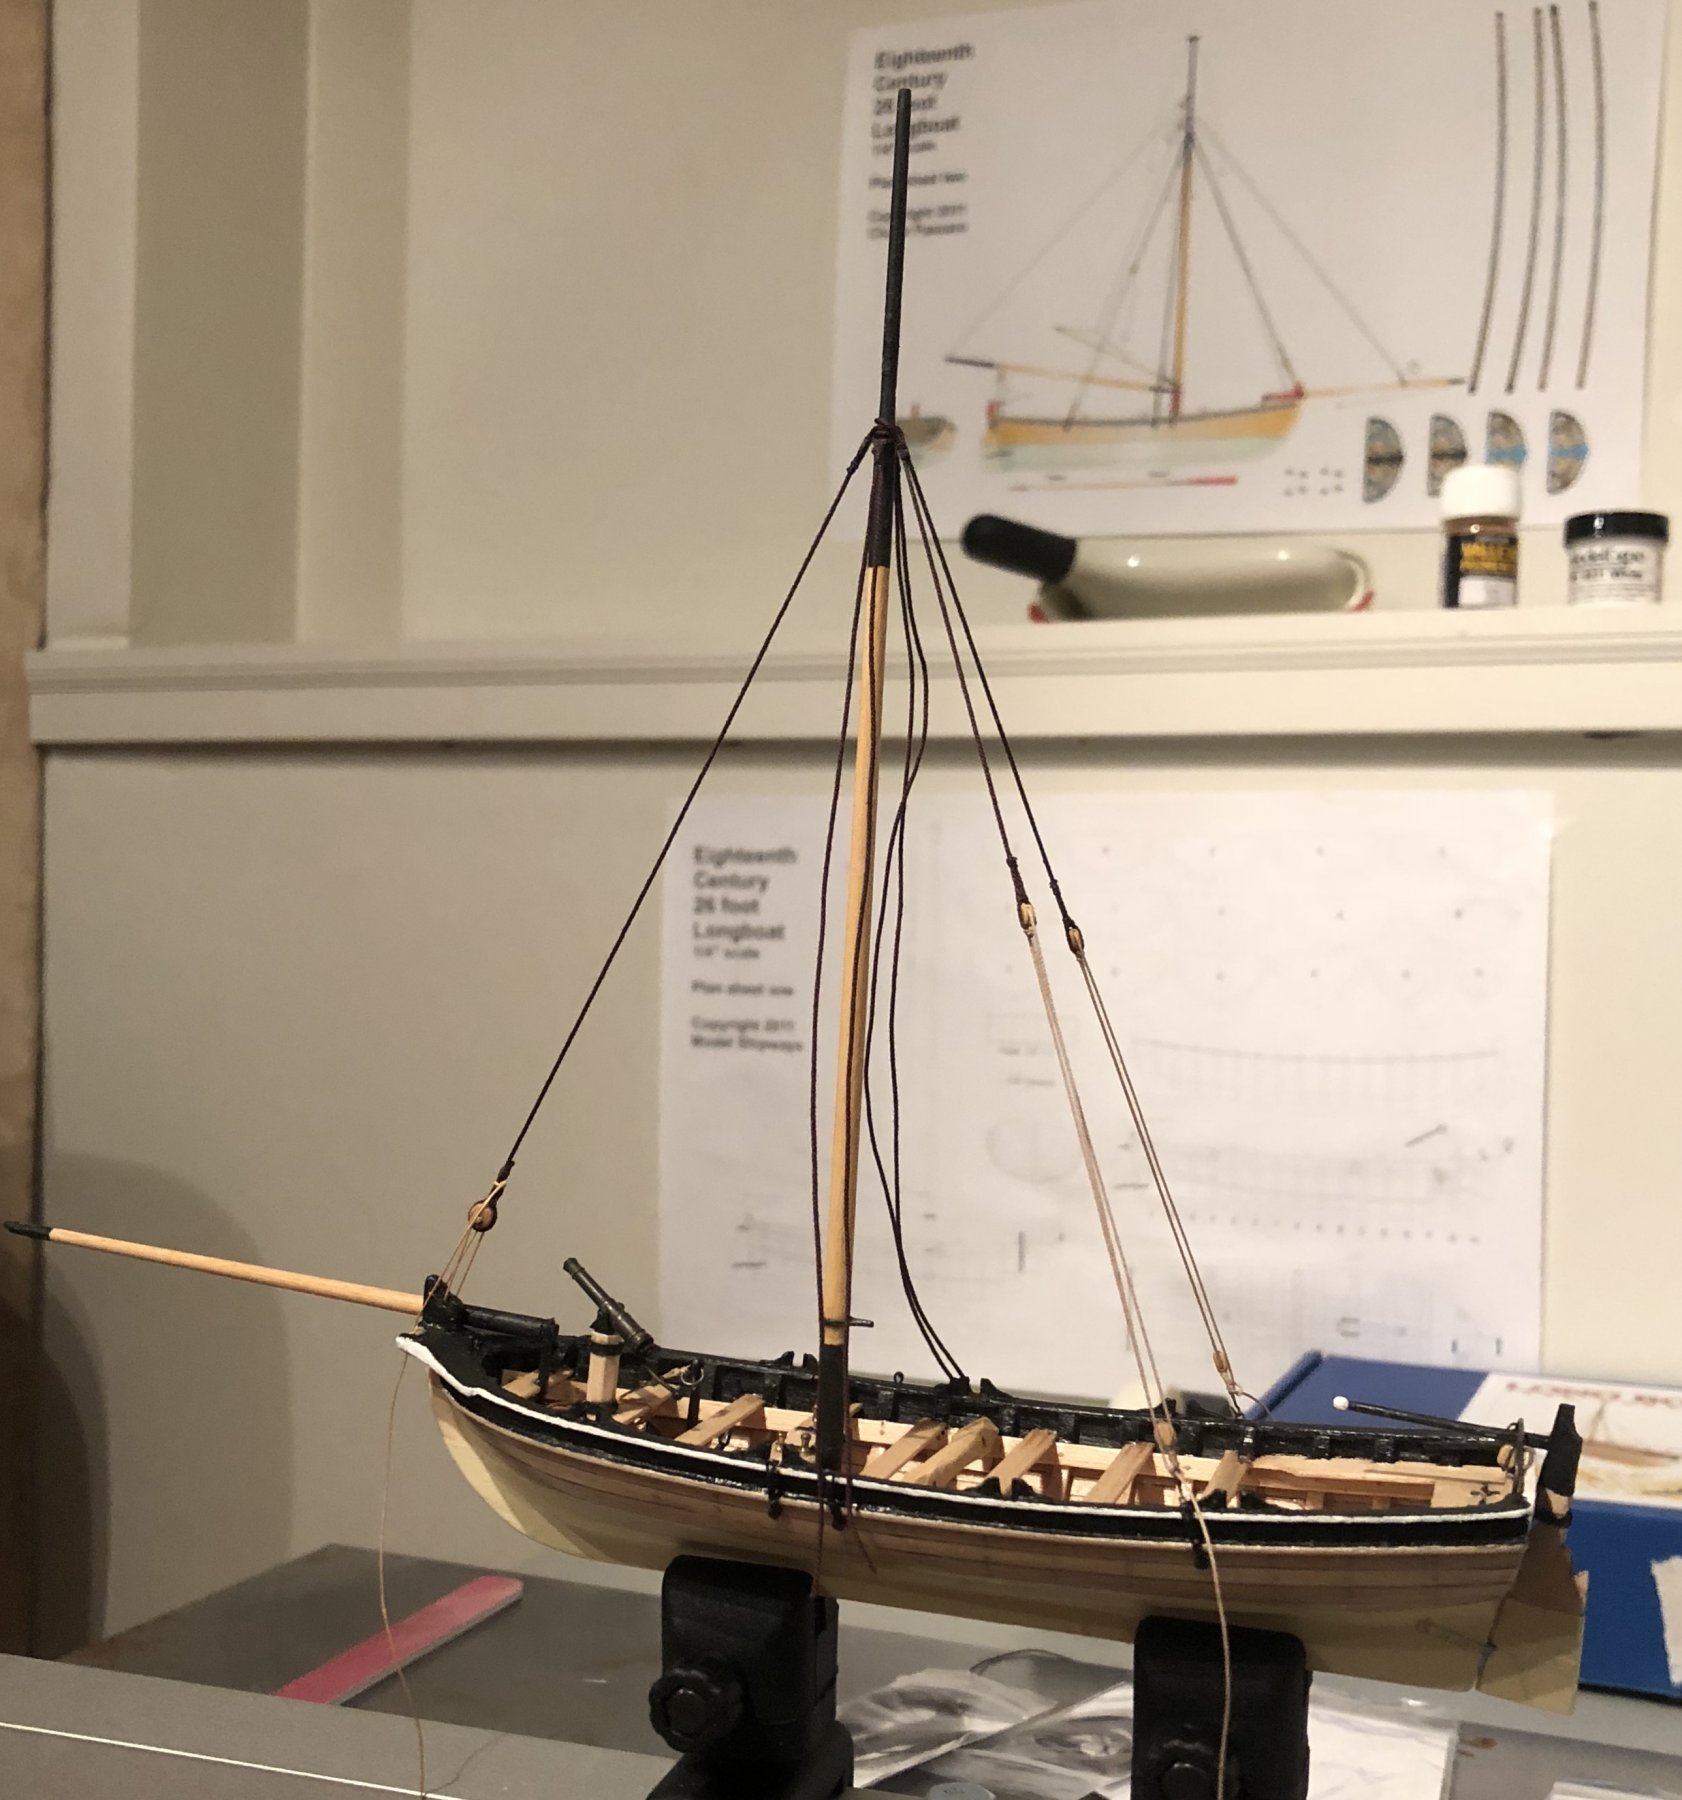
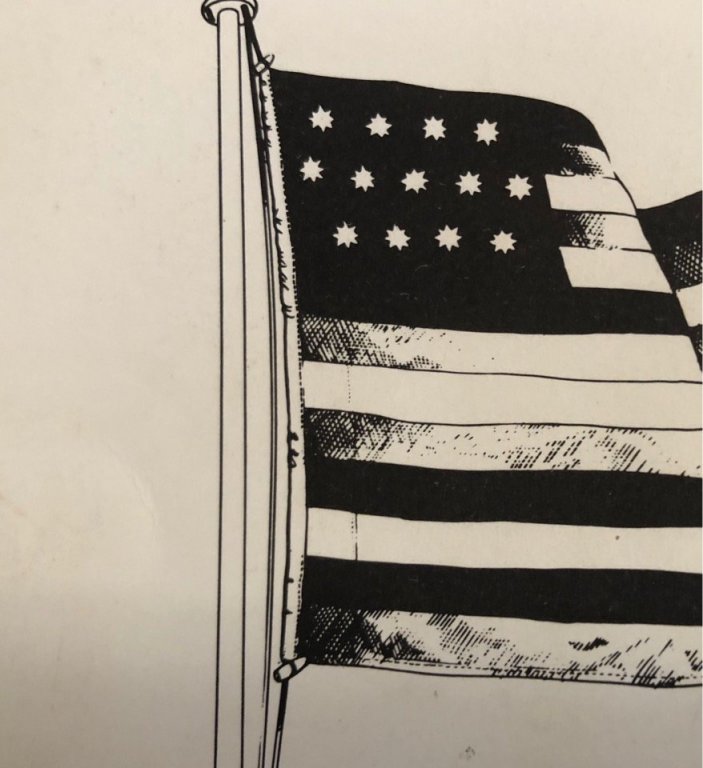
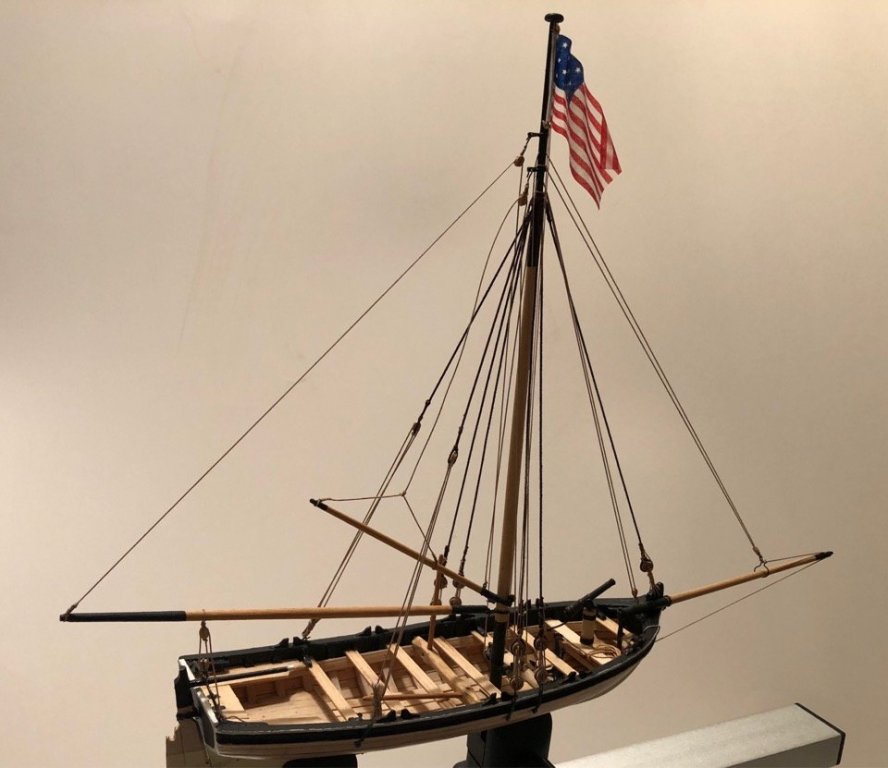
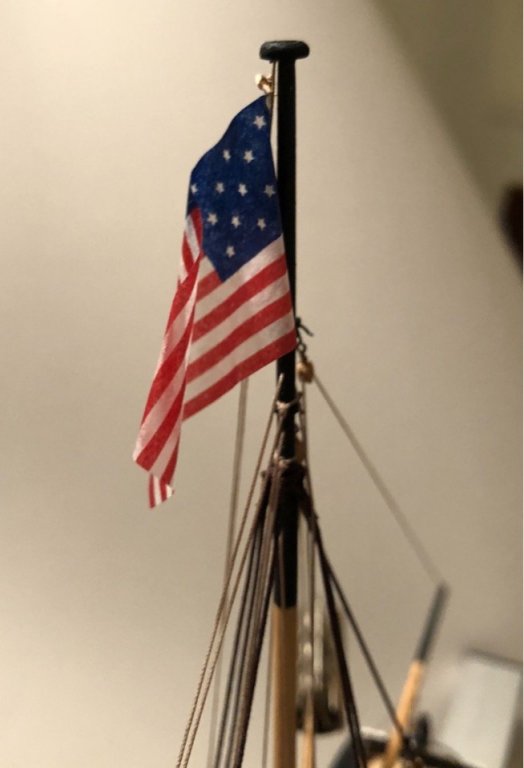
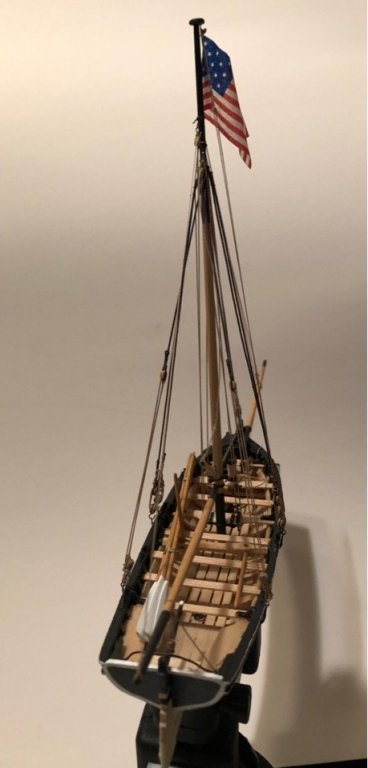
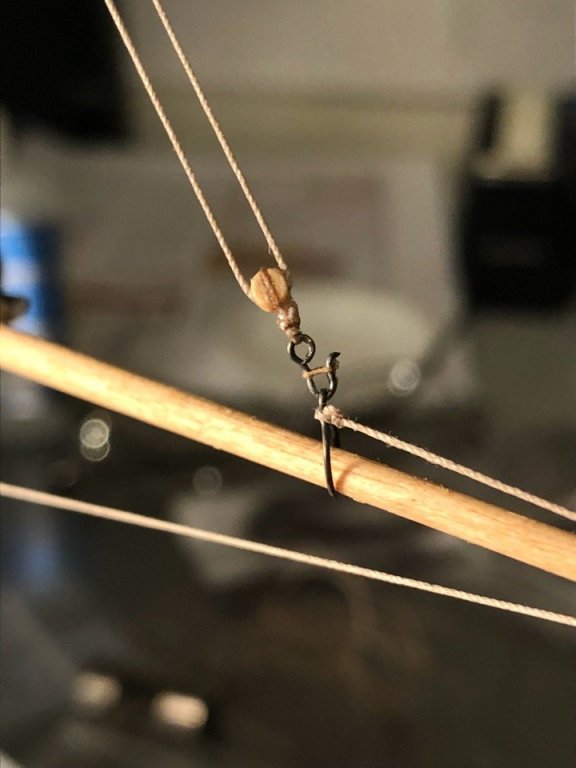
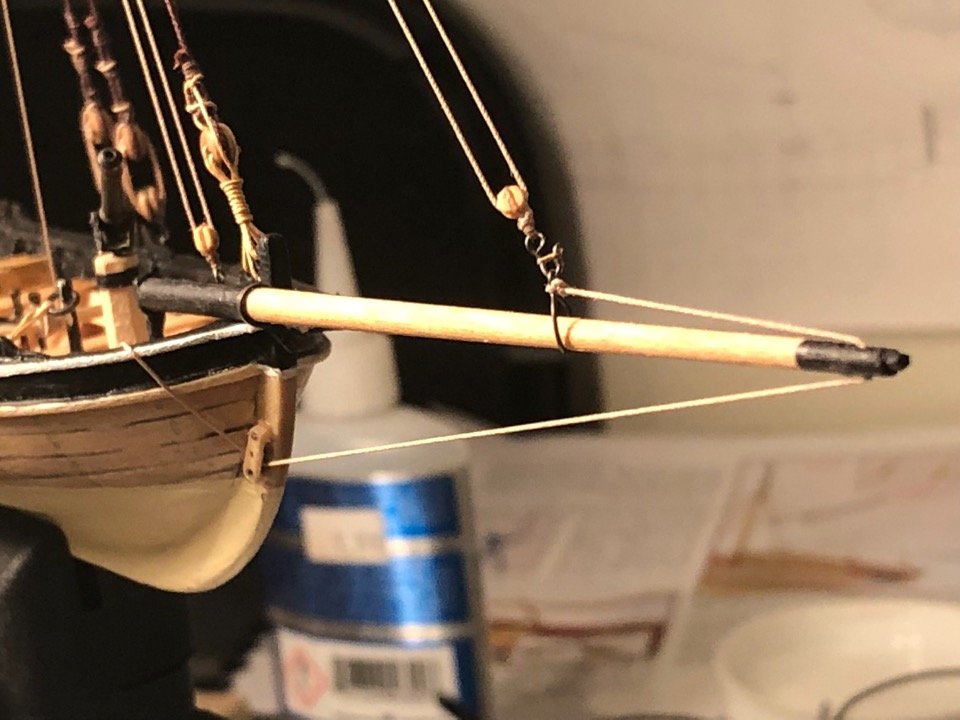
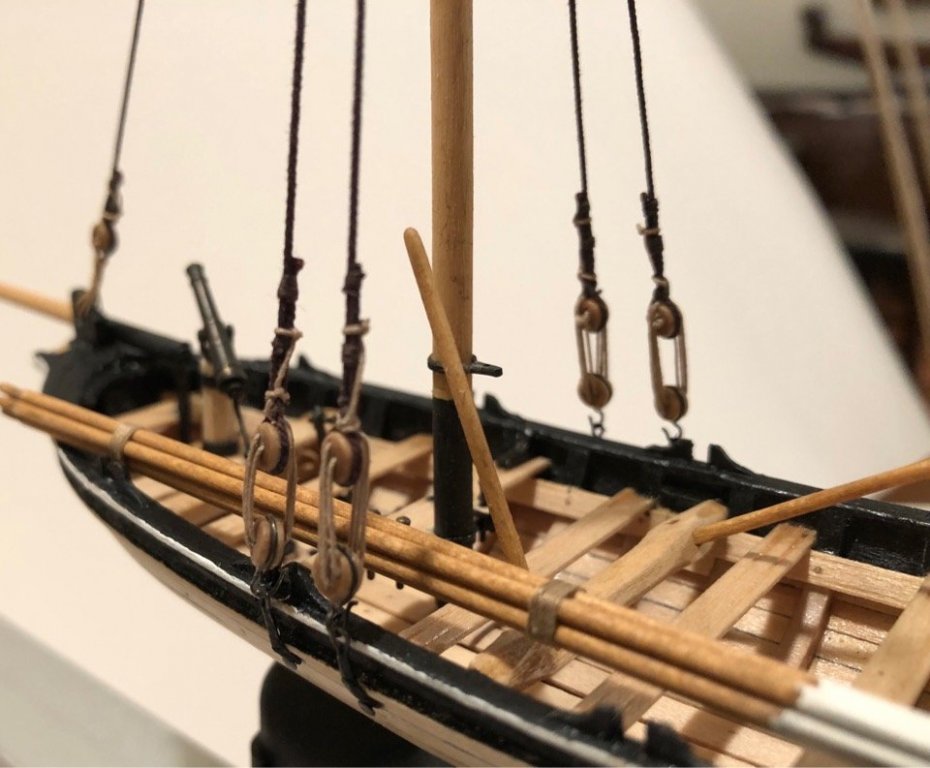
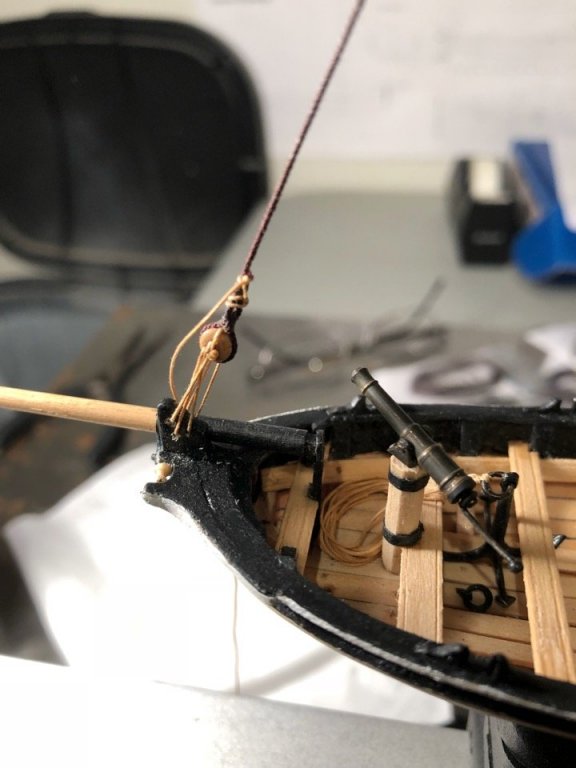
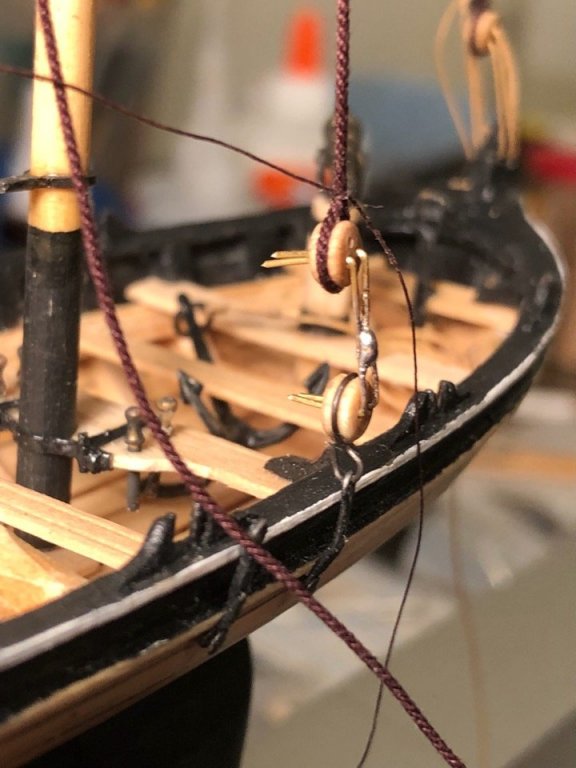
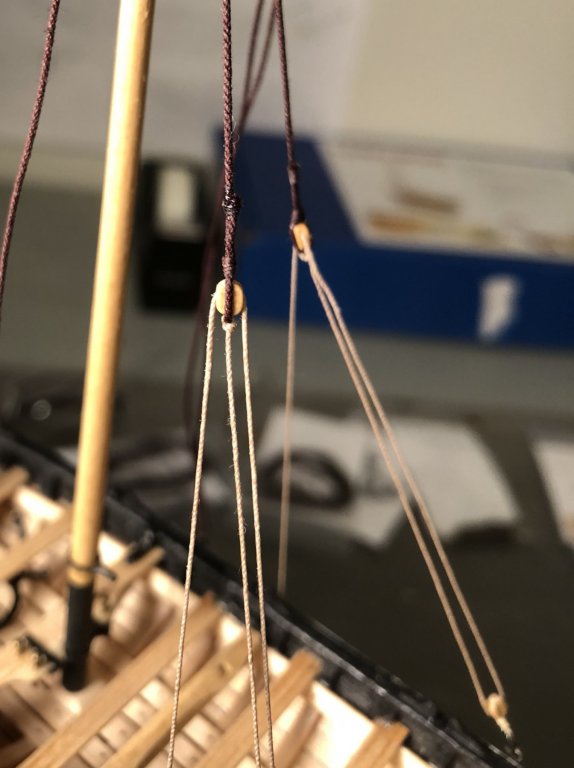
So I needed a flag but I needed to figure out how they attached the flag to the halyard. After a lot of searching around I referred to an old Jean Boudriot book and found a depiction of one in his book of the BonHomme Richard. Im assuming this is how they typically secured them and it makes sense. The period is correct so I gave it a try. The hardest thing to make was the toggles. At this scale they were about a mere 1.5mm. I turned down a piece of hardwood and wrapped the .008 rigging line around it. The Hoist of the flag (the vertical part) was left white and folded over the line and glued with thinned white glue. The flag was made using Chuck’s method of tissue paper. Here’s a link to his thread for the Cheerful. Cheerful Link I chose a 13 star flag representative of the era circa 1790. I used some some tissue paper the wife had squirreled away for Christmas. Cut a small piece and taped it onto a sheet of 8x11.5 office paper. This acted as a carrier to feed the tissue through the printer. Printed the flag then cut it to shape and sprayed some Krylon fixative. After gluing in the toggles I sprayed some more fixative on the flag to soften it and shaped it. Viola La! I attached the halyards and hoisted the flag to the truck. Secured to the starboard deadeye. Here’s some pictures of the finished product. Making and attaching the toggles was fiddly but worth it in the end. Next up is to make some rope coils and hang them on the boat and I’m done. Cheers landlubbers 😁

- 48 replies
-
- 18
-
-
- 18th century longboat
- model shipways
- (and 1 more)
-
Chuck, I'm playing around with the flag technique you detailed earlier (see below). It works amazingly well BTW. 👍 My question is, how did they (18th century) attach the flag to the halyard...or how did you attach it to the Cheerful? Toggles? Thanks for the great tips,
- 1,051 replies
-
- 6
-
-
- cheerful
- Syren Ship Model Company
- (and 1 more)
-
Robert, Thanks for the kind comments. I'm working on the last of the running gear and should have it completed soon. Cheers,
- 48 replies
-
- 2
-
-
- 18th century longboat
- model shipways
- (and 1 more)
-
B.E. a wise and sensible choice me thinks. I would have come to a similar conclusion. Nicely done. 😁
- 574 replies
-
- 3
-
-
- cheerful
- Syren Ship Model Company
- (and 1 more)
-
Toni, a real masterpiece. Well done. Have you considered adding short stub masts and bowsprit like some of the admiralty models do? Just to show easily where they are located. Either way, a real beautiful ship
-
Thanks Chuck, all your work inspired my build. I appreciate that you make these kits available.
- 48 replies
-
- 3
-
-
- 18th century longboat
- model shipways
- (and 1 more)
-
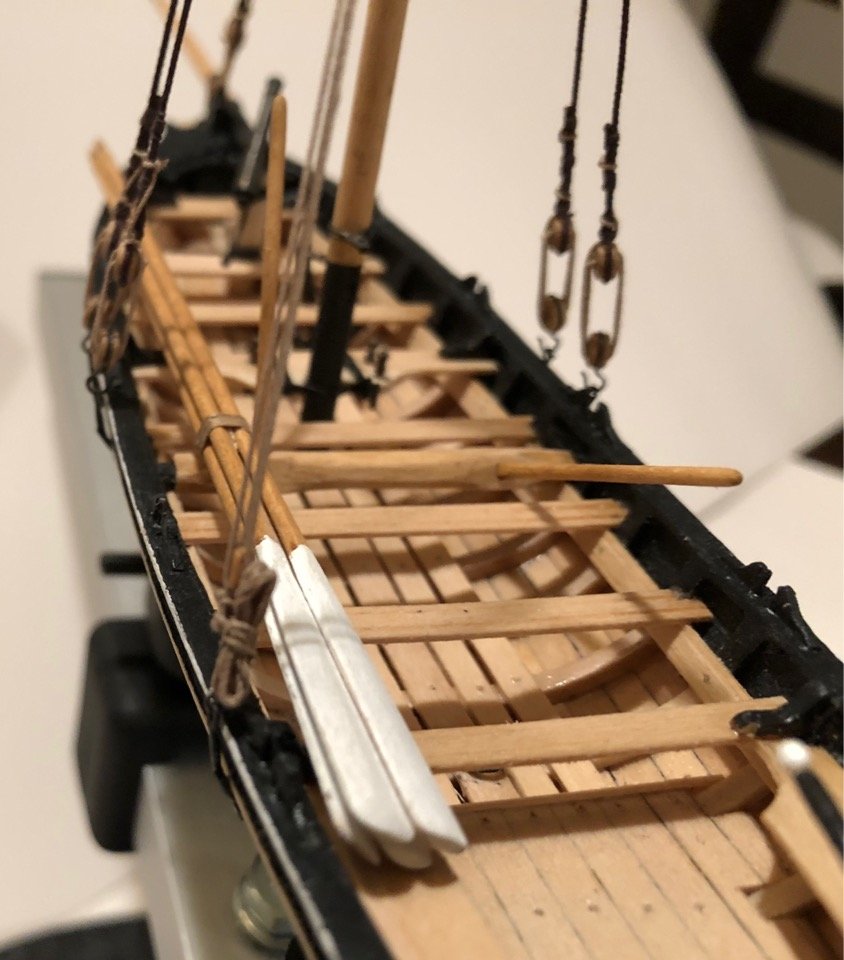
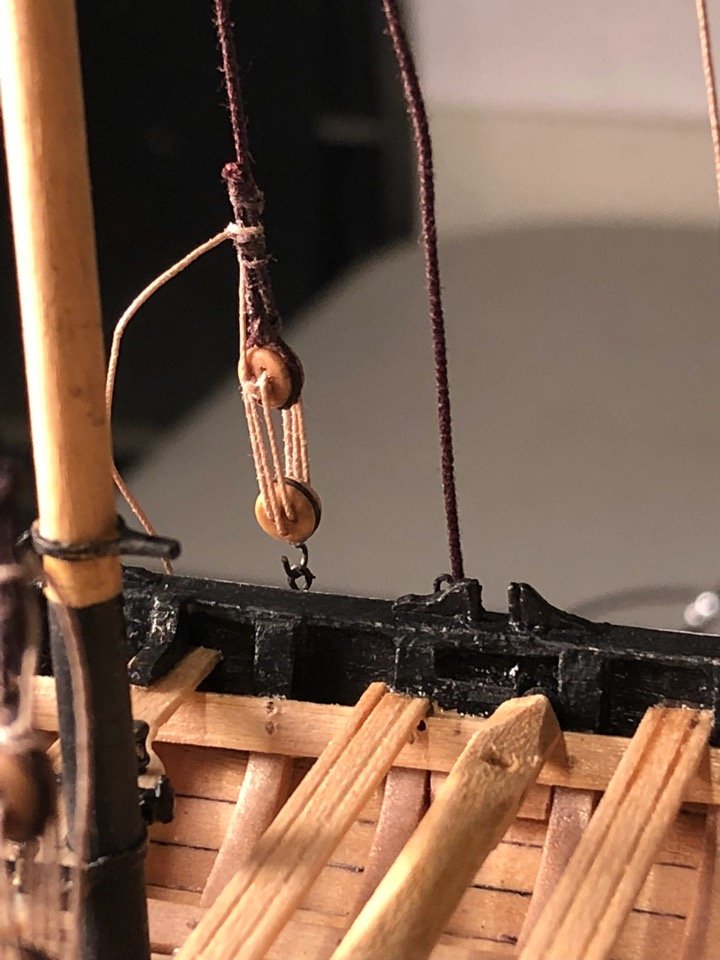
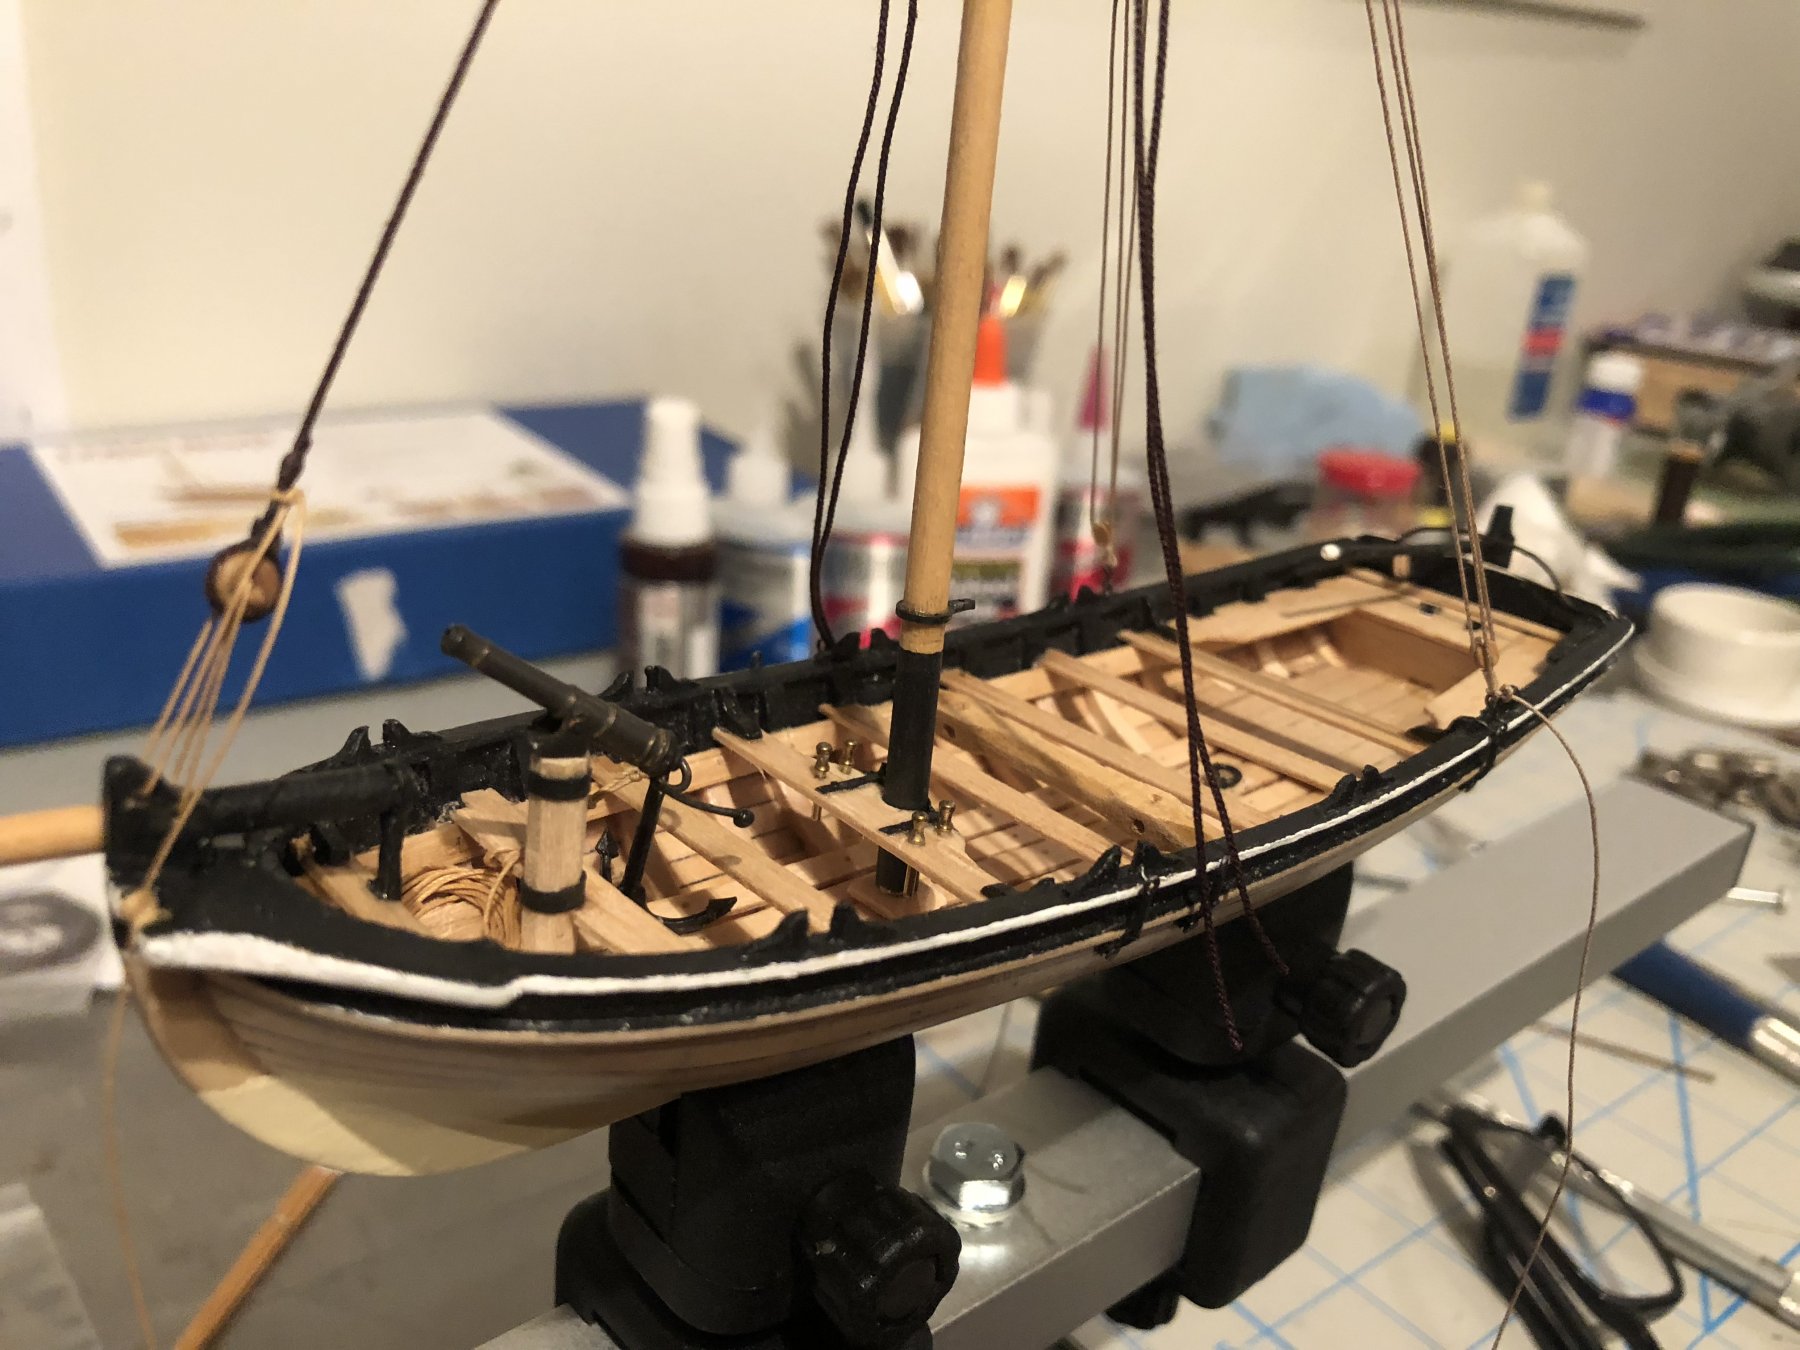
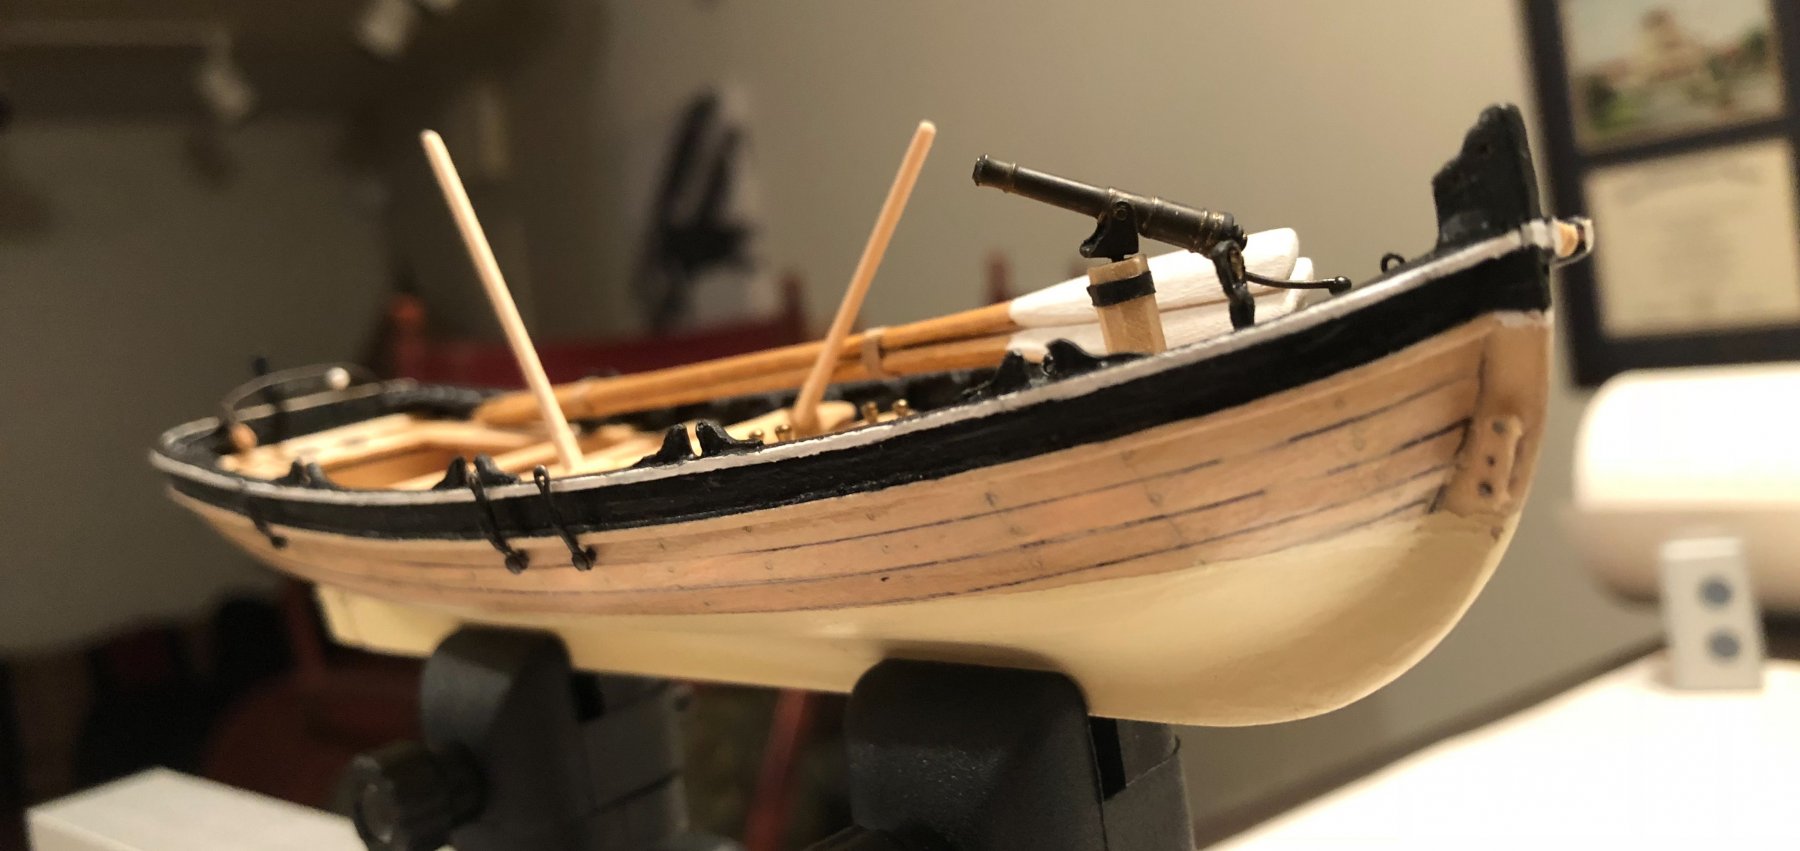
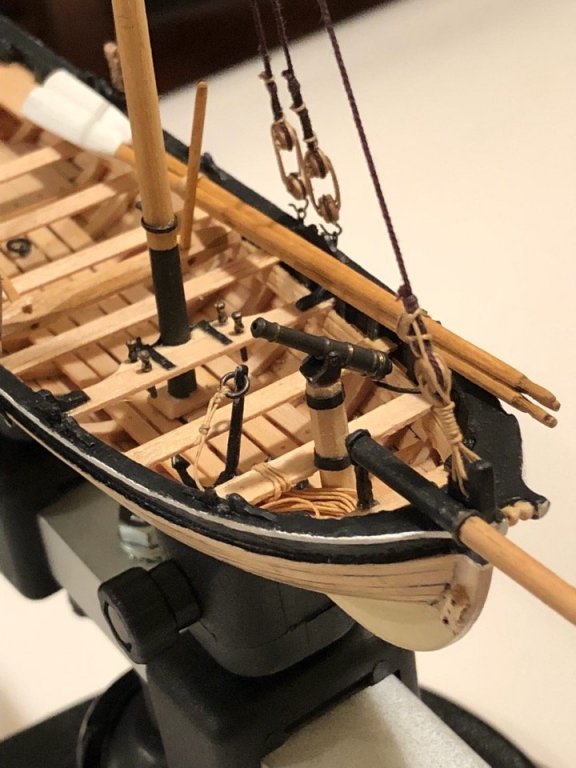
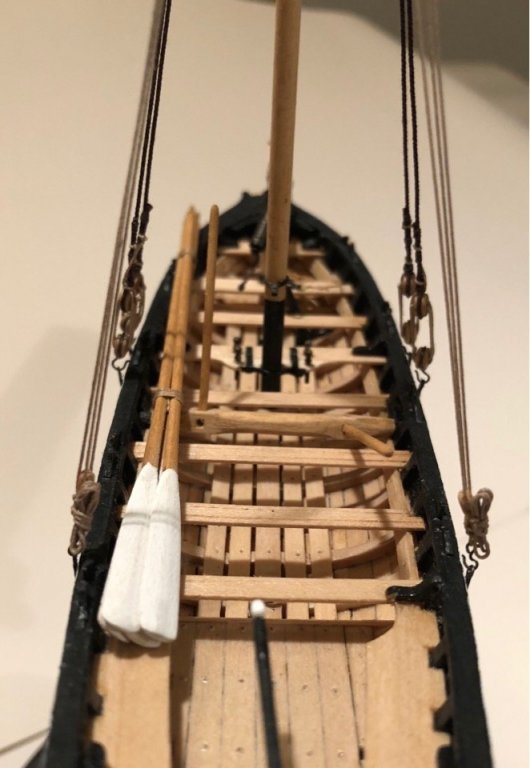
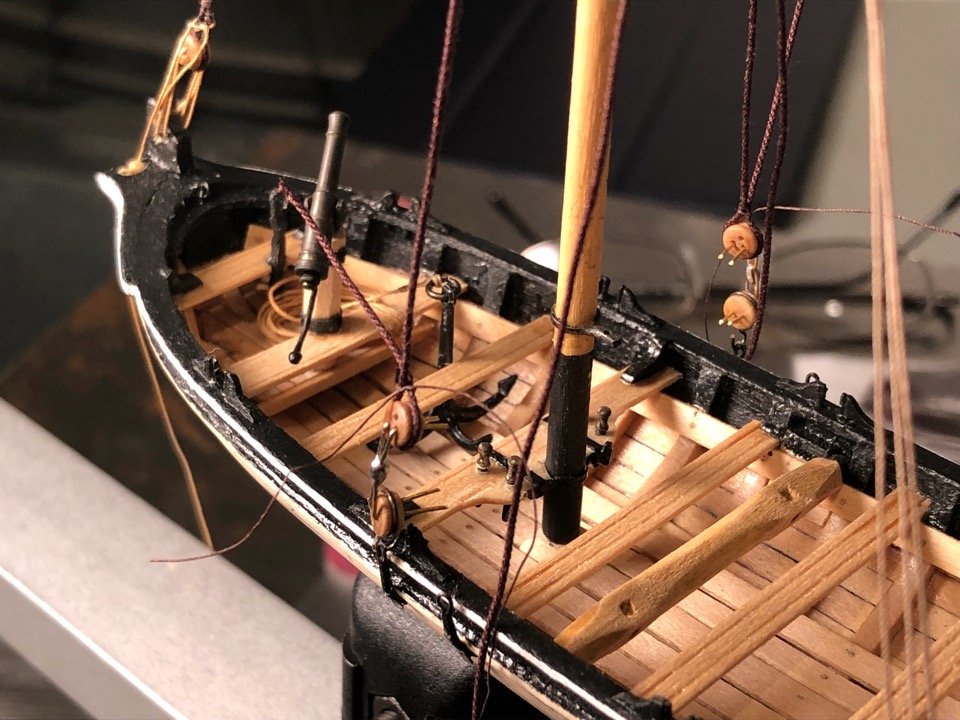
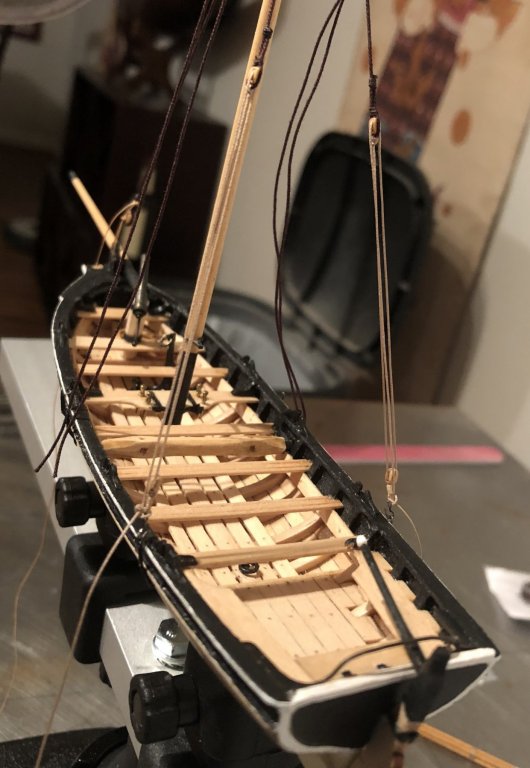
Thanks Lou for dropping in. It’s always nice to hear from you. I decided to rig the bowsprit and traveler. I made the traveler out of wire provided in the kit and attached the jib halyard with the small single block and hook. At this scale the hook is tiny, but I was able to mouse the end of the hook to keep it secure as it would have been done. I know, I have a sickness. 😃 The outhaul was rigged and passed through the sheeve on the end of the bowsprit then through the block on the stem and up into the bow to be secured to the forward thwart with the support knees. With the outhaul acting like a bobstay the bowsprit is surprisingly steady. On to the boom and gaff after the holiday weekend.
- 48 replies
-
- 13
-
-
- 18th century longboat
- model shipways
- (and 1 more)
-
Thanks Chuck, that will be a good compare contrast. I incorporated some of the changes you added to your 1:24 version to my current build of the 1:48 version....unwittingly of course. I guess great minds think alike. 😀 The hull shape is what it is, so I kept that or I would have built the hull from scratch. My build link is in my signature line. It isn’t the quality of your build, but then again, few are. 😉 cheers
- 421 replies
-
- 6
-
-
- medway longboat
- Syren Ship Model Company
- (and 1 more)
-
Looks great Chuck. I like the more full and round bow and stem as opposed to the smaller 1:48 version. The increased sheer is also a nice touch.
- 421 replies
-
- 6
-
-
- medway longboat
- Syren Ship Model Company
- (and 1 more)
-
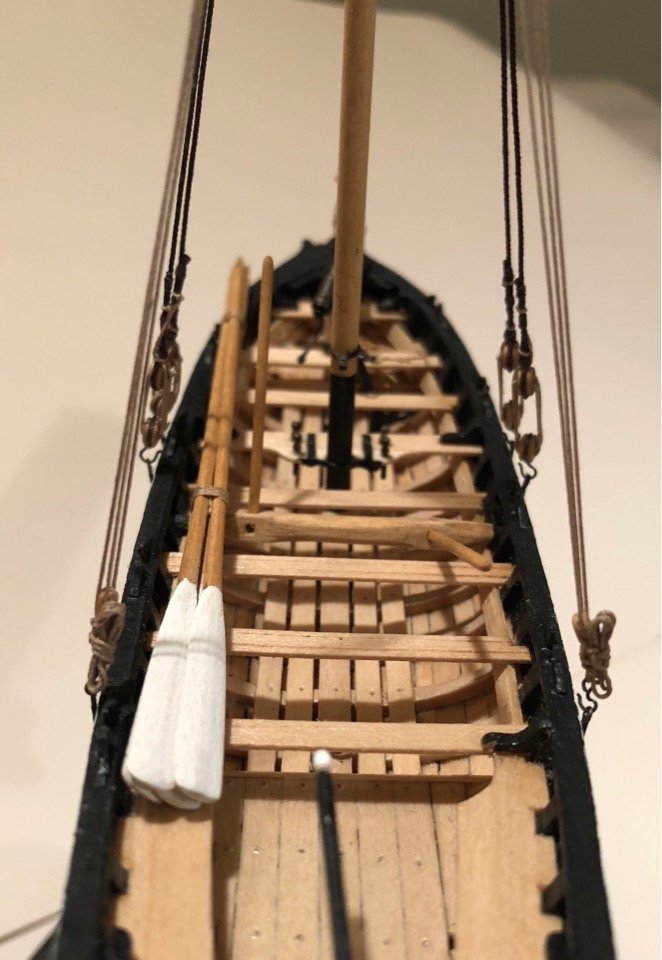
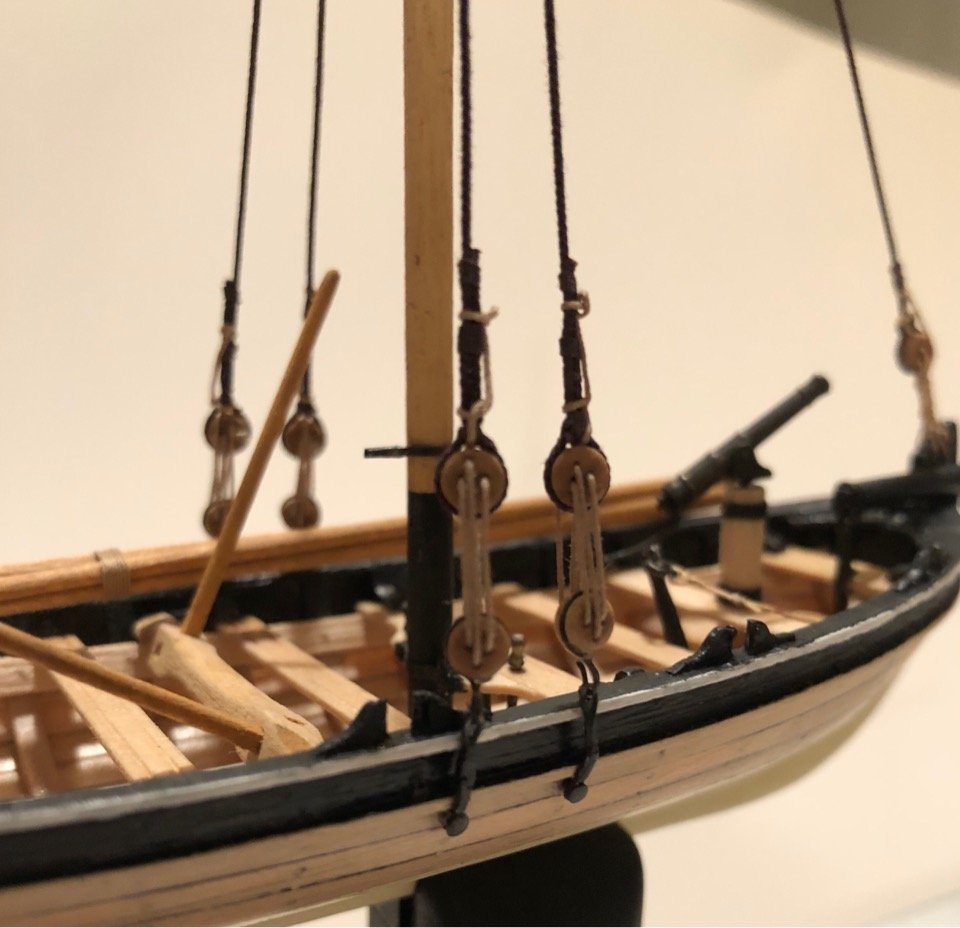
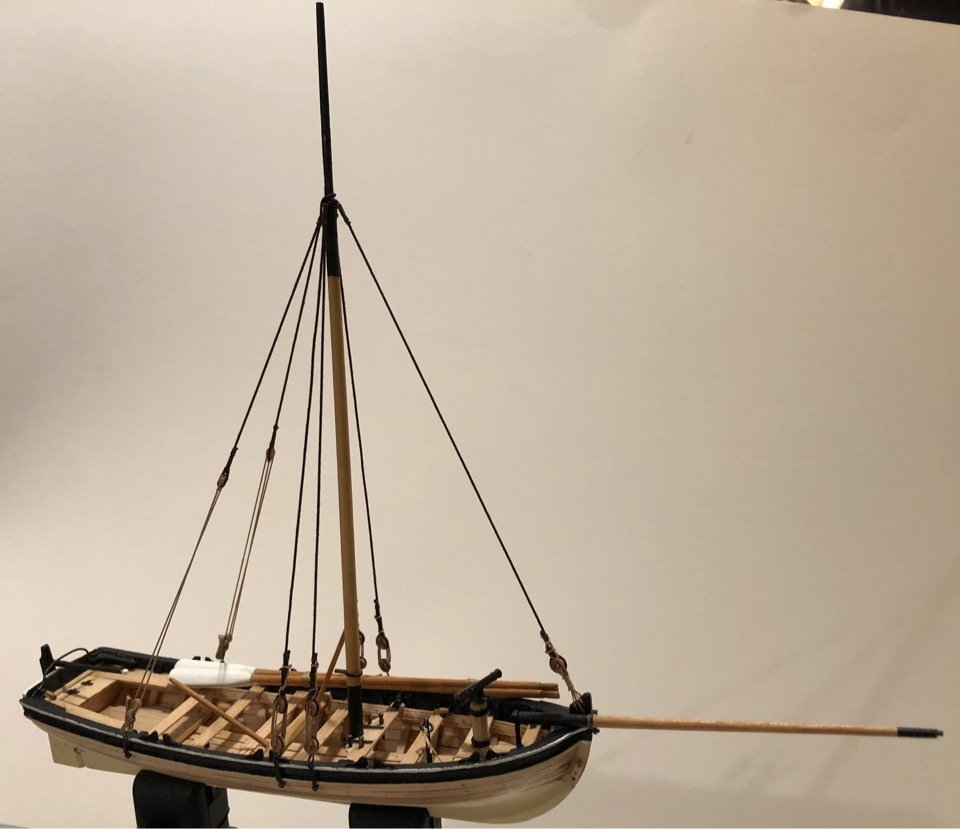
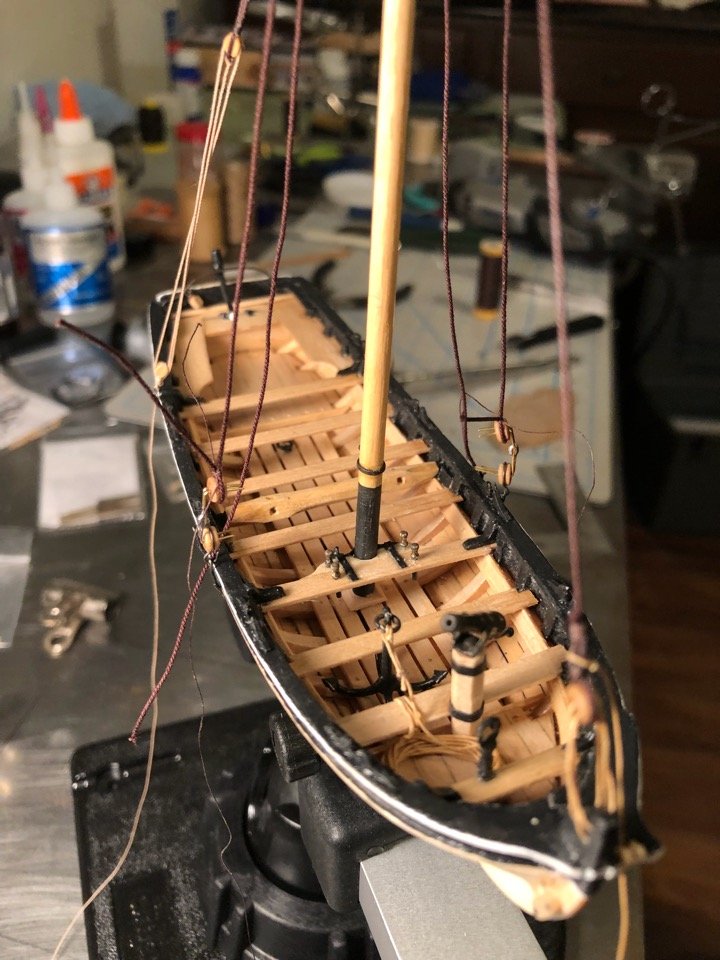
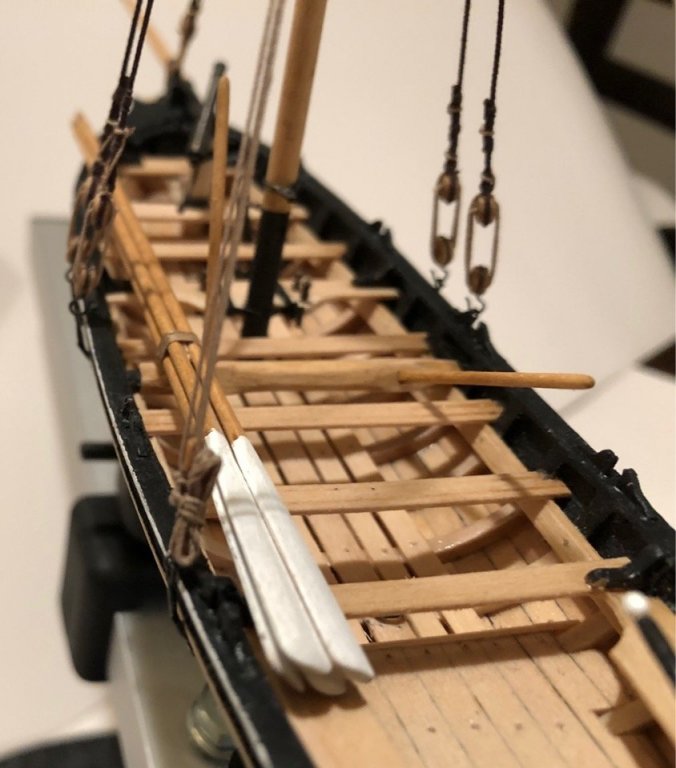
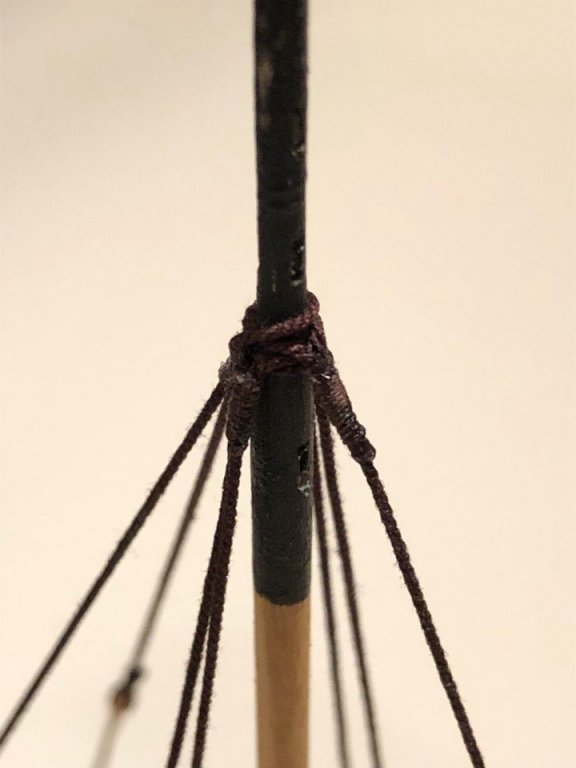
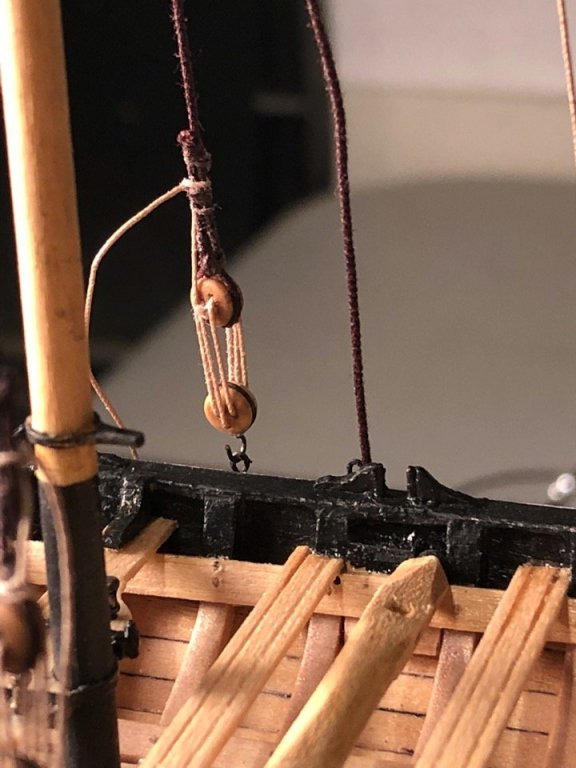
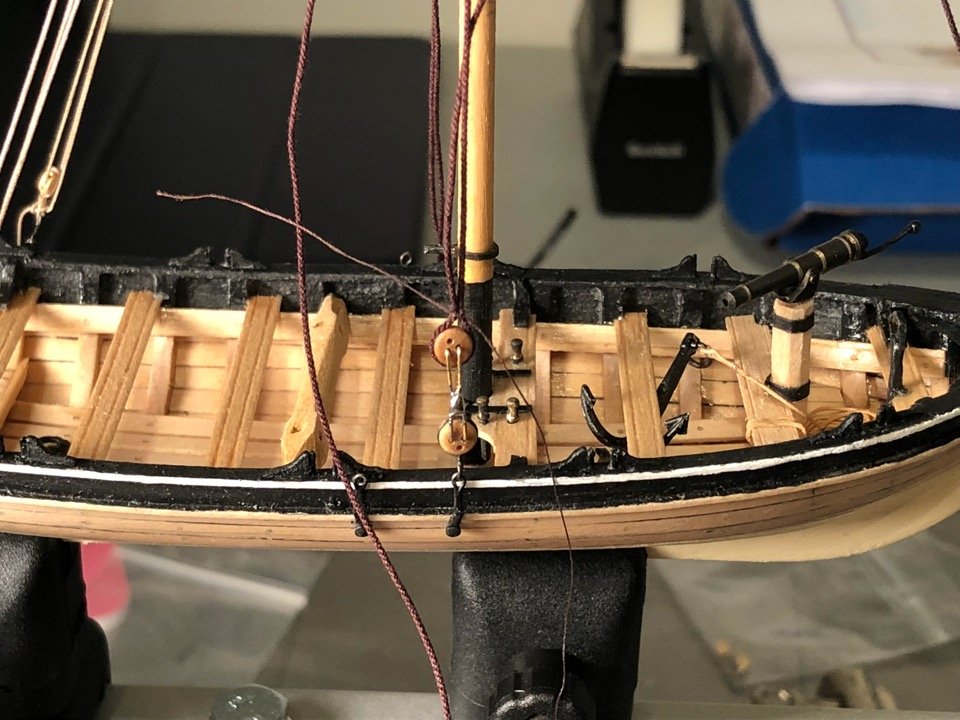
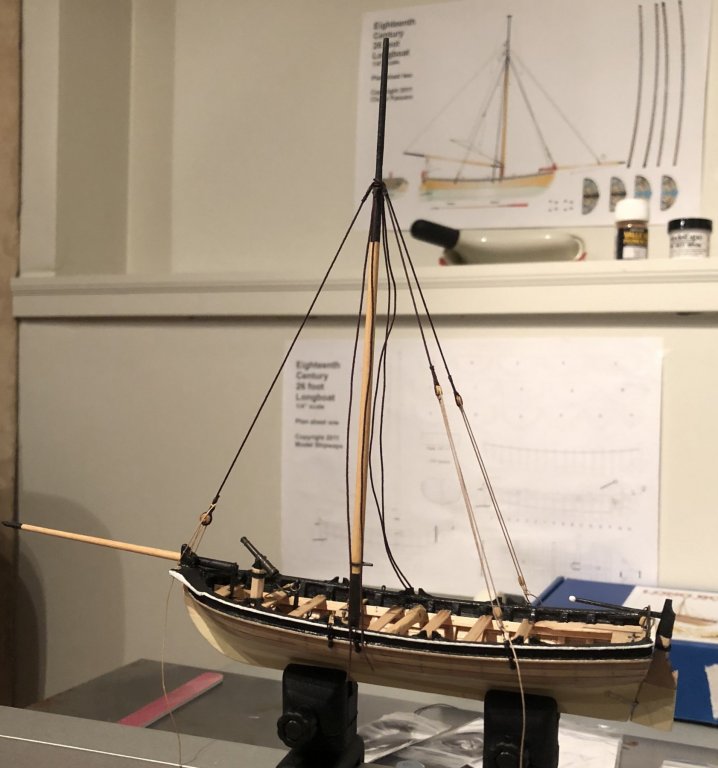
Standing rigging done today. 😀 On to the running rigging. This is such a small boat, the running rigging won’t take long. View from the bow. You can easily see the block on the stem for the outhaul and the grapnel and swivel behind the forward stay. View looking forward. You can see the backstays tied off and the rigging lashed to the block and hook. This was shown on the NMM Model and makes sense so I copied it. Port side view Starboard side view Standing rigging at the mast hounds Overall view. Now time to finish it up. Boom and gaff next with the jib halyard on the bowsprit.


- 48 replies
-
- 8
-
-
- 18th century longboat
- model shipways
- (and 1 more)
-
Excellent job BE! I like the careful and methodical false deck installation. Preparation and planning makes all the difference.
- 574 replies
-
- 4
-
-
- cheerful
- Syren Ship Model Company
- (and 1 more)
-
Lou, thanks for dropping by and you are very kind. Steve, thanks. I appreciate the comment.
- 48 replies
-
- 1
-
-
- 18th century longboat
- model shipways
- (and 1 more)
-
To give everyone an idea of how Alaskan Cedar ages, the below pic is of a ship I started in 2001. I then put it away in 2003 in a box. No sunlight on it, but it does have a light coat of Tung oil. You can see it has aged to a soft golden yellow. Very pleasing. The rest of the wood is ebony and holly. Let’s just say the ship has “weathered in frame” as they used to do. It’s about time it made it back to the lumberyard and onto the shipways to get finished. 😊
- 55 replies
-
- 15
-
-
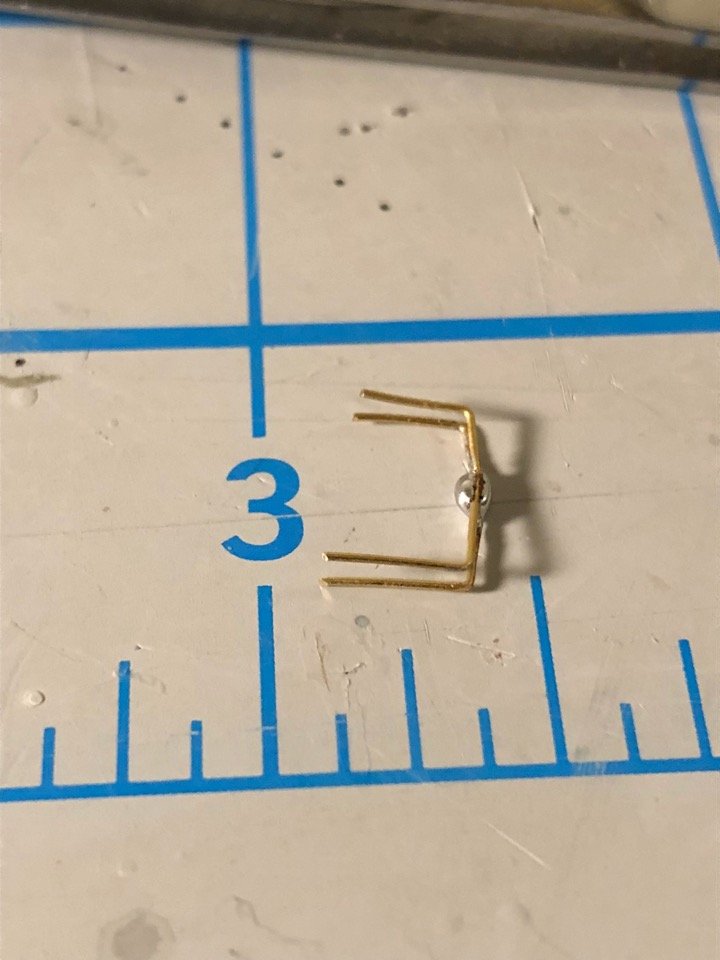
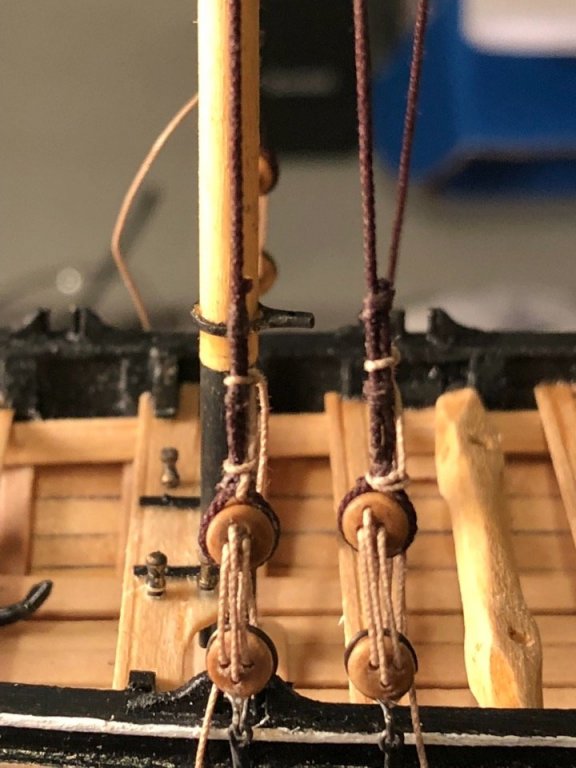
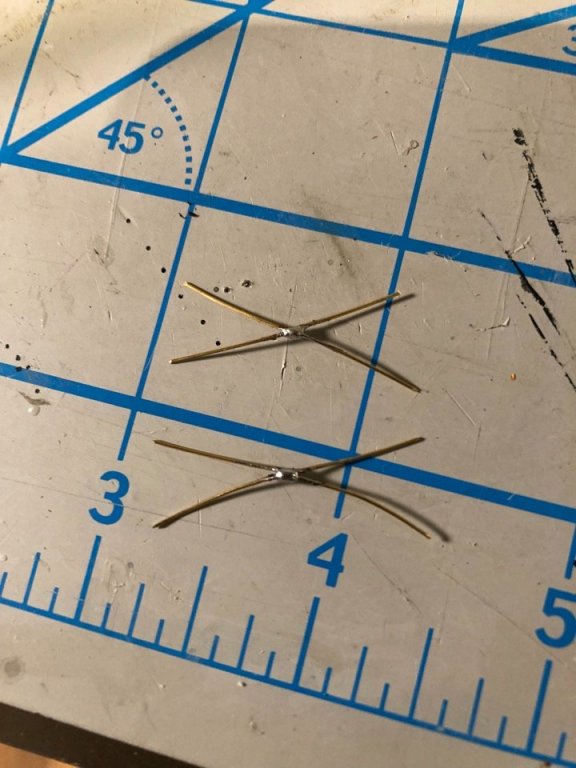
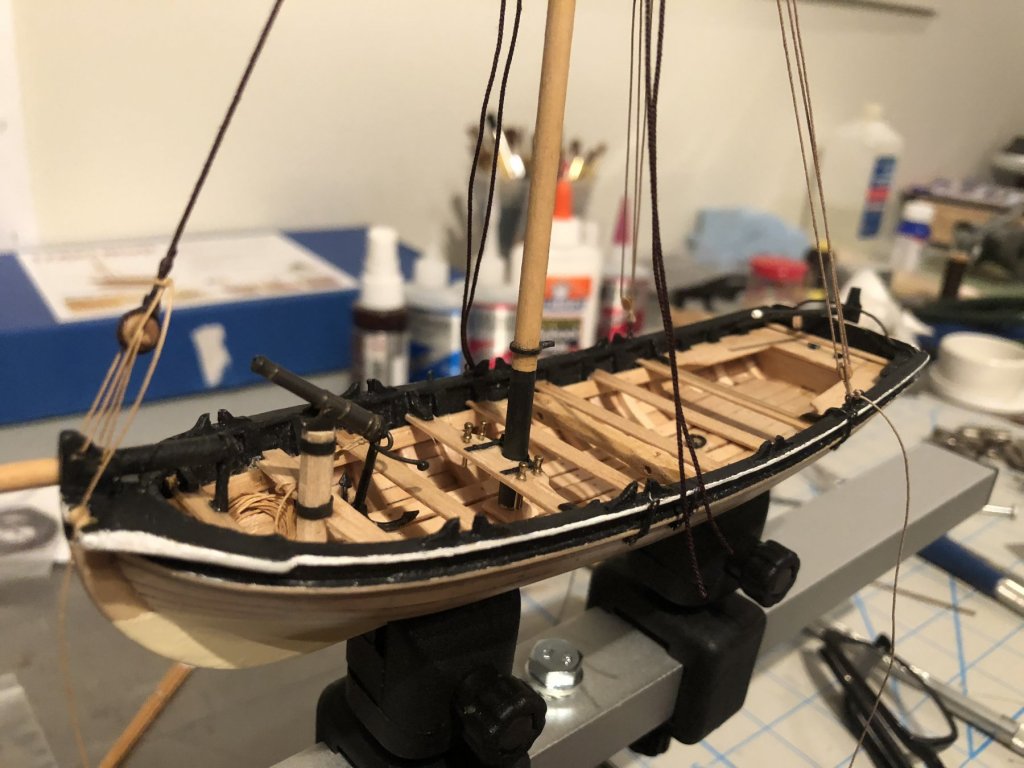
A bit of an update. Deadeyes seized on the port side and starboard side forward. One more to go. 😃 I made a convenient jig to hold the deadeyes in place. I know this has been covered in other threads before but for those that haven’t seen it I show what I did. I used some 26 gage wire that just fit in the holes of the deadeye and cut some short pieces about 1.5 inches long. Then put about a 30-45 degree bent in the middle. The amount isn’t important but it should be enough to separate the ends when you put the two together. I then soldered them together. See pic. Next I straightened them out and wrapped them around two small nails the distance I wanted between the deadeyes. This created the holding jig. I only made two, one for each side, but you could easily make more. It only took t minutes to make them. A pic showing them in action. Very convenient. A few more Then time to rove the lanyards. There are some good discriptions on how to set up the deadeyes in contemporary works. One of them is “The young Sea officers sheet anchor” by Darcy Lever. As the shroud cables cross each other and are seized at the top of the deadeye at the top, the short end should lay on the aft side port and the forward side starboard. The stopped knot of the lanyard will be placed on the opposite side and reeve though the deadeyes and lashed to the shroud above. The pic below is not finished on the starboard side. The lanyard is only tight to check the tension and spacing. But you can see the bottom deadeye hooked to the chainplate. These extreme closeups are very unforgiving. 😥 I also drilled another hole in the stem for the stay lanyard. After close inspection of the NMM model I noticed there are three holes, not two. Lanyard set up and seized to the stay. A couple of other spare pics for setting up the deadeyes. Enough for now. Enjoy.


- 48 replies
-
- 11
-
-
- 18th century longboat
- model shipways
- (and 1 more)
-
Thanks Lou, I appreciate your kind comments. You are correct, but these generally were not longboats, but larger sloops or schooners around 40 tons that they carried as frames in the hold. The Columbia carried the Adventure in her hold and it was assembled South of Nootka Sound, B.C during the winter of 1788. The first ship built on the PNW coast. All the other timber was sawn on site by their carpenter. Wow, what a job that must have been! 🤪
-
Nice job Lou, i think one of the reasons edge bending becomes too difficult is when the planking is thicker than 1/32”. I seem to remember Chuck saying that he typically uses stock that is about that thickness. Much thicker than that or more than 1/16” gets real difficult. It’s better to spile then I believe.
-
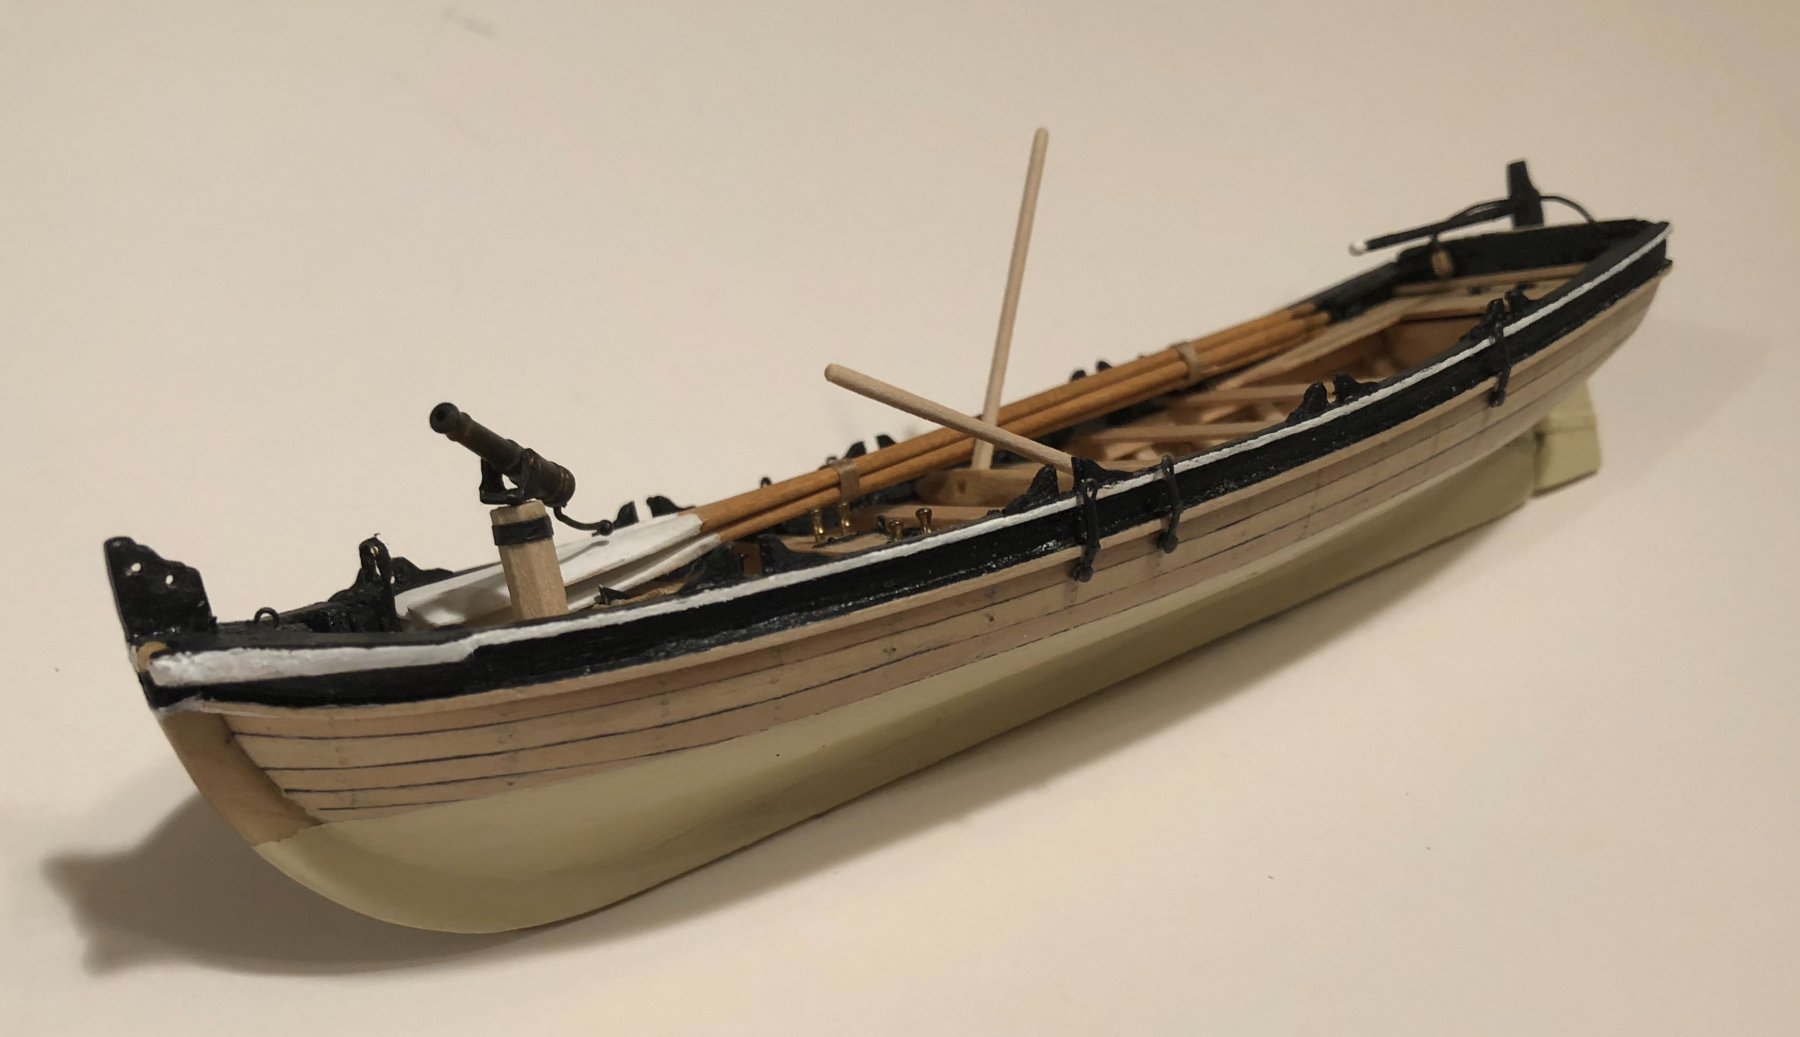
I forgot to mention for the rigging line and blocks I’m using parts from Syren Ship Model Company. The stuff provided by Model Shipways in this kit are about the cheapest, crappiest stuff I’ve seen. Definitely low grade nylon rigging line. So it helps to upgrade these or make them yourself for a much better look. Heres a pic of Syren upgrade items.
- 48 replies
-
- 7
-
-
- 18th century longboat
- model shipways
- (and 1 more)
-
Tasmanian, Thanks for visiting. You should have an enjoyable time building this boat. Be sure you support the frames well when you fair the ribs for the planking and take your time. This fragile small boat is not an inexperienced build.
- 48 replies
-
- 3
-
-
- 18th century longboat
- model shipways
- (and 1 more)
-
Fright, Thanks for visiting my thread and the complement. I hope this boat will be a little bit different then the standard longboat built by many. Cheers
- 48 replies
-
- 2
-
-
- 18th century longboat
- model shipways
- (and 1 more)
-
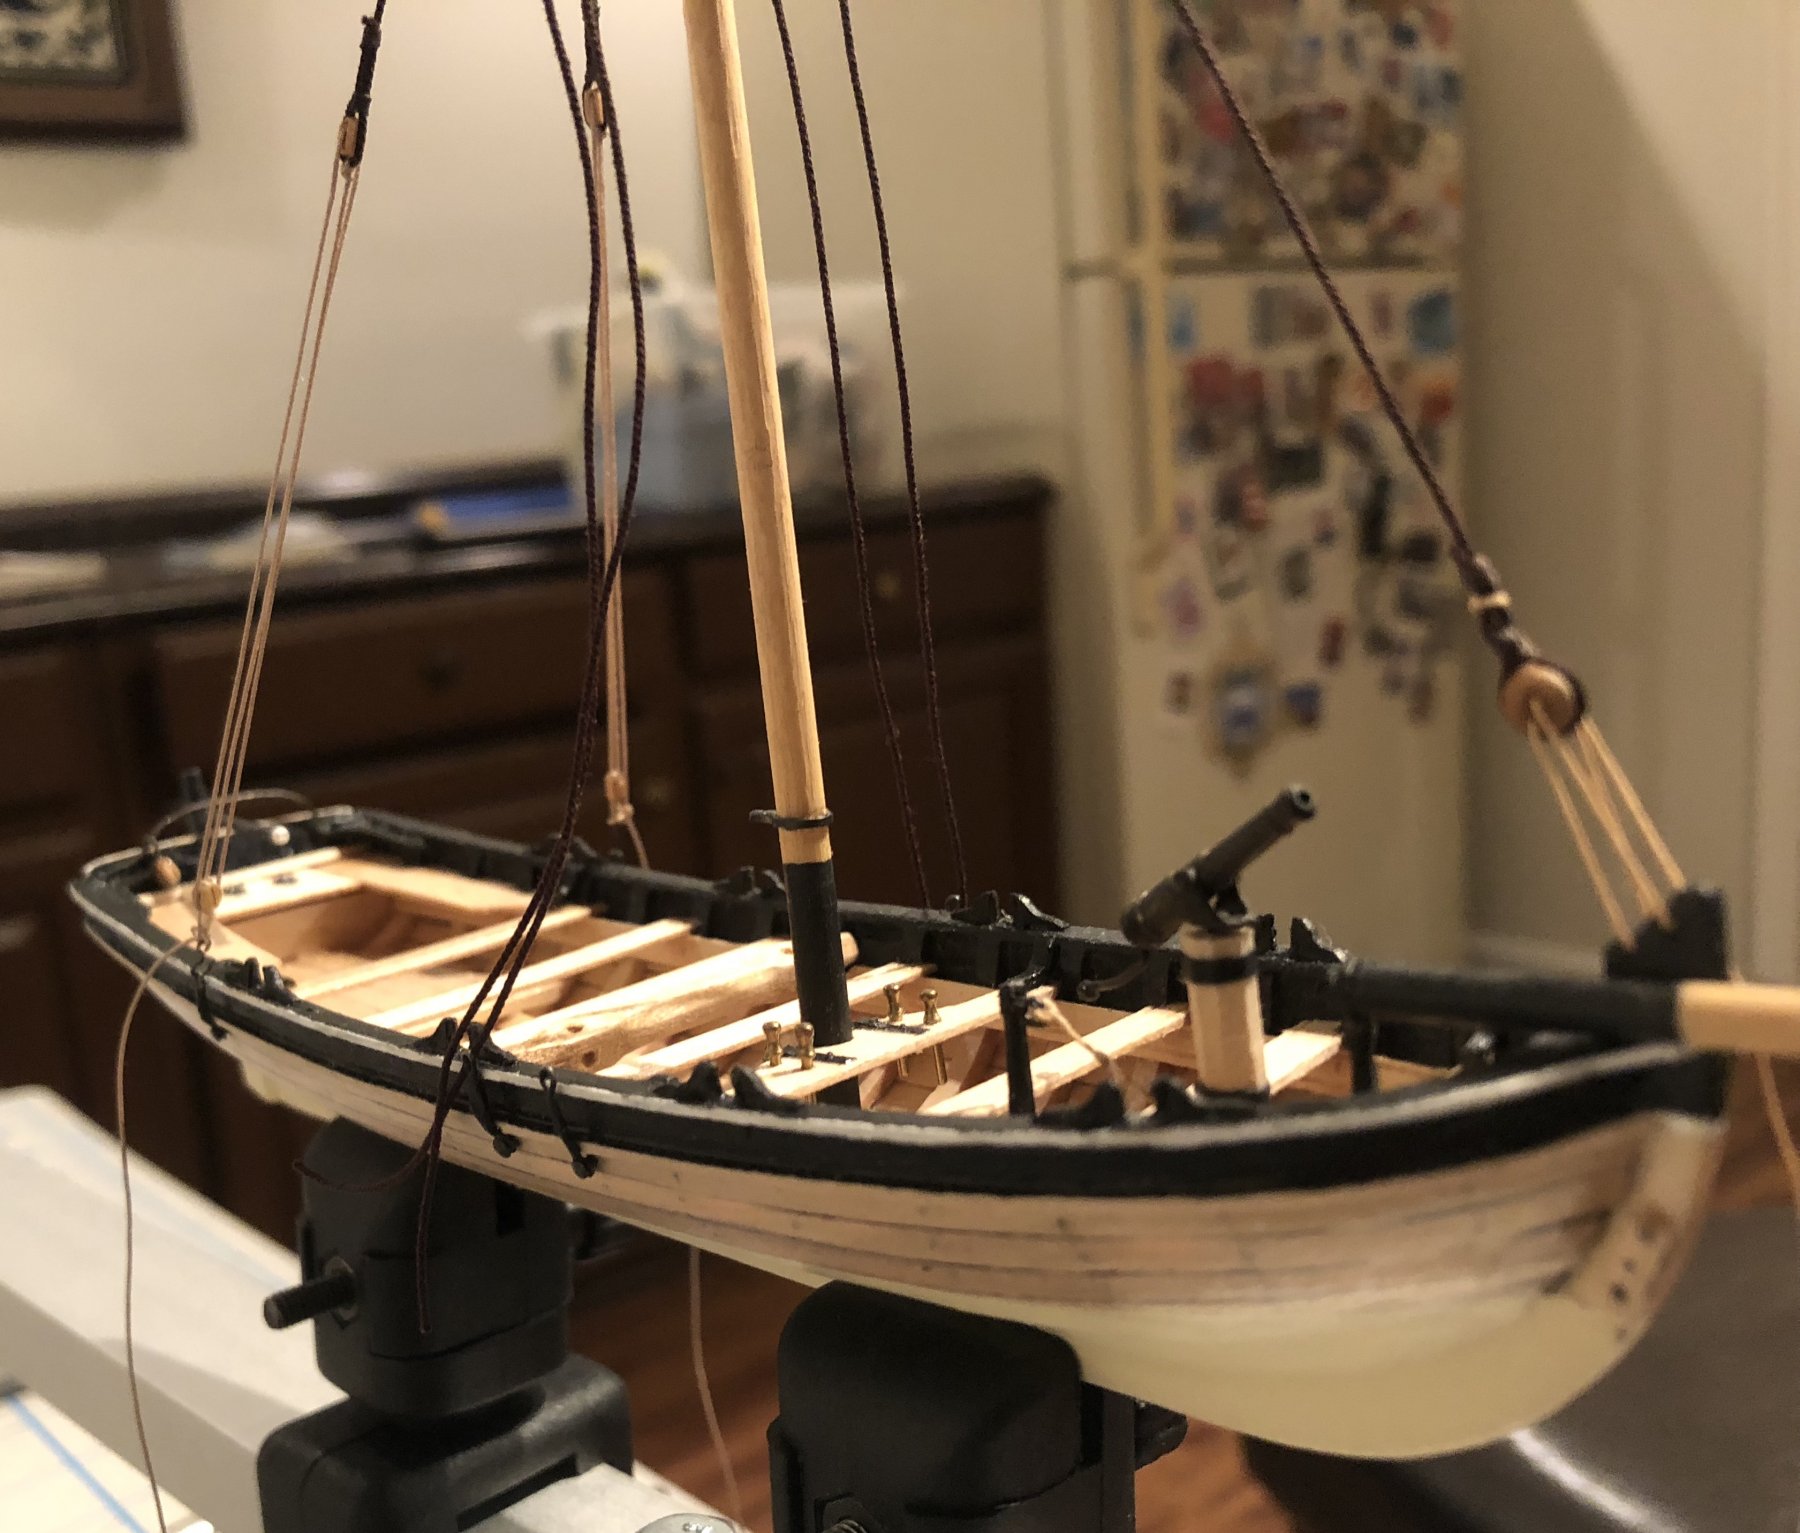
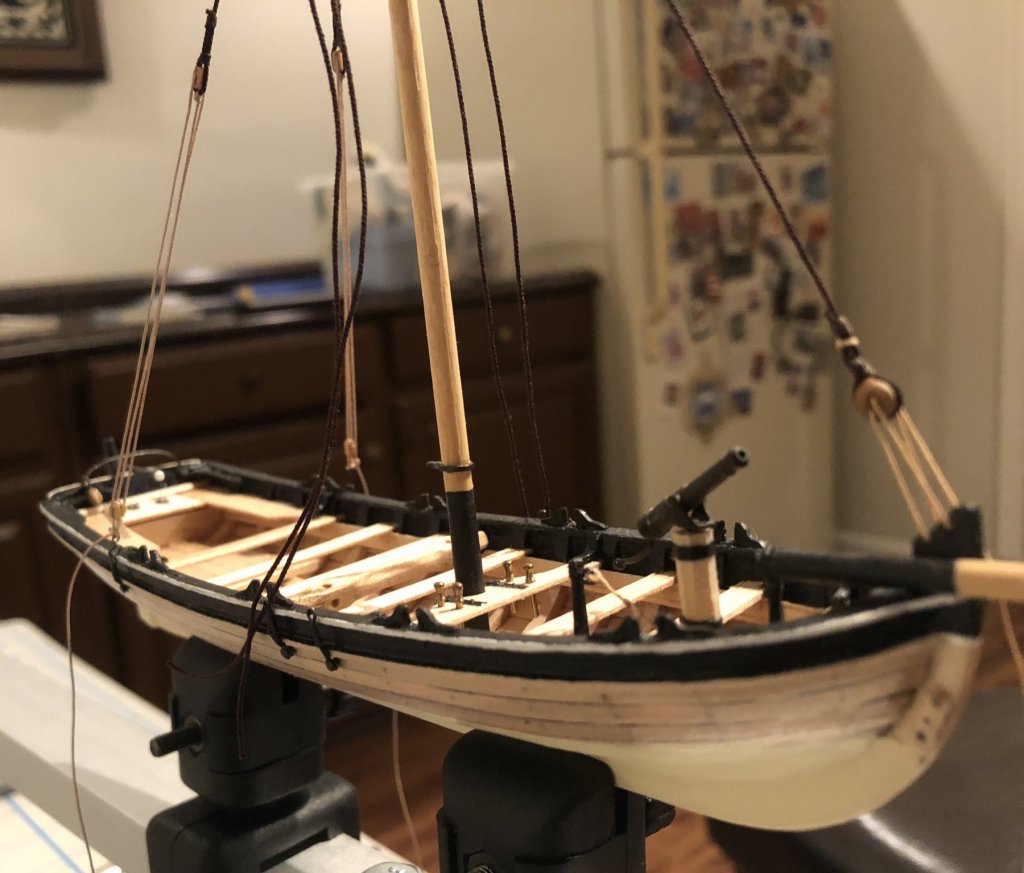
My favorite part is rigging. My work table is nothing special, just a card table in the basement and a vise. Most of the boat was made with this arrangement which goes to show that you don’t need much to build one of these boats. 😉 I started with the stays. With the forestay and back stays added it will hold the mast in place pretty well so I can seize the deadeyes in place without everything shifting all over the place. I made most of the standing rigging off the model so I could slip them over the masthead in the correct order. The metal fittings and mast cap at the top are not fitted yet.....err perhaps I should say they were removed once I found out I couldn’t get the standing rigging over the mast head. 😟 I’ll add them later after I’m sure everything is in place. All the lanyards are tied off temporarily until I get the deadeyes turned in and can adjust everything. Below you can see the backstays hooked into the eyes of their respective chainplate. Another view from the bow. The belaying pins still need to be blackened. The bowsprit is only sitting in place. A block has been added to the horse aft for the main sheet. Next I’ll turn the deadeyes into their respective shrouds and hook them onto the plates. That’s all for now.
- 48 replies
-
- 13
-
-
- 18th century longboat
- model shipways
- (and 1 more)
-
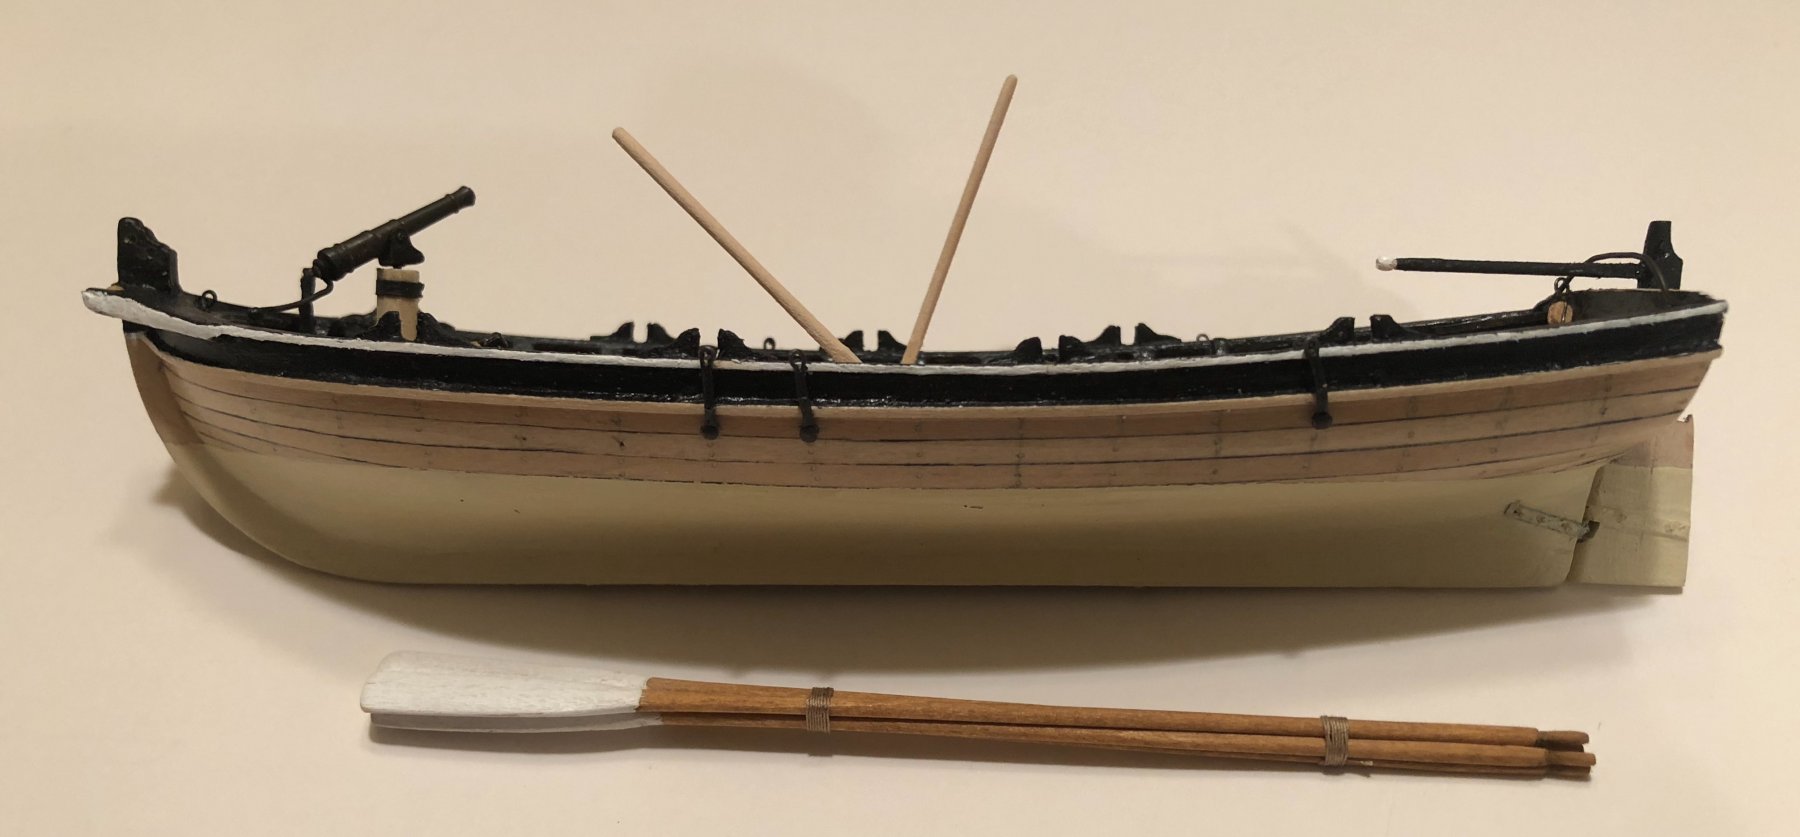
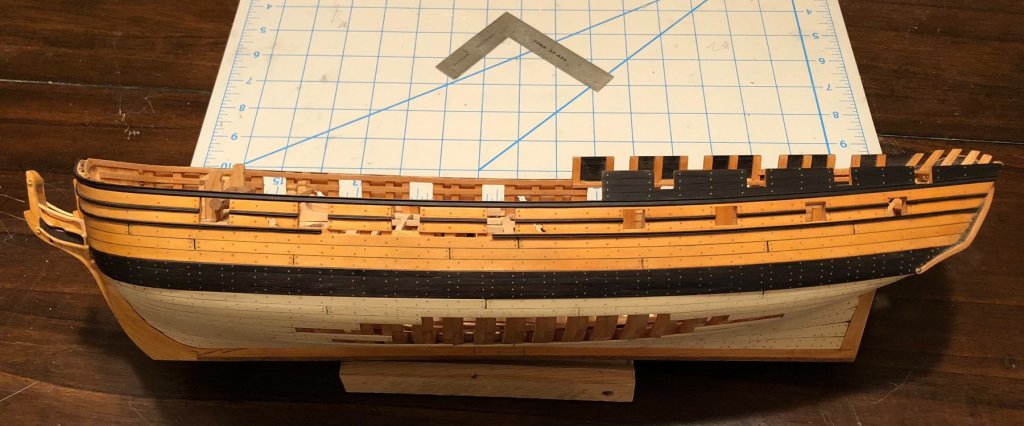
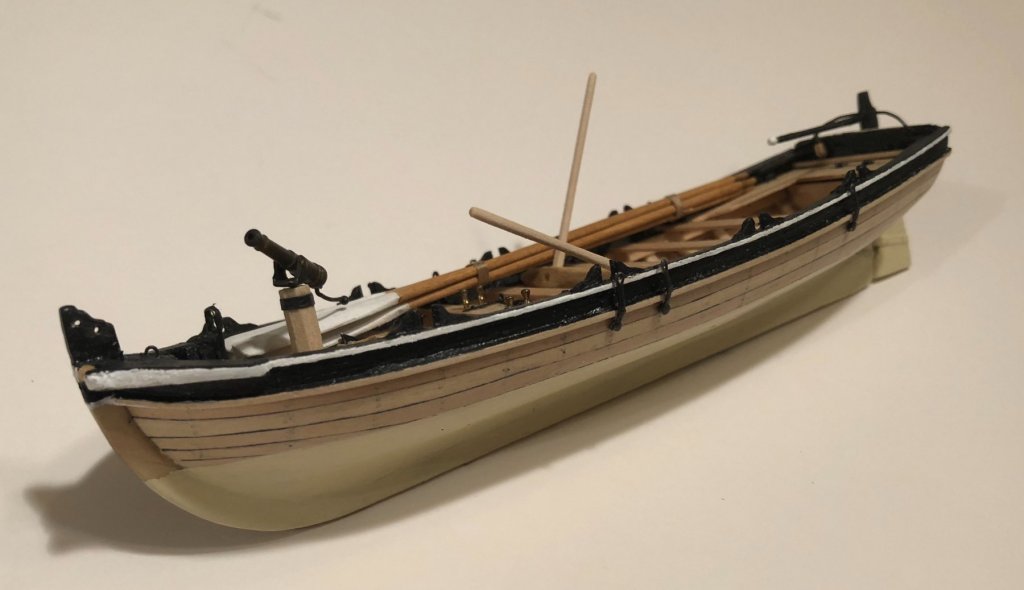
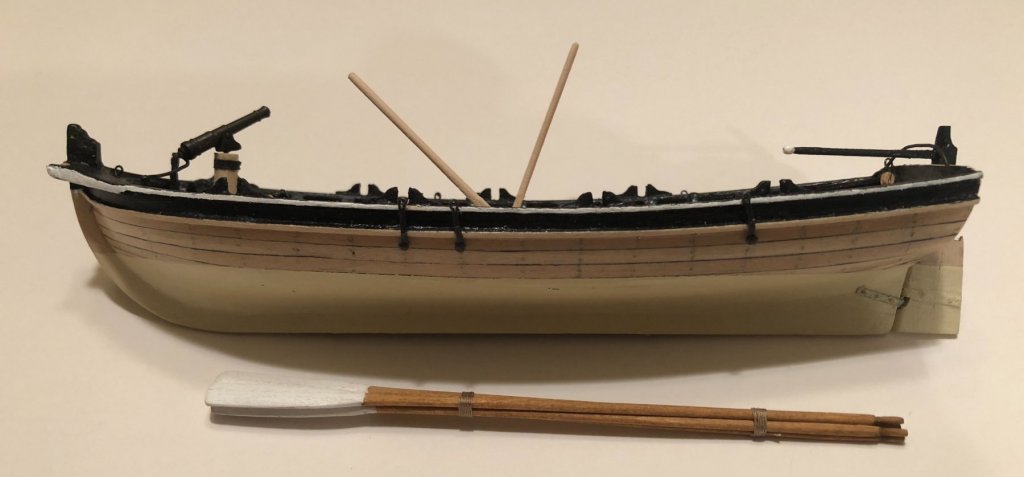
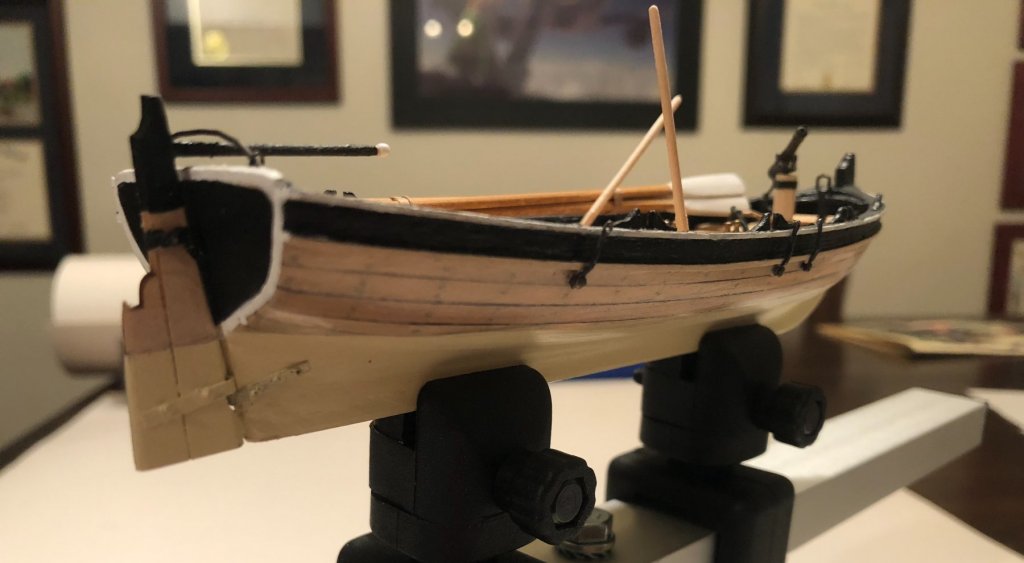
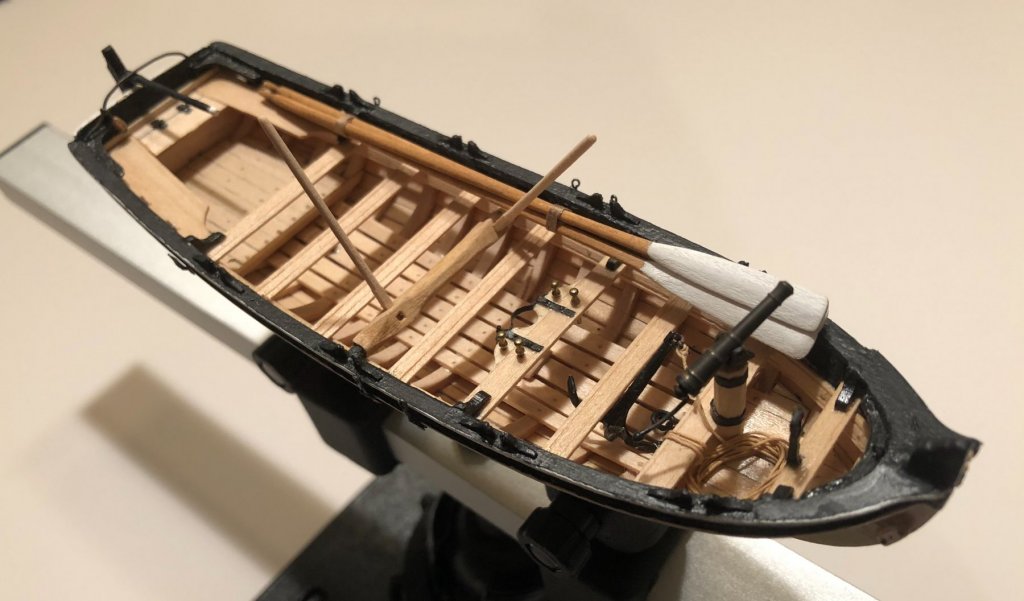
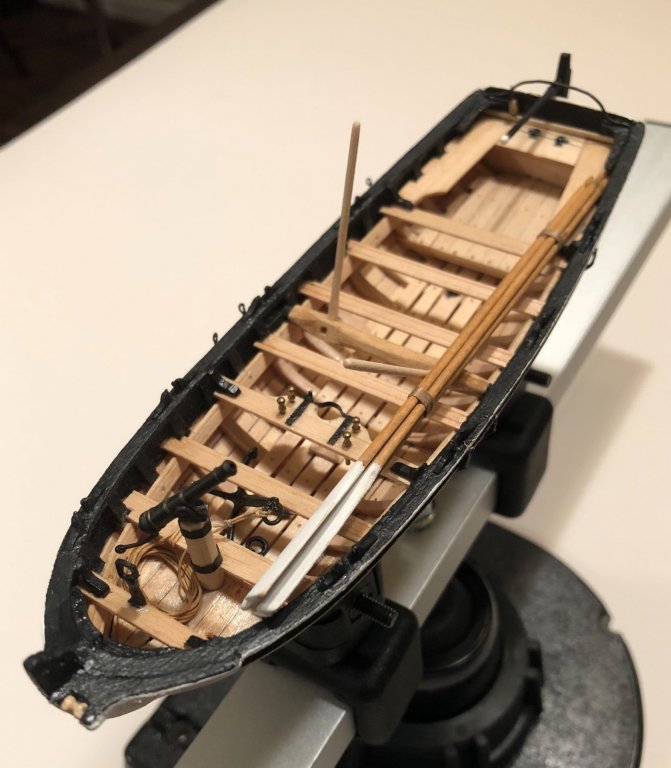
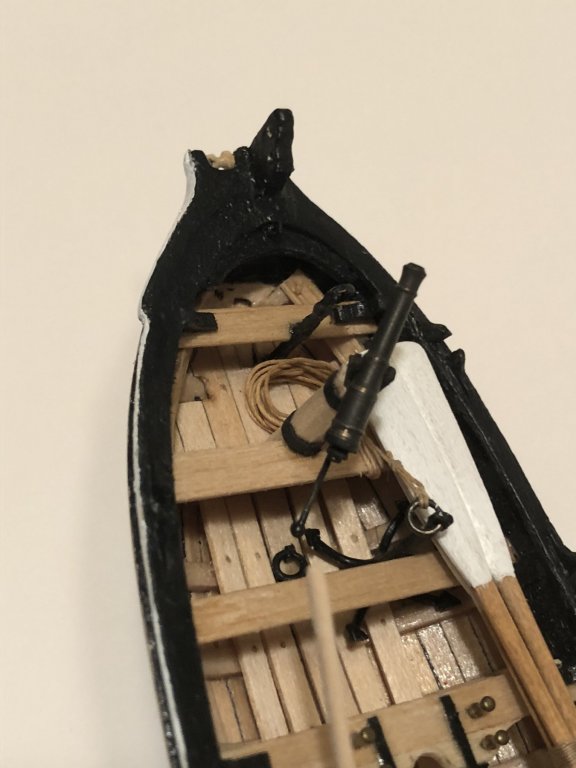
Hello fellow shipbuilders I’ve been a member of MSW for awhile, but while I have gleaned considerable mounts of techniques and information, I haven’t “given back” by contributing a build thread. So I figured I’ll dip the proverbial “toe” into the lake of knowledge and wade gently into the wash of expertise here in MSW. Although the initial build of the hull is finished, I will be rigging the model and will continue to post my progress. I have modeled for years and my passion has waned from ships to giant scale RC aircraft and now back to ships. I will admit that my ship modeling has increased my scale fidelity in aircraft considerably, but my first love is the sea so the ships call again. So hear I am. Jumping back into the ship realm after 15 years of dormancy and to be honest, it feels like coming home after an extended trip. I will try my best to make an acceptable model but doubt that it will ever touch the level of perfection seen by many on this site. The subject is the 18th century longboat designed by Chuck Passaro in 1/4 scale (1:48). However, it will be a blank canvas to serve as inspiration for the true subject, an 18 century merchant longboat used in the Pacific Northwest fur trade circa 1790. I never build kits per plans. I like subjects that are unique and that include some research. So the kit will provide a starting point for departure. My main interest per my signature line below are the historical and exploration vessels of the PNW coast. As such, I figured it would be interesting to build a longboat that could theoretically be used from a frigate like Columbia Redidiva (name sake of the Columbia river in Oregon). Some planning assumptions: The larger ships that the boats came from were small, so the longboats, cutters, yawls and jolly boats that accompanied them were small as well to fit between the masts or on deck. Reviewing their logbooks, these small boats 16-24 feet were constantly employed shifting and setting the anchors for warping or mooring in the treacherous tidal and unknown waters. Typically the boats were armed with swivel guns and muskets. Sailing rig seems to be either a gaff or lug sail rig that was preferred. The boats needed to be very sea worthy due to the unpredictable weather, tides and heavy usage lightering water casks, wood, furs and supplies to and from shore. Due to unknown shoal water throughout the area, these boats were typically employed trading for furs with the natives in shallow water while the larger ship stood off the lee shore in deeper water. This offered the boats the opportunity to explore and operate independently for a considerable time. Terrifying if you think about how small they were in a hostile land halfway around the world will little supplies or support if stranded. As far as paint or preservation, merchant ships were typically cheap and paint as a luxury and was used sparingly for preservation. Paint was expensive and cut into profit. Reviewing logbooks showed that the typical paint carried was lampblack, Spanish brown, and varnish. Enough of my blathering........ I built the basic hull earlier before I decided to do a build thread. Sorry, no build picks. But I assure you that the construction was the same as all of the other 18th century longboat kits on this site. No real revelations or deviations from the basic construction. I used only the basswood parts provided in the kit. If I had it to do over, I’d probably mill my own yellow cedar and boxwood for the planking and parts. The basswood is soft and a pain to work with and the grain is too fuzzy. One of my least favorite woods. Here’s the hull built. I’ll point out some of the unique features. Paint was lamp black, hull white and satin poly-c. I added a bit more sheer than the plans called for simply because I like the look and some of the plans from NMM had the amount I was looking for, so I figured it could be justified. Instead of thole pins supplied in the kit for the oars, I used another option that is typical of the time period instead of a washboard. I’m not sure what you call it. Why did I use this style, I don’t know, I like the look 😃. There was quite a bit of discussion on some other threads about placement of the horse. I chose the option of above the tiller. There are plans circa 1800 that show this so it fits and seems logical. You can also see the tree nails used in the planking. Holes drilled and filled with hobby putty as shown by Chuck in his builds. I typically like to use actual treenails but at this small of a scale with it being so fragile I decided to give Chucks method a try. It worked well. Below you can see that I added a post for a swivel forward of the second thwart, let into the raised deck into the keelson and secured and notched into the supported thwart. The swivel gun itself was purchased from Chuck at Syren Shipmodels. The handle, was 24 gage wire bent around the pommel and blackened. The metal supporting bands on the post and swivel support carriage were made out of paper and painted black. You can also see that I added a roller to the bow like BobF did with his boat. Very functional considering the heavy work that the boat would be doing moving anchors etc. The grapnel anchor rests on the floorboards. The chainplates have eyes for hooks instead of strapped into the deadeyes. This allows the rigging to be set up and taken down quicker. The NMM model is set up like this. Finally, I added a block onto the stem for the outhaul for the jib. If you look at the NMM model it has this feature but isn’t rigged. If you look closely there is some damage to the bowsprit so I assume the rigging was probably repaired at some point and perhaps not rigged. There are contemporary paintings and plans showing this out haul rigged through a block such as this. I’m assuming that it helped hold the bowsprit when the jib was rigged in brisk winds, acting like a bobstay. A few more pics So with the hull complete its time for the rigging. The next installment will start where I’m currently at. We are now all caught up. I hope you have enjoyed it so far.

- 48 replies
-
- 14
-
-
- 18th century longboat
- model shipways
- (and 1 more)
-
Mike, I like that you toned down the red with a little burnt umber. I think too many people use modern red colors that were just too bright for what they had available back then. Looking nice.
- 607 replies
-
- 4
-
-
- winchelsea
- Syren Ship Model Company
- (and 1 more)
-
I concur with all the aforementioned comments. We are all our worst critic. Every time I make a part or look back at previous old work I see a myriad of issues and say to myself, “Man I suck!” 🤪 But it I persevere and slowly my modeling gets better....I hope anyways. 😃 So keep going and keep posting Lou, we are all happy to see progress. I only laugh at myself. 😂