hollowneck
-
Posts
1,589 -
Joined
-
Last visited
Content Type
Profiles
Forums
Gallery
Events
Everything posted by hollowneck
-
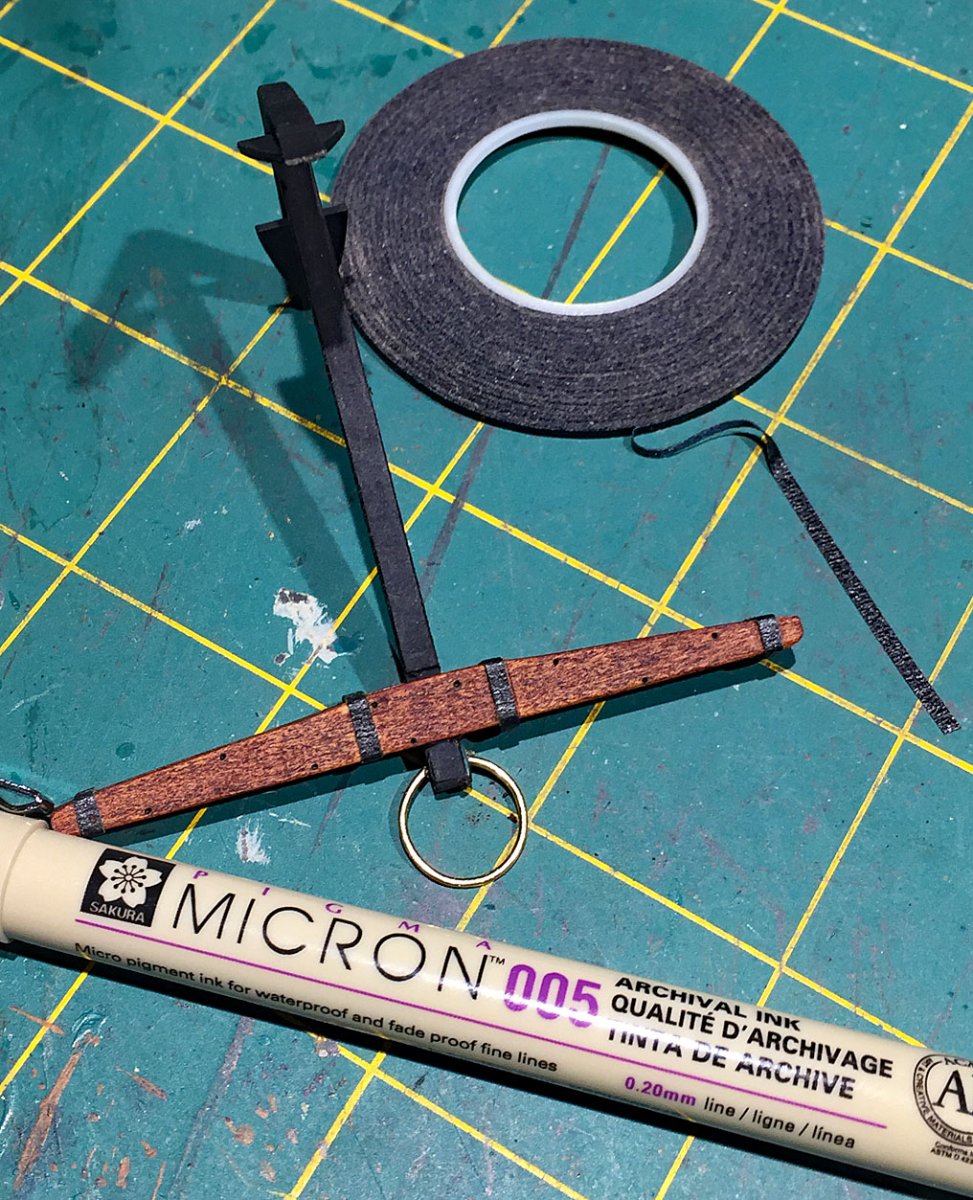
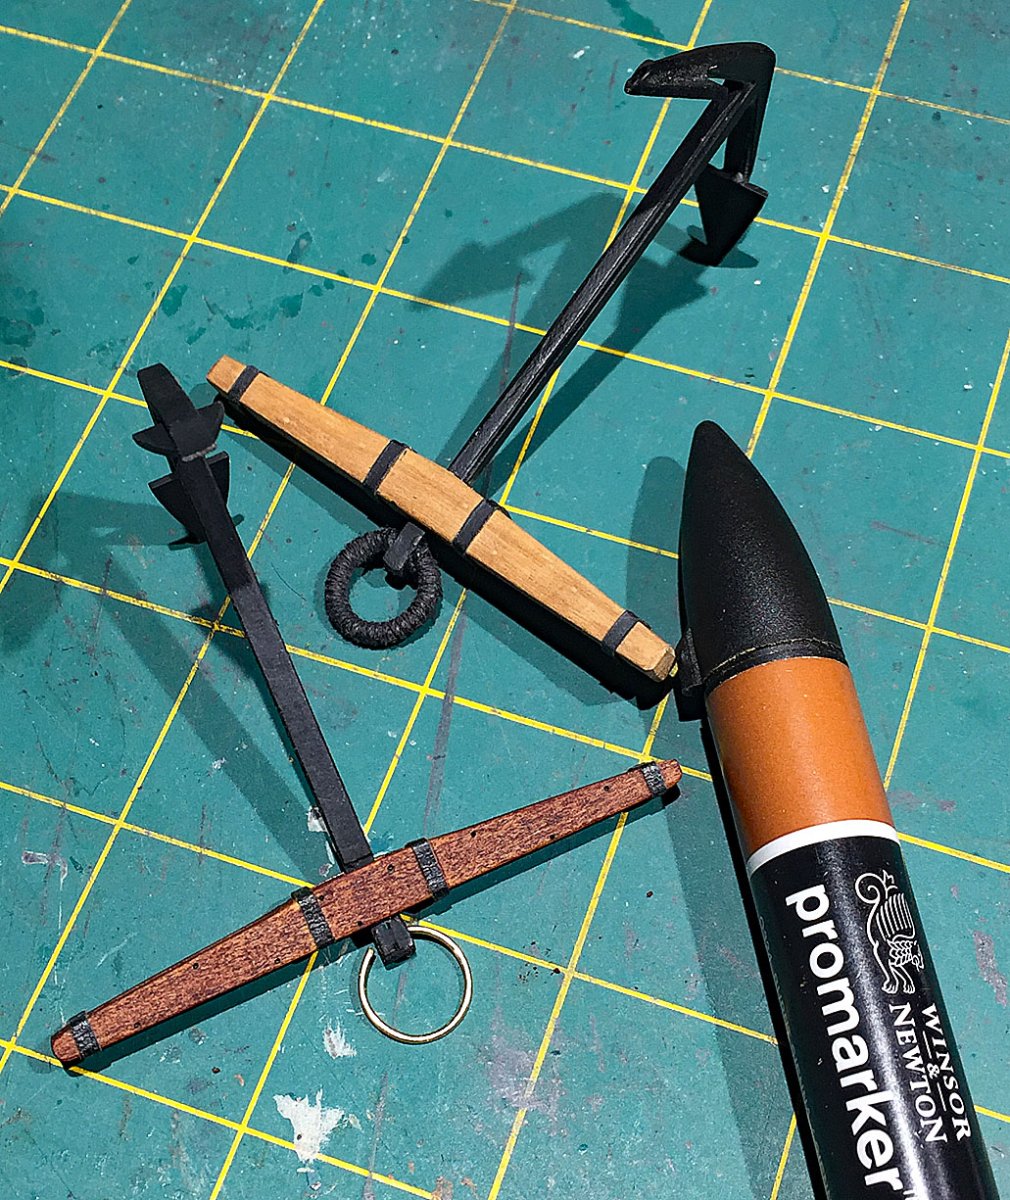
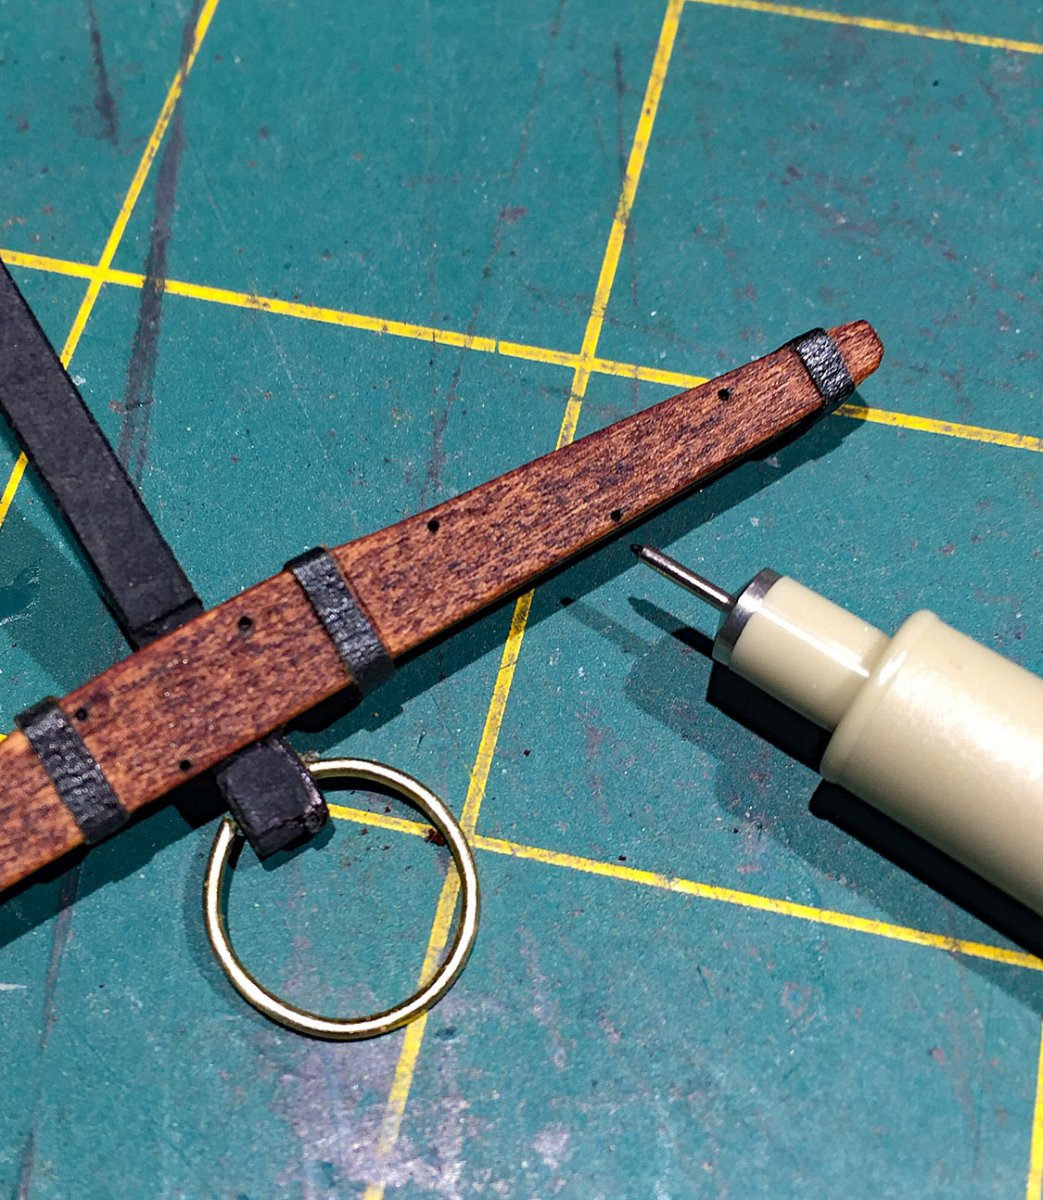
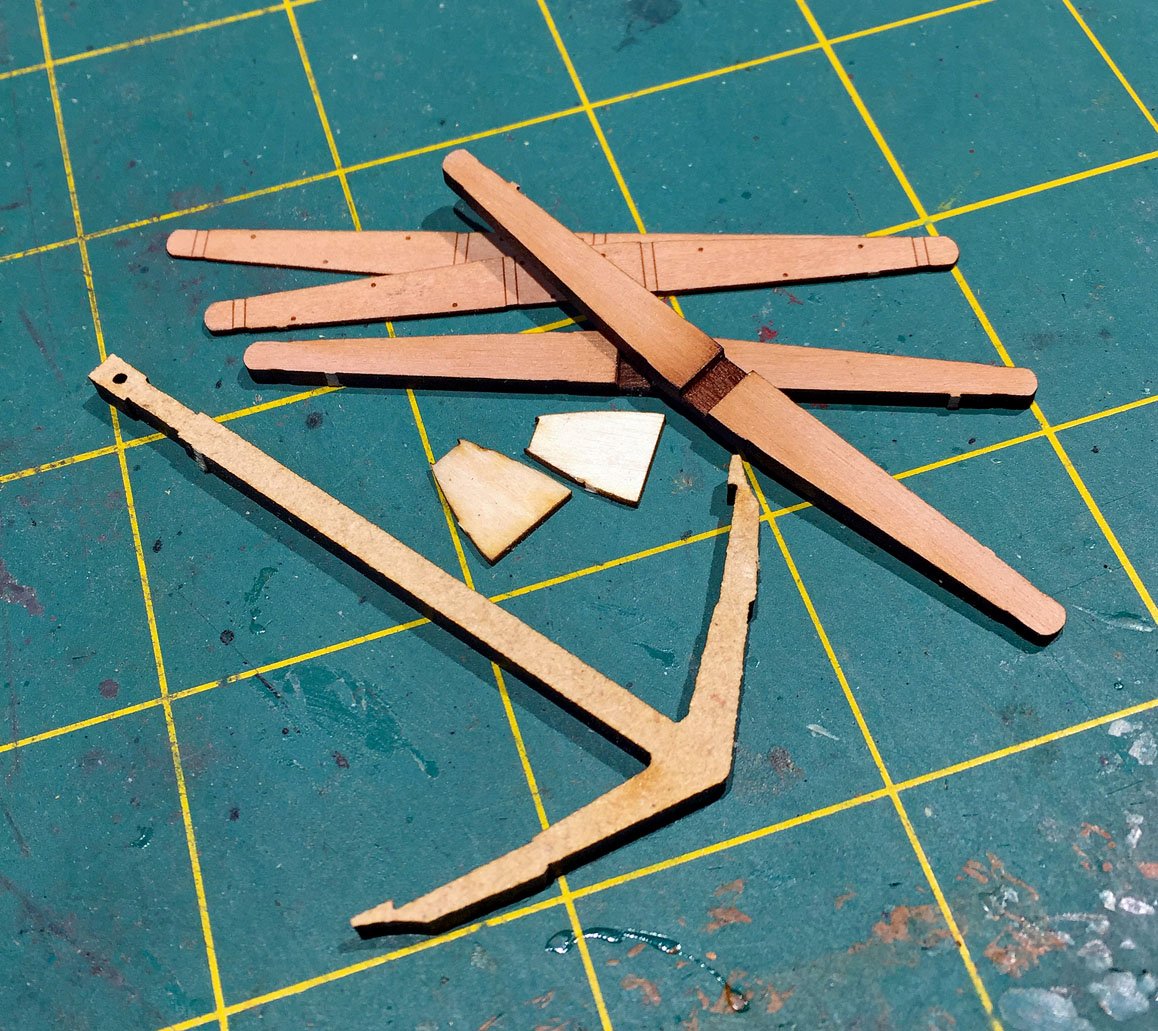
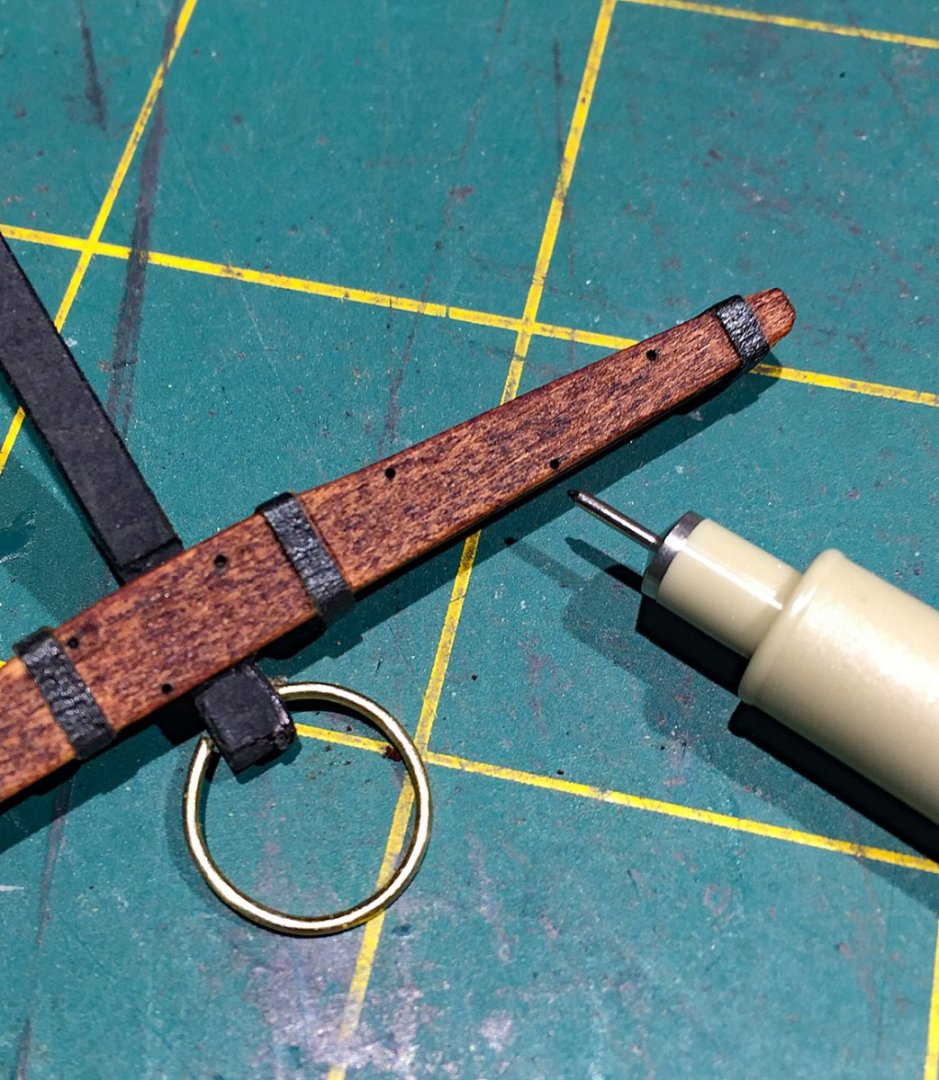
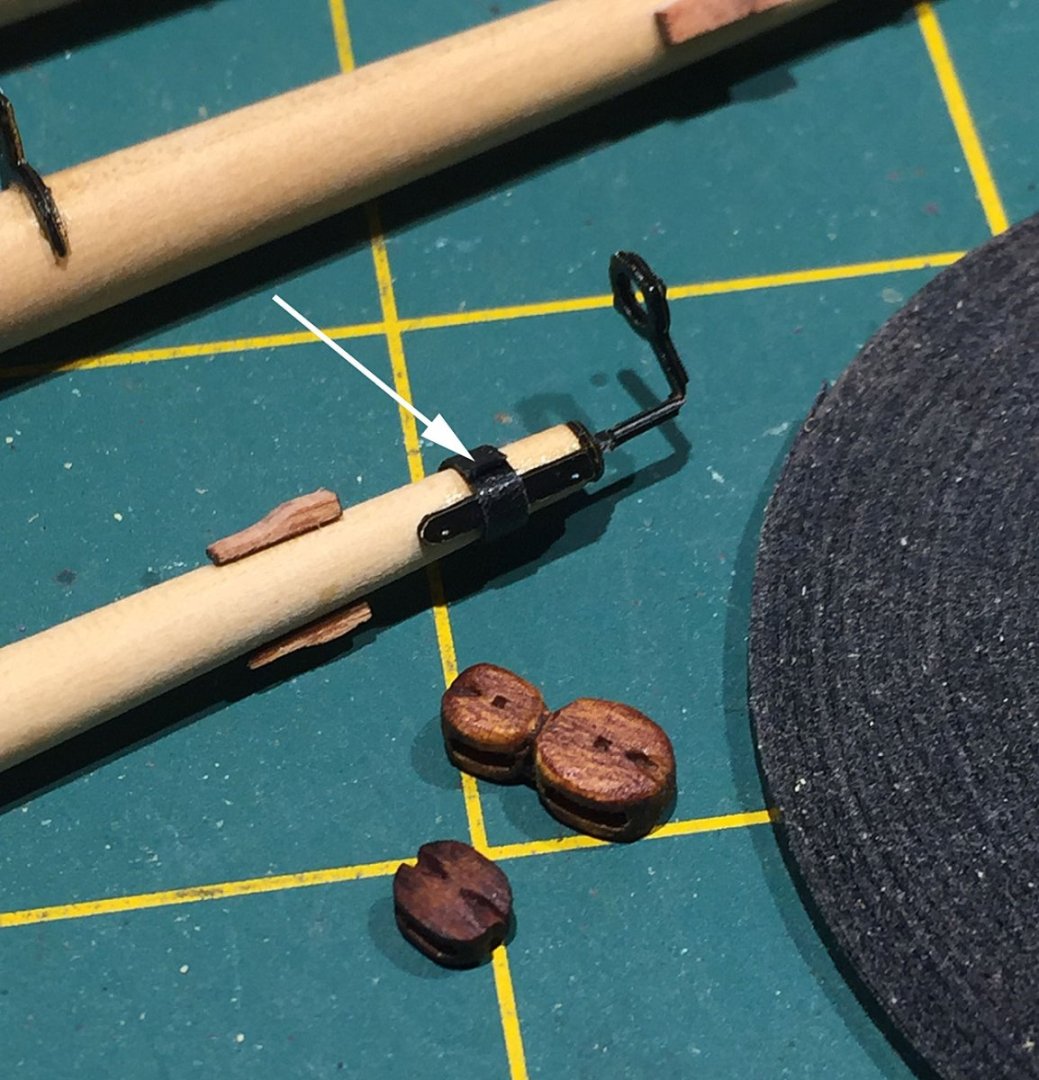
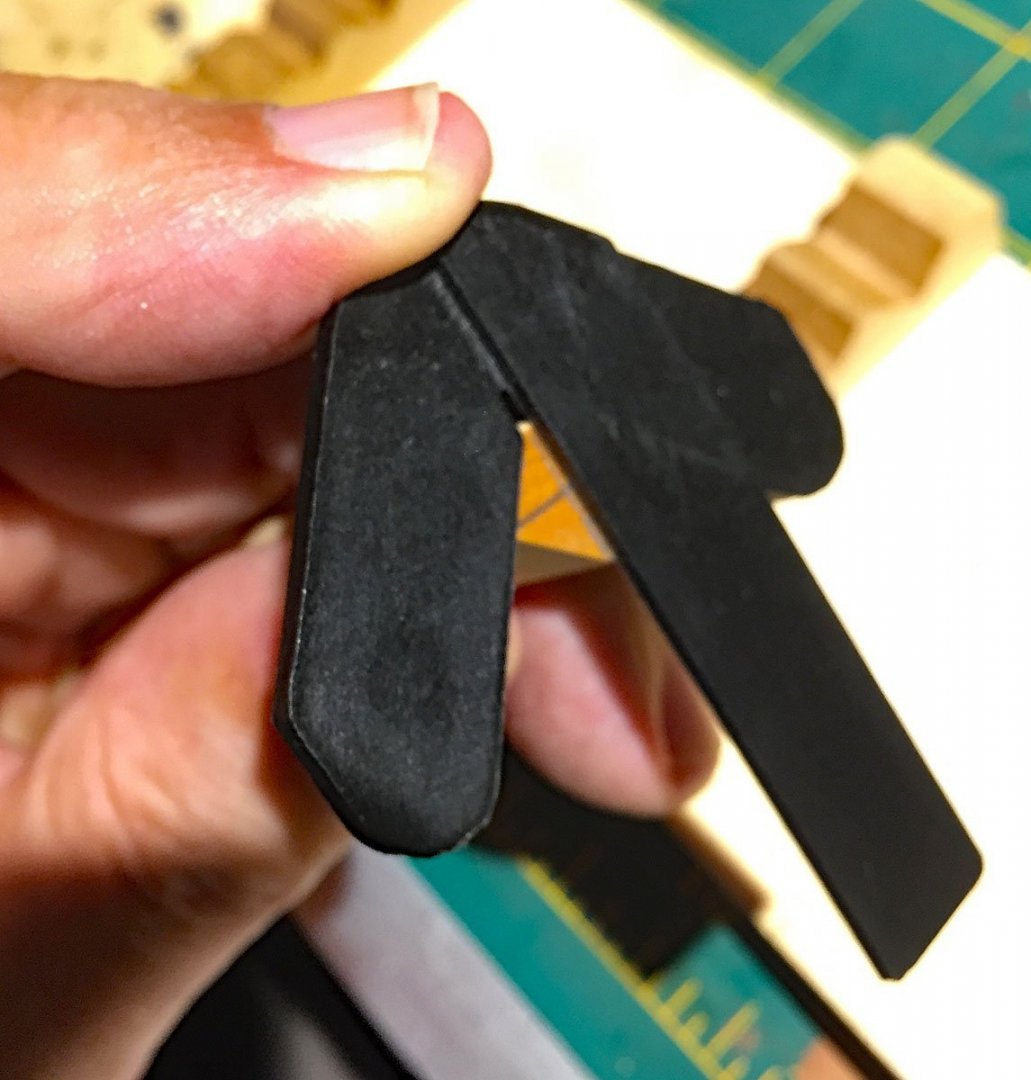
 Making the Sphinx kit's anchors. The provided pieces are pictured here as well as the tools and materials I use to upgrade their assembly. The MDF (anchor), thin plywood (the anchor flukes) and pear wood (stock pieces) are the components provided to fashion anchors. There are four sets like the above provided. I plan to add only two anchors to my build. To my knowledge this is a first and a unique approach to making these vital parts of a ship's sailing inventory; most of the kit models I've built have supplied cast metal anchors. One new anchor assembled (foreground) and nearly complete. The slightly larger anchor above it is from another 1:64 older model I've built (HMS Ardent/Caldercraft). I wanted to compare these two since the kit provided a new approach to make these components. As already noted, these new anchors are, I dare say, a radical departure from the "normal" kit pieces in that the anchor itself is made from a laser-cut MDF pattern and not cast metal. I colored the pear stock with my Promarker alcohol-based pen and to my eye it resulted in a quite acceptable simulation - along with a flat black acrylic paint applied to the anchor itself. As shown on the cast metal anchor, thick rope "puddening," will be added to the brass ring on the new anchor assembly. There are small but visible metalwork details to the cast metal anchor (the shaft lines and flukes) and both approaches are meant to represent black iron. The kit's all-wood anchor offers somewhat of a detail trade-off, but after detailing them, I'm O.K. with adding them to Camilla. With materials for four anchors provided in the kit (normal for a ship of this size) using MDF instead of cast metal surely lightened-up the kit box contents and shipping cost! There is also thin "black card" provided to make the iron straps ( also used for boom iron strapping on the yards), but I much prefer to use graphic arts tape. After assembly of the seven pieces that comprise this new anchor, one adds iron straps and a hawse ring. The Micron pen (.20 mm tip, from maker Sakura) is used to add the tiny black bolt details on the anchor stock (both sides). The bolt positions are etched in the pear laminate finishing pieces, as are lines to guide the application of the simulated iron strapping. The bolt heads in the pear laminate are too subtle without darkening them and need emphasis, as shown here. To make the anchor stock's four straps, I use a graphic arts 1.5 mm wide black tape (which is self-adhesive). After trimming I apply a tiny drop of CA to the end to insure that the tape stays affixed. The tip of the Micron pen used to "fill" the black bolt markings on the pear laminate stocks. The brass ring awaits rope "puddening." I'll wrap this hawse ring tightly with either black or dark brown thick rope, as was the shipyard rigging practice. The puddening cushioned the terminated hawse cables rubbing against the iron ring from excessive wear and tear; the worn puddening rope was frequently replaced in practice. To fashion the anchor's brass hawse ring, I use these stepped mandrel pliers - a great tool for making reasonably small metal rings. I used finger pressure only to wrap the brass rod (.89 mm) around the largest cylinder. After obtaining a round shaped ring section of the brass, it was cut off with my Xuron cutter and then the open end was closed-up with a small pair of regular needle-nosed pliers after inserting it into the anchor's opening.
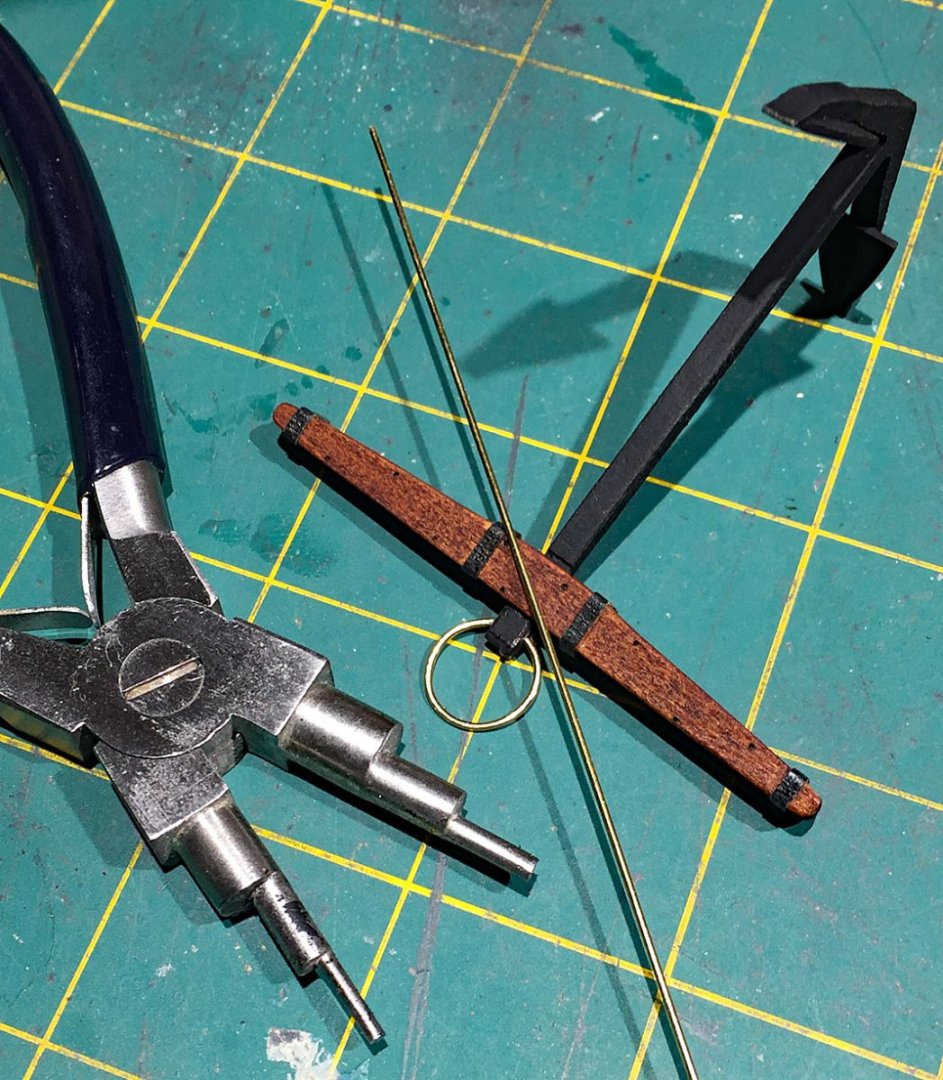


- 542 replies
-
- 18
-

-
- Sphinx
- Vanguard Models
- (and 3 more)
-
B.E. You gave me an idea. Thank you. Since I haven't begun the yard's rigging (jeers, lifts, etc.), the only thing I'll need to re-do by "flipping" the topsail yard is fashion a new pair of slings and attach them on the opposite side of the spar after switching the mounting pin. A little paint scraping and touch-up. All other yard attachments will present correctly so it won't be necessary to start over with removing and redoing these. This change is only a tiny diversion from today's workshop plan...and your comment reminded me that I need to scratch an extra main top mast for her midship skids.
- 542 replies
-
- 2
-
-
- Sphinx
- Vanguard Models
- (and 3 more)
-
You knew, didn't you? Indeed. HMS Camilla does seem to get smaller as I am preparing to squeeze-in other rigging lines in tight places! This one is 1:64 scale, but in challenging rigging moments she can seem I:700! Nonetheless, Thank You druxey. I'll humbly acknowledge your kudos - at any scale.
- 542 replies
-
- 2
-
-
- Sphinx
- Vanguard Models
- (and 3 more)
-
Thanks again for your comments B.E. In fact, I am not aware of that stirrup detail, but it makes perfect sense. Thanks for your keen observation! The knowledge of the Universe resides here on my desktop. I plan to stiffen the stirrups and finesse the foot ropes once her sails are mounted. So much of what these complex and magnificent looking ships are about can be straightforward engineering dynamics and - good, commonsense. I'll correct my stirrup error on the remaining yards and drape the stirrups BEHIND, but I'm going to refrain from re-doing the one that's completed. All the foot ropes will appear behind Camilla's many sails, tucked amongst her sail lines and other rigging bits, so I'll live with my error ...in perpetuity. And only you, myself and 42,000+ MSW'ers will ever know. Cheers!
- 542 replies
-
- 2
-
-
- Sphinx
- Vanguard Models
- (and 3 more)
-
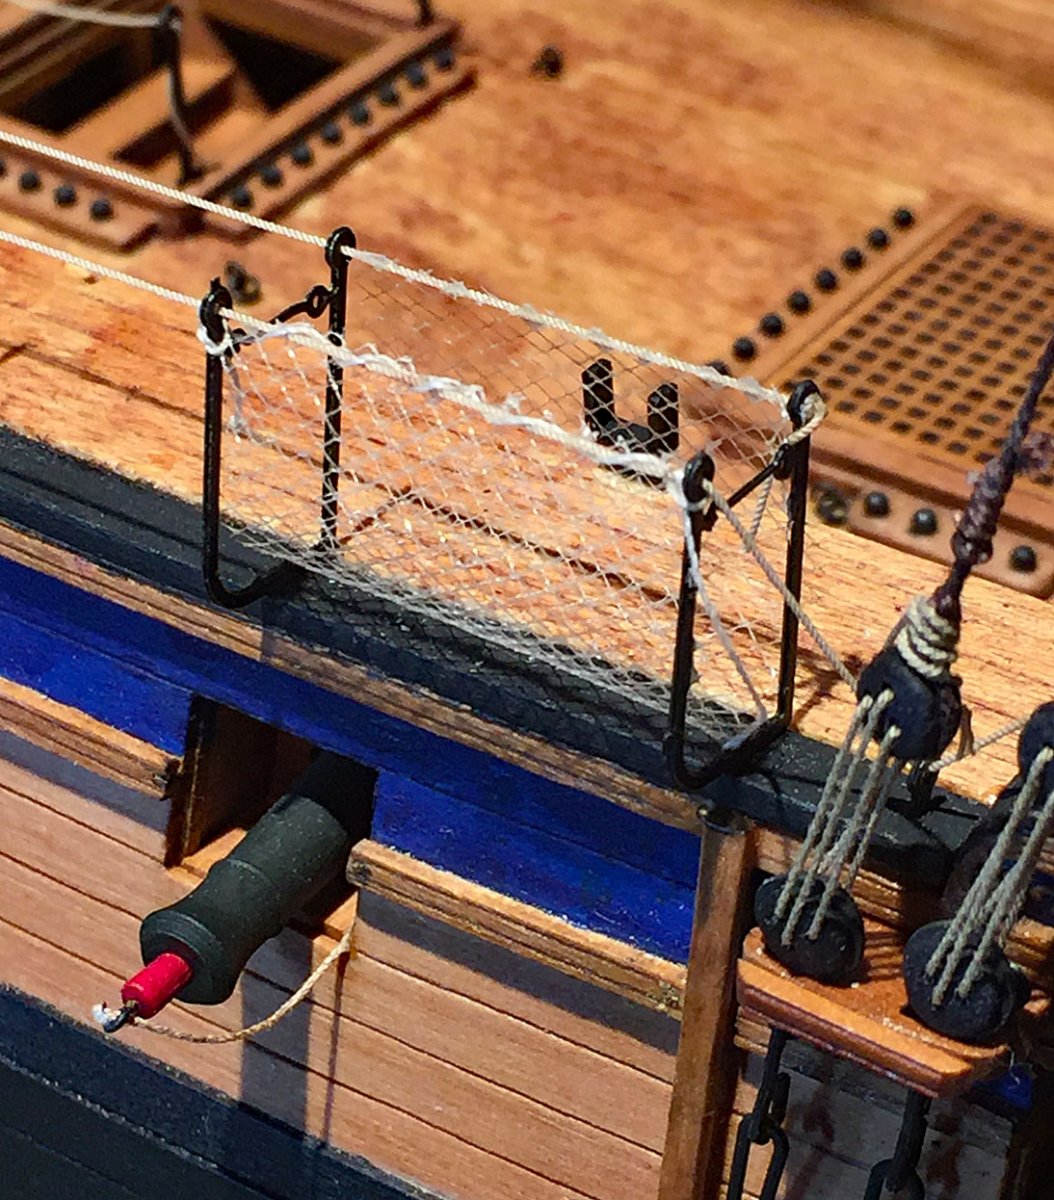
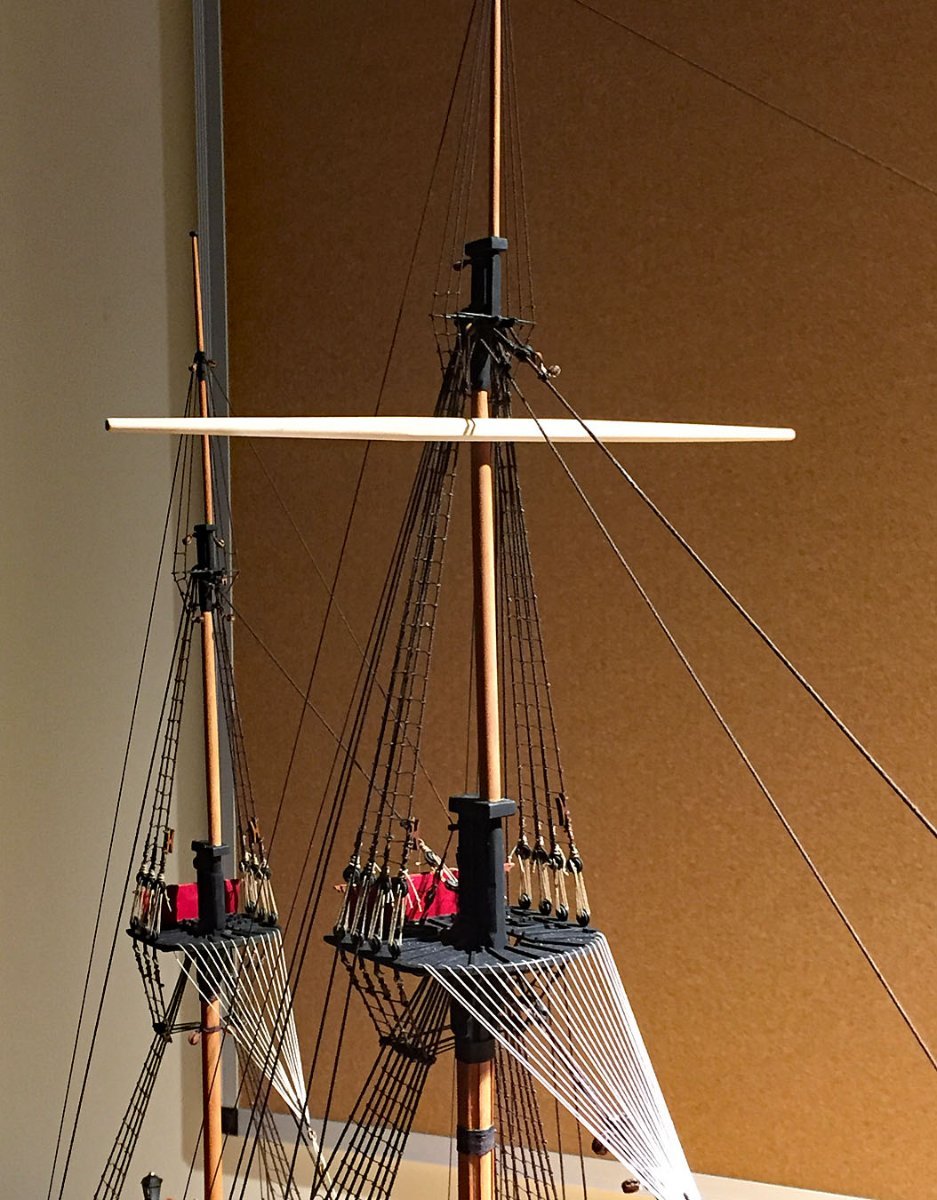
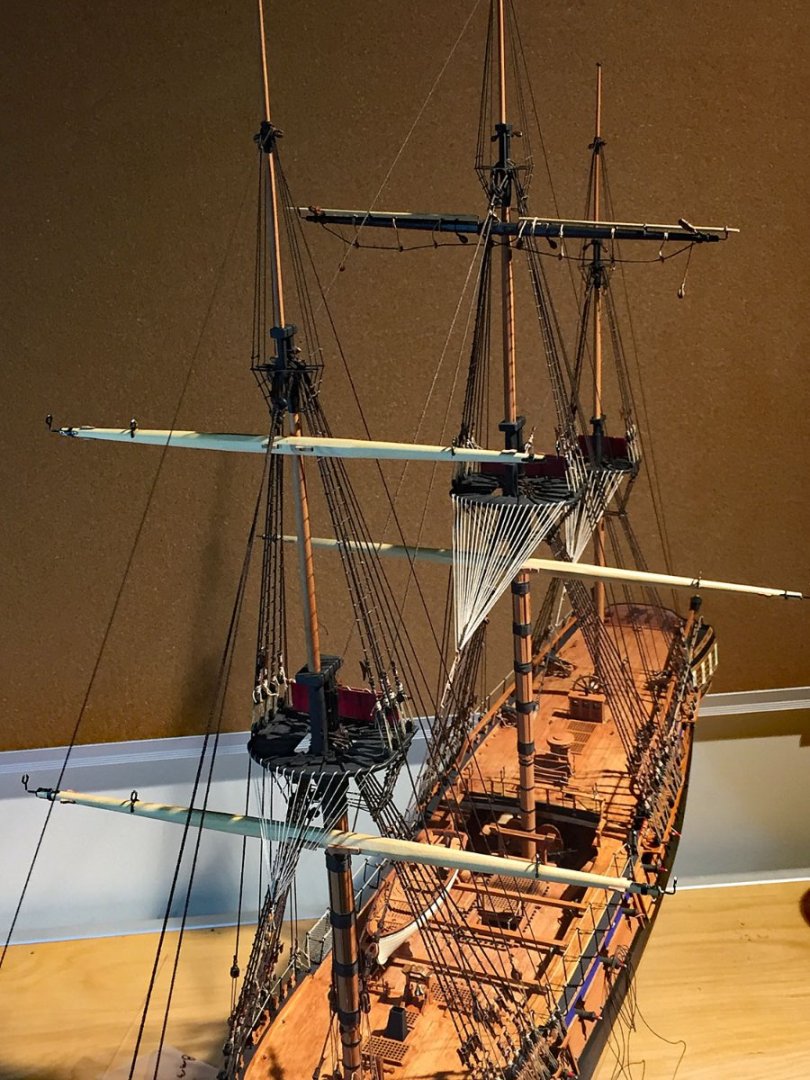
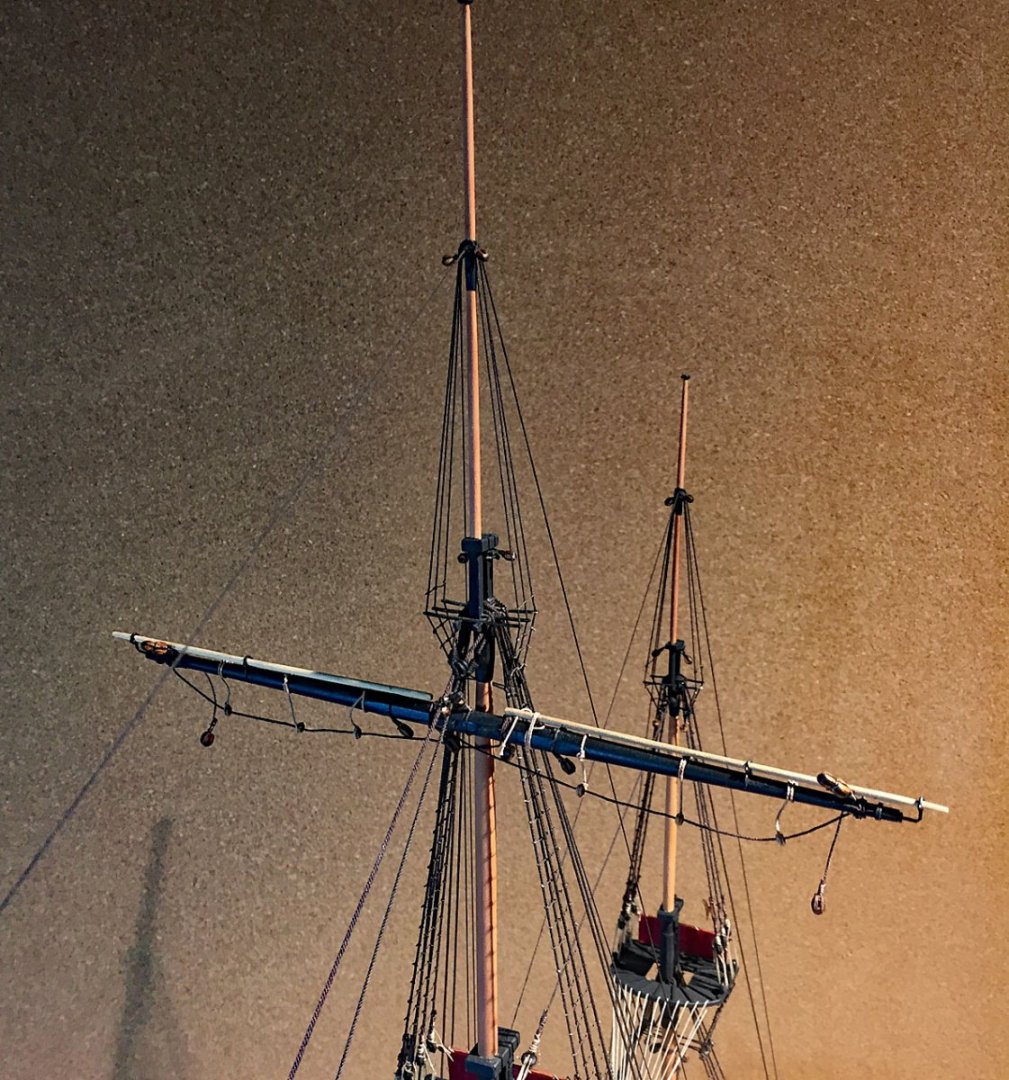
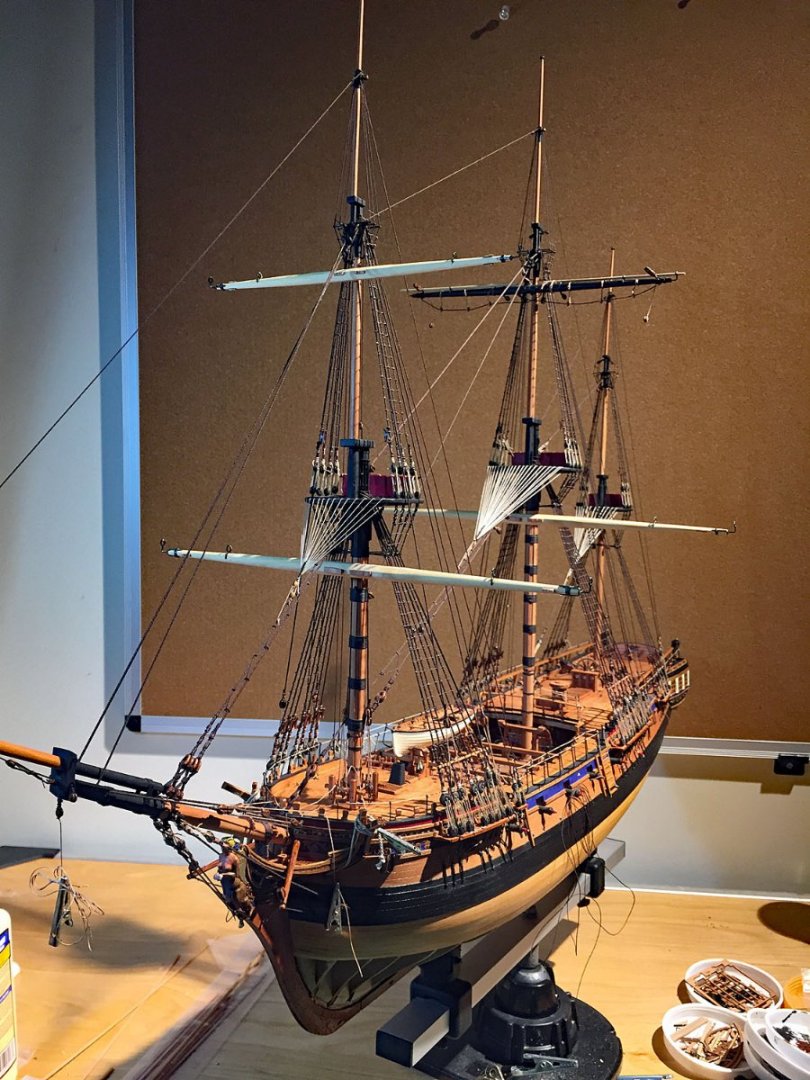
Camilla's yards & their fittings: making progress. Adding hammock crane netting. I use a fine bridal veil material known as "tulle" ("tool") for making the netting for hammock cranes. It comes in black, white and this taupe color which I prefer as the light brown resembles hemp rope and it's a better look than using either stark white or the black color. The thread spool is for color comparison in the photo and is used to lace this netting to the safety ropes on the cranes. The tulle material is polyester (or nylon - Quel matériel?) and tricky to manipulate into the cranes, but it can be done once its trimmed into a shape that forms a "U" and then poked down into the iron cranes and positioned for gluing to the safety ropes. I like this particular fabric for this netting purpose. It appears very scale-accurate for a 1:64 model. Inexpensive. It can be purchased at JoAnnes's Fabric stores, but be aware you'll have to buy a minimum yard (or two) which will easily outlast most people's model building hobby! Once positioned into the hammock crane, I attach the tulle with tiny daubs of matte adhesive, then carefully trim off the shaggy tulle bits at the ends of the loose fabric after the adhesive has set. I then lace a fine rope (.1 mm) through the tulle openings and around the hammock crane safety rope. Due to the configuration of the fine detail on the hammock cranes, I'll need to repeat this process for each "compartment" along the gangways. This is very fiddly work to get the tulle pieces to fit- and creating the first netting segment is the most difficult- but the hammock crane P/E supplied in the Vanguard kit is beautifully detailed as is evident here. Accomplishing this detail will take a lot of work to get both starboard and port dressed but I believe it will be worth the effort. Closer view of the hammock crane netting, post touch-up trimming; miniscule drops of matte medium (applied with the tip of a toothpick) holds the fine netting in-place. The lacing rope along the safety line is barely perceptible but will get noticed on a close inspection. A set of Camilla's "BIG" yards (fore & main courses, and fore and main top yards). The main top yard (black one) is complete with its myriad of blocks, cleats, stirrups, ropes, stunsail boom yards, brace blocks, etc. The parrel bead rollers that allow the yard to roll along the mast have been pre-strung, and the completed assembly sits behind the yard. A review: all the yards (with the exception of the stunsail booms) are made from square stock boxwood. All masts are made from Swiss Pear. The cleats on the yards pictured above are made from pear. The foot ropes on this yard are suspended with rope lengths per convention of the era; I chose to not use the P/E stirrups provided in the kit. Also, once the yard is mounted (with its accompanying sail), the foot ropes will hang loose from the stirrups in relaxed, catenary shapes. I pre-form the foot rope shape by applying matte medium adhesive so they drape naturally; the adhesive permanently sets them in this loose-looking shape. The three unfinished yards have had their cleats and ironwork mounted; blocks await mounting after these yards have been painted or stained black. A TIP: don't mount the stunsail boom yard end rings until last. They are quite delicate and easily bent due to the P/E scoring. There are another 8 yards to fabricate (not including the various boom yards and ensign staff), but they are easy-peasy compared with what's required for scratching these four. There is an iron strap that needs to be fabricated to wrap around the ironwork for the stunsail boom rings. I use a 1.5 mm black graphic arts tape (roll on the right side), sealed with a tiny drop of CA after it's secured around the yard's boom hardware. Two blocks await their ropes: a violin (fiddle) block for the lift rigging (the Syren DIY boxwood ones) and a single sheave 4 mm one for the yard brace (Falkonet, pear). The cleats shown here on the tip of the yard are ...tiny ... Be careful to get these placed properly so they are symmetrically mounted to the tapered yard and not too close to the boom ironwork since there will be a ropes that secure to the very ends of these yards. A view of the mainmast's main course and top yard, temporarily placed. I plan to affix ("bend" in maritime parlance) furled sails to both fore & main courses. The remainder of Camilla's yards will carry set sails. Four yards temporarily placed. The lighter colored ones (unfinished boxwood) will be painted black, the next step prior to attaching blocks, ropes and booms...and, of course, sails. A closer view of a nearly-completed top yard (mainmast). The stunsail booms extend to deploy stunsails. At this stage of my build I'm leaning toward NOT deploying these with sails as the width of the overall model may become too onerous with the addition of these as much as I'd like to add them! The foot ropes haven't been given their final shapes yet. She's starting to look like an 18th Century Royal Navy frigate. I may break-up some of this intense rigging concentration work with making Camilla's anchors (a sanity break). There are four provided in the kit, however, I think I'll likely only mount one to each side.


- 542 replies
-
- 20
-

-
-
- Sphinx
- Vanguard Models
- (and 3 more)
-
Yay! - 0.6mm PolyBak. I assume this material will take staining - or must it be painted?
- 488 replies
-
- 2
-
-
- Indefatigable
- Vanguard Models
- (and 1 more)
-
This is the NEXT LEVEL, gentlemen. Superb detail, Chris. Bravo! This highly detailed stern appears to be a combo of laser cut pear with resin cast (or 3D printed) decorative bits. The little black holes to either side look like they are for dual stern lanterns mounted with three iron supports. Love the optional open/closed window sash. Yum. (are you seeing this, B.E.?)
- 488 replies
-
- 8
-
-
- Indefatigable
- Vanguard Models
- (and 1 more)
-
I'm late to this opinion party, but also agree with my colleagues: less is more. Dump the cradles. Your Navy Board model is beautiful and these extra bits muck it up.
- 857 replies
-
- 2
-
-
- Sphinx
- Vanguard Models
- (and 1 more)
-
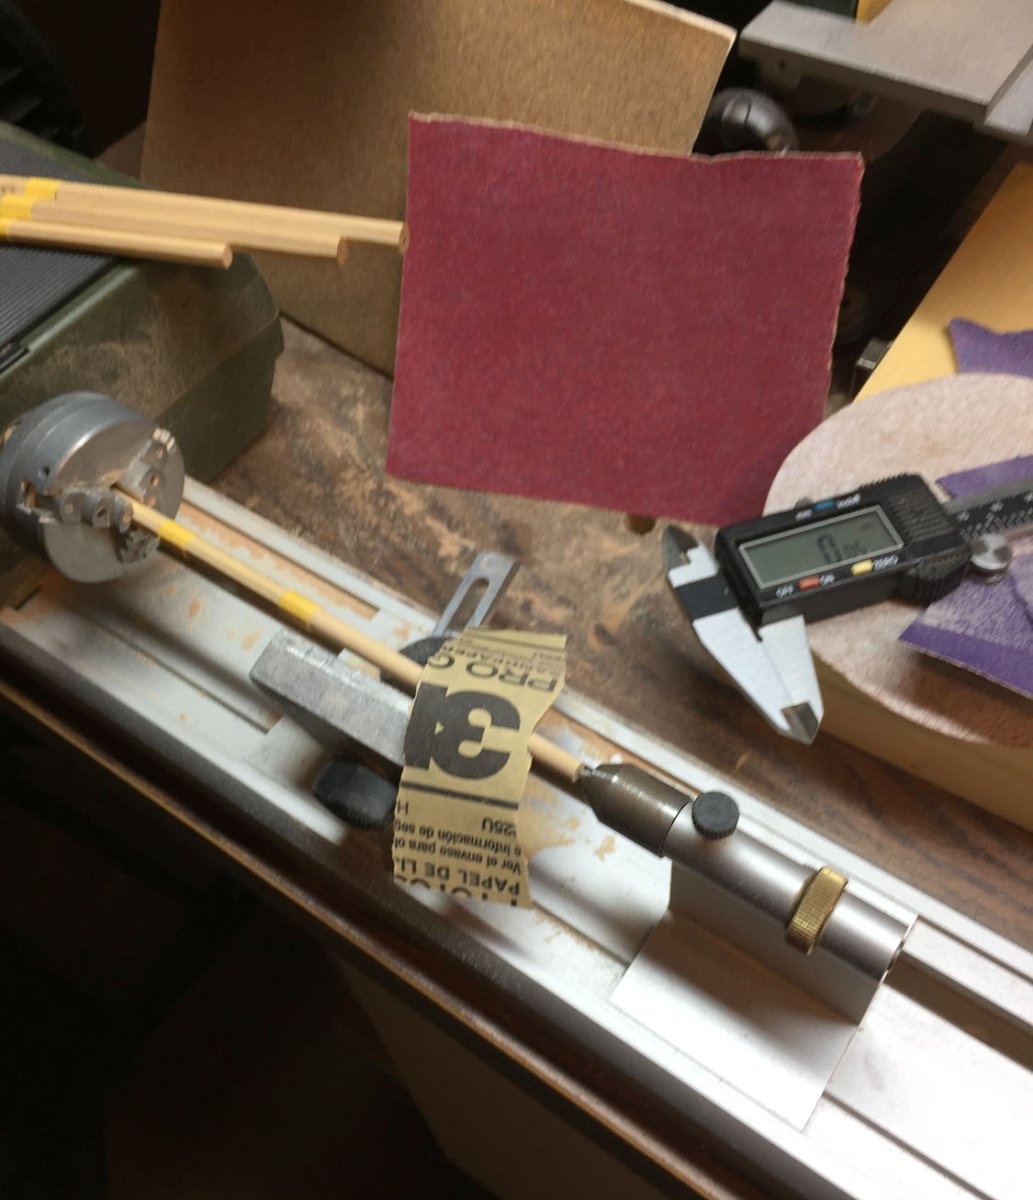
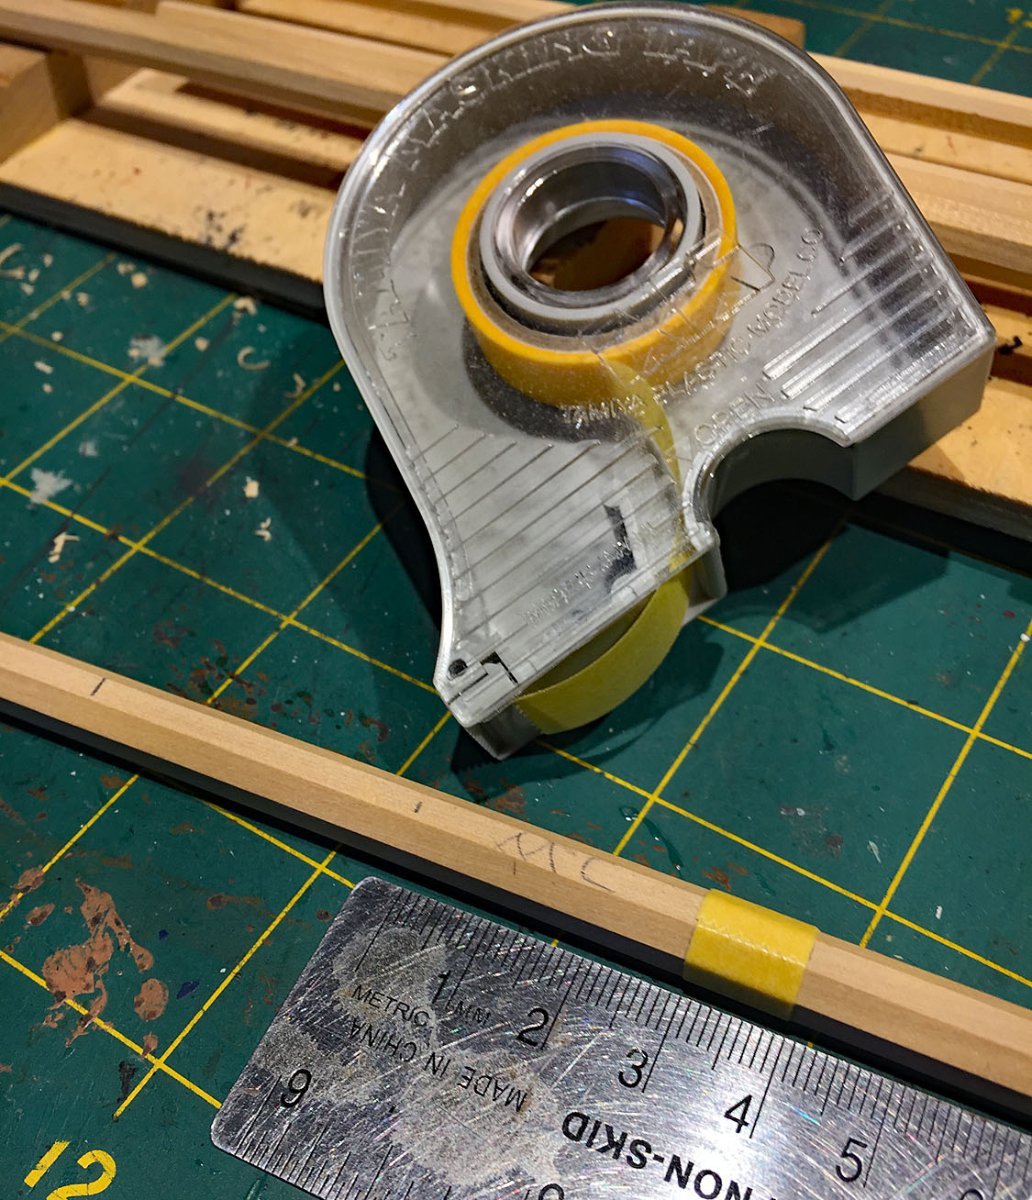
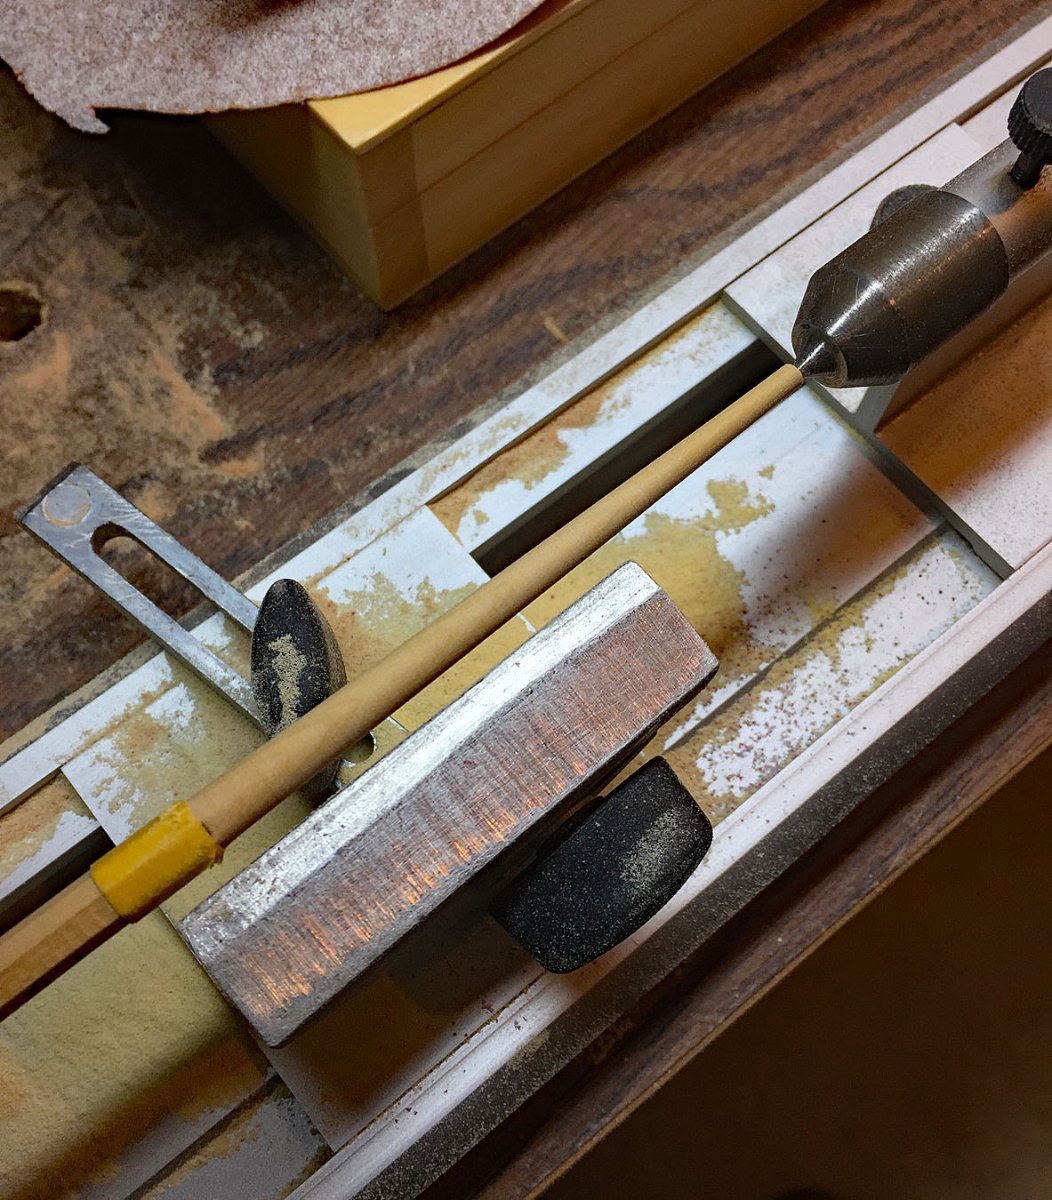
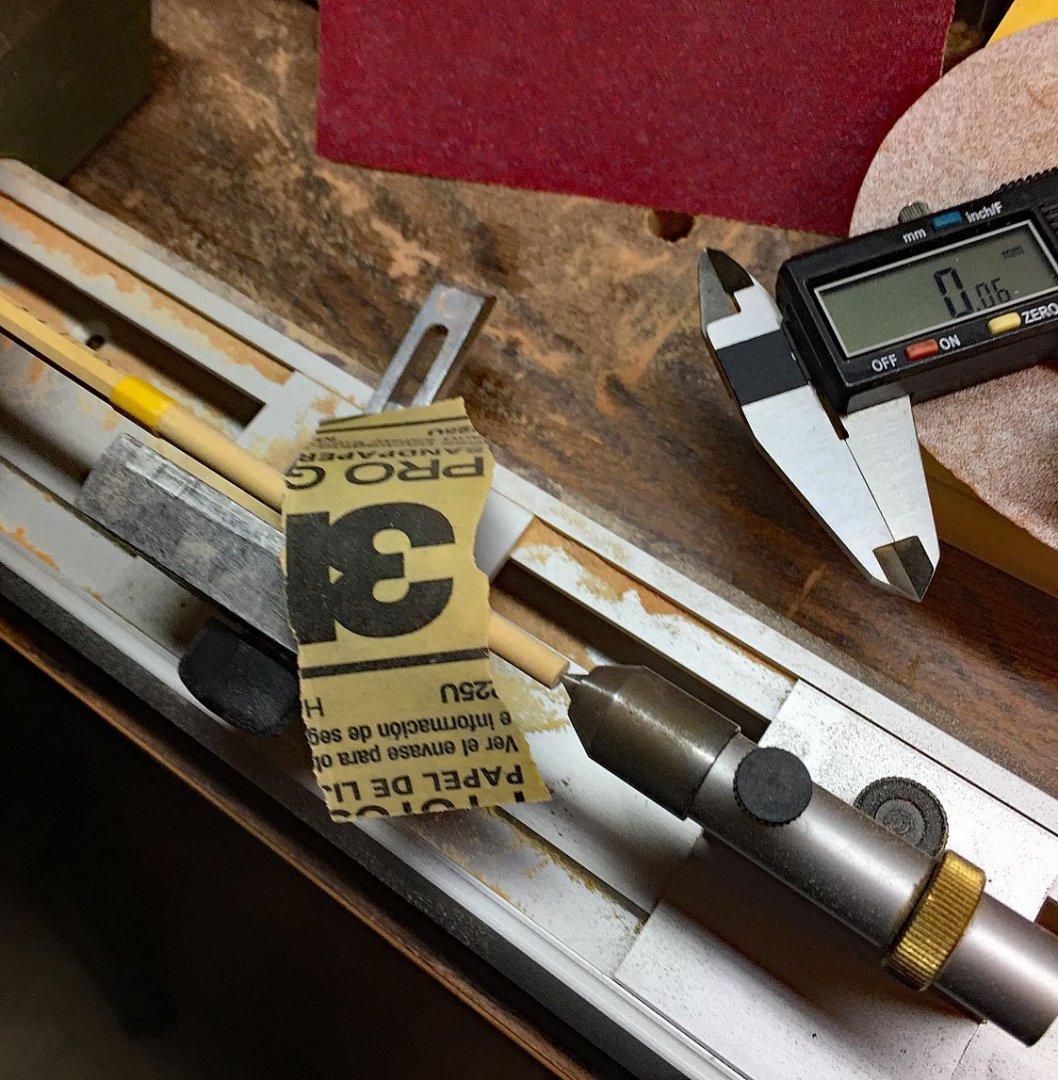
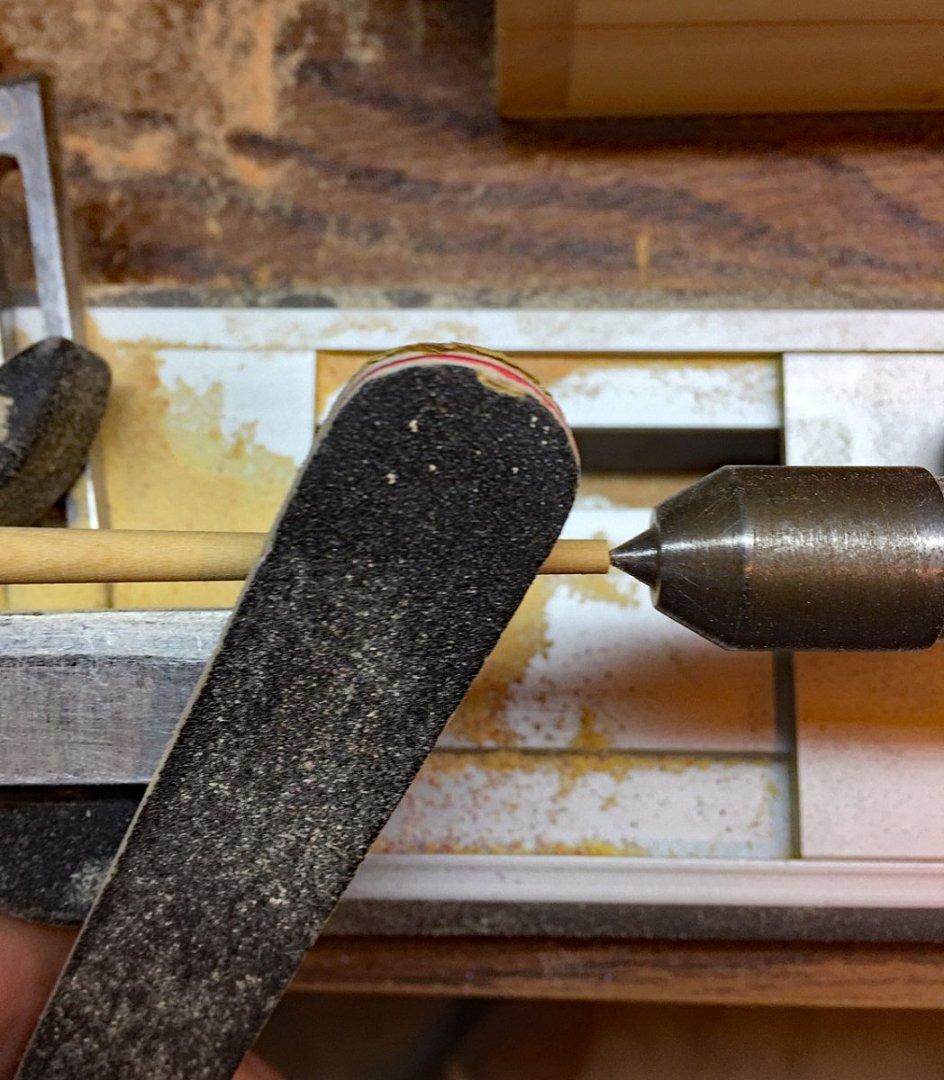
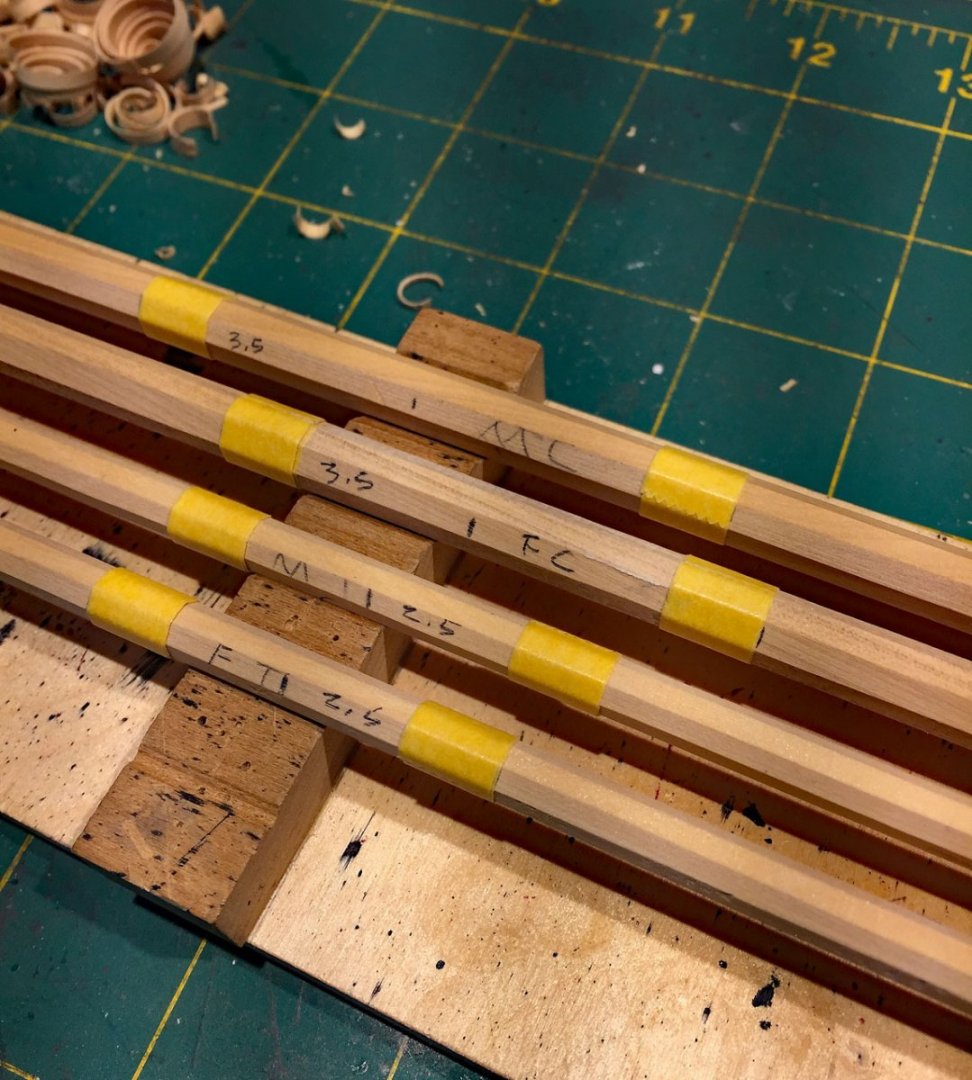
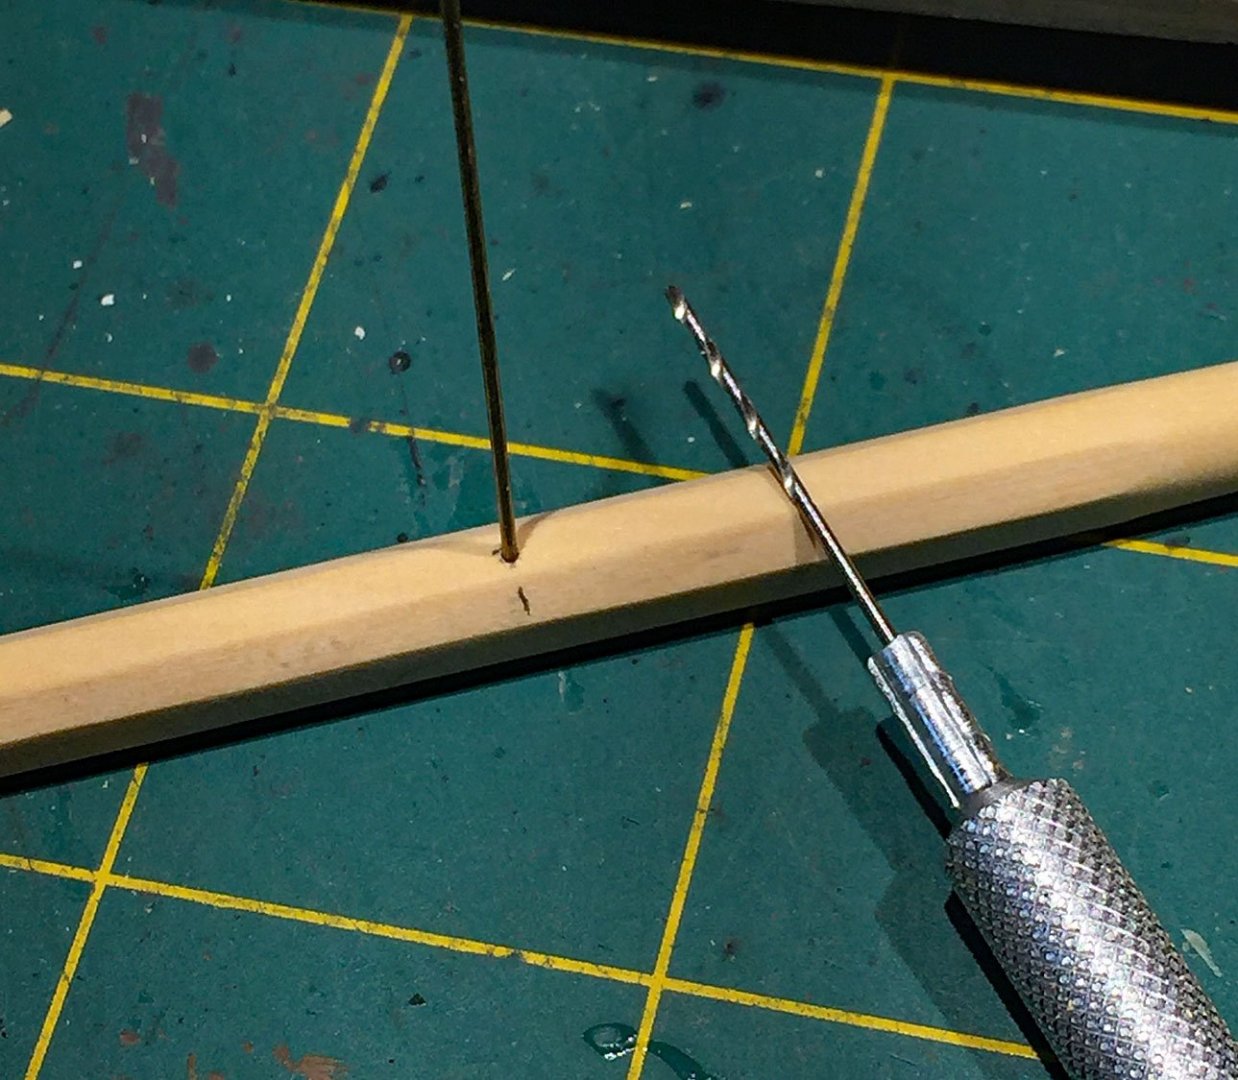
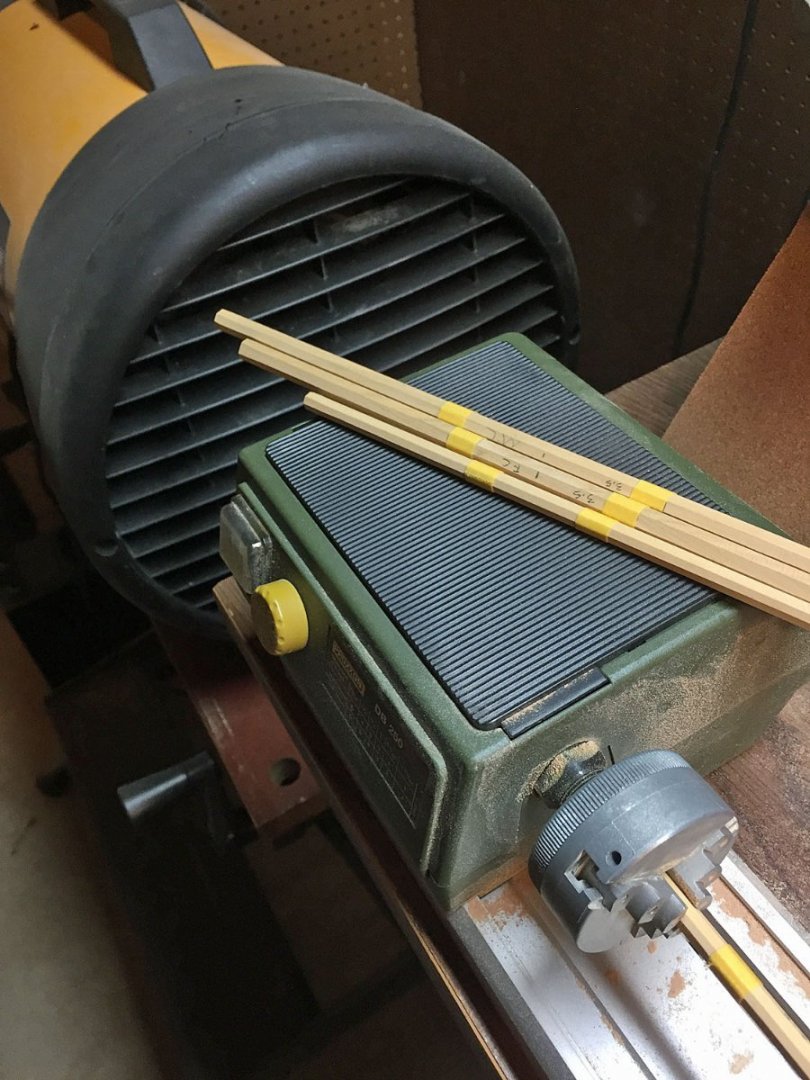
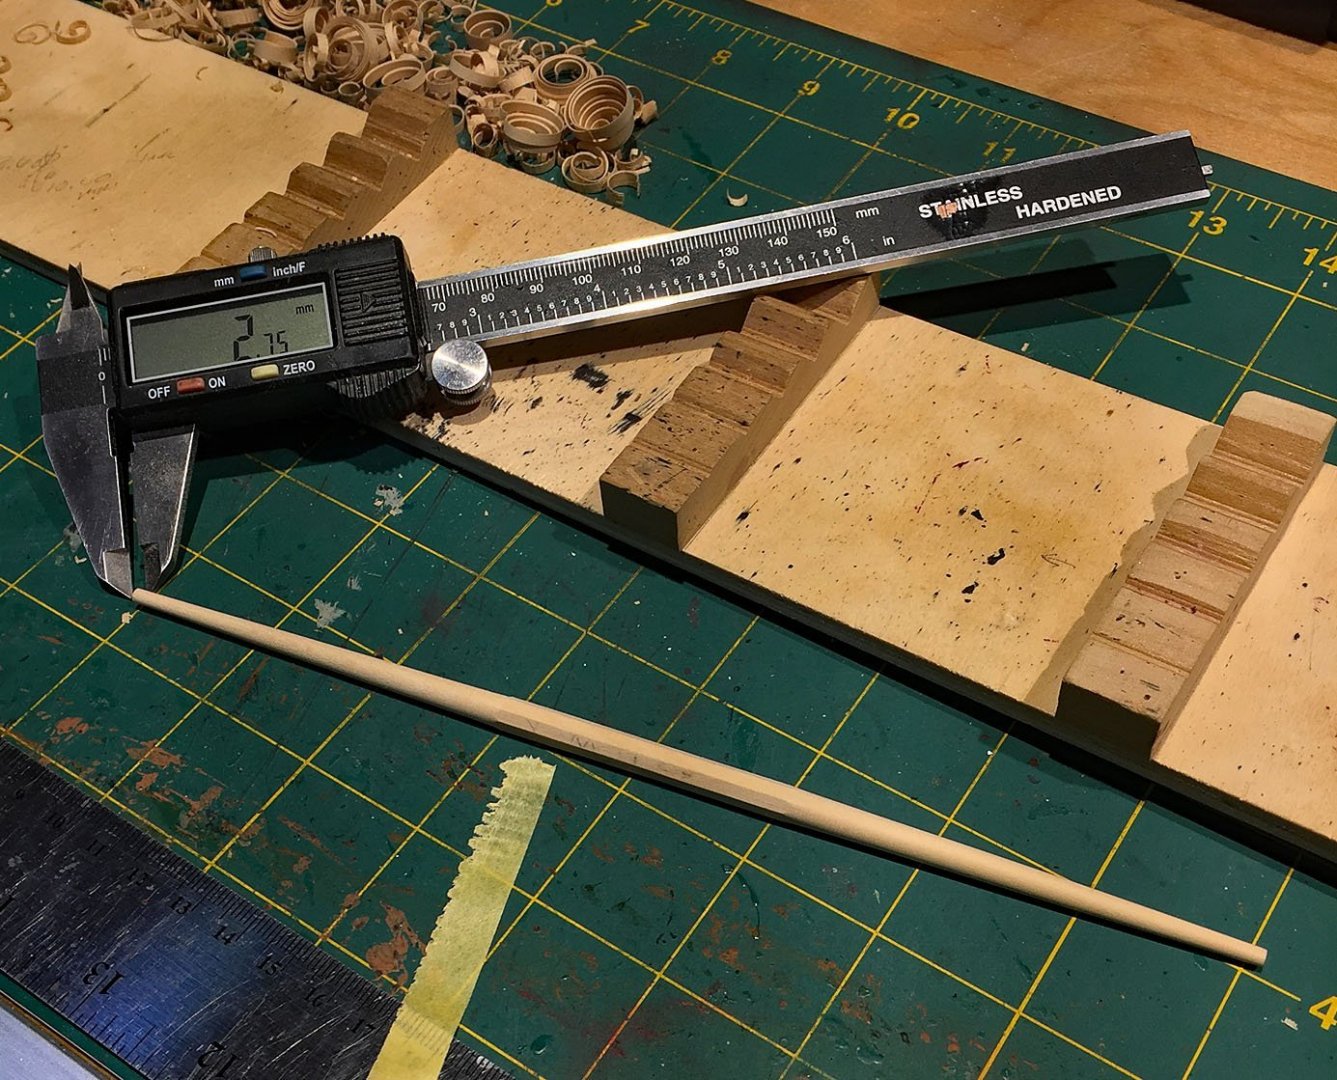
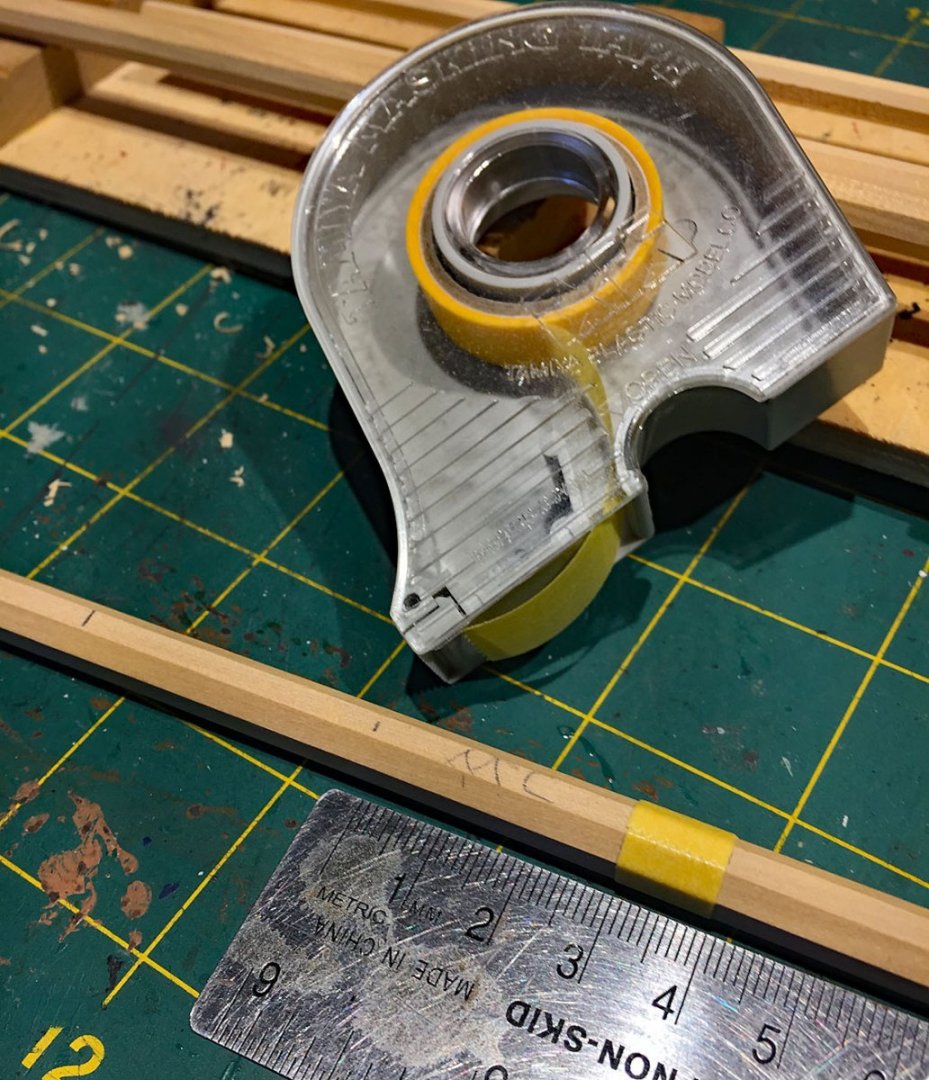
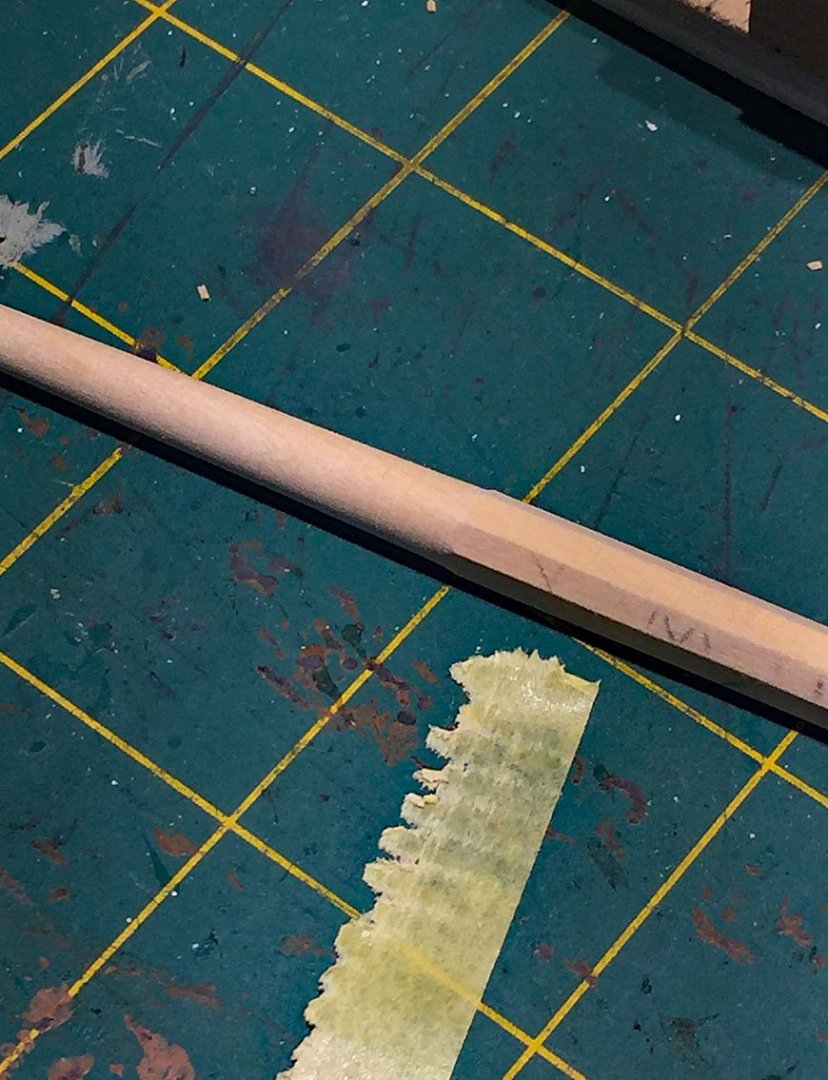
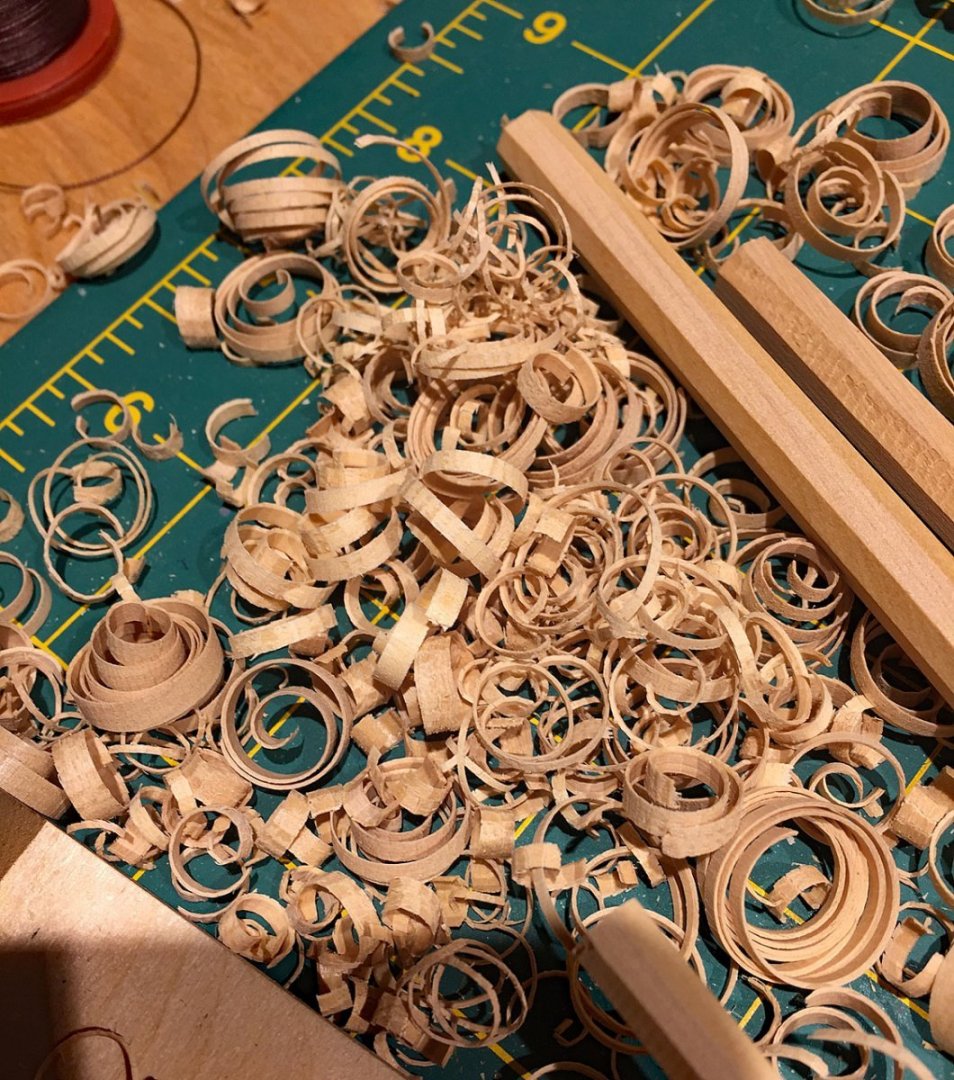
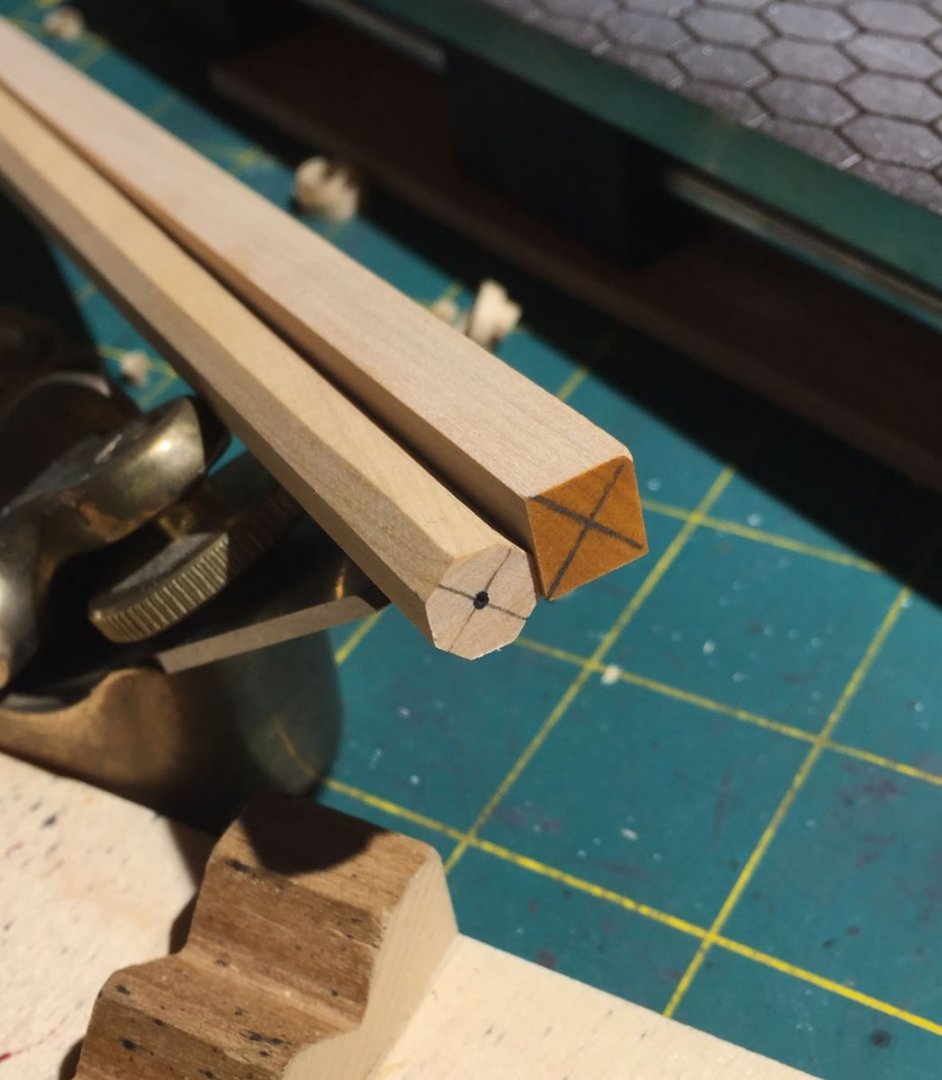
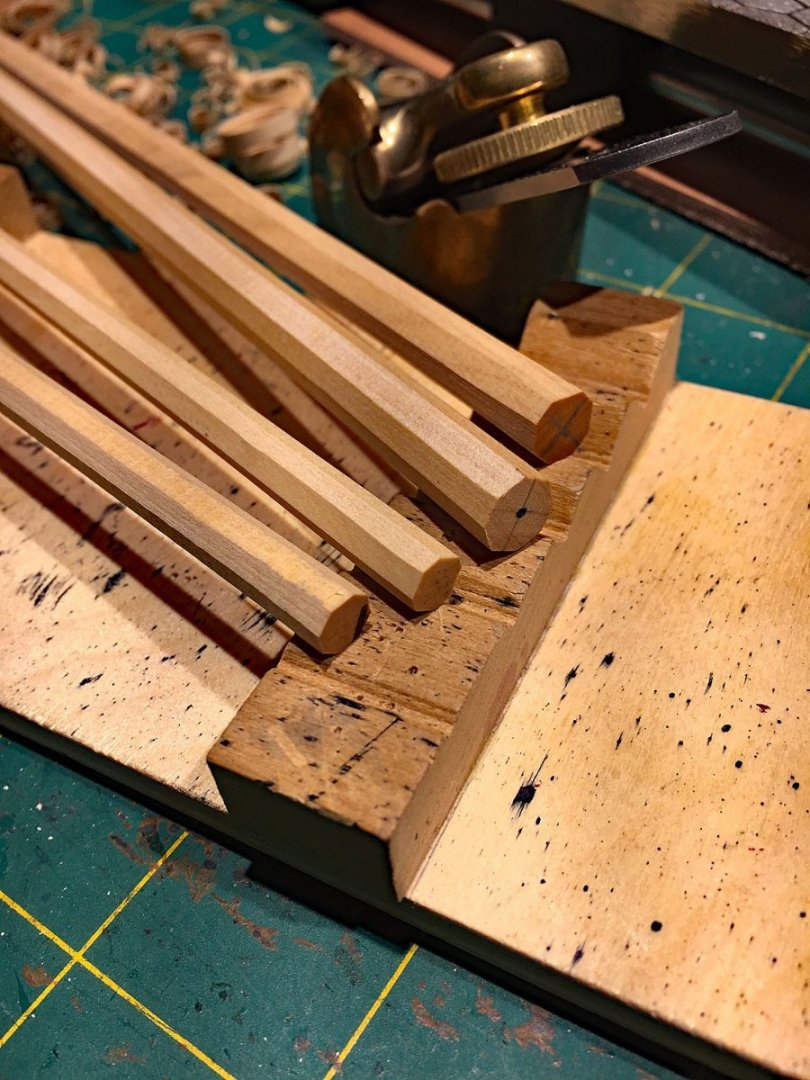
Spar Making Continued (processes)...I'll add detailed explanatory text a little later. In the meantime... I have been remiss for not mentioning that the Sphinx kit does include very good quality walnut dowels for masts and spars. Square-to-Octagon, one yard planed down. One yard (Main Topmast) completed, temporarily mounted. Sanding the taper into one end of a yard...this is a process requiring patience. When I first tried shaping tapered spars with woodworking mini-chisels and other small tools, the results were unsatisfactory and the process was difficult. Attempting to remove large amounts of wood to achieve the taper faster just didn't work with cutting tools. When reasonable pressure was applied to the workpiece with a cutting blade it would loosen from the tailpiece and in some instances, just snap into irreparable pieces. Also, it was harder to gauge the taper properly with larger cutting tools. The tool rest for the Proxxon is also too short to brace a cutting tool the entire length of the yard. Other, larger lathes might work better but this isn't an option with my little one. I will add that there are at least two other ways to sand the yard tapers which include clamping the yard into a hand drill. Another method is the "shoeshine" method: one clamps the yard firmly onto a table edge and then using a long length of sandpaper, rigorously sand and then rotate, sand and rotate, sand and rotate... Finish sanding the tapered yard (at one end). A beauty supply nail file (all wood modelers need dozens of these) with different grits handles the final finishing on the tapered ends of the yard. A super smooth, fine finish to the boxwood isn't necessary as the yards will be finished black. A finely sanded finish to my Swiss Pear masts is more important. Four yards have been planed to their octagonal center shapes and then taped-off for subsequent lathe sanding. The 2.5 & 3.5 pencil nomenclature are references for the ends of the tapers on the respective yards, in millimeters. These four yards (main courses - fore & main) and fore & main top mast yards are the largest on the model and require the most work to create properly. All other yards are considerably smaller in diameter (4, 3 & 2 mm stocks) and present other shaping challenges. Adding a mounting pin to the backside of the yard. A .69 mm brass pin is positioned dead-center on the yard. A corresponding hole will be hand-drilled into its mast to take the pin. Although the yards will carry all the conventional rigging tackle to support them, this building method is a tried n’ true one that makes the extensive rigging (especially true with mounted sails), much easier to accomplish; the yards will stay put as you rig them! Primary sanding on the lathe with various sandpaper strips. The Proxxon mini-lathe can accommodate up to 8 mm round stock through the open center chuck. The adjustable tailpiece holds the end of the stock securely as long as you make a small ‘pilot’ hole in the workpiece in order to firmly hold it to the rotating tailpiece. For tapering the octagonal boxwood, I start with 100 grit paper and as material is removed I gradually change to slightly finer grits. I hold the sandpaper strip UNDER the workpiece so I can see what I'm doing; not positioned as I've shown here draped across the yard. Lots of sawdust vacuuming! There is no easy attachment for disposing of the fine sawdust with a lathe (talk to wooden bowl turners!). I use a medium-slow speed on the lathe for this work; this helps to keep the yard stable as you sand as well as reducing the amount of fine airborne particles. The Proxxon lathe is a simple electric affair: an on/off switch and a continuously variable speed control. The motor is surprisingly powerful and I haven'y had any problems with stock up to 8 mm (1/4" dia.). I did purchase the three jaw chuck separately as an add-on. Double-check the measurements at the tips of the yards as you make them; here the"stop" tape has been peeled off where the octagonal profile meets the round one. If the tape looks crenellated like the above, then you’ve achieved a decent transition from octagon to round at the junctures. You can touch-up this transition area with a small file after removing the piece from the lathe. Taping-off the Octo-to-round profiles. For a sanding reference 'stop’ I use Tamiya masking tape (10mm width); wrapped around a few turns, it works great. It's also a cushion when I chuck the stock into my lathe so the jaws won't mar the wood. 'Stop" tape removed. You can see the smooth transition from the octagon center shape in the middle of the yard to the beginning of the round tapered portion. Both sides of the yard's taper should be symmetrical so you'll confirm that you’ve sanded uniformly on both ends with stepped caliper measurements. A completed yard still mounted in the lathe; you’ll do this operation on both ends. For this yard (main topmast) it took me approximately 45 minutes to complete (post square stock prepping). Like many other rigging tasks you’ll need to take your time. If you don’t, you’ll risk breaking the yard using this lathe technique. There are other methods to achieve yard tapering as I've indicated, but I much prefer this technique since it produces very precise, good-looking results. Wear a mask, fine boxwood is airborne - instantly - when sanding like this. In addition to a large vacuum at the edge of my bench, I have a large, ceiling-mounted air filtration system in this shop area. The mainmast top yard is temporarily mounted to the main mast with a pin registered hole. I use a small section of .89 brass wire which is glued into the yard with some CA. When the yard is finally ‘dressed’ with all its blocks, cleats, stirrups and other hardware, I’ll also mount sails before I attach the completed yard to its correct position on the mast. Note that the yards can be braced only slightly with this approach. This is only of concern when sails are to be added; Camilla's canvas will be depicted upwind in my diorama with minimal yard bracing required. Checking the position of the crossing marks with the aid of a small center-finding jig. These lines are a visual reference when you’re planing down to an octagonal cross section. It helps you maintain equal dimensions across the 8 planed lands. This cheapie little plastic tool gets more use than I thought possible when I casually bought it. Round & square stock. Pencil line allowance groove is clever and accurate as long as your marking tool is sharp; sometimes I scribe lines using an awl. Geppetto's workshop. Your wood shavings should look like these after you’ve planed the square stock into an octagonal shaped stick. Expensive boxwood kindling! Comparing a square section to a completed, planed octagon; the pencil marks that indicate the center of each help immensely to inform you on whether or not you’ve got an even measurement to each of the eight resulting lands. The black spot on the planed yard is a small hole drilled so that the lathe's tailpiece point hits the optimum centered position when its properly chucked. The main and fore course yards and the two top mast yards are ready for lathe sanding. Boxwood is a good hardwood choice for creating realistic looking yards. All the yards will eventually be painted - or stained - black, before bending sails.


- 542 replies
-
- 13
-
-

-
- Sphinx
- Vanguard Models
- (and 3 more)
-
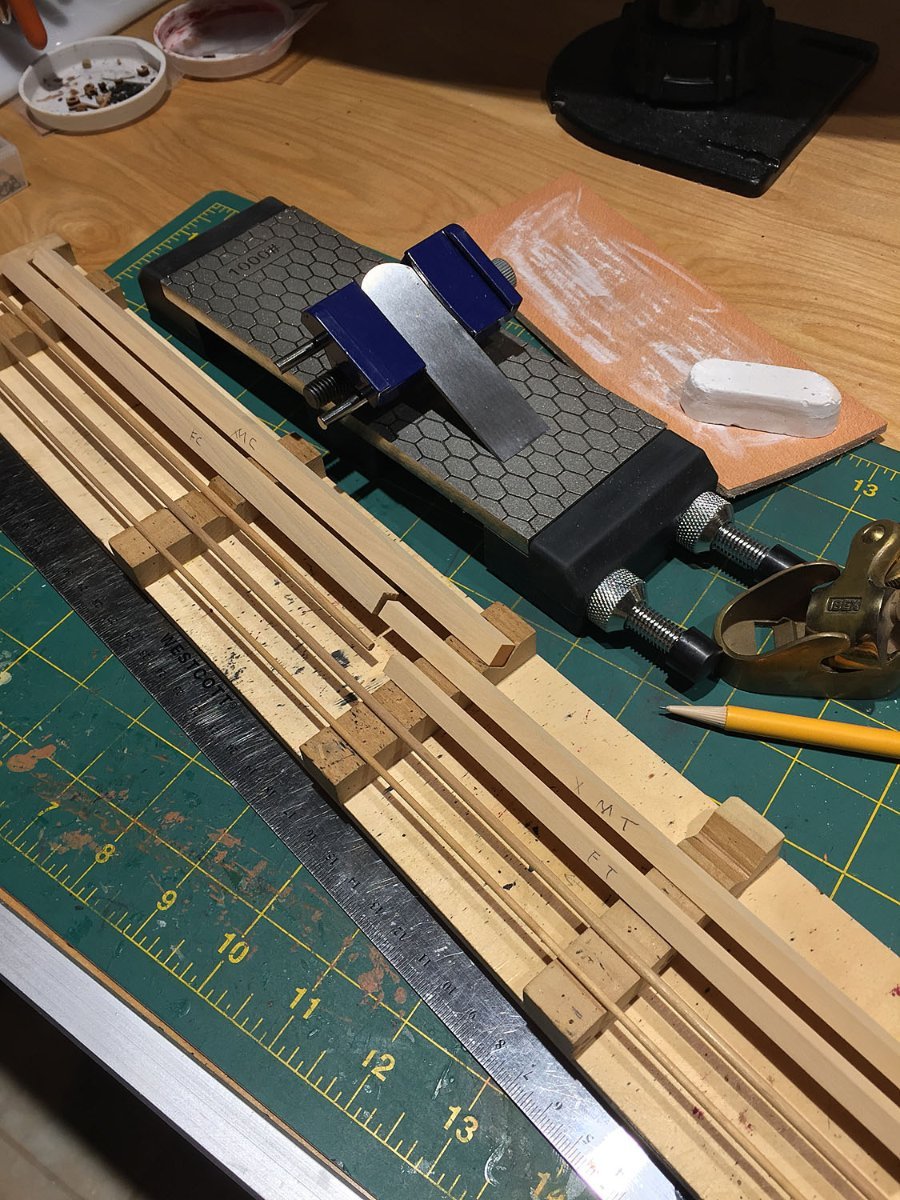
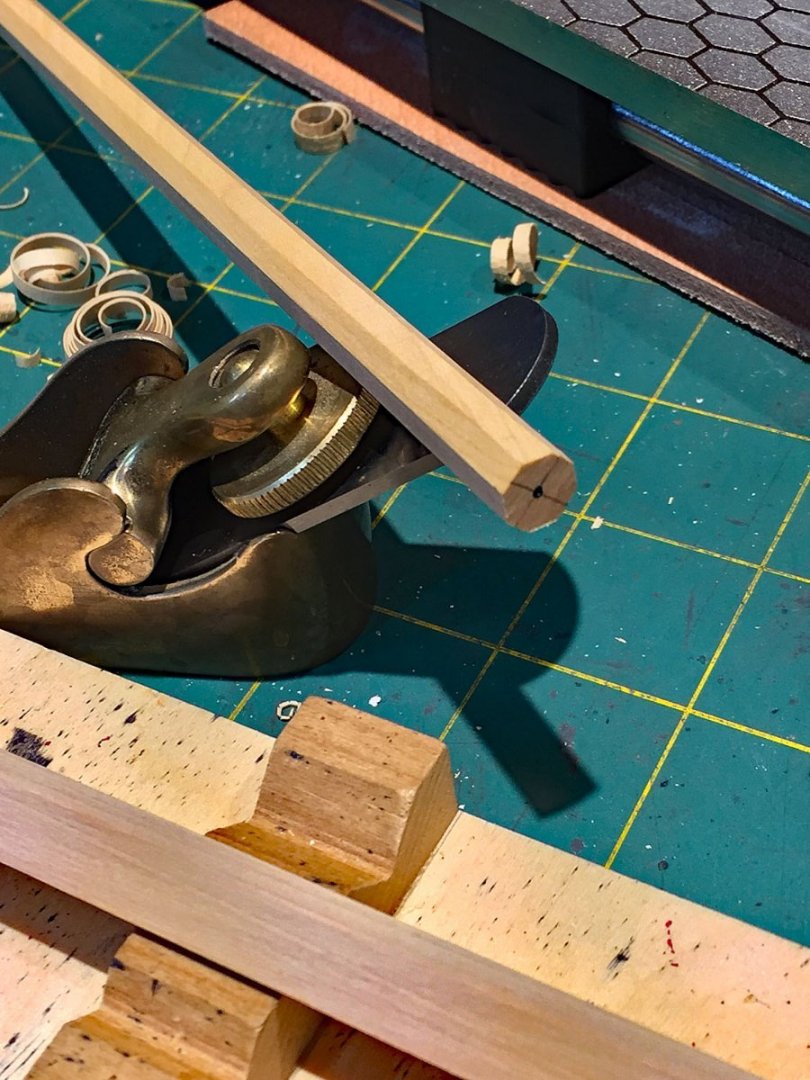
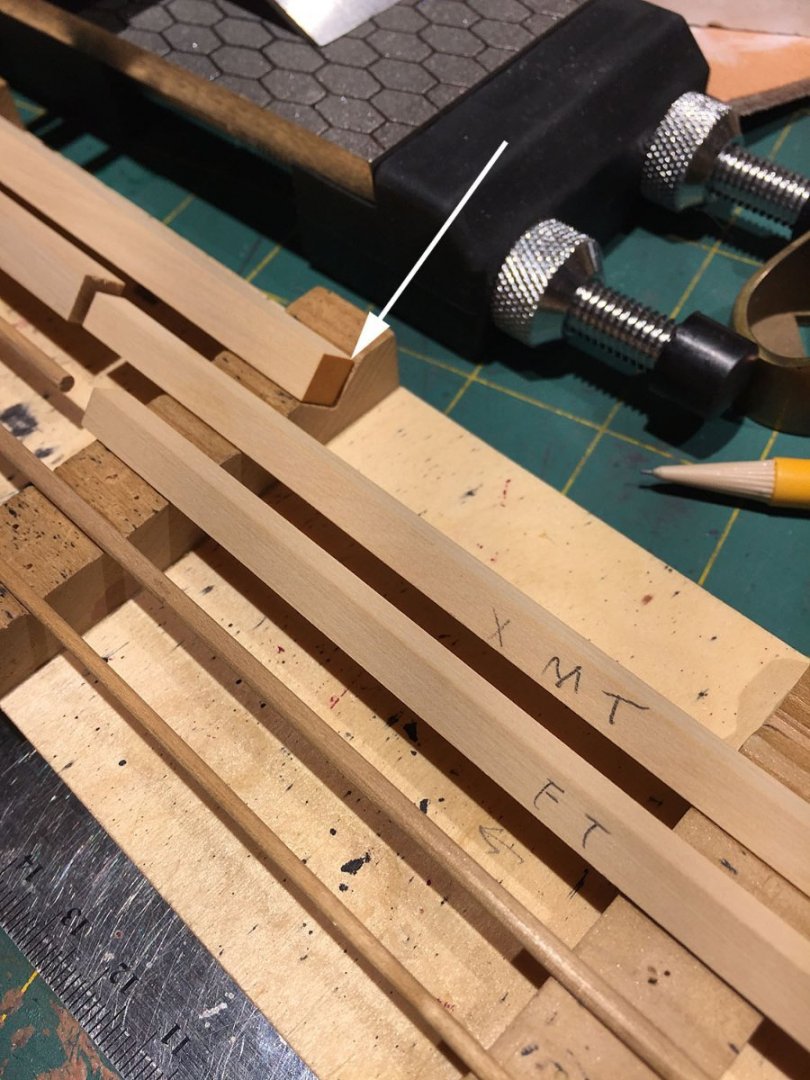
Did a little bench organizing to clear the way for the spar making. Camilla's going to sit idle for a few days while her rigging carpenters get back to work... I've pulled out my square stock planing jig, the same one I used for scratching my masts. Yes, this could be Deja Vu...in this photo you'll see I've prepped the various lengths for Camilla's four principal spars (the main and fore courses and the two topmasts). I've decided to use boxwood stock for these. Boxwood is quite a bit harder than pear and thus, any possible tear out is minimized when I start planing these down to their octagonal cross sections. The spars shown here are being made from 8 mm and 6 mm stock. I chose pear wood for my masts since they're finished in natural colors. All the yards will be black (with the exception of the stunsail booms). In the background is my disassembled Ibex finger block plane. The plane's blade is secured in the sharpening guide resting on top of the diamond sharpening stone. After giving the blade’s edge a "tune up" on the stone with a few simple passes, I'll use the leather strop and compound to add even more sharpness. Neither water nor oil is used in my "honing" process. When I mount the blade back into its brass body (a brilliantly simple design), I'll set the razor sharp blade below the plane's shoe so that it removes less than approximately .2 - .3 mm of material on each pass of the plane. I test the blade's setting depth with a spare cutoff piece of boxwood stock. The thinner pieces of 2 & 3 mm birch dowel in the foreground are for the stunsail booms on these larger boxwood yards; these will not be painted black but left natural. I'm using stock I've collected over the years for these particular spars. These thin booms will have a slight taper; there's no need to plane/shape these other than sanding. The arrow points to the profile of my planing jig's stock holding stations; a series of several "V" grooves along the 20" long jig holds the square stock securely while planing. A simple stop at the end of the jig (one end only) keeps the stock from slipping off the jig as you make a cutting pass.

- 542 replies
-
- 11
-
-
- Sphinx
- Vanguard Models
- (and 3 more)
-
Thought that Indy figurehead looked familiar to me...😬 This photo of my U.S.F. Confederacy "Navy Board"- styled model. All the new Vanguard sculpts and the 3D prints and materials look excellent. I plan to place my Captain Pennypincher ( Vanguard's "Cochran" 1:64 figurine) aboard HMS Camilla. Can you encourage Chris to sculpt a Top Gun (Tom Cruise) one for INDY?

- 488 replies
-
- 13
-
-
-
- Indefatigable
- Vanguard Models
- (and 1 more)
-
Glad to see you're back at your bench, Jim. Stay well.
- 488 replies
-
- 6
-
-
- Indefatigable
- Vanguard Models
- (and 1 more)
-
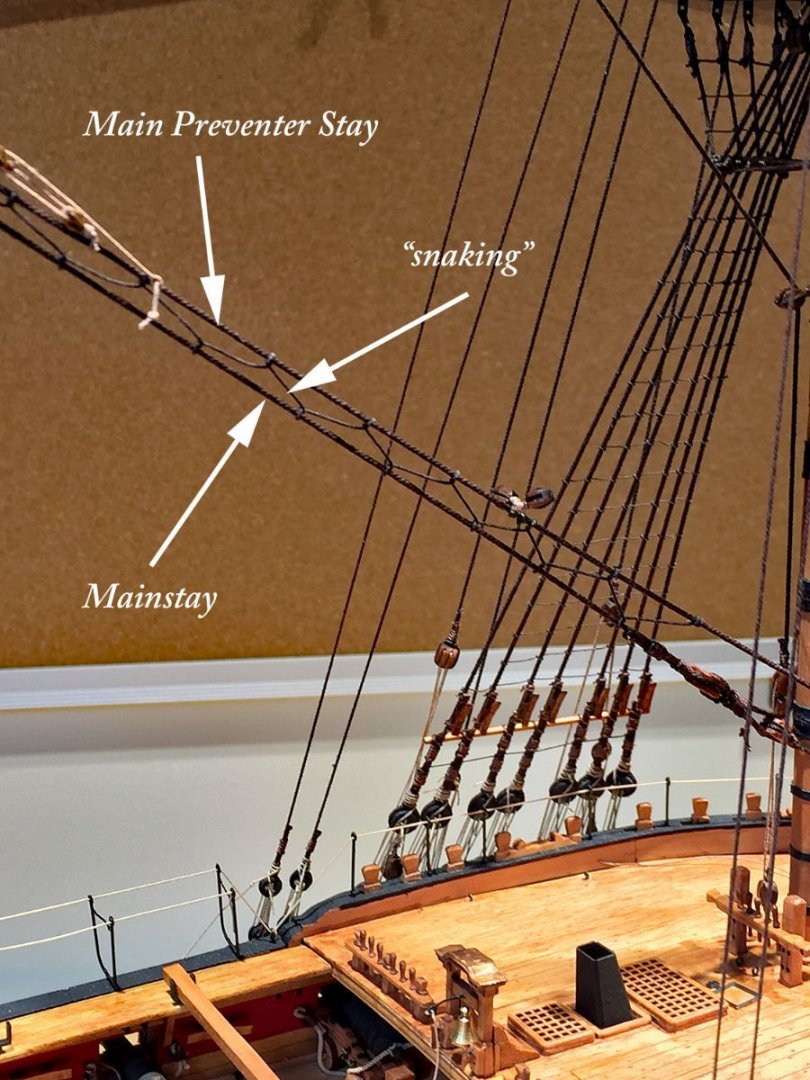
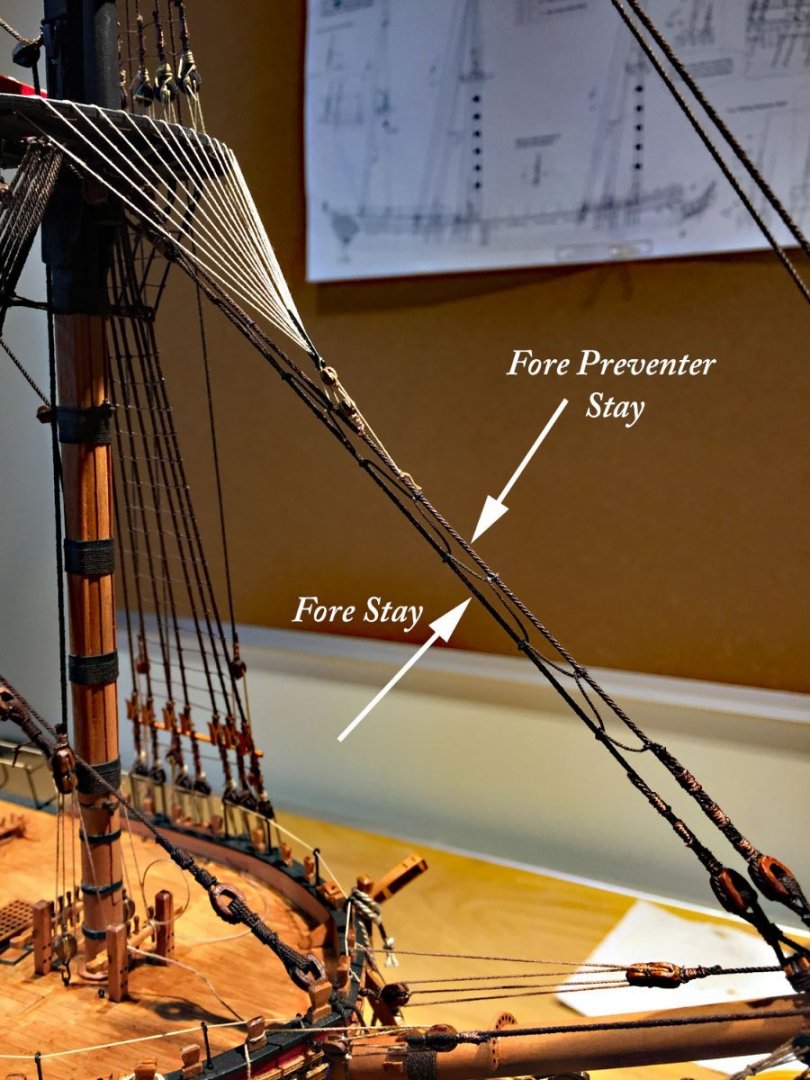
Thank you, Glenn. I follow your logs and your work is beautiful. I respect your comments immensely. On my "snaking" addition...my wife (my best critic) recently asked: "What does that zig-zaggy thingie do?" I responded: "Snakes On Board!"😂 A lot of the fun for me in our hobby is digging into details and discovering little "nuggets" in the various histories of all things maritime. Another example: my addition of the fighting top "cloths." There is a vast encyclopedia of information out there as well as in our amazing FREE forum!
- 542 replies
-
- 4
-
-
- Sphinx
- Vanguard Models
- (and 3 more)
-
Thank You, B.E. Like other rigging "portfolio " of tasks, making this look credible is a little tricky; one of the issues is to select the best scale rope size, similar to the crowsfeet rigging. Build one Theodosius! If my log is an incentive for you, then I'll feel very gratified for your look-ins when you post your own log for a wooden model. No pressure...😂
- 542 replies
-
- 2
-
-
- Sphinx
- Vanguard Models
- (and 3 more)
-
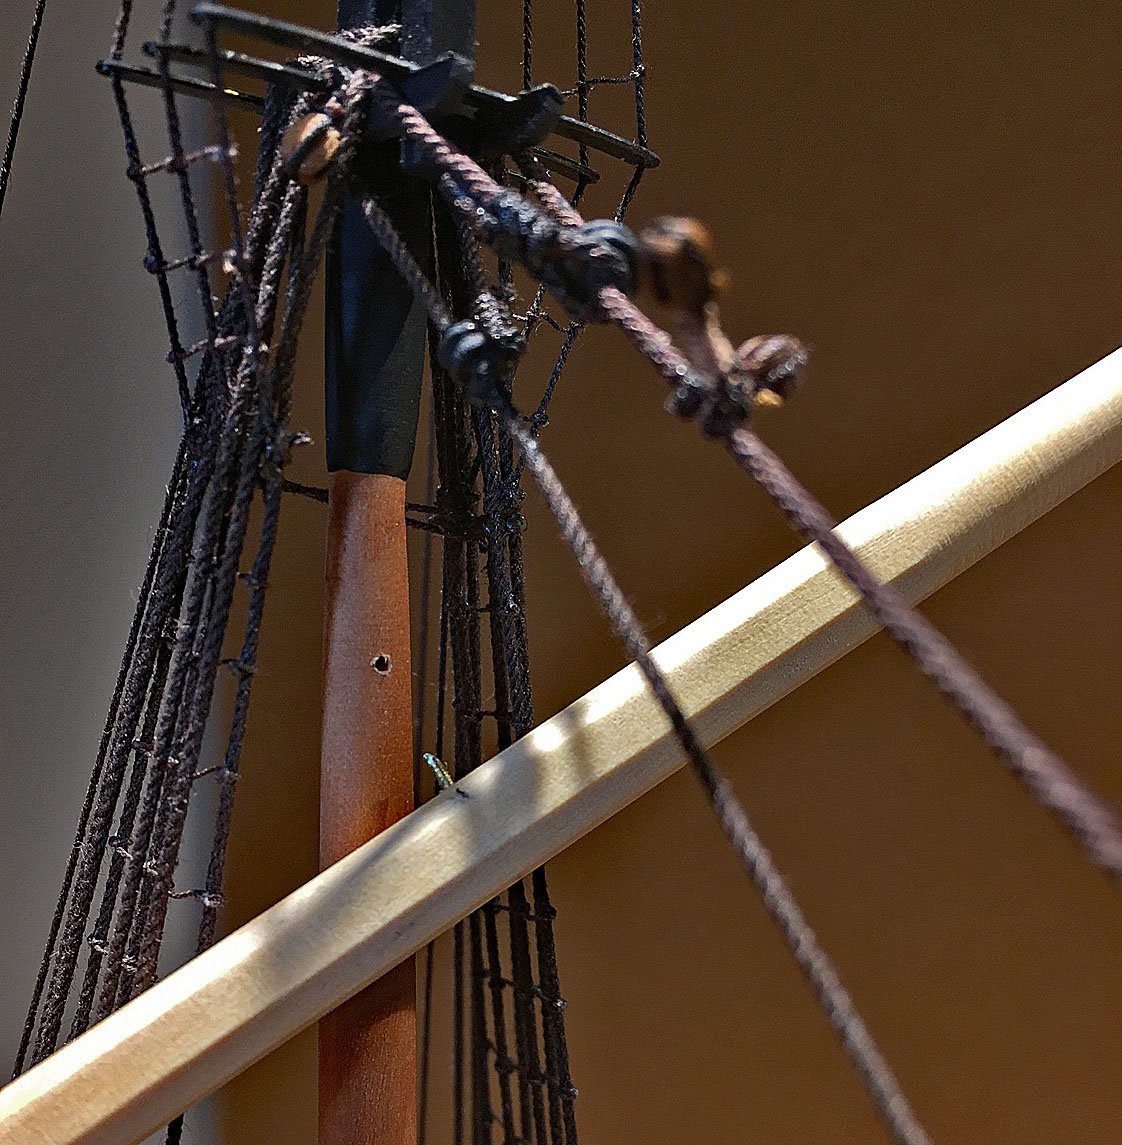
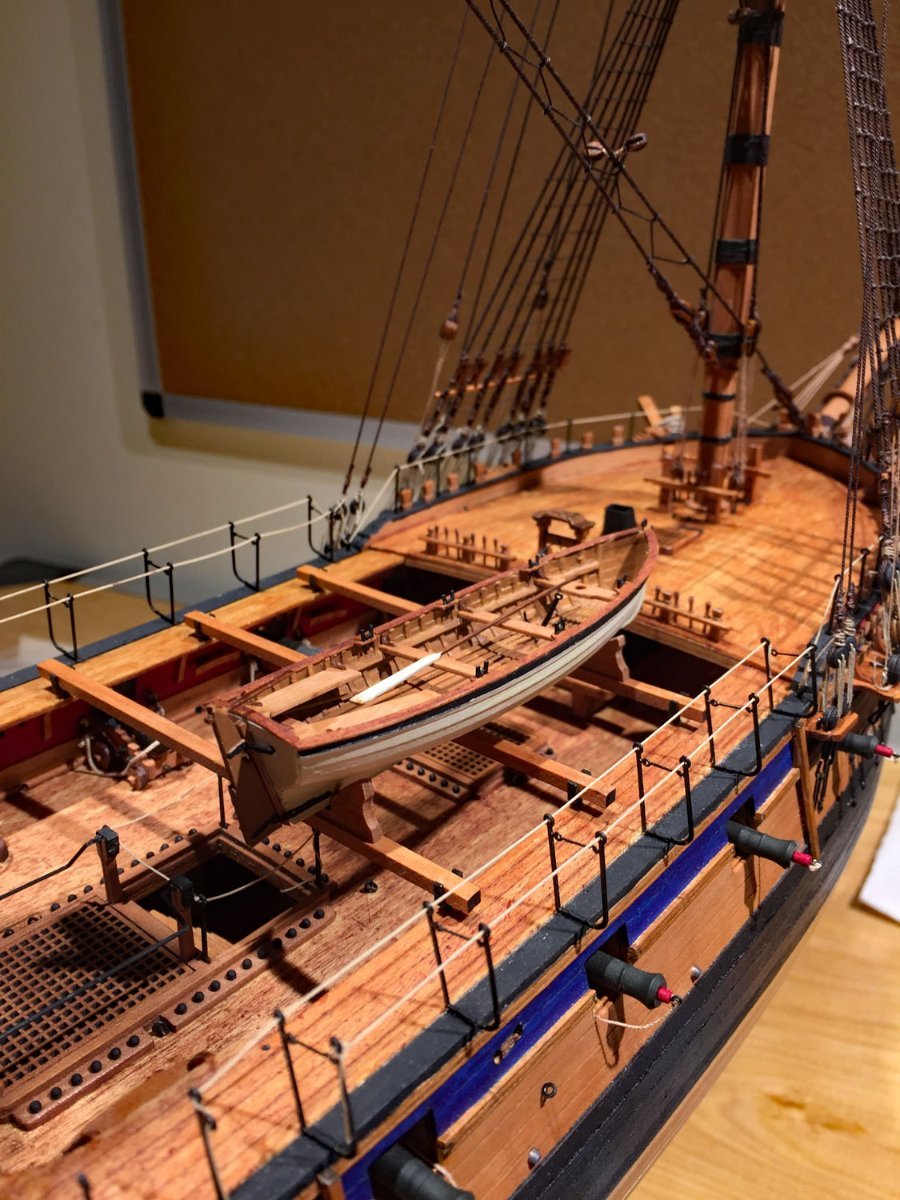
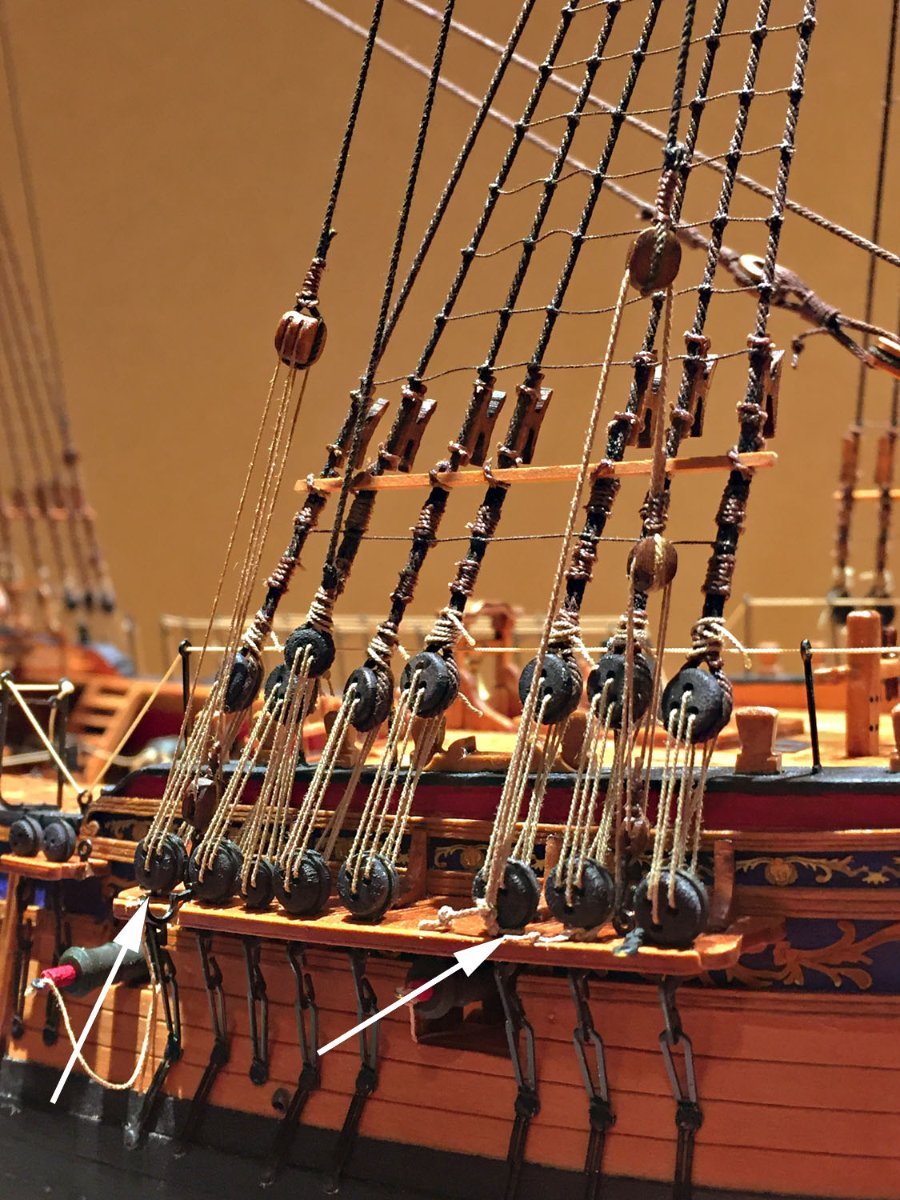
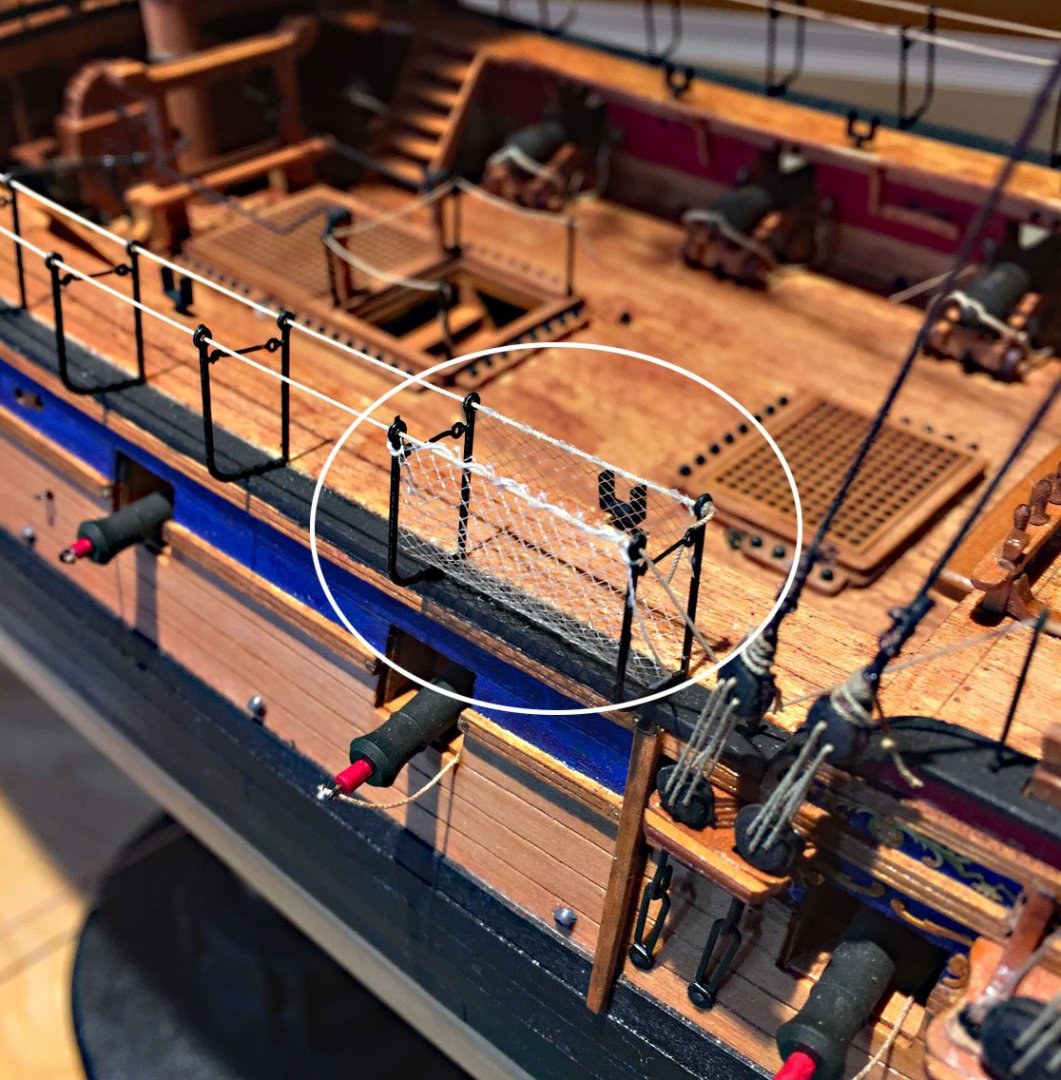
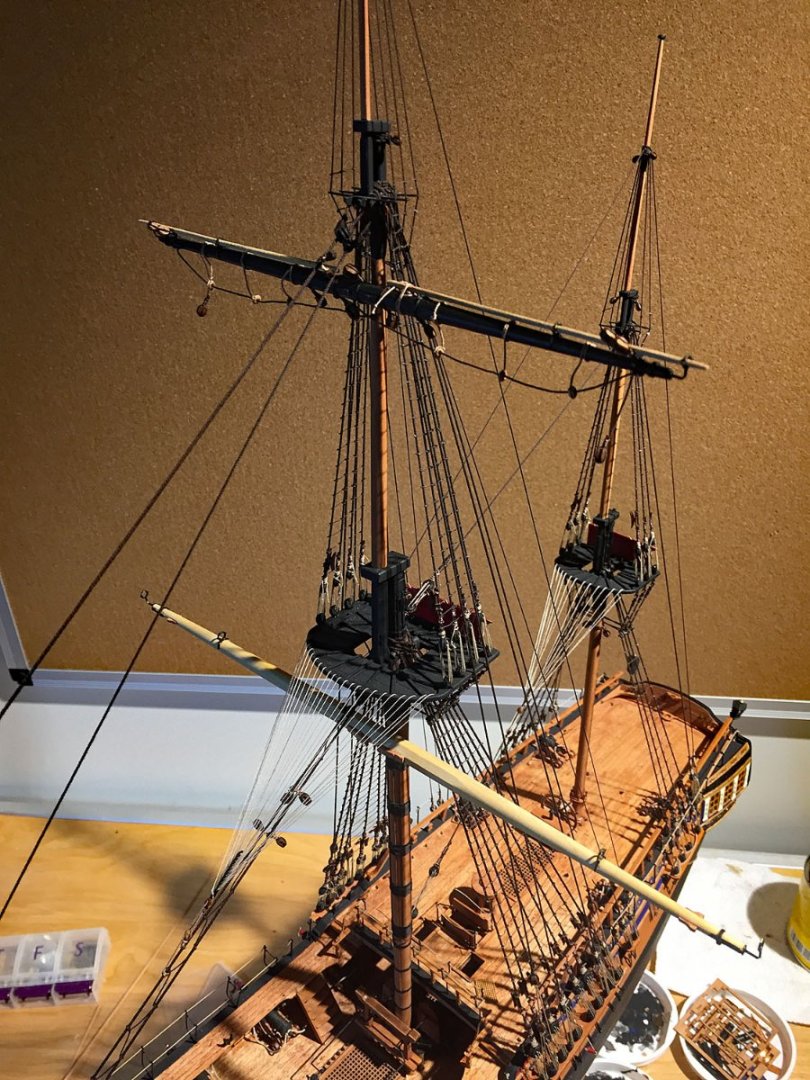
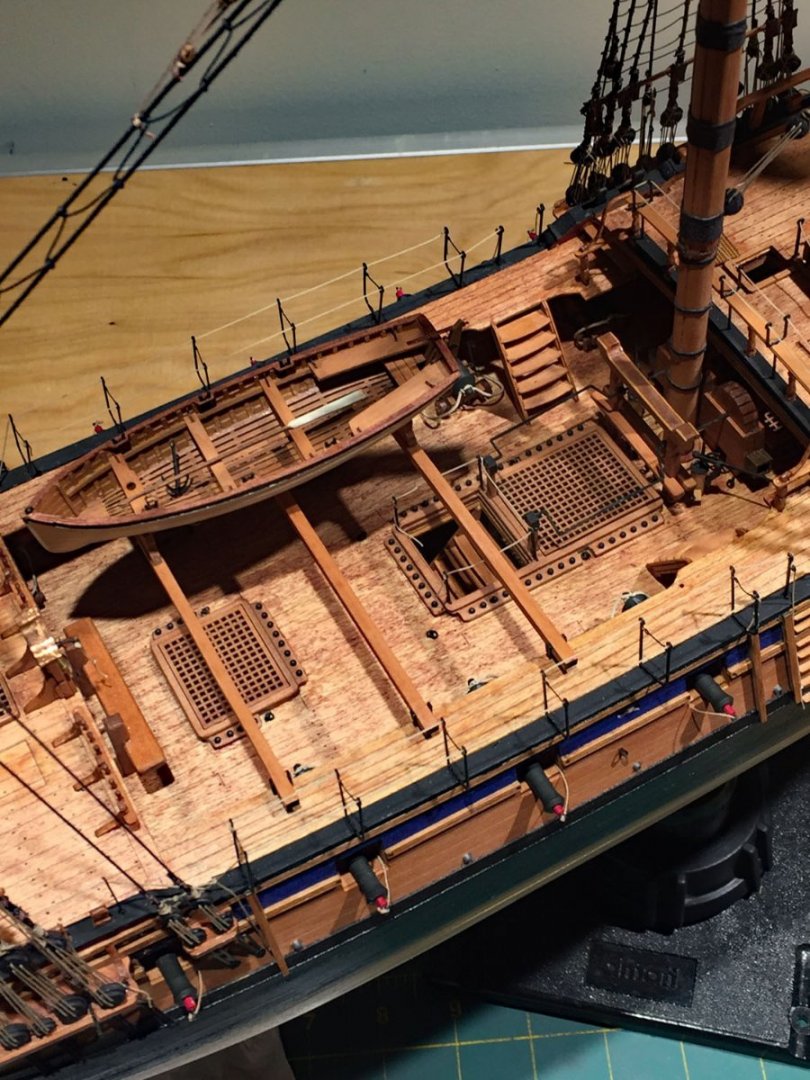
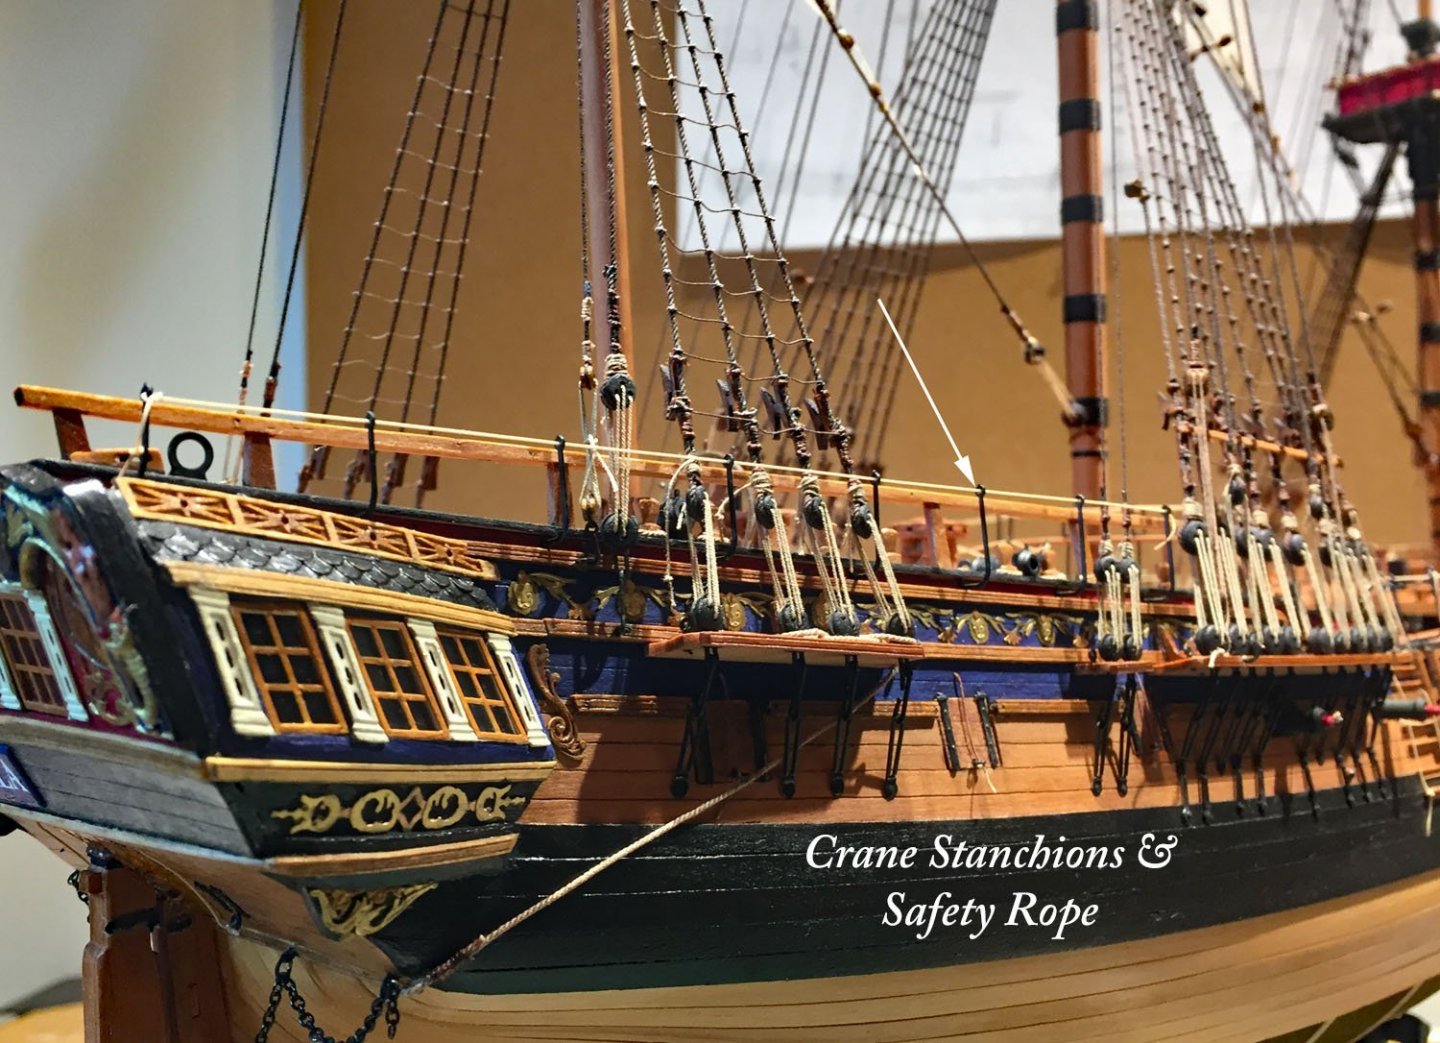
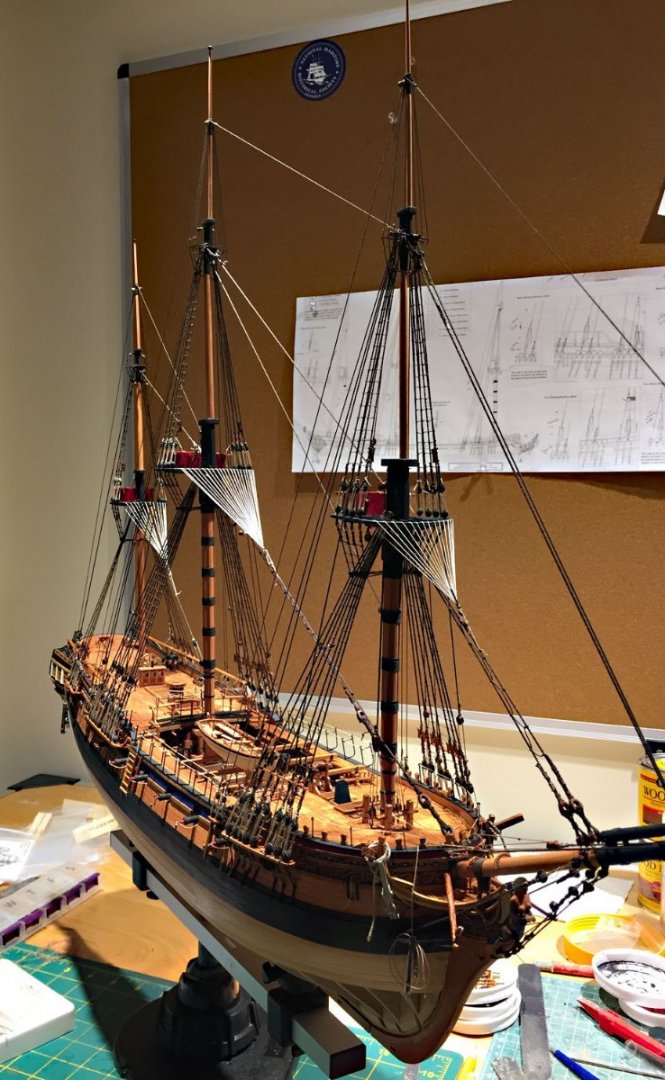
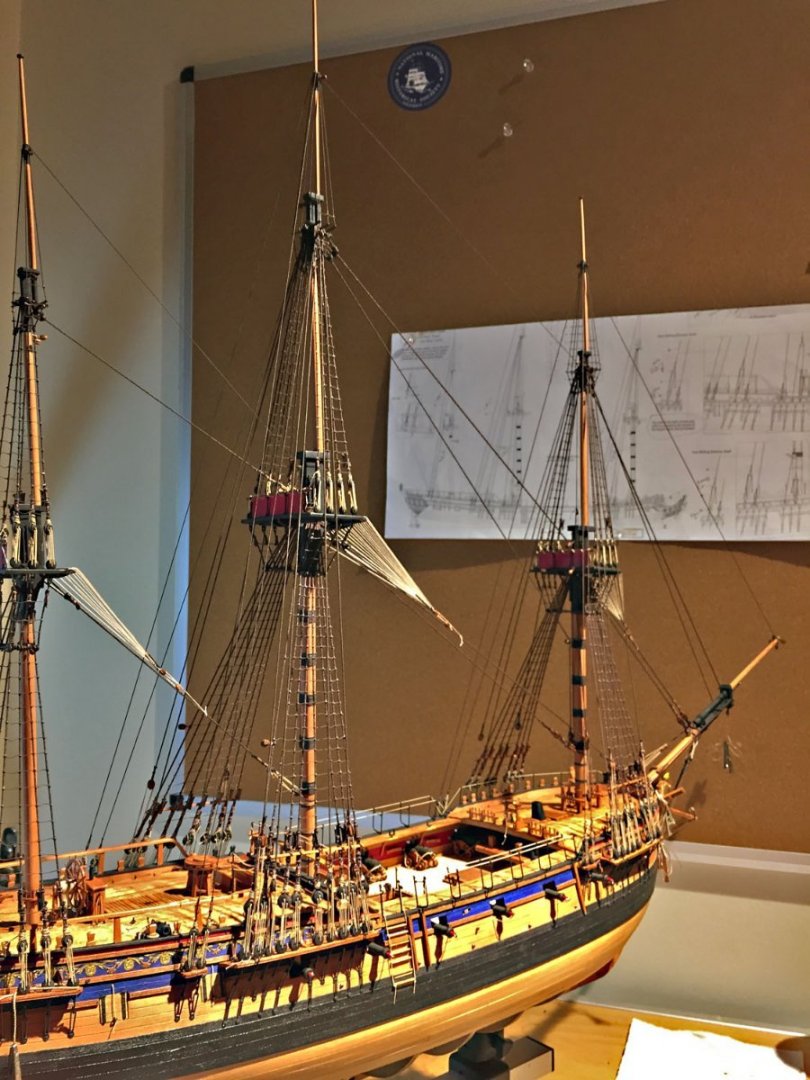
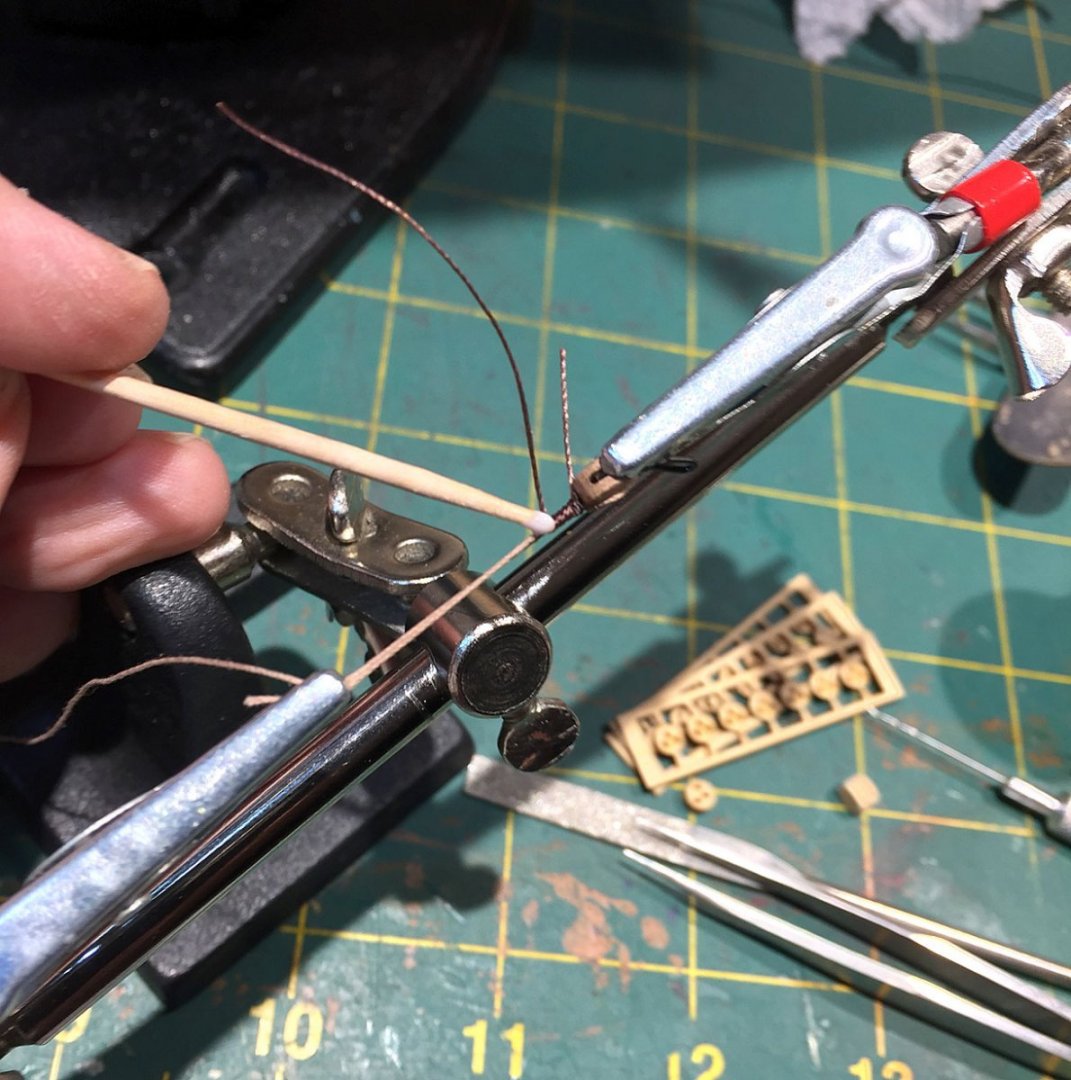
I added more rigging detailing before moving on to the next stage of making HMS Camilla's spars. While I still had decent access to this area of my build, I added the "snaking" to the ship's fore & main stays. These ropes were likely to be trussed in anticipation of enemy action, beginning around the 1780's. The continuous trapezoidal rope between strengthened the critical mast stays; if one became shot-through (enemy gunners aimed for this rigging), the snaking ropes helped to distribute the loading to the remaining stay. What happened if both stays were severed by a lucky shot? Beats me! What's good for the Main is good for the Fore. I've addressed the deck coloring midships: slightly weathered oak planking. The gun deck now conforms to the balance of the decking, fore and aft. I've placed the skids back along with the ship's boat. The boat will carry 6 oars across its thwarts when all is said and done. A spare main topmast will sit alongside the boat, atop the skids, to port (I'll make this when I start turning the spars) Another view of the color-matched planking on the gun deck. I haven't decided yet on whether or not to add netting ropes to the midship hammock cranes. I can do this up and to the point when I start adding all the sail management lines. After the yards are braced and their sails are bent, working in this area will be difficult. There are a total of 11 crane stanchions provided in P/E. I've used 8 on each side. Tucking the remaining 3 stanchions into the crazy-tight spacing directly above the main channels and between the shroud stay rigging was an exercise in futility - and, frankly, looked kluged. I figure this minor detail omission of 3 stanchions wasn't critical. I still wanted to include these nice and realistic embellishments provided by Chris as they are easily visible alongside the delicate q'deck railings. The rope here matches the safety ropes on the foc'sle and along the hammock cranes on the gangways. I don't plan to add rope netting along these lines. Some eagle-eyed members will notice that I've secured the emergency steering ropes to the mizzen channel boards; these ropes (on starboard and port) were stowed here - particularly during anticipated enemy action - so that if the steering became impaired for any reason - or even if the rudder became partially "unshipped," (usually by scraping on the bottom of shallow, unknown waters) - these heavy emergency ropes could provide critical purchase to the rudder by the crew. I stepped back to take in the "Big Picture." With considerable work still ahead of me to finish her rigging, she's now finally looking like a lean, mean, fighting machine. Note: I added the q'deck rope stanchions after these last two photos were taken. I can't wait to see her with raised and braced yards, stunsails deployed, dressed in her billowing finery. Everything on the rigging plan seen on my workshop's corkboard has been checked-off... In a couple simple words, this is a magnificent kit. The box of pieces is nearly depleted with HMS Camilla taking beautiful form. From here on out, I'm pretty much making the Vanguard model my own by going beyond the comprehensive rigging plans as I anticipate adding her wings, the large canvas that will move her across the waves.


- 542 replies
-
- 16
-
-
-
- Sphinx
- Vanguard Models
- (and 3 more)
-
True. Finding ships plans in the "updated" site has become a struggle and there are a number of sad MSW members who've expressed frustration about this new reality- including myself. However, I was searching "ships paintings" just today and had surprisingly good results - albeit a slog as their host server(s) are obviously over-burdened and it was very slow; worst case, the RMG site breaks as is the case this evening, at this very moment as I enter this post. The site currently is not functioning. I suspect the part of this problem is the massive amount of high-resolution content that the servers struggle to deliver to one's browser. Perhaps there's a dreadful Summer heat wave in the U.K.? Or, perhaps they were hacked by an angry FSB? Hot, in' it?
- 488 replies
-
- 5
-
-
- Indefatigable
- Vanguard Models
- (and 1 more)
-
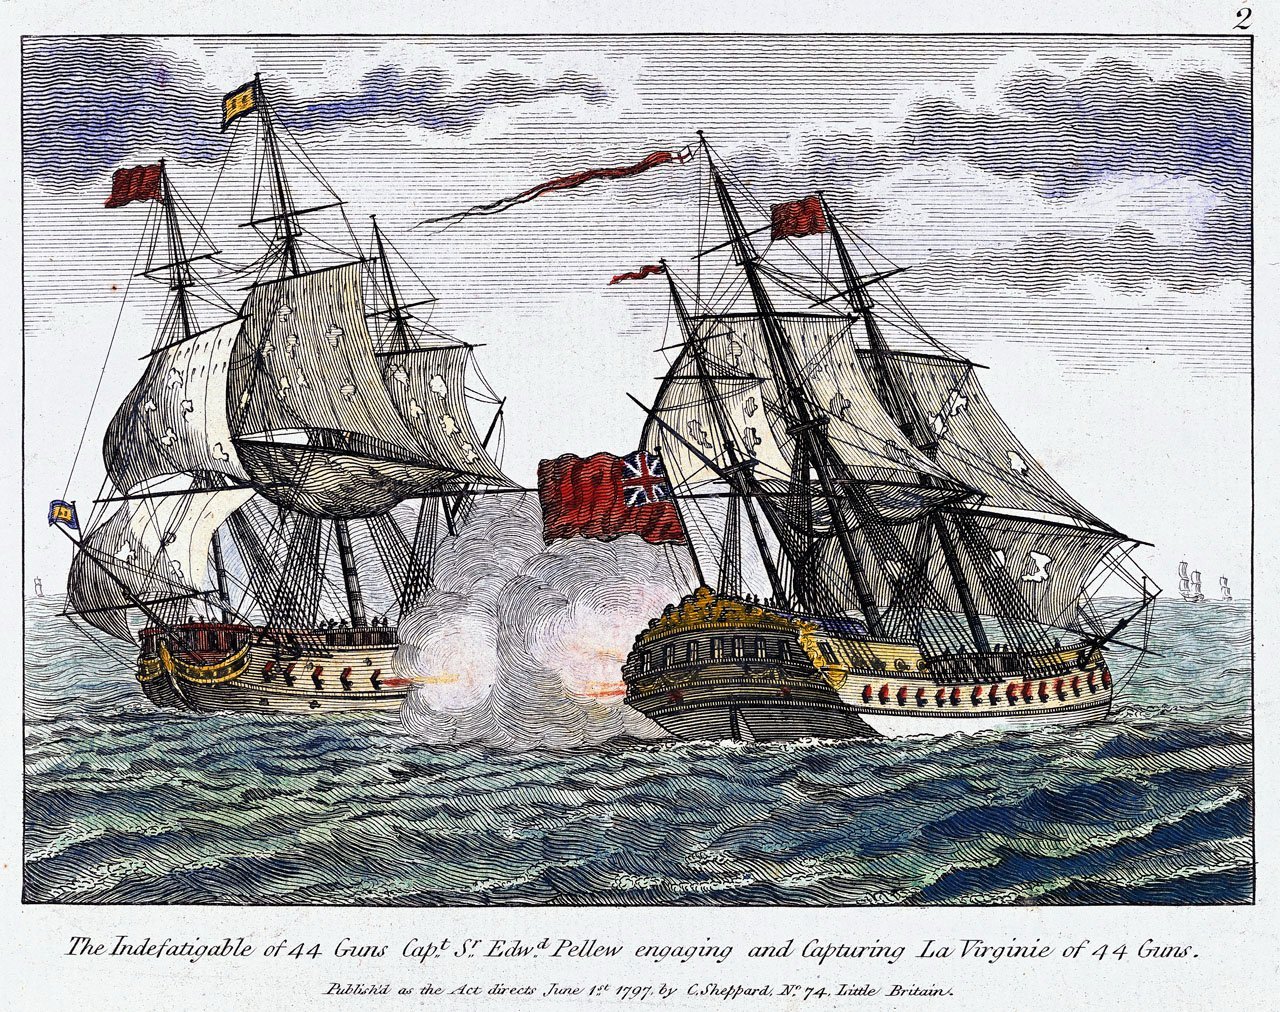
I was doing some research today at the RMG (Greenwich, formerly the NMM) and came across this very nice aquatint engraving of the Indy in action. I'd typed in "Pellew" and got interesting results of the man but also the various ships he commanded. Enjoy...
- 488 replies
-
- 10
-
-
- Indefatigable
- Vanguard Models
- (and 1 more)
-
This was a minor puzzlement for me also. I did work out a combo of supplied P/E pieces that got the job done eventually. I chose to close-up the deadeye loops (the top ones below the channels) on my build; in practice, I can't imagine these critical fastenings were left "open" (below the channel boards) after the ironwork was completed. BTW: clever to string a keeper thread through the deadeye loops to keep them from doing walkabouts. After I found a couple random deadeyes MIA (the 3mm ones)...I decided to set all of them aside until I was ready to permanently mount all their respective preventer plates and linkages.
- 857 replies
-
- 1
-
-
- Sphinx
- Vanguard Models
- (and 1 more)
-
Same problem here, B.E. It's a little long in the tooth having seen me through no less than thirteen models over the past 12 years. It hasn't completely failed so I just apply a little more force to tighten it's grip - however, I'll probably replace it with the Indy build coming up next year...with inflation, I wonder if I shouldn't get one now and have it on my shop shelf???
- 857 replies
-
- 1
-
-
- Sphinx
- Vanguard Models
- (and 1 more)
-
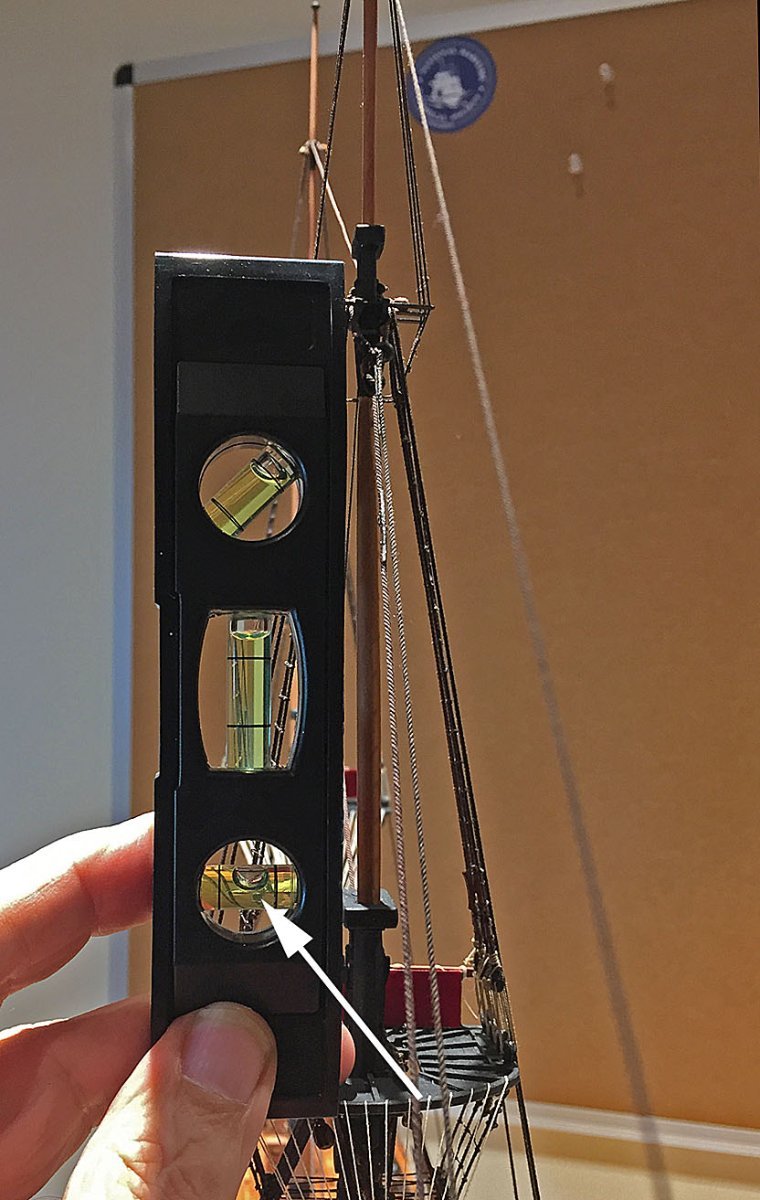
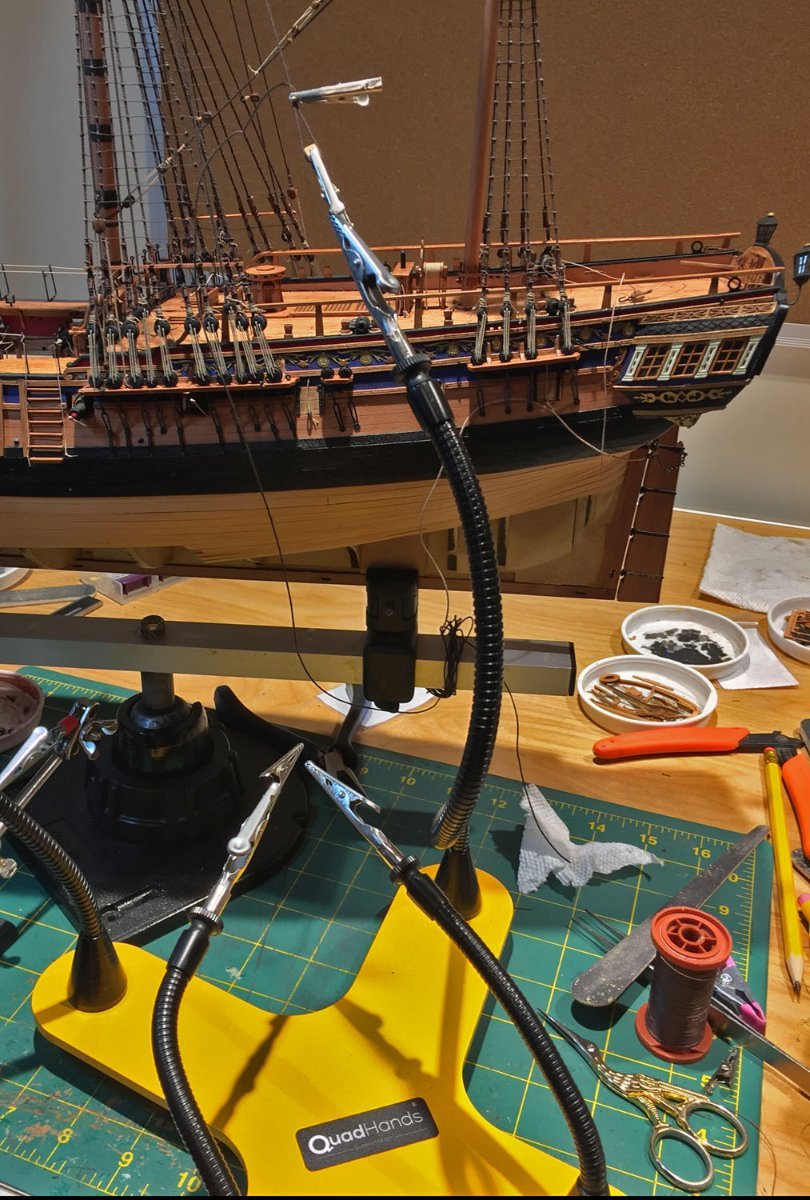
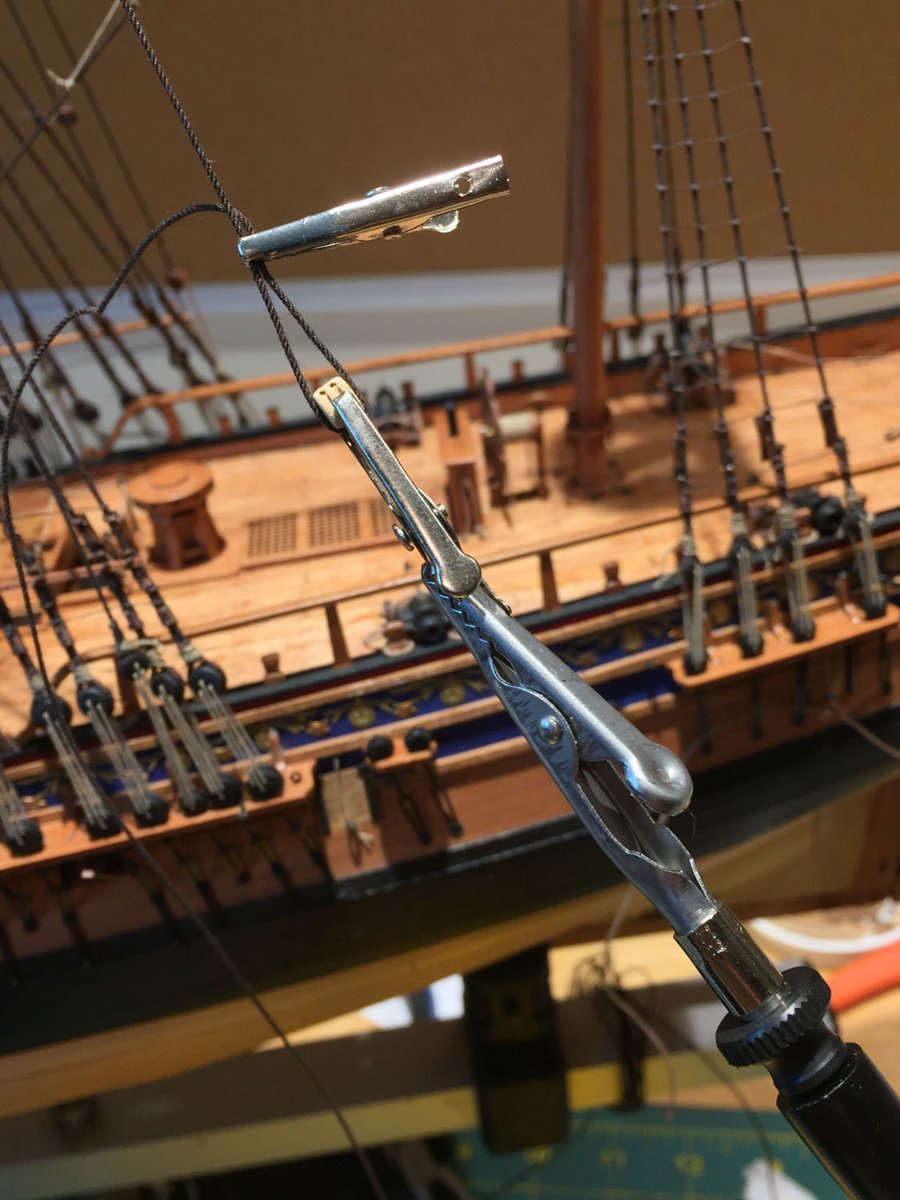
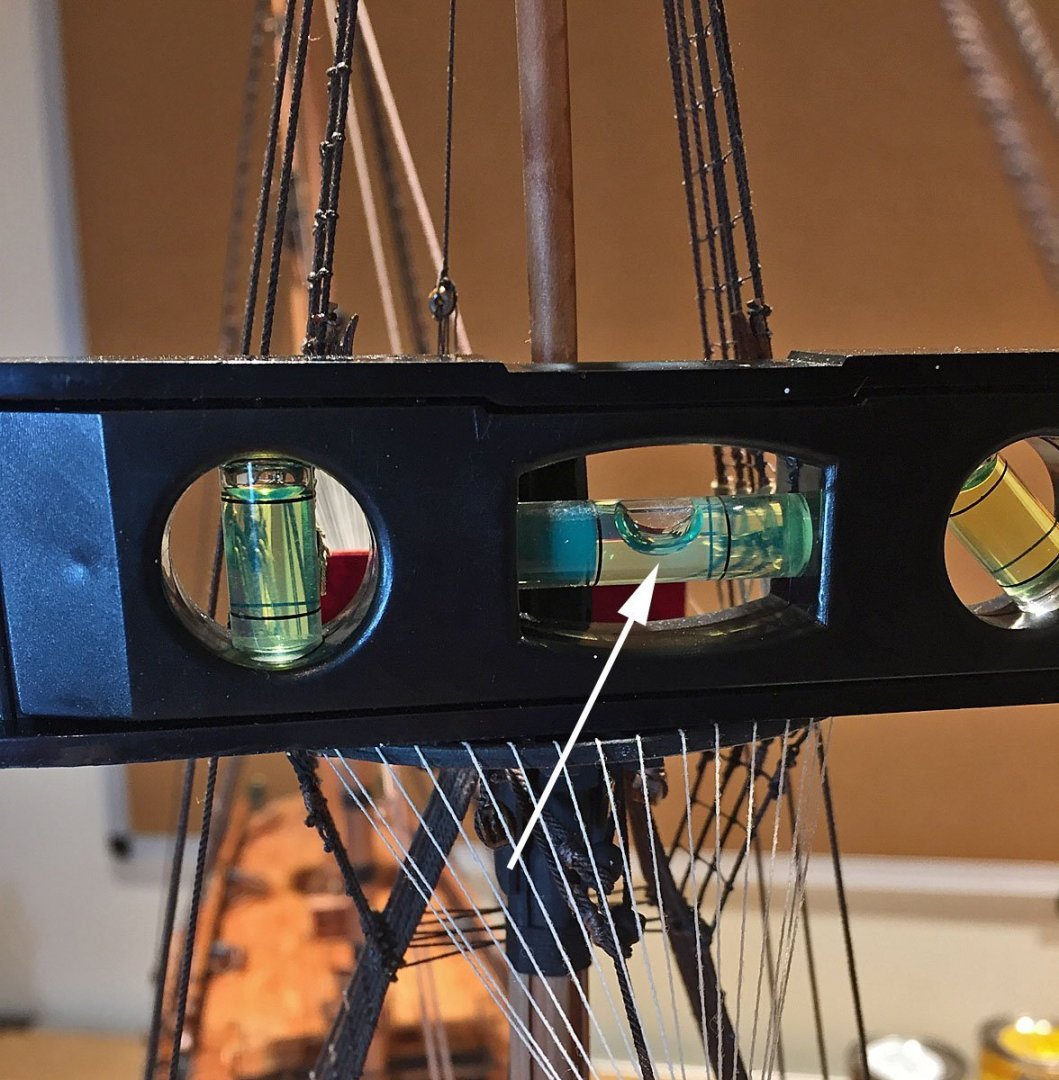
The backstays...continued. Setting-up a backstay with just one of the handy, flexible arms of my QuadHands jig. To hold the small blocks securely, I slip a smaller alligator into the jaws of a larger alligator. That's called Natural Selection!...Before I ran the block's tackle ropes I colored the boxwood block (see below). A view of the slightly cumbersome, yet extremely helpful jig that helps get tricky rigging jobs done. A close-up of the Matte Medium adhesive I use on block lashings; it sets pretty rapidly...in the background, some Syren Ship Models DIY 3 mm deadeyes. After lashing the boxwood double sheave block to the stay line I colored it with the alcohol-based ProMarker to match the ship's other blocks. Hidden amongst the deadeyes is a small (3 mm) single sheave block that has to tuck into a very tight spot for the shifting backstay tackle lines. I wish I'd mounted these when I was setting-up the deadeye shrouds... I ran out of 5 mm double sheave pear blocks. Luckily, had a small lot of boxwood ones from Syren Ship Models in my stash. These blocks are nice but require some adroit filing so that the rope will optimally nest in the grooves. Very fiddly...but the diamond flat file makes pretty fast work of prepping these guys...the outside edges of the these blocks also need to be rounded-off slightly. My diamond dust- encrusted flat file and indispensable #72 thumbdrill. More Syren Ship Model build-them-yourself, three-layer, superduper, lasered boxwood 3 mm deadeyes. Once you've assembled them (easy) and break them off their "sprues," the holes need to be opened-up, the rope recess needs filing and finally the edges need to be rounded-off, just like the square blocks. I also ran out of these small deadeyes. I needed just two more to finish-up the backstay rigging. I have no idea why I ran out. Looked all over the floor for too long. Cleaned my workbench. Checked all the little baggies one more time. I know there are two Vanguard-supplied ones lurking somewhere. I'll find them after I've prepped these and completed the stay. That's the way of the model ship builder. The thumbdriill makes yet another cameo appearance. In addition to opening the DIY deadeyes from Syren, their boxwood blocks also need their holes opened-up, especially after coloring which I suspect shrinks them ever-so-slightly and makes it impossible to get any rigging line through the sheaves. A progress photo. Main and Foremast stays completed. Mizzen stays left to do, then Voilá!...off to manufacture her 13 spars, July's task. If this Vanguard kit is your first, you can be confident that the extensive rigging plan sheets included with the kit are comprehensive and accurate. There are some nicely drawn rigging details to point in the right directions, but the numerous processes and techniques is one of the reasons you're here in the MSW forum; if you have questions about any aspect of this challenging process, the helpful answers are likely posted and explained here in Build Logs like this and in the extensive topical categories. Checking the position of the topmast for perpendicularity. My small level (like my short steel ruler) is very helpful. It's got a magnetized strip on one edge so I simply stick it on a nearby lamp so it's at-hand and doesn't get lost on my bench. The bubble knows! Checking the level of the hull BEFORE checking anywhere else, per the previous photo on checking the perpendicular alignment of a topmast. I'm confident that the placement of my level at this particular checkpoint reports an evenly balanced hull. More bubble reporting. Once the tops are level with the previously-checked stern level, the arrow points to a good sign you'll get the topmasts even when you tighten-up and secure all the mast backstays. I included these leveling photos to show the process I use for aligning and mounting all the stays. Once the multiple levels are checked, you can then visually verify that the topmasts aren't skewed to either starboard or port by looking straight-on from the bow: all the masts should align. From either side of the model, it's also important to see that you haven't over-tightened the stays; doing so will cause the topmasts and gallants to bend toward the stern at an unnatural angle. This should be pretty obvious if you've over(or under) done it. The mainmast is raked slightly to aft, the mizzen mast slightly more so whereas the foremast should be dead vertical to the waterline/foc'sle deck.


- 542 replies
-
- 14
-
-
-
- Sphinx
- Vanguard Models
- (and 3 more)
-
I like your simple solution for this task. I've always "eyeballed" them myself. These are always fun to affix... I mark visualised spots with a fine-tipped pencil for the mounting holes. When my wife and I were last in Scotland we had to visit the village where Clair (of STARZ Outlander series) had her foreshadowing vision. We weren't the only American fan/tourists standing next to the fountain in the square...we became huge fans of Outlander Seasons 1-4. I hope you can get the Starz app to download and catch-up!
- 857 replies
-
- 5
-
-
-
- Sphinx
- Vanguard Models
- (and 1 more)
-
Nice photos, B.E! This beach is gorgeous and one of the only ones in Wales where you can get into the water to swim or surf. Perhaps these are actually neolithic standing stones covered in moss. I know - The Time Lord from Doctor Who will have the answer!
- 857 replies
-
- 2
-
-
- Sphinx
- Vanguard Models
- (and 1 more)
-
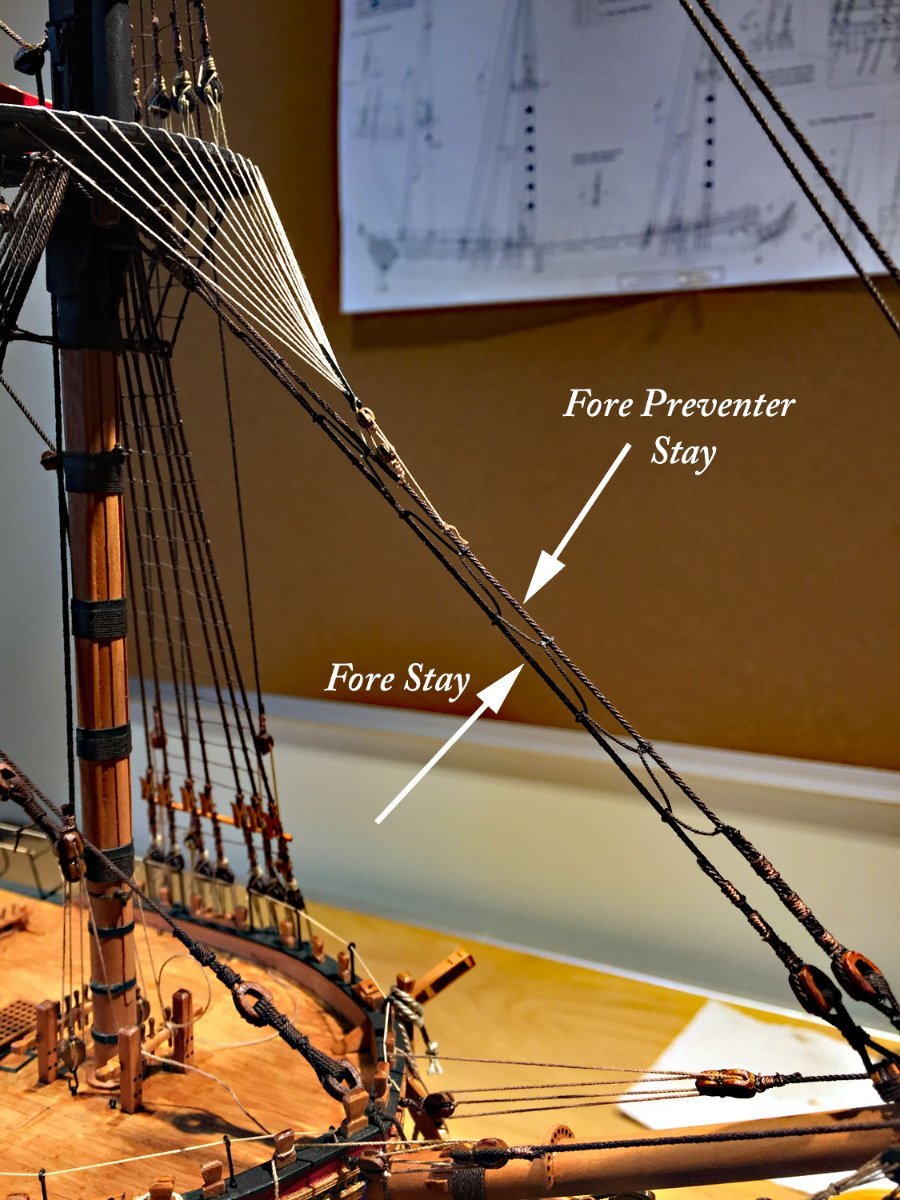
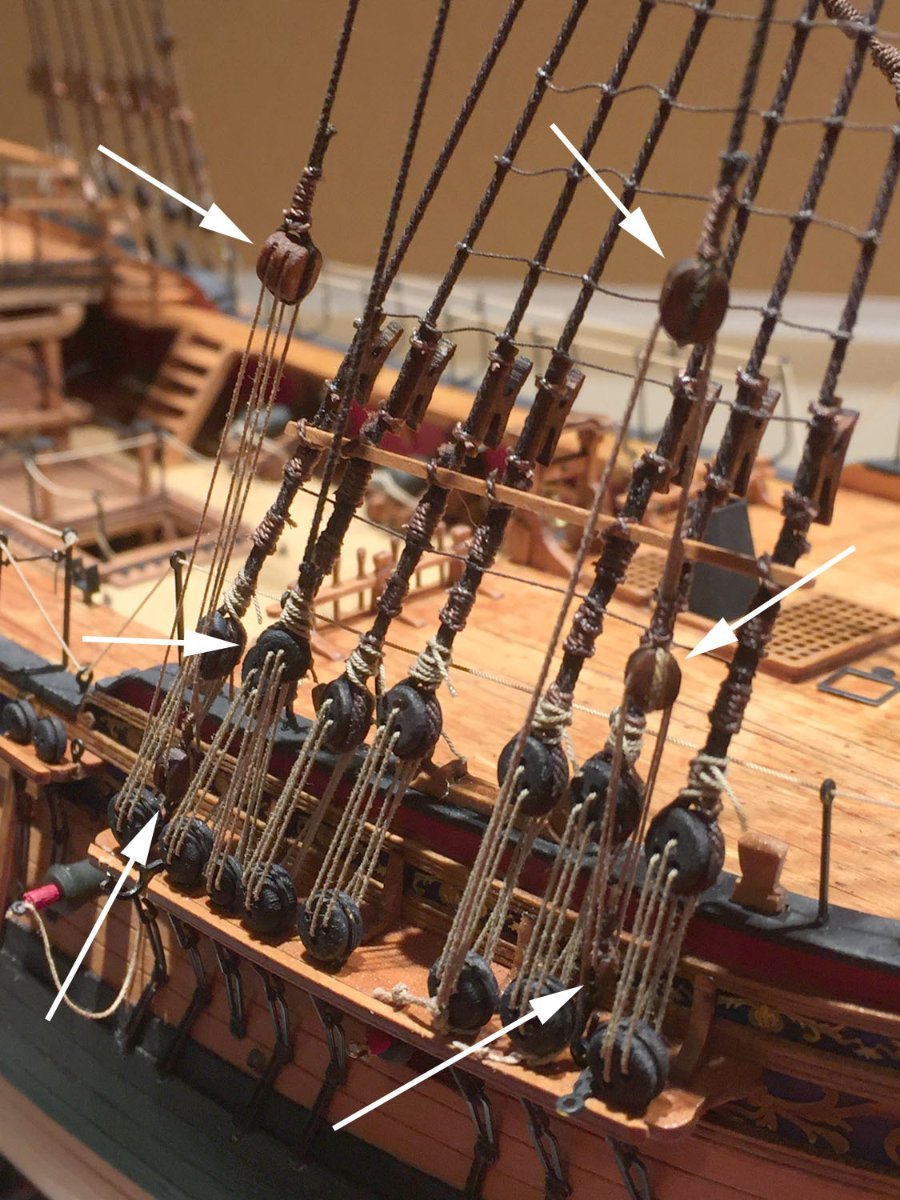
There are no less than 26 mast stays on this ship. These long, heavy ropes hold and stabilize the topmasts (and topgallants). Without a doubt - for this modeler - the stays are the most challenging aspect of rigging a ship of the era. Shrouds and ratlines are tedious but pretty straightforward to achieve without too many challenges - as shown in my previous posts. This is not the case with all the mast stays. It is very easy to get the port-to-starboard tensioning of these lines wrong. If one doesn't proceed with caution on this rigging step, the masts will easily bend, or appear askew. Each stay line (again, 26 of them) risks pulling the masts out of visually acceptable side-to-side alignment. The stays exert forces on the slender topmasts that need to be carefully "balanced." To help get this aspect of rigging correct, I alternate the stays from port-to-starboard and, when possible, leave all the final alignment tensioning until both sides have their stays in-place. I find this symmetry crucial. The various blocks and deadeyes on all the stays permit selective tensioning and work identically to their real-world counterparts. Also, setting-up the control blocks and fall lines for the stays - in their very tight channel quarters - also contributes to the challenges of the late-stage standing rigging. I've started with the foremast stays; shown here is the breast backstay (on the right) and the shifting backstay. The arrows point to the unusual spots to tie-off the fall lines from each tackle block. The falls wrap around the base of each shroud deadeye at the channel boards. Each stay shown here has three (3) tackle blocks, in three descending sizes (5, 4 & 3 mm). Setting-up the tackle off the model I find is close to impossible. Some of these blocks can be set-up with a third hand clamping tool but getting the length of the lines (particularly important for side-to-side symmetry) to be evenly positioned can only be accomplished by adjusting each stay tackle in-situ, by eye and with some temporary alligator clip clamping. This view points to the three blocks necessary for the breast backstay and shifting backstay tackle lines. The breast backstay fall lines (on the right) can be seen tied-off and lying at the base of two shroud deadeyes (below the right arrow). The main tackle block for the breast backstay is a 5mm single sheave one (topmost block); the shifting backstay has a 5mm double sheave. All my blocks are pear and from either Falkonet and Syren Ship Models. I stain my rigging blocks to make them appear darker per their real world counterparts. Stay lines in progress on the foremast. The arrows point to three lines temporarily rigged. A fourth line ( the port side foremast shifting backstay) is the next up for mounting. The first stays (breaststays) have been "tensioned" so that the topmast isn't skewed sideways. The stays will get secured at the tackle blocks (and deadeyes) after all the stay lines are rigged to the respective mast. Your model must be constantly rotated during all these critical processes to view the affects of your work with these rigging processes. If you can't see what you're doing with these rope lines and how they affect the mast positions you're going to run into highly unsatisfactory results. Like the "ratlining" ("ratt'lin down") from the earlier stage, none of this work can be hurried.


- 542 replies
-
- 15
-
-
-
- Sphinx
- Vanguard Models
- (and 3 more)
-
Thank you, Matt. Late night rigging keeps us out of the local bars...
- 542 replies
-
- 4
-
-
- Sphinx
- Vanguard Models
- (and 3 more)