

.jpg.d84ec4dad1d7791e855dca06210ab6f3.jpg.40b7a0ea2cc62bf0a3ec2a716005383a.jpg)
hollowneck
-
Posts
1,351 -
Joined
-
Last visited
Content Type
Profiles
Forums
Gallery
Events
Posts posted by hollowneck
-
-
A point of personal trivia which I believe is cogent on this thread:
if Chuck Passaro hadn't designed a superior kit several years ago (the Syren) and offered it through Model-Expo at a reasonable, yet up-market price, I wouldn't even be on this forum and more than likely pursuing another hobby entirely.
Passionate folks here, Chris. All of them, including Yours Truly.
")
Ron
-
-
Bravo, Chris! I love sails, especially ones that show these ships under glorious wind propulsion...
1/64 is the "sweet spot," IMHO a "perfect" scale for larger 18/19th- C sailing ships. Offering an optional full sail plan set is a good idea.
Keep Calm. And Carry On.
Ron
- mtaylor, chris watton and Canute
-
 3
3
-
Chris,
Are you planning to mast and rig her?
Ron
- chris watton, Canute and mtaylor
-
3
-
-
Rob,
Thanks for your compliment, pleased to help. Convincing looking sails in proper scale, are not easy to replicate accurately. Same goes for water!

The publication to which I'm referring is not a newsletter but is the "Nautical Research Guild's Journal," which is printed quarterly for members (and now posted online — go to: www.thenrg.org). The NRG is the owner of this forum and I recommend looking into an NRG membership which will give you access to the quarterly.
Sail on.
Ron
-
Rob,
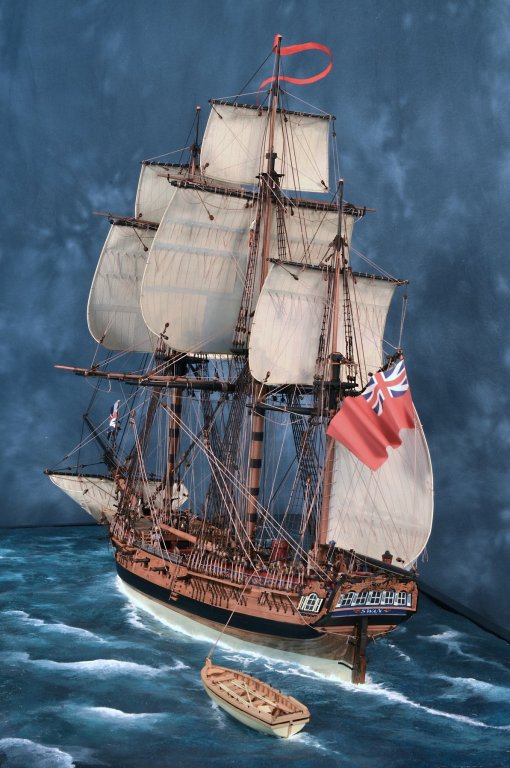
If you receive the NRG's Journal, I have written a detailed step-by-step tutorial on how to create "set" (billowing) sails with silkspan, including techniques and suggestions for painting. This is Part 2 to my article on HMS Swan diorama and will appear in this Winter's issue (I believe the first week of December for fulfillment). David Antscherl's tutorial on making silkspan sails is an excellent reference.
Your paper sails look very good. I would only add that silkspan material has a subtle texture that more accurately resembles canvas fabric, since in effect, it is a "fabric." Silkspan is pure white and needs to be painted (and "weathered" should that be appropriate).
Here are two pics of my HMS Swan sails showing the results of my silkspan techniques.
I hope this info is helpful.
Ron
.jpg.47c525150612c38486d0369a63f9f29a.jpg)
-
Mea Culpa.
 I forgot to mention in the last post that Cornwall also has the best prices of all online vendors; this is especially the case for English origin products and virtually all the European kits and goodies. Disclaimer: I do not own shares in the company, but I wish I did!
Ron
- Canute, mtaylor and Ryland Craze
-
3
-
I have been purchasing kits and sundry other items from Cornwall for 7 years. Their very well designed site shows the U.S. Dollar price for nearly all items (and all kits that I've purchased or looked at) and that's all one should be concerned about here in the ole' U.S of A. That simple.
Of course, shipping is additional. Cornwall is an excellent organization. I have only good things to say about them. Their web site also updates with currency fluctuations: I watch these carefully before I make large $ purchases. The U.S. does NOT have a national consumption tax - called "Value Added Tax, or VAT." In the U.K. this is 20%.
 In Europe it varies by country.
As many know, there have been proposals to establish a "VAT" in the U.S., which will likely never happen. Without massive federal tax reform, a regressive (add-on) consumption tax would blow-up the American economy in short order.

Ron
- ir3, mtaylor, Ryland Craze and 2 others
-
5
-
-
19 hours ago, chris watton said:
You may be right, it is about the same length as Victory isn't it, and that model in 64th is an absolute behemoth!
Anyway, I intend to focus on British subjects for the first lot..
British sailing ships, 17th/18th century. 1/64 scale. Frigates (or smaller). Here! Here! Once you begin to zero-in on a few final choices, list them here (in the order you'd potentially release them). I am certain you'll get lots of positive feedback among those who are your target market (high-quality kits and not price sensitive).
Cheers,
Ron
- mtaylor, Beef Wellington, Canute and 1 other
-
4
-
Not sure we need another U.S.S. Constitution. There is already a 1/76 version by Model Shipways (www.modelexpo-online.com) that is regarded as a good kit and sells for $419. It's also 48" long. A 1/64 would be approximately 54" long. Gulp.
Leda, Royal George, Shannon, Chesapeake all sound better to me...

Ron
- Canute, mtaylor, Beef Wellington and 4 others
-
7
-
Good news for all those who appreciate your excellent work with both Amati and Caldercraft projects.
Although small, there remains an international market for high-end kits of unusual period ship subjects.
Please stay in-touch with this forum; let us all know how you are progressing on your prototypes. Once or twice a month would suffice. You needn't spend hours -unless you'll be doing some research among members, which I would suggest could be quite valuable.
Best of luck!
Ron
- mtaylor, Ryland Craze and Canute
-
3
-
Perhaps you can fix this issue with a check on your mailbox, it could be full...
Ron
- popeye the sailor, CDW, mtaylor and 4 others
-
7
-
Your MikeyCasa is looking excellent! Nice work. I like the colors you've chosen.
I owe you a photo of my stained decking (now in place on two of the three deck pieces); this will clearly show the maple color I used. I'll post this over the next couple days...
The Minwax stains are oil-based (not water), so paint thinner is required for clean-up or thinning. I use Minwax right out of the can. If I want a little more darkness to the hue I wait for first coat to dry then go for a second coat.
Ron
- Old Collingwood, Canute, mtaylor and 3 others
-
6
-
Craig,
I'm satisfied with the Minwax stains (Home Depot/Lowes) - nothing fancy or expensive; they are consistent but you do need to toss 'em out after about 18-24 months. I also use a wood conditioner (also by Minwax) that helps even out the wood grain before staining. It's an extra step by I think it helps to prevent inconsistencies. The solvent stains dry pretty rapidly so the conditioner only adds a few minutes to the process. I'll take a pic over the next couple days ( I've only put the wood skin down on one deck piece thus far) and post it; you can judge the look and results for yourself. I used a med fine brush and had some Q-tips handy when I did my staining. Don't let the stain stay on long, wipe it off quickly with the cotton tip.
Ron
- mtaylor, popeye the sailor, Canute and 1 other
-
4
-
O.C.,
Thanks! Assuming the rehab/restoration has changed much of the original deck materials over the last 70 years, to me all the decks appear to be teak in various states of weather wear. The bridge shows teak- some pretty worn and another view shows highly polished wood. I'm thinking my choice of stains will be pretty darn close to what I see in the memorial pics.
Since there is so much visible wood decking on this ship model, the color decisions are very important I think.
Ron
- Canute, CDW, popeye the sailor and 3 others
-
6
-
Craig,
That's exactly the conclusion I'm coming to on how to approach this challenging project: the instructions only show HOW parts go together, not in what order - which can be critical, obviously - and especially at the small scales. I've already been writing down some sequences to follow as I look at - repeatedly - both the HobbyBoss booklet and Pontos "sheets".
Your last pic posts on your bridge detail is stunning. I've already decided to use three shades of grey on my build. And speaking of colors, I've tested stains on the wood applique/overlays and decided to use a maple color, except on the conning tower's floor which will be stained darker to simulate teak. I haven't seen you color your decking yet; have you chosen any colors or do you intend to retain the lighter, natural wood supplied in the upgrade package?
Ron
-
Craig,
As Ahnold said in the Terminator..."I'll be Baaaack..." Of course, I'll be back... just not sure exactly when since I've just cracked the boxes and inspected all the ingenious bits n' pieces. This so NEW to me...all the shiny brass...and nearly total lack of good directions on the PE upgrade. I must say, the instructions for the base HobbyBoss kit are pretty thorough, and this manufacturer has made a good effort to show detailed photos and avoid Chinglish: a picture is better than 1,000 mangled words and syntax.
My compressor and airbrush kit - I'm a newbie for this stuff - arrived only a few days ago. P/E bending jig, the same. Kool Lifecolor paints. Tiny, tiny glue applicators.....
My first inclination on this build was to add the brass bits and LEAVE them as-is; i.e. no painting (on the P/E). Leave them all shiny. And thinking about adding a custom nameplate: "IJN Bling-Bling." Seriously, I let that raw brass, raw idea fade into the background since this is my first plastic model (since I was an 8 year old) as I want it to resemble an actual ship. If I can complete this puppy, then maybe my NEXT plastic warship...Yamato?...Hood?...Bismarck? can be an all brass, bling-bling beauty.
I'll be checking-in here frequently and if I have something to contribute that's instructive or constructive, I'll do so. At this point, I don't plan to start my own build log for Mikasa - but that could change.
In the meantime - and judging by all your posts n' pics on this log - you are way, way ahead of me.
So many techniques and skills to learn. I'm pumped!...and looking closely at your photos- especially the items on your bench!
Ron
- Jack12477, Old Collingwood, CDW and 4 others
-
7
-
Craig,
Thanks for the thumbs-up on my HMS Swan picture posts. You may be interested to know that I'm just getting started on my new build: HobbyBoss 1/200 IJN Mikasa...w/Pontos PE set. I wanted to try something radically different than what I've been doing for the last few years.
I've scanned through your build log and your work looks really excellent, an inspiration....especially when one of those miniscule (no, make that "microscopic"!) parts goes "ping"...and its forever lost.
I'm very excited about building the Mikasa this Fall and Winter.
Ron
-
SOLD! I'm smiling now: a member has purchased an excellent shop tool.
Ron
- Landlubber Mike, mtaylor and Canute
-
3
-
-
-


Newsworthy updates from Chris Watton
in Traders, Dealers, Buying or Selling anything? - Discuss New Products and Ship Model Goodies here as well!!
Posted
Chris,
Corel's Bellona is 1:100. USD is $649.00
Ron