

.jpg.d84ec4dad1d7791e855dca06210ab6f3.jpg.40b7a0ea2cc62bf0a3ec2a716005383a.jpg)
hollowneck
-
Posts
1,351 -
Joined
-
Last visited
Content Type
Profiles
Forums
Gallery
Events
Posts posted by hollowneck
-
-
1 hour ago, glbarlow said:
I own no planers, that in itself would be interesting. Thanks for the photos and explanation. I’ll try and sort out making the jig and look for a planer.
You are welcome. Try this link Glenn: https://www.leevalley.com/en-ca/shop/tools/hand-tools/planes/32680-instrument-makers-planes?gclid=CjwKCAjw-YT1BRAFEiwAd2WRtmihasIlb4xC1d9xPZhxLv67iKKCGoeHCizMVbLTFKd8ymx37ItkRhoCGLAQAvD_BwE
I own several different finger and small planes (flat, convex and concave soles/blades), but the only one I use consistently for modelmaking is the Ibex (with a flat blade and sole). This is a personal preference because this particular tool offers me a really good feel in-hand and this helps me to control very fine movements; however, there are numerous other makers who make good quality planes.
Sorting-out making the jig will take some time and effort but it will be worth it. Of course, you'll also need to source decent square hardwood stock, or mill these pieces yourself.
Ron
- chris watton and mtaylor
-
 2
2
-
59 minutes ago, glbarlow said:
I'm going to get some experience with square stock with Cheerful. So when you say planing jig...?
I get the squaring off verses rounding off, but as I'm not interested in owning a lathe I'd be interested to hear more and maybe a photo of your jig. I can probably sort it out with my handy DeWalt battery powered drill, I'm all for seeing how the experts do it and any way that would make it more precise than turning my drill with sandpaper and files in hand.
Your dioramas are amazing, I thought you were showing me a painting..l.
Glenn,
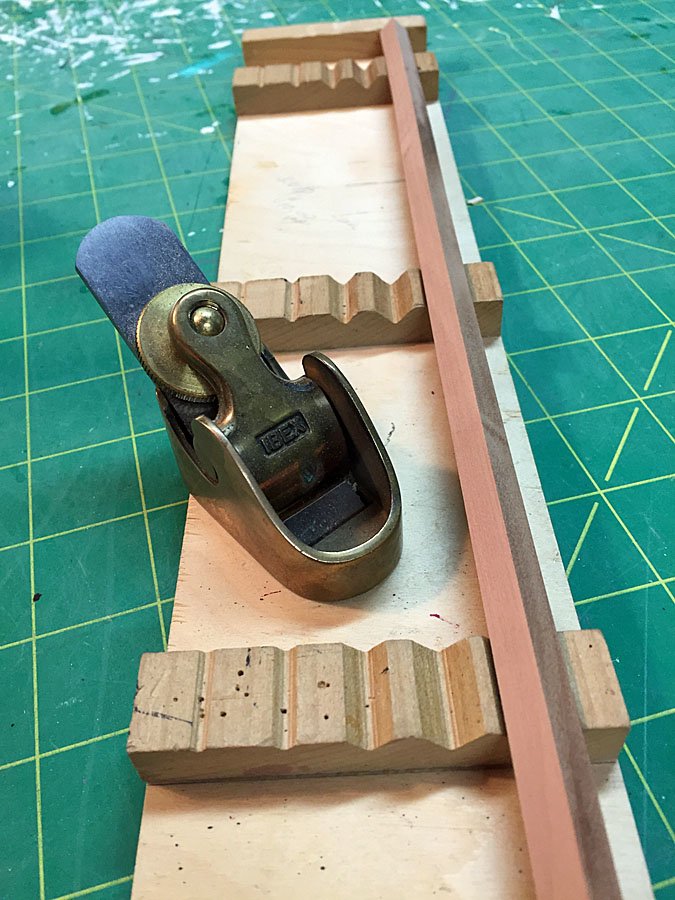
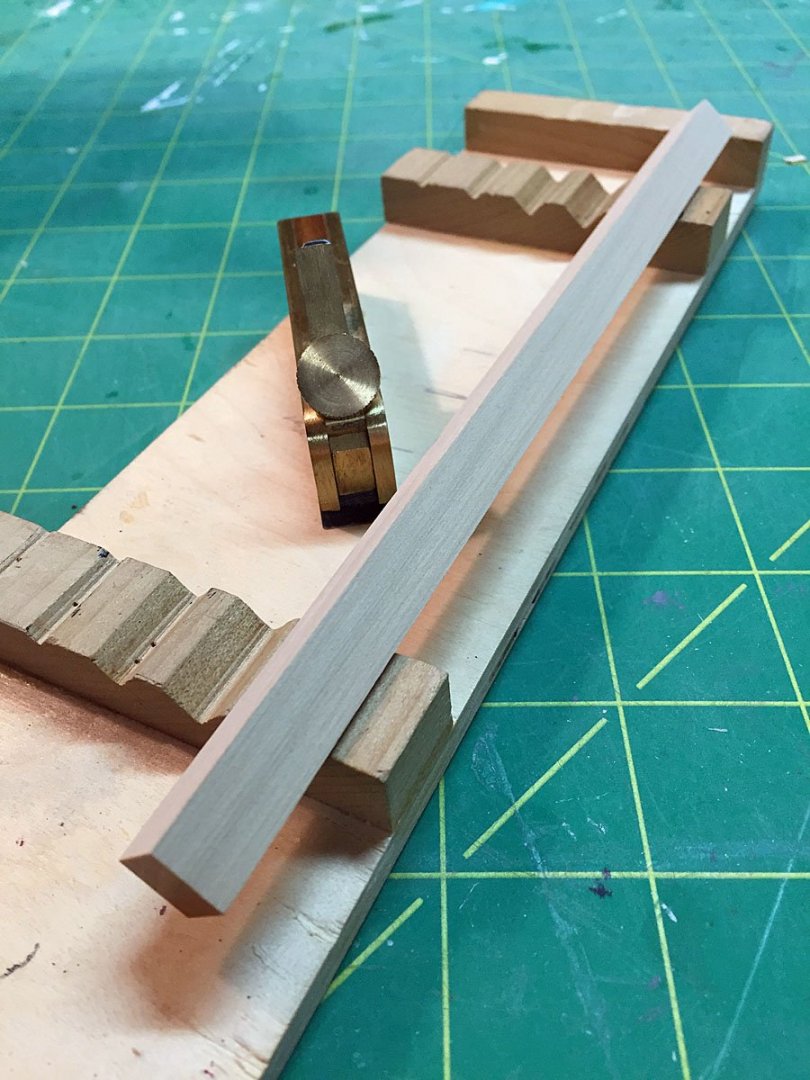
Here are two pics of my "planing jig." One shows a piece of pear square stock(8mm and long), the other, a shorter piece of Boxwood (10mm). Both photos show the grooved stock holding blocks and the end stop on the jig. The jig can securely hold square sections about 18" long and about 12-14mm (max) thick. As you can see, much smaller square sections can be accommodated easily (5 different sized holding grooves); I haven't run into a mast or spar yet when I couldn't use this simple jig. Yes - one does need to create the holding blocks and secure them to the baseboard (I have 4 total on the full jig length). I used a precision tablesaw (with a tilting table) to cut these grooves in a block of wood (maple, I think) and then "sliced off" the four pieces I needed. I chose to have three of the blocks fairly close together so I could plain-down short wood sections. Even hardwoods will bend slightly under planing pressure you'll apply: the close spacing fully supports the stock, end-to-end.
It is also good to invest in high-quality "finger" plains. The ones shown here are used for precision musical instrument woodworking; I got them both from violin maker tool vendors (one here in the U.S.-Ibex, and the other in the U.K. - Sheffield). Google 'em if you're interested. Not inexpensive, but superbly crafted tools with high-quality steel blades.
Note that once one has reduced the square section pieces to fully round cross sections, you'll still need to use sandpaper by hand - or employ a small lathe/drillmotor, etc. to finish. I do all of these sanding steps typically. Note that when making yards that there is an octagonal center section which will be easy to mark off when the eight sections are equal. One then carefully continues shaping to a round section with the plains on either side of the octagon. This part, going the eight flats to the fully round section takes some practice to get right.
Hopefully, my description and photos gives you a good idea on how I start my masts and spars for my models.
Cheers! - Ron
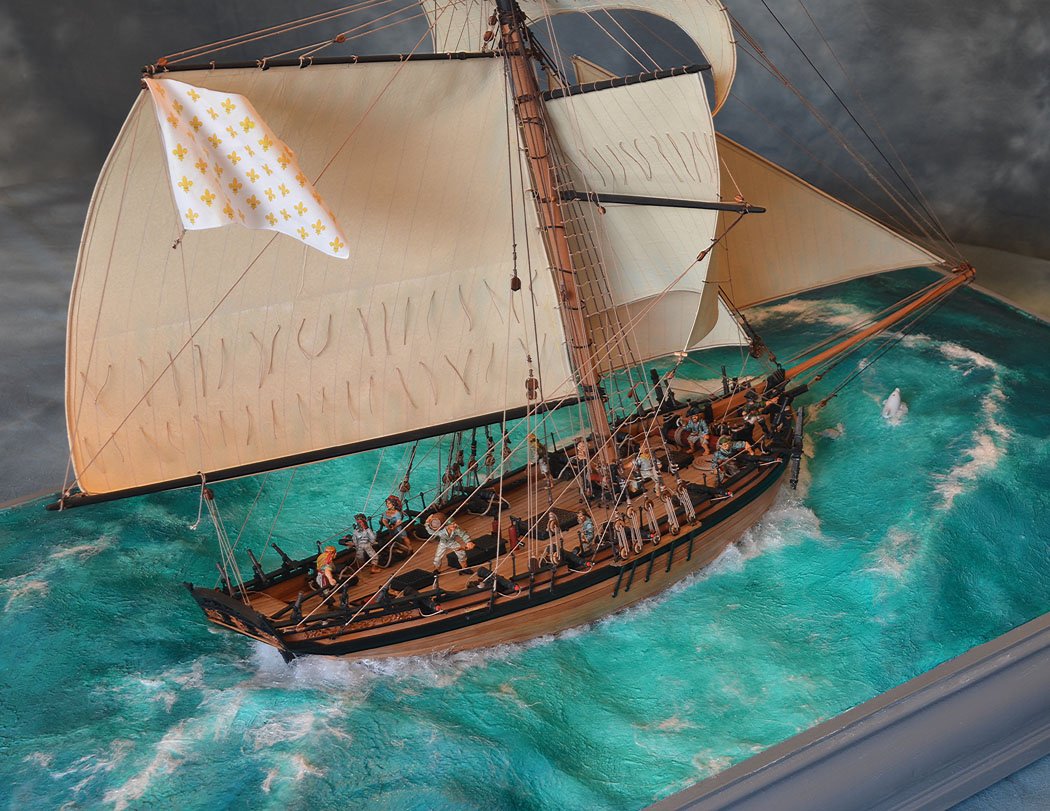
PS Thanks for your kind comment. I'm now working on my 4th diorama and I keep learning how to do water a little better each time. I love to present my models as living, "dynamic" artifacts, albeit from another era. On my latest model, I learned how to use new materials to simulate splashing water. Who knew?! It's a whole new thing (pour moi!)... on my current build I'm trying to figure out how a small river flows into the seashore- fresh water meeting salt water. It's a "thing" - trust me!!!
-
On 4/22/2020 at 1:34 PM, glbarlow said:
Is there such a thing as boxwood dowels for mast and yards.... 😄
Glenn,
I use square stock mostly for all masts and spars. To form the rounded sections I use a simple planing jig. A lot more work, clearly. ...BUT- This allows me to precisely taper and shape the center octagonal sections on yards extant on all 17/18th- C period ships. On masts, there are also square sections where tops must rest; this is considerably easier (and much more precise) when one starts with square section stock. In some instances I've stained final wood pieces, but boxwood doesn't take stain very well if one desires a darker appearance to their masts. To overcome this problem with boxwood, I have used Fiebing's leather dye (alcohol-based) successfully; it comes in several beautiful brown shades.
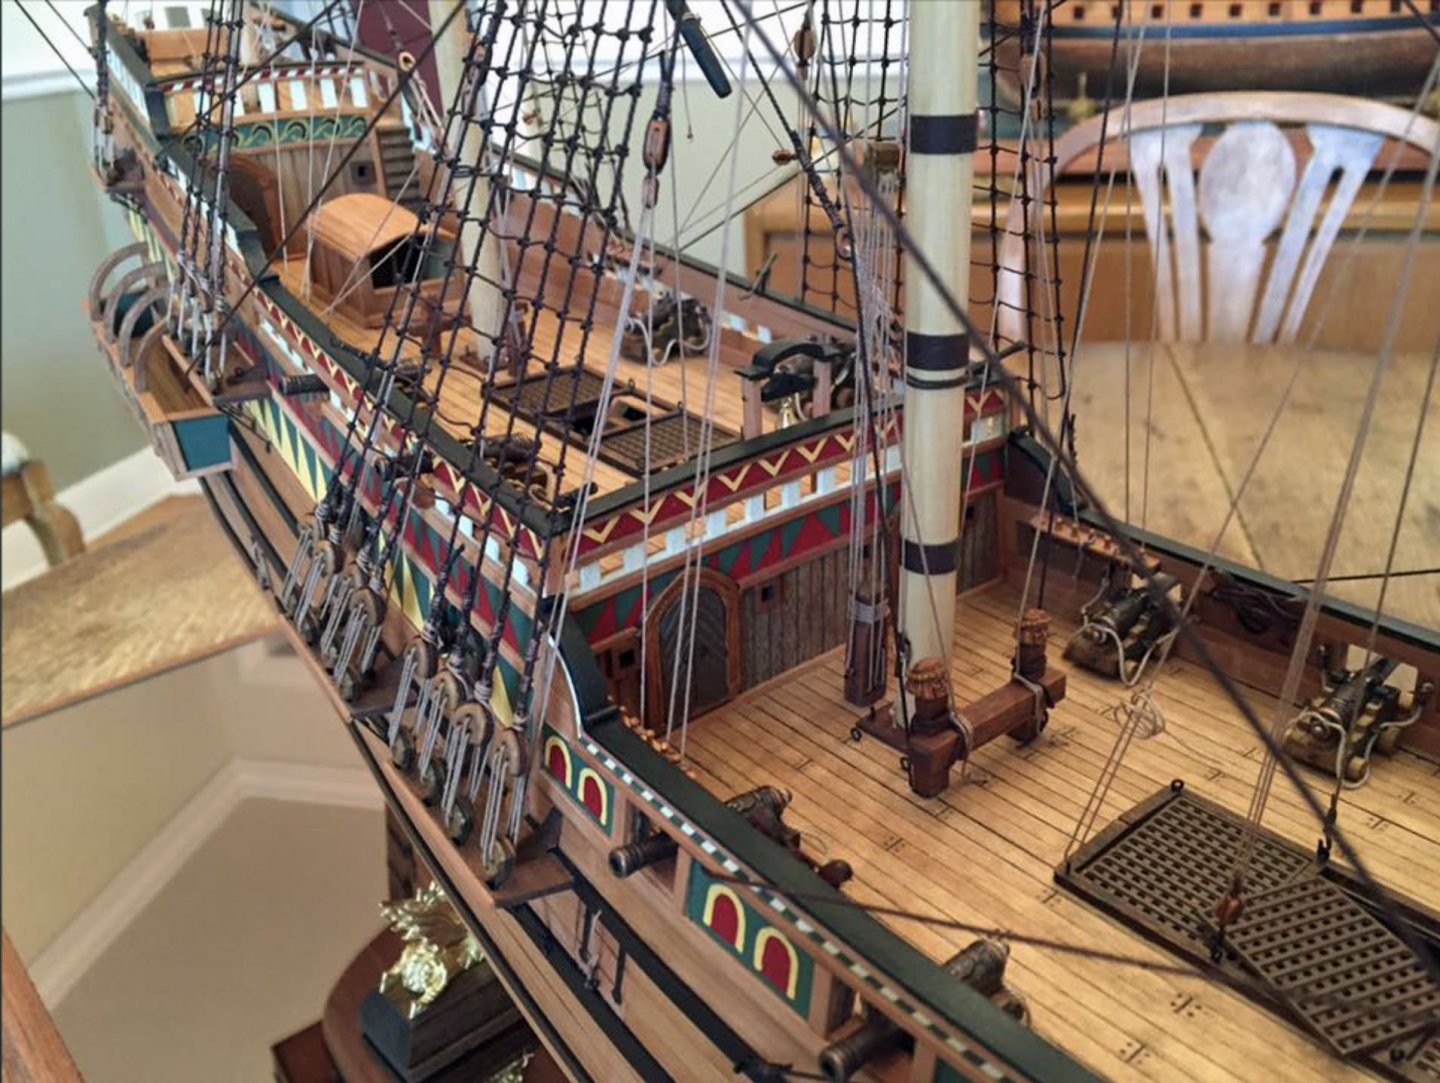
In the attached photo you can see that I used Swiss Pear for the model's two masts; all spars were made from boxwood, painted flat black.
Ron
-
-
Chris's 1577 Revenge kit from Victory/Amati provides extensive printed paper decorations. In my build of this superb kit and after testing this appliqué approach, I didn't like the appearance and I decided to paint over these printed patterns. I've included one photo here to show the results of my solution. Looking closely, one can see that my "over-painting" isn't perfect. In fact, slight brush marks and tiny "wobblies" in the application of acrylic paint accomplished exactly what I intended: the appearance of precisely-hand-painted, decorative friezes. It is important to note that the scale of this kit is 1:64; the large, geometric patterns weren't that difficult to execute by hand.
However....
For models of latter era ships, whether kit or scratch-built (mainly English and French Navy warships of the 17-18th centuries), accomplishing accurately painted embellishments (mostly on outer bulwarks, sometime on sterns) is extraordinarily challenging - at any scale - but especially so at scales smaller than 1/48 (I" = 1ft.). This style of ship decorative painting is called trompe-d'loeil ("fool-the-eye"). This painting style was popular in contemporary European art of the late 17th and early 18th centuries and adopted by ship owners and builders. The themes are very detailed and typically featured floral and ornate tapestry designs which mimicked the decorative interior trends of the period. I have seen numerous (legacy) ship models in museums and in various publications with this painting technique and believe the vast majority of these models are at scales of at least 1:48. Modeler's attempts to accurately portray this embellishment at scales of 1/64 or 1/72 (for example) are rare precisely because it is extremely challenging to do well.
To the point: Paper appliqués, whether printed or hand-painted off the model, are a reasonable "best solution" for period ship models at scales smaller than 1:48.
Members here will note that Chuck Passaro's HMS Winchelsea model has beautifully rendered the trompe-d'loeil style paintings on both the bulwarks and stern with excellent painting by hand: As most would agree, Chuck is a trained and accomplished artist — and, importantly, this impressive model is 1:48 scale.
It will be interesting to see what Chris decides to offer for his kits of ships featuring these 2-dimensional ornate embellishments. I'm certain it will be clever!
Ron
-
Glenn,
Try this link: (Amazon, of course, it's safe):
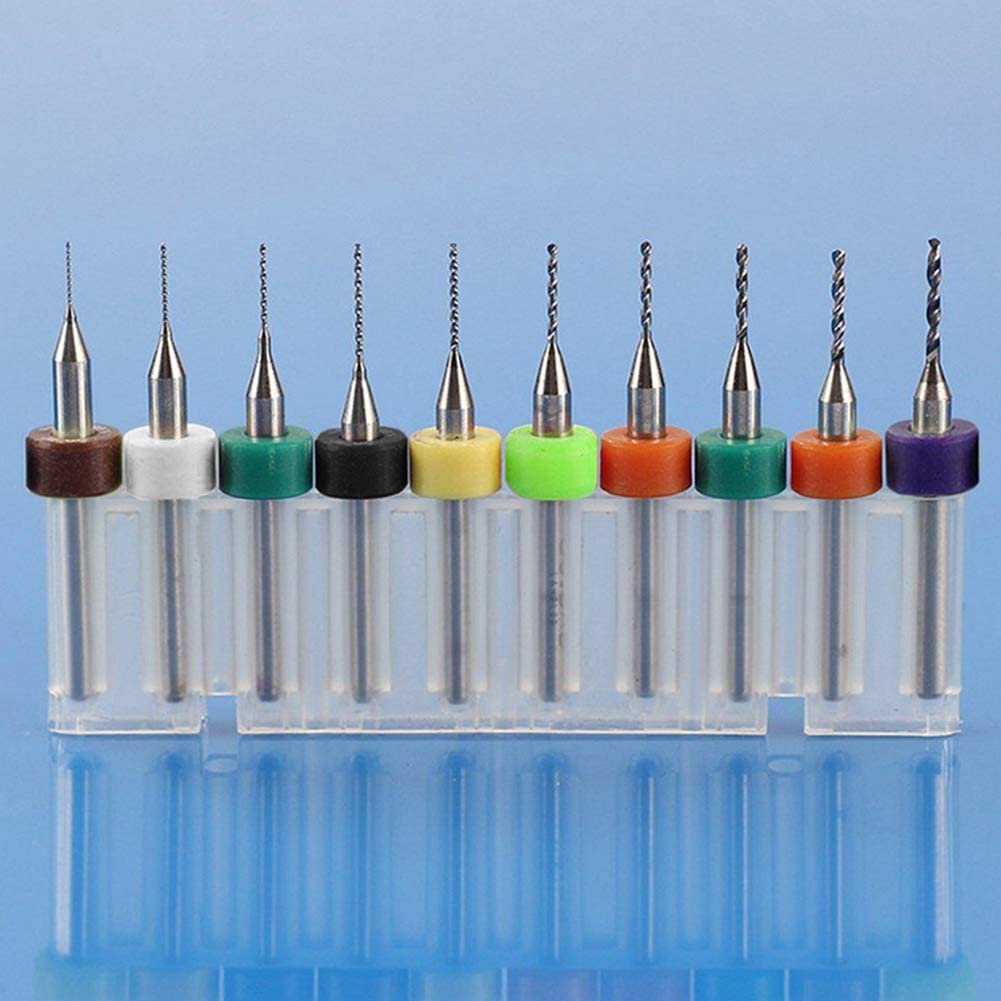
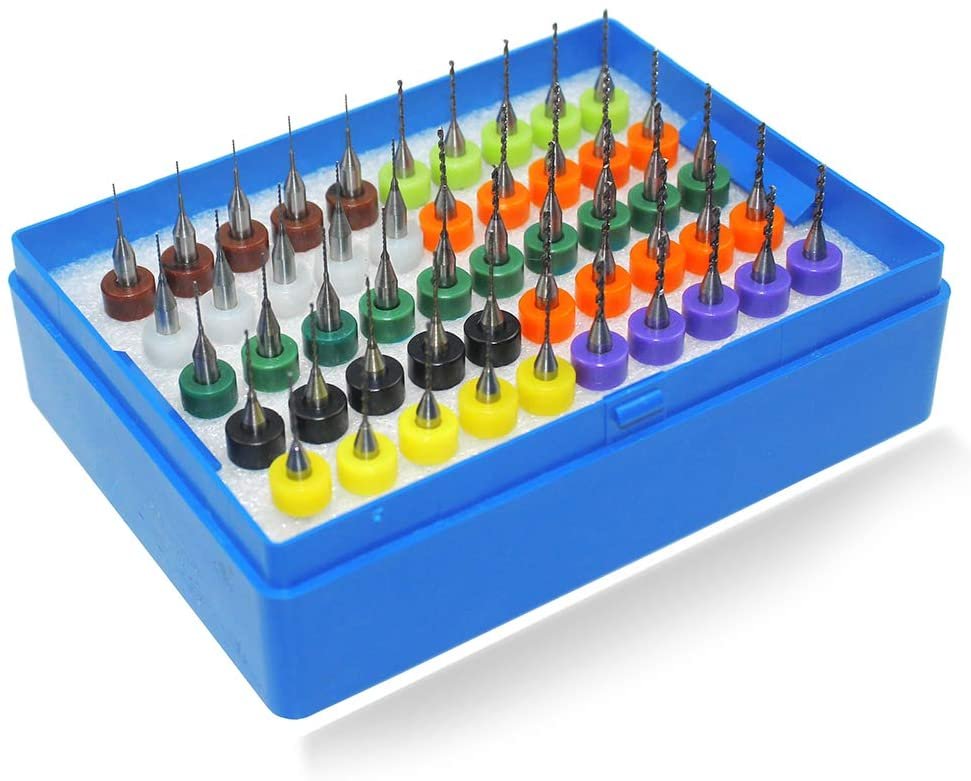
I have a set of "thumb drills" I use extensively. Purchased from MicroMark. No longer available, but I'm thinking about ordering a set of these. I work in metric, so these are great for me since my old ones are starting to get dull. And, I can't sharpen a .5 mm drill bit.🤨
Ron
-
James,
Thanks for posting Chris' latest. What a nice looking model this will be.
Your thread indicates that your HMS Victory production prototype is "imminent." Can you please give me a best (informed) guess as to how imminent, imminent is?🤔😂
Cheers,
Ron
-
-
Bob,
I like that: "Trivia Wonks." That's a "thing"for sure - and I'm going to unapologetically steal your phrase, but I'll use it "spar"- ingly.
BTW: I do like my models' decks to be a little dirty**, in a weathered light-to-dark grey in fact.😏
**Note that I've set someone up with a really good punchline here.
Ron
- mtaylor and Keith Black
-
2
-
Chris,
What an interesting model, thanks for sharing and posting all the photos; a very unique "dockyard" half-hull, cutaway reveal. The joinery and brass metalwork are very good. Are the lighter colored pieces add-ons (restoration?) or of a different material like bone? - e.g. capstan bars, wheels, stern decorations, tailboards, taffrail balustrades, etc. Primary wood appears to be pear. Any other information on the model - when built, the name of the modeler, etc.?
"If you build it, they will come."
Ron
- chris watton, Canute and mtaylor
-
3
-
Please allow me to contribute to this conversation.
I finish my deadeyes (and nearly all blocks) in a dark "chestnut" color. I use Fiebings medium brown dye which penetrates boxwood, pear, other euro woods included in kits really well. After the blocks have dried, a little wipe with a cloth cleans them up nicely and also imparts an ever-so-subtle "shine." This color may not be entirely authentic, however, I prefer it on my builds. Black, to me, is a little harsh looking; native pear blocks would be my second choice and third, native boxwood. The chestnut brown is much closer looking to actual restored blocks and deadeyes I've seen first-hand on full-size replica ships.
To my eye, Lignum Vitae, a material used for sheaves, also looks darkish brown.
Ron

- mtaylor, druxey and Roger Pellett
-
3
-
Chris/VTHokiee,
At www.hachettepartworks.com the only models I can find are installment builds for naval subjects Bismarck, and a U-96 submarine. There is also a build for Arnold Schwartzenneggers' Terminator T-800. All German oriented. The U-96 is divided into 150 weekly installments. Simple math says this project will take approximately 3 years to build - assuming one needs to buy all 150 installments... @ £8.99 per issue. That works out to be £1,348.00 for the project. In USD that's approximately $1,700.
Is this a real business in Europe (and the U.K.)? What am I missing here? Do people actually spend this kind of money on these "part works" model projects?
No wonder your beautiful prototype for the Quinquereme galley has vanished... have you ever considered buying back your un-realized prototype project from a former client? You know, at a "fire sale" price?😂
Ron
- mtaylor, Canute and chris watton
-
3
-
Well stated, Lou.
Chris has correctly judged that there are ship modelers who recognize how his design (and quality materials) improvements have substantially "upped the game" for kits.
Thanks again, James: your pics do a good job of telling the new story. It's no small coincidence that Amati has reacted rather quickly to Chris' new venture...
Ron
-
What Good News. I, for one, have planned to buy and build this 1:64 from Amati when it was released. When the kit is a reality, I plan to also mount sails and place it in a waterline diorama (solo @Trafalgar). I presume the marketing plan for Amati will allow for a one-time full kit purchase.
Speaking of purchases: as of today, one can buy the Caldercraft 1:64 Agamemnon for £790 ($803.00 USD). To earlier queries about legacy kits from Caldercraft; I believe their "pond model" business is waaaaayyyy bigger than their static model one. How many people - even dedicated modelers - can spend upwards of 1,500 hours on ONE model? This mammoth project is not only about the dosh!
James: thanks for your updates and picking-up where Chris left off. Please do keep us updated on your progress.
Ron
-
Steve,
This model appears to be a Chinese knock-off of the Agamemnon kit from Caldercraft (English mfr.). It is possible that some of the components came from an aftermarket purchase of the Caldercraft Photo-etched sheets (assessing the stern area), but this is difficult to accurately determine by looking only at your photos. The cannon appear to be brass, not plastic, and there are several sources for better cannon replicas. One source is Syren Shipmodel Company (there's a link here on the main site page on the right- just scroll down to their ad). Another source is Cornwall Model Boats (in the U.K., just Google). There are other sellers of genuine turned brass cannon of differing quality. Should you decide to "upgrade" this model's cannon, be prepared to spend upwards of $250-300, based on my two vendor recommendations here (assuming you replace all of them). Others will possibly offer you other alternate sources.
The most important detail about the model's cannon is that would not have been "brass"- gold and shiny, but rather, matte black (to simulate cast iron) and of more realistic scale. Another considerably less expensive alternative would be to simply paint the cannon with matte black acrylic (they will need to be removed obviously, but you would need to do this anyway for fitting replacements). Your friend can easily do this, assuming he's the builder- and, most importantly, not offended by your request...😡
This large model is certainly impressive and its builder did a reasonably good job with it.
You've come to the #1 spot on the internet for opinions about ship models; good finding!
Ron
Secretary,
Connecticut Marine Model Society
www.ctshipmodels.org
PS Should you have any other questions about this model, including more cannon details..shall we say, "just fire away!"😁
PPS I forgot to mention that you can also purchase cast resin (plastic), black cannon (in various sizes) from Syren Ship Model (link: https://www.syrenshipmodelcompany.com/turned-brass-cannon.php); these will save a little money, especially if you do a entire refit.
-
...yep, tempest fugit!
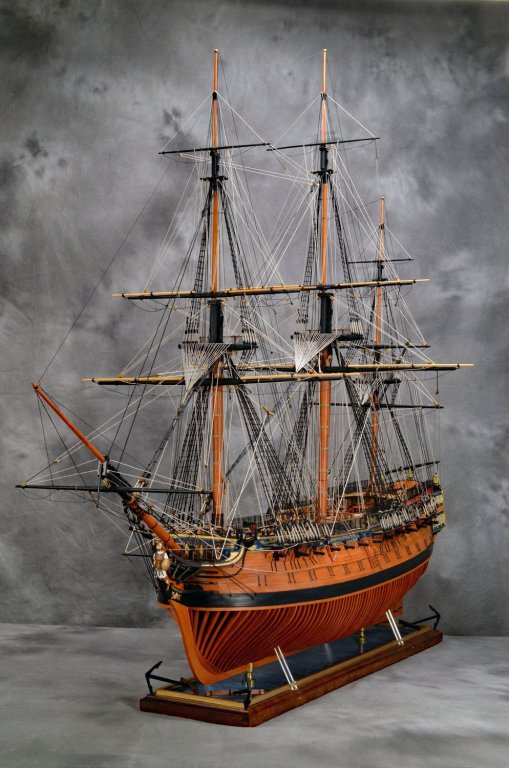
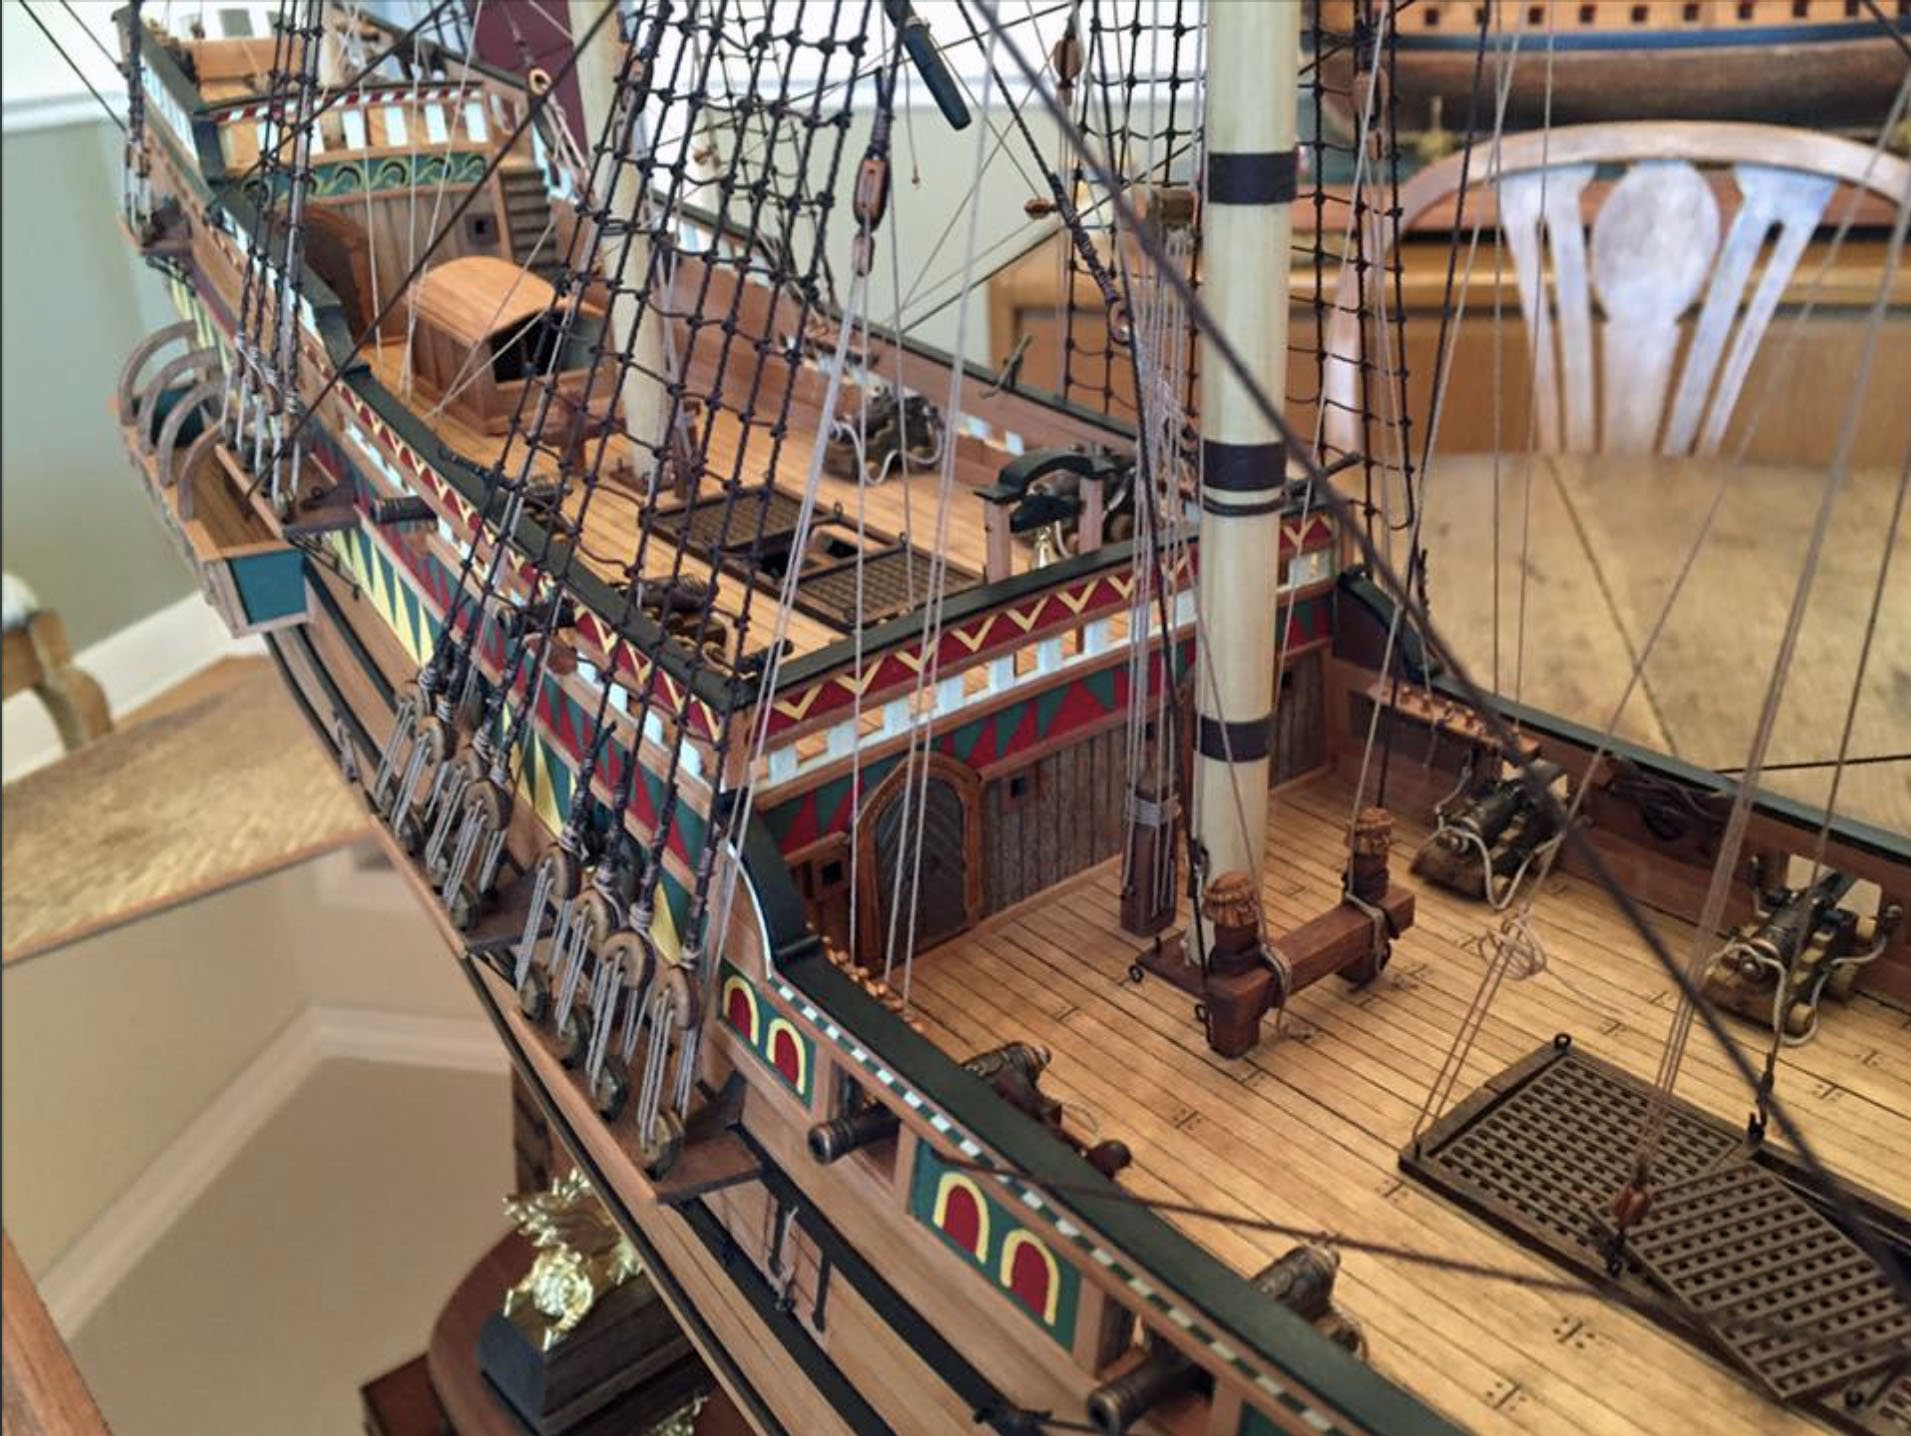
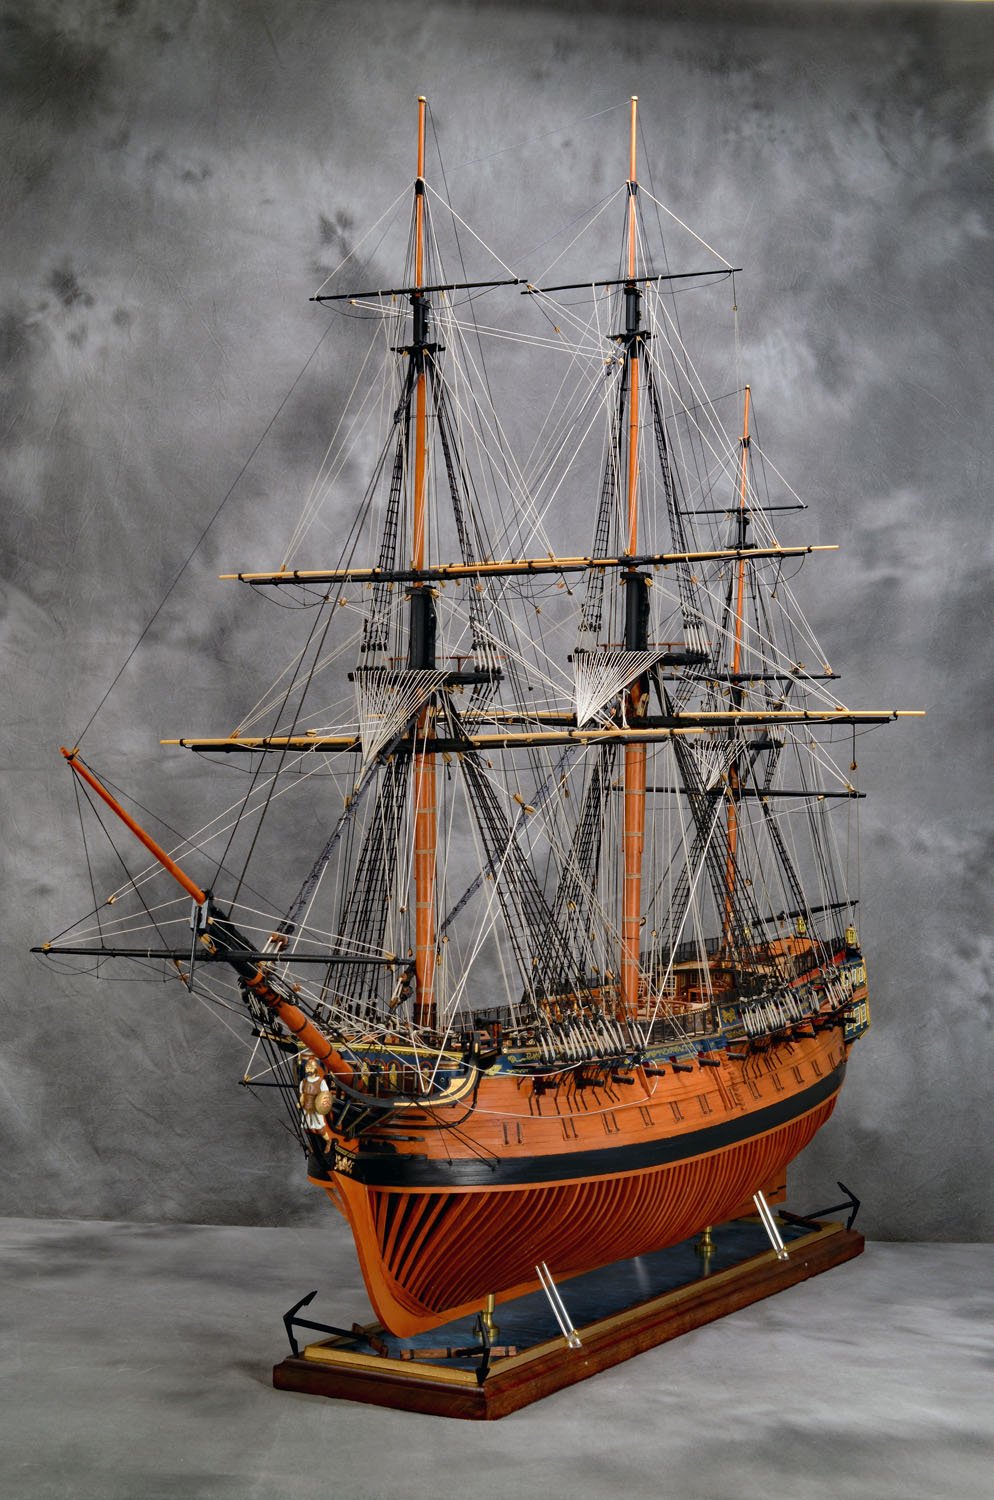
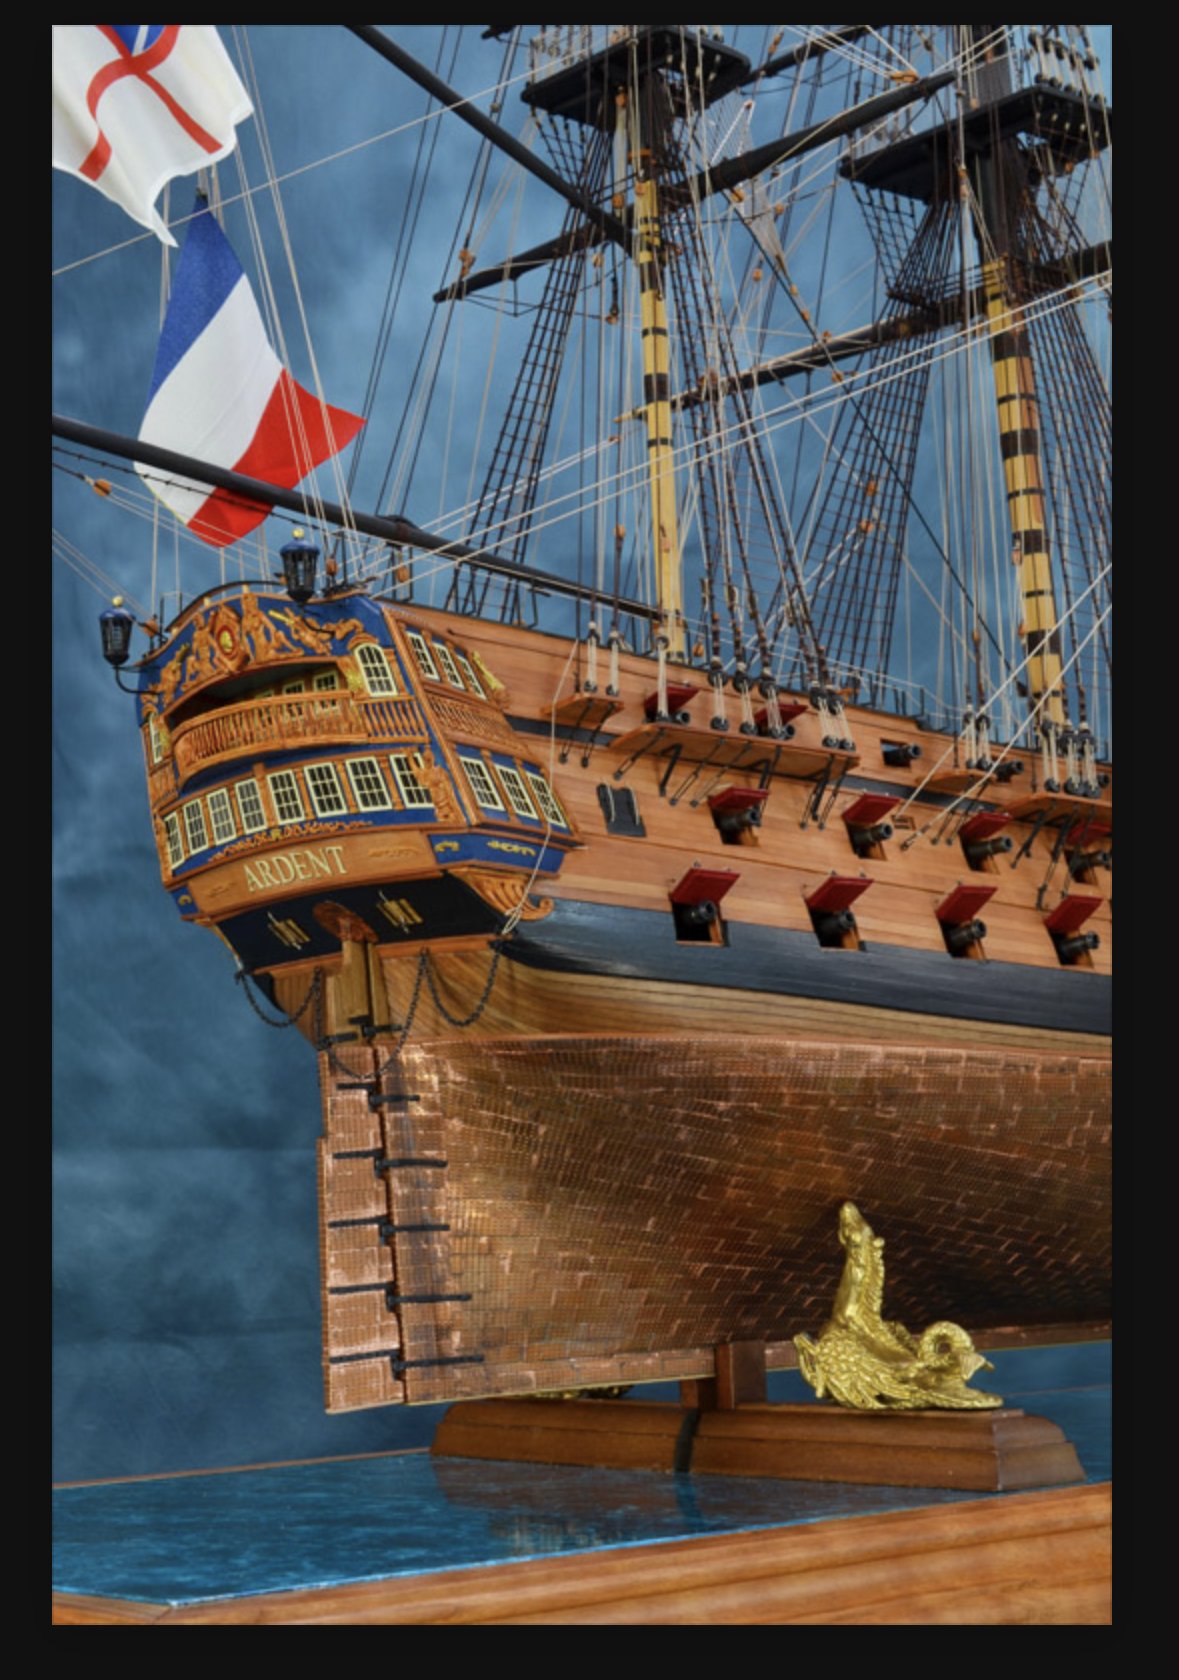
I bought your Aggy kit from CALDERCRAFT and turned it into HMS Ardent - NOT Amati/Victory. Nonetheless, your design has long legs, Chris; it was excellent 20 years ago and remains so for this legacy kit.
Check the attached pics out: not my build, but a colleague's in my ship model club who completed it this year as a modified "dockyard" styled model.

- Viggen, Jim Rogers, JpR62 and 9 others
-
12
-
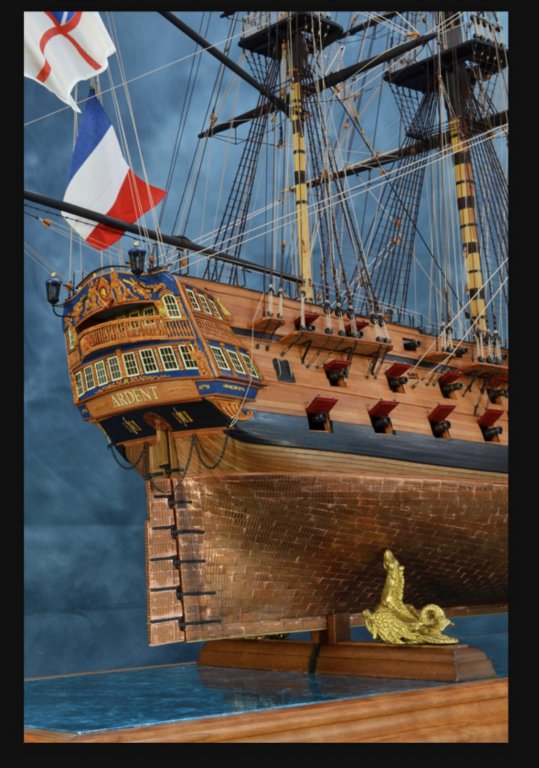
Oops, gentlemen! I meant 8 stern windows!
Brainfart; I hate when that happens...🤯
Ron
- chris watton and mtaylor
-
2
-
Ed/Chris,
Ed: Might you have a web address for the "Perry Brothers" miniatures?
Chris: attached is a view of my HMS Ardent (64) that shows the 7 stern windows; I highly modified your Victory Aggy kit in 2014. Indy was a razeed 64 of the Ardent class as you/others have noted; as such, 7 windows would be accurate according to Rif Winfield's reference. If you produce the Indefatigable, you'll sell at least one to a Anglophile in Connecticut. Until then, if Amati/Victory decide to sell your Vic1/64-scale before the Indy is available, I remain interested to modify a big Vic into the HMS Temeraire.🤨
Speedy looks very nice. Good second kit choice IMHO.
I'm in the hull planking stage with yummy pear on your Alert at the moment. It's tricky business with the stem and stern piece configurations, but not unmanageable (with some finesse).
When I'm finished with the hull planking, I'll post a shot or two of the results.
Ron
- chris watton, JpR62, coxswain and 1 other
-
4
-
-
Nic,
On behalf of the Connecticut Marine Model Society, our members wish you a speedy recovery. It was just a few years ago that you were our President!
Your latest build is looking great.
Best Regards to You, your Family, the "crew" at Bluejacket.
Ron
Secretary, CMMS
www.ctshipmodels.org
- Ryland Craze, bob porter and Torrens
-
3
-
Hello Chris, and other MSWer's:
My Alert kit arrived today, safe n' sound. No U.S. Customs disasters. Good timing too! It's great to see so many MSWer's on this Vanguard/Watton thread, and the various logs and references on this unique ship.
I have just completed a five month project for a Victorian 3-story dollhouse (1" = 1 ft. scale) that will be delivered to my 7-yo granddaughter this weekend. Phew! I'll soon dive into your Alert box and, once again, get really excited about building one of your kits. This is going to be fun - again.
All the contents in the box look excellent, including your hefty "Build Manual." After a few thoughts, I've decided to build Alert similar to my last model project ( HMS Swan - aka "Pegasus" - your design for Amati/Victory). I plan to place Alert in a similar diorama setting - another waterline build - underway with her full suit of sails.
I intend to make my own paper/silkspan sails per the techniques I outlined in my recent NRG article on the Swan. Similar to Swan, I'll also portray her in-situ, but in the shallow waters off Trinidad (more turquoise than blue). I'll do my normal modifications/additions minus the wood upgrades I've had to do in the past since you've included very nice hardwoods. Since I'm "water lining" her, I'll not bother with clinker authenticity since so little of her exposed hull will be noticeable. And she will be wearing her full make-up - decorations - bulwarks and stern.
I've already figured-out the sound track during my build as well as her completed display: a digital music stream to a small and adjacent Bose wi-fi speaker.
Now, all I have to do is search and find 1/64-scale figures playing steel drums for my Caribbean diorama.🤨
Anyone here have any suggestions where to start?
Cheers,
Ron
-
-
I built this Pocher model a couple years ago: Lamborghini Aventador 1/8 SIZE (not scale). Most of the kit is diecast. I understand that the paint on the diecast body pieces is identical with the paint on the real car. It is a stunning model. The kit and the plans are superb and I really enjoyed building it over a three week period (it wasn't a "build"- more of an assembly job). I wanted to try something a little different from ship models, obviously.
My 7 yo granddaughter has a Victorian three-story dollhouse now "on order." Yikes. The good news? No 1mm screws.
Ron

- Keith Black, BobG, Canute and 2 others
-
5
-
Chris,
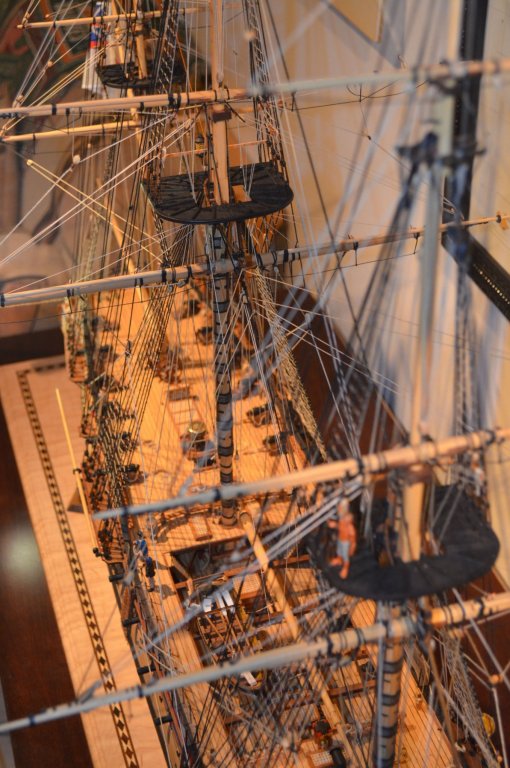
All my models (a majority of them of your design), are masted and fully-rigged. On my most recent ones, I DIDN'T use the dowels provided in the kits. I have chosen to make all masts and yards with square stock. I use my power-challenged Proxxon mini-lathe for other parts, but NOT for mast components or yards. One can achieve a properly tapered and octagonal shaped center section spar with a simple hand plane - and a simple jig to hold square stock - and, of course, with lots of sand paper. There are a couple different techniques for sanding/finishing (after planing), including using a power drill, which works fine if one exercises patience.
Like Chris mentioned, the topmasts and top gallants can be made from round stock, but for me, these are still best shaped by hand, with sandpaper. Indeed, these are the most fragile to fabricate.
I realize not everyone shares my passion for masting and rigging, especially on large sailing ships of the 17th and 18th centuries. But, I have also realized that observers of my models (casual and informed) do pay a lot of attention to detail(s) on elements other than the hull.
Rigging Rocks.
Ron


Chris Watton and Vanguard Models news and updates
in Traders, Dealers, Buying or Selling anything? - Discuss New Products and Ship Model Goodies here as well!!
Posted
Glenn (and others who may be interested),
Here is another link for a precision planer: https://www.highlandwoodworking.com/ibexluthiersflatsolefingerplane36mm.aspx
Ron