grsjax
-
Posts
1,062 -
Joined
-
Last visited
Content Type
Profiles
Forums
Gallery
Events
Everything posted by grsjax
-
 I use Elmers wood filler for a number of purposes and find it to work fine. Only problem is that sanding it makes a mess of find white power that gets everywhere. Today I tried a different method. I used a single sided razor blade as a scraper over the area that had been filled and it worked great. No dust and I got a very smooth finish. Just need to sand in a few areas that I couldn't get the blade into and a little finish shaping. End result is a good surface and far less cleanup.
 -
To keep wood from darkening you might want to try a finish with a UV blocking additive. Krylon is one brand that has a UV blocking clear finish.
-
All depends on what you want to do with the saw. As others have said a scroll saw is great for cutting tight curves but isn't very good for long straight cuts. A bandsaw does a great job of ripping and cutting gentler curves and will handle much thicker material than a scroll saw. Best thing is to have both but if you can only get one or the other it will depend on what you need it for most. If most of your cutting is tight curves in thin material a scroll saw is the way to go. BTW you can get 1/16" blades for a band saw that will cut some really tight curves.
-
What is the exact thickness of plates of iron in the 1870s?
grsjax replied to Moony's topic in Nautical/Naval History
Just my opinion so take it for what it is worth. I would say that each builder decided what size and thickness of plate to use based on experiance and availability. I don't think there was any standard in the industry. I know Lloyds published a set of specifications for insurance purposes but I do not know exactly when that was. If you know what Lloyds classification the ship was you could check to see what Lloyds requirements were but that would be a guide not an exact size. -
If you want a saw for ripping hardwoods a scroll saw may not be your best choice. A small bandsaw would do as well for cutting out bulkheads and be a much better choice for ripping lumber into strips.
-
Interesting French book that can be downloaded. http://gallica.bnf.fr/ark:/12148/bpt6k5699565s.r=Collection%20de%20plans%20bateaux Website is in French but I managed to get the book downloaded in pdf format ok not knowing any French.
-
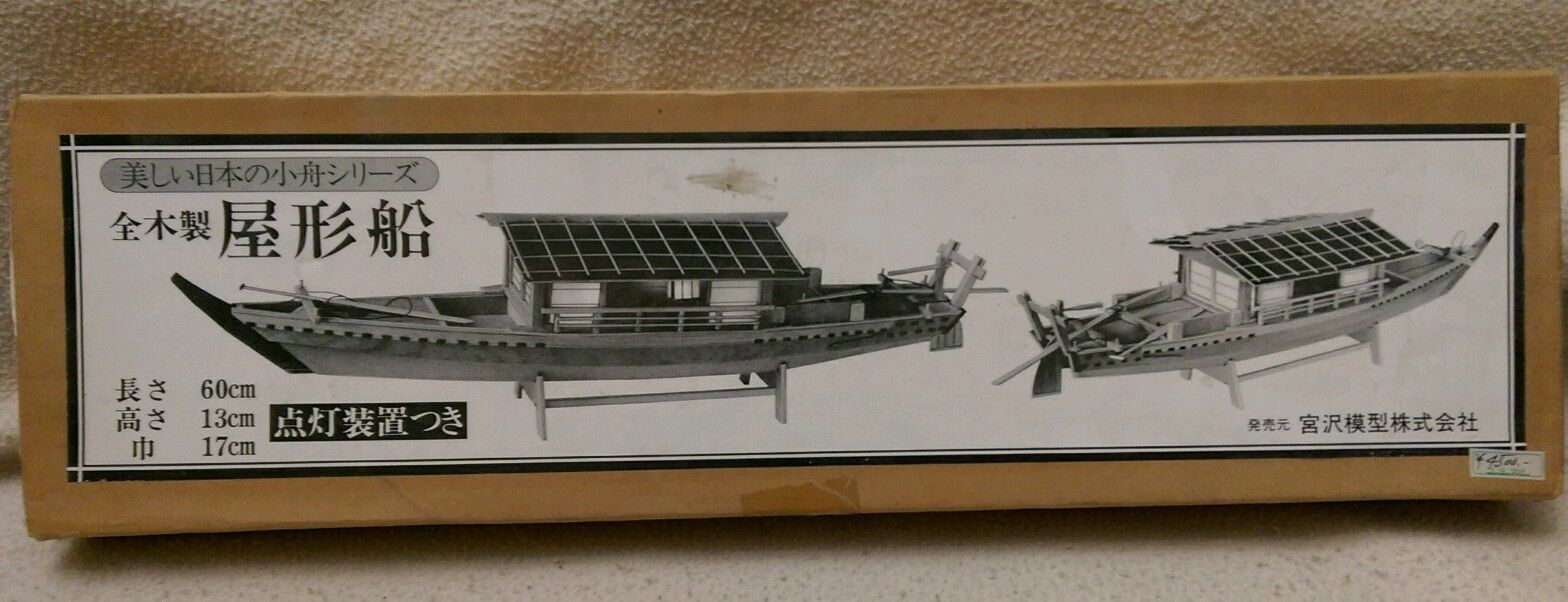
Found a bit more info about the Miyazawa model company. They made model power boats in the '50s and '60s. They show up on eBay occasionally.
-
Try a paint supplier. Denatured alcohol will work and it is used as a solvent for some paints.
-
Found a kit that isn't by Woody Joe. I found it on eBay. It looks like an older kit, the price tag says 4500Yen which seems pretty cheap by todays standards. A friend that knows Japanese translated some of the kanji on the box. It is an "Edo Period Yakatabune" made by a company called Miyazawa. I did a google search but could only find a company that makes plastic action figures in Japan by that name. Anyone know anything about this manufacture?

-
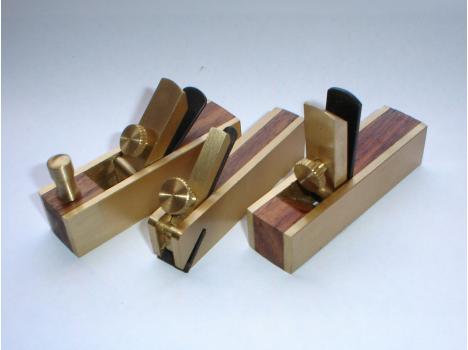
Harbor Freight Mini Wood Planes
grsjax replied to grsjax's topic in Modeling tools and Workshop Equipment
RE: Popular Science plans. Try this website, http://www.popsci.com/archives. I believe they have all the back issues with plans. No charge to download them. -
Solid hull centerline
grsjax replied to halbaby7's topic in Building, Framing, Planking and plating a ships hull and deck
Machine carved hulls have enough extra to allow a little carving as needed. The method I use is to pick two points, one at the stem and one at the stern as reference points. Stretch a string between the points or use a straight batten to establish the center line. Smooth up the bottom of the keel being sure to keep it level. Mark the station lines on the keel. Using the station templates, the established center line and the station marks start working the hull into shape a little at a time. Remark the station lines as necessary. As long as the center line stays consistent you should be fine. -
Interesting that there seem to be a large number of plastic kit manufactures in Japan but only one wooden kit maker. Guess the market in Japan for wooden boat kits must be small.
-
Are there any manufactures of wooden boat kits in Japan other than Woody Joe?
-
Try this website, bookfinder.com . I have found a lot of obscure reference books on this website.
-
Mesoglue, http://www.northeastern.edu/news/2016/01/researchers-metallic-glue-may-stick-it-to-soldering-and-welding/ When this hits the market it is going to be a great addition to model building.
- 1 reply
-
- 8
-

-
Mantua 1/17 English carronade: deck planking & oakum
grsjax replied to Jack Nastyface's topic in Wood ship model kits
Wooden dowels called treenails or trunnels for holding the planks in place. Paint the edges black before laying them and it looks like caulking between the planks. Decks were usually made from oak and were scrubbed everyday and they had a very light color so just finishing the basswood in satin or flat clear finish should look good. If you want to try staining use a very light application of golden oak or other light colored stain followed by a clear finish. Experiment on some scrape wood before you try it on the model. -
Go to Home Depot or Lowes and check out the saws available there. Most of the scroll saws sold under the major trade names are all made in China and are more or less the same machine. Another low cost alternative is the older Dremel scroll saws. They show up on eBay all the time. I picked one up for $15 and am pretty happy with it. Ebay is a good place to look for used saws in general. There are usually several available ranging from really poor quaility ones to high end machines.
-
Planking for Ships Boats
grsjax replied to mikiek's topic in Building, Framing, Planking and plating a ships hull and deck
A good reference for planking boats is Howard Chapelle's "Boat Building". It doesn't cover historical ships boats but the techniques for carvel and lap planking didn't change much between the war of 1812 and the time Chapelle wrote his book. There are other books out there that cover the subject as well. -
I was thinking the same thing last night when I saw a commercial for something called "5 sec fix". Look forward to hearing from anyone that has used one of these products.
-
Clean with a clean, fairly stiff, stainless steel brush. A light coat of oil will keep the files from rusting. Wipe off with alcohol or acetone before using to remove the oil residue.
-
Imperial or metric for lathes and mills?
grsjax replied to tkay11's topic in Modeling tools and Workshop Equipment
What ever you are comfortable with. Easy enough to convert from one system to another. It doesn't take much time when done by hand but most calculators can do it even faster. -
Harbor Freight Mini Wood Planes
grsjax replied to grsjax's topic in Modeling tools and Workshop Equipment
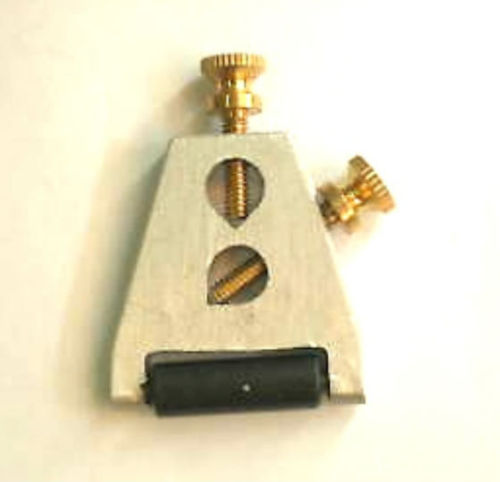
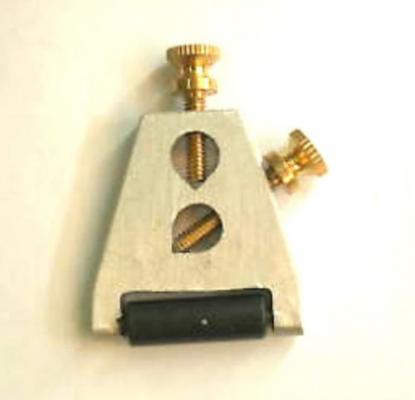
Here are two sharpening/honing guides that can be picked up on eBay for less than $10.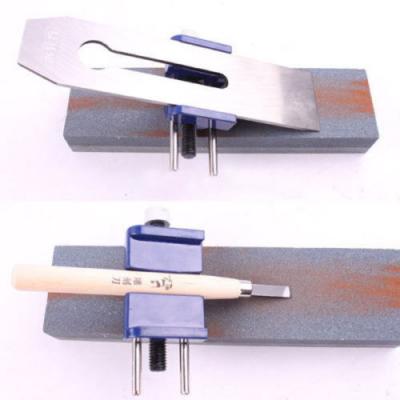
-
Harbor Freight Mini Wood Planes
grsjax replied to grsjax's topic in Modeling tools and Workshop Equipment
The Lee Valley planes are works of art. However for less than a third of the price of one plane I got three planes that are adequate for my needs. I would love to add the Lee Valley planes to my tool chest but can't justify the expense. Would rather save the money for other tools, materials and plans. That Popular Science article is great. I may have to try my hand at making some thumb planes. Another source of steel for plane irons is old files. The steel in them is excellent and once shaped will take and hold a very keen edge. -
I bought a set of these planes because they were on sale really cheap and because they looked cool being made from rosewood and brass. Didn't expect much from them for the price but was pleasantly surprised. The blades seem to be a good grade of steel and after sharpening (they were really dull right out of the package) and figuring out the best setting for blade depth (the thickness of a sheet of paper) they performed very well on both basswood and cherry. For a cost of about $3 each delivered I can not complain.
-
Tannic acid is not very acidic but it is a good point. Generally the natural pH of rain water is between 5.5 and 6, neutral being 7. This is due to the desolved CO2 in the rain water. In pH7 water the tannic acid in strong tea would barely move the pH. In most city water systems the pH is maintained at between 7 and 8 (neutral to slightly basic) to reduce corrosion in pipes. I would think the deterioration of cloth colored with tea is probably due to factors other than acidity. Interesting bit of trivia, the first khaki cloth was made by soaking white cotton cloth in tea, at least that is what I have read.