grsjax
-
Posts
1,062 -
Joined
-
Last visited
Content Type
Profiles
Forums
Gallery
Events
Everything posted by grsjax
-
Few if any of the baltimore clipper type model kits are very accurate. Most are way over canvased, carry to many cannon and pretty much ignore the deck layout found on most of them. H.I. Chapelle's book "The Baltimore Clipper" is an excellent reference on these ships. If you want a model to start with that is challenging without being impossible for a beginner I would recommend Model Shipway's skipjack model "Willie Bennett". If you want a ship with cannon try the MSW "Armed Virginia Sloop". For a simplier but very nice kit look at the offerings from Midwest's apprentice series.
-
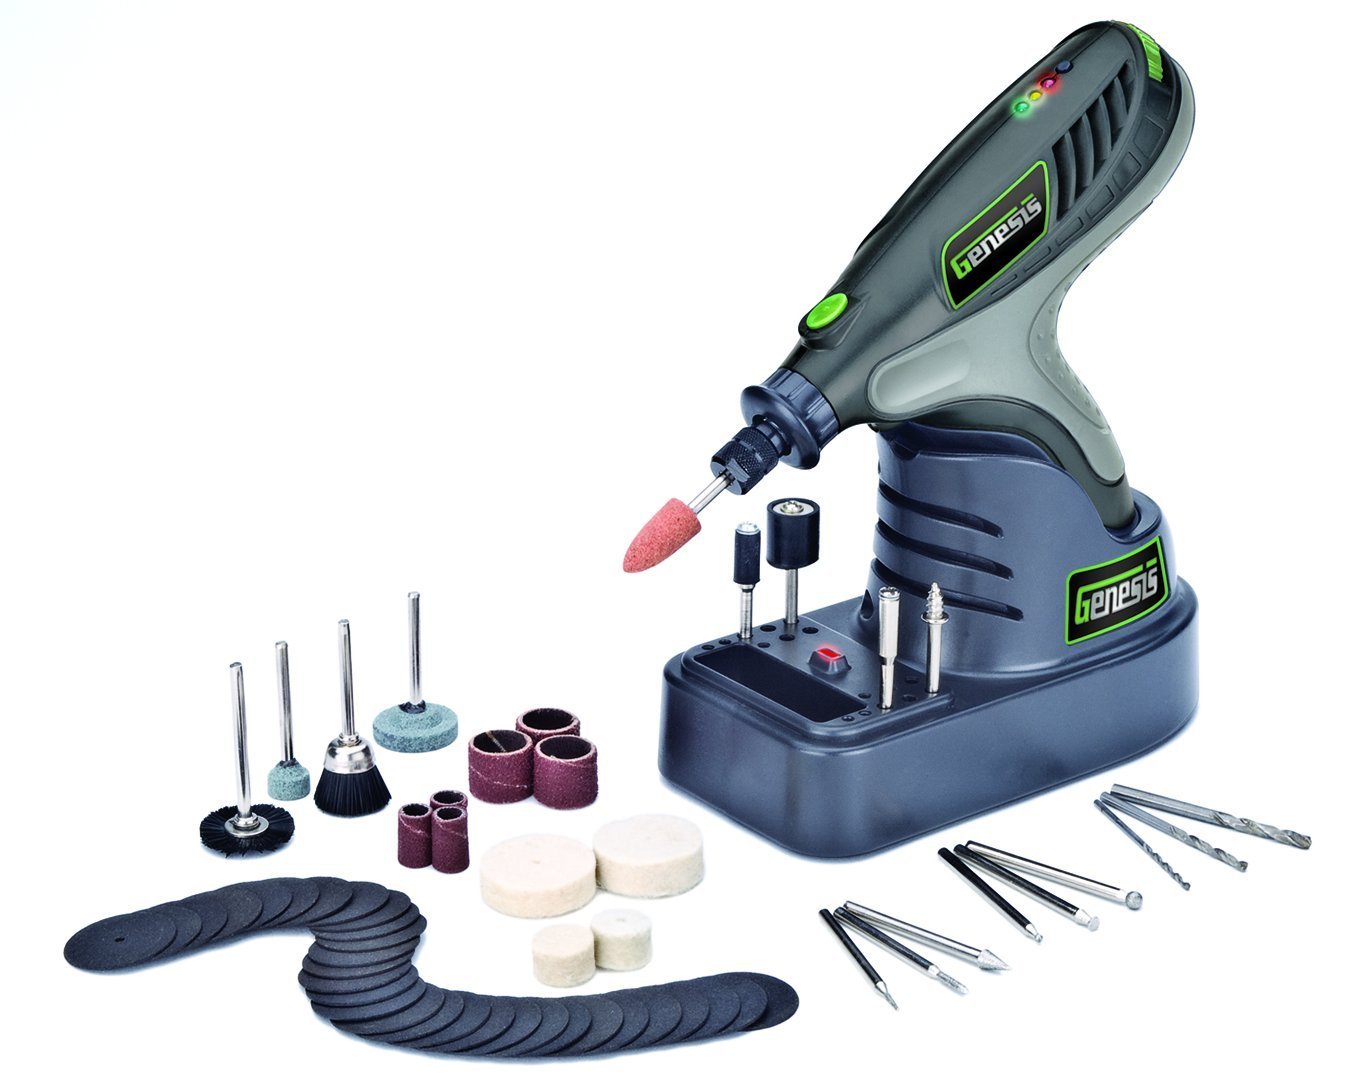
A while back I asked on this forum if anyone had experience with the Genesis 7.2v rotary tool. I got one to test out as it was not to expensive and it looked like it could be a very useful addition to my tool collection. Here is what I found when I got one. 1. First one I got had a defective switch but the vendor replaced it without any problems and the second one works fine. 2. Fit and finish are very good, at least as good as any of the other rotary tools on the market. 3. Has plenty of power for drilling. I used a 1/16" (1.5mm) drill to test it and it drilled through dry hardwood with no problems. Only issue is you can't push it, if you start to press to hard it tends to wobble a bit. Other wise no problems. 4. Very comfortable to hold. Fits in my hand well and doesn't cause hand cramps like holding a regular tool does when you need to do a lot of work in one session. 5. The on/off/speed switch is in an ackward place at the upper rear end of the tool. You can't position the drill bit and then turn it on. A trigger switch on the pistol grip would be a big improvement. 6. The small LED light is useless. Might be useful if you were working in complete darkness but is otherwise to dim to add any value. Maybe putting a trigger where the LED is would be a good design change. 7. A Proxxon 3-jaw chuck fits the spindle and is a worthwhile addition. Over all I would rate this tool a 7 out of 10. I might rate it higher or lower depending on how dependable it turns out to be over the long haul. As of now I am very satisfied with it and at $30 delivered from Amazon the price is right.

-

3D printer at Home Depot
grsjax replied to twintrow's topic in CAD and 3D Modelling/Drafting Plans with Software
The good news is that if HomeDepot is carrying something like this the product will continue to get better and cheaper. In a few years it may be possible to buy a decent 3-D printer off the shelf in your local big box store for a reasonable price. Early days yet on these things. -
The elm tree pump was just a hollowed log with a valve in it. The valve would let water through on the down stroke and lift it during the up stroke. The "tree" part of the pump, i.e. the pipe or body goes all the way down to the bilge and doesn't usually have a well or other structure associated with it. The pump body or tree doesn't necessarily have to be of elm although that was the traditional wood used. Any hard, rot resistant wood would do. If the pump was set up as a wash pump it would go through the hull and would probably have had a separate well structure to keep the water out if the pump had to be removed for repairs.
- 1 reply
-
- 4
-

-
Scientific name of Washington Hawthorn is Crataegus phaenopyrum. Tree grows to 25' or so and during the early years grows from 13" to 24" a year in good soils. I have seen speciments in the Willamette valley of Oregon that appear to be taller than 25' and were 12" to 14" in diameter. I don't know how old they were but assume they must have been there a long time.
-
Right now I have several short logs of various woods drying which is a large amount for me. I also have a pretty good supply of strip wood and sheets of different kinds but there are probably not that much all together. I would guess enough wood to compete a large model would be a fair amount, enough for two would be a large amount. Just remember you can't have to much wood as long as you have a dry place to store it.
-
Depends on how much I can find to salvage or get at discount prices. Sometimes I only have a small amount in the shop sometimes a lot stacked up drying and/or waiting to be cut up.
-
nice work. In many areas pear and fruit woods in general are hard to come by. However I have found that many woods that a woodworker would reject can be great for model building. I read an article years ago by a gentleman that regularly visits the green waste facility at his local trash dump. He wrote that he finds many pieces of wood that work very well but are not in general use. Pyracantha was one he mentioned and star fruit was another. Star fruit is a tropical species so I assume he was down in south Florida or some other warm place. The point of his article is to not rely on the conventional wisdom and experiment with what ever you can find. From personal experiance I can say that gardenia and dogwood are both good sources for hard, close grained wood. Neither gets very big but you don't usually need large pieces for model building.
-
Best I have tried with curly walnut is BLO. Sand to a very smooth finish and apply BLO with a rag wiping off the excess. Let it dry and go over it with 0000 steel wool. Wipe again with BLO let it dry and go over it again with 0000 steel wool. Repeat until you have the finish you are looking for. A couple of cavets, I have only done this with hardwood and don't know how a soft wood would preform. Also as said above try it on a small piece or the underside of your slab first before committing. Although it is not impossible to remove the BLO by sanding it is a lot of work.
-
For simple shapes using a low melting point alloy like brittania metal it is very doable at home. The one thing to remember it to incorporate as many vent holes as you can into the casting to ensure a complete fill out. Using plaster to make the molds is probably the easiest way. After the mold is dry use low heat to melt the wax and let it run out of the vents. Keep the heat on for a while to ensure all the wax is out. Heat the mold, melt the alloy and pour. As was said above the disadvantage is one casting per mold but for one offs it is hard to beat. One more thought. For series production you can make a split mold to turn out wax masters. Only works with symmetrical shapes like cannon.
-
Go to bookfinder.com and look for this book. I would bet you will find a copy for a lot less than $45.
-
Looking for instructions: (old) MGS Dutch Koff
grsjax replied to TheUnseen's topic in Wood ship model kits
Can't help you but that is a great looking kit. If you do manage to find instructions for it please let us know.- 3 replies
-
- 1
-
-
- newbie
- instructions
- (and 1 more)
-
BLO and tung oil are both natural polymers that will harden over time. They look really good if you let each coat dry and rub it down with 0000 steel wool before doing the next coat. 3 coats is usually enough but you can get a glass like finish with more work. Wood varnish is more of a hassle to apply than oil finish but three coats with sanding between coats gives a very good finish. Satin polyurethane works very well applied the same way but the fumes can be a problem for some. I have been using clear satin water based acrylic paint with good results. Three coats with light sanding between coats.
-
A full size table saw can be used for very fine cuts. As stated above the kerf is large so waste can be high but if you are cutting something fairly common the waste is worth it for the ease of cutting. Use a hollow ground planer blade in the saw and tune it up before attempting any cutting. It is surprising how out of alinement a saw can be without it being obvious. A couple of accessories you will need is an insert for the area around the blade with the smallest possible gap (make one out of thin plywood without a hole and cut the hole with the blade you are going to use by raising the blade as it is running) and a good fence. A trick I learned was to attach a thin piece of wood between the fence and the wood being cut. End the insert just beyond the location of the arbor. Line up the fence with the blade very carefully and you are all set. You can get good, smooth cuts down to about .03" (~.75mm) with practice. Depending on the wood you use you might do even better.
-
For that time and ship a small whitehall pulling boat or a skiff would look good. However any boat of the right size and period would probably be right as far as historical accuracy goes.
-
Micro Drills, Revisited.
grsjax replied to Modeler12's topic in Modeling tools and Workshop Equipment
One caution with tungsten carbide drills. They will break if you put a sideways stress on them. For other sizes check for for micro milling bits. They generally have a 1/8" shaft and come in a vast range of sizes. -
sealing a solid hull
grsjax replied to bushman32's topic in Building, Framing, Planking and plating a ships hull and deck
I use clear shellac thinned with denatured alcohol. About 50%. Does a good job sealing the wood and as long as you do not plan to use a water based clear finish over it it makes a good base coat. You can use oil or enamel over it with no problem or solid color water based paints. -
Couldn't find a woodslicer locally but I did get a Starrett bimetal 1/2" blade for a good price. Starrett has a good reputation. Will give it a try and let you know how it works.
-
Ran across an interesting tool in the fabric department and thought it might have some utility in our hobby. It is a rotary cutter used by quilters and leather workers. It has a handle and a round, rotating blade about an inch across. The blade is very sharp and is used with a cutting mat for cutting out patterns. I think it would work with wood veneer just fine. Anyone used one of these and if so what is your impression. This picture is one I found on Amazon.

-
A bit of both. I presently mostly use a 3/8" 8 tooth blade for general cutting. Thinking of getting a 1/2" blade for serious resawing and a 1/8" 15 tooth blade for fine scroll work. Would like to know what experiance others have had with different brands.
-
Recently read an article about bandsaw blades and it mentioned using bimetal blades for woodworking. The reasoning seemed sound and the article mentioned good results. Anyone here using bimetal blades? Also what brand of blade is preferred? I have been using a no name blade that came with my bandsaw and a Delta blade I picked up on sale. Both seem adequate but I am sure there are better ones out there.
-
If you want a simple (realitively simple) practice project try building a small pulling boat like a whitehall or peapod. Plans for both of these types are available from the Smithsonian for reasonable prices and Howard I. Chapelle's books "American Small Sailing Craft" and "Boat Building" also have plans as well as a wealth of info on building them.
-
A long sharp schooner like the America or a pilot boat would be good. One with a sharp bow and a transom stern would probably be best. Try to find one with no hollow in the garboard.
-
I have a set of checkering tools used to cut the checker on gunstocks. There are several different types and shapes of cutters and on my set the blades can be replaced. The are great small cutting tools but I have never heard of anyone using them for doing anything but cutting the checkering on stocks. Has anyone tried using them to do carving for models?
- 1 reply
-
- 3
-
-
Threads on miniature nuts & bolts
grsjax replied to jhearl's topic in Metal Work, Soldering and Metal Fittings
I can't answer the question but it may be possible to recut the threads in the nuts with the jewelers tap depending on what material the nuts are made of and how close you can get to matching the original thread. I have done this with regular sized bolts and nuts when I could not get an exact match. Can't guarantee it will work for you but it might be worth a try if all else fails.