


realworkingsailor
-
Posts
3,091 -
Joined
-
Last visited
Content Type
Profiles
Forums
Gallery
Events
Posts posted by realworkingsailor
-
-
-
Amazing work!
And incidentally, those anchor chain "chutes" as you call them, are more correctly known as
"spurling pipes"
Keep up the good work, and the amazing photography!
Andy
-
Yeah.... Uh.....your sidelights are backwards.... Red goes on the left (port) side, and green on the right....
Andy
- WackoWolf, harvey1847, Piet and 1 other
-
 4
4
-
It's already been declared a national historic site by Parks Canada.
It ain't goin nowhere.
Andy
-
-
I've had a lot of success in the past painting decal sheets.
Rather than trying to "paint between the lines", start with a blank sheet and paint a section the colour you desire (spray painting is preferred). Seal it with a clear finish like glosscot or dullcote. Then cut out a piece(s) the size and shape you desire. Apply these over the top of the already applied decal with the miss-matched colour. If you have a few spares, cut out the centre of the 9 and use the decal as a template (obviously, you leave the decal on it's backing paper).
It may sound a bit weird (painting decals) but it really works well.
Andy
-
-
Definetly a Flower class..
Wonder which of the 267 it is.....
Do we start alphabetically...


Andy
-
Piet,
Go to www.boatnerd.com and click on the "news channel" link.
The submarine museum in Cleveland (www.usscod.org) is going to be re-enacting the O-19 rescue on July 12
Andy
- mtaylor, SawdustDave, WackoWolf and 1 other
-
4
-
The basic technique is almost identical, you just have far more control with an airbrush.Andy, just out of curiosity (and ignorance), how different is airbrushing from using spraypaint?
Andy
-
A good airbrush should run between $100 and $200. Best bet is to look in to your local hobby shop and see which brands they support. You're going to want a double action brush, as you have greater control over the paint/air flow than on a single action brush (which acts more like a rattle can).
When you get set up, before you even approach your test model, practice on a few pieces of cardboard, or other scrap. Try to get the paint to a nice even coverage with no thin spots or weeps.
Airbrushing really is not that hard to do, it just takes practice to do it well. Good luck

Andy
-
-
You've got it Jan. It's one thing on a flat surface, but quite a different challenge on an open truss with thousands of angles, nooks and crannies.
Andy
-
Tamiya TS33 hull red over white?
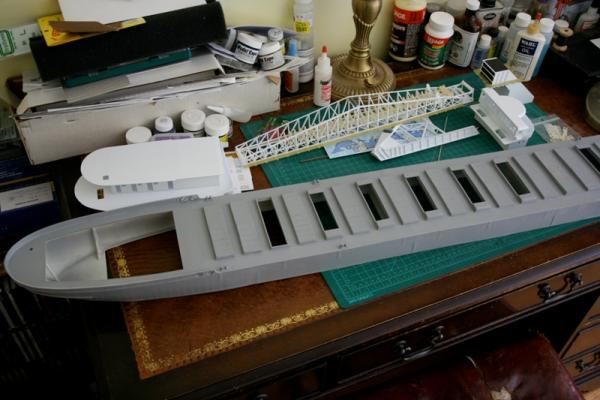
My main issue is the visuals. The truss is going to be a royal PITA to paint, any colour. I'm probably going to get some red automotive primer, then go grey over that.
Andy
-
So it's been a long time since I've posted any kind of an update over here....
The weather is nice today, low humidity and a light breeze, so first thing this morning (ok.... not exactly first thing, but close to it), it was out to the picnic table with some newspaper, a couple of rattle cans of primer, and the big white beastie.
(I love the smell of primer in the morning.... well... maybe not)
I've pushed this step a little, there are still some details to add to the hull, but I can now see any flaws, nicks, scratches, gaps etc. that I missed when whe was glaringly white. Turns out... there are a few gaps... and scratches... and other areas that need a nice combination of sanding and filling. Not a big deal, I expected that.
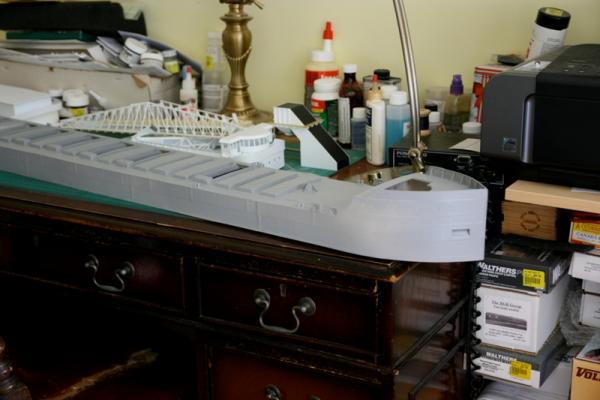
Incidentally, it's Tamiya grey primer that I used. OK for the hull, but when I do the unloading gear, I'm going to have to find something in a red primer... grey topcoat over grey primer is just not going to work....
Andy
-
-
I'll be sure to follow along. I generally have the same impressions of the CC kit. Good, but could be better.
Andy
-
Well, since the photo is a little less than determinate, and Werik guessed the ship you where after, by all rights it should be Werik's turn. (Also since I don't have time to find another ship at the moment, I could, but it would pause the game too much)
Andy
-
I agree, you google each and end up with the same photos. Both side wheel passenger steamers, converted about the same time. Only way to tell them apart is by the funnels. Both had four, but Wolverine's were evenly spaced in a row, whereas Sable had hers in pairs.
Andy
-
-
I have a similar cutter. They're great for stock thats 0.5mm or less in thickness. Much thicker and you start to get an angled edge due to the cross section of the blade
Andy
-
Greetings from another Swan class builder. For a first timer, you've surely picked a though one. Not impossible, though. Lot's of reference material here and as the others have said, the TFFM series of books are invaluable (just to help wrap your head around some of the concepts). Don't be afraid to ask questions, we've all hacked our way down this path before. Wood is forgiving, and extra parts can be ordered. You can honestly expect to take at least a year or longer on this build (I'm on my third, but mostly because I didn't manage any work last winter at all, so don't feel bad).
Welcome to the Swan club!
Andy
-
Nope, you got it.
-


Skipjack by michael mott - 1/8th scale - SMALL - 19 foot open launch
in - Build logs for subjects built 1901 - Present Day
Posted
I need to stop by here more often... Yikes... That's some scary impressive machining. Can't wait to hear it turn over for the first time! (When you get that far, of course)
Andy