Kevin-the-lubber
-
Posts
1,232 -
Joined
-
Last visited
Content Type
Profiles
Forums
Gallery
Events
Everything posted by Kevin-the-lubber
-
 Great work Bill. Your experimentation with resin casting is very like the learning process with resin printing - 2 steps forward, 1 back, but bit by bit you figure it out.
 -
This is one very intriguing project Ian - like some others, the arduino stuff goes way over my head but I can't wait to see the sea trials.
- 536 replies
-
- 3
-

-
- Quadrireme
- radio
- (and 1 more)
-
First off, that new version of the figurehead is stellar. Even though I'm more or less capable of doing quite a lot in 3D modelling myself, it won't surprise me if I head over to Daniel's shop for things like this when I go back to my Victory. Headband magnifiers - I only use mine in extremis because I find it so difficult to work with this on my head. It's when you need to look away that's the problem, i.e. to pick something up or whatever. I also have a lamp like Ross, but it only magnifies to about X2. Every now and then I look on the web for something 'perfect', which would be like this: it must be glass, not acrylic (the latter scratches too easily); it needs to go up to X4; it needs to be BIG! At least 5" or 6". I'm not sure such a thing exists or, if it does, is affordable. Even at X2 I'm hitting the lens with my brushes, but one day I'll probably cut down a set to suit.
-
Spyglass, that’s interesting and makes a lot of sense. The stays on the Cutty Sark are wire hawsers, for reasons which are now obvious when reading your post. I think I kind of understand the logic of raking the masts - I assume you’re trying to get the wind to fill / flow down to the bottom of the sail, as close as possible to the hull, but I’ve also read of masts being raked forward, which makes less sense as that must make the bow ‘dig in’. Either way, I’ve settled on the rake angles given by Underhill and kept them in line.
-
Thanks for your replies. Allan, no, in fact that hadn’t occurred to me so thanks, that’s a good suggestion. I was thinking that maybe it was a norm in tall ships, to possibly counter the increased flex you’d have all the way up there, but googling and searching on here hasn’t thrown up anything to back that up, so I’ll just assume it is indeed an artistic or printing error and keep them in line. But having started this train of thought, it’s got me wondering as to how much difference the rake angles made anyway. I’d have thought that the masts would bend forwards to varying degrees under the wind pressure. I imagine all of this was a somewhat inexact science that was sometimes beneficial and at other times, not.
-
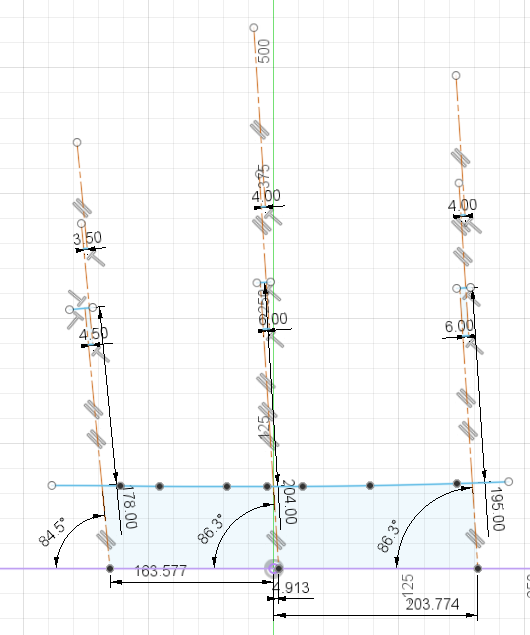
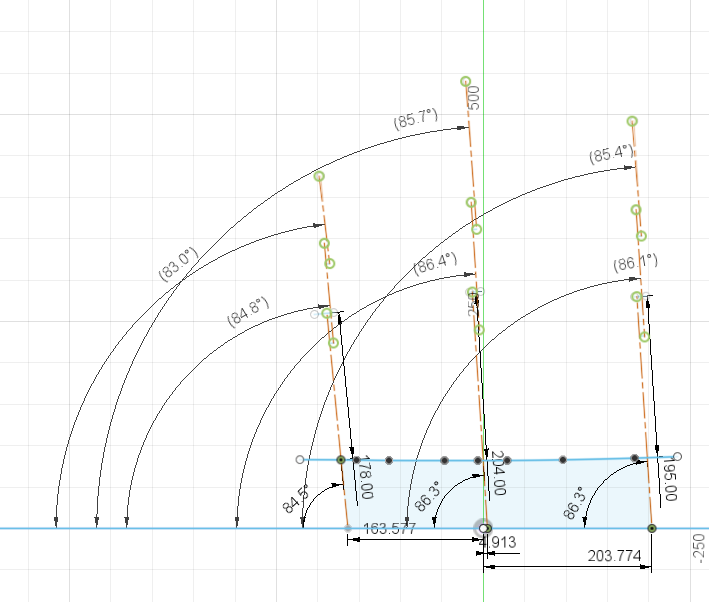
Hello all, I've been working on 3D modelling masts for the Cutty Sark in recent weeks and noticed something odd on the Campbell ship plans and would appreciate some advice. I'll explain the question through two drawings; 1. I had assumed that the different mast sections (lower, topmast, topgallant) would all be in line with each other, as shown below; However, the Campbell drawings suggest the topgallants in particular are raked further than the lower and topmasts; The Campbell drawings are more illustrations than technical plans, so is this just artists error or did the rake indeed vary? Incidentally, I know the Campbell angles are slightly wrong, it should be 86', 85' 84' fore, main mizzen respectively.
-
It'll be a little, I think, while until I'm ready to 'show & tell'. The masts and yards are the final bit of 'making', other than blocks etc, and are a kind of gateway to finishing off quite a few other things. I've been looking at your sails - they are simply fabulous. I've only had one brief play around with the modelling tissue and didn't really get anywhere useful, so that's something where I'm still very undecided.
- 444 replies
-
- 1
-
-
- Cutty Sark
- Revell
- (and 2 more)
-
Bill, if you don't mind me saying so, one of the nice things about dropping in on this log from time to time is seeing how self-assured you've become - you seem to have a clear plan for this ship, know where you're going and are just getting on with it. That's an enviable trait, I always struggle with completing/finishing. Hope the COVID remains not so bad. I got it last year and the worst of it was that everything tasted of salt for a couple of weeks.
-
Vitus, there’s a lot to be said for 3D as part of the toolkit. Feel free to ask for tips, I’m no expert but I think I’ve probably travelled the main learning curve now.
- 444 replies
-
- 1
-

-
- Cutty Sark
- Revell
- (and 2 more)
-
Not quite, but he did give me some very expensive hardware that should make it fun going through airport security 😁

- 444 replies
-
- 1
-

-
- Cutty Sark
- Revell
- (and 2 more)
-
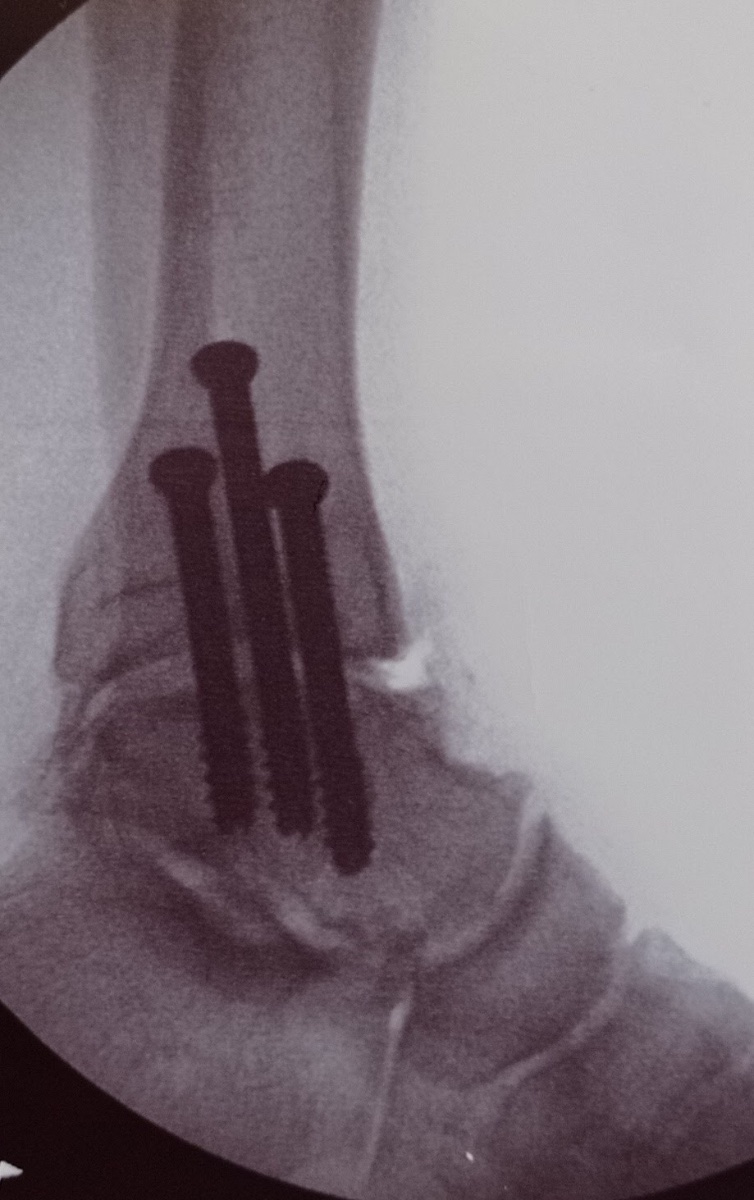
You're welcome Leo. In other news, I've had my ankle fused this week, ever worsening arthritis from a climbing accident in my youth which was taking all the pleasure out of physical activity, so I'm hoping the 2 or 3 month lay-off will see me finish modelling and making the masts. They've required a mixed media approach - some resin printing, carbon fibre stiffeners, wire eyebolts etc - and the cold winter has made this heavy going. Resin doesn't like being printed cold, paints don't like it either, and the failures/poor results get a bit exasperating after a while. So, I'll spend a few weeks doing all the remaining 3D work and resume the 'making' in the spring, when I'm weight bearing again.
- 444 replies
-
- 1
-
-
- Cutty Sark
- Revell
- (and 2 more)
-
3D cannon barrels
Kevin-the-lubber replied to allanyed's topic in CAD and 3D Modelling/Drafting Plans with Software
Allan, I might have time as well. The barrels are quick and easy in Fusion 360, the fiddly bit is the decor on top. This is where it would be good to have a repository somewhere, for the drawings and .stl's. -
Fourth & final set uploaded. https://www.dropbox.com/s/hqbl3se9q96kwjl/set4.zip?dl=0
- 444 replies
-
- 1
-
-
- Cutty Sark
- Revell
- (and 2 more)
-
Bill, interesting stuff - how brittle or tough is the epoxy casting? Sometimes you can get fantastically detailed resin prints but they won't bear being used, and I sometimes think I should try making molds for casting instead.
-
I haven't had much time for modelling stuff for the last two or three weeks. Set 3 of 4 is now posted. https://www.dropbox.com/s/pvovnu96bffc66k/set3.zip?dl=0. I may only leave this up there for a week as I'd like to be done with this now! I'll re-post set1 at the end, probably in two halves as it was so problematic last time.
- 444 replies
-
- 2
-
-
-
- Cutty Sark
- Revell
- (and 2 more)
-
Liquid bitumen of Judea… another art products lesson! Apparently used to caulk Noah’s ark. It seems to be readily available here in the uk (googling) so if you get stuck, shout out.
- 2,699 replies
-
- 3
-
-
- heller
- soleil royal
- (and 9 more)
-
What's easier?
Kevin-the-lubber replied to Srenner's topic in CAD and 3D Modelling/Drafting Plans with Software
Have you looked at regular CAD type software e.g Fusion 360, Rhino, FreeCad etc? I may be totally wrong but when I started out myself a couple of years ago I got the impression that Blender wasn’t ideal for precision engineering, which is where you’re headed. What you described in post #1 is straightforward and quick in F360 or Rhino once you know how. -
What's easier?
Kevin-the-lubber replied to Srenner's topic in CAD and 3D Modelling/Drafting Plans with Software
I don't want to muddy your water but can I ask what your end objective is? Is it to create purely virtual models or are you using Blender as a means to create components for 3D printing? -
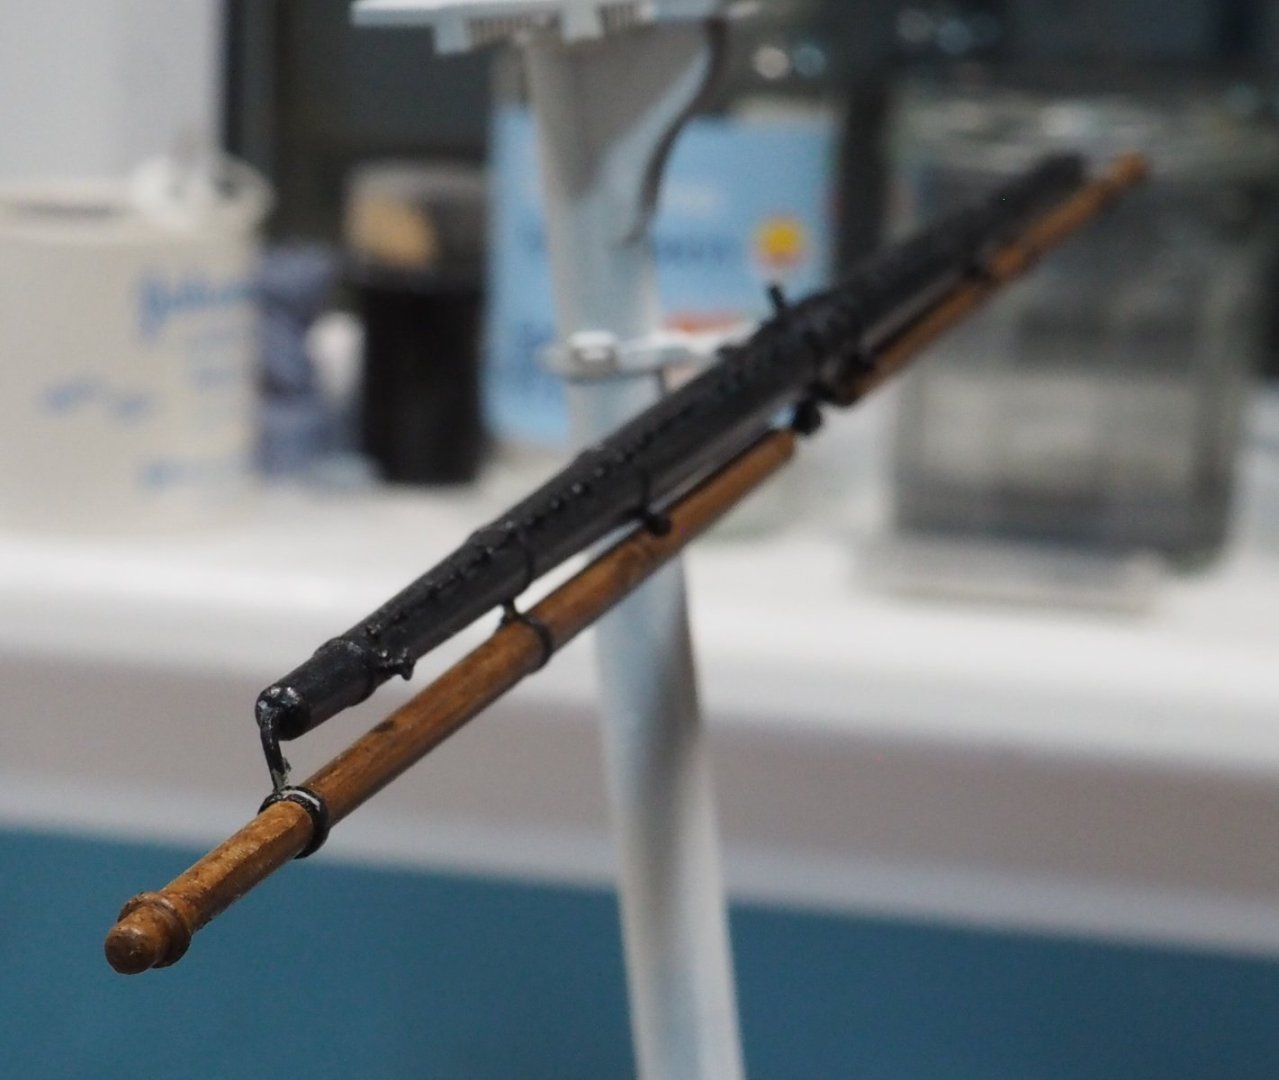
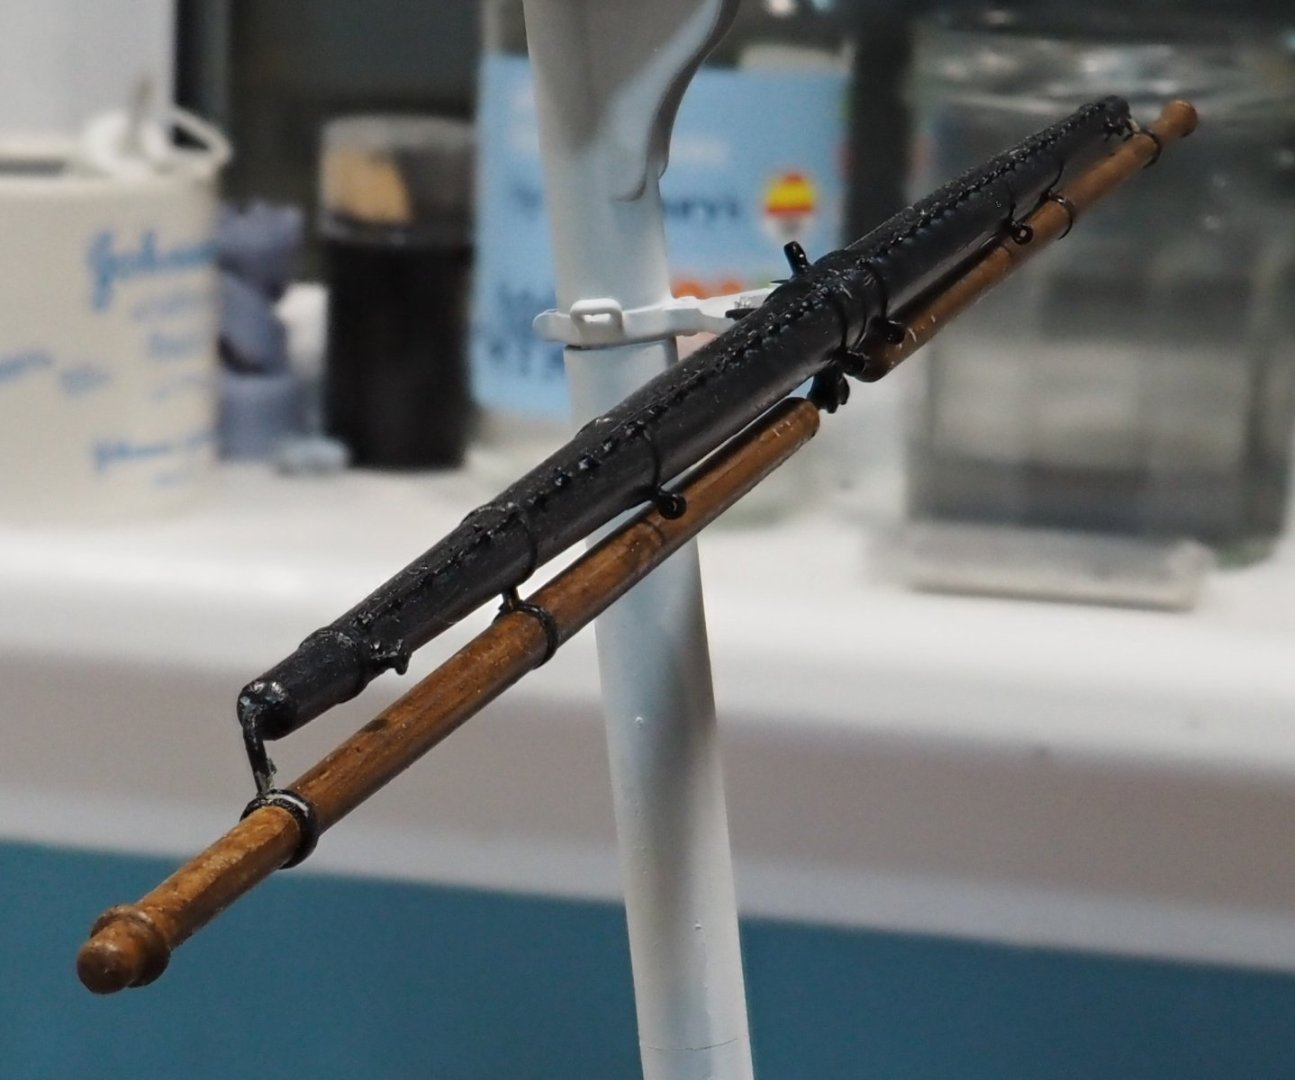
While waiting for the resin printing equivalent of paint to dry - a 10 hour print of the revised version of the lower topsail yard and topmast - I've been playing around with my recently purchased, second-hand Olympus OM-DE-M5ii. Trips off the tongue nicely, doesn't it, Olympus marketing staff definitely missed the memo about catchy names. Anyway, I thought I'd share these two pics to illustrate something which might be of interest to others. This camera has built-in focus stacking. That's a large part of the reason I bought it, as I also like taking macro shots of flowers, insects and whatnot, and it's always a little disappointing to have parts of the subject just out of focus, or a grainy (noisy in digital speak) result through stopping down too much. On the left is what stacking delivers - see how the yard is in focus for the entire length, without compromising the quality. On the right is the same shot without stacking. (The design of this yard has been re-done already, this one, with lots of errors, is just for illustration)
- 444 replies
-
- 4
-
-
-
- Cutty Sark
- Revell
- (and 2 more)
-
Thank you, I really appreciate the encouragement and interest.
- 444 replies
-
- 1
-
-
- Cutty Sark
- Revell
- (and 2 more)
-
I hadn’t heard of that before your mention, above. Also downloaded it and had a quick look. It seem intuitive but possibly a bit simple compared to F360, maybe one step on from TinkerCad. Anyone used it in earnest that could tell us more? I’m always on the lookout for a good alternative to F360, in anticipation of the day when it stops being free.
-
I found I was doing the same Ian, I was spending too much time reading and responding to build logs, which was often much more entertaining than the task at hand, until I switched to a weekly summary instead. That did the trick though it does mean I often miss stuff. The galley is coming on nicely, looking forward to seeing it evolve.
- 536 replies
-
- 3
-
-
- Quadrireme
- radio
- (and 1 more)
-
Photo set 2 is on dropbox, this is the link https://www.dropbox.com/s/qzgifbreac8850s/Set2.zip?dl=0 If you can't access/download I'm afraid there's nothing I can do about it, you just have to try again on another day. Dropbox temporarily stops allowing downloads after X many, then allows them again after a day or two. They would like me to buy lots of storage space to avoid this, but that's not happening!
-
Cutty Sark Photos - Free!
Kevin-the-lubber replied to Kevin-the-lubber's topic in Masting, rigging and sails
Photo set 2 is on dropbox, this is the link https://www.dropbox.com/s/qzgifbreac8850s/Set2.zip?dl=0 If you can't access/download I'm afraid there's nothing I can do about it, you just have to try again on another day. Dropbox temporarily stops allowing downloads after X many, then allows them again after a day or two. They would like me to buy lots of storage space to avoid this, but that's not happening! -
That's very kind of you Bill. The world cup has been fun to watch, disappointing for England but, as I tell my colleagues, it's only a game 😁. One thing I never understand is this - when teams get knocked out, they pack up and go home. If it was me I think I'd quite want to stay and watch the rest of the competition!
- 444 replies
-
- 1
-
-
- Cutty Sark
- Revell
- (and 2 more)