Kevin-the-lubber
-
Posts
1,233 -
Joined
-
Last visited
Content Type
Profiles
Forums
Gallery
Events
Everything posted by Kevin-the-lubber
-
 That's very kind of you Bill. The world cup has been fun to watch, disappointing for England but, as I tell my colleagues, it's only a game 😁. One thing I never understand is this - when teams get knocked out, they pack up and go home. If it was me I think I'd quite want to stay and watch the rest of the competition!
- 444 replies
-
- 1
-

-
- Cutty Sark
- Revell
- (and 2 more)
-
Hi Bill, thanks for looking in. I see you're still racing ahead on the SR, at this rate (and I'm serious when I say this) you'll complete the two most difficult ships in the heller series while I'm still plodding away on the relatively simple CS! Having both the CS and Victory so close is a huge luxury and I ought to make more of it. I've just bought a new camera this weekend (well, second hand actually, but very good) and may do another visit to the CS very early in the new year. Now that I've worked on the foremast and yards in detail I have a much better idea of shots or areas that I missed. I don't think I'd visit Victory again now unless I really needed sight of some particular details. Without masts and rigging she's a sorry sight at present, but I guess it has to be done. I saw the most beautiful model of the 1765 (I think) Victory in the maritime museum while visiting the CS, but the area with the clipper models was shut that day. I'm not so sure the average person would even notice the difference between OOB and kit bashed, apart from the rigging, but in any case, from the photos way back, you did a pretty good job on it. And remember a lot of the time this is the 4th or 5th time I've built this kit as that's how many goes it often takes to get to the 'final' parts. I'm able to learn from my mistakes on the fly and make improvements as I go. You don't get that luxury if you only have the one kit part! Honestly, you guys would be horrified if you saw my scrap bin, in fact here's just some of the CS tests. The wastage does get less and less as I progress, I hasten to add. I've almost finished designing the foremast assembly now, it's taken a long time but the rest should be quicker as there's a lot of shared principles. I may take a little break or at least slow down even more after Christmas, as I may be getting a couple of 1;24 vintage car kits in my stocking and if one of them is a Tamiya I'll want to start on that straight away. I've wanted to try one of their kits for a while as I understand they are fantastic, and it looks like cars are much more 'paint and stick' than ships!
- 444 replies
-
- 3
-
-

-
- Cutty Sark
- Revell
- (and 2 more)
-
Cutty Sark Photos - Free!
Kevin-the-lubber replied to Kevin-the-lubber's topic in Masting, rigging and sails
Like this https://youtu.be/ipibBzaByIU -
Cutty Sark Photos - Free!
Kevin-the-lubber replied to Kevin-the-lubber's topic in Masting, rigging and sails
Allanyed, as I understand it, it's like this: there is a bandwidth allowance which gets eaten into by each download. For my free account I have 2Gb of storage and an allowance of 20Gb of bandwidth, meaning the upload probably consumed 2Gb and downloads a further 2Gb each time. The inference is that the files have been downloaded 12 or 13 times since dropbox tells me I've consumed 26Gb of bandwidth. (Bored already by the tech stuff? Me too!). But it seems I can workaround this by renaming the folder and creating a new sharing link. This is fine if one really wants or needs to share with specific people but is probably a bit too much hassle for what you & I want to do, which is simply make freely available a load of reference material. And to be honest I don't understand or even care how dropbox monitor or apply the constraint - is it daily, weekly, forever? There is obviously some demand for a 'central library' for donations such as yours and mine but, setting aside all the copyright-type issues that would need managing, I expect this would need enormous amounts of server storage. Shipman, I think many would echo your sentiments about having to jump through hoops. To some extent I'm the same, but just accept that I have to do some jumping or forego freebies. I briefly considered asking if the rigging climb was open as there didn't seem to be anything happening in that respect, but given my level of decrepitude I went and had a cream tea instead. Really, it needs someone to go round and round with a drone camera at stepped heights but drones are forbidden. Though I wonder to what extent i.e. is that within a mile or just 50 feet. -
Cutty Sark Photos - Free!
Kevin-the-lubber replied to Kevin-the-lubber's topic in Masting, rigging and sails
Sadly Dropbox has suspended sharing of my account due to too much traffic. The suspension apparently lasts for 24 hrs, so anyone who didn’t manage to get the files may have more success later. If not, send me a pm and I’ll do workaround. I may need to handle the remaining photo batches a little differently, I.e. smaller sets. I suppose we can’t complain, it’s free! -
Cutty Sark Photos - Free!
Kevin-the-lubber replied to Kevin-the-lubber's topic in Masting, rigging and sails
Hi Shipman. These are all full fat photos, typical file size = 4Mbs, plus a few videos. When I follow the link myself it all seems to work as expected, I can download a copy of the original. There's no zipping at this end. maybe you have to submit to having a dropbox account in order to access them properly. I'm quite happy to upload to a different free portal if someone has a suggestion, it just has to be quick and easy. The folder is about 7Gb in total. -
I made another visit to the Cutty Sark last week and took around 1000 photos. For obvious reasons these are all detail photos aimed at helping me with aspects of the model. They are largely focussed on the masts, spars & rigging. I'm uploading these to dropbox for anyone to download and do with as you will. Due to free storage limitations I'll need to do this in three or four. The first tranche is accessible via this link https://www.dropbox.com/sh/5xnj0nrvpfztcnj/AAAAgu-W1ZY5fpTL8c3hYcKHa?dl=0. I'm not at all au fait with dropbox so if that doesn't work I won't know how to fix it! I'll delete these and upload the next load in about 2 weeks time, and so on. If anyone reads this, say next year, drop me a pm if you want them.
-
I made another visit to the Cutty Sark last week and took around 1000 photos. For obvious reasons these are all detail photos aimed at helping me wit aspects of the model. They are largely focussed on the masts, spars & rigging. I'm uploading these to dropbox for anyone to download and do with as you will. Due to free storage limitations I'll need to do this in three or four. The first tranche is accessible via this link https://www.dropbox.com/sh/5xnj0nrvpfztcnj/AAAAgu-W1ZY5fpTL8c3hYcKHa?dl=0. I'm not at all au fait with dropbox so if that doesn't work I won't know how to fix it! I'll delete these and upload the next load in about 2 weeks time, and so on. If anyone reads this, say next year, drop me a pm if you want them.
- 444 replies
-
- 2
-
-

-
- Cutty Sark
- Revell
- (and 2 more)
-
Bill, you’re getting through this at such pace! I can see all that learning on the Victory paying off here and it’ll be interesting to see how that plays out with the rigging. I’ve always assumed the SR would take ages. I love the paintwork by the way, both on the hull and decks. You’ve really nailed that.
- 1,508 replies
-
- 1
-
-
- Le Soleil Royal
- Heller
- (and 1 more)
-
Rob, I wouldn't at all disagree and I'm having to learn the mechanics whether I like it or not, as I always need to understand the 'why'. But it is a slow, piecemeal process of two steps forward one step back and, sometimes, the other way round. No matter, I'm a problem solver by nature and will plug away in my own way. I am just becoming a bit frustrated at having several other models that I would like to work on, having hoped to be finished with this one by now; whereas I realise I am probably not even halfway yet. And this isn't through some quest for perfection, just a need to have done as good a job as I reasonably could at this stage of the hobby. I know the next ship will be done much more quickly, and the one after that even more so, but there's always a need to feel tangible progress is being made. Anyway, enough whingeing, work to do and the CS can wait until the weekend.
- 444 replies
-
- 2
-
-
- Cutty Sark
- Revell
- (and 2 more)
-
I’ve been diligently following plates 5 & 6, steel lower masts! Now I see there’s even a very nice sketch on page 39 and narrative on p.40. I guess this is the danger of using something generic as a reference, coupled with not wanting to read the whole thing. I have a copy of Campbell on the way, hopefully that will be more definitive. ps. And just to complete the 'idiot' look, I now also see it's there in the revell instructions - they are called cranes. I think it really is time to stand back and get my ducks in a row around these references, I'm getting in a right old muddle here!
-
Gosh, it sounds like your ED is just like ours Ian, painfully long waits if you’re going to live. Good that you didn’t actually detach any digits though. Those rams will print fine in either FDM or resin. I couldn’t entirely understand the description of the hull development but, for what it’s worth, the most important lesson I learned when doing my little boats was to use the fewest stations possible.
- 536 replies
-
- 3
-
-
- Quadrireme
- radio
- (and 1 more)
-
Thanks Rob, that gives these old eyes a better chance. I most likely will go with how it should be and say a fond goodbye to the double, centred block. I notice the fairleads are quite long as well. Any idea what that rod, running down from the lower topsail yard truss to, it would seem, the foot of the topmast, is all about? I don't see this on any of my reference material. It looks like a bracing rod. I cant quite see, due to the black yard, what it connects to. The cheeks are much thinner than I thought as well, I'd guess that they are nevertheless 1/4" plate which is more than thick enough for that job. I might have to take another look at modelling the trusses. On the real thing they are relatively fine, rather nicely wrought pieces and can be that way as the chains take most of the strain; on a resin model, at scale they are an accident waiting to happen. This might be where I get out the soldering iron. I'll probably pause again for a bit now. I'm finding it painfully difficult to piece together enough knowledge to make progress, something I can probably address with a day trip up to Greenwich.
- 444 replies
-
- 1
-
-
- Cutty Sark
- Revell
- (and 2 more)
-
That's a very good shot Rob - do you by any chance have a larger version? There's a lot of good detail in that shot that I haven't seen elsewhere.
-
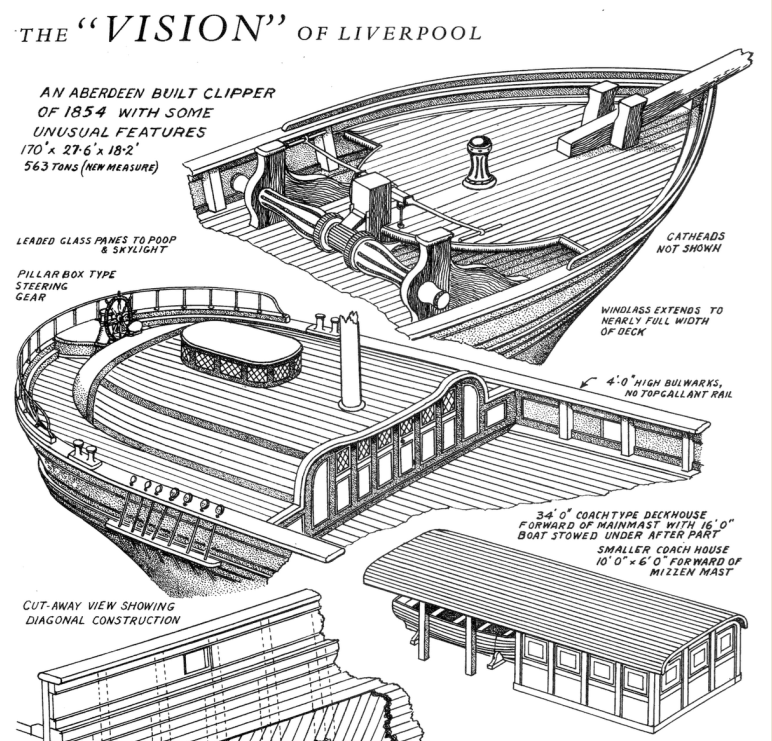
Thanks, Scott. I think you'd be quite hard-pressed to get a good result with FDM. Last year I tried printing cannons using FDM (in fact I think it might have been that which tipped the scales towards buying a resin printer) but I couldn't get at all close to something useful. If resin hadn't worked out so well I would have resorted to wooden dowels and metal, like Bruma's lovely examples. For me it's not so much the tolerance, more the hassle of cleanup - I can print to less than 0.2mm every time in FDM, but printing thin tubes vertically is almost impossible and split tubes horizontally on the plate will work, but you'd have to support the bore and then sand the outside smooth. With resin, I can print them vertically as tubes and with just a little external support (to keep them centred) do quite long lengths i.e. 150mm. But in practice I've found it's better to split them into 2 or 3 sections, using the fairlead bands as cut points so the joins don't show. I've half made a Cutty Sark hull in F360 and at some point will progress it to a stage where it's worth a first draft print. If it's any good I'll most likely use that, along with everything so far on the CS, as the basis for another clipper, quite possibly the Thermopylae. That said, while grazing some background material the other day I found a drawing of the 'Vision', which really appeals.
- 444 replies
-
- 2
-
-
-
- Cutty Sark
- Revell
- (and 2 more)
-
Yes Marco, the whole yard is currently based on Underhill rather than Campbell, which is also why there are two fairleads. I find there isn’t enough detail in the Campbell plans to rely on these and I don’t think I have Longridge. I may change these details at the last minute. I would so like some proper engineering drawings! I still have a few weeks of designing, I think, and may try to fit in a quick visit to Greenwich to get some better photos of the rigging.
-
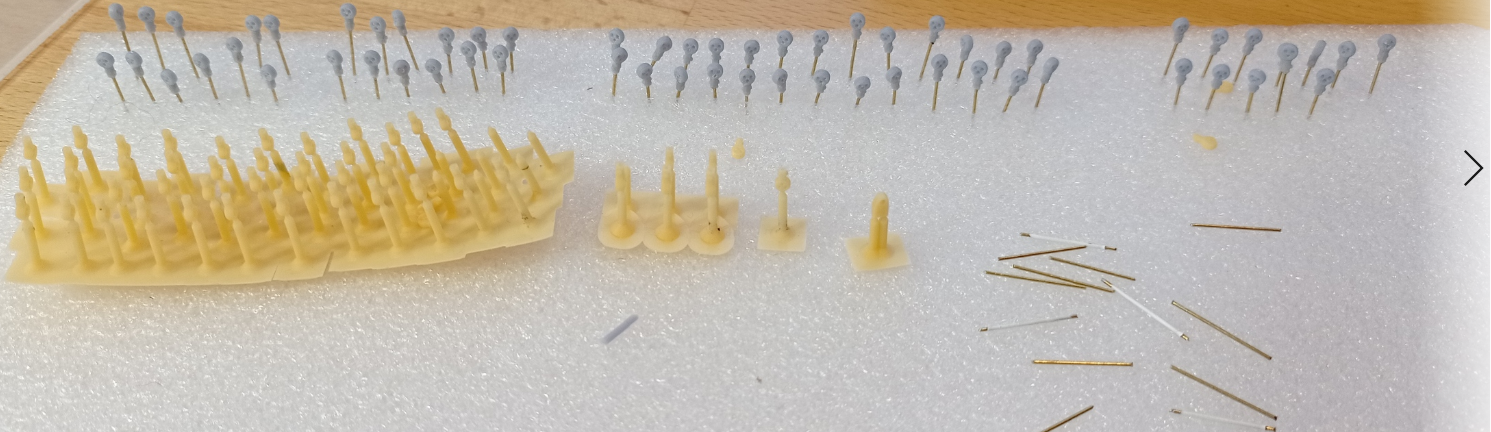
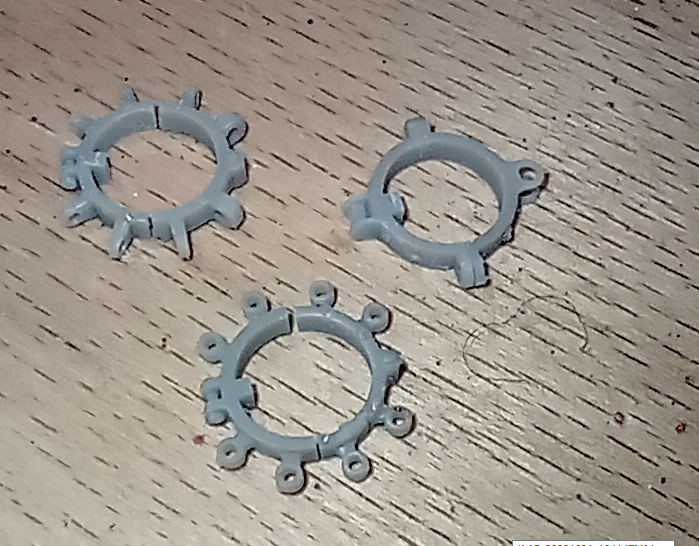
Oh that's entirely possible. I think I'm doing pretty well to not just be calling everything sticks 🙄. I don't have to drill through solid bars, I just have to open out the barrels slightly as they tend to close up down the tubes. It's relatively quick and painless, especially with these long drill bits. I think I've given up any ideas of ever marketing any of this stuff. It would be nice to make a little pocket money and all that but I'm coming to realise something I've probably always known about myself when it comes to making things. I love the design bit, the problem solving, but get very bored with repetition. For those familiar with Belbin, I'm a stereotypical 'Plant' with a bit of 'Shaper' for good measure. Here's an example; At the back, lower deadeye sets awaiting glueing and painting.... but I was three short. At the front, a batch that need re-drilling and pinning. They've been sat there for about 4 weeks. Making the foremast assembly is much more interesting. Cheek blocks at the back - as you say, it now makes perfect sense. So the fairleads then align to the cheek block. (I quite like that too!). Thank you once again Ian. If Messrs Underhill and Campbell were still around I would give them both a very stern lecture about the utility of proper isometric drawings.

-
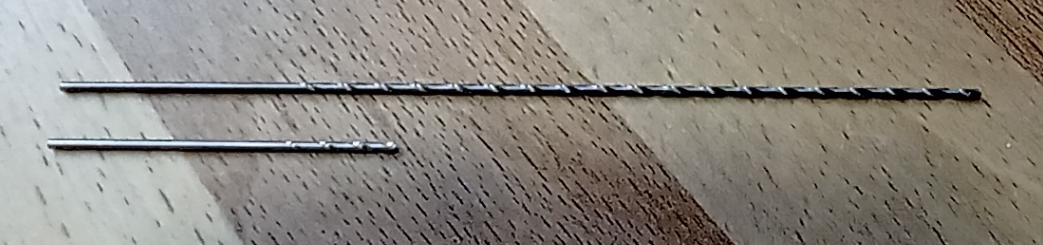
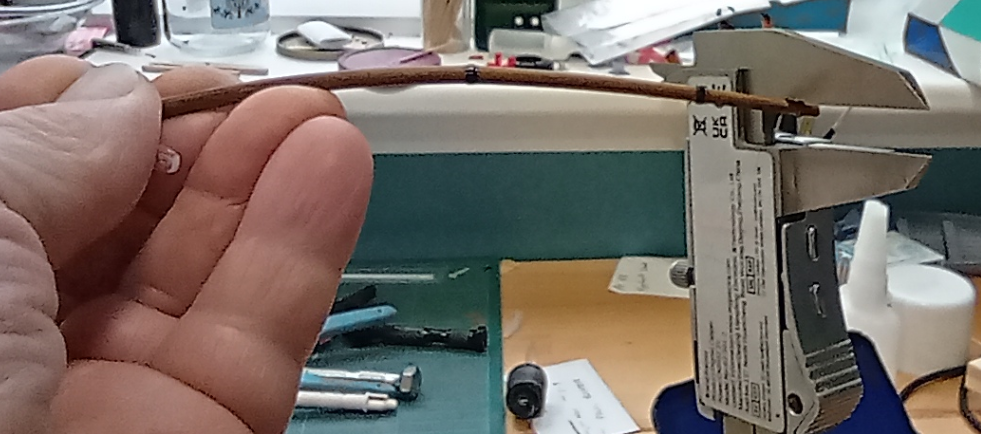
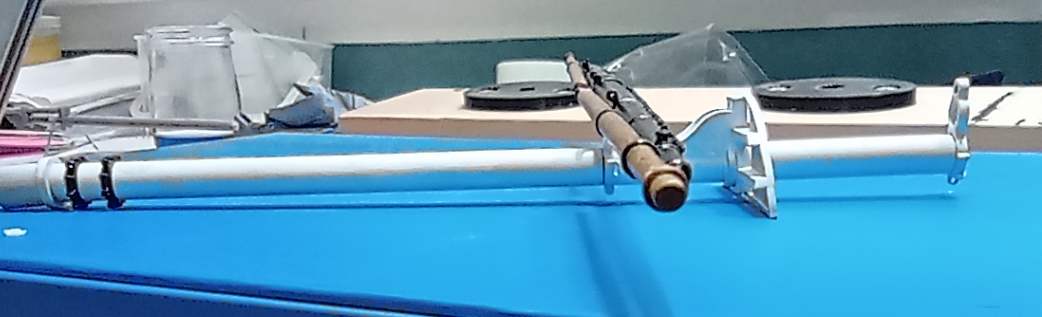
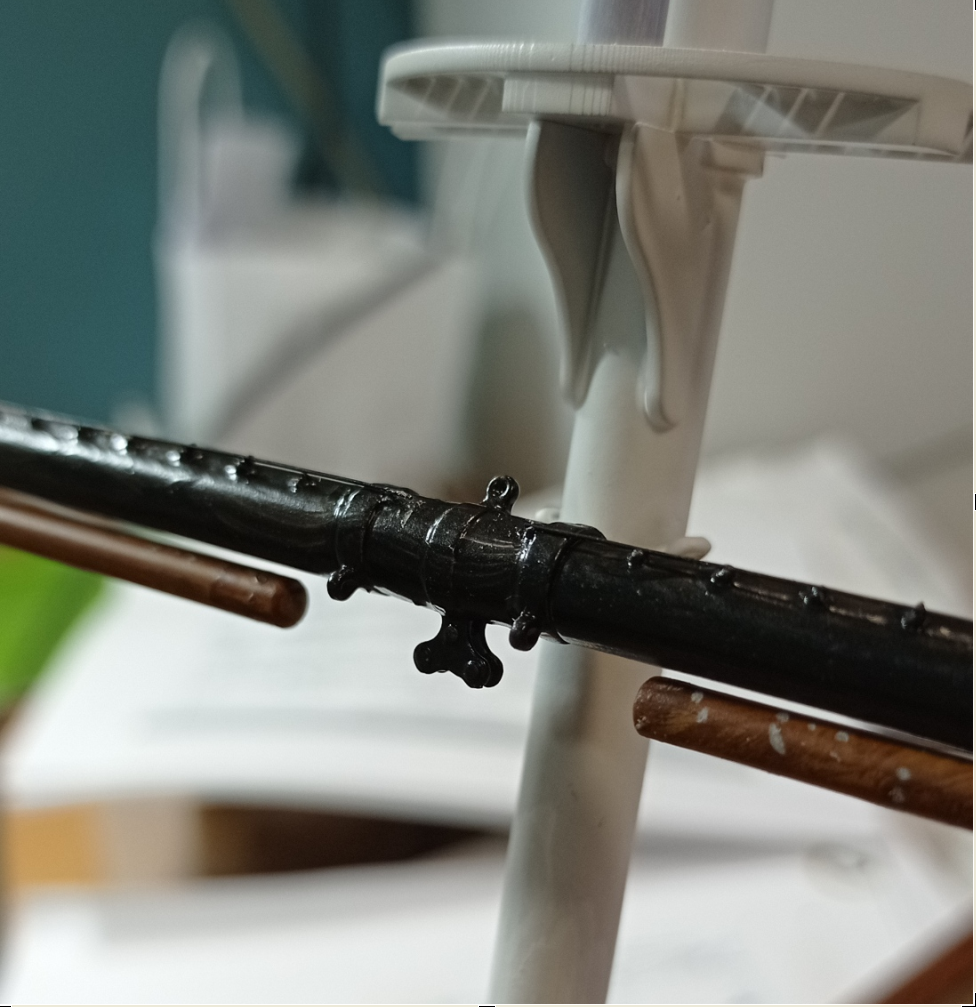
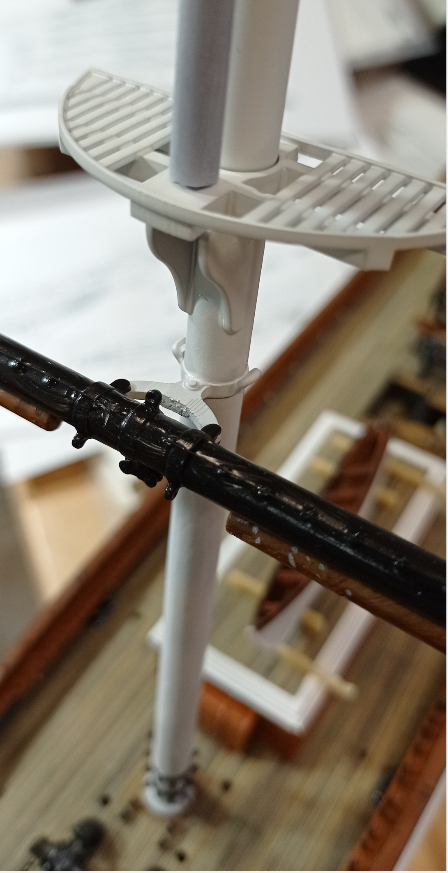
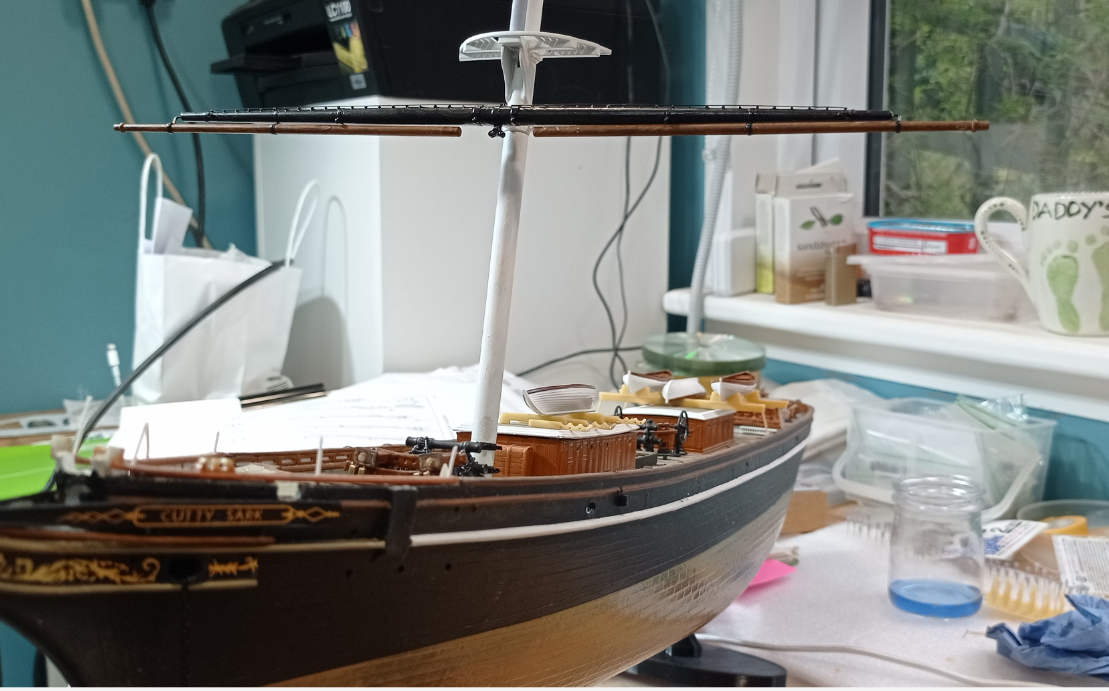
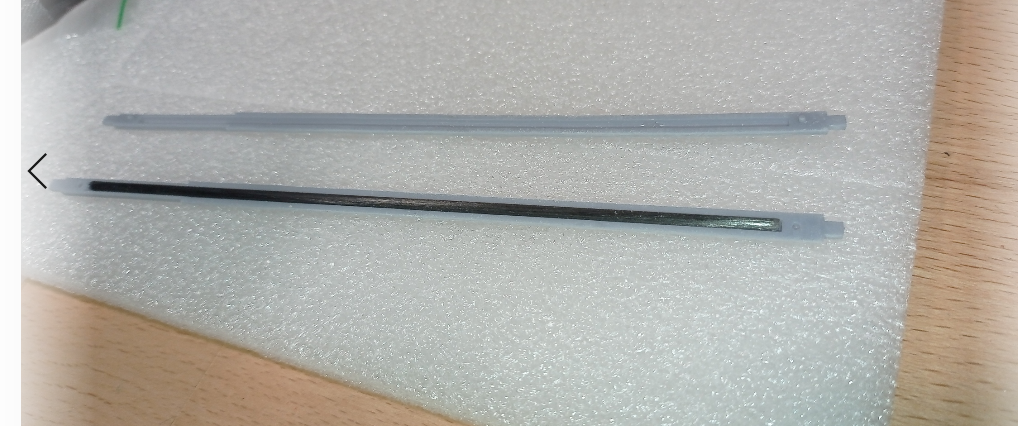
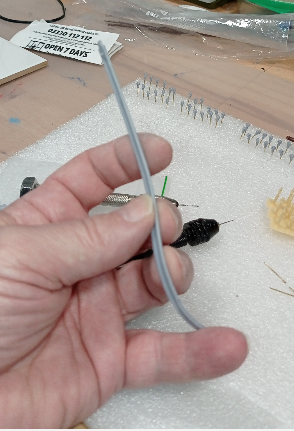
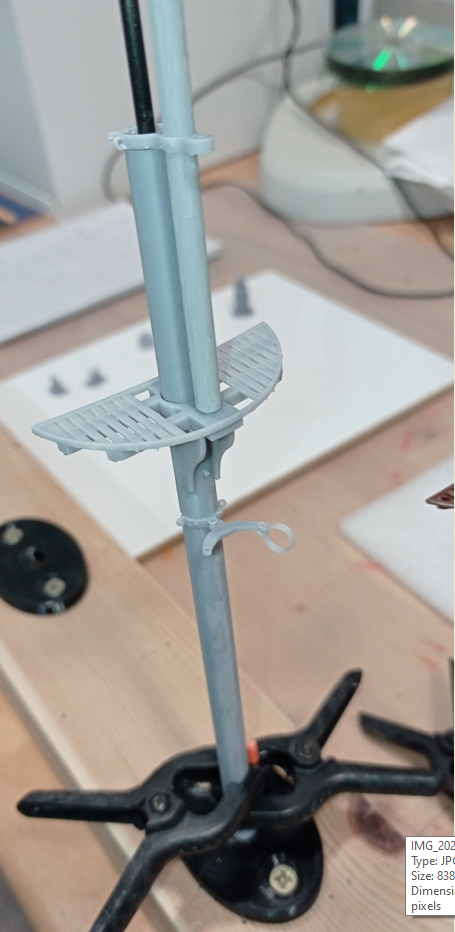
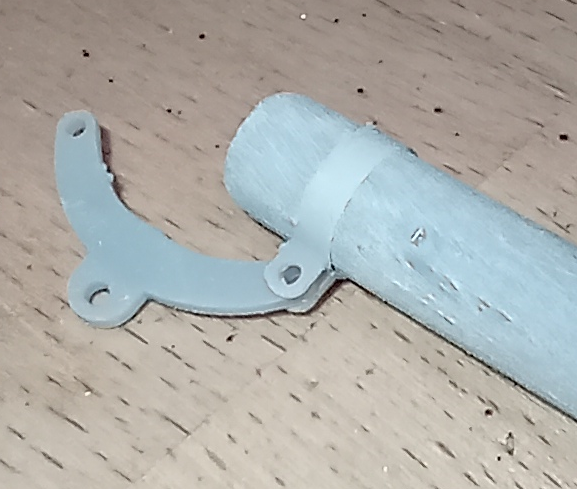
Folks, there's a question/plea for help in this further down, which I'll underline Second draft. The R&D department has been busy over the last two or three weeks and found a decent method of manufacturing the masts and yards as whole tubes, aided by some very nice, extra long micro drills; below, standard 1mm bit and 100mm long bit - you don't see many of those about, do you. By happy coincidence the lady who sells these on ebay is only a couple of miles away from me and has a veritable cornucopia of modelling tools, many of which will no doubt become mine over time. Anyway, these long drill bits allow me to bore out the barrels of tubes, which close up a little during printing, in order to slide in a CF stiffening rod. The results, in terms of being able to make even the thinnest of yards, are really very, very good; this is a 3mm or 4mm stiffened resin-printed yard-arm taking the full weight of my vernier caliper. with this amount of weight it'll bend, but not break, and returns to shape instantly. The mast and lower yard simply don't bend or break, solid as a rock. So we're in business from that perspective and here are a few detail photos of a 'dress rehearsal' of the lower foremast, largely so I can ask my questions! I find it is sometimes easier to see what changes are still needed if I do a quick'n'dirty paint up of the assembly, even though this iteration will end up in the scrap bin. Stiffeners are the magic ingredient here, well that and getting a resin mix that balances stiffness with flexibiity. You won't see it but I inserted two tiny brass pins in the truss that links the yard to the futtock band, which stops this weak point from breaking. However, I am not confident in my interpretation of the fittings on the lower yard: in particular, I am not convinced that the orientation of the sheet block, fairleads and cheek blocks relative to each other are correct and would very much appreciate a steer on this. I'd also be grateful for any pointers around details I've missed - bear in mind I've treated both the lower mast and yard as steel rather than timber, though the yard-arms are treated as timber. Getting this right at this point is key, because this mast and yard will essentially be the template for most of the others. Hopefully the two photos below show the current setup well enough. Looking at the yard from a side view, as per Underhill I've made the sheet block parallel to the mast. The cheek blocks are perpendicular to the mast. The fairleads (two on each side) are roughly halfway between parallel and perpendicular. I decided to orientate them like this because otherwise they would seem to foul the yard arms, or sit behind the same which seems illogical. My arrangement means the lower topsail sheets are going to slightly 'twist' their way around the yard as they pass from chain block through to sheet block. Is that correct? (Ignore the misalignment of the yard arms, they aren't glued in place)
- 444 replies
-
- 2
-
-
- Cutty Sark
- Revell
- (and 2 more)
-
You know for sure that I like her! That's very impressive. Are you working from plans or just pictures? Over the last couple of months I've found myself looking with more and more interest at planes, trains and other types of models but have resisted as I know there is a danger of losing interest in Cutty Sark. I would still like to know of a really great model in terms of detail and quality, that I could build straight out of the box and complete in 2 or 3 weeks.
- 399 replies
-
- 2
-
-
- cutty sark
- revell
- (and 2 more)
-
Shipman, go wash your mouth with soap! 🤪. Dare I say, in defence of my fellow 3D-ists, there's a bit of skill on the resin side as well.... Anyway, Marco, the yards and sails are just the best I've ever seen, they are extraordinarily lifelike, and I've looked at an awful lot of exceptionally good models on this and other forums. Even after you mentioned the wires I can't see them. And thanks for all those close-up photos, I can understand the bands and rigging a lot better from these. You must be pretty close to the end now?
- 399 replies
-
- 5
-
-

-
- cutty sark
- revell
- (and 2 more)
-
Taping would work, Marc. I like to be able to see the joints if possible as a tight line means all is well.
-
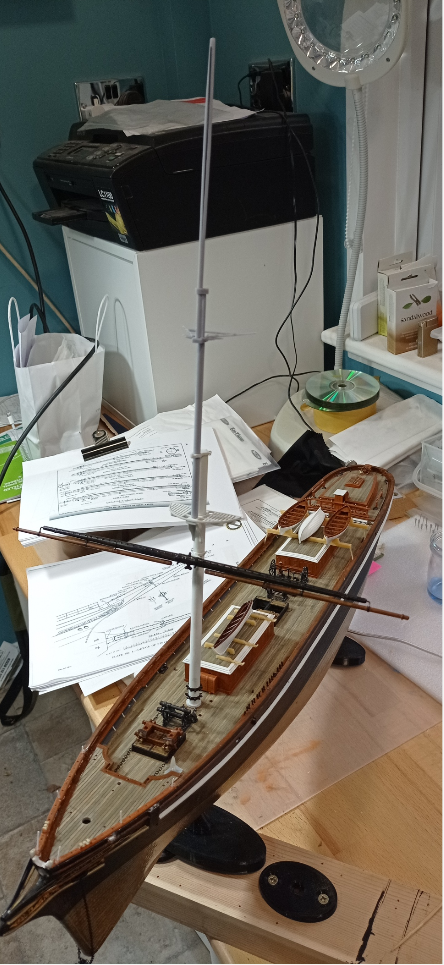
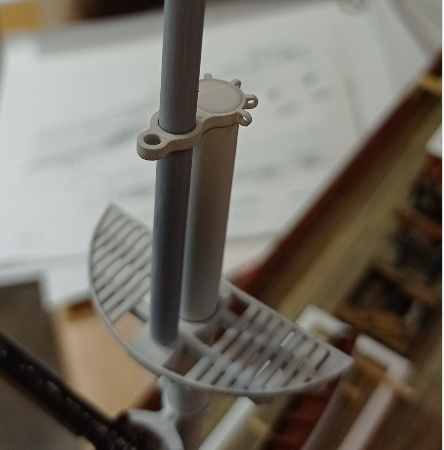
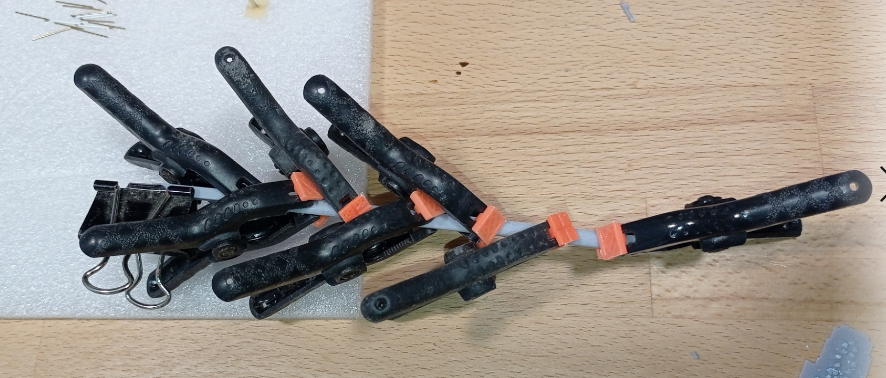
First 'draft' of the Fore mast. This is my typical 'stage 1' in the development process. Resin parts can be very flexible, too much so at times. But all masts and spars get a carbon fibre insert which makes them rock solid. Nevertheless, I will most likely change to a stiffer resin mix as I progress. A few months ago I tried printing a yard as a single 'tube'. It was hopeless, the 2mm centre hole (for the essential CF stiffener) closed up within 10mm or 15mm and even if I had a lathe (I don't), boring it out would be impractical as the resin would most likely be gooey in the centre. Split halves, just like the kit, work better, even on the topgallant. But when glueing up, you need loads and loads of clamp points to close the parts together, due to the softness of the print. Once glued the joints are far better than the kit parts. I think I may make a clamping jig for the final versions, something printed using the filament printer. A fitting trial. Everything looks generally good, I can see that, once everything is glued in place, the masts will naturally go straight and true. However, quite a lot of small adjustments are needed. I've made a better set of mast bands but none of them are fitting, need a bit more clearance. This is how it goes with resin: you find a magic formula, for me that's 0.2mm clearance, and then find it's not working for some reason or another. In this case it's an easy fix. The truss for the lower yard is in the 'really?' category. Even with the chain to the centre band, it'll be snapping at the slightest touch. And at 0.2mm thickness, the yard bands, while looking the part, are probably also a non-starter. I'll probably use hidden brass pins here. The rest of this weeks modelling time will mostly go into the revisions and then I'll print again. The good thing today is that everything printed fine, so at least I'm not chasing my tail to overcome problems in that area, which is good.

- 444 replies
-
- 3
-
-
-
- Cutty Sark
- Revell
- (and 2 more)
-
Bruma, thanks for those tips. I’ve noted someone (was it you?) recommending to leave glueing the fife rails until later, as space around the base is tight, but in any case I’m avoiding fixing anything in place - even the cabins and boats - until I’m reasonably sure that won’t be a problem down the line. In general I’m using underhill’s designs as they seem more detailed than Campbell, and I’m only using revell for things like the length or diameter of a mast or spar. I think I used underhill’s designs for the caps and mast bands. Ian, I followed Rob’s excellent Glory of the Seas but don’t think I’ve looked at his Great Republic, so will do so presently. I have the first draft print underway, it’ll take 12 or 13 hours, meanwhile I’m back on house painting! Bruma, my white woodwork says ‘hold my beer’ to your yard rigging. I can’t believe that, once upon a time, I used to quite enjoy painting and decorating. Ian, the centre sheet blocks are simple in resin, the big question is whether they’ll be strong enough. At 1/100 I’m constantly on the margins of fragility with small parts. In fact the whole centre area, connecting the yard to the mast, is what I’m most interested to see once the printing is finished, as I have a feeling I’m going to need to cheat a bit and use some hidden metal pins to make everything secure. If everything prints successfully (high risk of print failure on the mast and yard sections) I’ll post reflections sometime this week.
- 444 replies
-
- 2
-
-
-
- Cutty Sark
- Revell
- (and 2 more)