


Kevin-the-lubber
-
Posts
1,232 -
Joined
-
Last visited
Content Type
Profiles
Forums
Gallery
Events
Everything posted by Kevin-the-lubber
-
 I’m the wrong person to offer an opinion as you know which direction I’ll head in. All I’ll say is that the ones I made were experimental so no-one is treading on eggshells by criticising them or favouring either of the others.
 -
I’ve never seen a bow rudder before, will be interested so see it when it’s done. You’re right about the bow line, very elegant.
- 454 replies
-
- 2
-

-
- Union Steamship Company
- Stepcraft 840
- (and 3 more)
-
You’re scaring me. 3D printed shrouds and ratlines being considered already. Whatever you do, don’t tell Bill, he’ll never leave that beach. Now I think about, printed really might not be such a daft idea. You can do the most amazing cables in f360.
-
I blink at a fiver... but still spend whatever it takes on this game, since whatever it's going on is obviously going to make everything so much easier and better.
- 454 replies
-
- 1
-
-
- Union Steamship Company
- Stepcraft 840
- (and 3 more)
-
I expect so. The picture is both interesting and, to me anyway, a little sad. Even allowing for the fact that everyone was a bit smaller back then, I'd guess that he's maybe 13 or 14 years old. But look at his posture. It's that of a grown man. I don't think I've ever seen a child stand like that. The point being that I guess they had to be, at 13 or 14, what I didn't have to be until I was maybe 18 or 19. Still the case in many parts of the world.
- 481 replies
-
- 2
-
-
- Cutty Sark
- Revell
- (and 2 more)
-
That's a great photo, isn't it. Might that be the little bell, safely wrapped up! See the chained block, possibly coming off the gaff. As I have to remake the quarterdeck there are a couple of things I'm noting from this (apart from the white seams, which I think will be beyond me): no water casks - I think these are plain ugly and look completely out of place, so I may omit them now; the height and shape of the skylight - quite a bit lower than the kit and with very little roof lip, and I quite like the louvres; the amount of deck space - just right for an extra boat or something. Talking of which, is it just me or does the kit seem a bit short on boat oars? I would have thought there would be 4 or 5 pairs for each boat as these were pretty large boats. In the same vein, all the boats have the 'socket' (I'm sure it has a proper name) for a mast and sail, does anyone know where these, and the rudder, would have been stowed? Logic tells me they'd be in the lifeboats. I imagine, on a good day, this was a lovely spot on the ship.
-
Good grief, 3000+ tiny knots? I think I’d just bodge that, one way or another, or find some spurious justification to not do them, but then my patience and perseverance do have some limits. It seems to be a week for breaking our models, along with mine another chap has snapped delicate bits while rigging. Anyway, the ship still looks magnificent.
-
Yep, that looks good. I hadn't realised you'd fitted the rail winches; looking at the Revell instructions just now, I have to confess when I read them through previously I thought they were paint pots as a symbol to "highlight pins with wood tan colour" 🙄. And I couldn't work out what those half circles were on parts 68 and 70 so omitted these from my remakes, thinking I'd make something suitable presently. That's the trouble with hopping between Revell and Campbell, you can lose things inbetween. .
- 481 replies
-
- 1
-
-
- Cutty Sark
- Revell
- (and 2 more)
-
I think I do and I will. I'm getting fairly bored with reading the Game of Thrones set now, book three and I still haven't got a clue who's who.
-
The tools may have been less sophisticated than all the mechanised and computerised kit at our disposal today, but the knowledge and skills were far superior. I spent a year of my apprenticeship with a good old fashioned blacksmith, arms like tree trunks and all that. What he didn't know about working heavy plate and section with heat wasn't worth knowing. I only picked up a tiny, tiny fraction but methaphorically dined out for many a year on a party trick that used exactly the same method used to bend the long, heavy beams on ships like the Victory: heating and rapidly cooling one face to cause the length to curve. In my case it was usually to straighten big, warped RSJ's or hollow sections but I was amazed when I read that they did the same thing, way back, to bend those thick oak sections.
-
Both are worth the visit, but I hope you have plenty of years in you in order to see the Victory when they eventually put the masts back on. It's a bit reduced these days. Still something special, but not as awe-inspiring as it will be when finished. The Cutty is less to see in one sense but great if you enjoy detail. Although I took no photos inside the hold, I loved being able to see the iron framing and all that.
- 481 replies
-
- 1
-
-
- Cutty Sark
- Revell
- (and 2 more)
-
Bob, take a look at Bill's Victory log. It might be easier to work backwards from the end, rigging is discussed virtually step by step and I'm sure much of this will transfer to the Cutty. It's also a great build. .
-
It definitely makes a difference - I used the sand colour on the furniture and that gave them a warmer, more yellow-ish (to state the obvious) tint. But it was only a tint. I think this is likely more about the final washes, coupled with the flatness of the printed deck, which doesn't have the fake woodgrain. The really funny (as in ha-ha) thing is that I just fished out the kit deck, which I painted months back, and that is much closer to what I want.... if I can but remember what colours I used!
-
I think I originally used that but then changed to a sand colour. I guess I'll just have to do some more testing and see what's what.
-
Wow. That's what the UK used to be like way, way back. I once had to pay about £100 customs duty on a £200 guitar I bought on a trip to California; I could have wept, especially as I couldn't even really play the thing.
- 536 replies
-
- 2
-

-
- Quadrireme
- radio
- (and 1 more)
-
This may be useful. On mine, I included margin planks in the deck and flat skirting on the dechhouses. This photo has reminded me that the ship only had one deckhouse originally, so wouldn't have had margin planking, and from my february visit photos, that was true of both houses. The quarterdeck cabin has something very similar but more quadrant-shaped. Nice little pump here too, on the aft deckhouse at the main mast end: this looked like it was added later. I decided not to model in the duct tape, I sense that too may not be part of the original ship. (Lazy tykes, you'd think someone would have sorted that out on a showpiece!)

-
Thanks Bill. That’s weird - I’ve used the same paint set, maybe I haven’t followed the instructions so closely. Or maybe I’ve been a bit too tentative on the washes, watered them down too much.
-
That was another thing - previously I had to use a raft on everything. I’ve forgotten what it’s called but now I just have it run that perimeter a few mm away from the actual part, so I don’t have any messy printing right at the start, which means I can have no cleanup whatsoever. If 3DLAC was $40 I’d try something else too! Here in the UK it’s about £10 a bottle and I’d expect one bottle to last maybe 5 or 6 reels of filament.
- 460 replies
-
- 4
-
-
- Finished
- Flower-class
- (and 1 more)
-
Bill, you've got a much more grey deck than my CS even though we used the same paints. I'd assume you had a stage where it was various shades of brown, do you remember what you used to wash it grey? (Yes, I am looking at re-doing my CS deck - after demolishing the quarterdeck yesterday I'm thinking I may as well look at this while I'm at it).
-
Bill, if you look at any of the bare items on either my victory or cutty log, it'll be that colour, which gets represented fairly well on the photos. I know what you mean about energy levels. Mine took a nose dive more or less as I hit sixty, which is partly why I now do modelling. Previously I would always have been doing some kind of major house or garden project, something creative to keep me busy.
-
Don't worry, I'm not too disheartened. Everything so far has been a learning exercise and I've made a good few mistakes along the way. Making things again isn't nearly as time-consuming as making them in the first place and I might just treat it as a natural point to put some of that learning to good use.
- 444 replies
-
- 2
-

-
-
- Cutty Sark
- Revell
- (and 2 more)
-
Minor catastrophe earlier this evening - fiddling around with the quarterdeck assembly to see if I could gently remove a couple of bits for improvement when the entire thing jumped out of my hands and landed upside down on the floor. A few bits broke off and I'm not sure whether it's worth the effort of salvaging or make it again. This all arises because I really don't like how similar in colour the decks are to the coppered hull and furniture was exploring whether I could remove the furniture in order to repaint them a lighter colour. That'll teach me. I think I'll mull on this for a few days and just carry on making those gorgeous boats while I think on it.
- 444 replies
-
- 2
-
-
- Cutty Sark
- Revell
- (and 2 more)
-
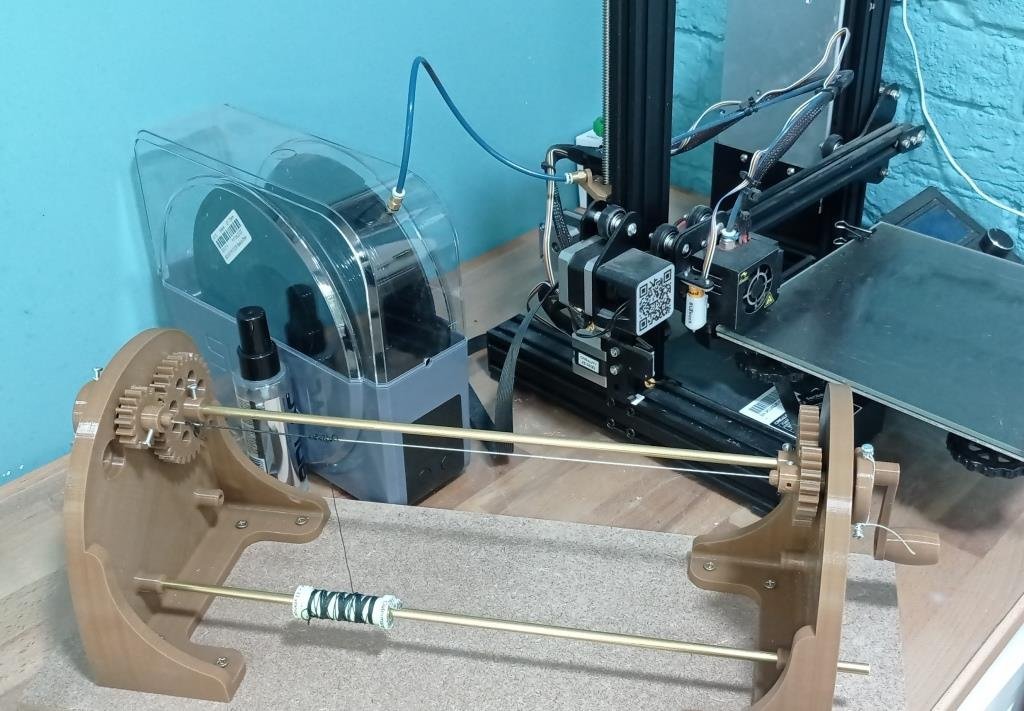
I fitted the auto-levelling thingy to my ender 3 V2 when I upgraded everything a few months ago. I set it up as per instructions and haven't touched it since. To be honest I have no idea if it's that which makes the difference or just the better springs, but I haven't re-levelled at all since then. In fact everything is exactly as I set it maybe 3 months or more ago and the only fail I've had was with some ancient filament that I over-cooked in an oven last year, such that it ever so slightly fused on the reel. Other than that I haven't had a single fail since then. I use 3DLAC rather than glue, which I found horribly messy and, because 3DLAC is not very expensive and lasts forever, I'll carry on using it. If I had to guess at what cured my ills I'd say it was most likely the filament dryer, but for all I know it's the combination of the auto-levelling and springs, or all three. At the end of the day, my printer now works exactly as I thought it would when I bought it, it's very plug'n'play and it was worth the £100 or so I spent on all the upgrades. This shows how I've connected the dryer box to the printer with a short bit of capricorn bowden tube and a modified filament guide to take the connector. The hole in the dryer takes the connector without any modification. And below that, a serving machine I made a couple of weeks ago that is 90% printed - I had virtually no clean up to do post-printing, just the odd wisp.
- 460 replies
-
- 7
-
-
- Finished
- Flower-class
- (and 1 more)
-
Mine in the raw are a medium grey. I usually just buy grey resin because it's great for seeing detail and is usually the cheapest. I've been thinking about this lately, whether to get some brown resin, but up until now figured they'd still need painting so why bother. But a light dry brush of a different brown sounds quick and easy.
