


Kevin-the-lubber
-
Posts
1,232 -
Joined
-
Last visited
Content Type
Profiles
Forums
Gallery
Events
Everything posted by Kevin-the-lubber
-
 Many thanks gents. I have three small Victory "sub-projects" on the go right now; home made decals for the trophy of arms, lanterns, and the smaller cannons. The cannons are pesky creatures, there are very minor differences between the long, medium and short 12lb guns but I figure I better do it true to the figures as these are 'show guns' or I'll just kick myself later on for being lazy. Decals..... not quite there yet, still learning how to make and apply them. They are similar to kit decals but less forgiving in some ways, more so in others. Once I'm 'there' I'll do a little write up. The lanterns really are fun. The offset octagons make for an interesting little CAD exercise and, blessings, I can simply scale down the big one to get the other two sizes.
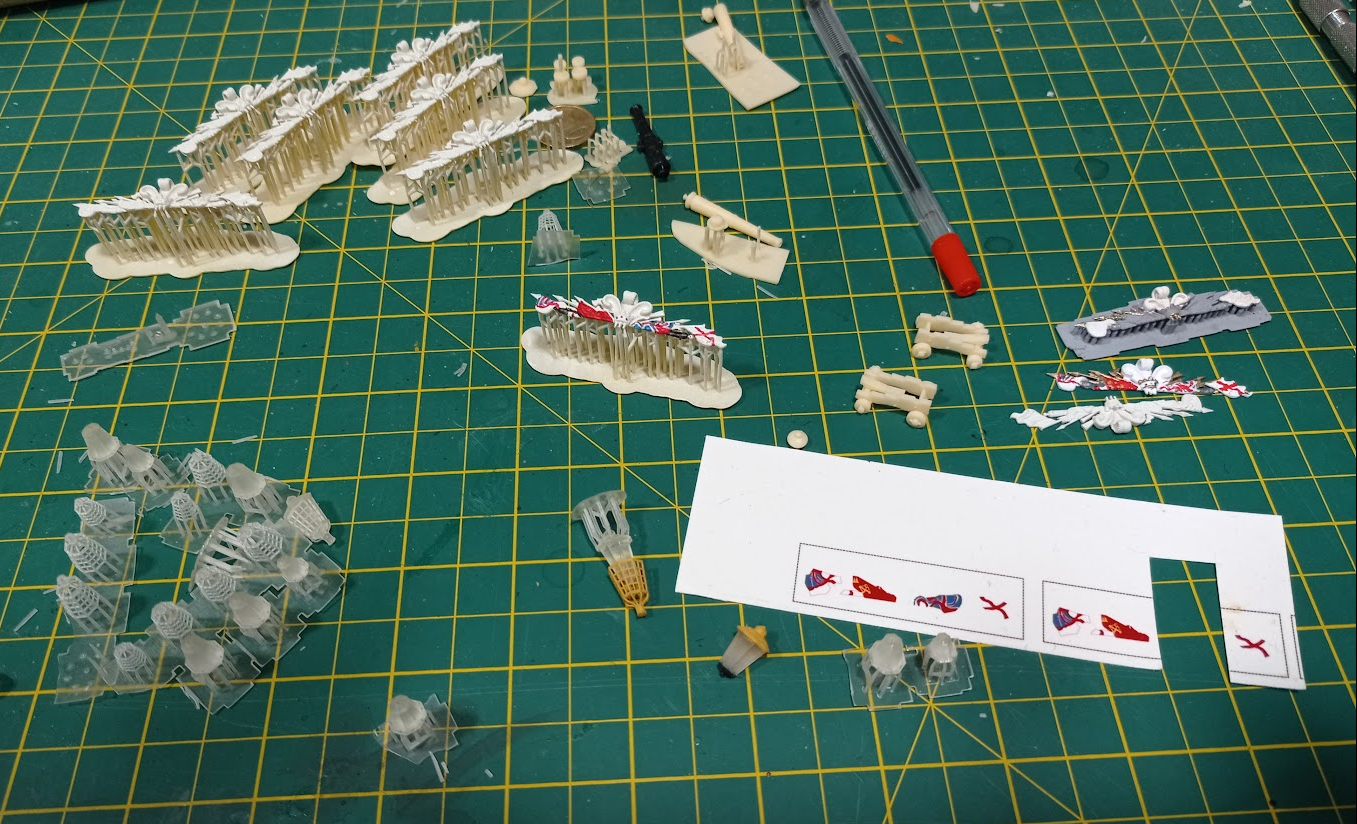
-
David, I think you’ll see a glued, butt-joined kit deck early in my log, link below, before I made my own deck. I know I put a decent bevel on mine I.e a good 1mm, and glued some hefty styrene strips to the underside to make it stay true. It was pretty easy to sand the joined deck to disguise the joint. I’m also pretty sure I was able to spread the glued hull enough to get the deck in. I’ve noticed that unused deck a few times, lurking in my scraps box, and sometimes wondered why I even bothered to make a replacement; in other words, go for it, it’ll be fine 😀. If I was doing this all over again and wanted to stick with the kit deck without any overlay, I think I would sand off the positive plank lines and scribe negative plank lines instead, after joining the main deck sections. Why? Because you’ll get a much better ‘faux wood’ effect with negative lines as the inking to simulate caulking will have grooves to sit in.
-
Never mind the printing, that's just button-pressing; look at the painting skills! What I'd give to be able to do that, let alone have the underlying knowledge.
- 1,508 replies
-
- 2
-

-
- Le Soleil Royal
- Heller
- (and 1 more)
-
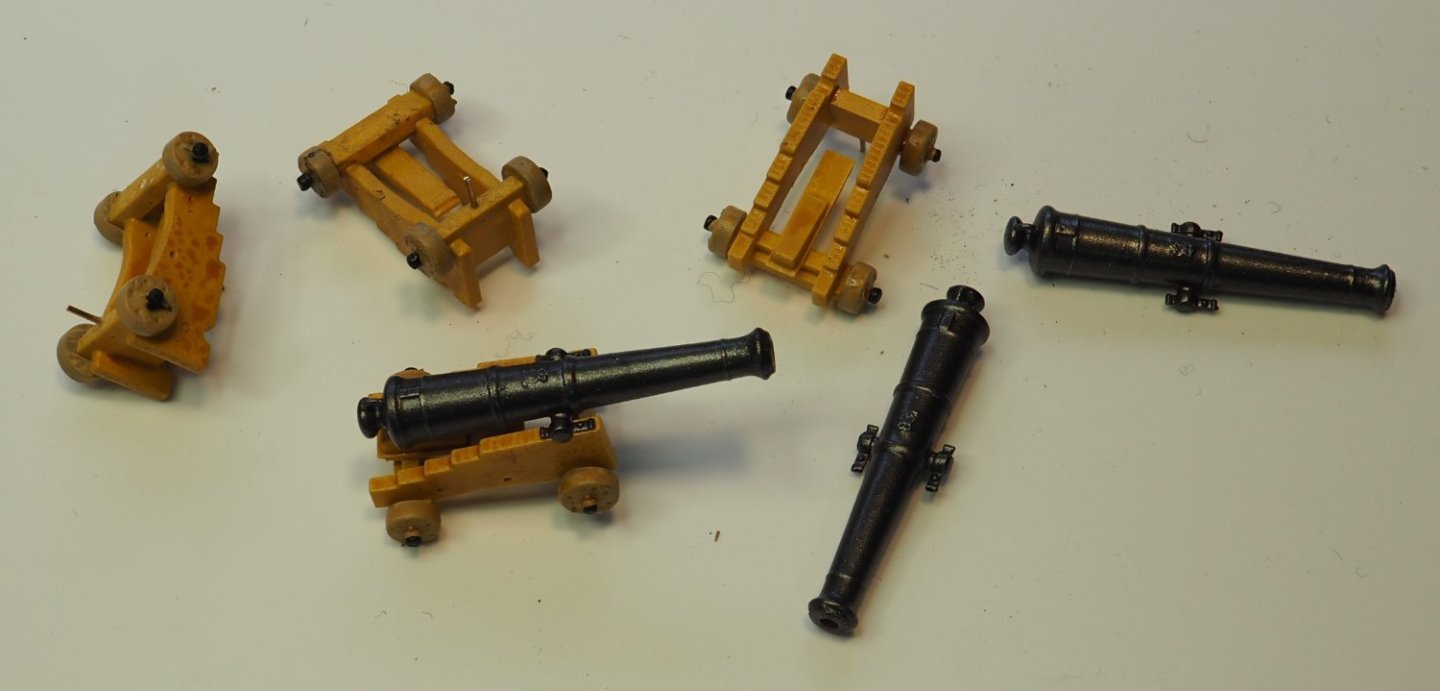
4th Feb 2024 And so we resume... First batch of cannons, the 24lb and 32lb, more or less complete. I resin printed replacements for both the cannons and the carriages as this was easier than modifying the kit parts, based on the drawings in McKay. So, added cyphers, cap squares and breeching rings to the cannons. For the carriages I made these with just the trucks (wheels) separate. It wasn't such a good method and I'll try something different for the 12lb-ers. The brass pin in the bottom of the front bracket is, obviously I suppose, to fix the carriage on the deck so they can't get knocked out of place once the deck is closed off. The mottled and rough finish is intentional. As these carriages will be hardly visible I experimented with spraying a peat brown artists ink to give some shading and weathering, as doing it with a brush is very tedious x 80. That very mottled one on the left is unrepresentative, the assembled one is more typical. I also took a shortcut for painting the axle hubs black - I smeared undiluted black acrylic on a palette and drew the axle tips through this. From a distance the result looks okay, but here again I will try something different for the 12lb-ers, as they will be on show. I don't think I'll be rigging any of these, as they're hidden.
-
Beautiful guns. Now I can see the real thing I can understand that unusual cascabel on the model part. Though I actually prefer the 'before' over the 'after'. I think it would be better if the restorers aged the carriages a bit. I remember a friend from years ago, who made replica antique furniture, telling me that when they made a table they would leave a chain on top in the workshop. Every time someone walked past it, they were supposed to give it a good whack with the chain. When 'aged' enough they'd polish it up and make it ready for sale. Roel, two words: selfie-stick 🤪
- 2,699 replies
-
- 6
-

-
-
- heller
- soleil royal
- (and 9 more)
-
There’s a very good thread here about painting to look like metal https://modelshipworld.com/topic/35788-painting-resin-printed-cannon-bronze-color/. I’ve used Vallejo metallic bronze and their Verdi Gris to reasonably good effect but I’m not in the same league as some of the stuff in that thread.
- 536 replies
-
- 3
-
-
- Quadrireme
- radio
- (and 1 more)
-
The cannons look much better with the trunnions moved. Though the barrels look very long for the girth and carriages. Are they true to history, Hellers best guess or recycled moulds from another kit? The original trunnion positions are very odd. By coincidence, I’ve been plodding away on the Victory’s cannons and carriages for what feels like several decades now, though in reality it’s just since Christmas. As you infer, it’s strangely relaxing and absorbing, isn’t it. No major head scratching, just rinse and repeat, rinse and repeat.
- 2,699 replies
-
- 5
-
-

-
- heller
- soleil royal
- (and 9 more)
-
Although I haven't been commenting I've been following with interest and this is a fantastic achievement Bill. Not only is it a great looking build, your work rate is incredible and you're making it look easy. On top of which, here we have another build log that I'm sure will become the go-to for many that follow.
- 1,508 replies
-
- 1
-
-
- Le Soleil Royal
- Heller
- (and 1 more)
-
Daniel, assuming you're talking about the 'hull planking tests', that isn't warping, they were meant to be curved. I don't remember why I chose a concave rather than convex curve, probably for no reason at all as, at that stage, I just wanted to see if I could make a disguised joint. However I have PLENTY of experience of parts distorting as you mention. The stern base plate was very bad for this. I think it's probably because of more material on one side than another i.e. differences in surface area. I've found this doesn't matter if you glue parts together fairly soon after printing, however it's something I'll look at again when I resume work on the stern. When I was working on it previously I had all but abandoned filament printing but over the last couple of years have been learned that you can solve many problems by combining these technologies.
-
That's another thing. There are a ton of parts that bulk it out, many of which most people are going to discard. Hundreds of blocks, deadeyes etc. Maybe 600 - 700 pieces for the cannons. It goes without saying that I'll make my own blocks, in fact I did those ages ago, and I've also done my own cannons and carriages, largely to minimise the repetition. Once you set aside all that lot, you're left with a beautiful, hugely interesting set of challenges or mini-kits. When I parked it a couple of years back I literally put it all in a big box and stuck it away in a cupboard (much as I've now done with my cutty sark) and when I re-opened the box three or four weeks back, I was once again struck by the quality.
-
Oh, that's an interesting approach, I wouldn't have thought of using white, but I will now. I'm very deliberately not even looking at the stern right now as I know it will be another mammoth undertaking to finish that off. I'm currently on cannons (done) and carriages (half done). They take hours, don't they. No pics yet as this is a very ordinary thing with nothing of real interest to others.
-
I'd agree with you both, it's a BIG kit in every sense, but all the same, I don't really subscribe to the sage's that say it's a bad place to start, as many do. Bearing in mind I just wanted something to do rather than sit in front of the TV one dark, boring winter, I think if I'd bought something smaller and easier I wouldn't have needed to get googling for advice, would have done a rudimentary OOTB build in 2 or 3 weeks, probably treated the itch as scratched and moved on. As it is, it's led me to explore and experiment with branches of making and modelling which has been largely enjoyable and, who knows, maybe one day I'll finish it.
-
I’m not really sure. From what I can see, the kit on retail today is basically identical to both of mine except that they’ve added the new, apparently much better, instructions and three pots of paint. Maybe they’re reflecting that it’s very common for people to modify, reinterpret, add aftermarket parts and so on. I guess it’s self-fulfilling, by virtue of being here on this forum, that I’ve never seen a simple out-of-the-box build. The irony is that I only ended up on the forums, about 10 years ago, because I bought the kit on impulse having not touched a model for 40-odd years and I couldn’t make head or tail of the instructions. Anyway, the bottom line is that I don’t think you forego anything important by getting the starter kit.
-
To tell the truth, I was happy enough just to get away with airbrushing the yellow ochre and parked the project as soon as that was done. I’ve been airbrushing gun carriages yellow recently which has served as a reminder that yellow ochre is definitely the devils spawn of model paints, dreadful for clogging. Anyway, sooner or later I’ll pick up on the stern again and will probably experiment with some shading. Not too much around the stern, it just needs knocking back a little.
-
I think you probably just got unlucky, just about any side cutters should easily go through soft 28swg. Maybe you hit a bit with micro particles of slag or something. As I’m sure you know, not all steel / brass / copper is the same. Back in the day, I could sometimes be chasing my tail making long runs of something if we’d got a batch of low quality mild steel, with folds varying by a degree or two. That’s no good if the tolerance is 0.004”, which is pretty much what you’re working to if you measured. Personally, I have a pair of ‘best’ cutters that I am super careful with and only use on plastic, and a couple of well-used ones with the odd nick from cutting wire, as this always seem to damage the blades sooner or later.
- 2,699 replies
-
- 5
-
-
-
- heller
- soleil royal
- (and 9 more)
-
Looks like you’re very close to finishing a particularly fine build of this kit. It’s worth saying that, while the sails are simply extraordinary, the rest of the build is pretty special too.
- 399 replies
-
- 2
-
-
- cutty sark
- revell
- (and 2 more)
-
Thanks, like you I parked it for a while. In fact I just started looking at the Victory again about a week or two back, time will tell what comes of that.
-
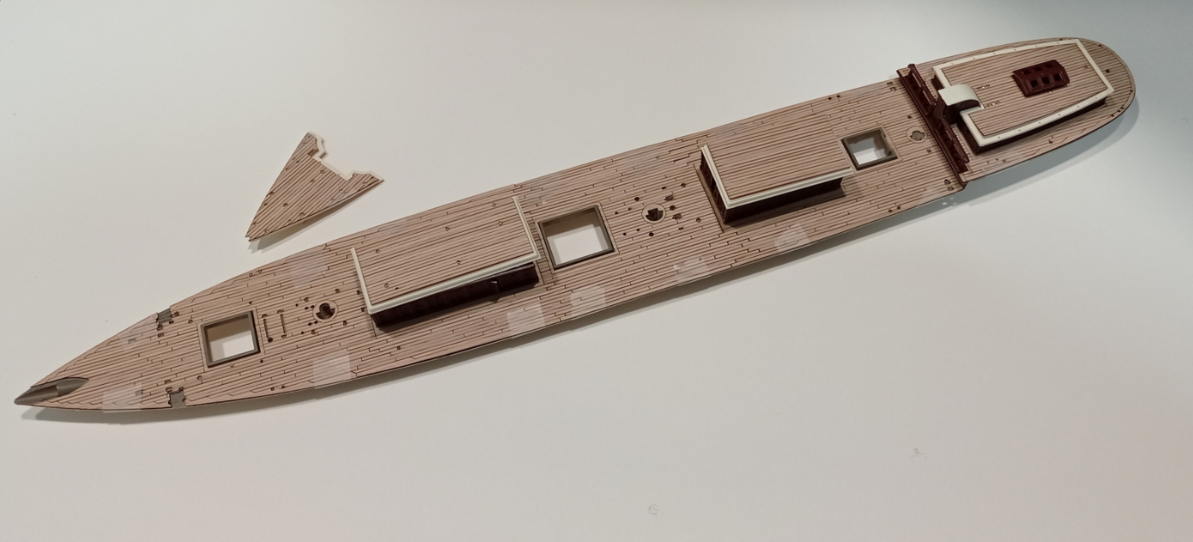
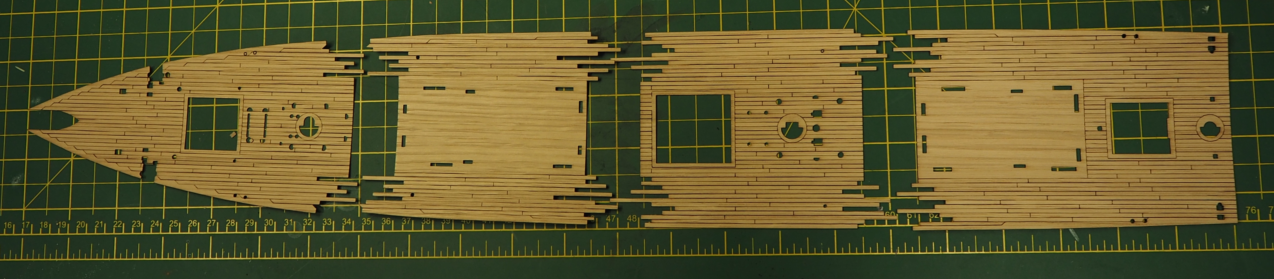
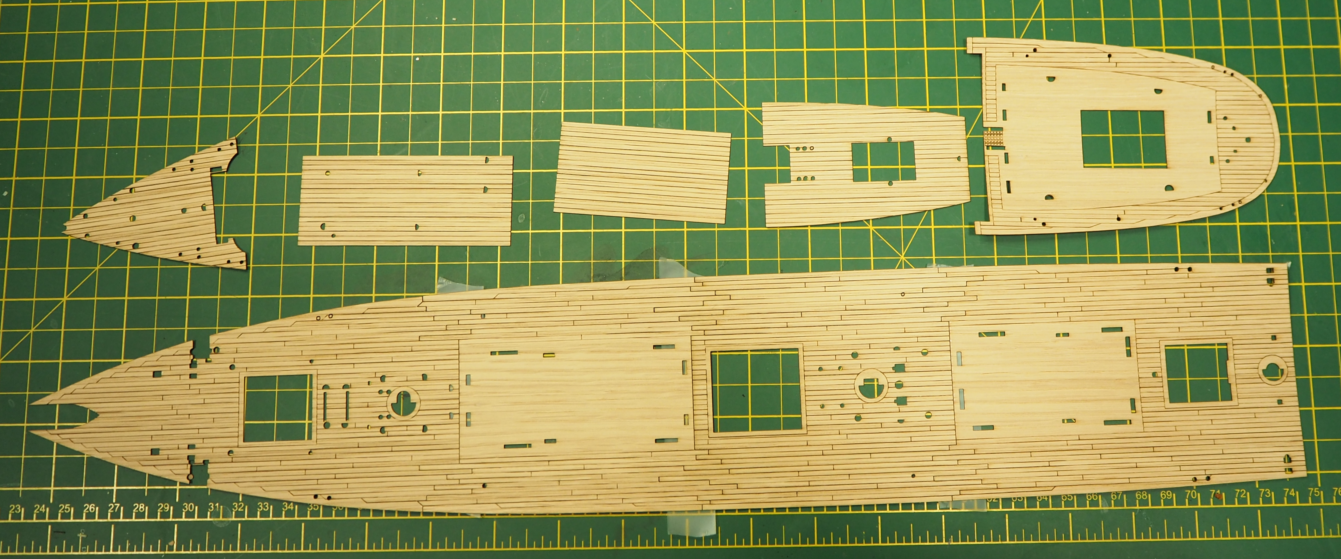
Beta version of a laser-cut oak veneer deck skin. It's taped on at present to keep it more or less in place. The true colour is closer to the photos underneath, the top photo was flashlit and my lighting this evening is shocking! I've used the same multi-part approach as I did when making a replacement deck. Personally I think the joins blend in quite well and are a sight less intrusive than those on the bare kit deck. I think I'll stick with this format. Next up will be a paper/card version of the same. While getting this right I used heavyweight art paper as it cuts and engraves very nicely and is a fraction of the cost of veneer. It occurred to me, along the way, that if it was nicely painted it would be a viable, lower cost alternative. So that's the task for some point over the next week or two.
- 444 replies
-
- 3
-
-

-
- Cutty Sark
- Revell
- (and 2 more)
-
Laser cutting services?
Kevin-the-lubber replied to Jsk's topic in CAD and 3D Modelling/Drafting Plans with Software
Jeff, it looks like a .svg is just as good. Regarding the red/black thing, the drawn lines don’t need to have colours, that happens when you programme the lasering and it’s just colour-coding of operations. Basically, for bulkheads you just want to make sure the outline is one continuous line I.e. no breaks, and no other lines touching the outline. Part numbers would be no trouble. N.b. drawings need to be full size (for the model). I’d have thought 3mm - 4mm might be more suitable for a POB as it gives you some meat to pin into but it can be any thickness you like. However the thickness affects cost and probably not in the way you’d expect. I can buy a 950mm x 600mm x 4.5mm sheet of hardwood ply for about £10 from my local timber yard, because this is a commonly stocked size. If I wanted 3mm or 1.5mm, these are “specialist” thicknesses. I’d have to get small, hobby-size sheets from a model or craft shop and the cost can be quite high. Have you thought of looking for a Men’s Shed in your area https://usmenssheds.org/ ? Lasering is easy to learn and a shed might have a laser machine. -
Laser cutting services?
Kevin-the-lubber replied to Jsk's topic in CAD and 3D Modelling/Drafting Plans with Software
If you’re in no hurry, send me a dxf drawing and material spec and I’ll at least look at what I think I’d want to charge, as a maker who’s mostly just interested in offsetting the cost of all the kit I keep buying 🙄. As the parts are flat I don’t think postage would be nearly as bad as you might fear. But I’d have thought there’s a fair chance someone on here but more local will pop their head up too. There are probably a few reasons lasering is more expensive than 3D printing. I have the impression that people are sold lasers as an income generator whereas people buy 3d printers because it looks like fun. You’re right that laser cutting is easier and quicker than printing, but it’s very space hungry and the initial outlay is relatively high. -
"nice die ad navem iter" perhaps? I originally thought of something more salty, but discretion and all that.... Vic, never too old and it doesn't take brains. And as Ian is demonstrating, it doesn't even necessarily take money.
- 536 replies
-
- 2
-
-
-
- Quadrireme
- radio
- (and 1 more)
-
Impressive. I wouldn’t be surprised if the kids were 10 or 11, my daughter was using laser cutting at school at age 11.
- 536 replies
-
- 4
-
-
- Quadrireme
- radio
- (and 1 more)
-
As ever, amazing hand skills Marc, you are definitely king of the plastic carvers! You’re right about life getting in the way, sometimes there’s just to much else to do.
- 2,699 replies
-
- 4
-
-
-
- heller
- soleil royal
- (and 9 more)
-
Someone in your library or local government is enlightened, what a great way to get kids (of all ages!) into the library.
- 536 replies
-
- 3
-
-
-
- Quadrireme
- radio
- (and 1 more)
-
I've often thought of the incredible changes a 100 year-old would have lived through and I guess those of us alive now are seeing something akin to the industrial revolution. Imagine what will happen when all of this becomes ubiquitous. Especially when you layer AI on top. You want a new car, or a house, designed to suit you - throw in a few parameters and the computers will do the rest. I'm not sure this is a good thing, in fact I'm sure it's about 50% bad, but it's interesting all the same.
