
HardeeHarHar
-
Posts
615 -
Joined
-
Last visited
Content Type
Profiles
Forums
Gallery
Events
Everything posted by HardeeHarHar
-
Heya Diver! Welcome to Model Ship World. Full Steam Ahead 😃
-

Salutations and felicitations from England
HardeeHarHar replied to smtm2013's topic in New member Introductions
Welcome to the forum, and looking forward to seeing your build(s)!! 👋 -
Nice work my good man! I agree, serving the line before seizing would have looked sweeet, but its not like the seizing alone doesn't look great. I wish I had thought of doing that, but I didn't do enough research.... Most of the time, I was just driven to see if I could finish it without breaking it in spectacular fashion. 😃 You probably already noted this, but I (for some unknown reason) used belaying pins I installed at various points for the running rigging. I thought I made some cleats and placed them on the mast and the bowsprit too....but I don't see them in this picture.... Doh. Keep up the good work Kev!
- 129 replies
-
- 5
-

-

-
- Bounty Jolly Boat
- Artesania Latina
- (and 1 more)
-
That is great work Andrew, and resourceful!! 😃
- 206 replies
-
- 2
-
-
-
- Vanguard Models
- Brixham trawler
- (and 2 more)
-
Yes, safely handling a boat in progress is both critical and difficult. I’ve read where one individual dropped their ship down stairs!!! Needless to say, it doesn’t get any worse than that…During my rigging of the Jolly Boat, I had a couple of near catastrophic spasms, which made me repeat the following 3 words, over and over….”slow and steady”. I can’t even remember clearly, but I think I must have affixed the boat to some stand to do the rigging. I know it wasn’t flopping around that is for sure! I don’t recall the line being too flimsy either, but I wasn’t pulling it hard…ever. Can’t wait to see what you get done!!!
- 129 replies
-
- 1
-
-
- Bounty Jolly Boat
- Artesania Latina
- (and 1 more)
-
That is looking good Kev! I bet it feels very nice to see your hard work and deliberations pay off with some significant progress. I wish I could say the same, but our bathroom renovations are coming along!
- 129 replies
-
- 1
-
-
- Bounty Jolly Boat
- Artesania Latina
- (and 1 more)
-
I did, and thought i sent you a reply, but maybe it didn't get sent/failed for some reason. I'll go do so (again) presently.
-
I forget to note that your comment on Granpa's fly tying line gave me the idea and the inspiration to try it, particularly since there was a fly tying store near-by. Thanks Kev!
-
I should also note that I still need to temporarily "install" most of the cannons in the jig I have created. Once "installed", the lines will be coated with dilute PVA in order to make sure that they all have and retain the correct "natural looking" shape. Once they have all been treated as described, they will all be installed permanently in the Granado's gun ports. And then I will have a celebratory moment (or two or three).
-
Also, one has to admit that “it’s in the instructions!” :-). I do like the aesthetics of a fully rigged gun, and will likely do it again in the future. But when the ship has 32 or more, I might have to look into purchasing fully rigged cannons 😉
-
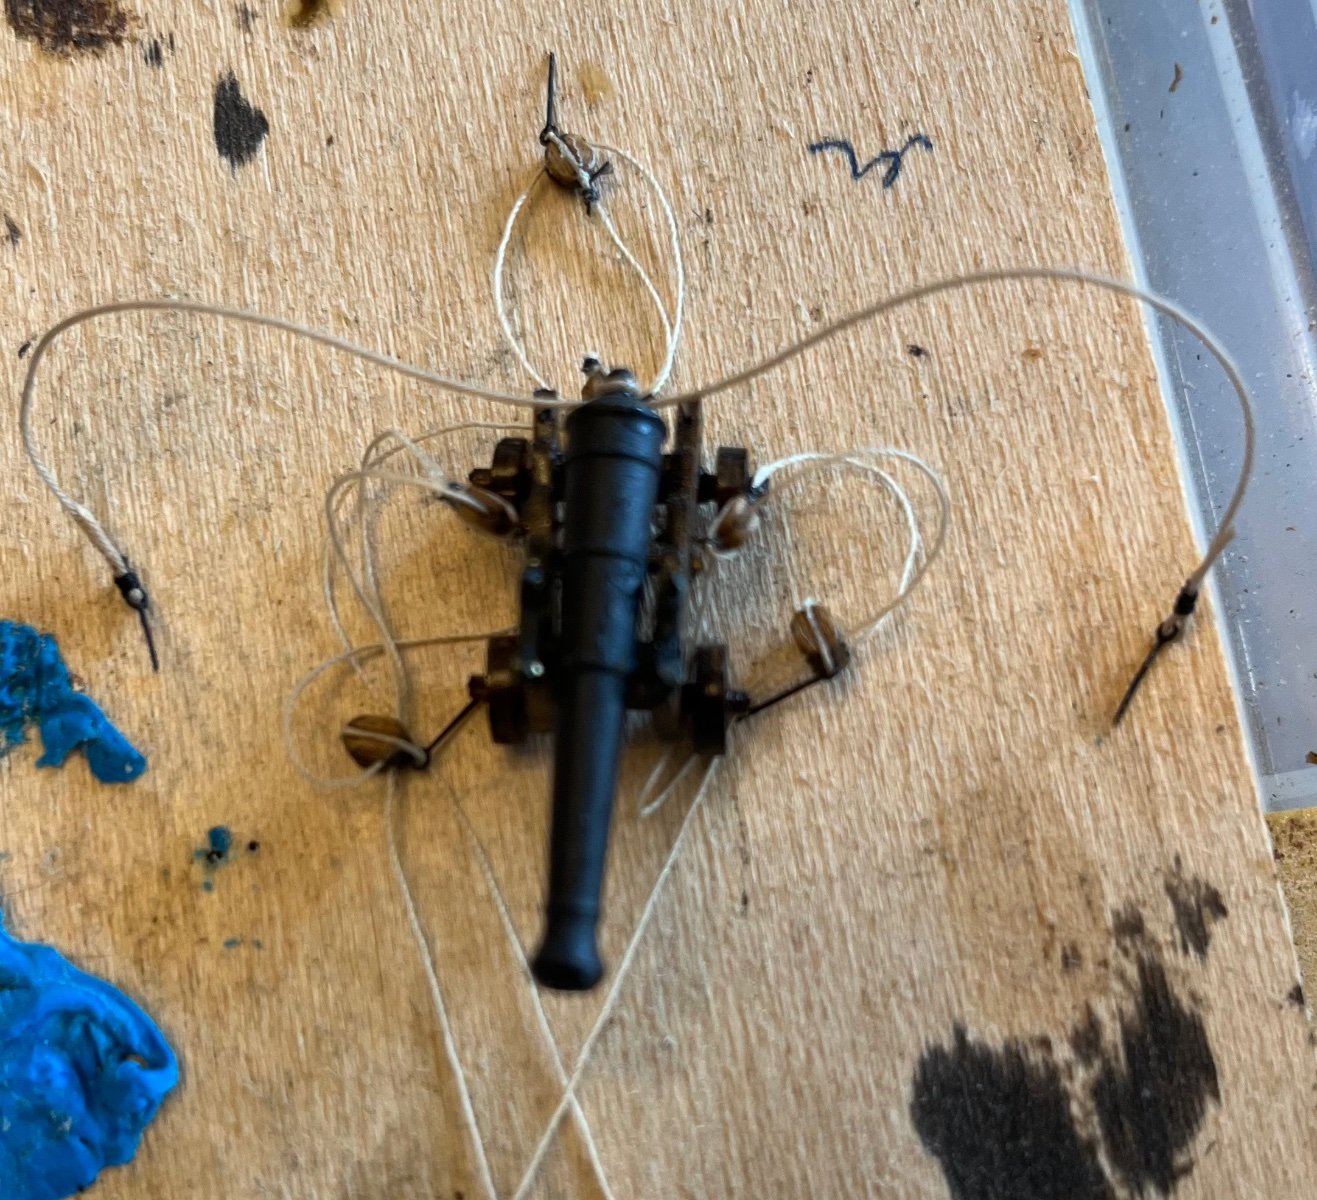
I’ll be an intermediate, if that!!! Beginner with some experience. Seasoned novice. Etc! There will be 12 cannons total, including the two bow chasers already in place under the forecastle deck. The cannon tackle rigging is all being done with tan rope and black seizing. I’ve stained the blocks very lightly to give them some aged appearance. While out on the coast I went to a fly fishing store and got some waxed black nylon thread size A, and it seems to do a pretty good job as the seizing line. Time will tell!
-
Kev- I’ve got one more to build from scratch, some tune ups to do, monograms to attach on all but the one test case completed. We have been inland for a while, so the shipyard was closed 😞
-
Got back to the coast and the Granado shipyard for a couple days, and I am still rigging cannons!!!

-
I understand your thought process, but if I were to be an optimist, I’d bend the horse before I plugged the holes. If by chance you get lucky, you’re good. If you don’t, then stage 2 can be pondered. However, I must admit I just “made mine fit”.
-
Your chain plates and deadeyes look great!!! Well done amigo!!!
- 129 replies
-
- 1
-
-
- Bounty Jolly Boat
- Artesania Latina
- (and 1 more)
-
All that hard work is paying off, your oars are amazing, and the tiller is too! Fantastic die hard attitude and perseverance shows through and overcomes all “issues” encountered. :-$
- 129 replies
-
- 1
-
-
- Bounty Jolly Boat
- Artesania Latina
- (and 1 more)
-
I am still making progress my good men. I’m almost done with the cannon rigging. I’ve been traveling a lot, and when I have time to work on the Granada, I am trying to do the best job possible.
-
Whoa, that looks awesome John. I am intrigued by your suggestion to open one side of the vessel up a little so you could see the interior. Do you think the interior actually could be made to look interesting enough to deserve the effort, and do you have any ideas or recommendations for how to upgrade the interior? We are spending more time in two locations these days, so it seems like I might be breaking my "one build at the time" rule and starting the Secret Vessel at the inland "dry dock", while finishing the Granado on the "island".
- 36 replies
-
- 1
-
-
- Morel
- master korabel
- (and 1 more)
-
Nice work (around). I appreciate the de-bugging you are doing to the building "code". 😃
-
HMS Granado 1742 Kit - CAF Model - 1:48 Scale
HardeeHarHar replied to cafmodel's topic in Wood ship model kits
Any updates on release of the other two parts of the kit? Edit: [Doh, I just read above where part 3 is delayed until April. It is looking like a beautiful kit, and since I am no where starting part I, I will buy part 2 and 3 and place them carefully on the shelf alongside part I. If some other adventurous and more talented builders take on the exploded view and offer their build logs up for duplication, then I may try to make the exploded view over what ever time I have left on this planet. I'm likely to need all of it to do this kit justice. Great work!!!] -
Looking VERY nice, and I wanted to note that I understand how wonderful it must feel to be knocking this beautiful little kit out in a matter of weeks (or months) and not years. You are doing an awesome job and I am watching with close attention. I also have it in the box here on the shelf, but am focused on finishing the Granado in a year or so, and then starting on the Secret Vessel as a form of therapy. I also have the CAF model (part I of 3) of the Granado on the shelf, but I have that on hold until after the Secret Vessel, when I will be compelled to consider spending the rest of my life building it in its exploded 3 part view......if that makes any sense at all. Keep up the awesome work John!
- 36 replies
-
- 2
-
-
- Morel
- master korabel
- (and 1 more)
-
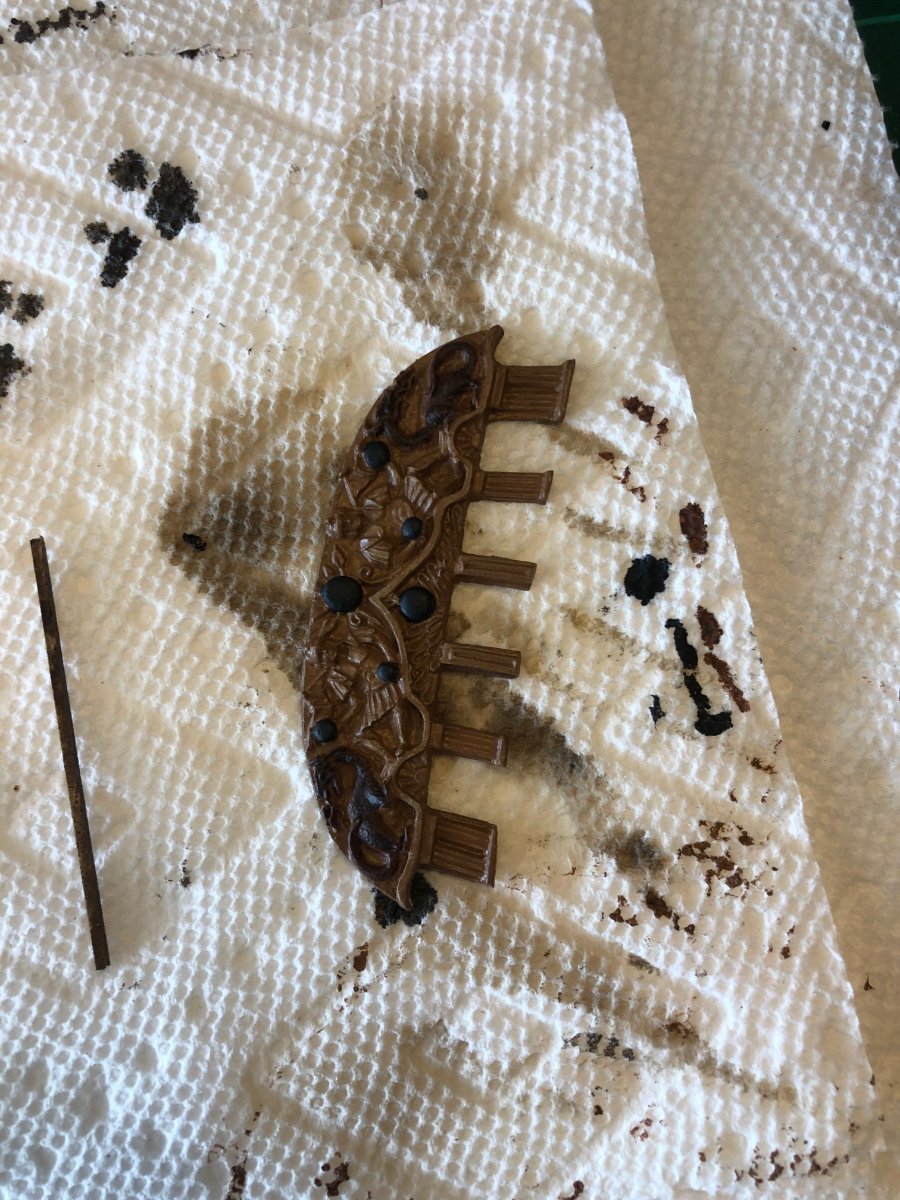
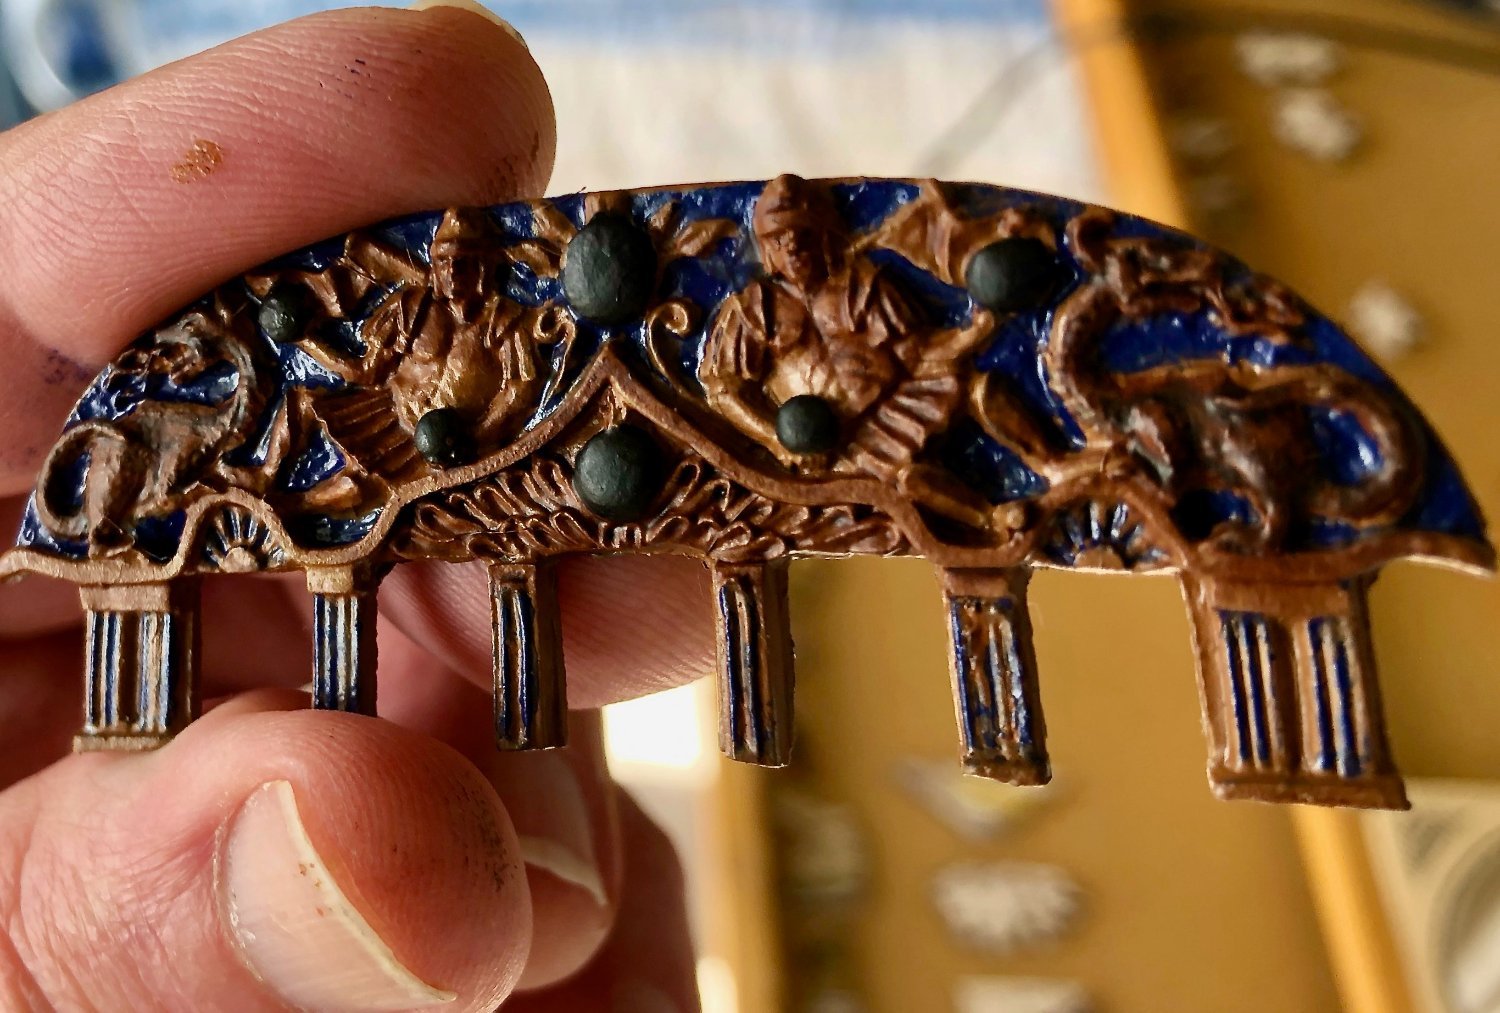
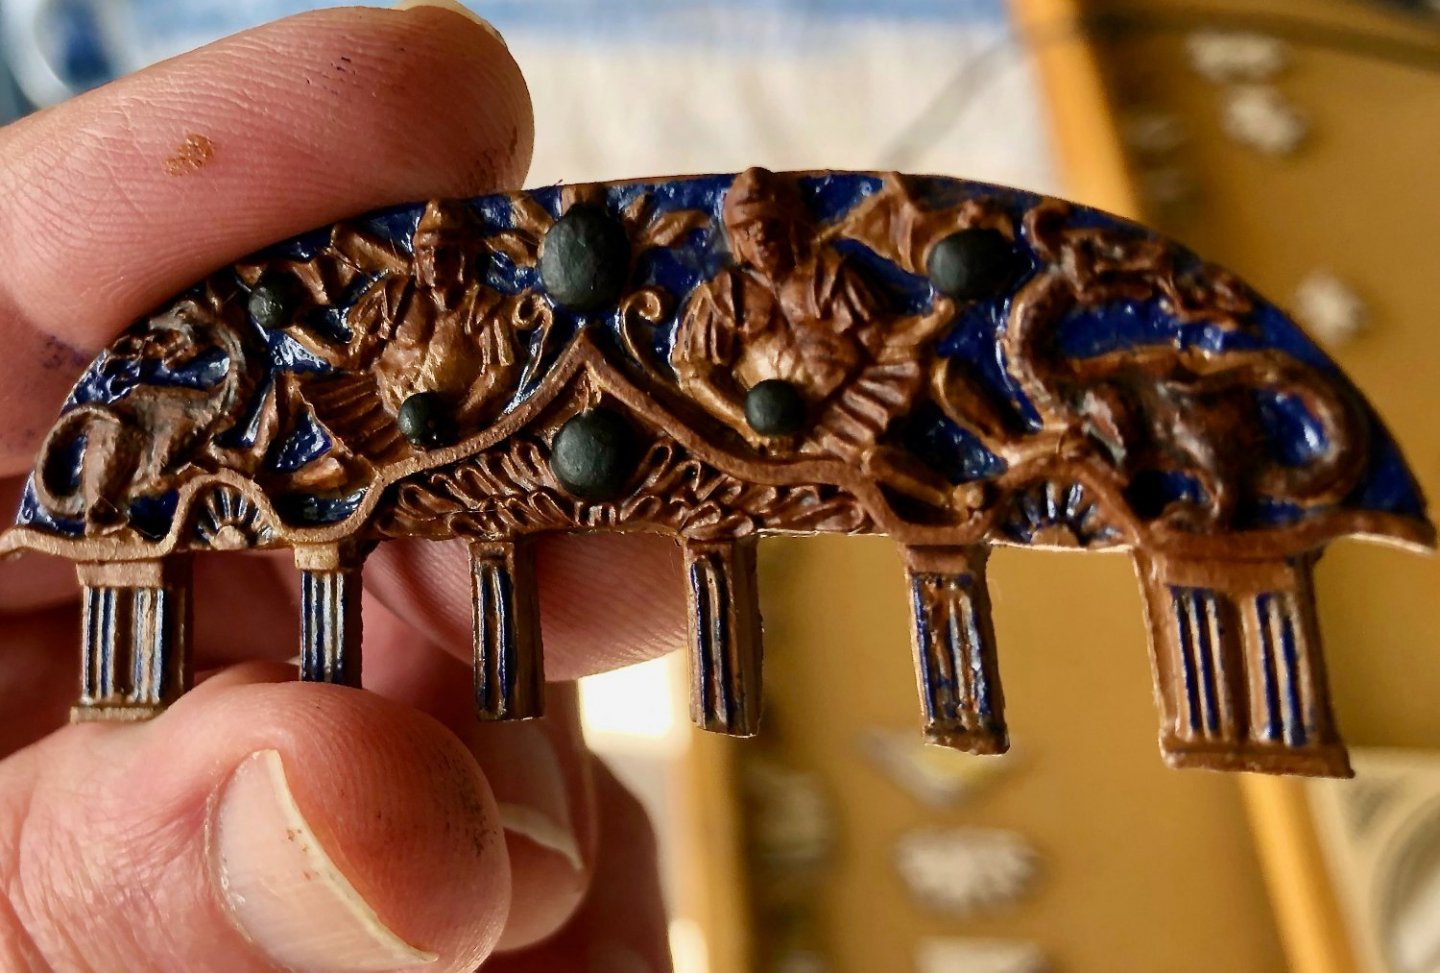
Yo Kev @Peanut6, Glad to hear you are getting stoked to get back in the shop and do some ship work! I am all too familiar with the whimsy of mother nature, out here on Roanoke Island it has been windy, really windy, cold and windy, warm and windy, and windier. It keeps me off the water, and indoors, but I don't have very many excuses for my slow progress in the build. Work has kept me from doing a lot, but I must admit that rigging guns is slow and tedious work. Because it is slow going, I very much appreciate your encouragement and kind words, as I do those of @glbarlow and others, it helps keep me going! I put two guns in the bow chasers, but I had 10 more gun ports and 8 cannons remaining from the kit. I have finished 5 of the cannons with tackle and breeching ropes, and 3 more still need their breeching ropes added. As @Timmo noted on his Granado, I wouldn't want to stand behind the cannons when they were fired, but the finished cannons look pretty good. Since I wanted a cannon in every gun port, and was 2 short, I ordered cannon carriage kits, cannons, and cannon monograms from Syren. These are awesome products Chuck has to offer, and luckily he had the size that is used on the Granado. So I am in the process of building the last 2 cannon carriages, so that every gun port on board the Granado has a cannon in it. That is how I would want my ship outfitted, fully armed! I have been worrying more and more about what needs to be done and when, like "should I go ahead and finish the stern before installing the cannons, so I can manhandle the hull if needed without cannon barrels sticking out everywhere." The answer seems like it should be yes, so I have been trying to paint the transom relief using the exemplary work of @Timmo as a role model. So, I started with a base coat of walnut brown to simulate carved wood, and painted the cannonballs black. I then added some depth to the carved figurines using light tan highlights and darker shading hues with a touch of red to make the wood have a darker more aged appearance that should match the dark walnut stain I have been using throughout the build. Then I added the blue background and pin-stripes to the columns, which didn't come out as well as I had hoped. I might redo the columns, once I figure out what to use to remove the paint so I can start over.... I will also do the remaining cast metal items that adorn the stern area in a similar fashion. I will post some images as I take the next steps forward. I will be so glad to install the cannons and start to glue down some of the multitude of finished parts I am amassing, before I start losing them all. Thanks again for the kind words of interest and encouragement, I am doing my best to keep moving forward. Two steps forward, one step back. Two steps forward, one step back.... I apologize for the poor photo quality. The one below is not in plane or in focus, but it does give a pretty good approximation of the color tone and detail, warts and all.

-
Big plank is hardly that noticeable! It all looks very solid and well done. And it is going by in a hurry!