


Matrim
-
Posts
1,401 -
Joined
-
Last visited
Reputation Activity
-

 Matrim got a reaction from Mr Whippy in Bounty by Matrim - FINISHED - Caldercraft - 1:64
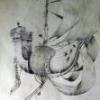
Complete at last. Now follows an unsuccessful attempt to find the best place to take a photo which sets her off nicely. But fails.
I was pleased with the way that the hull and wood fittings sections went and thought most of my scratch and replacement choices both looked and worked well. This was not a surprise as after my last kit (Caldercraft Diana) I had specifically been unhappy with both of these and had then completed the Triton cross section and Chucks longboat in an attempt to improve basic wood working skill. Curiously though I had been happy with my rigging on Diana and it is something I enjoy doing a lot yet I was much less pleased with my rigging now. Probably due to the length of time since I last attempted to rig an entire ship. The worse bit if rigging for me was the shrouds. Looking back at my Diana the Shrouds are straight (still) and their primary weakness is that the ink has worked off (basically if there is any movement in the shrouds over time due to dusting etc then even sight motion will gradually de-ink). For this kit I used black thread and whether this made it worse or whether it was the relative size and distance they did not come out well. Something for me to consider in far more detail when moving forward.
The Rigging.
Since it’s been so long and it is likely to be a similar huge amount of time before I rig again I want to cover some of the lessons learnt concerning rigging to remind my future self of what to do. Now rigging, like many things, is an art and some people are very good at it. It is less important to an unknowledgeable observer as it is the impression of the multitude of ropes that counts rather than ‘ooo that one is seized beautifully’ but even so I want to try and move towards best practice from ‘just works’
So random notes (in no particular order)
Add the shroud cleats to the shrouds BEFORE tying the ratlines and carrying out any other rigging. I attempted to add after I had starting rigging and it did not go well
IF you superglue to secure a rope then ensure you put it under strain before supergluing. If you don’t then you will get a rope with a weird angle (I don’t do this any more but remembered it from last time) You will accidentally punch a rope when tying something, so it is NOT POSSIBLE to keep ropes correctly tensioned. The solution here is to seize the highest (most easily accessible) section of the rope (usually the one on a yard) allowing it to be tightened later on in either direction. That way if something gets loose you can do something about it. So the area on a live ship where you would tension the rigging (down on deck) is actually a locked area and tensioning is done where you can both easily reach it and where it can occur (allowing you do not glue both ends) Order is important and not always the kit order. I think starting from rigging that bases itself close to the masts then move outwards (after the primary (not back) stays).
Always drill block holes again and test the intended rope fits through prior to fitting on the mast/yards. You will regret it if you attach a block then find it has too small a hole for the rope. Especially if trying to do so from two inches away
Like with gun carriage rigging I often found that it was easier to rig off model with the rope through all the relevant blocks and then attach to the model and then tighten as opposed to trying to rig onto the model directly.
When making belaying pins it is better to have long shanks as it is easier to get purchase around them when rigging especially when other ropes are present. The shanks on the Bounty are tiny so I gave up and went for simple hitches in most cases.
Before securing ropes try and tighten manually to see if another rope is in the way. Sometimes you add a rope think it looks okay and then tighten then when you see its actually competing with an unexpected different rope, so you have to undo and re-do. there was something dodgy about the lifts and the way they were interacting with the shrouds. I suspect I made a big mistake somewhere so be careful of this next time.
In the past I have secured the yards with a pin. This is all very well but A) Doing so prior to the shrouds going on can cause shroud issues so don’t pin until you can see the shrouds and secondly it can make securing the yards correctly difficult. I found I preferred not pinning and pulling the yard into place was the easiest approach.
When cutting loose ends of threads always pull the loose end with tweezers first so you can see what you are cutting. Though I was much better at this this time around I still ended up cutting two-three actual ropes as opposed to the loose end I was aiming for
When attaching blocks to ropes I found simple seizing was the easiest approach (not historical) and secured the block better. Basically wrap the thread around the block and hold close to the block with locking tweezers then a simple hitch with thin material at the block end then repeat further back. Slight drop of super glue on the securing material (not on the block holding rope!) and job done.
Don’t forget that if you randomly tighten one rope that looks loose then you may be loosening a different rope elsewhere.
Scale matters. My Snake and Diana are at the same scale as the Bounty but are larger ships so the rigging is (was) easier. For this reason it looks like the Bounty rigging is even more simplified but equally there are a lot of ropes fitting in a smaller area.
For me my next task is to build a couple of Goban (not ship modelling related but it will help hone skills with almost all of my machine tools) which should take a month or two to do correctly. After that I may re-furbish my Diana by fixing some broken rigging (and a mast ☹ ), re-inking the shrouds and generally trying to de-dust. That should take only a week to do. After that I am going to re-start my Amphion. Due to the lessons learnt above I will be upping the scale from 1:64 to 1:48. I have zero chance of getting a 1:64 scale frigate into the house so since it will be remaining in my workshop I might as well go for a 1:48. This will make some of the parts much easier to make and machine. It’s either that or drop it to 128 and lose loads of detail and perhaps go solid hull. I have a couple of months to decide. Anyway, thanks for reading and happy modelling.
-
Matrim reacted to GrandpaPhil in Bounty by Matrim - FINISHED - Caldercraft - 1:64
Congratulations! Well done!
-
 Matrim got a reaction from AJohnson in Bounty by Matrim - FINISHED - Caldercraft - 1:64
Complete at last. Now follows an unsuccessful attempt to find the best place to take a photo which sets her off nicely. But fails.
I was pleased with the way that the hull and wood fittings sections went and thought most of my scratch and replacement choices both looked and worked well. This was not a surprise as after my last kit (Caldercraft Diana) I had specifically been unhappy with both of these and had then completed the Triton cross section and Chucks longboat in an attempt to improve basic wood working skill. Curiously though I had been happy with my rigging on Diana and it is something I enjoy doing a lot yet I was much less pleased with my rigging now. Probably due to the length of time since I last attempted to rig an entire ship. The worse bit if rigging for me was the shrouds. Looking back at my Diana the Shrouds are straight (still) and their primary weakness is that the ink has worked off (basically if there is any movement in the shrouds over time due to dusting etc then even sight motion will gradually de-ink). For this kit I used black thread and whether this made it worse or whether it was the relative size and distance they did not come out well. Something for me to consider in far more detail when moving forward.
The Rigging.
Since it’s been so long and it is likely to be a similar huge amount of time before I rig again I want to cover some of the lessons learnt concerning rigging to remind my future self of what to do. Now rigging, like many things, is an art and some people are very good at it. It is less important to an unknowledgeable observer as it is the impression of the multitude of ropes that counts rather than ‘ooo that one is seized beautifully’ but even so I want to try and move towards best practice from ‘just works’
So random notes (in no particular order)
Add the shroud cleats to the shrouds BEFORE tying the ratlines and carrying out any other rigging. I attempted to add after I had starting rigging and it did not go well
IF you superglue to secure a rope then ensure you put it under strain before supergluing. If you don’t then you will get a rope with a weird angle (I don’t do this any more but remembered it from last time) You will accidentally punch a rope when tying something, so it is NOT POSSIBLE to keep ropes correctly tensioned. The solution here is to seize the highest (most easily accessible) section of the rope (usually the one on a yard) allowing it to be tightened later on in either direction. That way if something gets loose you can do something about it. So the area on a live ship where you would tension the rigging (down on deck) is actually a locked area and tensioning is done where you can both easily reach it and where it can occur (allowing you do not glue both ends) Order is important and not always the kit order. I think starting from rigging that bases itself close to the masts then move outwards (after the primary (not back) stays).
Always drill block holes again and test the intended rope fits through prior to fitting on the mast/yards. You will regret it if you attach a block then find it has too small a hole for the rope. Especially if trying to do so from two inches away
Like with gun carriage rigging I often found that it was easier to rig off model with the rope through all the relevant blocks and then attach to the model and then tighten as opposed to trying to rig onto the model directly.
When making belaying pins it is better to have long shanks as it is easier to get purchase around them when rigging especially when other ropes are present. The shanks on the Bounty are tiny so I gave up and went for simple hitches in most cases.
Before securing ropes try and tighten manually to see if another rope is in the way. Sometimes you add a rope think it looks okay and then tighten then when you see its actually competing with an unexpected different rope, so you have to undo and re-do. there was something dodgy about the lifts and the way they were interacting with the shrouds. I suspect I made a big mistake somewhere so be careful of this next time.
In the past I have secured the yards with a pin. This is all very well but A) Doing so prior to the shrouds going on can cause shroud issues so don’t pin until you can see the shrouds and secondly it can make securing the yards correctly difficult. I found I preferred not pinning and pulling the yard into place was the easiest approach.
When cutting loose ends of threads always pull the loose end with tweezers first so you can see what you are cutting. Though I was much better at this this time around I still ended up cutting two-three actual ropes as opposed to the loose end I was aiming for
When attaching blocks to ropes I found simple seizing was the easiest approach (not historical) and secured the block better. Basically wrap the thread around the block and hold close to the block with locking tweezers then a simple hitch with thin material at the block end then repeat further back. Slight drop of super glue on the securing material (not on the block holding rope!) and job done.
Don’t forget that if you randomly tighten one rope that looks loose then you may be loosening a different rope elsewhere.
Scale matters. My Snake and Diana are at the same scale as the Bounty but are larger ships so the rigging is (was) easier. For this reason it looks like the Bounty rigging is even more simplified but equally there are a lot of ropes fitting in a smaller area.
For me my next task is to build a couple of Goban (not ship modelling related but it will help hone skills with almost all of my machine tools) which should take a month or two to do correctly. After that I may re-furbish my Diana by fixing some broken rigging (and a mast ☹ ), re-inking the shrouds and generally trying to de-dust. That should take only a week to do. After that I am going to re-start my Amphion. Due to the lessons learnt above I will be upping the scale from 1:64 to 1:48. I have zero chance of getting a 1:64 scale frigate into the house so since it will be remaining in my workshop I might as well go for a 1:48. This will make some of the parts much easier to make and machine. It’s either that or drop it to 128 and lose loads of detail and perhaps go solid hull. I have a couple of months to decide. Anyway, thanks for reading and happy modelling.
-
 Matrim got a reaction from Candice in Bounty by Matrim - FINISHED - Caldercraft - 1:64
Complete at last. Now follows an unsuccessful attempt to find the best place to take a photo which sets her off nicely. But fails.
I was pleased with the way that the hull and wood fittings sections went and thought most of my scratch and replacement choices both looked and worked well. This was not a surprise as after my last kit (Caldercraft Diana) I had specifically been unhappy with both of these and had then completed the Triton cross section and Chucks longboat in an attempt to improve basic wood working skill. Curiously though I had been happy with my rigging on Diana and it is something I enjoy doing a lot yet I was much less pleased with my rigging now. Probably due to the length of time since I last attempted to rig an entire ship. The worse bit if rigging for me was the shrouds. Looking back at my Diana the Shrouds are straight (still) and their primary weakness is that the ink has worked off (basically if there is any movement in the shrouds over time due to dusting etc then even sight motion will gradually de-ink). For this kit I used black thread and whether this made it worse or whether it was the relative size and distance they did not come out well. Something for me to consider in far more detail when moving forward.
The Rigging.
Since it’s been so long and it is likely to be a similar huge amount of time before I rig again I want to cover some of the lessons learnt concerning rigging to remind my future self of what to do. Now rigging, like many things, is an art and some people are very good at it. It is less important to an unknowledgeable observer as it is the impression of the multitude of ropes that counts rather than ‘ooo that one is seized beautifully’ but even so I want to try and move towards best practice from ‘just works’
So random notes (in no particular order)
Add the shroud cleats to the shrouds BEFORE tying the ratlines and carrying out any other rigging. I attempted to add after I had starting rigging and it did not go well
IF you superglue to secure a rope then ensure you put it under strain before supergluing. If you don’t then you will get a rope with a weird angle (I don’t do this any more but remembered it from last time) You will accidentally punch a rope when tying something, so it is NOT POSSIBLE to keep ropes correctly tensioned. The solution here is to seize the highest (most easily accessible) section of the rope (usually the one on a yard) allowing it to be tightened later on in either direction. That way if something gets loose you can do something about it. So the area on a live ship where you would tension the rigging (down on deck) is actually a locked area and tensioning is done where you can both easily reach it and where it can occur (allowing you do not glue both ends) Order is important and not always the kit order. I think starting from rigging that bases itself close to the masts then move outwards (after the primary (not back) stays).
Always drill block holes again and test the intended rope fits through prior to fitting on the mast/yards. You will regret it if you attach a block then find it has too small a hole for the rope. Especially if trying to do so from two inches away
Like with gun carriage rigging I often found that it was easier to rig off model with the rope through all the relevant blocks and then attach to the model and then tighten as opposed to trying to rig onto the model directly.
When making belaying pins it is better to have long shanks as it is easier to get purchase around them when rigging especially when other ropes are present. The shanks on the Bounty are tiny so I gave up and went for simple hitches in most cases.
Before securing ropes try and tighten manually to see if another rope is in the way. Sometimes you add a rope think it looks okay and then tighten then when you see its actually competing with an unexpected different rope, so you have to undo and re-do. there was something dodgy about the lifts and the way they were interacting with the shrouds. I suspect I made a big mistake somewhere so be careful of this next time.
In the past I have secured the yards with a pin. This is all very well but A) Doing so prior to the shrouds going on can cause shroud issues so don’t pin until you can see the shrouds and secondly it can make securing the yards correctly difficult. I found I preferred not pinning and pulling the yard into place was the easiest approach.
When cutting loose ends of threads always pull the loose end with tweezers first so you can see what you are cutting. Though I was much better at this this time around I still ended up cutting two-three actual ropes as opposed to the loose end I was aiming for
When attaching blocks to ropes I found simple seizing was the easiest approach (not historical) and secured the block better. Basically wrap the thread around the block and hold close to the block with locking tweezers then a simple hitch with thin material at the block end then repeat further back. Slight drop of super glue on the securing material (not on the block holding rope!) and job done.
Don’t forget that if you randomly tighten one rope that looks loose then you may be loosening a different rope elsewhere.
Scale matters. My Snake and Diana are at the same scale as the Bounty but are larger ships so the rigging is (was) easier. For this reason it looks like the Bounty rigging is even more simplified but equally there are a lot of ropes fitting in a smaller area.
For me my next task is to build a couple of Goban (not ship modelling related but it will help hone skills with almost all of my machine tools) which should take a month or two to do correctly. After that I may re-furbish my Diana by fixing some broken rigging (and a mast ☹ ), re-inking the shrouds and generally trying to de-dust. That should take only a week to do. After that I am going to re-start my Amphion. Due to the lessons learnt above I will be upping the scale from 1:64 to 1:48. I have zero chance of getting a 1:64 scale frigate into the house so since it will be remaining in my workshop I might as well go for a 1:48. This will make some of the parts much easier to make and machine. It’s either that or drop it to 128 and lose loads of detail and perhaps go solid hull. I have a couple of months to decide. Anyway, thanks for reading and happy modelling.
-
Matrim reacted to jhearl in Sherline 5400 versus Micro Mark Milling machines
I own the Sherline mill so I guess I'll weigh in with a few things to consider. Before I do, though, if you don't already own a metal lathe, I'd recommend making that your first purchase over a mill. You will use it FAR more often. That aside, the main thing to consider between the Sherline and a mini-mill is the size. I sometimes find the Sherline to be a bit small for some things I'd like to do. But I simply don't have room in my shop for a larger mill. The mini-mill offers more travel in all three axes than the Sherline and that could occasionally be useful. At the time I bought my mill, Sherline didn't offer larger and taller columns, but they do now, so that would be something to consider. On the other hand, the large mini-mills are MUCH heavier. The one Micromark sells weighs 110 pounds. There's no chance I could get that up on a cabinet by myself or even get it out of the box! As for power, I have not found any limitation with the Sherline. I'm not trying to hog out 1/4" deep cuts in steel with a half-inch cutter, of course. On the other hand, if I needed some deep cut in steel, I could do it with the Sherline - it just might take a little longer. For ship modeling, it's not likely you're going to need a lot of power and you're probably going to be cutting more brass and wood than you are steel.
One feature I like on the Sherline that I don't believe is available on the MM mill is the ability to rotate the headstock by 90 degrees. I'm not talking about rotating the column - just the headstock. When I make propellers, I use this feature to cut slots in the hub. There's probably a way to do that without rotating the headstock but it seems to me it would require a more difficult setup.
If you decide to go with Sherline, you might want to compare prices at Discount Campus - http://www.discountcampus.com/
I've bought all my Sherline equipment through them because they offer a better price. They are an authorized reseller and, in fact, the equipment winds up getting shipped directly from Sherline in any case.
Another thing to consider is adding the DRO option. I don't have it on my lathe and don't miss it, but I find it VERY useful on the mill. And, by all means, get it with one of the accessory packages. Also consider a rotary table. Very useful for things like steering wheels.
Bottom line, if I had it to do over again, I'd go with the Sherline with larger table and column.
Hope that helps some -
John
-
Matrim reacted to wefalck in Sherline 5400 versus Micro Mark Milling machines
Micro Mark is a dealer, so the question is which machines did you look at ? I gather they mainly import machines from China, but have some sort of quality control, which you may not have, when you buy e.g. directly.
When choosing your first machine it might also be important to assess your own machining skills and whether you feel capable to make your own attachments - and the will to learn it.
Sherline offers a fairly complete range of attachments. My concern would be that the structural material is aluminium, but it seems that many successful modellers and horologists use them without problems. Perhaps one should not work too much steel with them.
An old rule-of-thumb when buying a machine is that one should go for one twice the size/capacity one thinks first ... this means one should think carefully about what kind of parts/attachments/fixtures you expect to make. This determines the travel along the three axes.
A modeller doesn't really 'need' a (milling) machine - after all it is a hobby. However, once you have one, you will wonder, how you managed without one up to then
-
 Matrim got a reaction from allanyed in Need CAD type program
I like TurboCad. The version under a hundred quid does fine at any ship plan cad work.
-
Matrim reacted to tlevine in Why second hull plank?
And if you are interested in learning how to plank correctly, consider this:
-
Matrim got a reaction from Candice in HMAV Bounty by Candice - Caldercraft - Scale 1:64
As an aside I have used a bit of wood from the piece used to hold the laser cut pieces. It is a useful thickness, already has an excellent 'curve' so just needed a slot for the wheel house and some shaping underneath to fit the very slight inverted U (or V) of of that area and does not get in the way of the lanterns.
-
 Matrim got a reaction from GrandpaPhil in Wooden box by Wiktor.L - FINISHED
when i built my work table I joined the planks vertically together. It made the top 'thick' but gave it a lot of strength that I think it looses by joining width ways. Here are some quick shots (you#ll have to forgive the mess as as I am obviously mid model)
So front view showing size
Side view to show how the table top planks join together
And finally how the base structure works (this is actually similar to your approach I think)
It is very heavy but will not move anywhere and if the table top gets cut up then I can always re-plane and varnish and it would still be huge...
-
Matrim reacted to Candice in HMAV Bounty by Candice - Caldercraft - Scale 1:64
More progress at last!
The next step required an education in acrylic paints. I learnt that craft paint is basically cheap acrylic but does come in a much wider range of colours if you find the right brand. I also learnt the hard way that the colour on the outside of the acrylic tube is NOT necessarily the colour on the inside. I wanted a rusty red and more of a light yellow than the orange mustard that apparently fits the "yellow ochre" category. This took quite a lot of shopping around but in the end I was quite satisfied with my choice.
Correctly placing the whale and other painted planks on the hull provided an interesting challenge. I first glued the yellow L shaped side pieces on at the stern and went more with the alignment of all the pieces than the exact measurements on the plan sheets. For this reason I started with the yellow plank above the whale before planking the whale itself. The yellow strips I painted completely before hand, but wanting to sand and woodfiller the three whale planks, I opted to just paint the edges black before sticking them on.
I then used my new-found woodfiller expertise to perfect the gaps before painting everything black.
It did work out much easier to only have to paint the main surface and just touch up the edges where needed. I also painted and glued the side badges/windows on so that I could fit the 1.5mm square yellow strip around them instead of having to cut a hole for them later.
Next was the bulwark patterns and this is where my problems really started!! Thinking I knew better I decided to assemble and plank them before gluing them to the hull as I figured it would be easier to paint them more accurately that way. The upper and lower cappings of the left bulwark pattern clipped on well, such that I could easily glue planks onto the bulwark and then clip off the cappings to sand, woodfiller and paint the planks. The right cappings however were rather ill-fitting, even after sanding adjustments and had a shallow groove that prevented them from staying clipped on. In my ignorance I therefore planked the right bulwark without the cappings. Once they were completed to my satisfaction and I came to the exciting part of gluing everything together, I found that the bend (both across the length AND width of the bulwarks) required by the curvature of the hull was far more than I was able to force out of my now three layered completed pieces!
So wood bends with moisture, heat and pressure and seeing that everything was beautifully sealed with paint, I was left with heat and pressure. I then began a very long process of experimenting with building a jig of sorts. I don't have any power tools so don't laugh, but here is version 2.0:
After positioning the bulwark between nails and using string wrapped around the jig (to prevent the nails from deviating outwards and the bulwark from sliding upwards away from the pressure), I heated the contraption with a hairdryer. Five minutes seemed to work quite nicely and made the wood hot enough that I could only just touch it. I then re-positioned the nails and tightened the string to ensure maximal bending and allowed it to cool for 30min or so. This worked quite well. Until I progressed to bending the bulwark across its width and found that the action undid my first bending's hard work. So back to the drawing board! I don't have a photo but version 3.0 resorted to bits of wood stacked up under the far corners of the bulwark and a clamp in the middle forcing the bulwark down towards the wooden base, in conjunction with the nails bending it across its length.
After three evenings of struggling and figuring, the left side finally mostly came together. There are still some very small gaps, but nothing like there was before!
Having been planked without the cappings, the right side provided more severe problems. I eventually managed to get the bend across its length right but the forces acting across the width were just too great and as the wood continued to cool, the CA glue was insufficient to maintain it and everything started pulling apart. I even tried gluing the bulwark down just after heating and bending in the hope that it would give the glue more time to set before the wood cooled enough to return to its old shape, but I only succeeded in intoxicating myself with the resulting CA fumes! An important lesson learnt: don't put CA glue on anything hot!
This was the closest I could get it on the right side:
I finally gave up on bending alone, sliced the bulwark off once again (probably the third or fourth time) and resorted to adding an extra plank to decrease the gap. I sanded a 1x4mm walnut plank down to about 0.7mm and then laid it down flat on the edge of the deck. I then sanded it, filled the gaps with woodfiller and painted it blue. Using jig 3.0 I bent the bulwark pattern one last time. The end result still has a few small gaps, as on the left, but is far more acceptable:
Bulwark patterns finally glued on, I then secured the rest of the lower cappings. Unfortunately these didn't quite meet the lower cappings of the bulwark patterns for some reason:
So more fixing was in order. I cut and glued in a small section of 1x4mm walnut plank.
Sanded it down and painted it black. I forgot to take a close up, but the result was passable. You can also see in the photo below the unfortunate result of my multiple bending attempts on my intact right bulwark pattern. The capping above the aft gun port broke. I repaired it as best I could but sadly it will never quite be the same again 😢
I'm still toying with the idea of trying to fill the remaining gaps between the deck and the bulwark patterns with woodfiller, but my concern is that, working in such a small, difficult place I may only make it worse due to decreased accuracy of sanding and repainting. You can't totally see the gaps if you aren't looking at the hull on eye level:
But they're still definitely there... Any thoughts?
In other news I also planked the insides of the gun ports, although the instructions didn't call for it, as it really seemed necessary. I beveled the planks at the corners for a snugger fit and decided to paint the insides yellow as I found the red shining through to the outside a little stark.
My last bit of progress was the stern fascia. Here I opted to leave the windows brass (instead of painting them yellow as in the instructions) as well as scratching off all paint on the Bounty wording on the name strip. The lighting here wasn't the best but I like the resulting look:
One big area of confusion for me currently is what seems to be a complete lack of a capping for the stern fascia. All the photos of completed models that I have found have a black stern capping that is flush with the upper cappings of the bulwark patterns. I have read my instruction book cover to cover and examined all the plan sheet views but can find no hint of it! I even looked through all the pieces still remaining and can't find anything that looks like it will work. It definitely needs one and I suppose I can fashion one, but I just wanted to check before I do that I'm not missing something...
-
 Matrim got a reaction from mtaylor in Brig Syren as a second build?
Once you have got through one completed model then I think you are quite able to up the complexity of kits undertaken. If (on the other hand) you start but don't finish one then staying at beginner (or dropping if you started higher) might be appropriate.
-
 Matrim got a reaction from paulsutcliffe in Wooden box by Wiktor.L - FINISHED
when i built my work table I joined the planks vertically together. It made the top 'thick' but gave it a lot of strength that I think it looses by joining width ways. Here are some quick shots (you#ll have to forgive the mess as as I am obviously mid model)
So front view showing size
Side view to show how the table top planks join together
And finally how the base structure works (this is actually similar to your approach I think)
It is very heavy but will not move anywhere and if the table top gets cut up then I can always re-plane and varnish and it would still be huge...
-
 Matrim got a reaction from Ronald-V in Brig Syren as a second build?
Once you have got through one completed model then I think you are quite able to up the complexity of kits undertaken. If (on the other hand) you start but don't finish one then staying at beginner (or dropping if you started higher) might be appropriate.
-
Matrim reacted to G. Delacroix in New monograph : L'Egyptienne French 24prd frigate 1799
Hello,
Thank you all.
For now, only in French because we make corrections until the last day. An English, Spanish and Italian translation is in progress but it's a very long job.
Anyway, the booklet text translation without illustrations, when it will be available, is always sent in pdf file to the buyers of the French monograph whose acquisition is imperative to obtain the translation.
GD
-
 Matrim got a reaction from popeye the sailor in Wooden box by Wiktor.L - FINISHED
when i built my work table I joined the planks vertically together. It made the top 'thick' but gave it a lot of strength that I think it looses by joining width ways. Here are some quick shots (you#ll have to forgive the mess as as I am obviously mid model)
So front view showing size
Side view to show how the table top planks join together
And finally how the base structure works (this is actually similar to your approach I think)
It is very heavy but will not move anywhere and if the table top gets cut up then I can always re-plane and varnish and it would still be huge...
-
 Matrim got a reaction from Canute in Wooden box by Wiktor.L - FINISHED
when i built my work table I joined the planks vertically together. It made the top 'thick' but gave it a lot of strength that I think it looses by joining width ways. Here are some quick shots (you#ll have to forgive the mess as as I am obviously mid model)
So front view showing size
Side view to show how the table top planks join together
And finally how the base structure works (this is actually similar to your approach I think)
It is very heavy but will not move anywhere and if the table top gets cut up then I can always re-plane and varnish and it would still be huge...
-
Matrim reacted to Wiktor.L in Wooden box by Wiktor.L - FINISHED
This my 1st project that type. Next can be better. But that table i made for heavier work than making models I wanted to avoid buckling the countertop... In the previous Bought tables are twisted....
By the way i glue counter top to legs. This need onlky grind, and look corrects. And after i try to make a drawer and the shelf for tools...
-
Matrim got a reaction from mtaylor in Wooden box by Wiktor.L - FINISHED
when i built my work table I joined the planks vertically together. It made the top 'thick' but gave it a lot of strength that I think it looses by joining width ways. Here are some quick shots (you#ll have to forgive the mess as as I am obviously mid model)
So front view showing size
Side view to show how the table top planks join together
And finally how the base structure works (this is actually similar to your approach I think)
It is very heavy but will not move anywhere and if the table top gets cut up then I can always re-plane and varnish and it would still be huge...
-
Matrim reacted to druxey in Basswood vs Limewood
Not quite. Lime wood is tilia and basswood is tilia americana. I've used boih and the European tilia is a little harder and somewhat less 'fuzzy'.
-
 Matrim got a reaction from Chuck Seiler in Struggling newbie
If you are completing then you are a 'successful' newbie. There will always be someone 'better' as with most things in life some people dedicate everything to specific endeavours and so will be miles ahead of everyone else. I tend to be happy if my current model improves on my last and fortunately there is a huge amount to improve..
Anyway welcome to the site!
-
 Matrim got a reaction from JeffT in Struggling newbie
If you are completing then you are a 'successful' newbie. There will always be someone 'better' as with most things in life some people dedicate everything to specific endeavours and so will be miles ahead of everyone else. I tend to be happy if my current model improves on my last and fortunately there is a huge amount to improve..
Anyway welcome to the site!
-
 Matrim got a reaction from druxey in Struggling newbie
If you are completing then you are a 'successful' newbie. There will always be someone 'better' as with most things in life some people dedicate everything to specific endeavours and so will be miles ahead of everyone else. I tend to be happy if my current model improves on my last and fortunately there is a huge amount to improve..
Anyway welcome to the site!
-
 Matrim got a reaction from RussR in Struggling newbie
If you are completing then you are a 'successful' newbie. There will always be someone 'better' as with most things in life some people dedicate everything to specific endeavours and so will be miles ahead of everyone else. I tend to be happy if my current model improves on my last and fortunately there is a huge amount to improve..
Anyway welcome to the site!
-