
HOLIDAY DONATION DRIVE - SUPPORT MSW - DO YOUR PART TO KEEP THIS GREAT FORUM GOING! (Only 24 donations so far out of 49,000 members - C'mon guys!)
×

GGibson
-
Posts
1,039 -
Joined
-
Last visited
Content Type
Profiles
Forums
Gallery
Events
Everything posted by GGibson
-
 Hi Bob! No doubt John's Bluenose has been turning out great from the get-go, which is why I've been following his progress (and stealing ideas!) for a long time. Yours looks equally as magnificent! Congrats! For alternative options to the hull color, on my Bluenose hull, I used Liquitex Basics Acrylic Alizarin Crimson Hue Permanent (brushed on with multiple coats) and sealed with Minwax Polycrylic Crystal Clear Topcoat. I was really pleased with the outcome.
- 282 replies
-
- 2
-

-
- Bluenose
- Model Shipways
- (and 1 more)
-
Thank you, Mustafa! Appreciate your encouragement!
- 184 replies
-
- 1
-
-
- Bluenose
- Model Shipways
- (and 1 more)
-
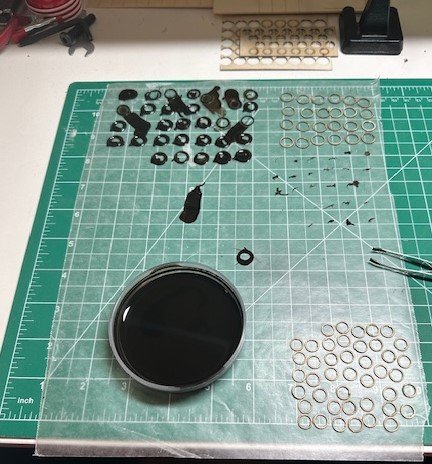
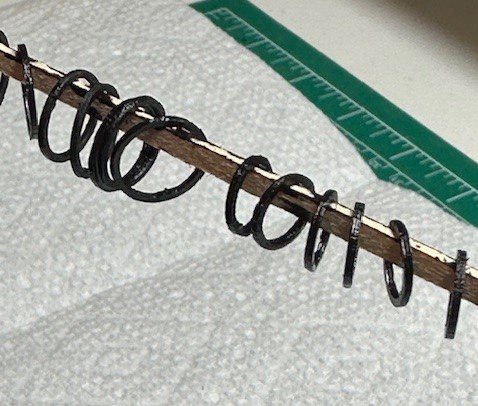
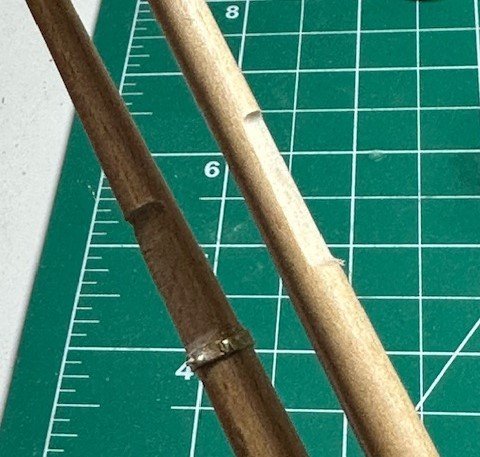
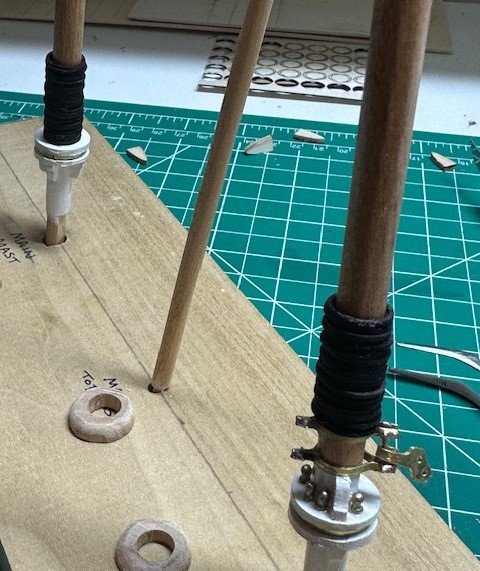
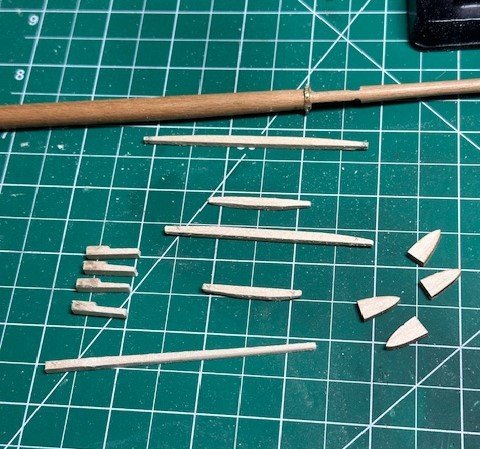
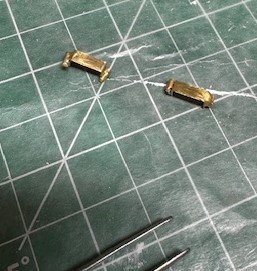
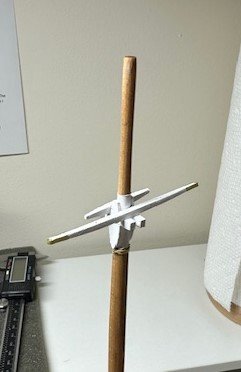
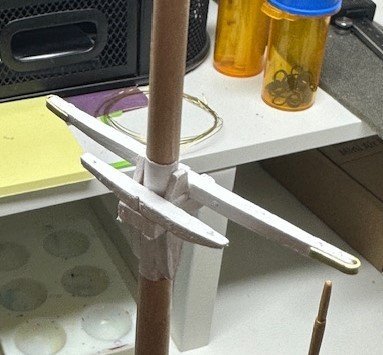
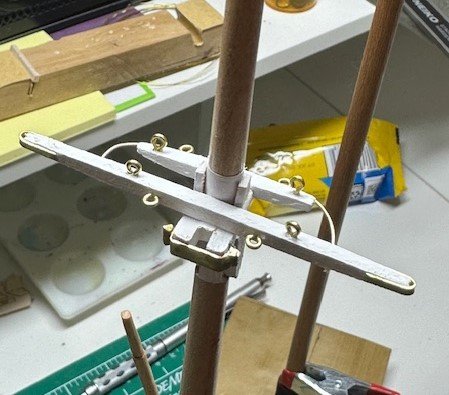
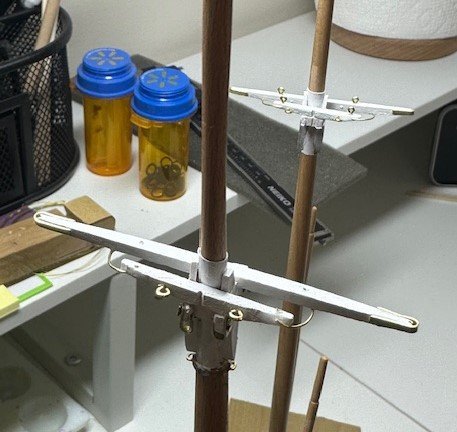
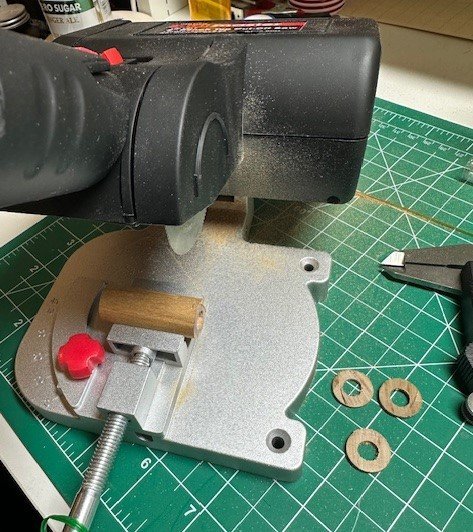
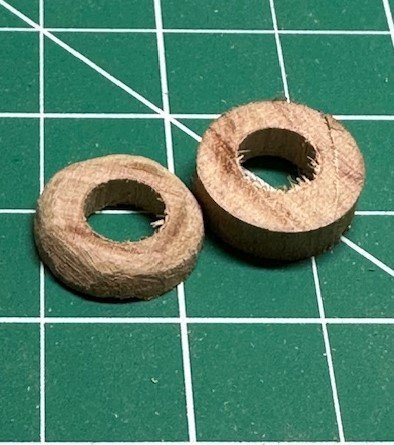
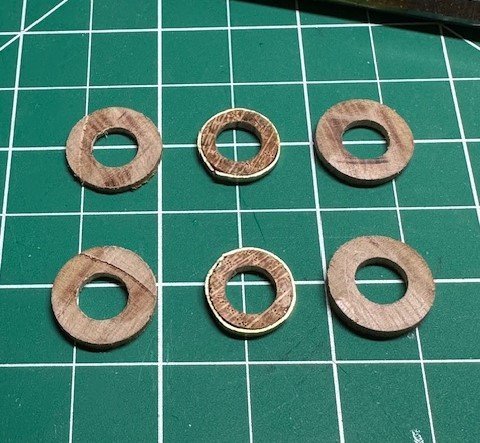
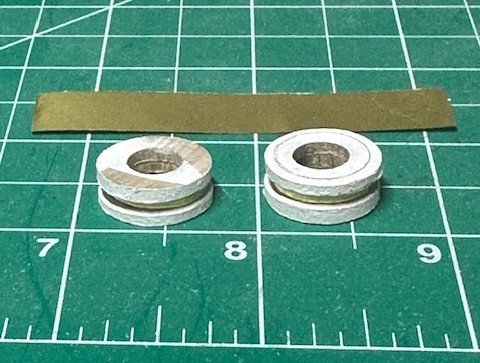
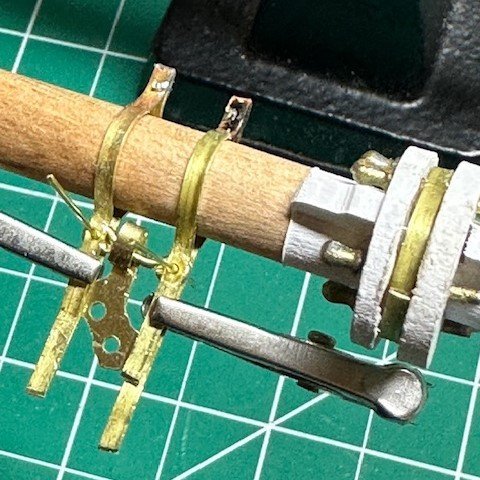
Another small update on my Bluenose progress... this time working mostly on the upper portions of the lower masts, specifically the trestle tree area. Before attaching anything to the top of the lower masts, though, as Bill reminded me in the post above, I needed to place the necessary mast hoops around the lower masts. Whether I decide to do full sails, furled sails, or no sails at all, I think I will still want the mast hoops attached to rigging in some form, so... let's get that done first. The mast hoops were provided in the kit but needed to be carefully cut out from the laser sheets. Once I had them all cut out and cleaned up a bit with sandpaper, I wanted to stain them. I used the same red mahogany stain that I used on the deck buildings. I dipped them in a stain bath and then hung them to dry. They came out much darker than I expected, but I still think the contrast between the cherry stained masts and the hoops look good, so we'll go with that. Once they were completely dried and ok to stack on one another, I placed the larger ones on their respective masts, saving the smaller ones for the upper masts when the time comes. Now to the trestle tree assemblies. I first worked on the main mast band for the futtock shrouds, using a 1/16" x 1/64" brass strip. I wrapped it around for size and then soldered. (I'm getting a little better at soldering!) I then fit it onto the mast and drilled two holes in port and starboard sides for placement of U-shaped wires on both sides for the shrouds to ultimately tie to. Using my recently-acquired Proxxon mill, I shaved/flattened some spots on both sides of each mast for the cheeks and made up all of the needed parts for the trestle tree configuration. The spreaders were made from 3/32" square strips. I put pencil marks on the appropriate sides of each strip to help identify which ends were not to be tapered for sanding, which helped keep things straight in my mind. The trestle trees were made from 1/8" square strips. I lined them up together and used some parallel pliers to grip them as a guide for where they needed to be filed down, and that seemed to work well. For the bolsters, I sanded a long piece of 3/32" square stock down to 1/16" and rounded one corner. I then cut them down to size to fit between the spreaders. The slabs were cut from scrap sheets. I glued the cheeks and trestle trees in place on both masts, masked above and below the areas and painted white. I decided to paint the spreaders off the mast and added the end clips (using the 1/16" wide brass strips) before gluing the spreaders to the trestle trees. After the spreader trees were secure, I added the bolsters and slabs and painted the entire assembly sections white. For the iron gates, I had a 1" x 6" x 0.3mm thick brass sheet and cut a 1/8" wide strip and trimmed two of them to fit securely around the two trestle trees. 1/16" brass rods were then soldered onto the strip ends and cut to size to simulate the pins on each end. (Another chance to get better at soldering!) Spreader rods were made using 0.020" brass rods and were attached to both masts' spreaders using CA glue. The quarter lift bands were placed under the main mast trestle trees using the 1/16" brass strips. Four eyebolts were attached to the top of both foremast spreaders, four eyebolts were attached on the sides of the foremast spreaders for the fairleads, and two eyebolts were attached to the sides of the shorter mainmast spreader for fairleads. (I hope I got everything where needed!) All in all, I think the trestle tree assemblies came out well, considering. Now it's on to more mast work... and more soldering! Yippee! Appreciate the follows, likes and comments. I continue to learn from many others!
- 184 replies
-
- 6
-
-
- Bluenose
- Model Shipways
- (and 1 more)
-
Very impressive dory work, Richard! 👍
-
I'll keep on squinting... <shrug> 🤣🤣
-
I purchased this caliper/divider a couple of years ago on Amazon and I love using it when needed. The bow spring and fulcrum screw are strong enough to hold their position well when using for measuring or scribing. Amazon.com: Starrett Toolmakers Spring-Type Caliper and Divider with Bow Spring and Hardened Fulcrum Stud - 6" Size and Capacity, Spring Joint Type - 277-6 : Industrial & Scientific
-
Yep! In fact, I keep going into the grandkids' stash kept in the storage room for when they aren't here dragging them out, and I stealing some more! <shrug> 🤣 Looking very good so far, Andre!
-
Awesome shipyard, Richard!! 👍🏆
-
Great job, Doug! They all look awesome! Looking forward to starting my Santa Maria version soon. Will no doubt be looking back at some of the things here on your build log. Thanks! What's next for you?!?
-
USS Constitution by mtbediz - 1:76
GGibson replied to mtbediz's topic in - Build logs for subjects built 1751 - 1800
Amazing photos, Jon! Are these a part of the USS Constitution Museum website? I have it linked/saved. but have not perused through all of the sub-pages. Thanks for sharing! Been wavering a bit, but still have the Constitution on my "add to shipyard" shortlist. -
They really look sharp, Chuck! Amazing what can be produced at this scale! 👍🏆
-
Nice work on those barrels, John! Nice lathe work. If I stay in this hobby too much longer, I may have to add a lathe to my shipyard arsenal!
-
Ooooooohh!! A new tool for the shipyard! Seems to me like the Rockler one with the digital readout would be better than the Lee Valley ones, as you would have to measure and adjust the setting on the Lee Valley's Veritas gauge using a separate scale/device, whereas the Rockler has the gauge built-in like a digital caliper, correct?
-
Hi Andre... Great build so far, love following your progress. I have a really nice digital micro-caliper that I use all the time. I'm sure most of them are very similar, but mine can switch from millimeters to decimal inches to fractional inches with the press of a button. The proportional divider you linked to MicroMark looks interesting, as well, though! No such thing as "too many tools" in the shipyard!! <shrug> 🤣
-
Yep, I see them now! Wow, that cherry wood looks sharp! Nice work! 🏆
-
Yep, there is a fine line (no pun intended) in getting the tapering just right. When sanding the entire taper distance, I think I would use an 80 or 100 grit sandpaper to get it down as best I could, then finish with 150 or 220 grit. And, sort of like you were describing what you are doing in your Swift post, I would have measurements for each plank at each bulkhead point, so that, for instance, at Bulkhead A, a certain plank needed to be 3.48mm wide, at Bulkhead B 3.75mm, Bulkhead C 4.05mm, etc. Sounds like you've got it down, though! I'd just be too afraid that I would snap the plank if I had it in a vise. At least in my hand, I can control the wavering a bit better. <shrug> 🤣
-
Hi Jim! Your pictures in this last post are not showing like others in your previous posts. Did you insert them differently into this last update? I'm not "techy" but perhaps someone else can offer some advice if you can't resolve.
-
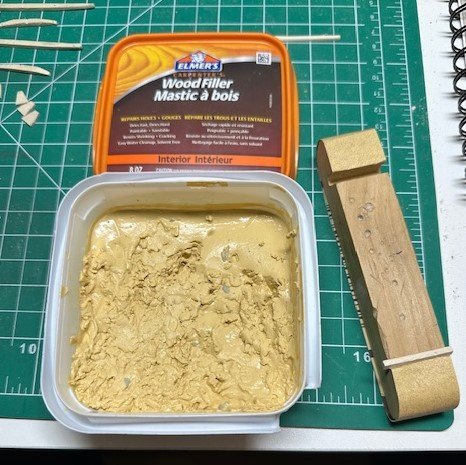
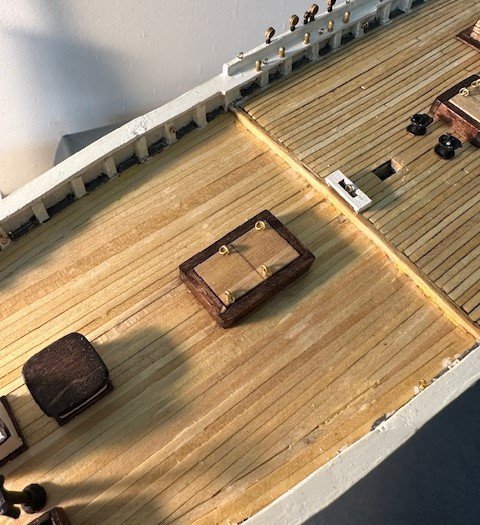
Hi Jim! Appreciate your comments! Yeah, on all four of the ships I have now worked on, the planking part (whether it's hull or deck) has been my least favorite and where I seem to most struggle. Regarding the tapering of planks, I do it the old-fashioned, manual way! If there is a better way to do it, I'm all ears. But, I have simply held the plank strips in my hand and, using a small wooden palm sander with appropriate grit sandpaper attached, (pictured below), sanded to whatever width needed. When I was doing the hull planking, it sometimes required getting the wood hot (either with hot water or with a hot iron) to bend the way it was needed, but the deck planking only required tapering, as I recall, no bending. Regarding the putty, when I was doing the deck planking and it required a bit of putty in spots, I was then using the Elmer's Carpenter's Wood Filler (also pictured below). Fortunately, I didn't use a lot of it, as it did not take the pre-stain and cherry stain all that well, as you can see from the port-to-starboard spots on either side of the hatch, as shown in the 2nd picture. Since this is where the two dory kids with the stacked dories will be eventually placed, most of those imperfections should be hidden. Hope that gives you some answers! Looking forward to seeing more of your work on the Swift Virginia Pilot Boat!
-
USS Constitution by mtbediz - 1:76
GGibson replied to mtbediz's topic in - Build logs for subjects built 1751 - 1800
Great detail, Mustafa! Love following your Constitution build log. So, will you be placing a fire extinguisher on the wall, as well? Forgot which "era" of Constitution you are recreating, but did see that fire extinguishers were actually invented back in the 1700s, so... <shrug> NOTE: Hope you understand this is intended as a bit of levity, and not criticism.👍 Continued success, Mustafa! -
Awesome job with the eyelets, Gary! The sails look very sharp with them! 👍 🏆
- 88 replies
-
- 1
-
-
- Muscongus Bay Lobster Smack
- Finished
- (and 1 more)
-
Initial planking looks very nice!
-
Thanks for your input, Bill. Yeah, I made a quick decision after my post above to put the hoops on the masts, and will probably tie them/secure them to the appropriate rigging just for the appearance that they are connected, albeit at the bottom of the masts, but sails are off. And, yes, they will go on before the trestle trees! Wouldn't think of asking....
-
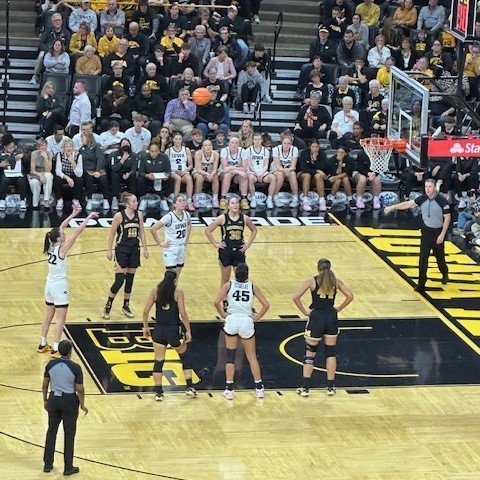
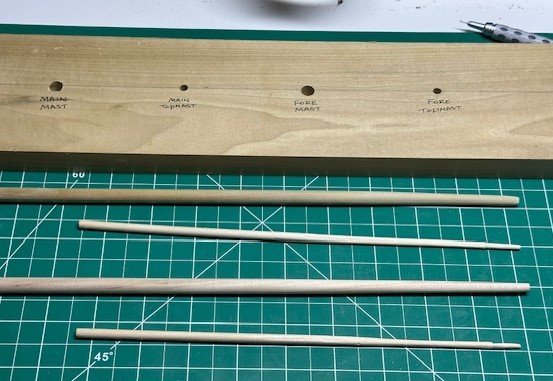
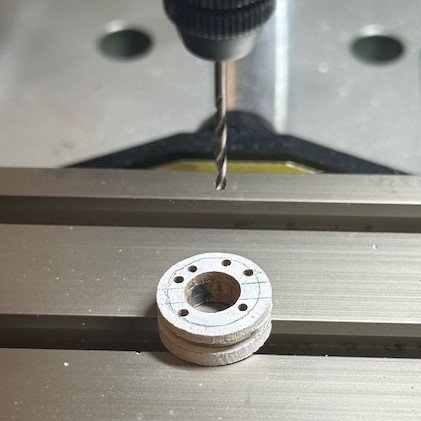
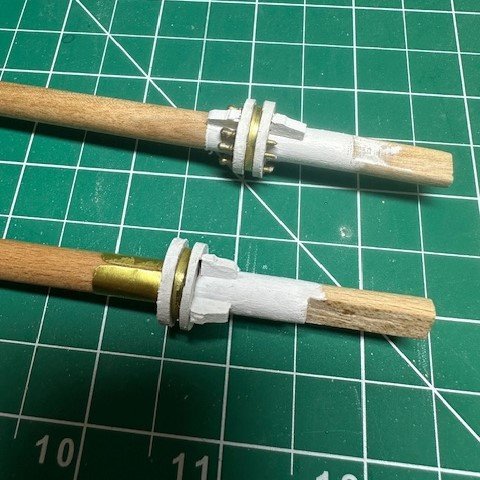
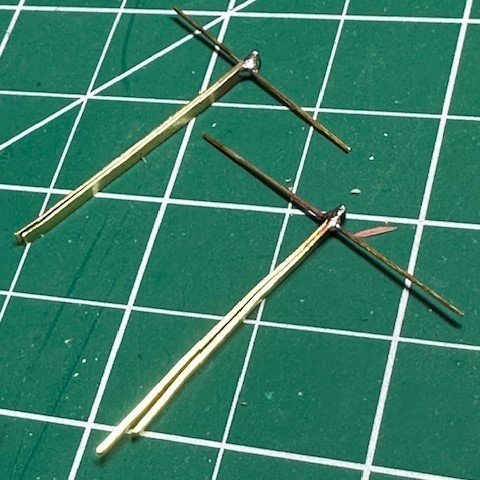
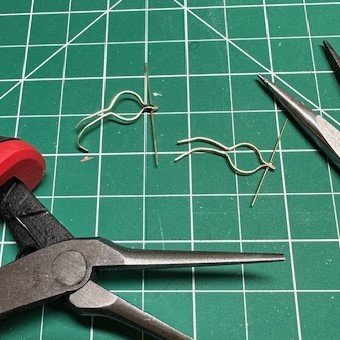
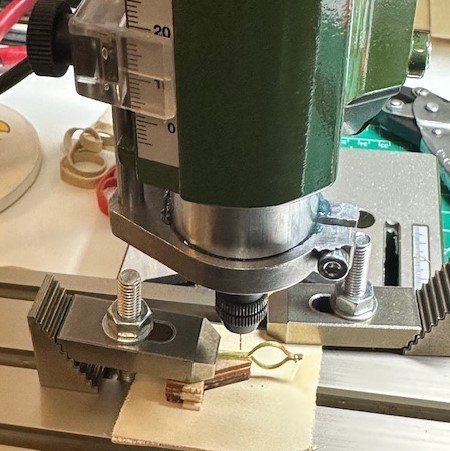
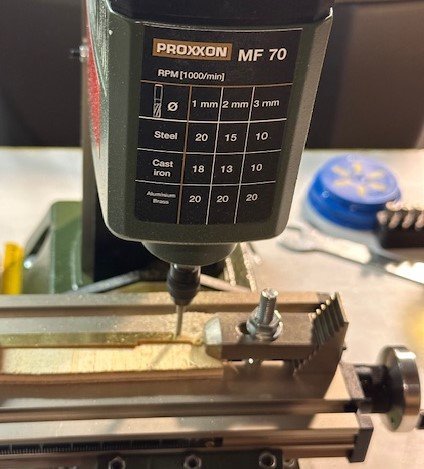
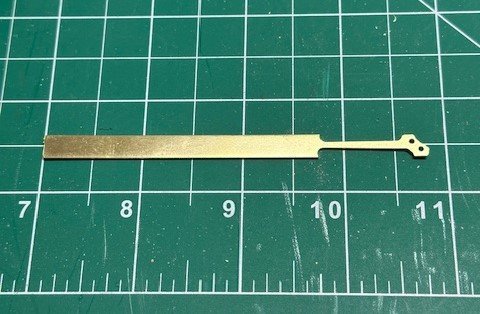
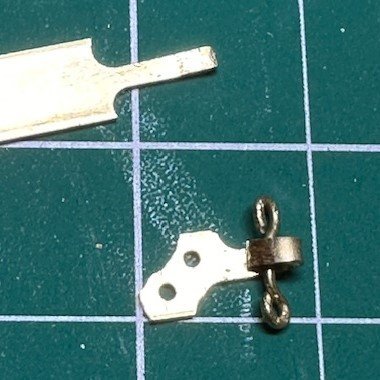
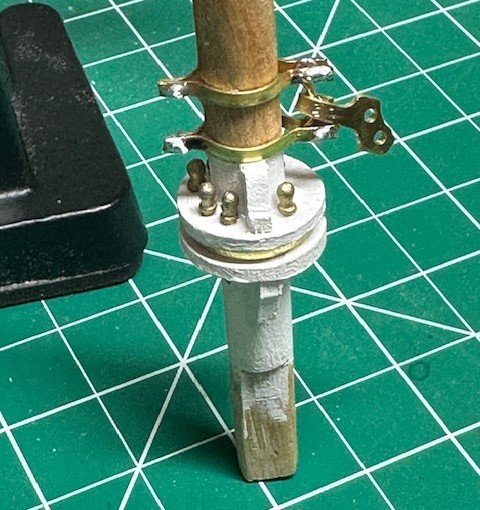
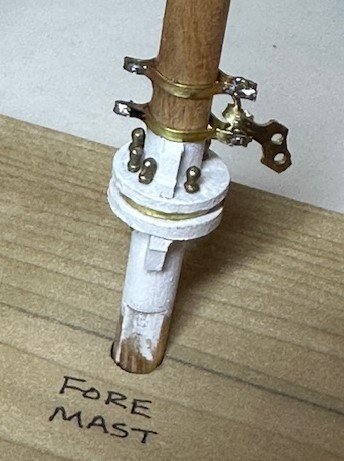
Time for another update! It's been a bit of slow-going. One of the reasons for delays was for a quick trip to Iowa. For those of you who are in the USA and are sports fans, you have no doubt heard a lot recently about Caitlin Clark with the Iowa Women's basketball team breaking the all-time NCAA scoring record recently. My 91 year-old mother-in-law is a big basketball fan and a fan of Caitlin and her recent success. A few months ago, I bought tickets to a game in February in order to take her and some other family. Well, that just turned out to be the game in Iowa City when Caitlin Clark broke the record! So exciting to be there and to have my MIL witness the achievement in person! OK, now on to my Bluenose update... Began work on the masts. First task was to cut and shape the masts from the dowels provided in the kit. As others have probably done with their masts, even though I'm beginning with details on the lower masts, I shaped and tapered both the lower and top masts to start. That was pretty straight-forward. Also made a pretty crude stand for the masts to sit in while I work on them and the rigging that will take place prior to putting everything on the actual Bluenose deck. Next task was to work on the boom rest for the main mast and the pin saddle for the fore mast. Taking a 5/8" and 1/2" diameter dowel, I drilled 5/16" holes down the center of each several inches. Then, using my little DrillMaster 2" cut-off saw, I cut narrow "discs". The 1/2" discs were used as the center pieces for both the pin saddle and boom rest, so that 1/16 x 1/64" brass strips could be wrapped and secured around the center disc. It actually worked pretty well! I also cut two additional discs to eventually place at the base of each mast. After assembling both pieces, I painted them and then drilled holes in the appropriate spots for the belay pins on the piece that will be on the fore mast. Using some stock 3/32" x 1/8 " strips, I made the chocks that go on both pieces. A chafing piece was placed above the boom crutch on the main mast using a very narrow 0.05mm brass sheet that easily wrapped around the mast. The next thing to complete was the gooseneck on the fore mast. I carefully folded two 1/64" brass rods in half and, using my new Proxxon drill press, drilled a hole in each to place a .51mm brass rod thru the holes. Another opportunity to work on my horrible soldering skills! 🤣 Actually, did pretty well! Then, I opened and wrapped them around each mast, and marked & drilled holes on the other side for pins. So far, so good! Needed to now create the shackle piece that attaches to the gooseneck and is used to connect to the fore boom. This requires a NEW tool, right?!? I've been interested in getting a mill machine and have seen good reports on the little Proxxon MF70 mill machine, so... why not?!? It actually worked out really well (in my humble opinion) for a first-time use. Following genericDave's Bluenose build and his suggestion, I loaded the MF70 with a 1/32" thick brass strip (0.81mm x 6.35mm) and cut the brass strip to shape. Cool! I then cut and wrapped the shackle piece around a 0.82mm brass rod that I had shaped to fit into the gooseneck bands. I secured the entire gooseneck piece on the fore mast. The shackle piece may be a little oversized and out of scale, but once everything else is installed around it on the completed ship, any differences should appear negligible. Time now to work on things higher up on the masts! Moving along, slowly but surely. My retirement travels should be done until May, so I should be able to put some decent time in the shipyard. We shall see how I do. Quick question and recommendation request for those of you who have read this entire post to this point (thanks for hanging in there!). I still have not decided entirely on whether to put the sails on this Bluenose, to place furled sails, or to not put any sails on and just do all the rigging. I am guessing, though, that if I do not do any sails, I should still put the mast hoops on the masts, and they would simply be stacked at the base of each mast, accordingly? Would I do anything differently? I've glanced briefly for now at the rigging plans, but have not specifically determined how my plan would affect mast hoop placement. Any expert advice is greatly appreciated. For now, though, I'll work on the hoops and then on to the trestle trees! Thanks for peeking in!
- 184 replies
-
- 6
-
-
- Bluenose
- Model Shipways
- (and 1 more)
-
Hi Olaf! If I am understanding your question, the #10 Xacto blade I was referring to that I like is the 2nd one down from the top left in the picture on my post, that fits into a "standard" Xacto knife handle. The lower right one is similar, but fits in a larger handle, as you can see the notch part (the little rectangle opening on the left side of the blades) is a bit bigger in that one. EDIT: Here's a "knife/blade matrix" I found that will help determine what blade goes with what handle... x-acto-matrix.pdf (scene7.com)
-
Not sure what you mean either by over or under, Paul. As a relative newbie, I always have to remind myself how to tie off to belay pins or cleats. Here's a nice short video reminder. Hope this is what you were asking about. Tying to fife rails wouldn't be any different, I don't think, than to rails or mast cleats.

