
HOLIDAY DONATION DRIVE - SUPPORT MSW - DO YOUR PART TO KEEP THIS GREAT FORUM GOING! (89 donations so far out of 49,000 members - C'mon guys!)
×


Snug Harbor Johnny
-
Posts
1,485 -
Joined
-
Last visited
Content Type
Profiles
Forums
Gallery
Events
Everything posted by Snug Harbor Johnny
-
 Besides, one should take into account the "preponderance of the evidence". A datapoint that is an 'outlier' from the bulk of the evidence has relatively little weight ... and artists are known to use 'artistic license' at their discretion.
 -
Fair points - and unless a well-funded effort to recover every possible scrap of surviving wreck can be done at some future time, we may never know the entire story. The CSS Alabama had a 'lucky shot' that lodged in the rudder post of the USS Kearsarge ... but 'unluckily' failed to explode. Imagine the outcome had the round gone off. History is full of 'what ifs'. With the Mary Rose, we're still short of evidence. And as the parents of most teenagers learn, "The absence of evidence is not evidence of abstinence. "
- 12 replies
-
- 2
-

-
- Great Harry
- Henry Grace a Dieu
- (and 2 more)
-
Hi - first post here
Snug Harbor Johnny replied to Scrumpymanjack's topic in New member Introductions
'Looks like this would be a GREAT model to gently restore, and a good way to get some experience with rigging without first having to build a hull and outfit the deck. The paper flags have deteriorated, so you could re-create them. The rigging might also be on the weak side, so replacement with scale rope from Siren or Ropes of Scale can insure a long future life for the model. Take pictures so you can replace existing rigging the same way. There are fife rails near the base of the masts, but you can also add a few pin rails inside the bulwarks if you opt to add additional lines. The yards are tied to the masts, so that can be re-done, or you can opt to add yokes/parrels and add halyards. The sails can be replaced (if fragile) by finer material. Once the yards and rigging are cleared (the masts can be left in place if they won't pull out), dusting and perhaps a few touch ups will freshen the hull and deck. Then re-assemble and think about a case to limit future dust accumulation. Fair sailing !! Johnny -
Dremel 4 inch table saw 588-2
Snug Harbor Johnny replied to lynne's topic in Modeling tools and Workshop Equipment
Someone with access to a lathe and metal stock could turn their own pulleys to suit whatever non-toothed belt they have that will deliver approximately the same blade speed. -
Dremel 4 inch table saw 588-2
Snug Harbor Johnny replied to lynne's topic in Modeling tools and Workshop Equipment
With parts missing, can the condition be "great"? -
1:100 is a relatively small scale to work in (as it tests my skills) - and you are doing a GREAT job of it !!
-
Now that you've stained the strakes, Pavel's scarf joints mostly 'disappear'. The finish on everything looks great !
- 52 replies
-
- 2
-
-
- Oseberg
- Pavel Nikitin
- (and 1 more)
-
One can use 'natural', but I still think it seems vey light - and may 'read' nearly white in photographs. Brand new full-size rope starts out on the light side, but it doesn't take long under use to darken into a medium tan. Builders can used their own judgement, as the whole point is to please oneself with any build.
-
Siggi, I've received the steering board handle you sent me ... and now I see just how detailed many elements of your project are at 1:50 scale. I salute your skill and craftsmanship ! Johnny
-
Of course, it is white thread (the only kind I've seen), so the resultant scale rope will have to be dyed to the desired color. The classic linen fishing line was also white, but vintage examples are now slightly off-white. White rigging on model ships just doesn't look right anyway. Standing rigging should be either black or a very dark brown - that includes the lacing for the deadeyes and ratlines. Running rigging should be tan - but not too light or it looks "whitish" in photographs.
-
When using polyester thread, the scale rope made can have a tendency to unravel when cut. Baking (and note that this for a limited time at a moderate temperature 5 - 7 min at 300 deg. F ... to avoid melting) seems to 'set' the rope better and the raveling is far less. Cotton (or linen) scale rope can ravel also, but does not need heat setting. Cotton can weaken over decades, and that used on my Dad's clipper crumbled after 70 years. Heat, pollutants and UV exposure will affect this - as well as for many materials. No doubt, making scale rope from multiple cotton strands should be more durable - but linen is better a s natural material. The old-timers used linen fly fishing line (known as Old Cuttyhunk) and linen does stand the 'test of time' for rigging as well as sails. The indications are the Polyester scale rope will also hold up over the decades. BTW for either scale rope making or with full size rope (and I've demoed making some of that), one first spins the rope - and the trick is to balance the number of turns v/s counter turns in step one and step 2 of the process. If you've done that, the rope won't 'kink up' on itself. If nearly in balance, the rope will only kink slightly. The solution is to 'whip' the rope around so that it will get rid of any excess counter-twist. Then with one end fixed to something or restrained as convenient, you pull on the run (not too hard) to get the twist to meld to itself better. Stretching a few times will give a little more length and reduce the tendency to ravel when cut. The poly gets heat-set as noted above. Those who don't want to make their own can buy good scale rope from Syren or Ropes of Scale, as scale rope is far better than what is supplied in most kits. You'll notice that kit rope has a lot of 'fuzz' in close up shots. Poly has the least fuzz. Cotton rope will have some fuzz, but then what I've made from cotton has been QUICKLY passthrough a (relatively) low temp flame of an old-fashioned alcohol burner. This 'singes' off most of the fuzz, but if you don't move the scale rope fast enough - the line will catch fire and part. DON'T do this with polyester scale rope. Old linen fly fishing line doesn't have much fuzz because of the long fibers (cotton is short fibered), but it is VERY hard to find, since it was not made since the 1940s - and because some people collect spools of it, Old Cuttyhunk is very expensive. The rope size is also larger - for 1:48 scale models.
-
Your rig is similar to Syren's Rope Rocket - the videos on scale rope making on the Syren website are very instructive. The consensus is the Guterman poly sewing thread makes the best rope (oven 'set' 5 -7 minutes in a 300 degree F oven after winding and stretching), with Mettler a close second. I've used both, and the standard sewing thread has been available in sewing retailers (those that have not closed) or on line. Its best to buy in person to judge the color. The thread is aprox .006" in diameter, and using a single thread on the rig set up for three strand rope yields scale rope about .010 in diameter - that represents 1" rope at 1:100 scale (or thereabouts). Using 2 threads on each of the 3 strand setup (6 threads in all) yields scale rope about .020 in diameter. 3 treads on each of the 3 strands to wind (as I recall) yields closer to .030 scale rope. By experimenting (e.g. first making .010 rope and using THAT on each of a 3 strand set up - mind how the twist runs - can make thicker rope for larger scales). You get to control the product as needed.
-
Thats some deadrise on the Benjamin F. Packard ...
-
Glad to have you aboard, mate! Johnny
-
'Hope you didn't refund what was NOT the product you sent. If he contest this, you have a case for customer fraud/theft. Stunts like this were why my Admiral put a no return-no exchanges policy on her ETSY shop.
-
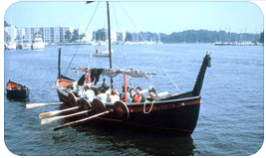
'Sounds like you had a rather warm spell, mate. The Hamburg vicinity is supposed to have an average daily high of 72 deg. F ? Below is the Sae Earn, a cobbled replica I rowed on in College - The ship's boat towed behind I built myself, named Herjan by the captain, Atli.
-
we have an antique drop-leaf table (mostly mahogany) with one piece on the frane is cherry stained mahogany - and it looks convincing. Note that it isw heartwood cherry - not sap wood.
-
'Lots to learn here. One tip from the home page - you can find MSW build logs (complete or not) for a specific ship (often from multiple kits brands) by hovering on Browse, then clicking forums, scrolling to and clicking the index of build logs (marked 'new') under Members Build Logs, then click the Quick Find indexes (the first listing). There you will find categories by year of launch of the ship you are looking for (you need to know the approximate year that ship was built). An alphabetical list will appear of the ship names, builder and kit supplier (if applicable). You can avoid many pitfalls by learning from those who have built these kits before.
-
Apparently things get a little complicated with paperwork and Canada's thresholds are different than those of the U.S. As far as Canada is concerned, they have what is referred to as CAD thresholds, which stands for "CAnadian Dollars" - so with the Canadian dollar now representing only about 73 U.S. cents, the CAD 150 threshold for Canadian duties would apply to courier shipments of a Model Expo kit exceeding $109.50 - and many kits are above that amount. However, "commercial" shipments are subject to a CAD 40, which is only $29.2 ... and it is not clear which limit may apply in the case of model Expo. But even goods now valued between the CAD 40 and CAD 150 points are STILL subject to: Goods and Services Tax (GST), Harmonized Sales Tax (HST), or Provincial Sales Tax (PST). Any kit now over $109.50 (CAD 150) is subject to BOTH duties, GST, HST and PST. 'Sound complicated? Trade deals are still in a state of flux, so it is no surprise that MANY companies are staying on the sidelines for now.
-
AN absolutely BRILLIANT idea for a builder who wants to make the detailed hull the star of the show ! Build her to the point pictured so far (or thereabouts) in your build and call her finished ! Such a model will be easier to case - or perhaps may not need a case ... just a little 'dust off' occasionally, and one can always have immediate access to the model. Transportation or moving won't be a problem, since the ship can be laid on its side over padding/bubblewrap in a box - and can even be safely shipped.
- 351 replies
-
- 1
-
-
- Flying Fish
- Model Shipways
- (and 1 more)
-
Planking bends amidships are generally gradual, with the greatest curves needed at the bow or stern. What I've done with pre-soaked planking needing more bend at the end is to put the end into my mouth ... Don't scoff, since perhaps there is something in saliva that helps the process - then I cautiously use my front teeth to slightly crimp the wood sequentially, with hand and tongue forming a tighter radius. One can 'feel' the fibers strain and just start to crack a little, which is the cue to back off. Its a bit of an art, but with some practice its worked for me. Different species of wood have a variety of tastes, but as with wine tasters, one does not swallow but rinses with water to cleanse the palette.
-
Wow, Kevin ... I watched #8 (planking) as a sample, and it covered in real time (mostly, except for some fast-forward sanding) fitting the first 3 plank pieces. The degree of design (including jigs and fixtures) is more impressive than first imagined, yet there is real craftsmanship in the 'fine tuning' of each piece for an exact fit - to be expected of a fine model. I noted the sparing application of white glue - most likely to avoid any irregularities when staining later on.
- 52 replies
-
- 3
-
-
- Oseberg
- Pavel Nikitin
- (and 1 more)
-
Yes, Kevin ! Thank you for the link. By applying the planks on the next phase to notched framing, everything should fit with only minor adjustments. The engineering in this Pavel kit is indeed remarkable. The Billings Roar Ege that I've done some preliminary fiddling with has a simple building jig with smooth, un-notched forms with only laser 'tick' marks where (presumably) the top edge of each plank should go. BUT, these marks are off (as well as the middle building bulkhead being not wide enough) - and builders typically have lapped planking trouble along the way. The frames to put in later just don't fit right as there are gaps, etc. The plank shapes appear to conform to published shapes of the originals, and I was able to determine where the 'tick' marks should go on the build frame bulkheads of the Roar Ege (the middle one remade to the correct width conforming to 1:25 cross sections - enlarged from the less than model scale provided with the kit). Still, having notched building frames would be better ... but would the actual notched ribs provide still fit after the planking is done? So I stopped work, at that point. I contrast this problem with the excellent approach the kit designers of the Woody Joe Khufu barge I did a build log on some time ago. There, they lasered the hull frames into the build bulkheads leaving small points of attachment. So after planking, those attachment points are cut with an X-Acto to release the hull frames from the building bulkhead - which took some care and fiddling, but the result was fine. So I'm thinking now that revised jig bulkheads might be fashioned for the Ege with recesses to receive the rib segments held by tape (for ease of later removal). Then the planking will be right on the ribs, so when the jig is removed everything will have a great fit.
- 52 replies
-
- 1
-
-
- Oseberg
- Pavel Nikitin
- (and 1 more)
-
This is amazing puzzle, with pre-fairing noted on frame pieces by a second lasered line within the perimeter. The building jigs are also engineered cleverly. I saw another build somewhere (but can't find it again just now) that goes meticulously through each step - with some useful tips/caveats. Other related builds of Billings Oseberg or Vikingskibbe have troubled themselves with installing riviets, yet Siggi's Gokstad recent build used a scribed line near the plank edge and pencil dots to simulate rivets effectively.
- 52 replies
-
- 1
-
-
- Oseberg
- Pavel Nikitin
- (and 1 more)
-
Not happy with the first one? I'd be delighted to buy it for a future project !! ... Of course, you've upped the bar with the detail on the second tiller.
