HOLIDAY DONATION DRIVE - SUPPORT MSW - DO YOUR PART TO KEEP THIS GREAT FORUM GOING! (Only 24 donations so far out of 49,000 members - C'mon guys!)
×


Theodosius
-
Posts
345 -
Joined
-
Last visited
Content Type
Profiles
Forums
Gallery
Events
Everything posted by Theodosius
-
Good job on the boats. I mean one can't stress enough how smal these are 🙂.
- 422 replies
-
- 2
-

-
- Vanguard Models
- Sphinx
- (and 1 more)
-
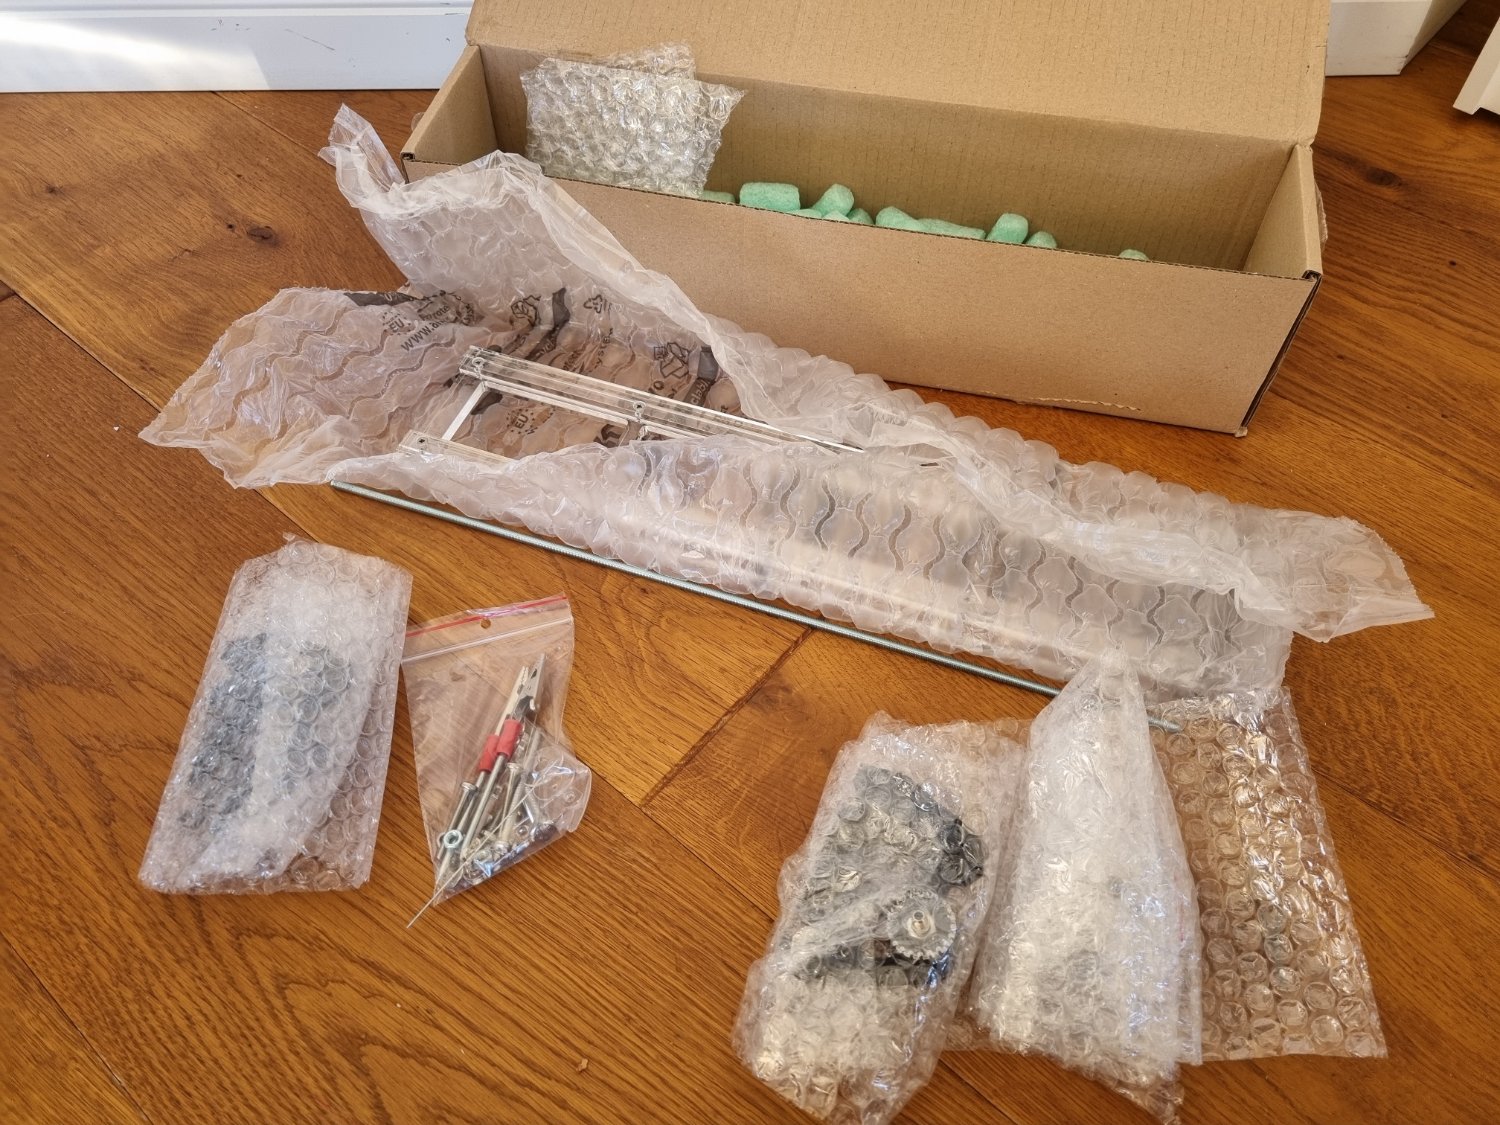
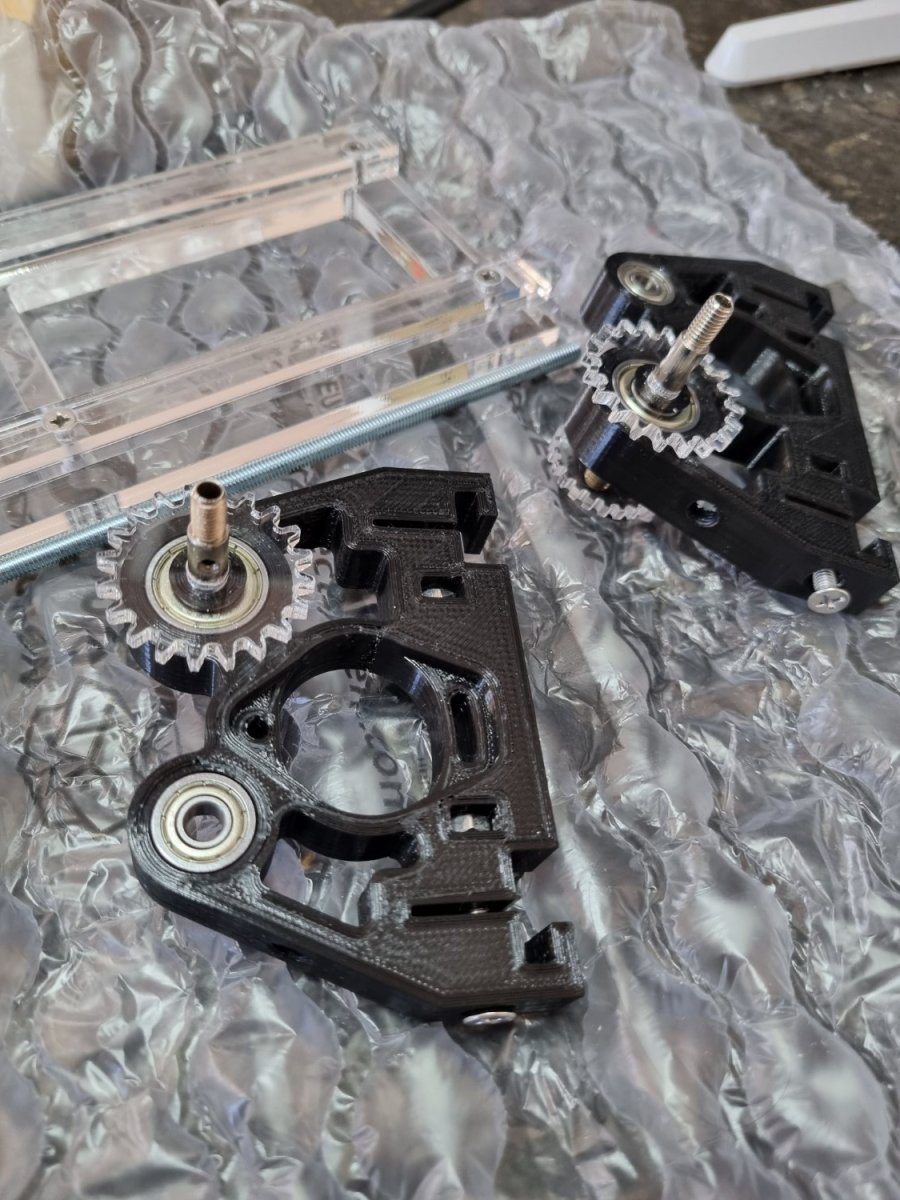
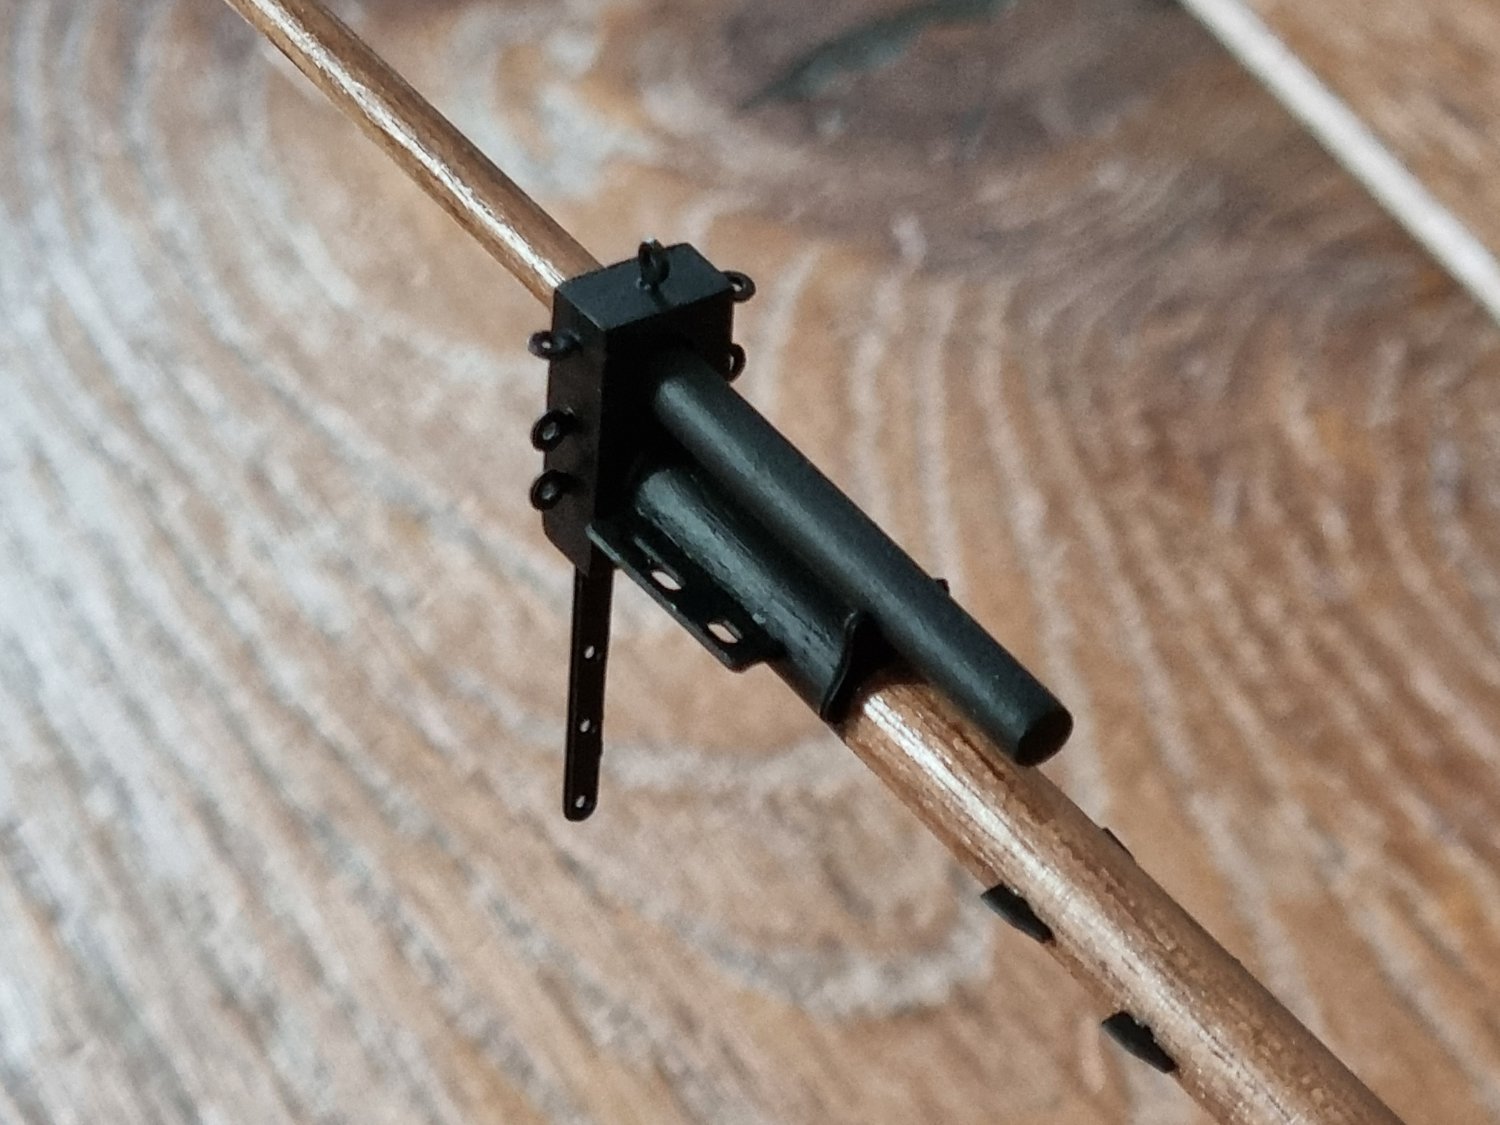
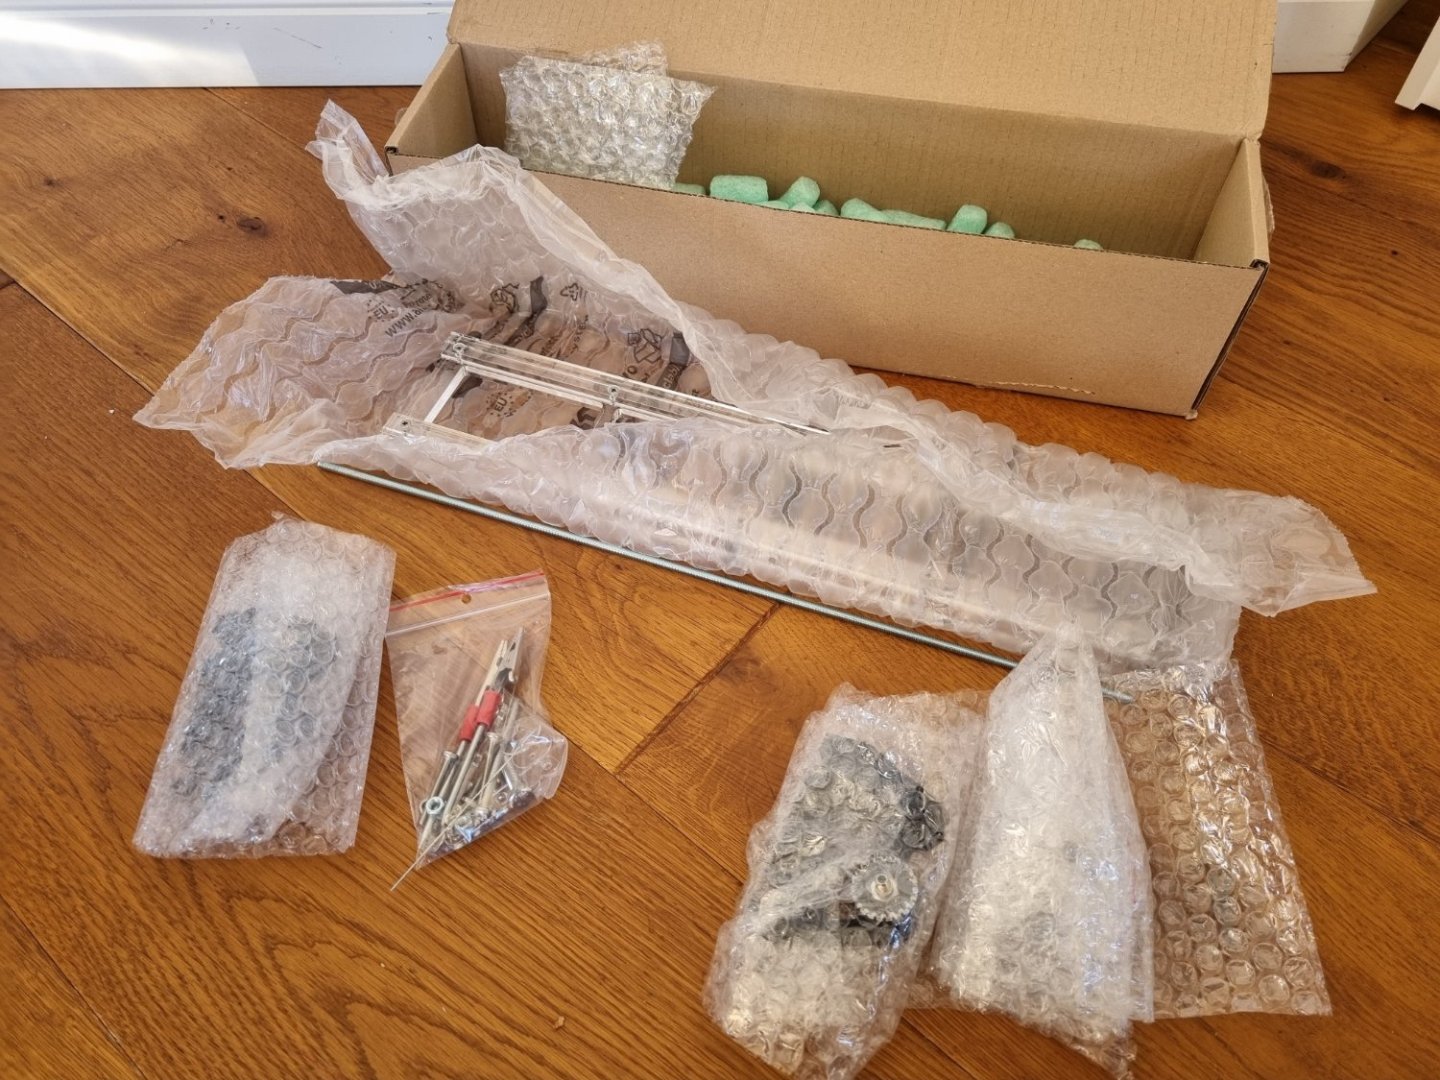
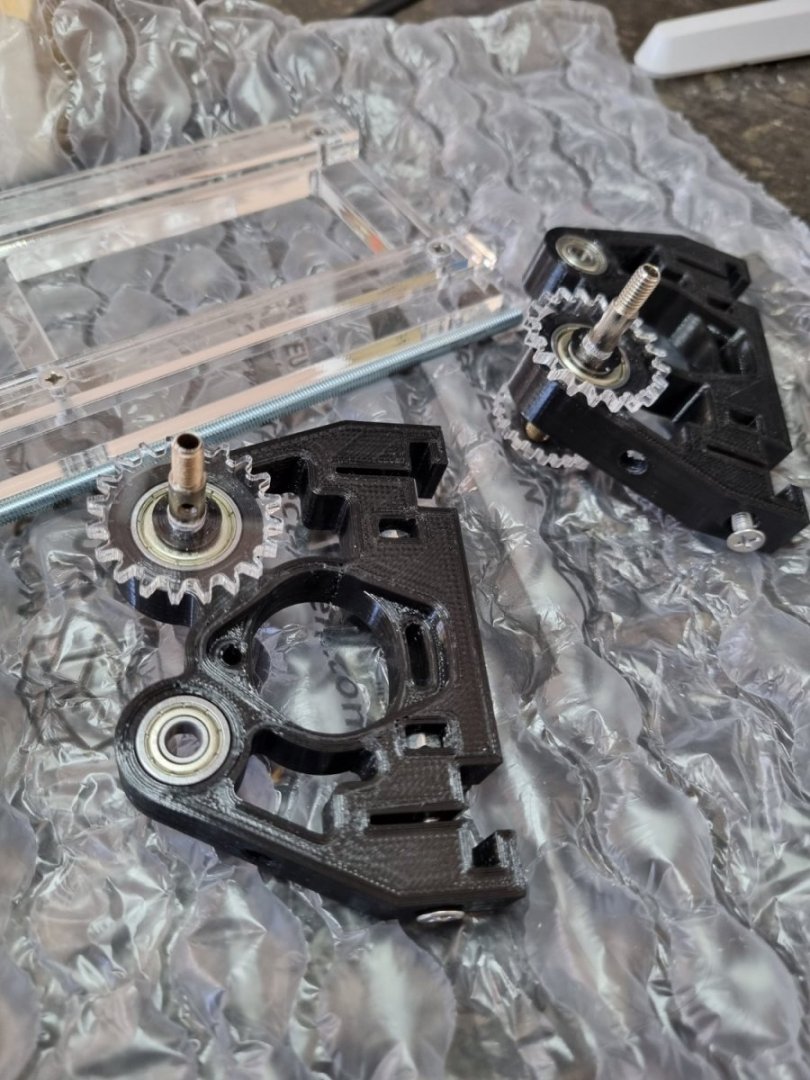
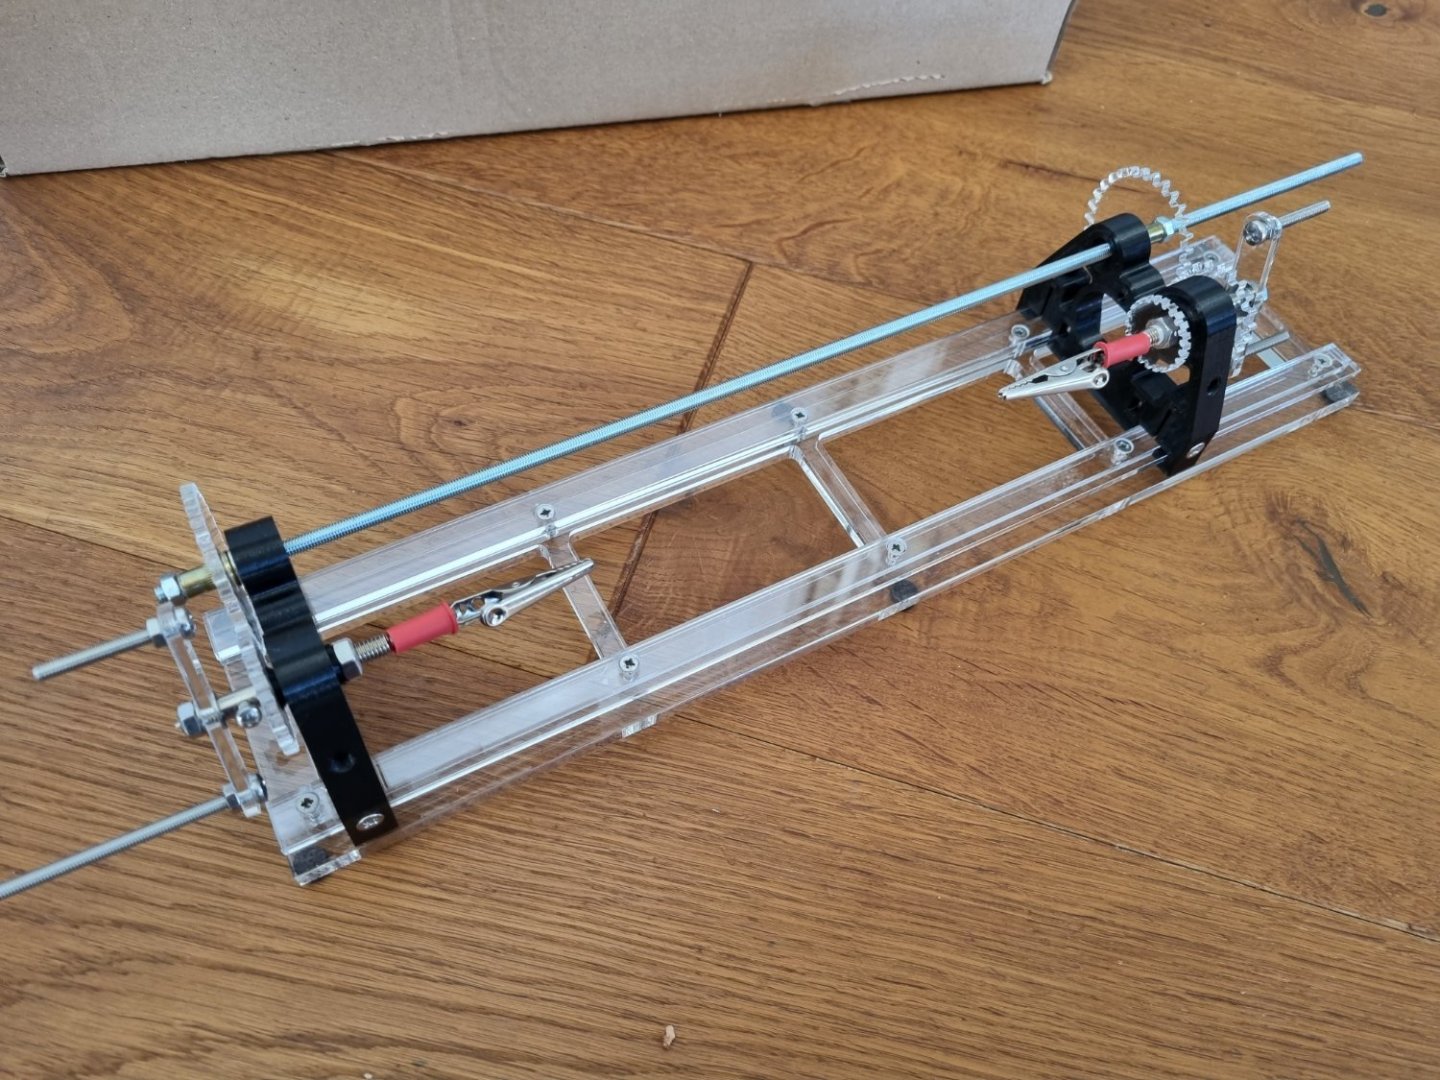
The machina arrived as a kit today, all very well packaged: There are no extra instructions, I used the one one youtube. Ather than in the video, some parts are allready pre-build: No problems while assembling the rest: I quite like the fakt, that one can change the with to use. You need to open some screws, and then you an adyust to a length as needet. The gears are running smooth. Perhaps I will write a little bitt more, when I have used to actual serve something. This is the basic modell, but, If needet, you can buy the motor and other add-ons seperate.
-
Roter Löwe 1597 by Ondras71
Theodosius replied to Ondras71's topic in - Build logs for subjects built 1501 - 1750
Masterclass! -
@Dziadeczek: thank you! That was exactly I was lookin' for! Just placed an order on his webside🙂.
-
@wefalck and @Roger Pellett: thank you both for your advice. Yes, one can build that, for sure. It would need it's time for research the materials, form, size, etc, etc, etc. While time for itself ist fortunatly not the bottleneck, but time, where I have enough power, energy, motivation, and, have allready all the tasks life itself rates higher than ship modelling, done, is in my case ver rare! So, if I can buy me more modelling time, I do that! Sure, you can't know that, but, if possible, I wan't to buy something ready to work with, or at least, just assemble it 🙂 So, I'm still searching for something out of the EU. Thank you all for your suggestions.
-
I think it was a very good decision from you to correct the position of the wales! The fashion pieces will gain some profit of that, but IMO more importand is, that you have the right distance between the wales and the chain plates. If you're wales are to high and the later on addet channels are in the right position, the chain plates will not end right on top of wales, but stick out, and you will have more trouble fixing that! :-). Besides of that your Speedy looks realy good! And I'm very noisy to see how the sails will come out! 🙂
- 144 replies
-
- 2
-
-
- HMS Speedy
- Vanguard Models
- (and 1 more)
-
Sorry, if I did'nt look (and found) hard enough, but I'm looking for a serving mashine for the rigging, that I can buy here in europe. Any advices? Thank's a lot for every help!
-
Great work on the rudder, and, of course: also on the rest of the build 🙂
- 648 replies
-
- 2
-

-
-
- Indefatigable
- Vanguard Models
- (and 1 more)
-
I realy like how you used a to-scale length for your planking strips. That adds a lot of authencity! 🙂
- 152 replies
-
- 1
-
-
- Flirt
- Vanguard Models
- (and 1 more)
-
Beautiful, how the planks run into the stem and counter! And thank's a lot for explaining in detail, how you worked out your planks for that!
-
Can't help with your question, but nevertheless your model looks good so far! 🙂
-
Great work on the masts and spars so far! 🙂 As I found out on my own build: it's not so easy as it looks to taper correct, make all the holes and add ons that way, that it all alligns in one line, etc. You nailed it realy good! I like 🙂
-
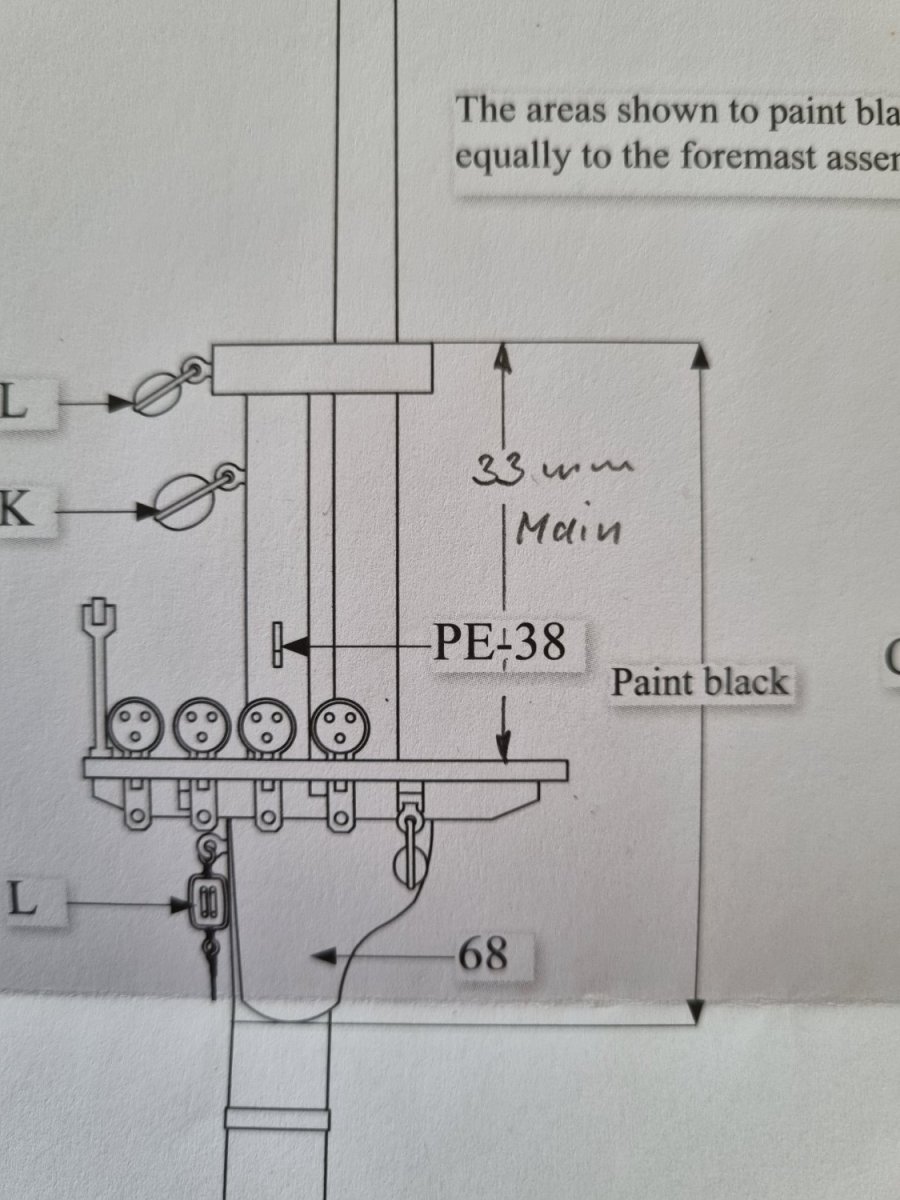
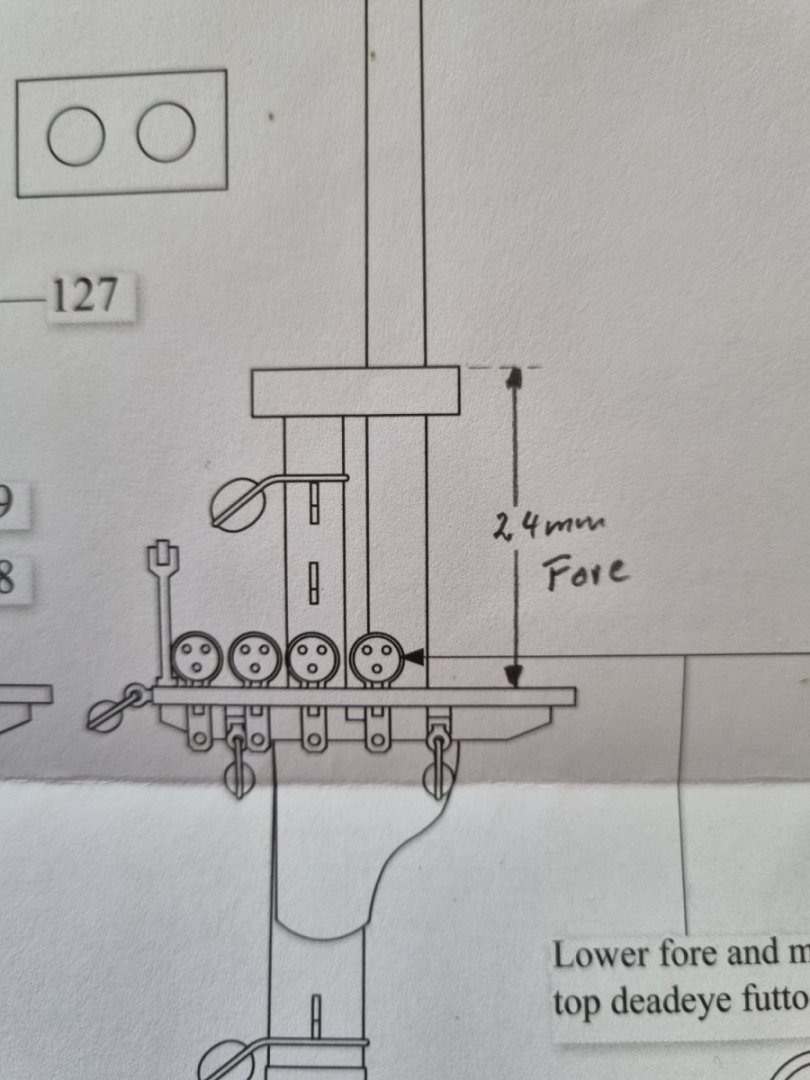
@all for your visit! And thank's a lot for the thumbs up! :-) @Thukydides: yeah, the pictures are fine as they are, my fault! I'm happy, that it is so easy to use the forum also as a picture host for the build-logs! :-) I tried to search for similar tapering problems here on the forum. Found something, but not exactly what I was looking for. Don't look hard enough, I think! Perhaps it's also just a fact of not enough practice on my side. @jereremy: thank's a lot for looin in and leaving an nice comment! I remember the discussion about the 'to-taper-lines' on the bulkheads. I think missing them is a little bit of a beginners thing. It would have helped me, but when one take his time during the fairing process, the outcome does not differ because of the lines being there or not. Often enough I was just afraid of, I could damage something, what I could not repair later. So mostly I sandet not enough and not to much. But better this way, I think :-). Oh, and sorry, I don't know at what time this has changed during a revision of the kits from @Chris Watton. Continued, but not much. Addet the pe-parts to the bow sprit and also addet some paint: Now, I have a problem with the measurings of the fore- and mainmast: I have read in some other Flirt/Speedy-build logs (but for some reason can't find the right places any more), that the tops are on both the same, and therefore the plans are not right. @Chris Watton wanted to correct this for the kits for Flirt/Speedy still to come, but mine has not the corrected ones. So my question is: is in my plans the foremast with the right measurments, or is it the mainmast? Thank's @all for any help! :-). Here are two pictures of the questionable areas:


-
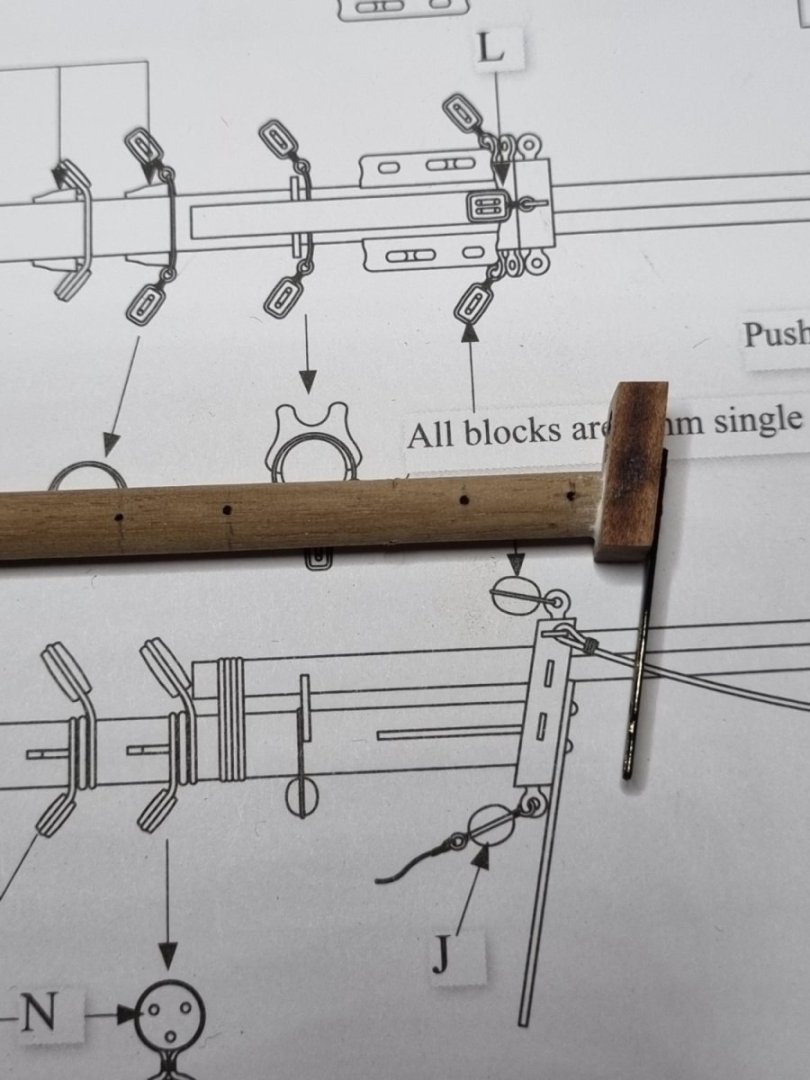
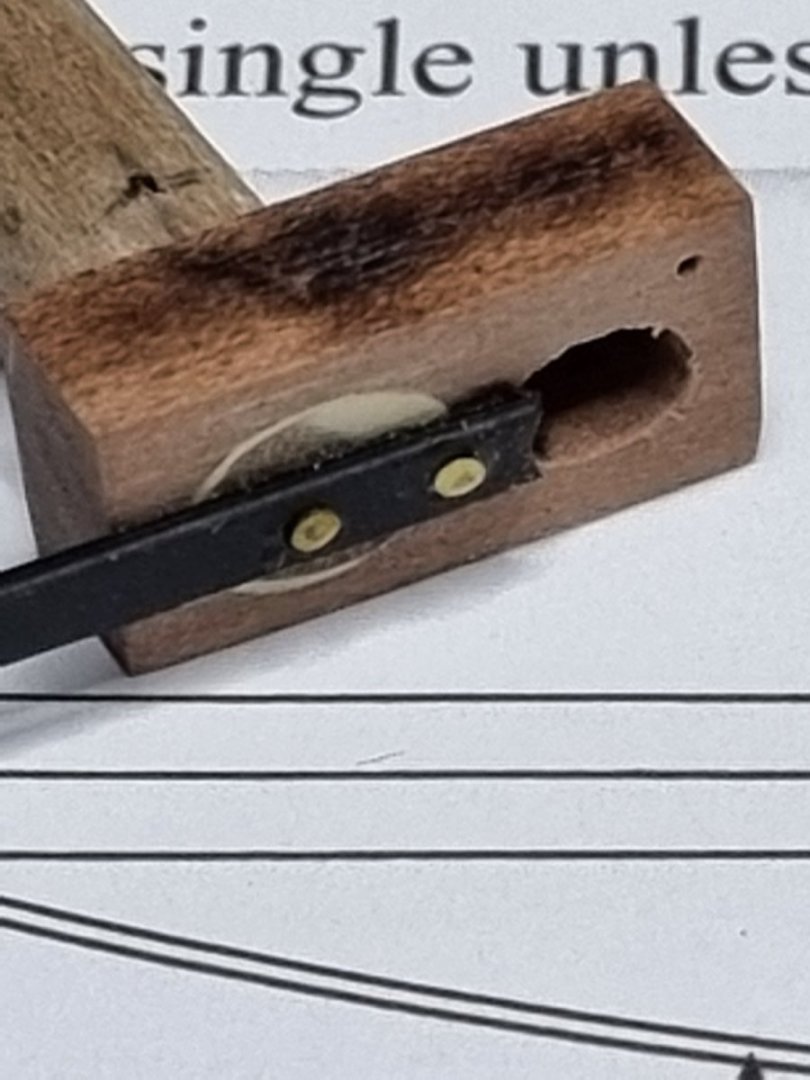
@Thukydides: so true! When I was junger, I did dancing as a competition and there we said: I still can't spinn properly, but on a much higer level 🙂 Hello and a happy new year! Still fightig an infect, but lately I could start again building the model. I thought I could go with the bow sprit. First time I needet to taper some dowels. Even though I baught the proxxon DB250, I had my issues to get it right. The end of the dowel, that has to be held by the tip/spike gets wobbly during the tapering process, because the hole from the tip became bigger and the dowel now was not hold any more. Addional to that, the tip of the dowel brokes because of that, when the tip became to thin. Any help/idears how I can improve this process for all the other spars that are still to do? I used sanding sticks and sand paper for the tapering process. Nevertheless, in the end I could fabricate the three dowels for the bow sprit (three with the flying jig-boom(?)). The thickes one, I managed to get an very slight oval form on the tapered end because of my lack doin it properly. Ok, it is barley to see, but is something I would like to sort out before I proceed with the booms and yards. Needet some filler on the block, but it will be get painted, so no problem here. The seven-degree angel in the block and the dowel was done with a disk sander, where I could put the tapble with the right angle. Enough words, some photos: *problem: my old picture host might not proceed in the distant future, so I try to upload them here on the page. Don't know if this works... HELP: the picture are muuuuch toooo big! How can I change this? Thanks a alot!
-
Great solution on the bulwark-problem! For me, the ply-bulwark was the hardest part of the build so far - but, the rigging is still to come, so this might change in the future! 😉
-
Thank you for pointing that out! So the new Indy is then also a new construction! My respect for everyone who has worked on this! My first skepticism was just because there seems to bee more and more POF kits are commin, most out of the south asian region, and per coincidence, models where a monography in some way allready exists.
-
Just wow! Thank's for explaining in details your approach to get the propper hull! 🙂
- 30 replies
-
- 2
-
-
- Corel
- wappen von hamburg
- (and 1 more)
-
I don't know this brand, but it's a 'funny', äh, 'coincidence', that the last one was Speedy, and now Indy, just two models, where another brand (vanguard models) came out earlier with full plans and research...
-
Sorry, if I missed that, but, with this beautiful windows, do you plan to create some form of the cabins laying behind? And again: such a great work in every aspect of this wonderful model!
-
I'm realy impressed of your approach! This is very intresting! It's realy great, that you dig so deep into the Nelsons Victory! I will follow this with great interest. What confuses me is, I mean, there is so much research on the real thing, that it is hard to believe, that there is so much wrong on the real Victory. Or is the real one just not in the Trafalger form? I'm sorry, if the answers to my questions lies in your pdf-uploads. You gave a ton of information there, and at this point, I have not read all of it. And because of foreign language issues, I might not be able to understand everything the way it is needet. Nevertheless and again: great project. Perhaps the most interesting Victory build project at the moment running! 🙂
- 2 replies
-
- 3
-
-
- HMS Victory
- Caldercraft
- (and 1 more)
-
Good start on this beauty! 🙂
-
Wow! Theses mouldings add so much to the model! I like! 🙂
- 648 replies
-
- 2
-
-
- Indefatigable
- Vanguard Models
- (and 1 more)
-
Good idear with this tape! I'm again ill, so I'm building in my mind more with you all here on msw, then I can build on my own, so thanks again for all the work you are doin with your build log! 🙂
- 587 replies
-
- 1
-
-
- Indefatigable
- Vanguard Models
- (and 1 more)
-
That's a realy good start! I'm sure you have a lot of fun with this one 🙂.
- 152 replies
-
- 2
-
-
- Flirt
- Vanguard Models
- (and 1 more)