HOLIDAY DONATION DRIVE - SUPPORT MSW - DO YOUR PART TO KEEP THIS GREAT FORUM GOING! (Only 75 donations so far out of 49,000 members - C'mon guys!)
×


Theodosius
-
Posts
345 -
Joined
-
Last visited
Content Type
Profiles
Forums
Gallery
Events
Everything posted by Theodosius
-
To my eyes that all looks good enough for not to be afraid of this rigging process ;-)
-
taper the top timbers/ribs of the plattforms!??
Theodosius replied to Theodosius's topic in Masting, rigging and sails
Thank's a lot! That is exactly what I meant and what I was looking for! Sorry for my confusing entry because of the name/wording/vocabular/ship name. I'm not a native speaker, that makes it even more difficult, but I will try to improve my skills on that front also! 🙂 I will do it like you say: tapering is easy, I will do that, but build a more to scale "what is the right vocabular for the plattform?" in 1:64 is still way beyond my skills :-). Again: thank you very much for your help and clarification. PS: funny thing is, this morning I searched the net for exactly the book you referred too (James Lee), but at about 120.- bucks I'm not so sure if I need one. Propably not as long as I build a Vanguard kit with its phantastic plans and Chris approach to make his model kits as much as historical accurate as is possible in that scale! 🙂 -
What a great model! Running a log is a lot of work! And one can have different reasons to keep it alife. In my case, I run a log to get help, and I get a lot of help here. I would not be that far in my build without this forum. And then I hope, somebody who read my log may take advantage of my errors. Last reason: my log is also a great place for getting motivation for myself to go on with my build, even if I have some personal downings the last year. Would I like to have more advice? Sure, but not getting a ton of responce does'nt mean that nowbody look at my work. And look at your own log: a ton of visitors to your log! In my oppinion u can't say that there is not enough interest in your build and your log! I can only imagine that you don't get more comments because of this: now I just speak for me: The builds, where the quality of the shown work is so far ahead of my abbilitys, just like your's(!), I can't say anything constructive, and how boring it would for be you, to only just read "*fill with poisitive superlative of choice*". But that does'nt mean I don't love to read and see your work here! So be very sure, that your work here is very much appreciated, even if there are not as much responds as you would like to read :-). I hope, that you and your great build log will not dissapear from here! 🙂
-
Wow, wow and WOW! I like the dutch influenced ships, and this one is particular beautiful! Thanks a lot for this great start and your story from childhood to this model! I will sure follow this build, even though I'm not so consistent in leaving comments :-).
- 30 replies
-
- 1
-

-
- Corel
- wappen von hamburg
- (and 1 more)
-
Thanks for the explanation and giving two examples! That would be a hell of additional work, and as you pointed out: the visibility of the details below would be much more restricted, what was your point anyways. I'm very curious, what solution you have for the upper decks :-).
- 648 replies
-
- 2
-
-
- Indefatigable
- Vanguard Models
- (and 1 more)
-
Yeah, I will save this filler-thing for potential future works :-). Your planking-start looks very promising!
-
I'm sure you know very well, that you are not symetrical starboard/baboard for the first decoration-line above the wales for the last three gunports. But noone will ever be able to see both sides at once ;-). So, if you are fine with it, it is fine as it is! And I realy like what you are showing to us here 🙂
- 587 replies
-
- 1
-
-
- Indefatigable
- Vanguard Models
- (and 1 more)
-
You have a good pace with this rigging-process! And it looks beautiful too!
- 443 replies
-
- 3
-
-
- Indefatigable
- Vanguard Models
- (and 1 more)
-
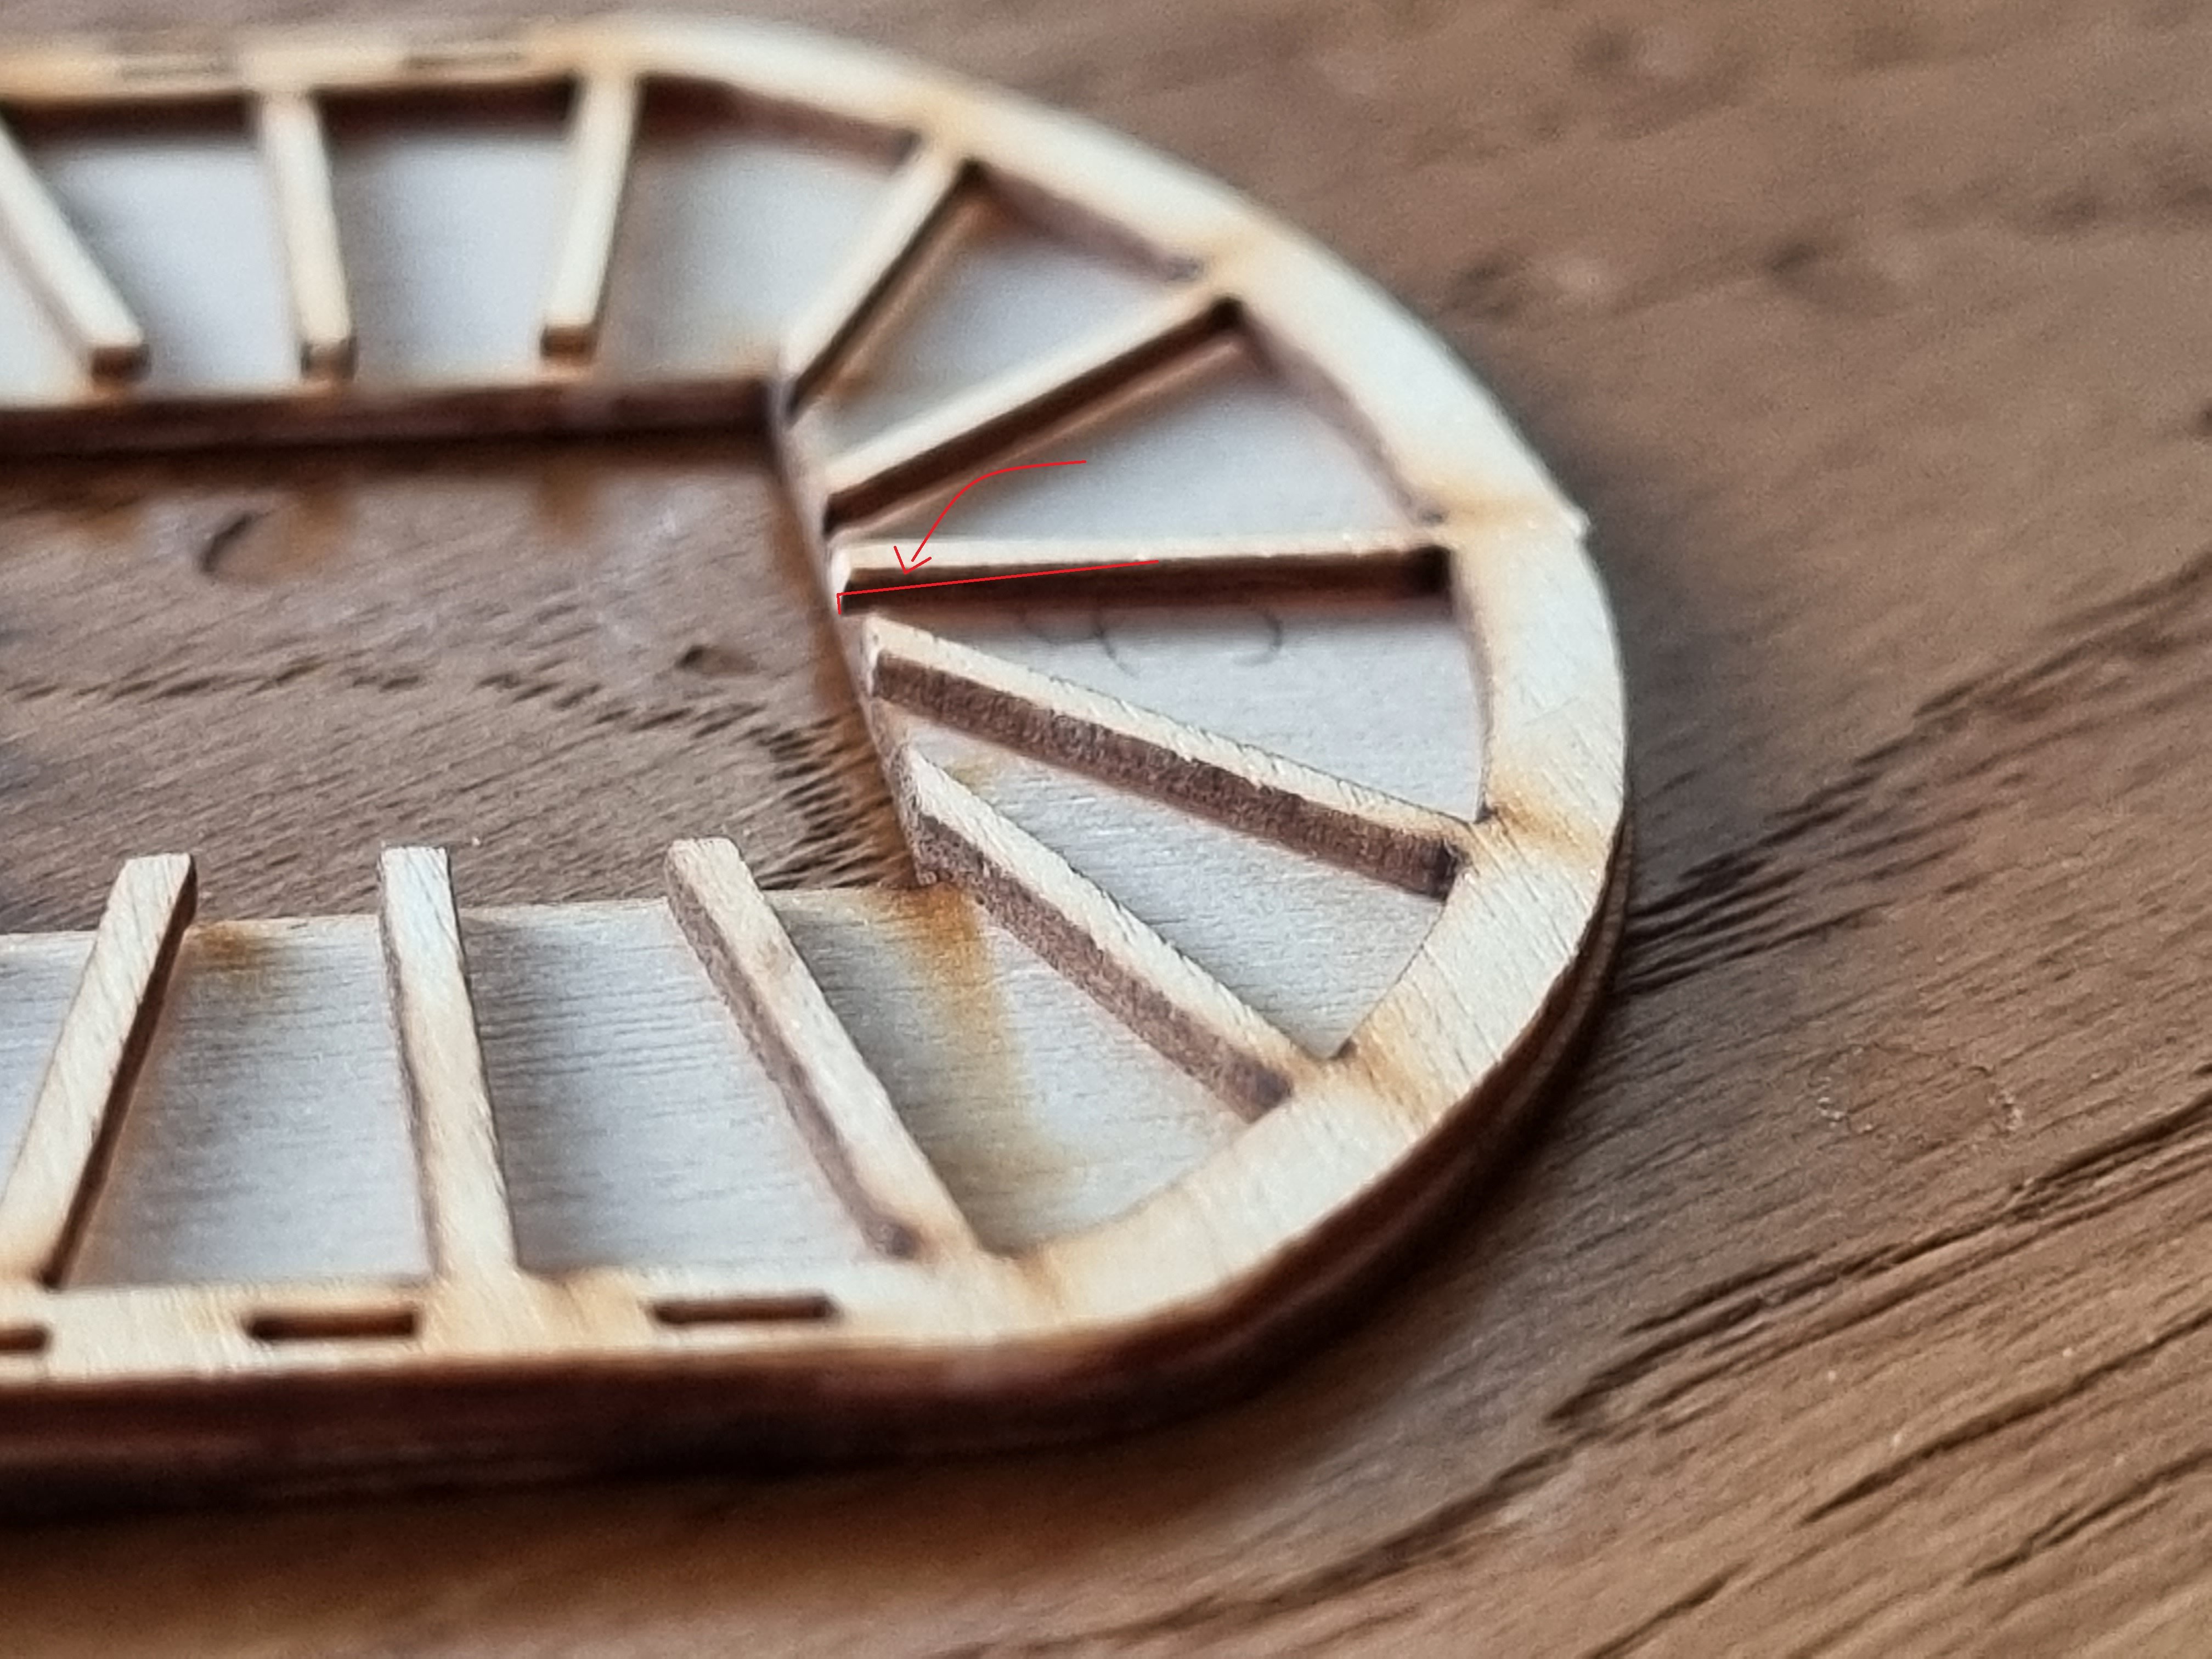
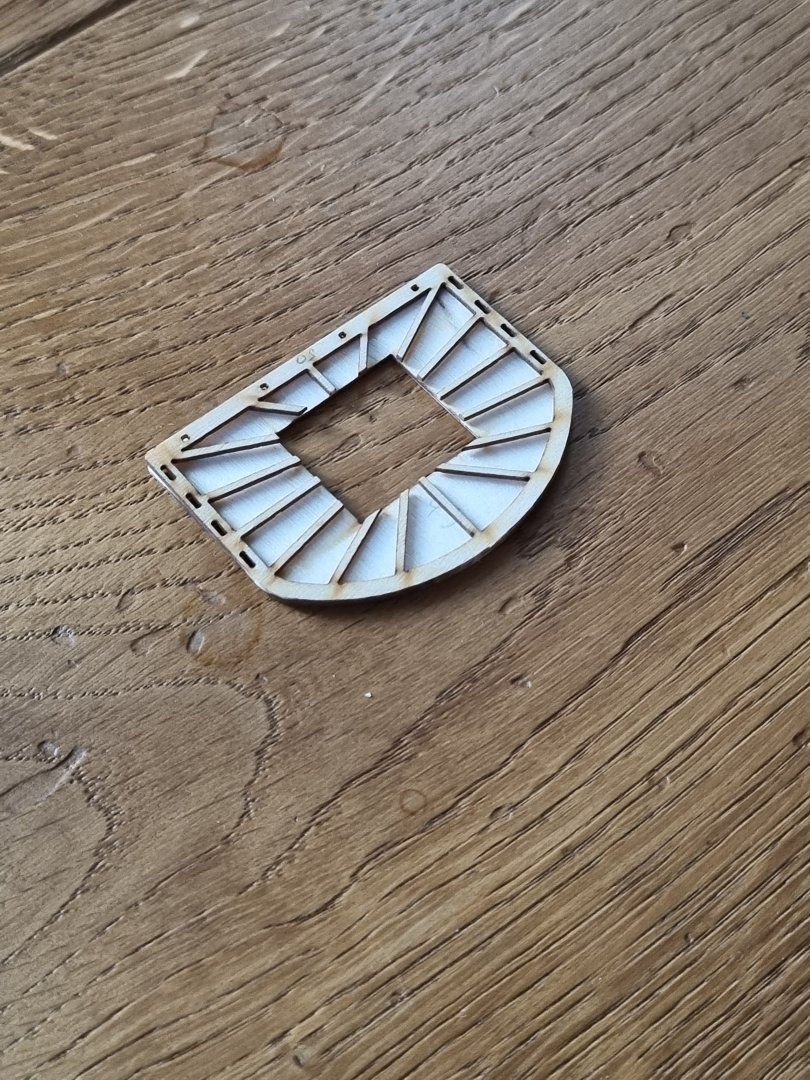
I have question regarding the top timbers (ribs) of the plattforms, Mars(?). Started this in my build log, but I think it should be here, perhaps I can get more Information in this part of the forum. I started with the masts, nothing to see jet, but still a first insecurity regarding the plattforms(?): My reference here is Longridges's "The Anatomy of Nelson's Ships". I know that the book is about HMS Victory, and not HMS Speedy, but they are from the same navy/time/area, so similar building rules must be used. Am I wrong here? In the book there are severel drawings which shows very clearly, that the top timbers (ribs?) on top of the plattforms are tapered from the hole in the middle to about half or a little bit more of the length. I tryied to mark it in this picture: My marks are very thin, I hope you can see 'em :-). So my question is: is it the right way to taper all the top timbers the way I marked one of em, or is it all bul*sh*t, and I can spare that work? I did'nt found anything in my Speedy-plan-sheets regarding this, so perhaps the easy way is the right one, but I want to be shure of that. Now it would be quite easy to file them all down. Thank you all for your help! 🙂 This is what I wrote in my Speedy-build-log, @TBlack was so friendly to point out, that there is no tapering in Druxey's instructions in his Swan Class book, volume IV. So I start to go through the sources I have: R. C. Anderson, this is for earlier time, 1600-1720, but not much, in his book the timbers are tapert. Wolfram zu Mondfeld: in this book the timbers/ribs are are also always tapert. I mean: why would you add not needet weight high above the point of gravity? I think you would only let the timbers untapered, if it would be structural needet, don't you? So I tend to taper on my build too, but I'm not full convinced jet.
-
@TBlack, thank you very much! I have started this disscussion again the the section for masts and rigging in this forum, perhaps there we can get more input :-)
-
Thanks for leading me to this linked disscussion, did'nt see it in the first place! Good to see, that with some logic, we all here come to similar results :-).
- 562 replies
-
- 2
-
-
- vanguard models
- alert
- (and 2 more)
-
Great recovery work on that fascia pattern! And thanks for showing us your new micro-saw, because that is exactly what I'm also were loking for. Will buy this one too!
- 587 replies
-
- 1
-
-
- Indefatigable
- Vanguard Models
- (and 1 more)
-
I don't know what Ledges are, but it looks great the way it is 🙂
- 648 replies
-
- 2
-

-
-
- Indefatigable
- Vanguard Models
- (and 1 more)
-
I'm late to this party :-). But you ask for personal oppinion, not necessarily with any know-how, so version B pleased my eyes the most!
-
Did'nt add to the chorus becuase I was very sure, that you would easily rescue the first planking and you did it very good! I mean, look at your Diana, just top noch! I like this model and your build!
- 152 replies
-
- 2
-
-
- Vanguard Models
- Cutter
- (and 2 more)
-
Nice to see you back on your great model! I like how you rescued the too-deep-cut on the mizzen-mast with an added pice of scrap wood!
-
Impressive! She becomes a big lady with that flying boom!
- 443 replies
-
- 3
-
-
- Indefatigable
- Vanguard Models
- (and 1 more)
-
I'm not sure jet, if I became a fan of your heavy copper-wethering, but I do like all the reast of your beautiful build model!
-
Your gun-tackels(?) look phantastic! Even though I have a question about it: It seems to be common sense, that one have to use a one- and a two-block! I can understand, that for the big guns it was nessessary to use a pulley to translate more length of line into more force. But also for this small ones? I mean, perhaps a sailor could move them with a gentle push of one of his feet. I could imagine, that a smaller translation with only one-blocks, or perhaps just even a single block would produce enough force to easyly push the loaded gun through the gun port. My point here is: the less line you have to pull, the faster the gun is ready again to fire. But that is just a theory of mine and propably completly wrong 🙂
- 562 replies
-
- 3
-
-
- vanguard models
- alert
- (and 2 more)
-
Thank you all for looking in and for your thumbs up, much appreciated! 🙂 Ok, back to fun (work :-)), I have another question: I started with the masts, nothing to see jet, but still a first insecurity regarding the plattforms(?): My reference here is Longridges's "The Anatomy of Nelson's Ships". I know that the book is about HMS Victory, and not HMS Speedy, but they are from the same navy/time/area, so similar building rules must be used. Am I wrong here? In the book there are severel drawings which shows very clearly, that the top timbers (ribs?) on top of the plattforms are tapered from the hole in the middle to about half or a little bit more of the length. I tryied to mark it in this picture: My marks are very thin, I hope you can see 'em :-). So my question is: is it the right way to taper all the top timbers the way I marked one of em, or is it all bul*sh*t, and I can spare that work? I did'nt found anything in my Speedy-plan-sheets regarding this, so perhaps the easy way is the right one, but I want to be shure of that. Now it would be quite easy to file them all down. Thank you all for your help! 🙂

-
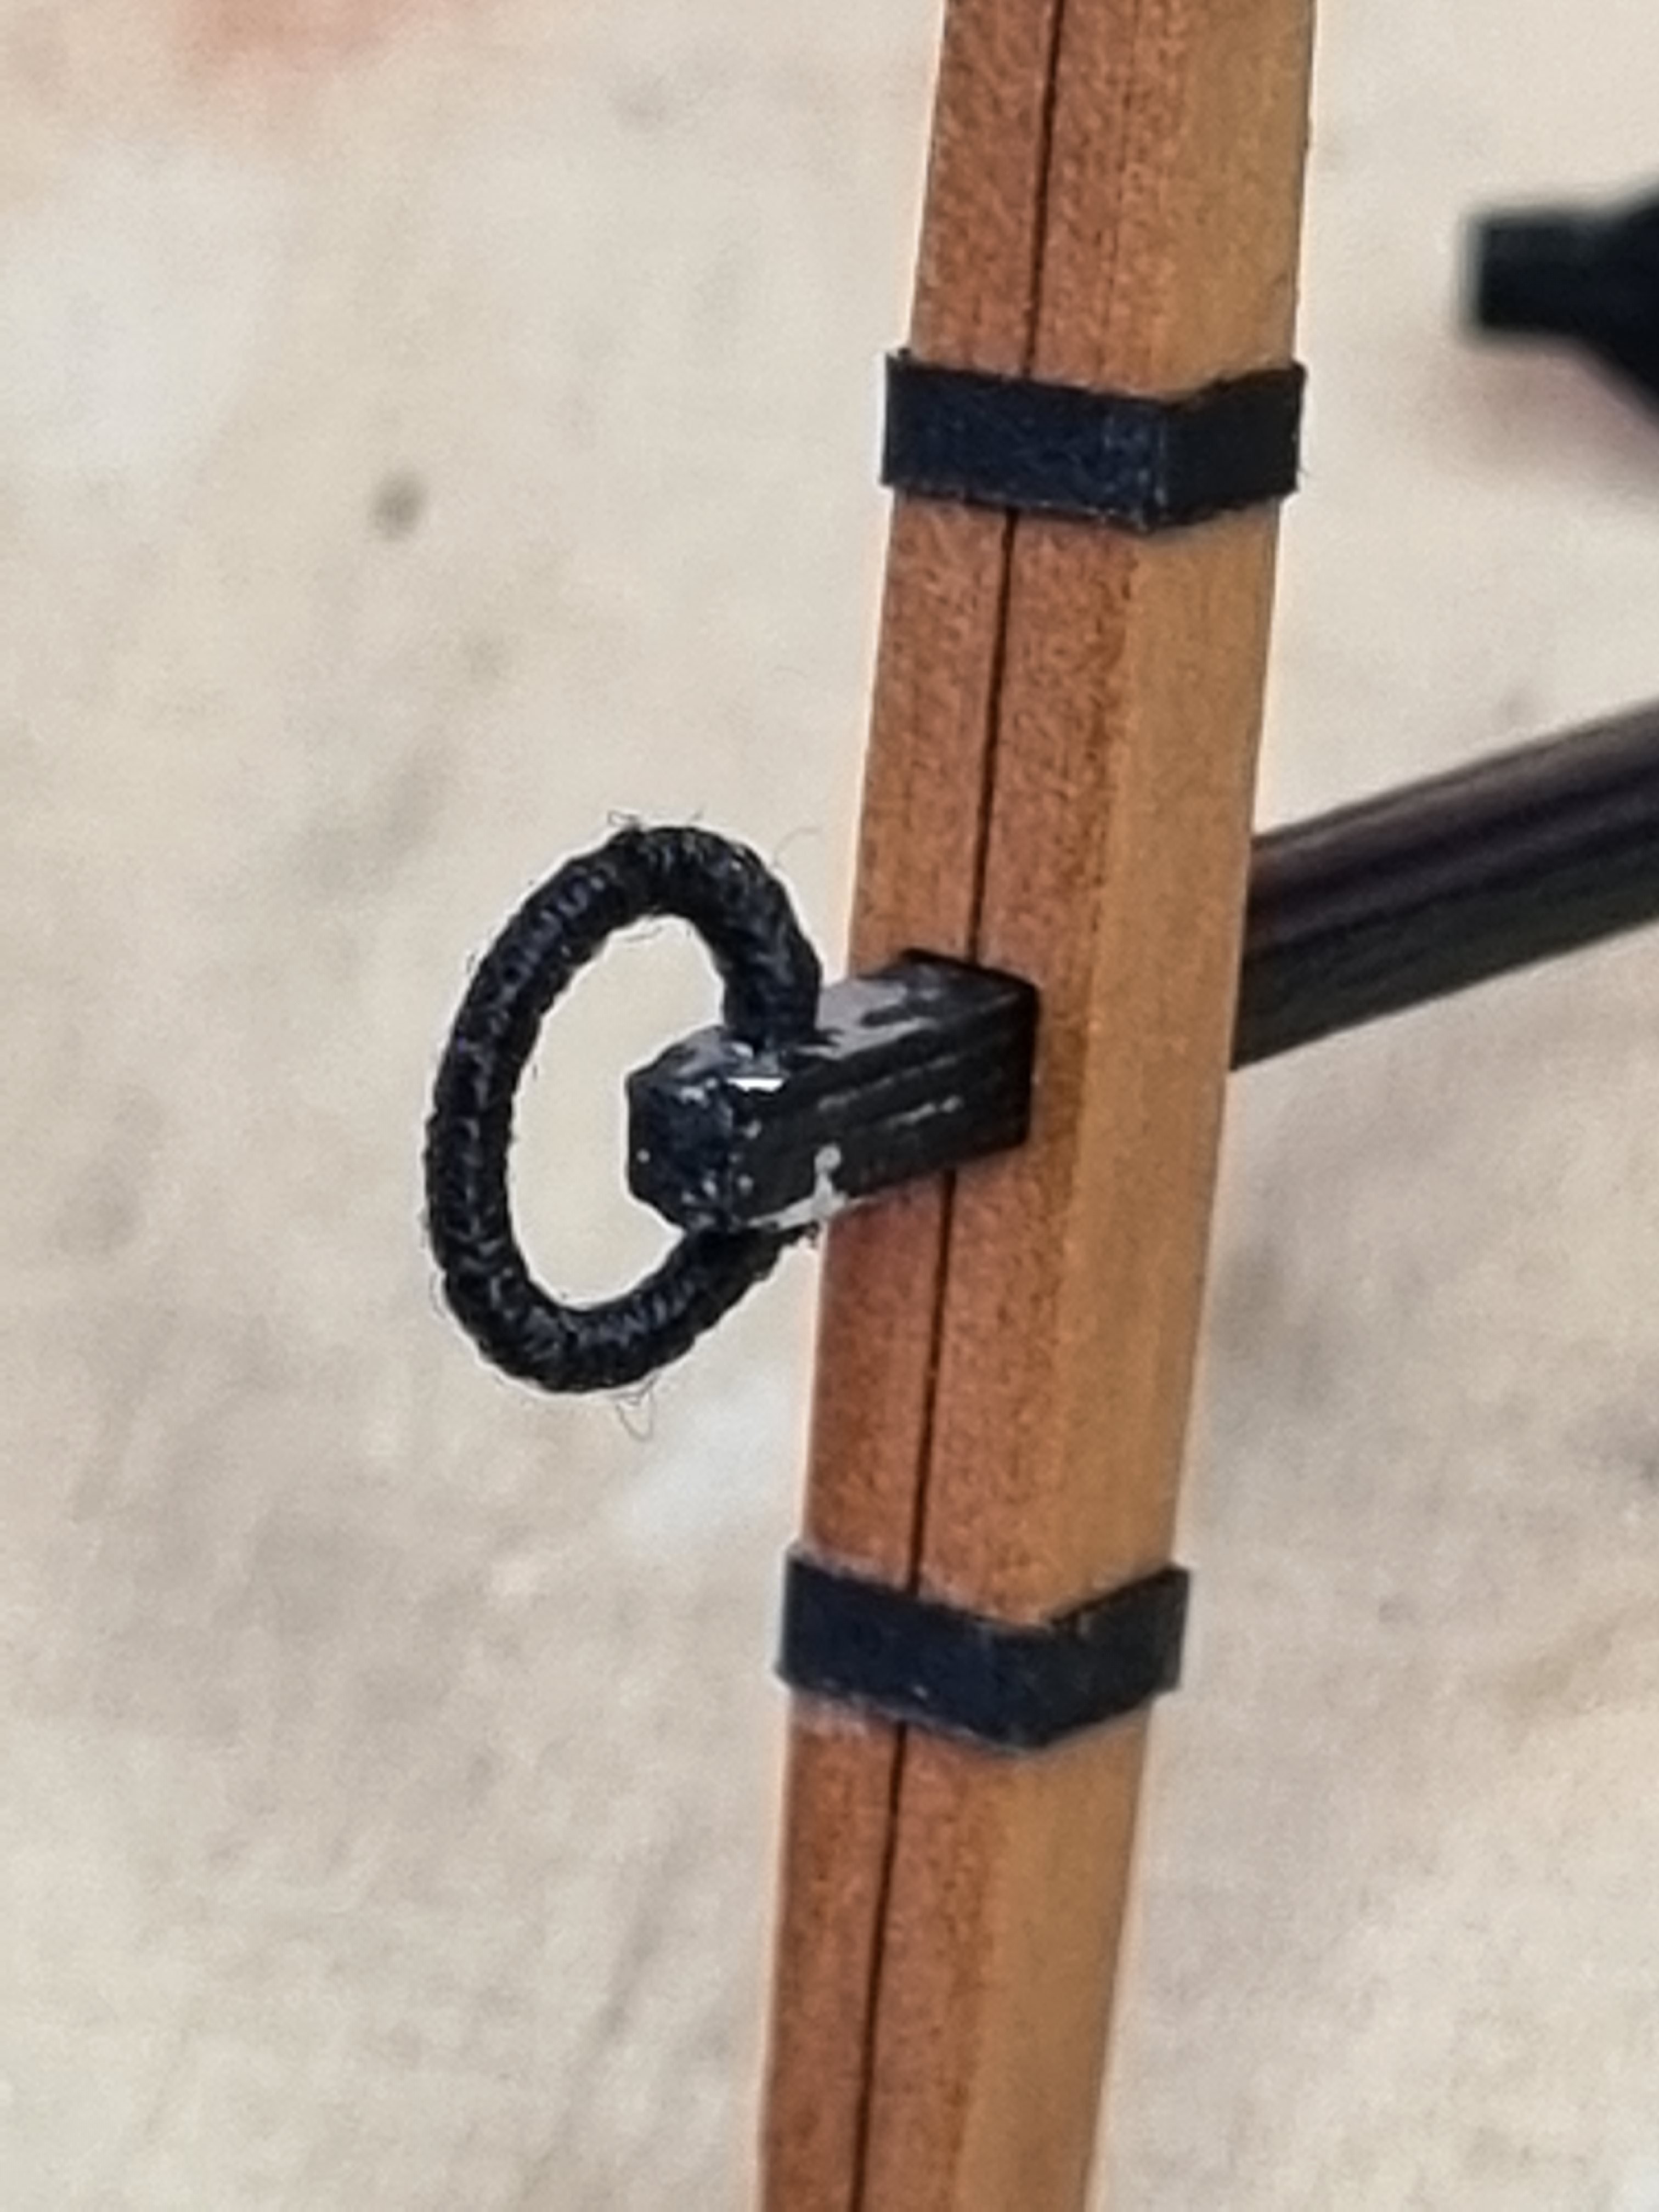
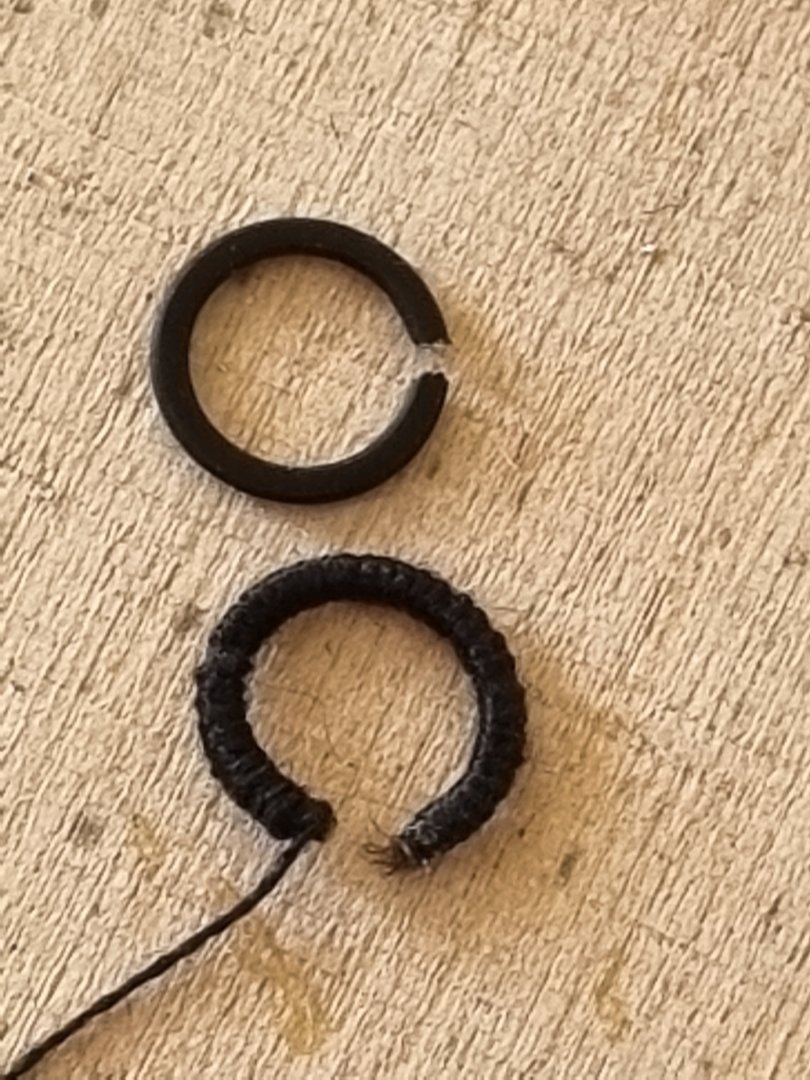
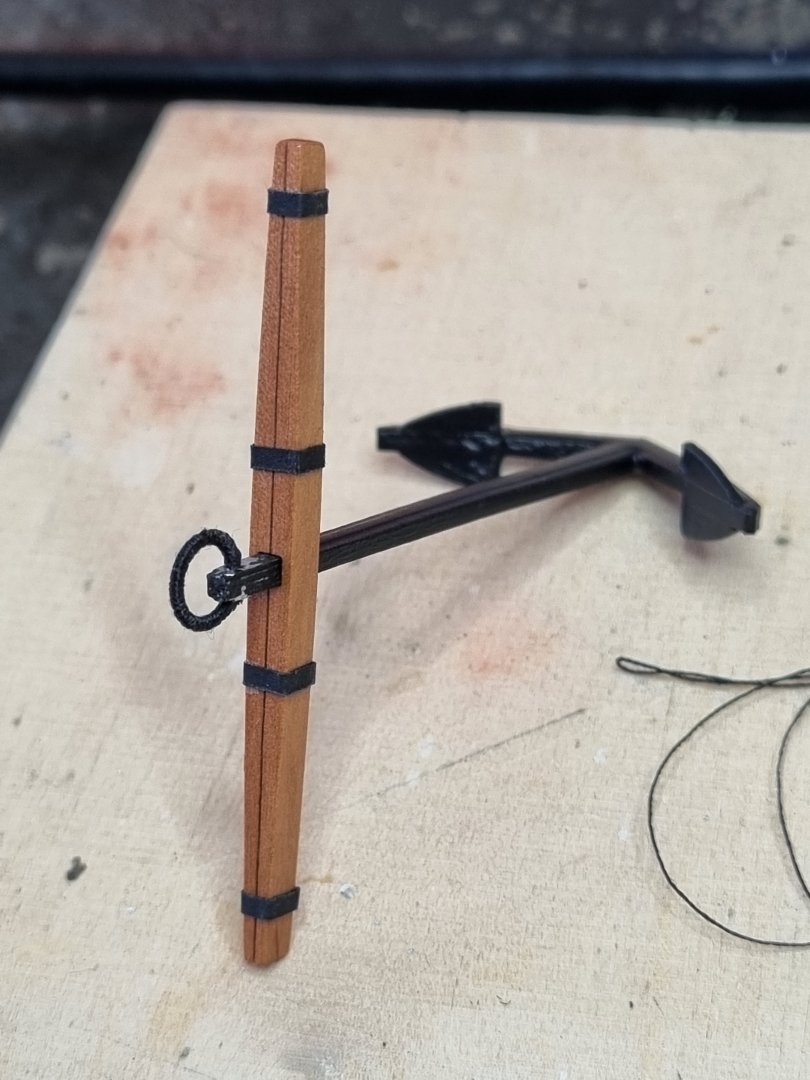
Thank you all for your thumbs up, much appreciated :-). @Jack-in-the-Blue:Thank you too! And yes, it's all about the jurney and not the goal. But the curve for what you aim for is allways steeper than the curve for what you have learned allready :-). But otherwise this hobby would'nt have such a good long time motivation, has it not? :-). Anchors next. No problems, but I'm not sure, if it's realy worth to serve the rings? Ok, for storage reasons I will dissassemble the anchors again. Yust sain, because they need some touch up work, cleaning exessive glue and black paint, that comes then during the final assembly on the ship after rigging. I totaly forgot to ask: is the PROXXON DB250 the powertool of choice, when it comes to the masts and spars? Thanks for your help! 🙂

-
What I have read about Cochrane is, that he did very successfull a lot of raids at land, so I'm very sure that he was able to not only his whole crew, but also some soldiers, to transfer them to/of/from-to land/ship in one go. I have no Idear how many boats of what size he had used for that. But that was Speedy and perhaps not during her whole career. But while your Ship is more based on a novel, I would just go with 'what looks best' and not what might have been. I'm sure you will find a good solution 🙂
- 341 replies
-
- 4
-
-
- Sophie
- Vanguard Models
- (and 1 more)
-
Good idear with this colour-layering approach on the cast side-pockets(?).