

Nipper
-
Posts
135 -
Joined
-
Last visited
Content Type
Profiles
Forums
Gallery
Events
Posts posted by Nipper
-
-
1 hour ago, uss frolick said:
What? No spoons and forks?
Love it!
Well, I gave your comment a laugh, but I'm also planning to place on the table a scaled down map of Charleston Harbour, a quill pen and inkpot, and a few books! From the creative point of view, it's a lot of fun to do this alongside building Chris's lovely Sphinx.
Nipper
-
30 minutes ago, chris watton said:
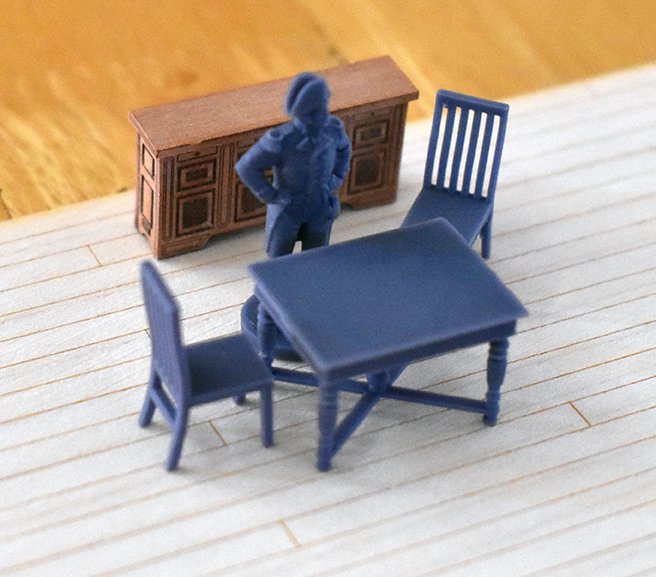
Chris - now what is this? Here am I painstakingly building a table and chairs to go in the cabin of my Sphinx. and here are you producing a beautiful resin set straight out of the Dockyard stores! Is this going on sale?
Nipper
- mtaylor, Dave_E, Oldsalt1950 and 3 others
-
 6
6
-
4 hours ago, Linda DOBLE said:
Hi guys, I am a novice and attempted to build the Endeavour by AL years ago - I ended up so frustrated with the cheap materials and very bad instructions, I scraped it. Now I’m 66, looking for a Gratifying hobby so thought I’d give it another go.
After reading many of the comments, I’ve narrowed my next model brand between Caldercraft or Occre. May I please have your experienced and expert opinions on which one to get? I’m interested in clear instructions and good quality.
thanks - Linda
Linda - I'm a relative novice too, especially compared to the many experienced contributors here on MSW. But what I have learned from MSW is that you get what you pay for in terms of model kits. My experience with Vanguard Models is that you get superb materials and a superb manual - and in addition, if you have a problem, you'll get help from the producer of the kits, Chris Watton, and his model builder James H, right here on MSW. This is also true of Syren models, whose producer Chuck Passaro is always here to provide advice and help, as well as being an inspirational leader of the ship modelling community.
Nipper
- mtaylor and Ryland Craze
-
2
-
I also struggled to get a good fit where the rails meet the crutches and the stern. Whatever I did, it didn't seem right and in the end I had a gap between one of the rail and the crutch. It was my first model and I didn't have your courage. Looking back, I should have removed some of my work and followed your example.
But now I see this sort of thing as part of the joy of the hobby - don't settle for a compromise, because the fun is in the making, not just the finished product. And if you know that the finished product has a flaw, it will always leap out at you!!
Nipper
- Thukydides, Dave_E and Obormotov
-
3
-
Jim
Sorry to hear that you're not feeling well and I hope that it clears up soon.
I'm also feeling guilty in hijacking your log to chat about 1/64 figures . . . perhaps I should have posted that in the VM pages.
Nipper
- thibaultron and mtaylor
-
2
-
10 minutes ago, chris watton said:
Wolfie Smith!
I love it!
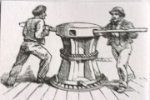
Chris - seriously! - have you thought about extending your 1/64 figures a bit further? At present the only ones available for the mid to late 18th century are the Amati 25mm ones, which I like apart from their fierce expressions. I really like to put crew on the models as it brings them to life, but there needs to be more variety. But not from the Tooting Popular Liberation Front.
Nipper
- mtaylor, Rik Thistle, jpalmer1970 and 4 others
-
5
-
 2
2
-
Bug
I've been browsing MSW for ideas on binnacles for my Sphinx - and yours is so helpful!
I've learned from MSW members (thanks to yourself, Blue Ensign, et al) that the binnacle on the Amazon is the most likely design to copy in order to match the Sphinx date of 1775, and your content here will enable me to do just that.
So thanks very much for providing this.
Nipper
-
3 hours ago, chris watton said:
He has done a fine job, as usual.
Pity about the sail set situation. I cannot release this kit until this problem is sorted, very frustrating. The Spanish made sails are now in the refuse bin, where they belong, and a hard lesson learned for me.
Chris
This is one of the issues with going it on your own - you have to accept the risks as well. I'm sure nearly everyone on MSW will agree that you are right to ditch the sails in order to maintain your high standards. It will pay off handsomely in the long run.
Nipper
- chris watton, hollowneck, Canute and 11 others
-
14
-
12 hours ago, chris watton said:
Well, as almost half of my total customer base is from the US, I must do something in the future to show my appreciation!
Chris
BobG's comment about American ships echoed a thought that was in my mind, about looking to the future in terms of what ships VM might be able to sell. I'm delighted to hear that Sphinx has been so successful - I remember how quickly your first batch of 50 odd disappeared off your shelves! Setting up business on your own and putting out an "expensive" kit like Sphinx were both a big risk, and your judgement has paid off because of the quality of your work and your deserved reputation.
But how to keep the momentum? I remember Patrick O'Brian saying in one of his few interviews that his publisher has persuaded him to write for the American market. As a result, O'Brian placed Jack Aubrey and Stephen Maturin into the war of 1812 and then sold thousands.
Nipper
- hollowneck, Canute, BobG and 5 others
-
8
-
9 hours ago, chris watton said:
It is all dependant on sales. If Indy is successful, then of course, I have quite a list of what I want to do. After Indy, there will be a couple of medium size kits developed (in size, between Speedy and Sphinx), plus Bristol.
Eventually the 'Flagship' is to be a First Rate, Royal George of 1756 - but again, all dependent on how things go, as this will be a two year development at least.
I do have a 38 earmarked, two, in fact (one is of Spanish origin) , but I will do a 36 (Phoebe Class) before then, as a 36 hasn't been done in kit form yet, as far as I know. I very nearly decided to go for the 36 before Indy, but the latter just pipped it at the post.
But right now, and for most of the rest of the year, I shall be concentrating on Indy.
Chris
I wish you every success with Indy and I'm really looking forward to what your next project will be. When I've finished my Sphinx - I'm anticipating another 18 months mininmum of pleasure before that event! - I'm thinking of doing one of your lovely little fishing boats, which will look so good alongside the bigger craft. And by that time we'll know what further treats are in store. Personally, I'd be delighted if you choose something from the mid-eighteenth century - this time was the epitome of beauty, in the lines of the frigates in particular.
Nipper
- Canute, hollowneck, thibaultron and 3 others
-
6
-
9 hours ago, Blue Ensign said:
Cheers Guys, thank you very much.
@ Glenn – I’ve picked up tips from many on MSW and the beauty of acrylics is that you can experiment a lot within a very short time.
@ Chuck - your Winnie build is my constant reference for detail. I can’t replicate the top-notch standard of your work, but because of it Sphinx is much enhanced.
@ Ron - I too will be adding the Billboard, bolster and lining, they appear on the Marshall painting.
I intend to add stump lower masts and Bowsprit, but they won’t be glued into place. The gammoning will probably be the only rigging on the model.
I am toying with the idea of leaving the masts as tall as the case cover will allow and maybe add the cheeks, front fish, and wooldings. I may also make up a full mast to include in the case as an example, but this all a long way ahead.
@ Mark – I don’t know about gold standard, but I do hope my efforts are of some use to other builders.
Regards,
B.E.
B.E. - re your last remark to Mark: "I do hope my efforts are of some use to other builders". Let me assure you that they definitely are!
We all learn so much from the contributors on MSW, but I have to thank you for the extensive effort you put in. When I found your build log on Alert last year, I learned so much, especially about the rigging and how to make it as realistic as possible, that the process and my finished product (Alert was my first build) was so much better. The joy was in doing the research, prompted by your log, and then working out how to apply this to my model.
Nipper
- Dave_E, Blue Ensign, hollowneck and 1 other
-
3
-
 1
1
-
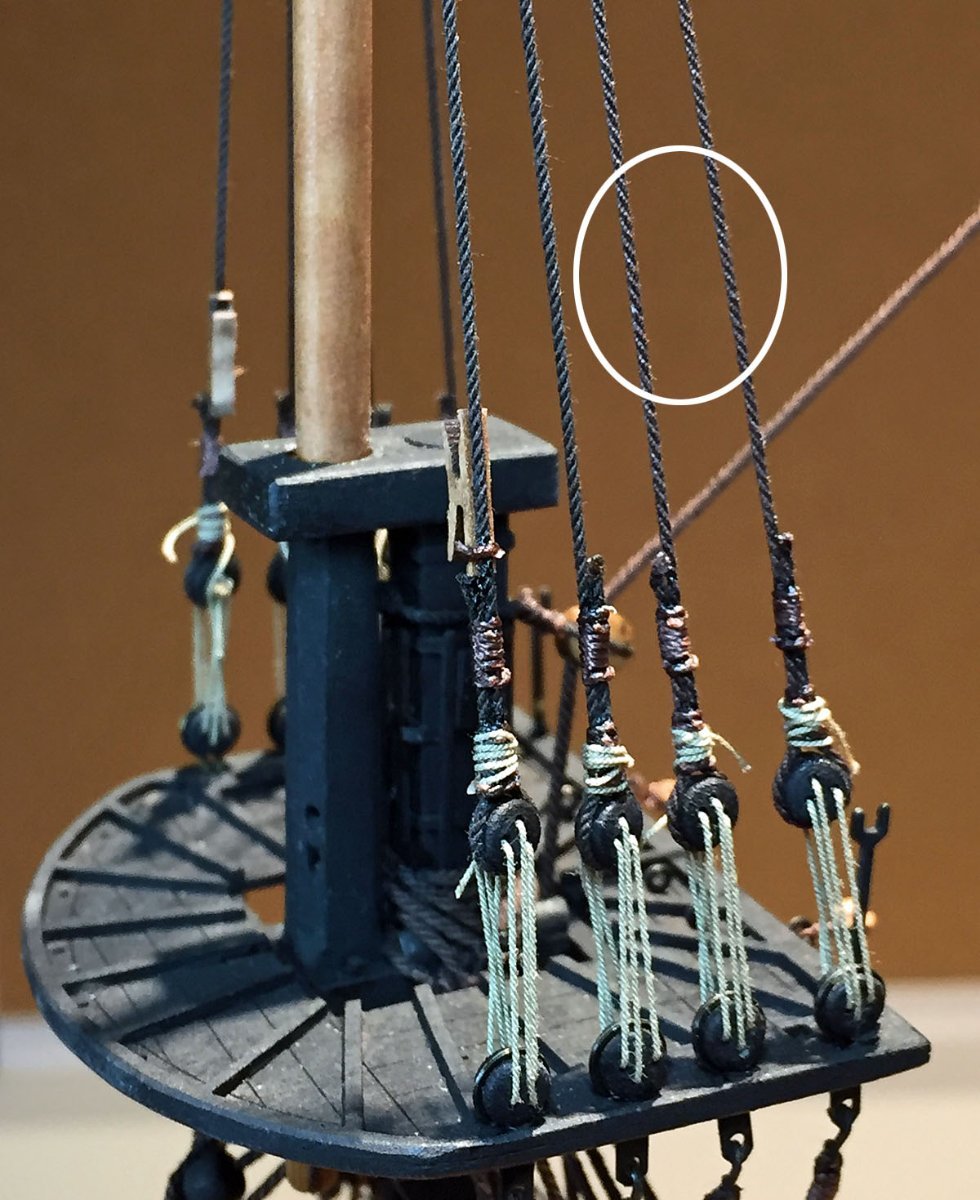
14 hours ago, hollowneck said:
A few more photos of HMS Camilla's rigging progress.

Rigging fixed. In my previous post I showed how I tried to cleverly remove some random glue from a rope with a handheld lighter; it torched the line, burnt it. Sacré Bleu! Non-reparable. So, I stripped-off the line that consists of two leads wrapped around the upper post head at the crosstrees and started over. I'll never do that again.

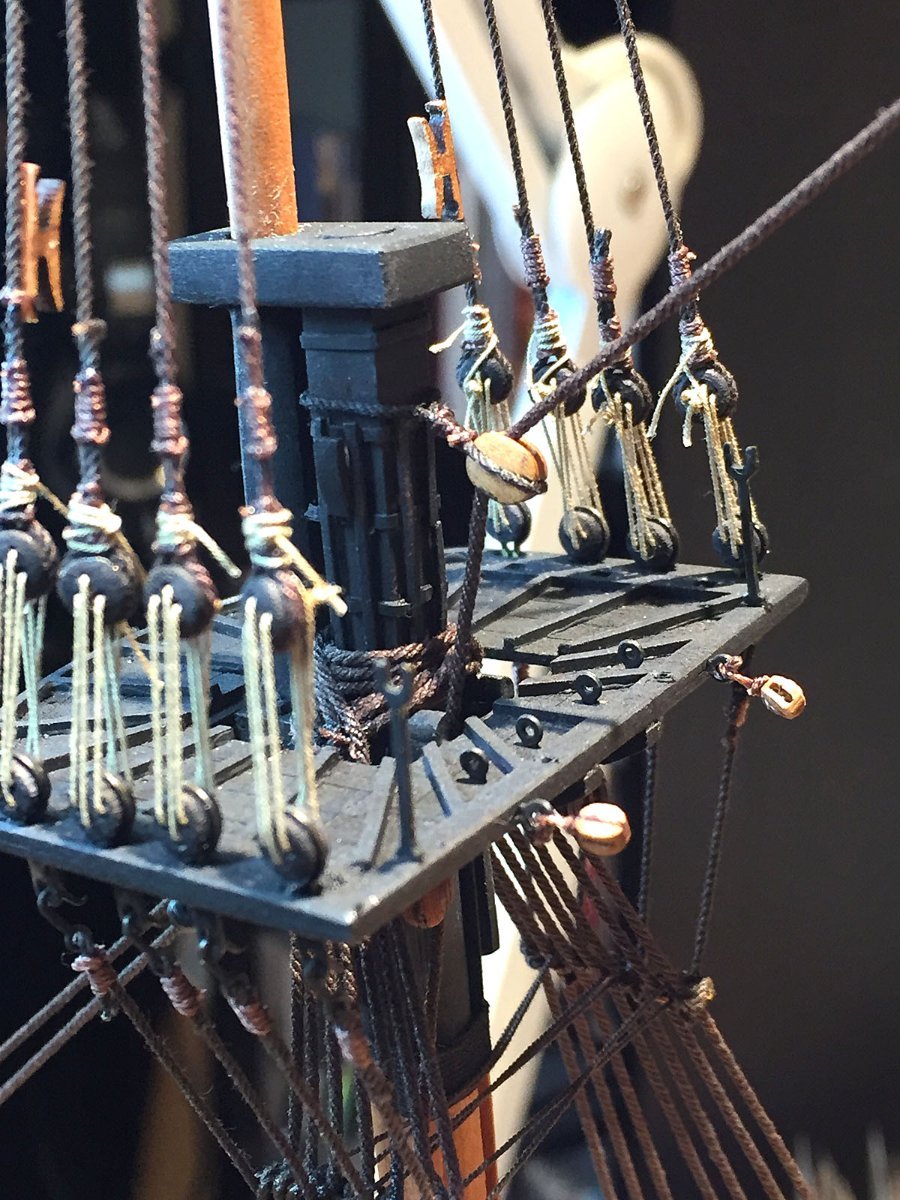
A lot to see in this photo of the foremast rigging. At the bottom of the photo, the catharpins are laced and tied to the intersection with the futtocks. The resulting tension created with this rigging step is quite critical to get right. All shroud lines on the foremast are now completed, upper and lower. The large single block holds the mainmast stay that descends to the base of the foremast. Setting each of these stay lines is a tricky business to achieve the right balance for line tension. With standing rigging, one needs to constantly double-check the alignment in three planes as well as insure that all the lines are taut- without skewing the angles of the mast components unnecessarily.
Another detail in this photo: I will mount the guardrail and remaining stanchions AFTER all the stays are run (including backstays). There are several lines that terminate to the small eyebolts at the aft area of this top. Mounting the guardrail (and its rope netting) too early makes attaching the subsequent rigging to the eyebolts very difficult.
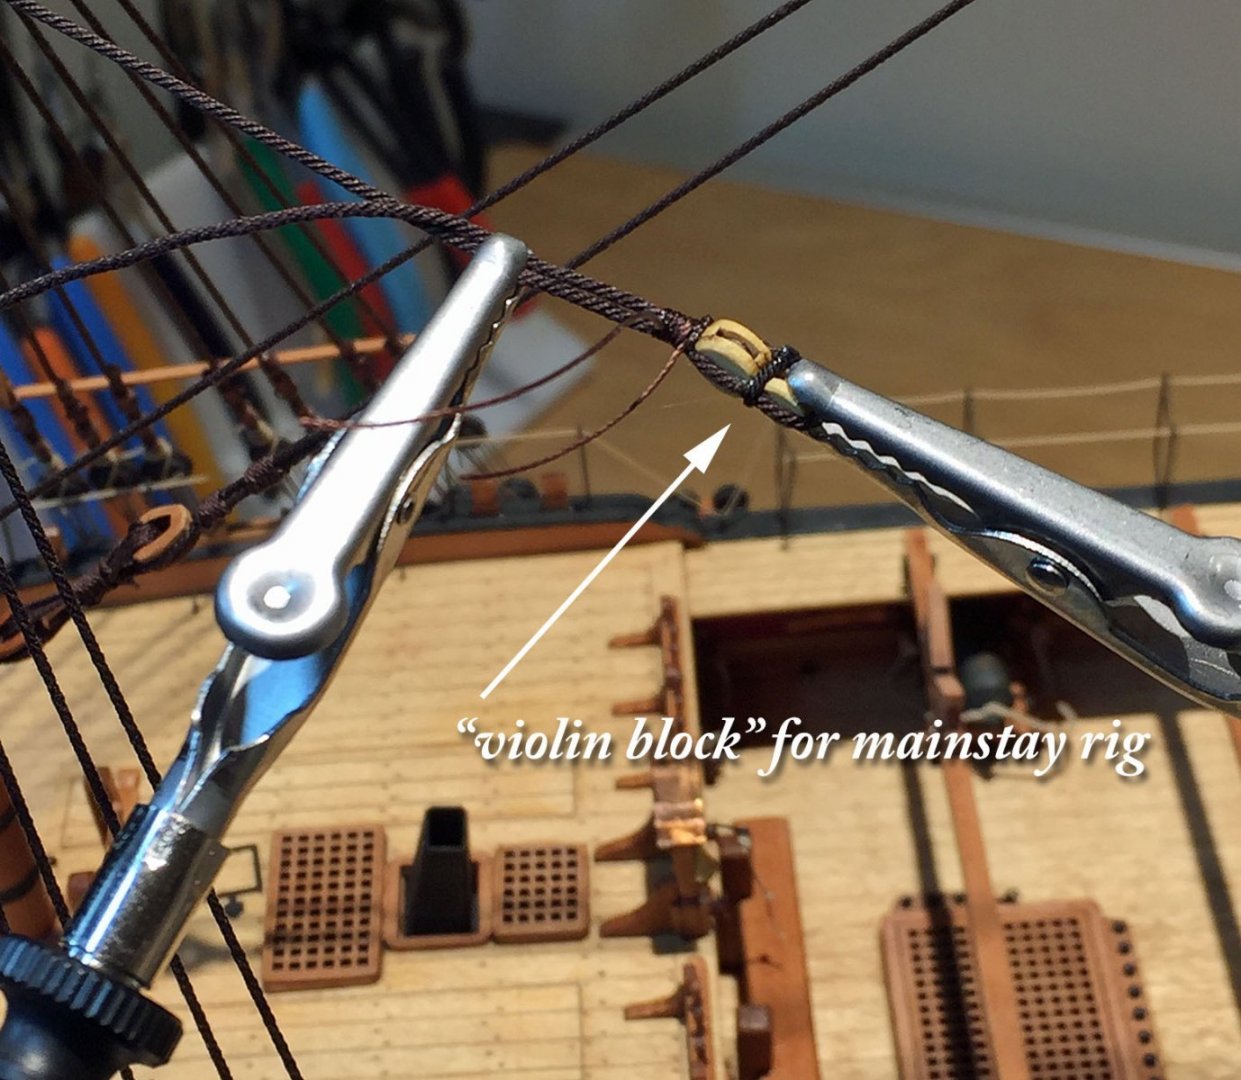
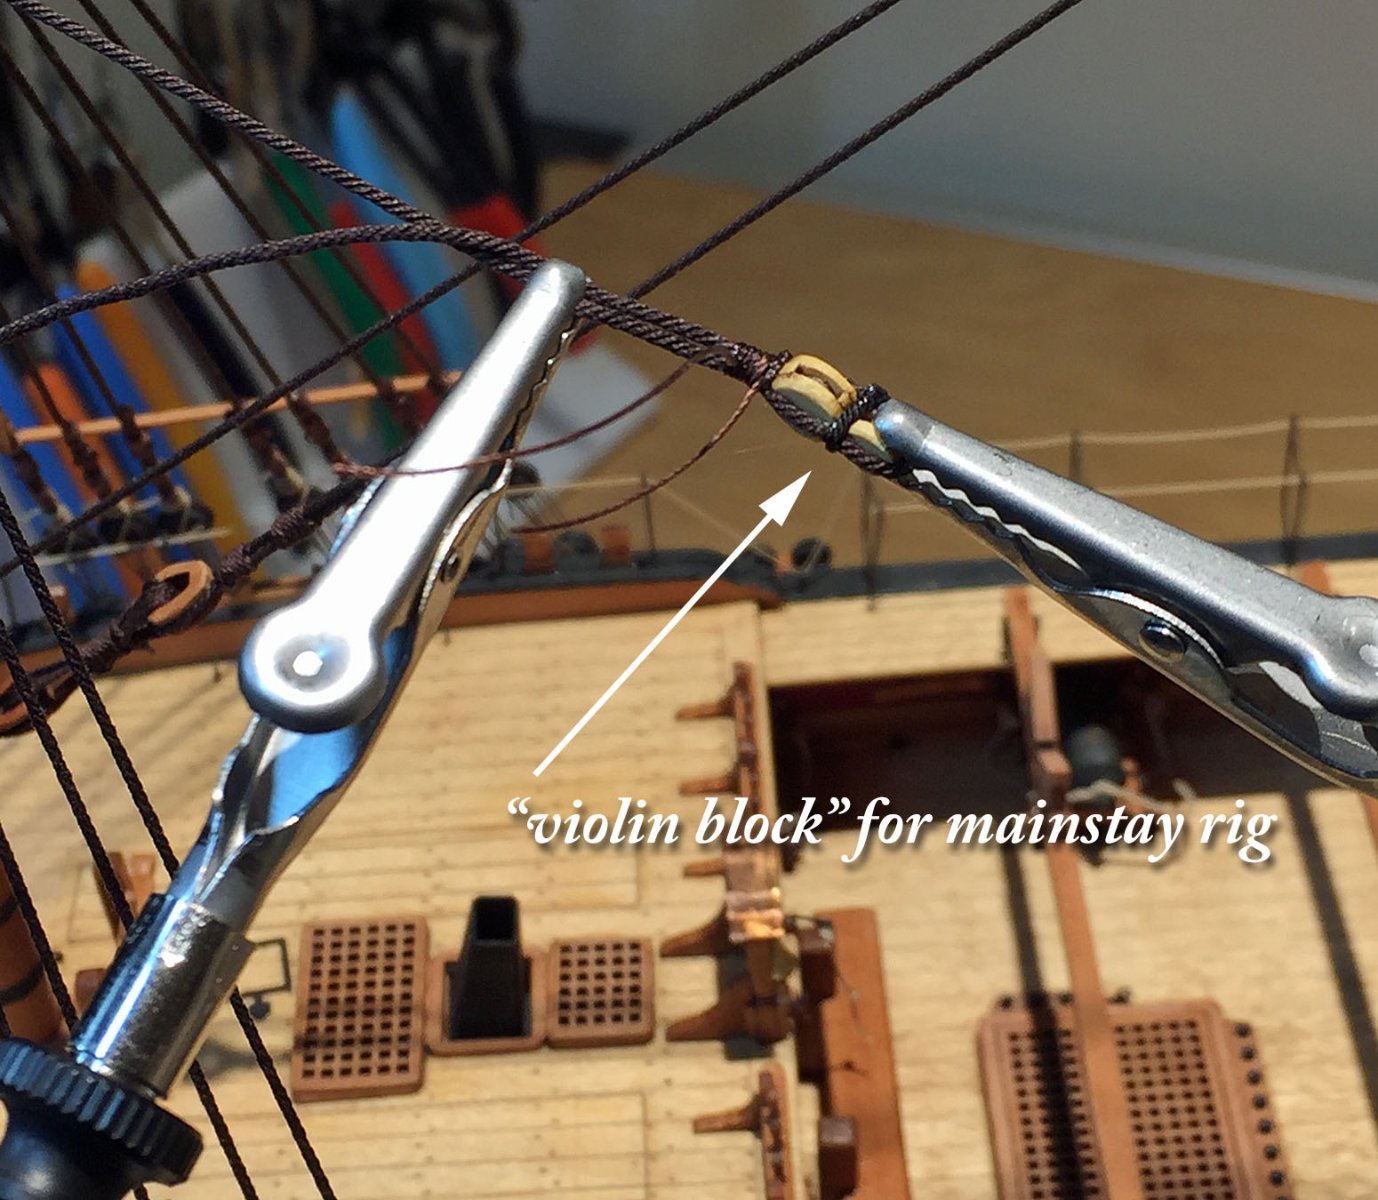
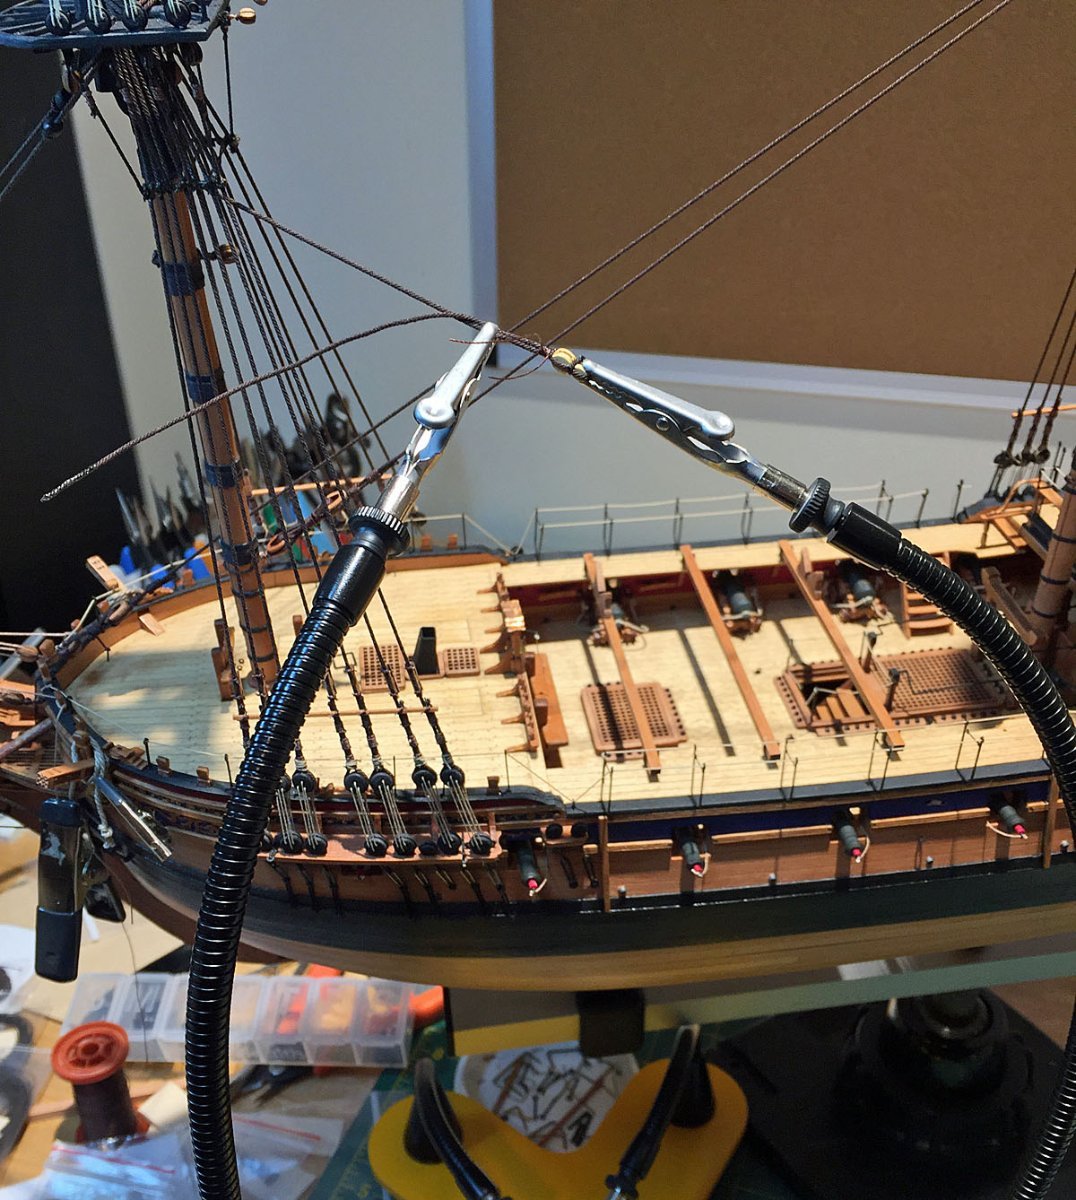
Tying-off the Mainstay violin block. These one-piece blocks are much easier to rig than attempting to tie two separate blocks together - particularly at this smaller scale. This detail is shown to illustrate the usefulness of the "QuadHands" tool for rigging. Here, two of the four flexible extension arms firmly hold the block and the rope in-place. The extensions reach almost 15 inches high from their base. This is very handy in many rigging spots. Here, this double block provides leverage to the lines secured at the base of the foremast; the rig is designed to tighten the mainstay line that runs upward through a large block at the tophead and then across to the main mast. The same rigging set-up will also apply to the adjacent Mainmast Preventer stay to the opposite side of the foremast.
There are many different approaches to rigging processes by age-of-sail modelers and all of them are correct - as long as the result is neat and accurate - with all lines appropriately taut (or not). This consideration is very important when one adds sails to their model. Assuming a model's sails are mounted as "working sails," some running lines will be very taut, others, not.
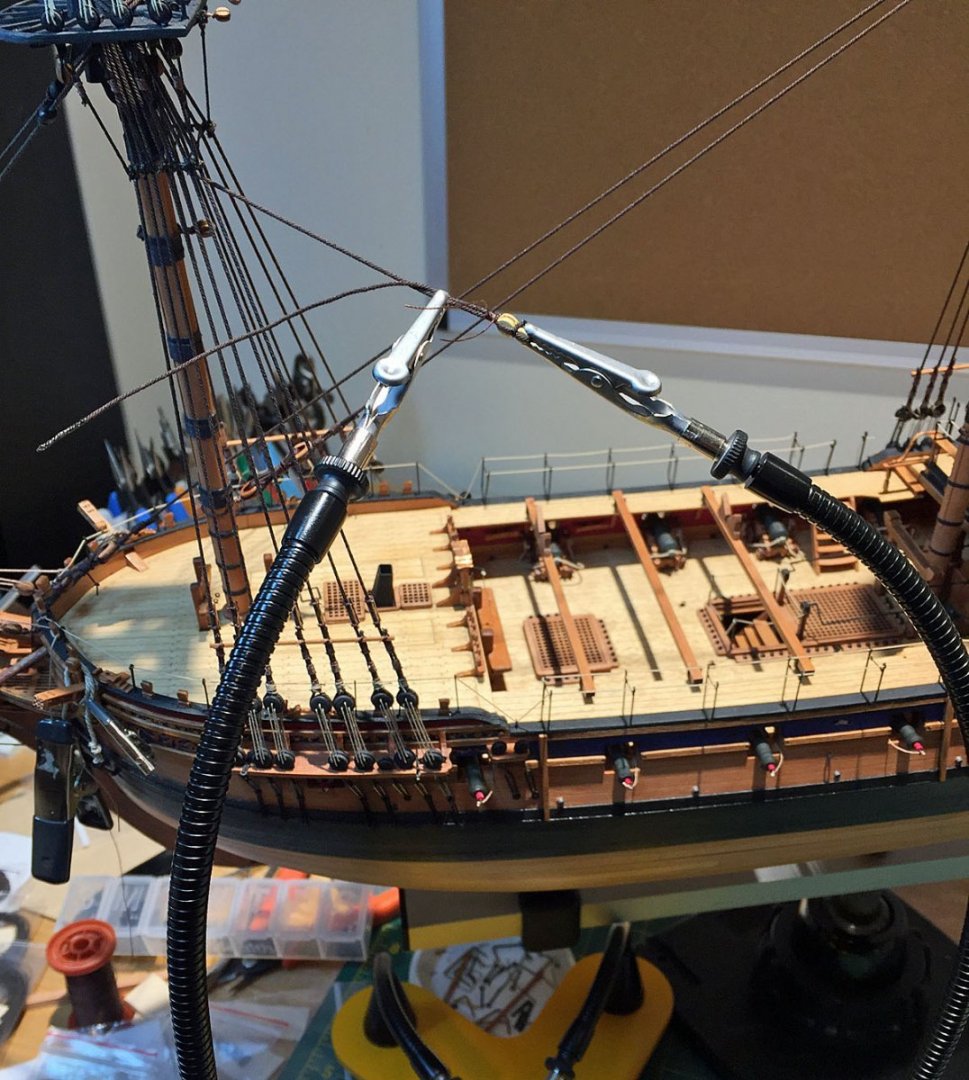
Another photo showing the utility of the QuadHands jig. Pretty self-explanatory. In the bottom left corner, a spool of my Coats & Clark dark brown upholstery thread. I use this thread extensively for tying-off blocks and lashing lines. It is a polyester thread and not likely to come undone once secured. I've used this thread for all my models and so far (knock...knock...), so good: no loosened or unwound rigging lines- yet.
Ron
What thickness is the upholstery thread that you are using? I'm using some fly-tying thread for my model but it's too fine and difficult to handle. Presumably you have other colours for e.g. running rigging?
Nipper
-
Tom
I've just returned to your build log after a few months when I read the interesting discussion at the very beginning about Geoff Hunt's imaginative depiction of Sophie's stern. You've done a brilliant job of modifying Speedy, and I appreciate how satisfying it must be to be so creative. And for sticking to your guns when some members hinted that perhaps this project was not doable.
It was O'Brian's books that got me into ship modelling (way back in the 70s for me), only it's only since lockdown that I've been able to find the time to focus on the hobby. My ambition way back then was to build Surprise, as did so many lovers of the novels, and maybe one day I'll follow your example to do just that.
Keep up the good work and the fascinating log!
Nipper
- mtaylor, Keith Black and Cathead
-
3
-
BE - you know are going to replace those hooded planks! So do we!
Your attention to detail and your never being satisfied are an inspiration. It is always with a heavy heart that we remove parts of our careful work that we have spent ages preparing, but replacing them with some better is always the best option. Otherwise it will always come back to spoil our satisfaction at a job supposedly well done.
This is something I have learned from reading your build logs, and as someone once wrote - "the journey is more important than the destination".
Nipper
- Blue Ensign, mtaylor, dunnock and 1 other
-
4
-
22 minutes ago, glennard2523 said:
It is strange. When the two parts of the platform were glue together I clamped the entiire platfirm flat. This then allowed me time to build the crosstress and check the mast bibs. After a couple of hours I released the platform from the clamps and noted it was flat. I added the crosstree frame work and glued everything in place. Finally I added the banding and mast battens. I can only assume this was due to moisture engress when wiping away the excess glue, which resulted in the warping whilst I took an hour away from the shipyard to cook and eat lunch (poached salmon fillet with red and yellow peppers, red onions, cherry tomatos, mushrooms, cucumber and french fries.
Glenn
That was some lunch! How close is the shipyard to the galley? Could it have been steam from the stir-fry that got to the mizzen top?
Seriously, clamping in situ sounds like a sensible move, rather than taking it all apart first.
Nipper
-
-
Looking at your lovely build, and especially the wonderful close-up of the heads, led me to follow a line of thought about the seats of ease (yes I know I can be accused of an unhealthy interest!). I wondered about how precarious it would be for a sailor to perch on one of those in a strong wind and with waves breaking over the bows. There must have been something to hold onto - perhaps a rail or at least some ropes somewhere. I looked up Lavery's "Arming and Fitting . . . ", where he has a section on heads and ablutions generally. He remarks on the exposed nature of the heads, especaily on a small ship, but the only suggestion of a device to improve safety is a design for a seat of ease shaped like a throne with arm rests. Could this be where the English slang term for a toilet - the "throne" - came from?!
Nipper
-
Hello Glomar
I'm a relative newbie but I've done the fairing on two boats now. I understand your fear! My advice (based on what so many excellent people on MSW have said in the past) is just to take it slowly and be patient. Use your eye to judge what the line should be to enable the bulkheads to sit comfortably. and check regularly with a full length plank. Hold the plank along the bulkheads (using clamps helps with this) and look to see the extent to which each bulkhead is at the right angle for the plank. Do this all the way down from top to keel. Use a pencil to mark where bulkheads need more fairing.
You won't ruin your boat if you take it carefully. Look on it as a challenge, and imagine how delighted you are going to be when you've achieved it, as you surely will!
Nipper
-
-
Hello Grey
You've been quiet for a while and of course you may be busy with all sorts of other things rather than Nisha, but I want to check in to ask how you are and how it's going.
I've hit a sort of psychological barrier on my Sphinx at the moment - first planking! - and I know I'm inventing all sorts of diversionary tactics to delay the moment, like designing some period furniture to go in the great cabin (great fun of course, but there won't be a great cabin until I do the planking!).
But today I'm going to get back to the planking - it'll be tricky but if this hobby didn't provide challenges, it wouldn't really be satisfying,
Nipper
-
12 hours ago, tomganc said:
Hello, sorry I have missed your comment
")
Thank you for kind words and I'm glad you like my build. I have some pics to upload as I have done quite big progress since this post.
To reply to your question I had black netting supplied in the kit but it was black, and as you know the real Victory has white netting. I had a little reseatch and I went into Etsy to get this (https://www.etsy.com/uk/listing/965753581/ivory-off-white-extra-soft-italian-tulle?click_key=49482354e64f9a5323afe1180f9292d156ef17b9%3A965753581&click_sum=faebdaba&ga_order=most_relevant&ga_search_type=all&ga_view_type=gallery&ga_search_query=tulle&ref=sr_gallery-1-4&organic_search_click=1&frs=1&pop=1)
I had to stain it a little as white was just too white
I hope it helped.
RegardsTom
Tom - many thanks for this. I will use your idea when I come to make the hammock netting for my Sphinx, if that's OK.
Like you, I searched the internet for a suitable material when I wanted to make the sails on my Alert, and found some voile in a lovely off-white/buff colour. This is much more finely woven than tulle, but still a little too open when looked at really closely. But it responded well to furling and I'm pleased with the result.
Lovely pictures above - welldone!
-
Hello Tom - I've just come into your log and I have had a wonderful time reading through and looking at your ideas and methods. What a fascinating build and I'm really impressed at what you're doing at such a small scale.
One question - I may have missed this elsewhere in your log, so apologies if I have: what did you use for the hammock netting? What you have there looks very good for 1/84.
Nipper
-
I found the same problem when 2nd planking my Alert. It was a struggle to stop the CA from getting where it wasn't wanted. I tried using the tip of a needle to place small drops or smears of CA exactly where I wanted it to go and this worked well. Certainly better than those long plastic nozzles that you can buy.
The main problem was in not shaping the plank accurately enough. I think you've said above that you've read the many guidelines on this here on MSW - so it's careful cutting, lots of dry fitting until you're certain the shape and bend of the plank is right, and that made it a lot easier.
It's a long process, but as you say, make the challenge part of the fun!
- Thukydides and Grey
-
1
-
1
-
That looks amazing B.E.! The combination of colours on the friezework looks so realistic - much more so than gold or simple yellow ochre. When I first looked at one of the full hull photos above I thought at first you had put in a photo of the Marshall painting!
It may have been several days work, but so wothwhile.
- mtaylor and Blue Ensign
-
1
-
1
Chris Watton and Vanguard Models news and updates
in Traders, Dealers, Buying or Selling anything? - Discuss New Products and Ship Model Goodies here as well!!
Posted
Glad you have recovered Chris, and I trust that you won't have any long term effects.
That's great news about the new figures! I know that you personally prefer not to have figures on models, but for those of us who do, there is a shortage of quality 1/64 figures for the late 18th century period. So I am really pleased that you are continuing to expand your range. and I'm also delighted that after tempting us with the cabin furniture, these are now going into production!
Nipper