rtropp
-
Posts
936 -
Joined
-
Last visited
Content Type
Profiles
Forums
Gallery
Events
Everything posted by rtropp
-
I checked all the scales against each other. I made sure that all pdf's were printed at same 100%. Could have been that the last few frames from the basswood I milled was a little off. Having said that, I did something wrong and will do a lot more inspection and spend more time with dry fitting. This first go around was a familiarization and testing effort and I used basswood so no great loss. The next build should be better. I will post and we will see. For now, I have to mill some Boxwood and Swiss Pear to get started. Thanks Richard
-
Thanks all, Wonder why they changed the name... my copy "English..." is published in US by naval press. So the original must have been "Sailing..." Perhaps the Naval Press wanted to be more specific about the nationality of the ships discussed. Oh well, at least I won't have two of them. Richard
-
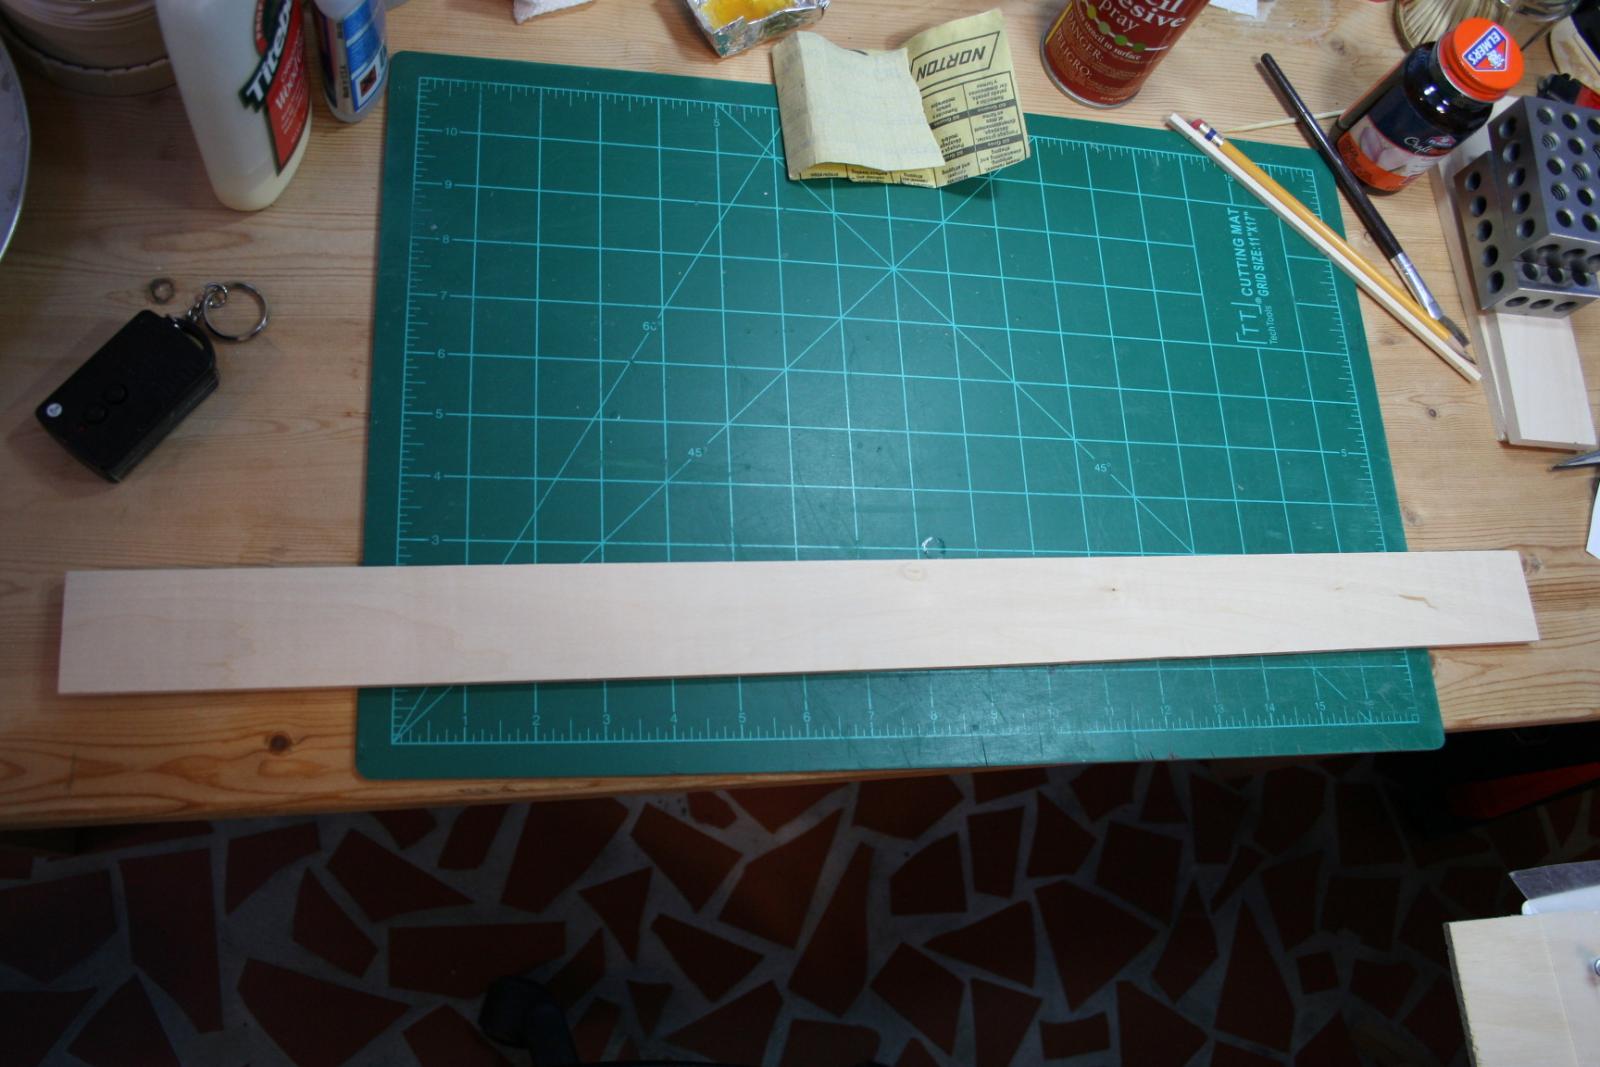
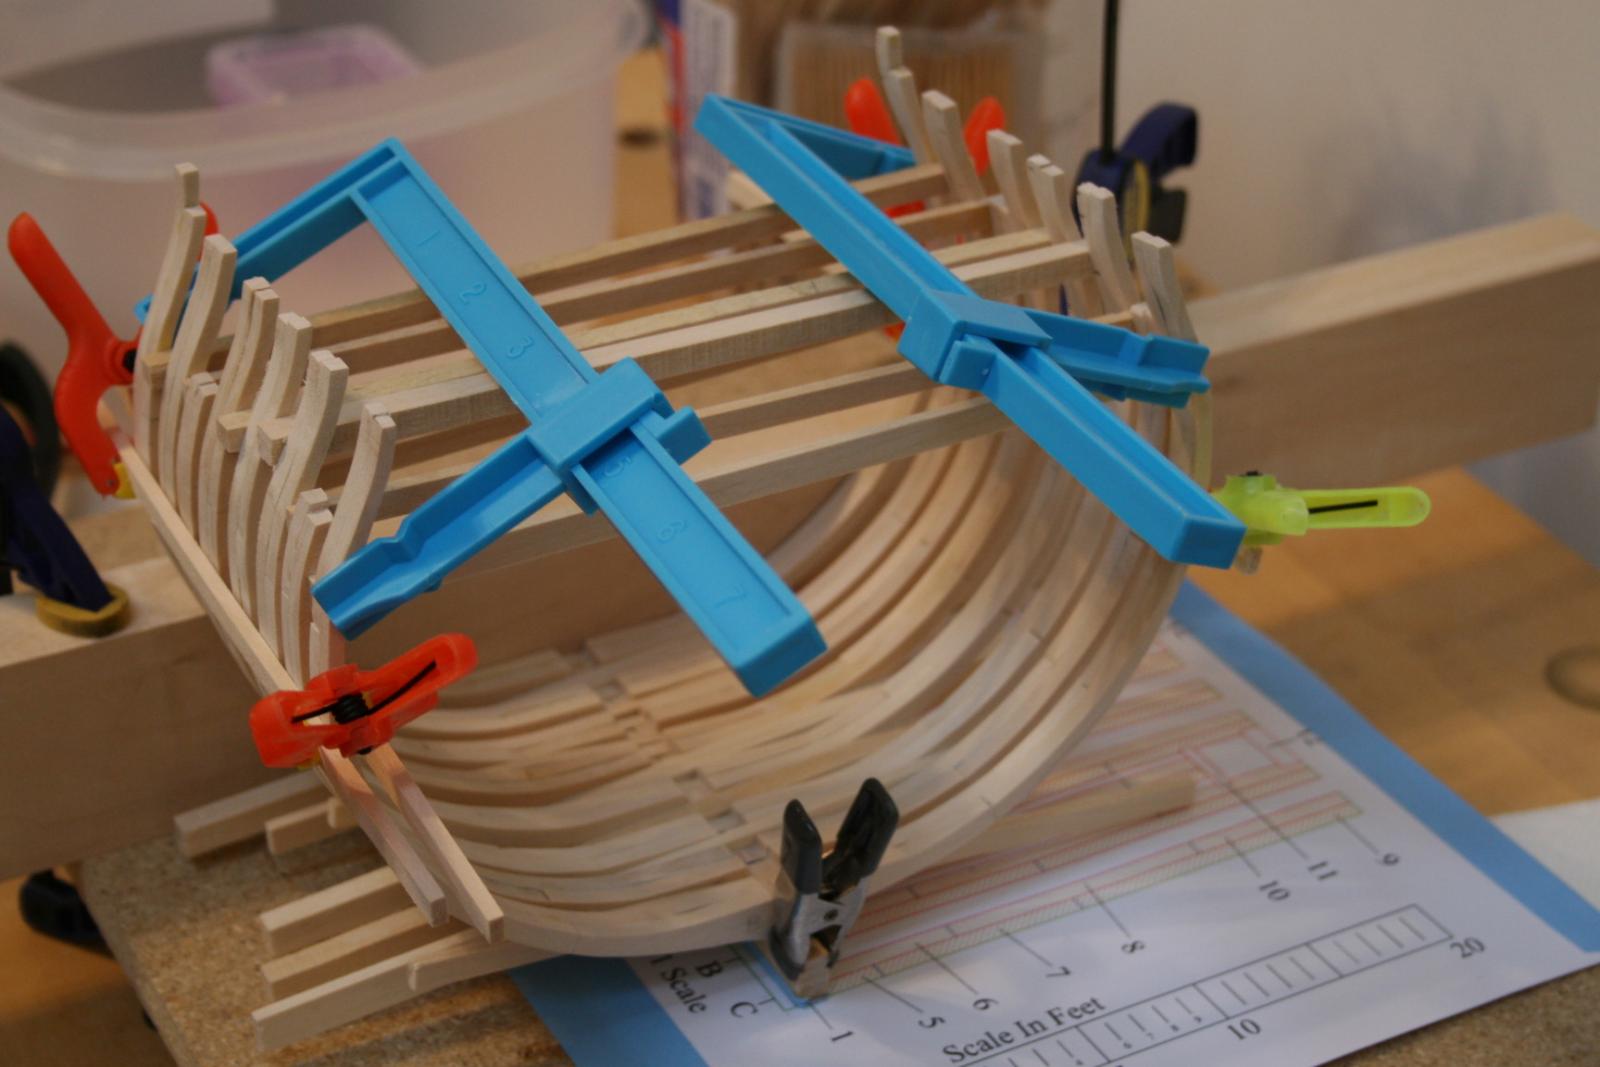
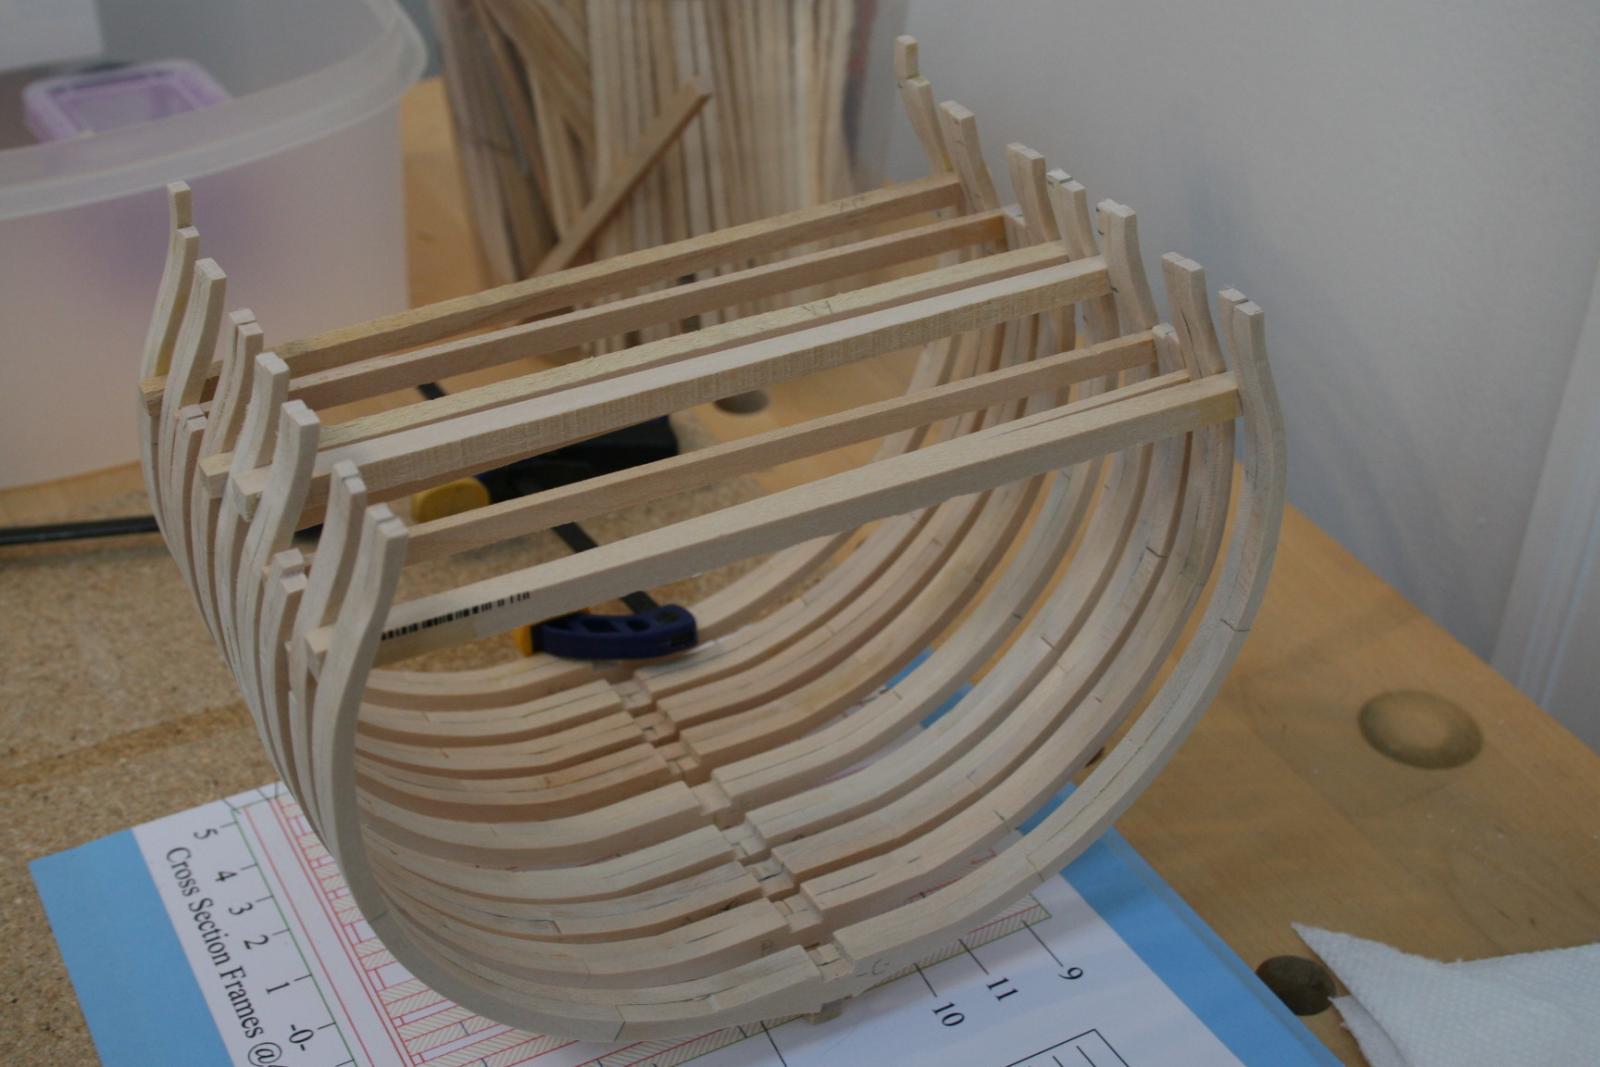
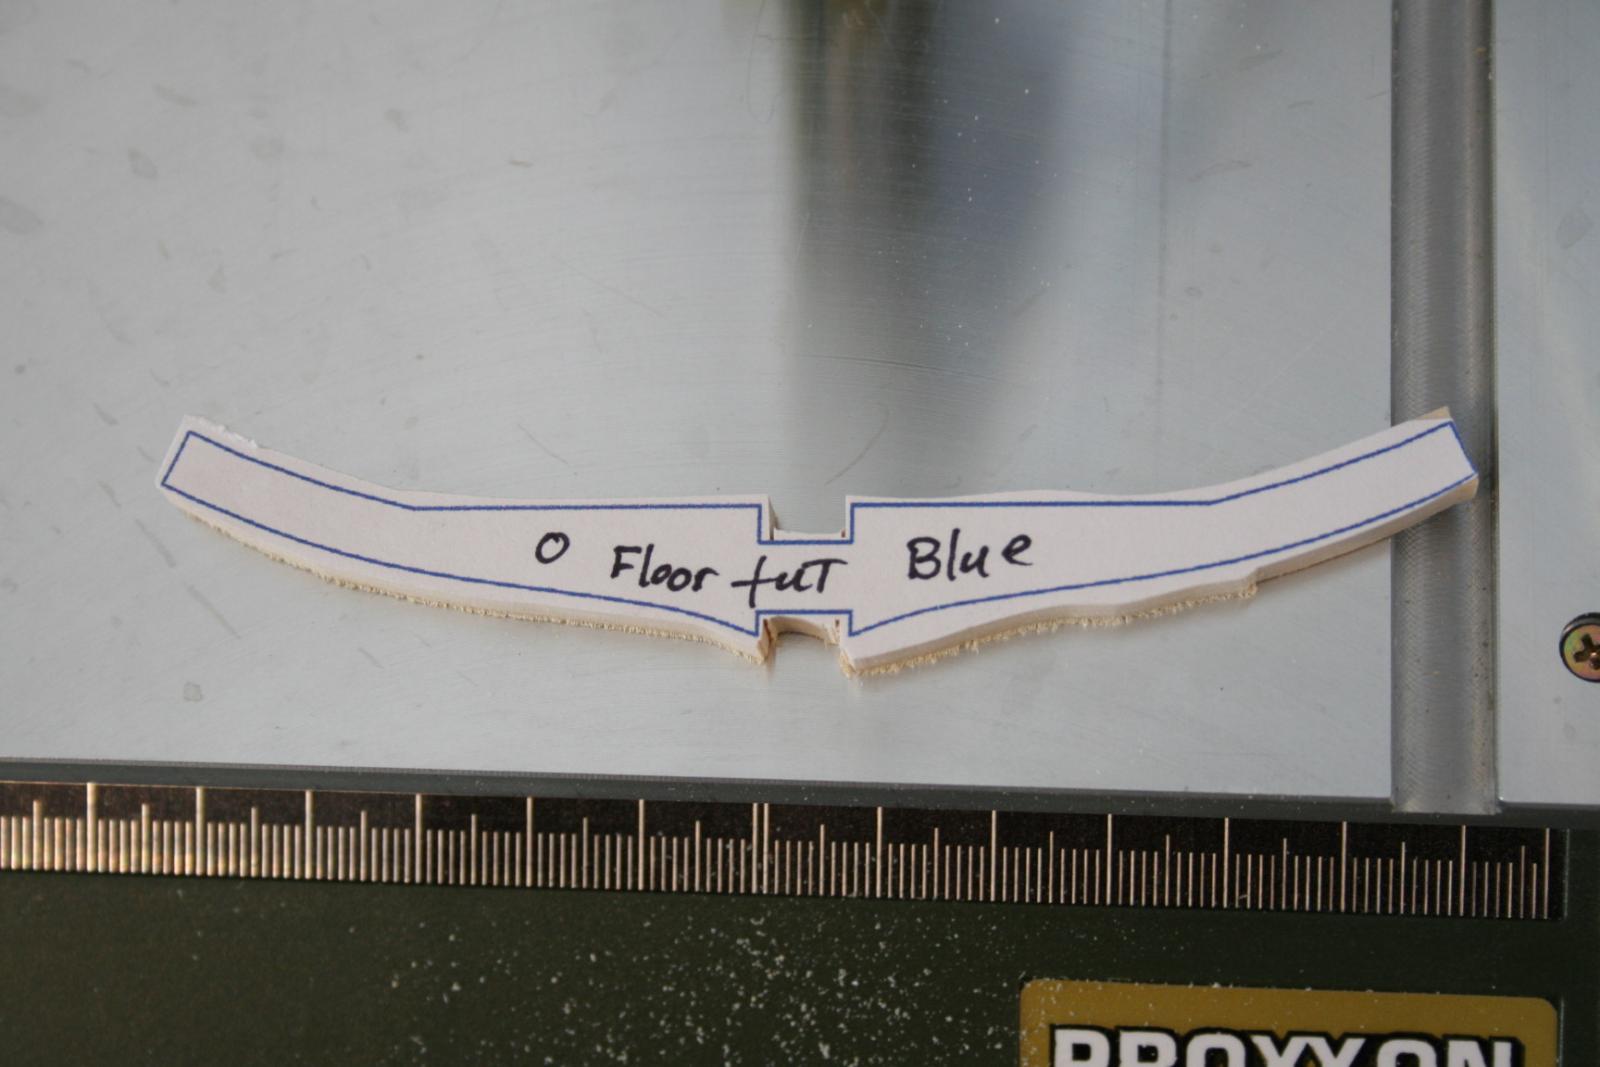
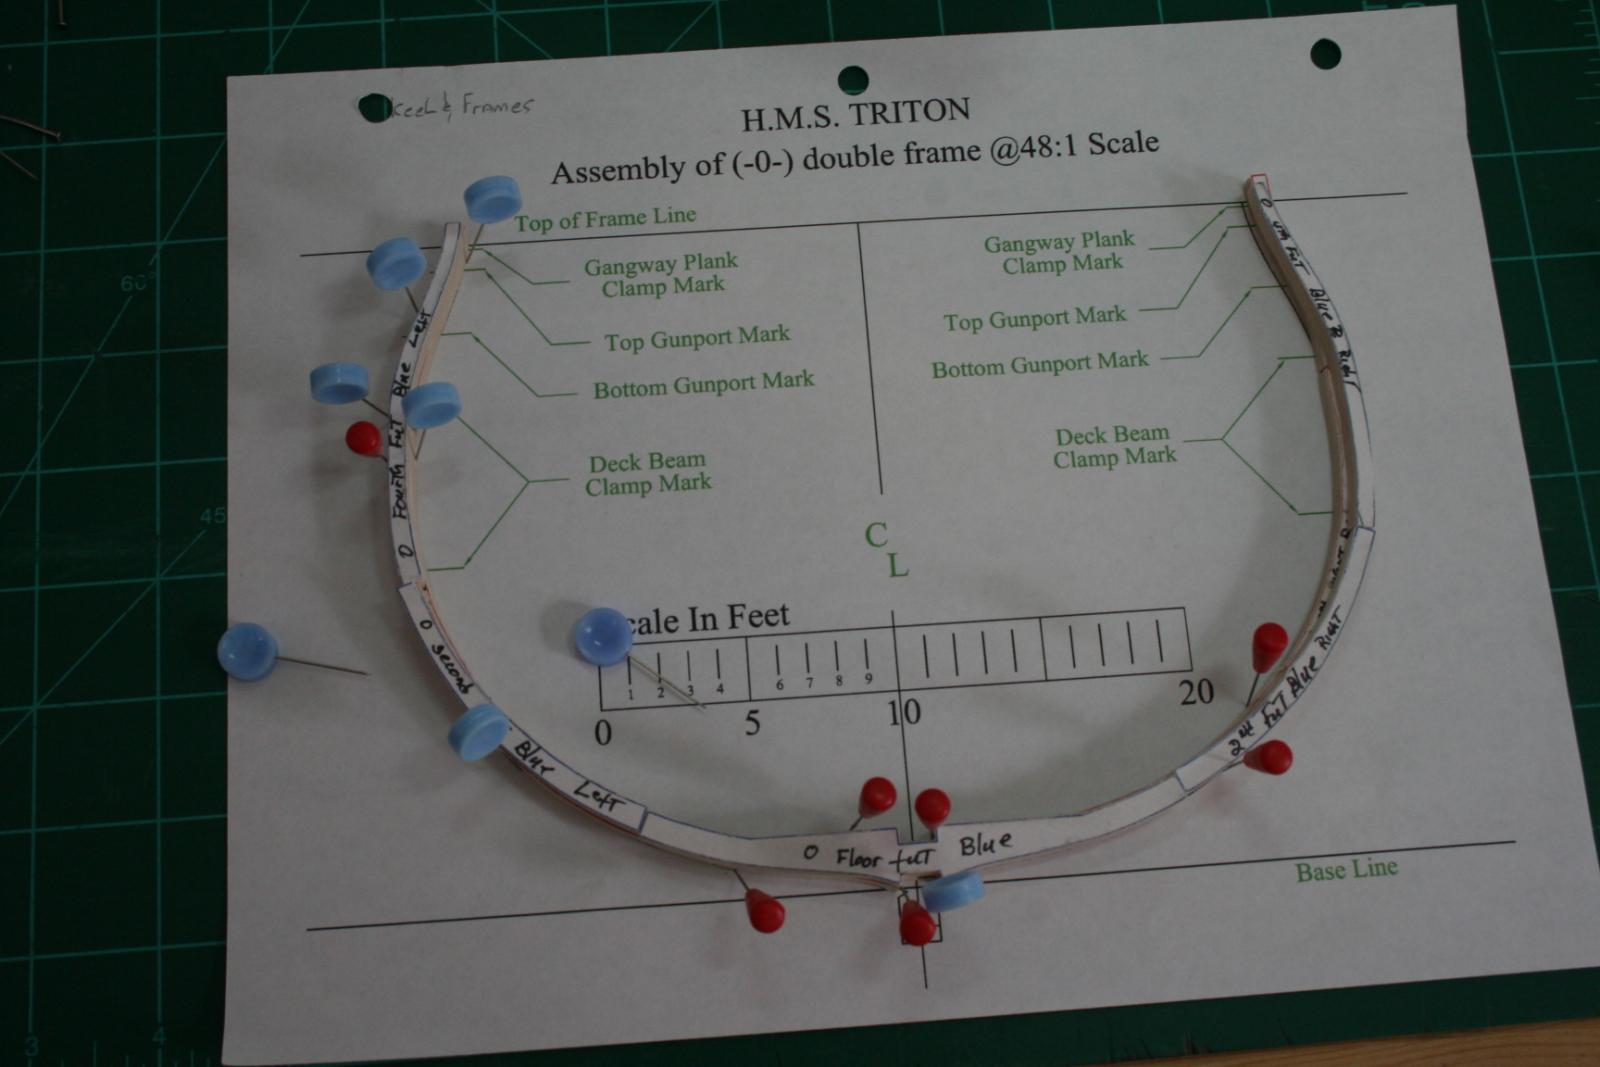
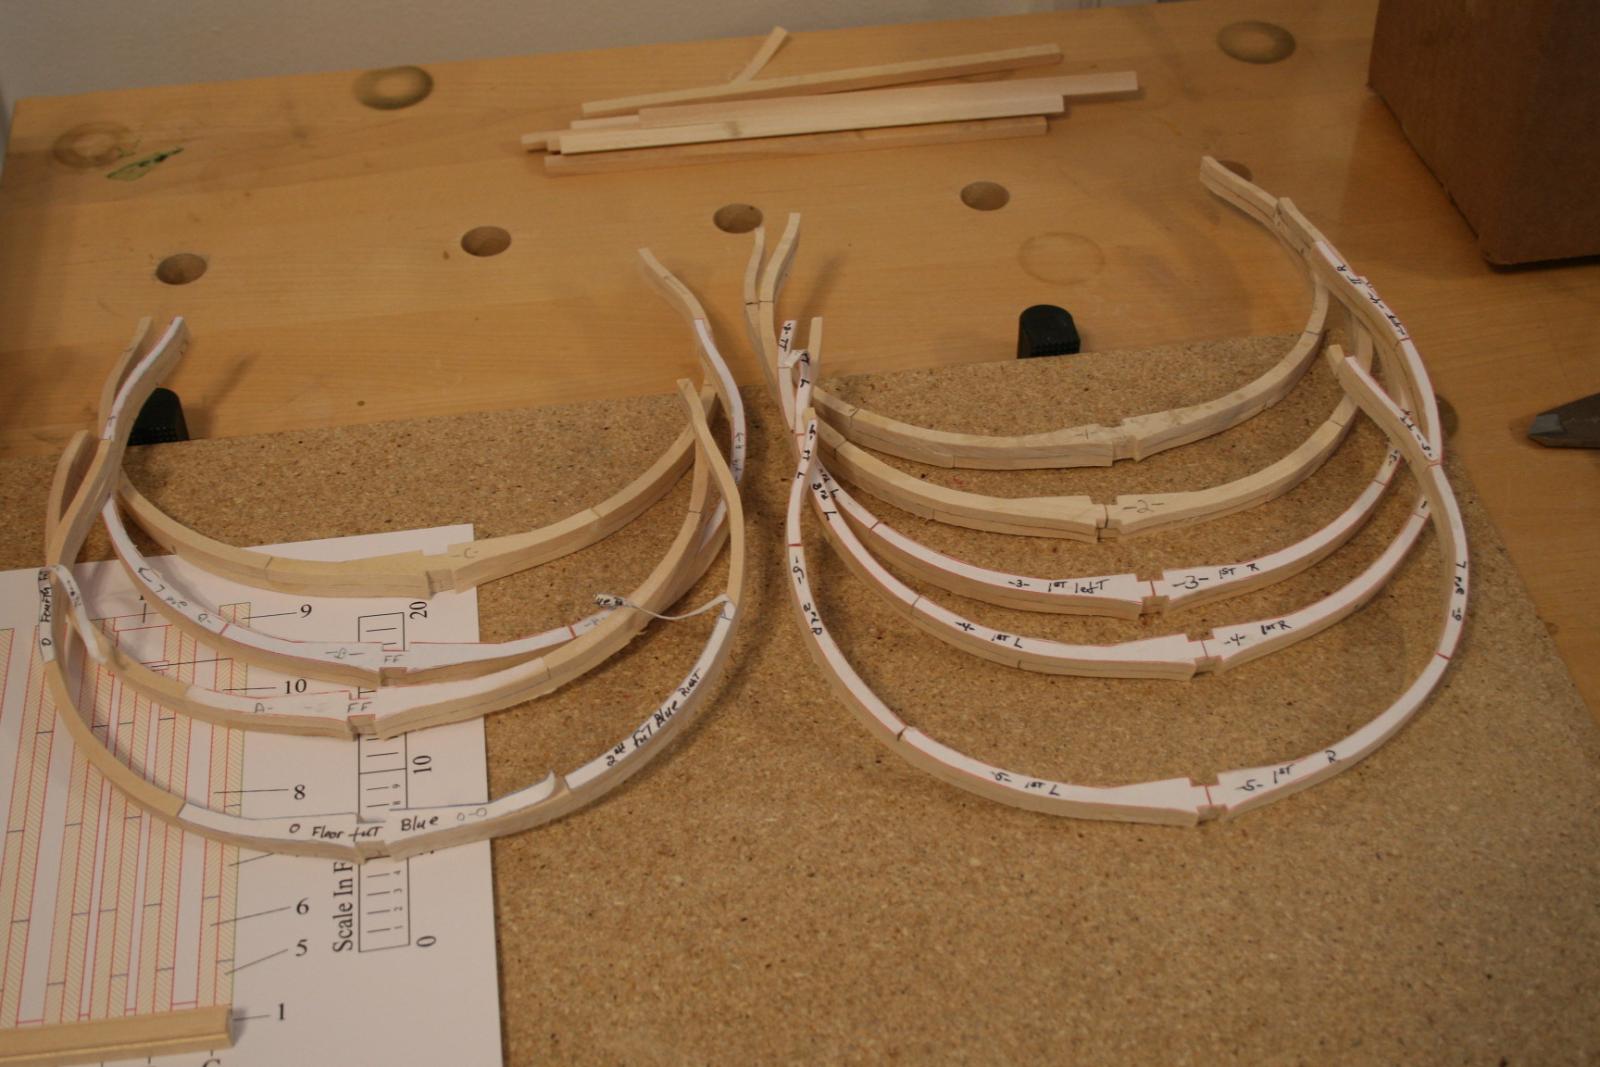
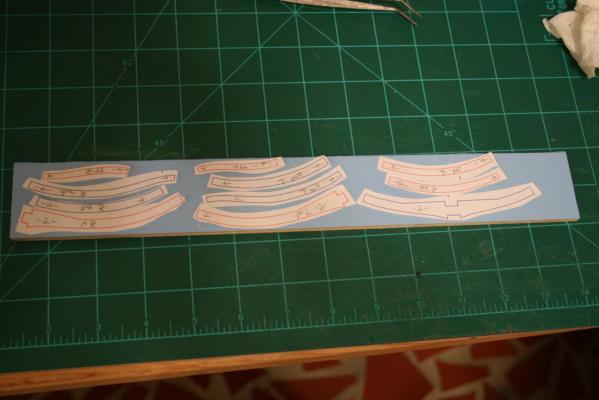
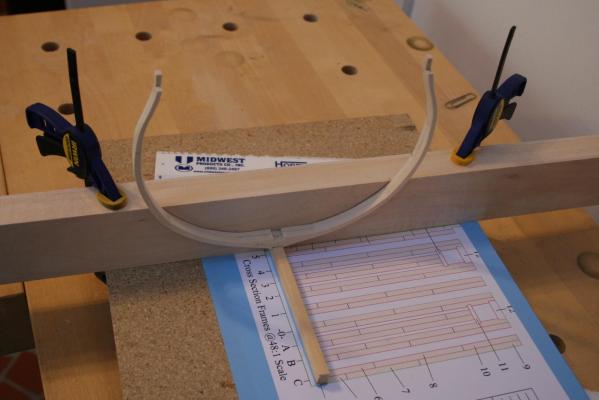
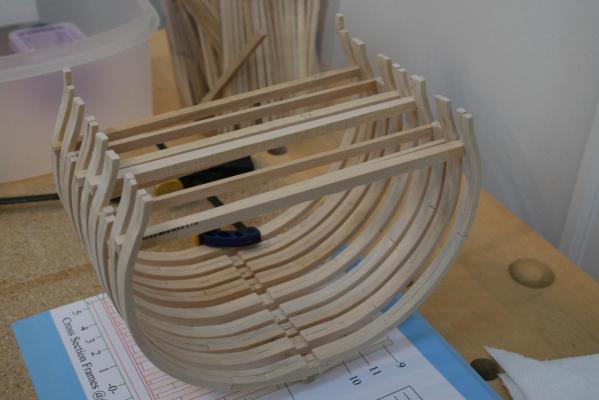
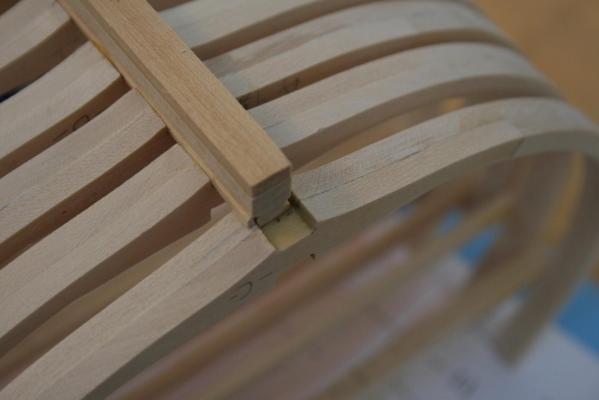
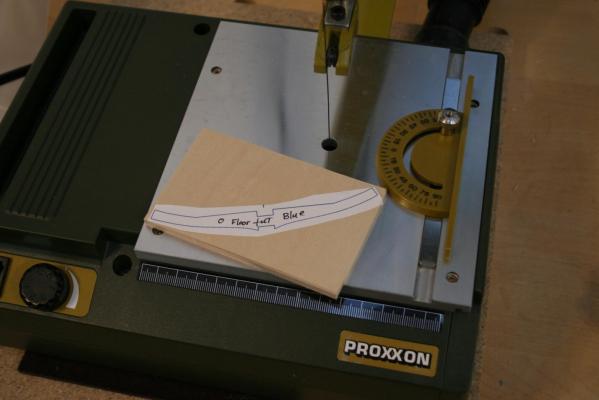
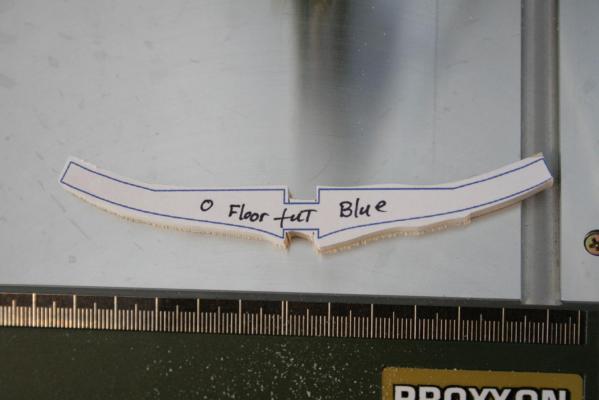
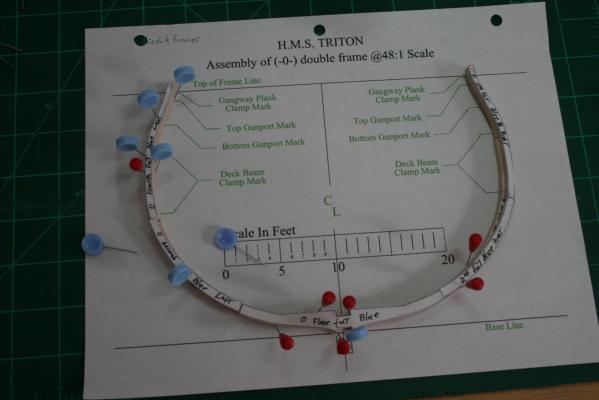
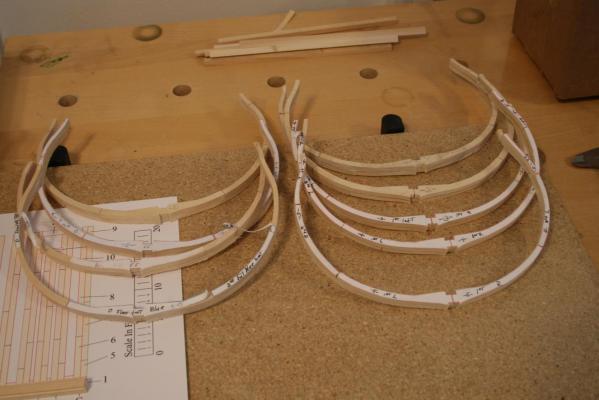
Its a couple of weeks later and there is good news and bad. Good - I liked the way the frames turned out. Bad - The frames ran past the end of the keel segment. Lesson learned - Dry fit wherever possible. Just because the parts measure up, doesn't guarantee the whole will fit. I could take it apart and reuse the pieces, or just add a small piece of keel, but decided to start over. I think I would do a better job and wanted to try it in boxwood and pear which I have not used before. I received some rough planks and will use the Byrnes saw and Thickness Planer to mill them to size. It went pretty well with the basswood and I would like to see the difference in working boxwood and pear. I like the idea of being able to mill my own materials. It provides a great deal of flexibility and creates more of a scratch built feeling. Anyway, attached are the pictures the final basswood plank after milling from larger piece. This is different from the ones posted above as I used the planks milled from the rough cut basswood for the last few frames. This is the set up for cutting. Thanks to MTaylor for hint about using low tack tape on the wood then gluing template. It worked like a charm with the the templates peeling off the cut pieces without a hitch. After cutting and creating all frames began build: Received these Excel clamps (in blue.) They helped a lot. and so it ended up looking pretty good: Oops: As you can see, the final frame ran past the end of the keel. I learned much and will see if I can apply it by starting over, this time with boxwood and pear. Richard

-
Thanks Wayne and Druxey, I have the English Man of War and think its pretty good. That is why I am interested in finding out more about Sailing Man of War. As I mentioned, the slip covers are the same so wondered if Sailing was basically a reprint under a new title. Richard
-
Hi Druxey, I double checked both, looking at the Covers in their listings. One is: The Construction and Fitting of the Sailing Man of War 1650-1850. The other is: The Construction and Fitting of the English Man of War 1650-1850 Both by Peter Goodwin. It just has me wondering. Richard
-
Can anyone tell me what differences there are between Goodwin's Sailing Man of War and the Construction and Fitting of English Man of War. Both cover the same periods, One is English Man of War, the other "Sailing". The covers seem identical. Is one better than the other for the ship modeller. Are both helpful or would one repeat much of the other? Appreciate the help Richard
-
Can i live without a BYRNES TABLE SAW
rtropp replied to shihawk's topic in Modeling tools and Workshop Equipment
I guess I run counter to the majority opinion. I have the Byrnes Saw and did not go overboard buying extras for the saw. I did get the extended rip fence and a few zero clearance inserts to match the various blades used, but I consider those part of every day operation. I had decided to wait until I had a need, and skills, before spending a couple hundred dollars on the rest of it. So far the need has not come up as so far I have other tools that fill in, i.e., micrometer, brass spacers, etc. So instead I used the money to buy the Byrnes thickness sander which has already gotten a fair amount of use. Richard -
Danny, thanks for the info and wishing you a happy new year. Richard
-
Can i live without a BYRNES TABLE SAW
rtropp replied to shihawk's topic in Modeling tools and Workshop Equipment
Mark, I agree that the shop vac is the most important, most used, power tool in my shop. I have a remote wireless switch in my pocket and move the hose from tool to tool as I use them. I have rigged all my power tools to fit the hose. I also have one of those car cleaning attachments for the hose and use it when cutting or sanding by hand at my workbench. A pair of noise cancelling headphones from my air travel days does a great job of cutting the noise for me while using the vac and tools. I tend not to listen to music while on power tools, for me too distracting, but the head phones still cut a lot of the noise. My shop is in the sunroom and, luckily, it is on the opposite side of the house from the bedroom, so the noise does not travel. My wife is nice enough to have agreed for to me converting the sunroom to a shop so I want to make sure she does not regret it because of dust. So far, no complaints. Richard -
Can i live without a BYRNES TABLE SAW
rtropp replied to shihawk's topic in Modeling tools and Workshop Equipment
Shihawk I have all the tools you mentioned except for the bandsaw. For me, I am only considering a band saw if i decide I need it to rip down large planks. Others prefer the band saw saying it does everything a scroll saw does and more. I find it easier to control the scroll saw for cutting out parts. At first, You might want to exchange one of those for a drill press or stand for the hand rotary cutter in order to better contol angles and placement of small holes. Also I made a sander attachment that uses larger sanding drums and is great for sanding inside curves. Part of the modeling fun for me is learning how to use tools. I am spending a lot of time learning how to use them which is actually slowing down my build. But, that is just me. After all, if I dont like a tool there is always ebay. Either way just make sure you are having fun. For most of us it is a hobby Richard -
Dan, beautiful work, a pleasure to follow. I am at a point where I am starting to solder... for the first time. So I am experiencing a learning curve. You said that you are silver soldering. I believe from what I have learned, that means high temperature with a torch. Can you tell me what brand of solder, and what brand of torch you are using? I am not yet ready for a "professional" type set up so am looking for a butane type torch that will reach the temperatures needed. Thanks, Richard
-
Thanks Jaager. I appreciate the explanation. Richard
-
I have seen a number of boxwood types including Costello, European and others. Which type is preferred for modeling ships? Richard
-
The problem with following threads such as yours is I keep thinking "I have to try that." Before I know it two or three weeks have gone by. But... I really do have to try it :-) Thanks for the fine works and all the pictures and explanations. Very helpful. Richard
-
Can i live without a BYRNES TABLE SAW
rtropp replied to shihawk's topic in Modeling tools and Workshop Equipment
regarding planer / jointer and how to live without one. I found two interesting videos on YouTube. I was wondering what our more experienced members thought of them. The first is how to build and use a table saw jig to flatten and edge a board. the next one show how to flatten and dimension rough boards by hand. It looks pretty straight forward but I suspect the tools would cost almost as much as a planer/jointer. Richard -
I have been using the Proxxon 115 and it has done everything I need so far for the modeling that I do. I have been pleased with it. This is my first scroll saw experience so I can't really say if I am missing anything by not having a larger model. Richard
-
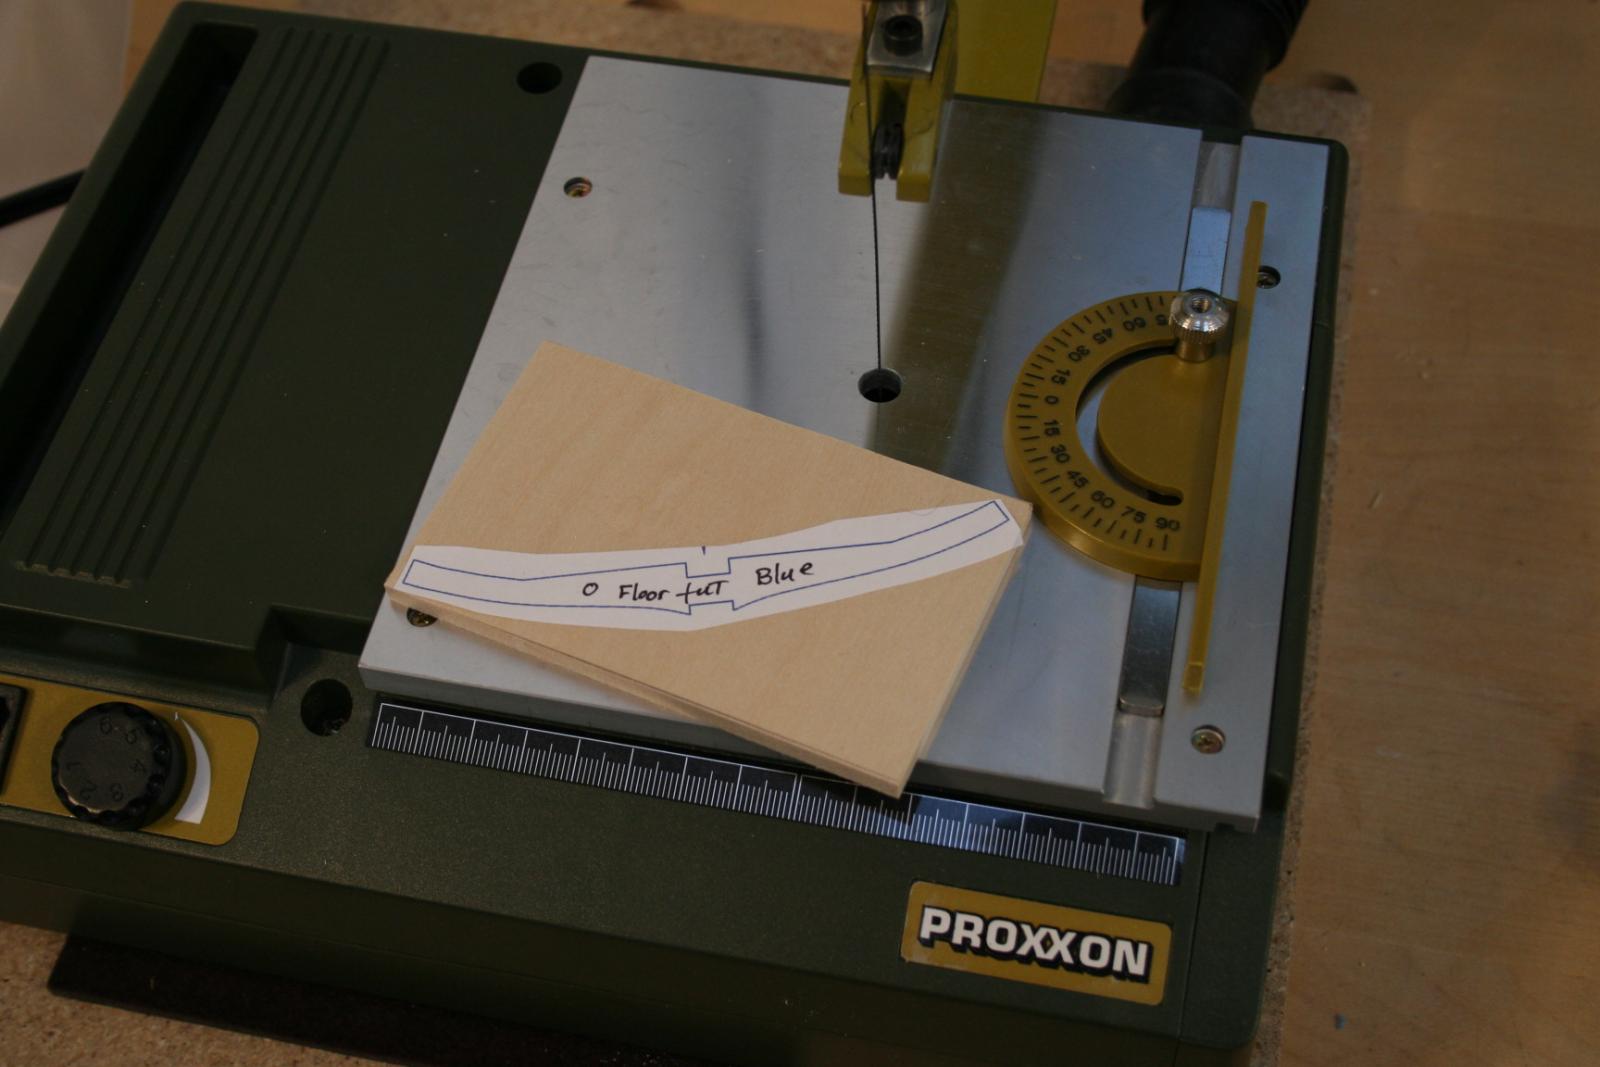
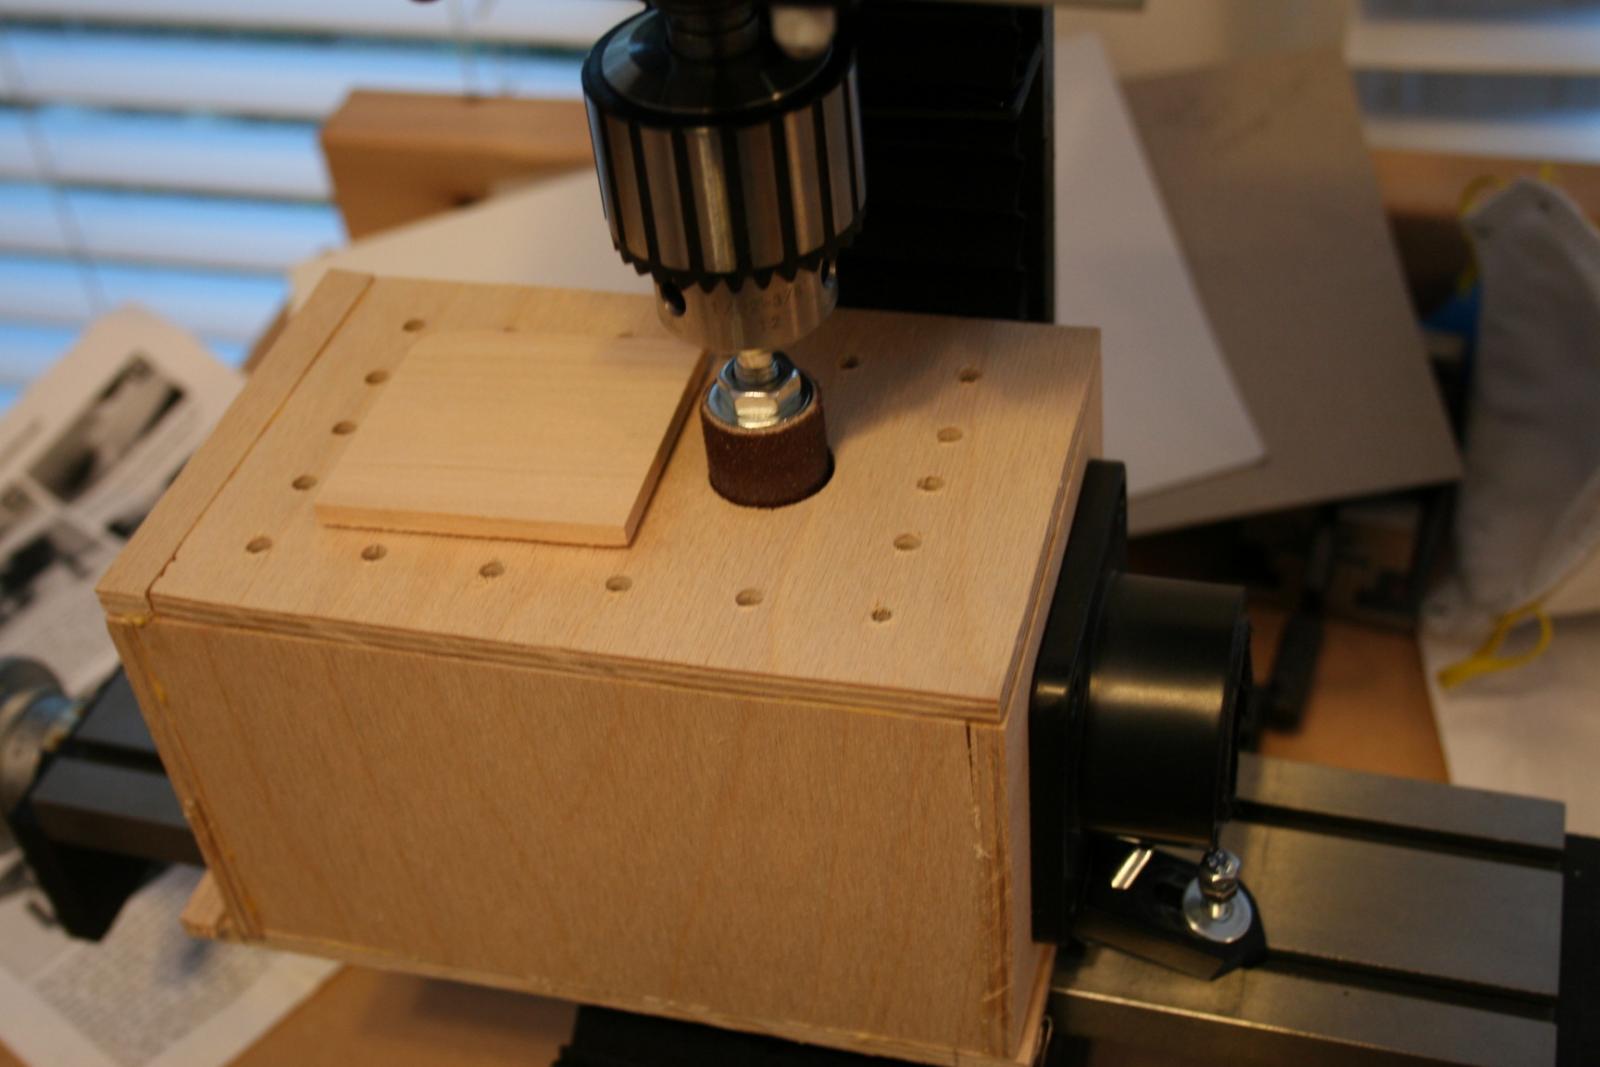
I thought it was about time for an update. As I explained in my Syren thread, I am learning how to use tools and that is considerably extending the amount of time it takes to perform even simple tasks. But, I am sure having fun. In order to better work on the frame parts I made the following jig for my micro mill. It works great at keeping the room almost sawdust free. Also wanted to increase safety on the table saw And this not only increases safety but also increases the precision of the cuts. Ok, here is where I am to date This was next sanded using my proxxon disk sander and the new drum sander. Of course I forgot to take a picture of it finished :-) I know the lines are already colored blue but wanted to make sure I could identify it if the sanding took out the lines... it didn't. I had to rework a few of the frames. Some were skills issues. A a couple seemed to be poor basswood. I bought some 3/16 from hobby lobby and a couple of the pieces felt wrong... spongy, but I tried them anyway. I am practicing this first build in basswood because it is cheap and available. I have some pear and boxwood planks coming that I can size on my "soon to arrive" Byrnes Thickness Sander. I may just go ahead and consider the basswood frames as skill building and if it all fits nicely on the keel go back and rebuild using the boxwood or pear. Not sure yet. I did not think I would want to have two builds going at once, but it is nice to take breaks from one to work on the other. Kinda re-energizes you. Oh, by the way, is there a top down plan for the Cross section? I'd like to put it down and use it to guide the assembly. I did not see one in the downloads. and so it goes... Richard


-
Well, it has been awhile since my last update. I have not been idle as I ran into difficulty with completing the copper plating and the rudder. I was having difficulty replicating the darkening effect I liked on the copper plating. I finally remixed fresh solution and was more successful. I have to rework the rudder because parts of it started to turn green and I suspect I used too heavy a hand with it. Also was not thrilled with the plating and would not mind reworking that. Adding to this, I am not satisfied with the pintles and gudgeons. They came out too clumsy looking, so I ordered more material to rework them. The problem is my lack of experience and skill at soldering. So I am taking time to practice some more while waiting for replacement parts to arrive. I am not really frustrated by this as I enjoy learning how to use the tools and techniques and find it fun. I think that is a large part of why I started in the first place. While waiting for all this to arrive I decided to do some side work that had been on my list for awhile. So I built the following jigs to help with the work. This is a saw table originally made to increase safety, I found it also increases accuracy. This vacuum table allows me to mount a sanding drum on the mill and collects all the dust. Along with my Proxxon disk sander, it gives me a lot of flexibility when sanding. There is almost no discernible dust escaping. (Part of my commitment to my wife to control the dust in the house.) Once the supplies arrive, I should be able to get back to my Syren. and so it goes... Richard

-
Can i live without a BYRNES TABLE SAW
rtropp replied to shihawk's topic in Modeling tools and Workshop Equipment
Clark, thanks for the explanation. It makes it very clear. Richard -
Can i live without a BYRNES TABLE SAW
rtropp replied to shihawk's topic in Modeling tools and Workshop Equipment
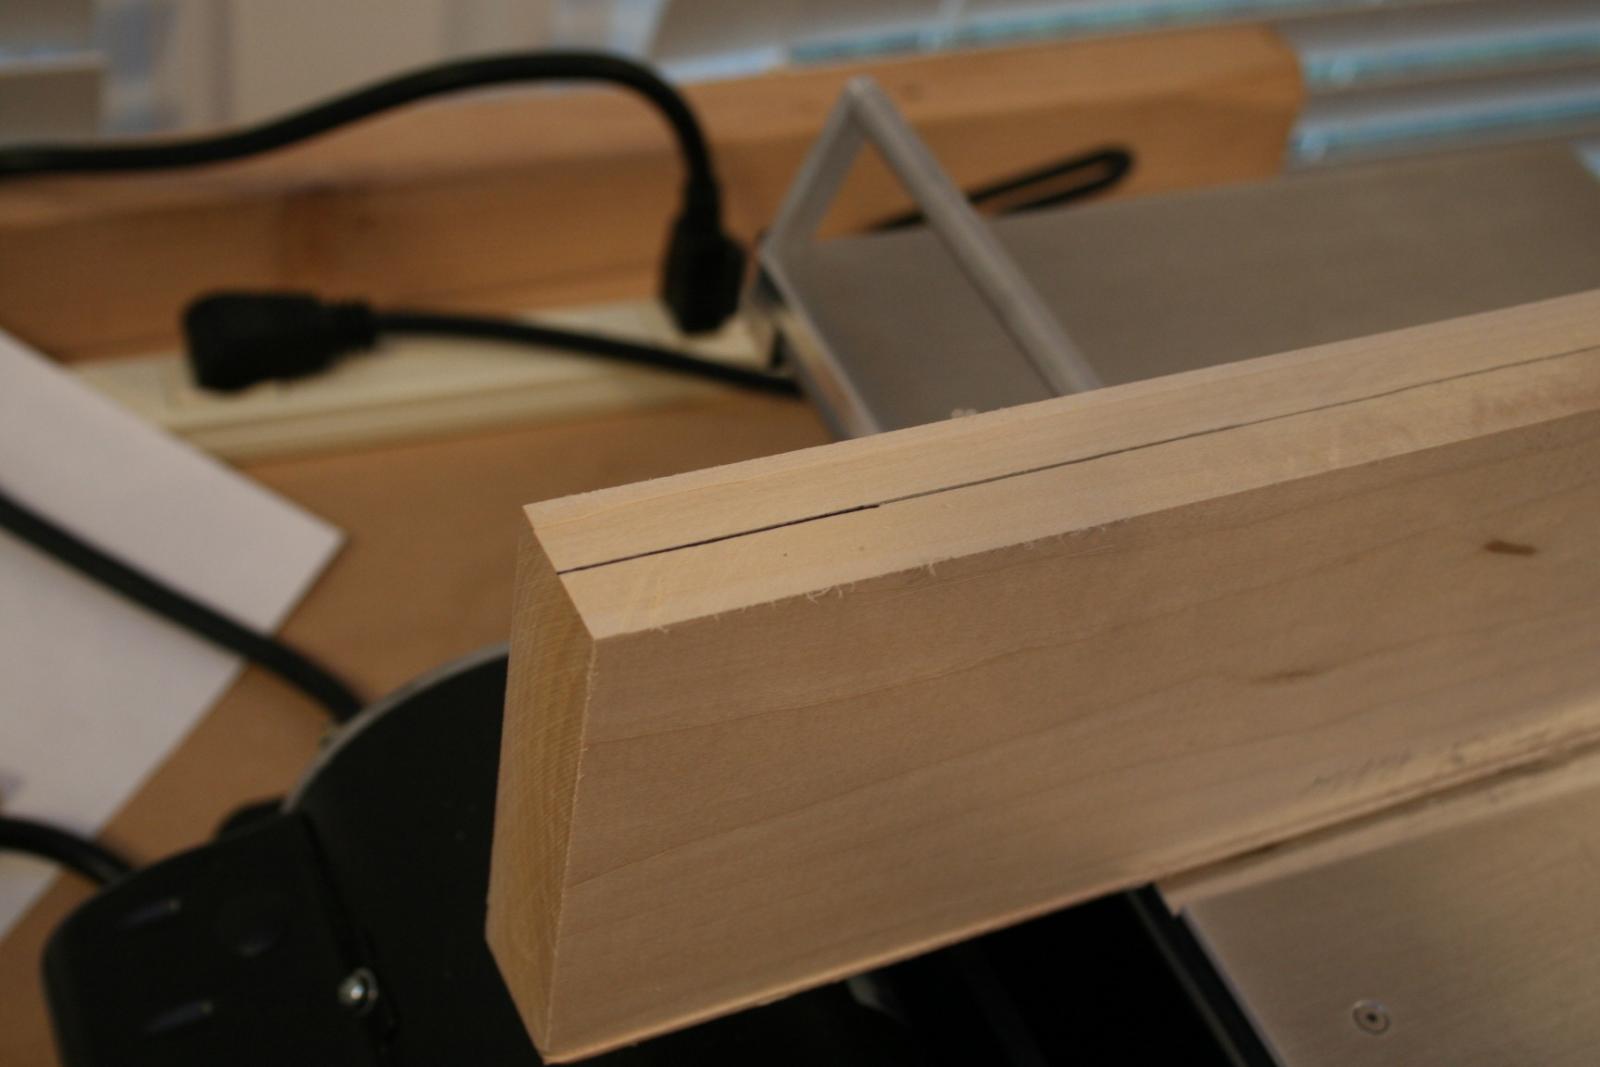
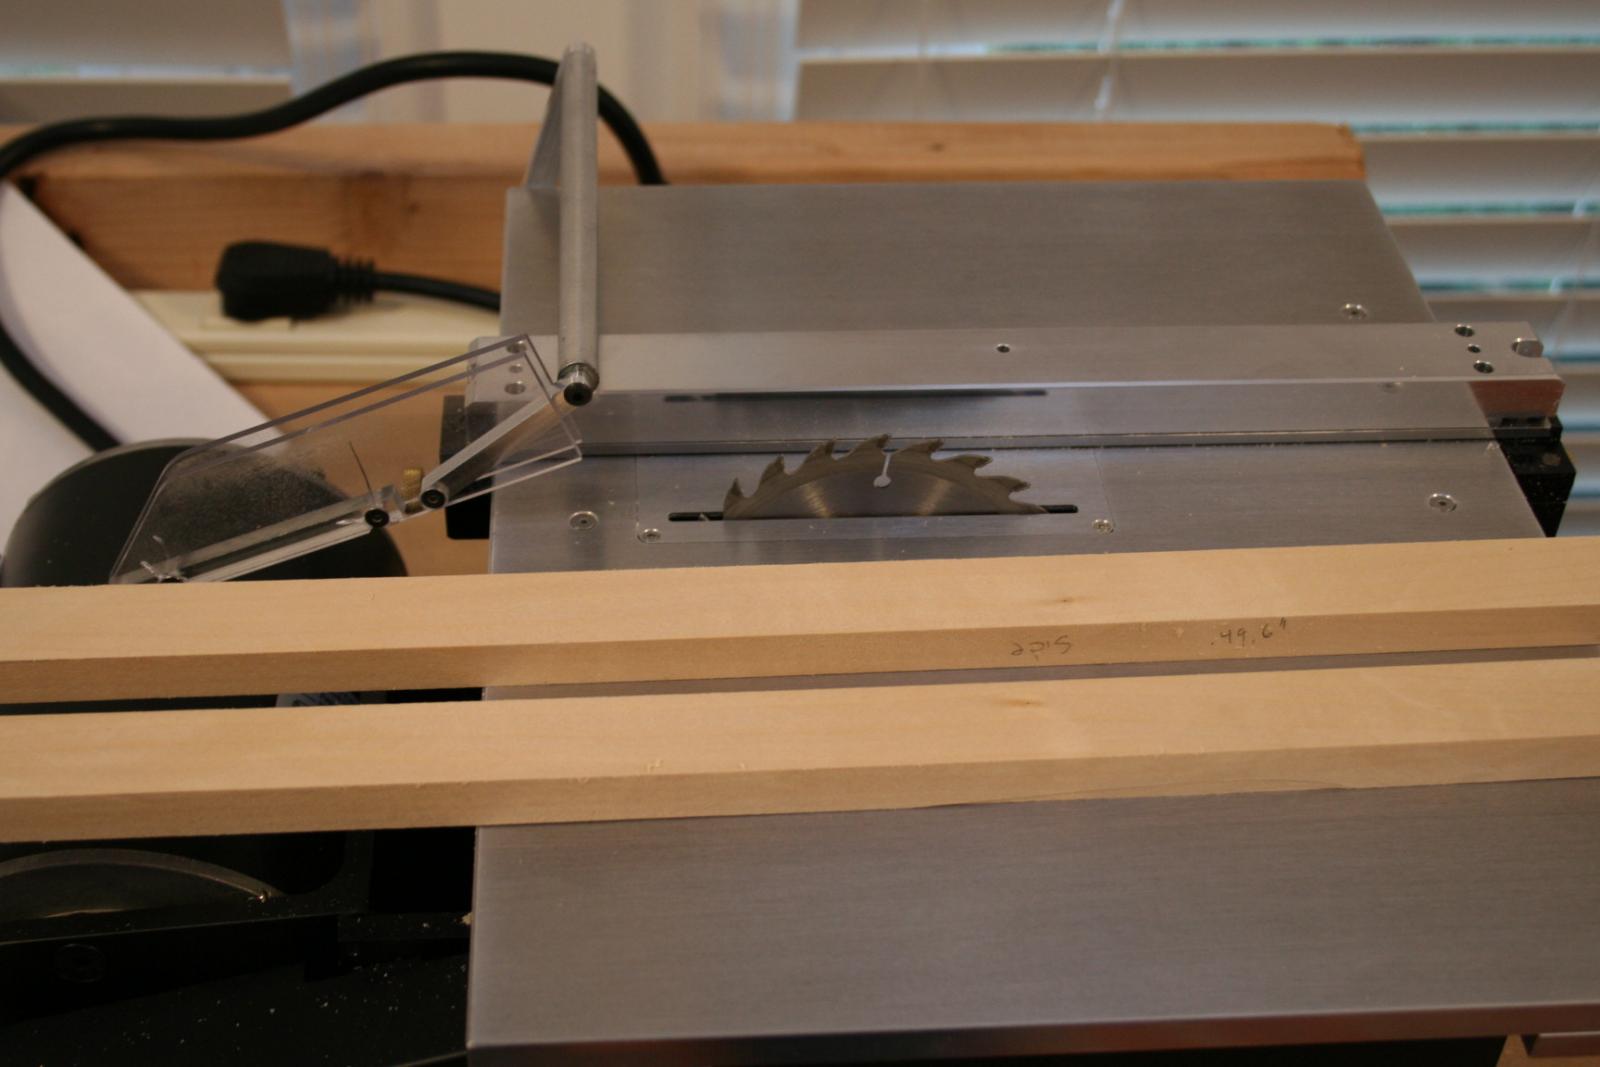
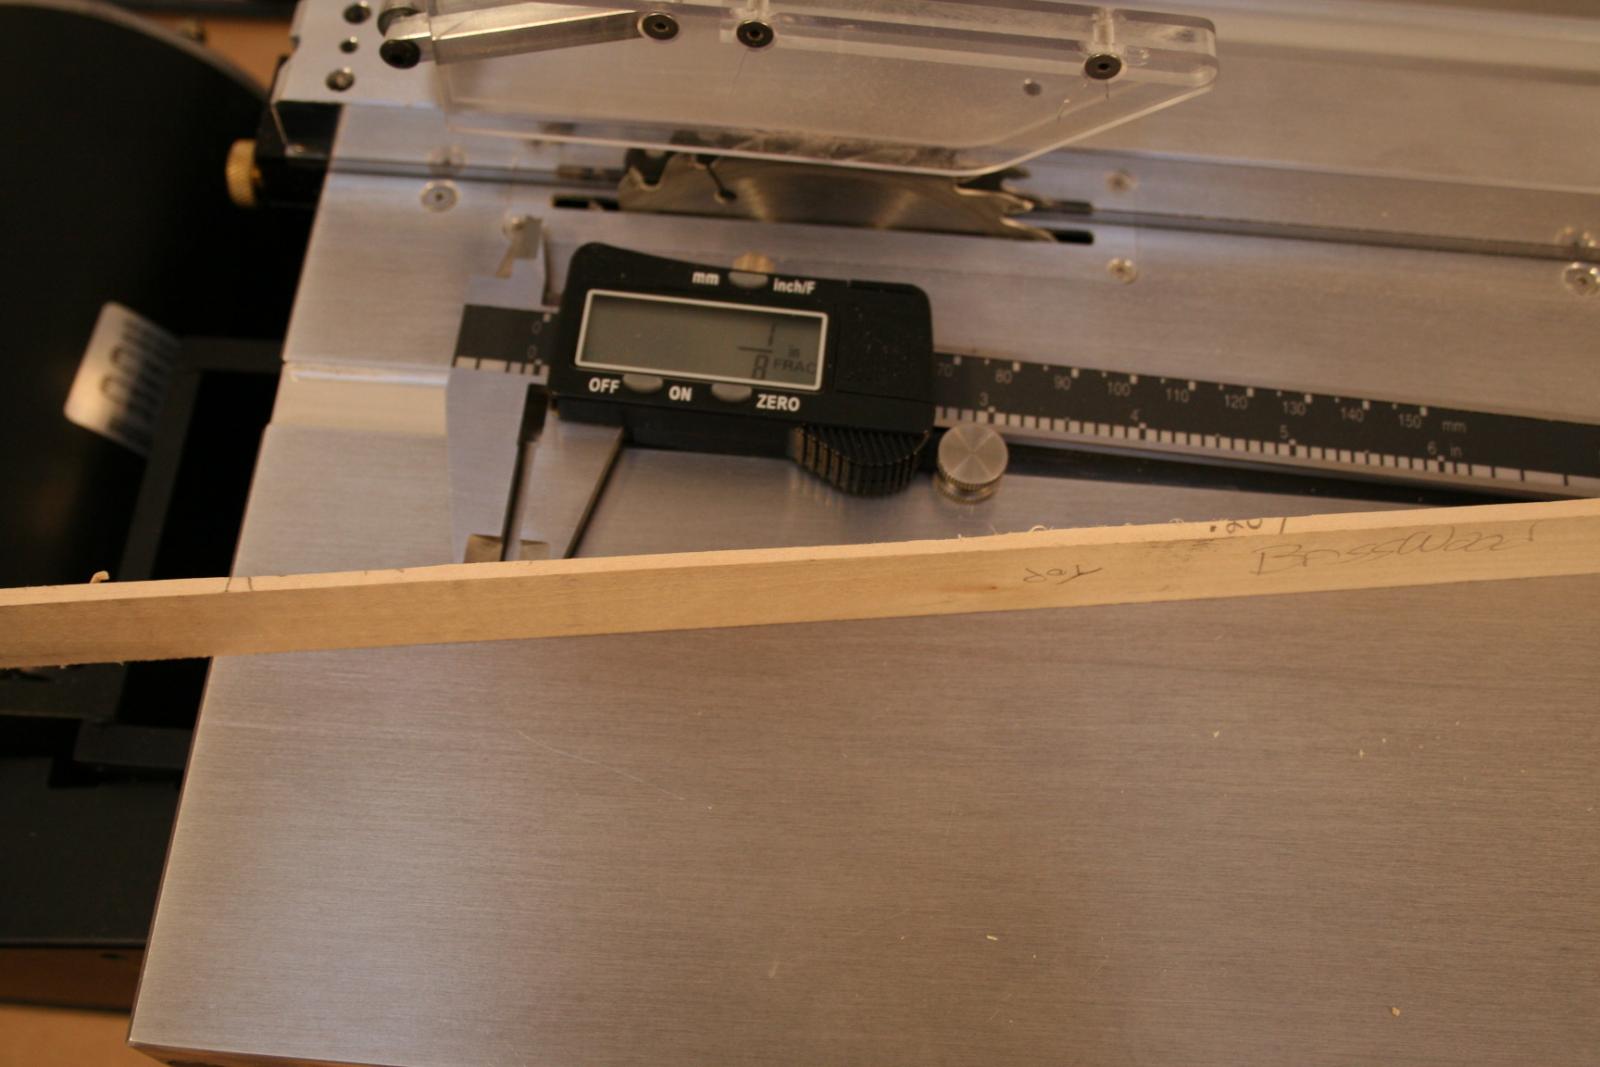
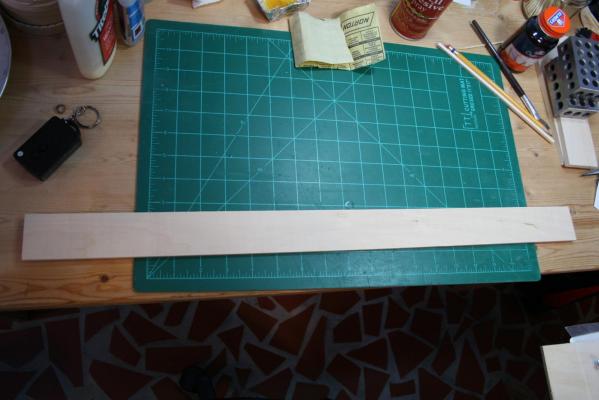
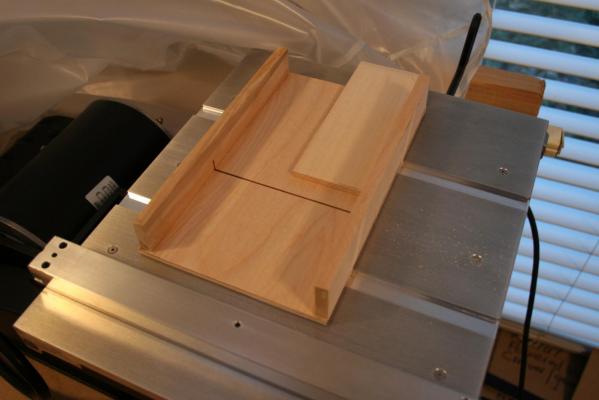
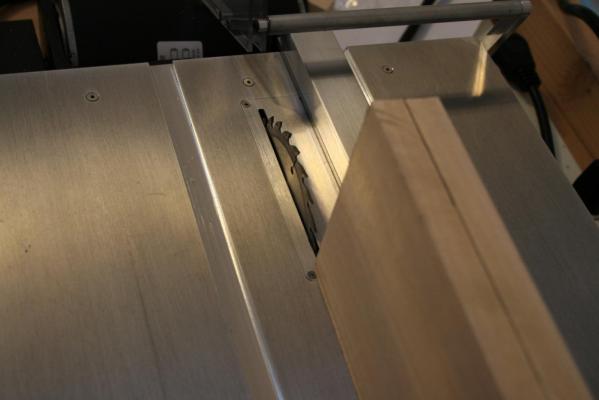
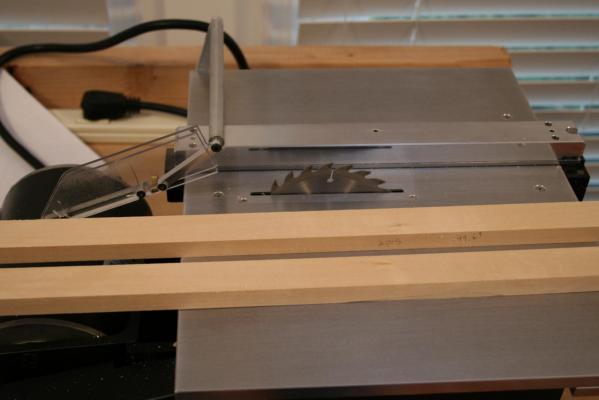
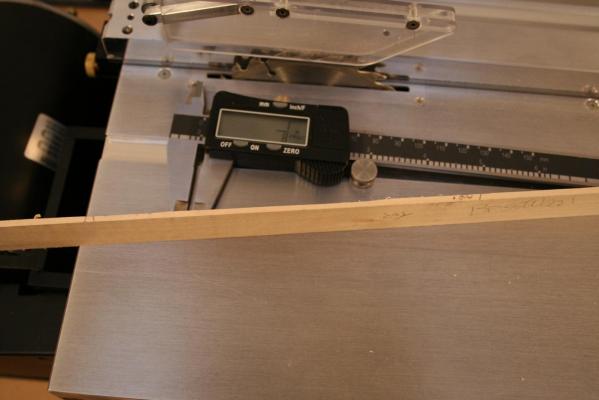
I wanted to see if I could solve the ripping question without resorting to additional tools. (Ones that would really start to crowd my small workshop.) So started playing around with the possibilities with my existing tools. As I though about it, I realized that I very rarely needed pieces that were more than 2" wide. This thought came to me from working on the Triad cross section and the Syren. Of course other builds might change this but I could worry about it then. Also, I could always buy the occasional sheet of in three or four inch wide stock if needed. So I tried an experiment with some 1 inch thick by four inch wide basswood that I have on hand. First I cut the 4" wide plank into 2 inch wide planks. (so I ended up with two pieces that were 1'" thick x2" wide x24 long piece" Then marked a center line along the edge of one of the cut planks. Next, with my Byrnes blade extended to its full height, I made two opposing cuts in the center of each 1" edge so the cut would meet in the center. ( I took this picture of the first cut while it was still 4" wide. Given the blade capacity, I would only get planks that were 15/16" wide after turning it on the side to cut out each piece. So I tried again by first cutting the four inches down to two inches, then made the opposing center cuts. Of course I forgot to take a picture of this, but you get the idea. The blade was large enough to overlap slightly at the center of the board giving me two planks that were 1/2" by 2" by 24" I put each of those planks flat on its 2" wide side and cut it into 1/8" and 1/4" planks at 2" wide. Below is a 1/8" by 2" x 24" plank This should work as well if the board was two inches thick (actually with a 15/16" cut depth the maximum would be a little less than two inches.) As I read through this I see that my explanation is more complex than the actual production of the planks. it also occurs to me that different cutting sequences can be used to obtain different results. Rhis first try seemed to work for Basswood. I will also have to see how it works on the boxwood and pear when it arrives. I guess will need to see if 2" wide will really cover most of my needs. While the 1" wide planks that I made in my experiment were too narrow for some of the frame sections on the Triton cross section, the two inch wide should get it. If not, its back to figuring out where to put a band saw, and, now as I understand it, I also need a jointer. I wonder if my wife would let me make the sunroom our living room and make the living room my my shop.... nah, not a chance. Richard
-
Can i live without a BYRNES TABLE SAW
rtropp replied to shihawk's topic in Modeling tools and Workshop Equipment
How do the Proxxon Planer and the Byrnes Thickness Sander compliment each other. ( thought they did the same thing but with different approach, blade vs sandpaper??) Richard -
Can i live without a BYRNES TABLE SAW
rtropp replied to shihawk's topic in Modeling tools and Workshop Equipment
Shihawk, Sorry if I have misdirected this thread? Should I start a new thread to continue? Richard. -
Can i live without a BYRNES TABLE SAW
rtropp replied to shihawk's topic in Modeling tools and Workshop Equipment
Is it possible to "rip" thick lumber, 1 to 2 inches thick, without a band saw or other full size tools? I only have miniature tools such as the Byrnes saw and thickness sander, but do not have the space for full size tools. I considered the 9" table top models but they don't seem to have the strength or depth of cut to be very helpful even if I did have the room for them. (I was told it was not a good idea to keep it outside, even under a protection, here in Georgia.) Hence my question, how to "rip" a plank without using a band saw or other full size tools? Thanks all, Richard -
Hi Grant, I really enjoy following along. The black looks more realistic. I was thinking of using black fishing line but the wire looks really nice. Do you know, what would the actual bolts on the full size be made from? Richard
-
Thanks for the masking tape tip. I will be using it on some practice strips to test my hand at making the bolts using my current supplies. If the test goes well, I will probably try my hand using the sizes you have outlined. Richard