HOLIDAY DONATION DRIVE - SUPPORT MSW - DO YOUR PART TO KEEP THIS GREAT FORUM GOING! (Only 13 donations so far - C'mon guys!)
×


rtropp
-
Posts
936 -
Joined
-
Last visited
Content Type
Profiles
Forums
Gallery
Events
Everything posted by rtropp
-
Making small nails with round head
rtropp replied to Aleksei Domanov's topic in Metal Work, Soldering and Metal Fittings
Hi Alexey I found it on youtube Thanks Richard -
Making small nails with round head
rtropp replied to Aleksei Domanov's topic in Metal Work, Soldering and Metal Fittings
hi, I want to make small nails with round heads. I could not find the instructions and would appreciate your sending me in the right directions. Thanks Richard -
I checked but did not see "book Collector" in their listings. Did I miss something? Richard
-
Thanks Chris, The link was what I needed. Richard
-
Proxxon compound table -- Opinions?
rtropp replied to rtropp's topic in Modeling tools and Workshop Equipment
Thanks all, I just acquired a used Proxxon Drill and was trying to decide between just the vise, or the compound table. Richard -
US Brig Syren by Gahm - Model Shipways
rtropp replied to Gahm's topic in - Kit build logs for subjects built from 1801 - 1850
Thomas, boy, following you is tricky business :-) In image 3 B, what did you use to hold the capstan on the lathe? It kind of looks like a Dremel bit holder. Thanks Richard -
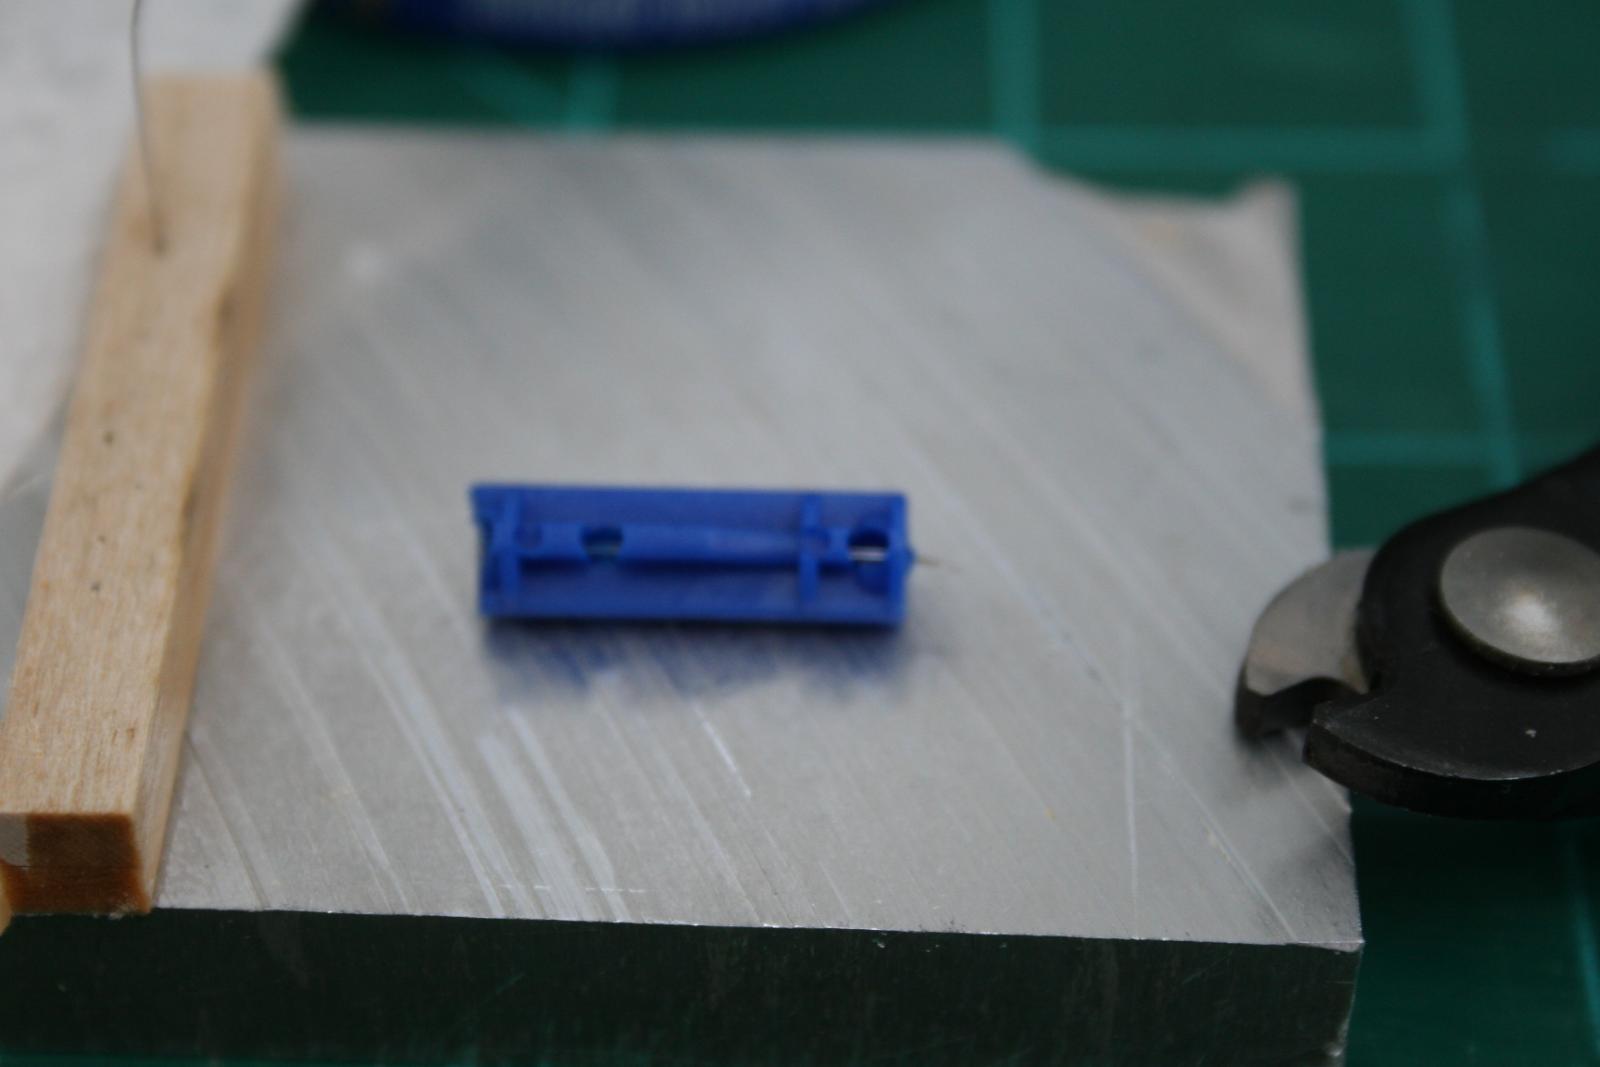
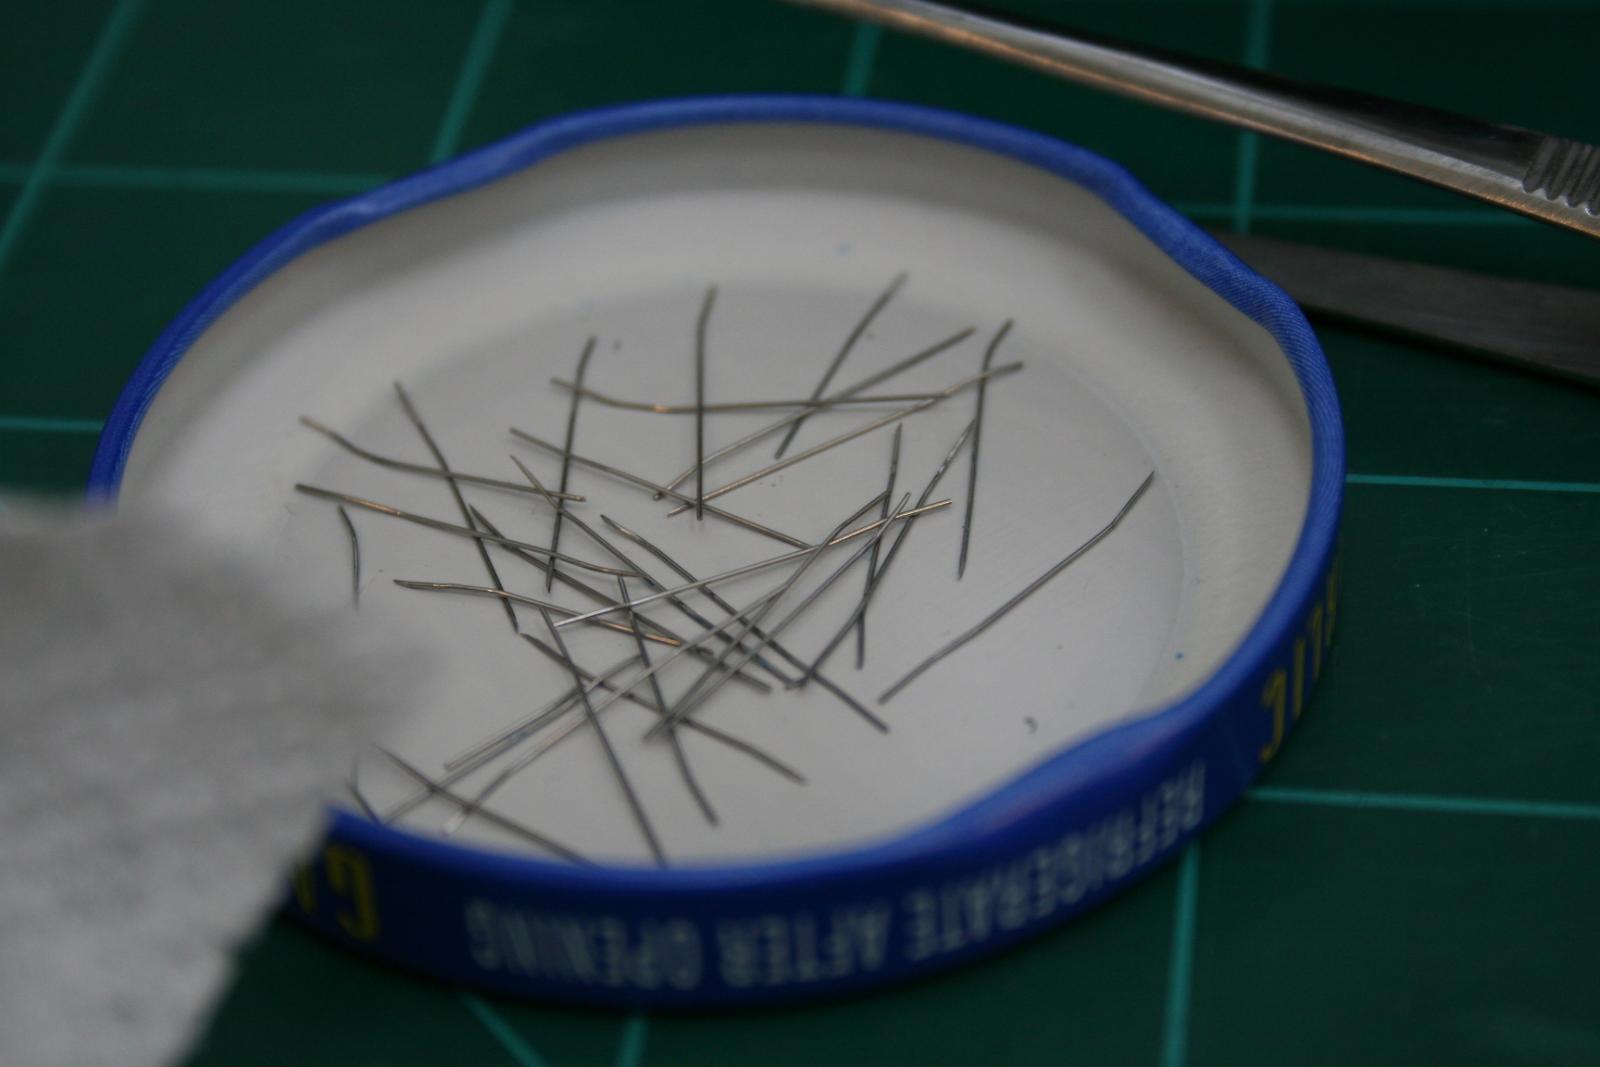
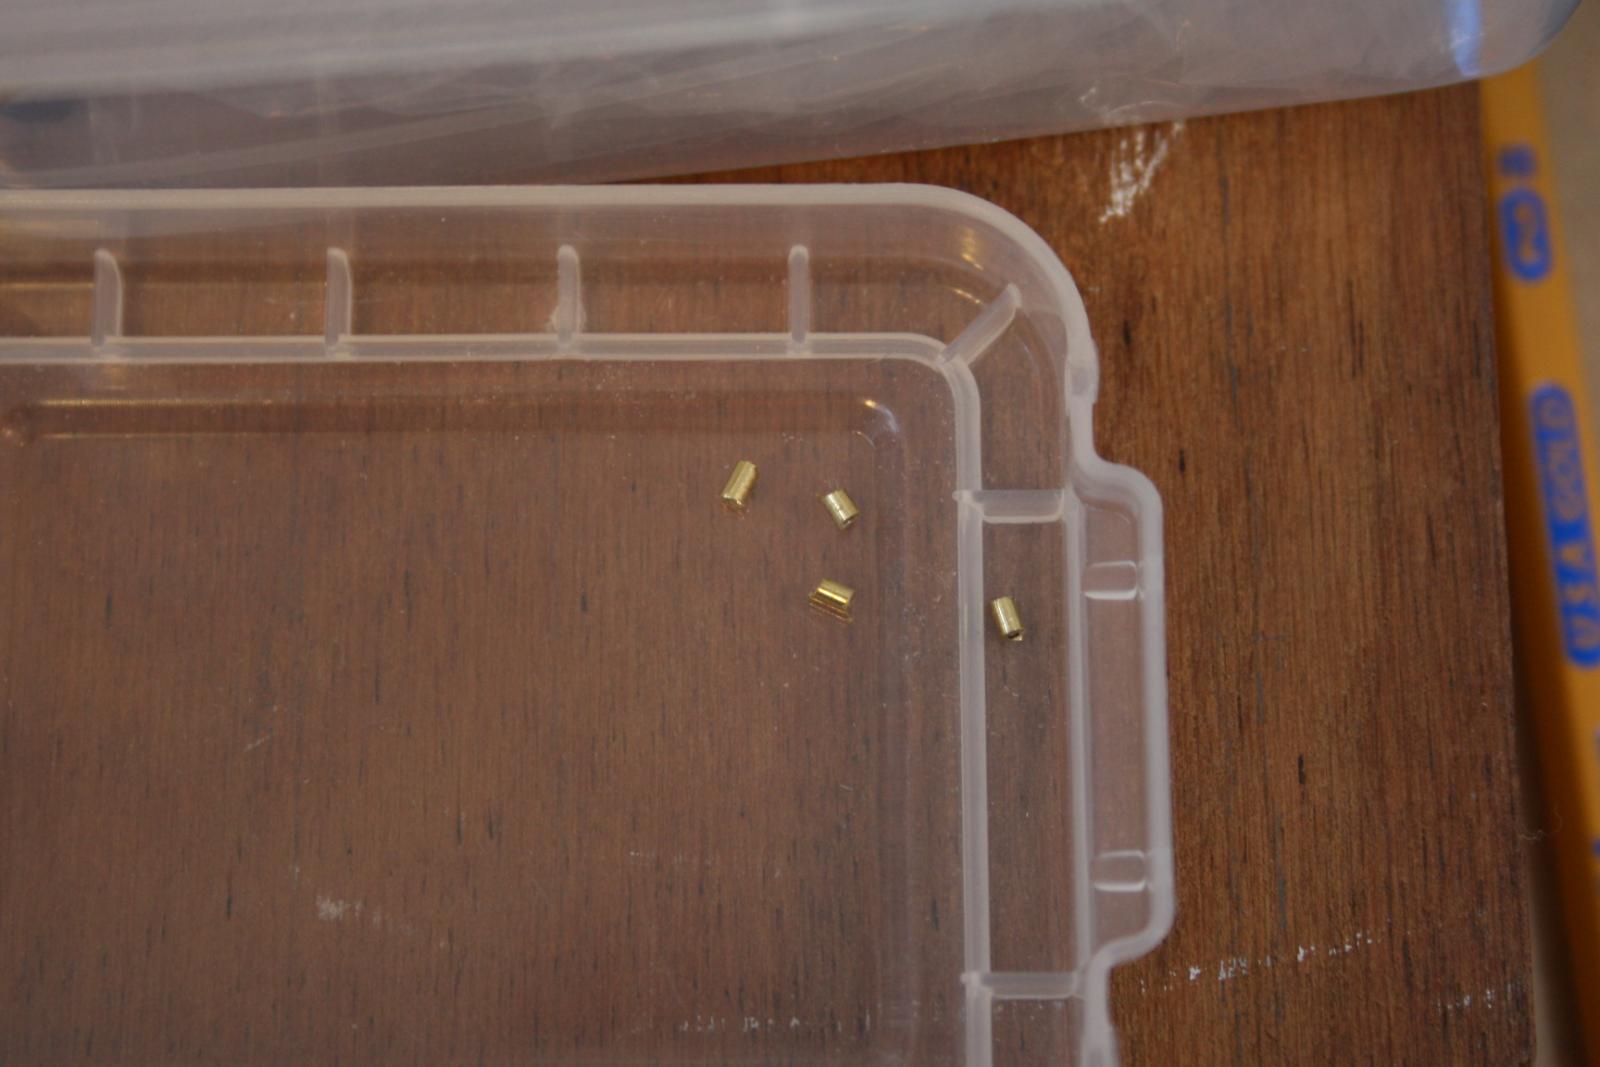
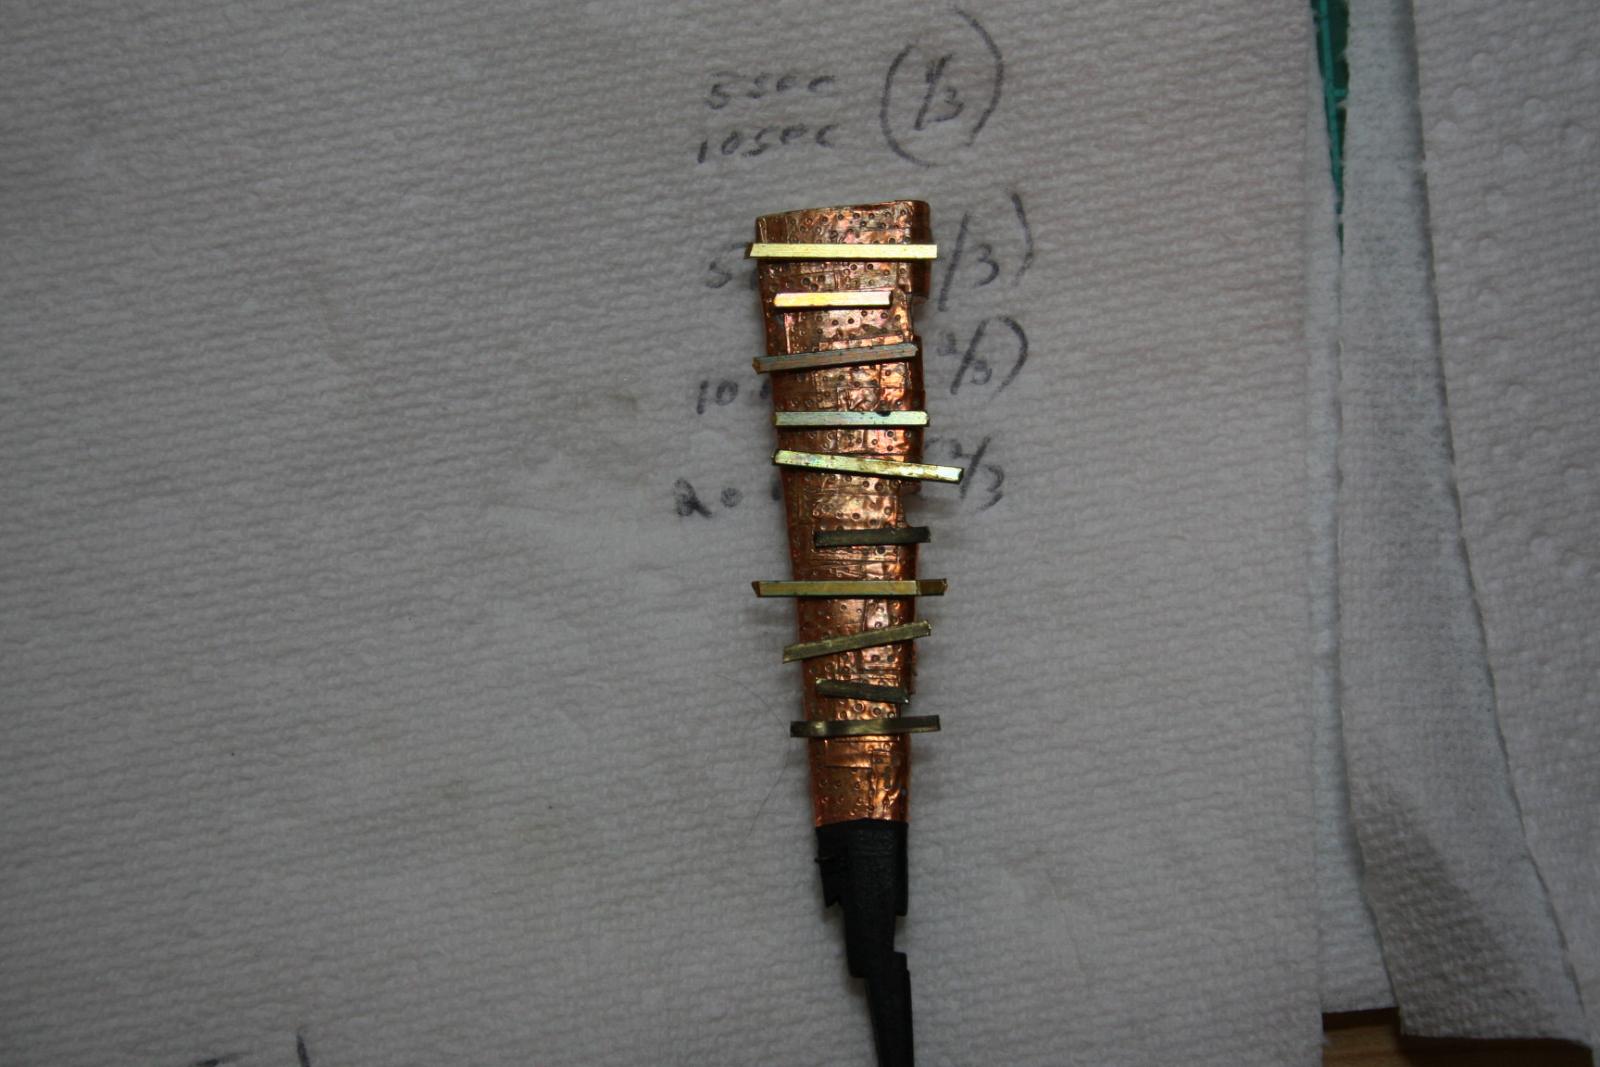
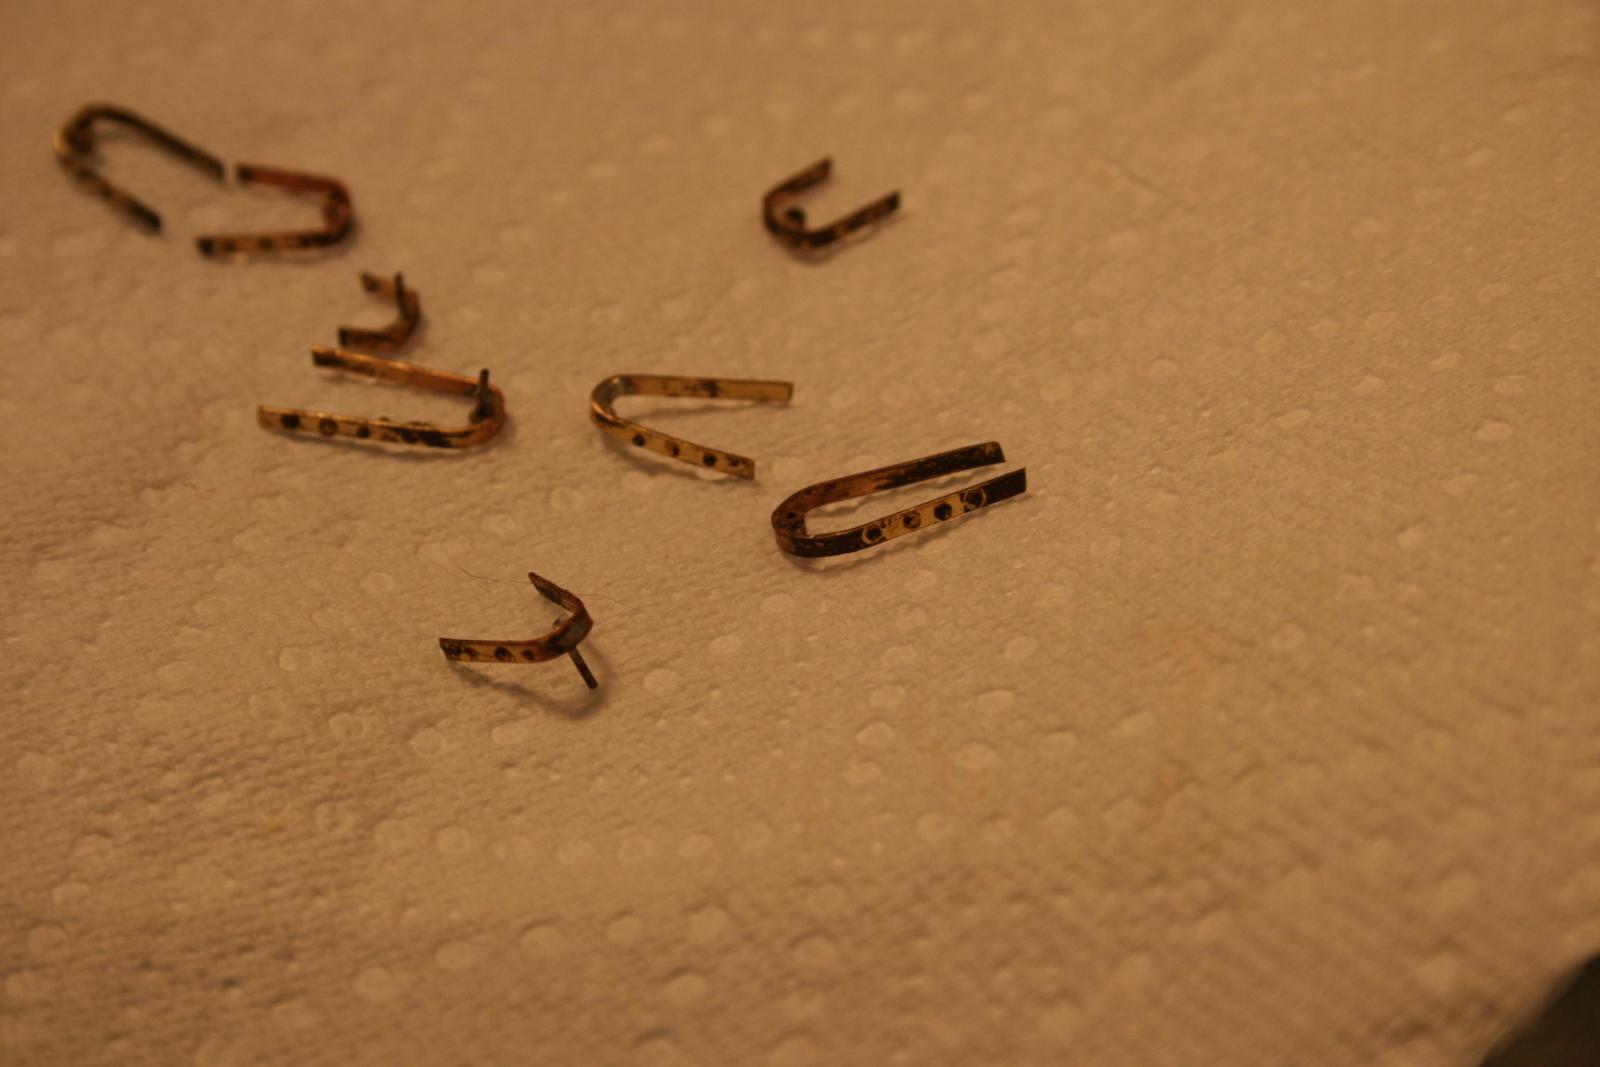
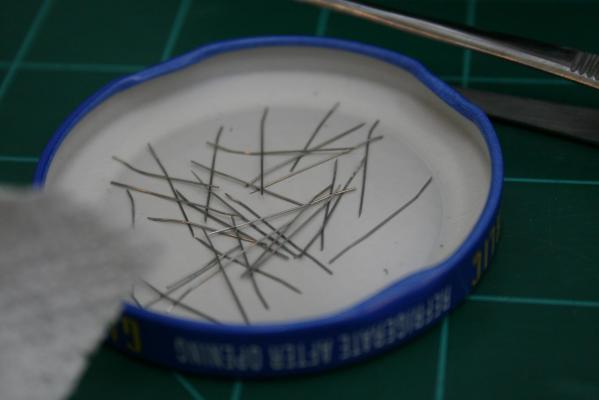
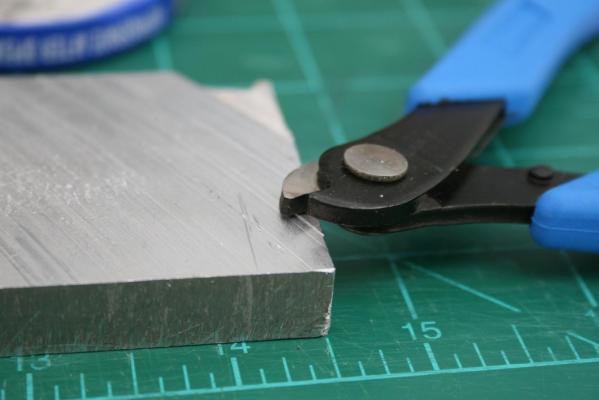
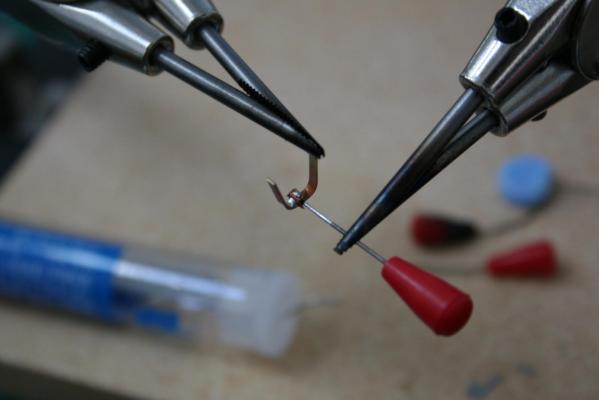
Hi Ed, 30 gauge lancets measured at .31mm 33 gauge were .19mm 26 gauge were .43mm Here are some pictures of the lancets being used I cut and removed the plastic from the two ends first, then with two pliers pulled the pin from the remaining plastic coat. The height of the wood strip on the aluminum bar is measured to reflect the desired length of the pin (minus the width of the cutter used.) Uniform size pins were created by drilling holes into the wood to hold the pin while cutting and the aluminum bottom acted as a stop. These are the lancets after removal from the plastic but before cutting, described in the previous step. You will notice they are all bent on one side. I believe that is how they are made to better hold on to their plastic sheath. Those were cut off and discarded during the sizing process. By being careful I could actually get two "nails" from many of the pins. The cutter in the picture was the only one that would work without getting chewed up. In preparing to cut the lancets I had to account for the width of one side of the cutter. Richard

- 3,618 replies
-
- 4
-

-
- young america
- clipper
- (and 1 more)
-
I would appreciate feedback on the proxxon compound (x-y) table. I will be using it on the Proxxon TBM bench drill and wanted to check its quality and accuracy.
-
Chris I would be interested in hearing more about the plans. Are they in French or English? (I am not conversant in French) Can a picture of one of the build frames be posted? (Not sure that is allowed.) Thanks, Richard
-
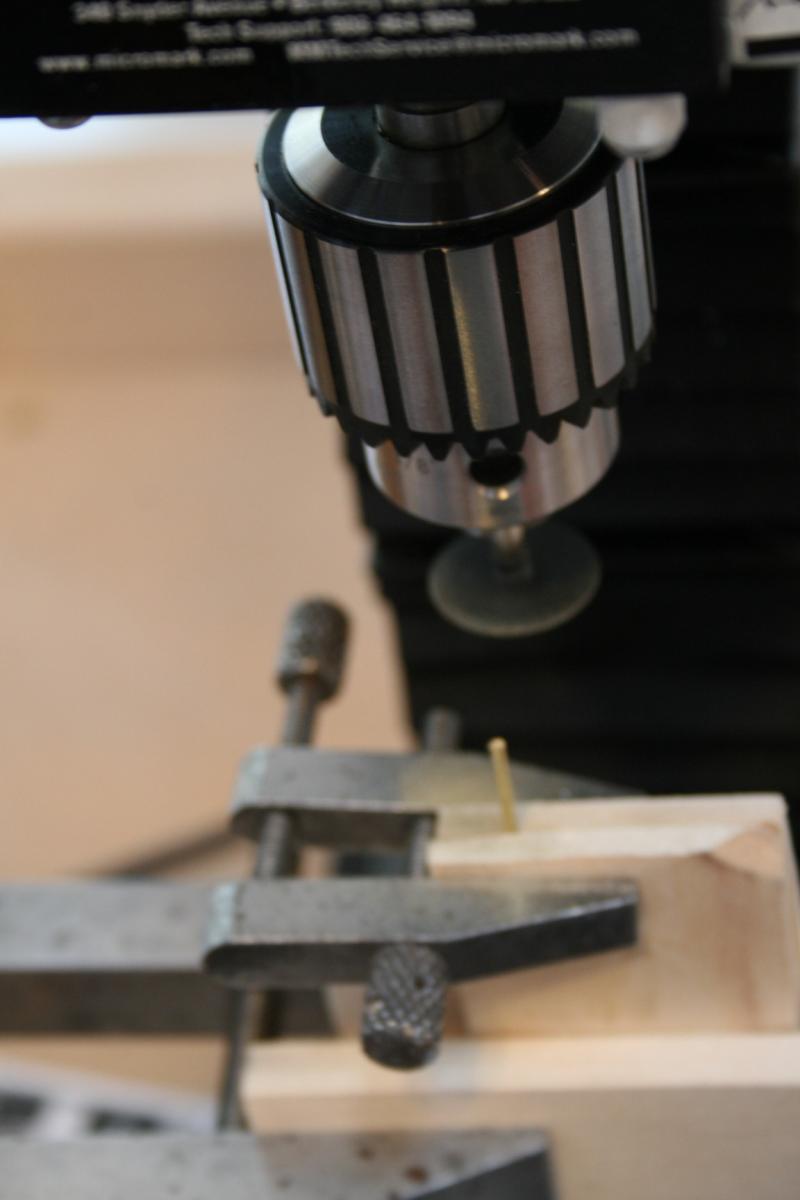
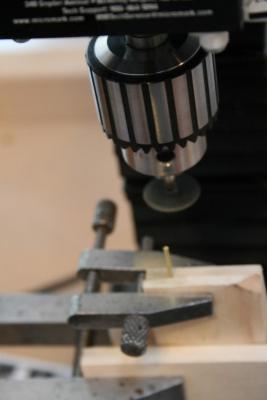
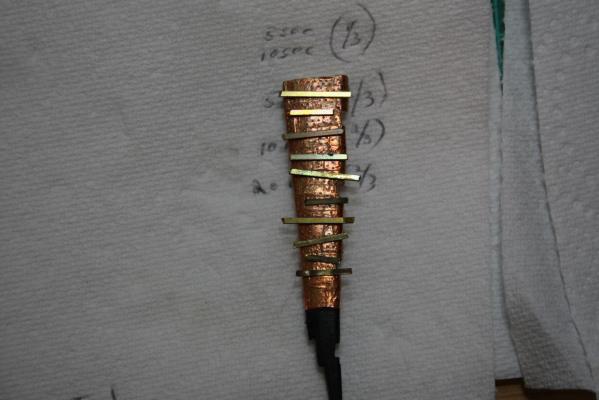
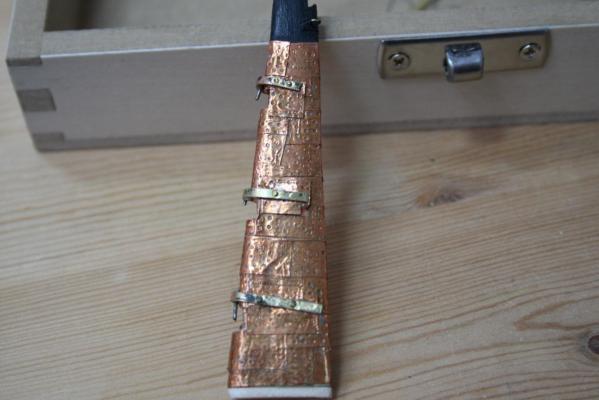
Mark, I cut all the pins (diabetes testing pins) to the same length. I made one stamping block that was about 2/3 the height of the pins. I backed this with masking tape after the holes were drilled. The block was placed on a flat surface, pins were inserted and drowned in CA. Once dry I removed the tape and than added additional blocks to the bottom to get the stamp to the correct height for the stamping jig. I put a grinding wheel in my mill (could use a rotary tool in a stand) and very, very gently took out any small variation that still existed. I emphasize gently because I went too hard on the first block and ended with pins pushed sideways in the wood block. (I was using basswood and it was a little soft.) If I had it to do again I would use hard maple or hickory. Richard
- 3,618 replies
-
- 4
-
-
- young america
- clipper
- (and 1 more)
-
Ed, I found that pins were subject to bending and dulling, even when short. I tested a number of different types. I finally used diabetes testing lancets. They come in many widths and are very strong. I could not use regular wire cutters as they would not cut the pins easily and in short order became damaged beyond use. I ended up ordering side cutters. Taking them out of their sheaths can be a pain in the neck, but they worked very well. The ones I made were good for all the plates on my Syren and are still good to use. Richard
- 3,618 replies
-
- 4
-
-
- young america
- clipper
- (and 1 more)
-
Thanks Ed, An excuse to learn more tools and techniques. And I thought this hobby was going to be all about wood :-) Frolich was right.... "Model making requires...the need to master a multitude of techniques ... crafts.... wood, metal, fit, saw, turn, solder, glue, rope, drill, grind, cut sails.... He needs to be a carpenter, carver, coppersmith, block-maker, rigger, sail maker and painter." Richard
- 3,618 replies
-
- 6
-
-
- young america
- clipper
- (and 1 more)
-
Ed, I read how you made your gudgeons and I am going to try this for my Syren. Do you think silver soldering is required or would regular, soft soldering of the tube to the sheet work ok? Thanks, Richard
- 3,618 replies
-
- 1
-
-
- young america
- clipper
- (and 1 more)
-
Thomas, Hmmm... prototype, I like it :-) Also, where did you get your copper strips? So far I am only able to find sheet or foil strips. Thanks, Richard
-
Hi George, welcome aboard I checked the stained glass suppliers and they have foil which will be too thin. ditto with Model Expo. I have ordered some copper sheet to see if that cuts to size on my Byrnes Saw. (a learning experience.) At the same time I will be attempting to make Gudgeons and Pintles as Ed Tosti did on his Young America. I will have to order a high temp torch and silver solder. (another learning experience.) At the same time, I have some 18 gauge copper wire from Hobby Lobby and will try my hand at flattening it. Ok, I have today pretty much lined up :-) Richard
-
I ordered what I thought would be copper strips 1/16 by 1/64. The website listed these as copper. My receipt listed them as copper. The items were brass. So, I am back to searching for a source for the copper strips. Every source I have found so far only has brass. K&E has copper strips listed but I cannot find any place that carries them. If anyone knows of a source for these I would appreciate it. Meanwhile, I am considering experimenting with the technique used by Ed Tosti on his Young America. I have some copper sheet and copper tubing, so, what the heck. Richard
-
double planking a hull
rtropp replied to pugman11's topic in Building, Framing, Planking and plating a ships hull and deck
Keep in mind that most of the hull is covered in copper plates. Richard -
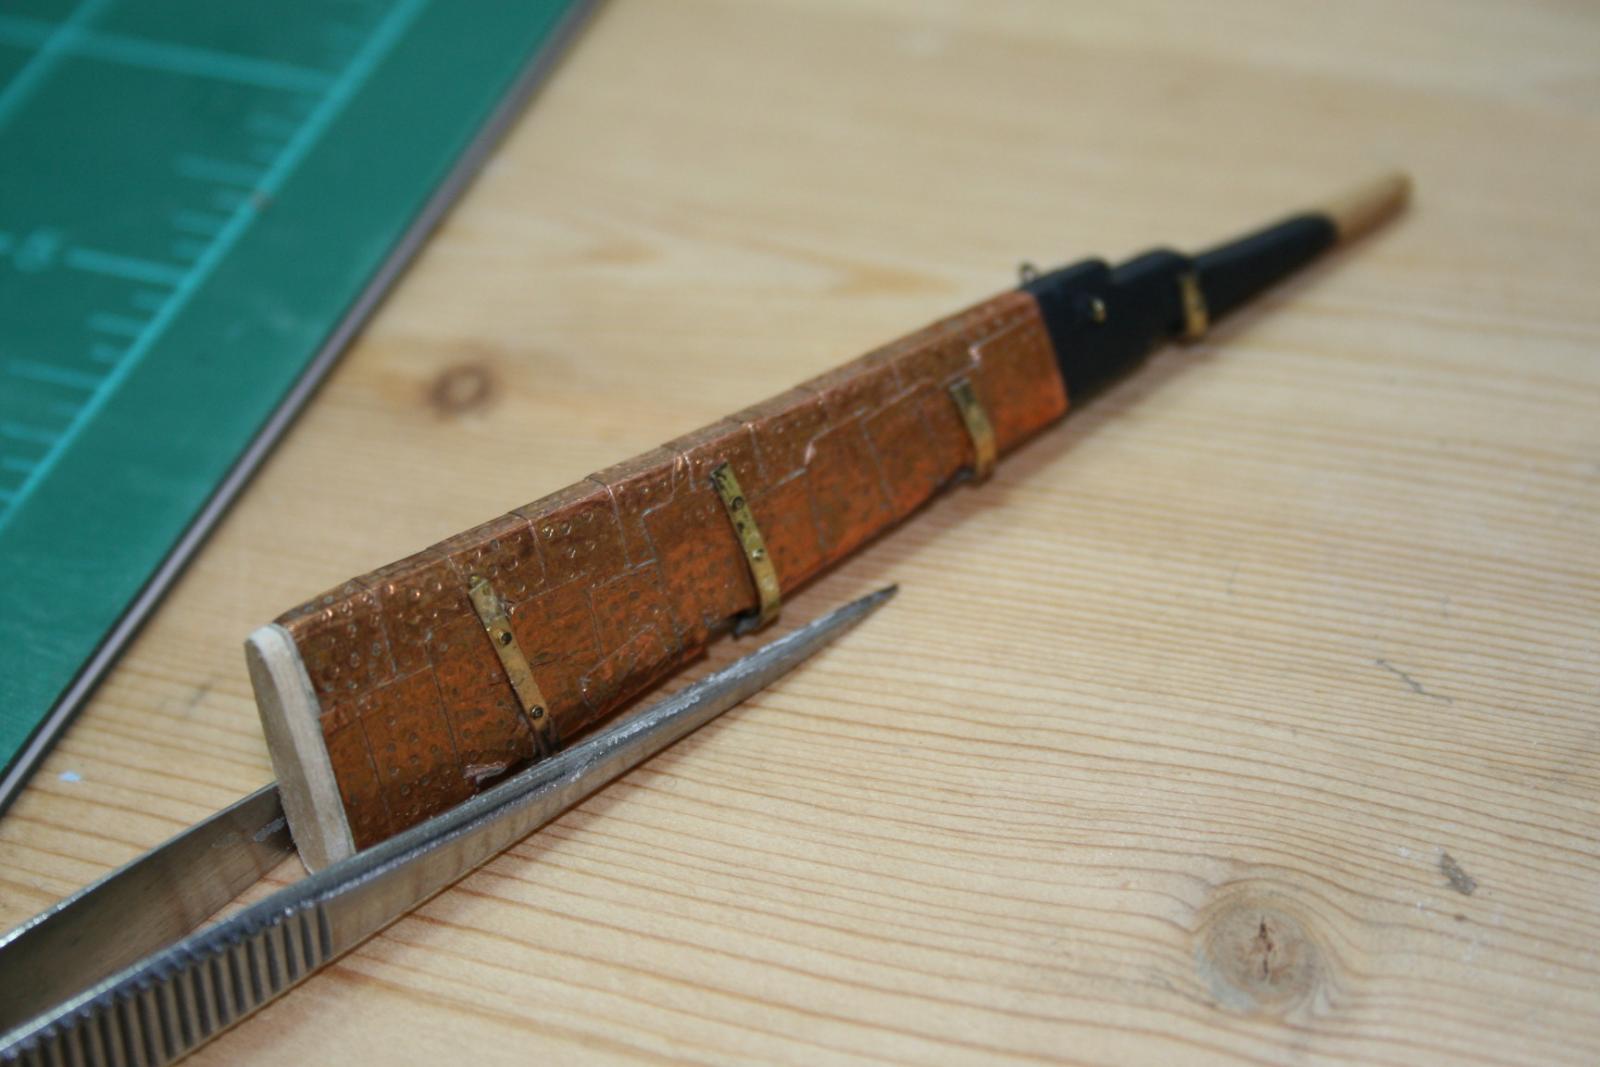
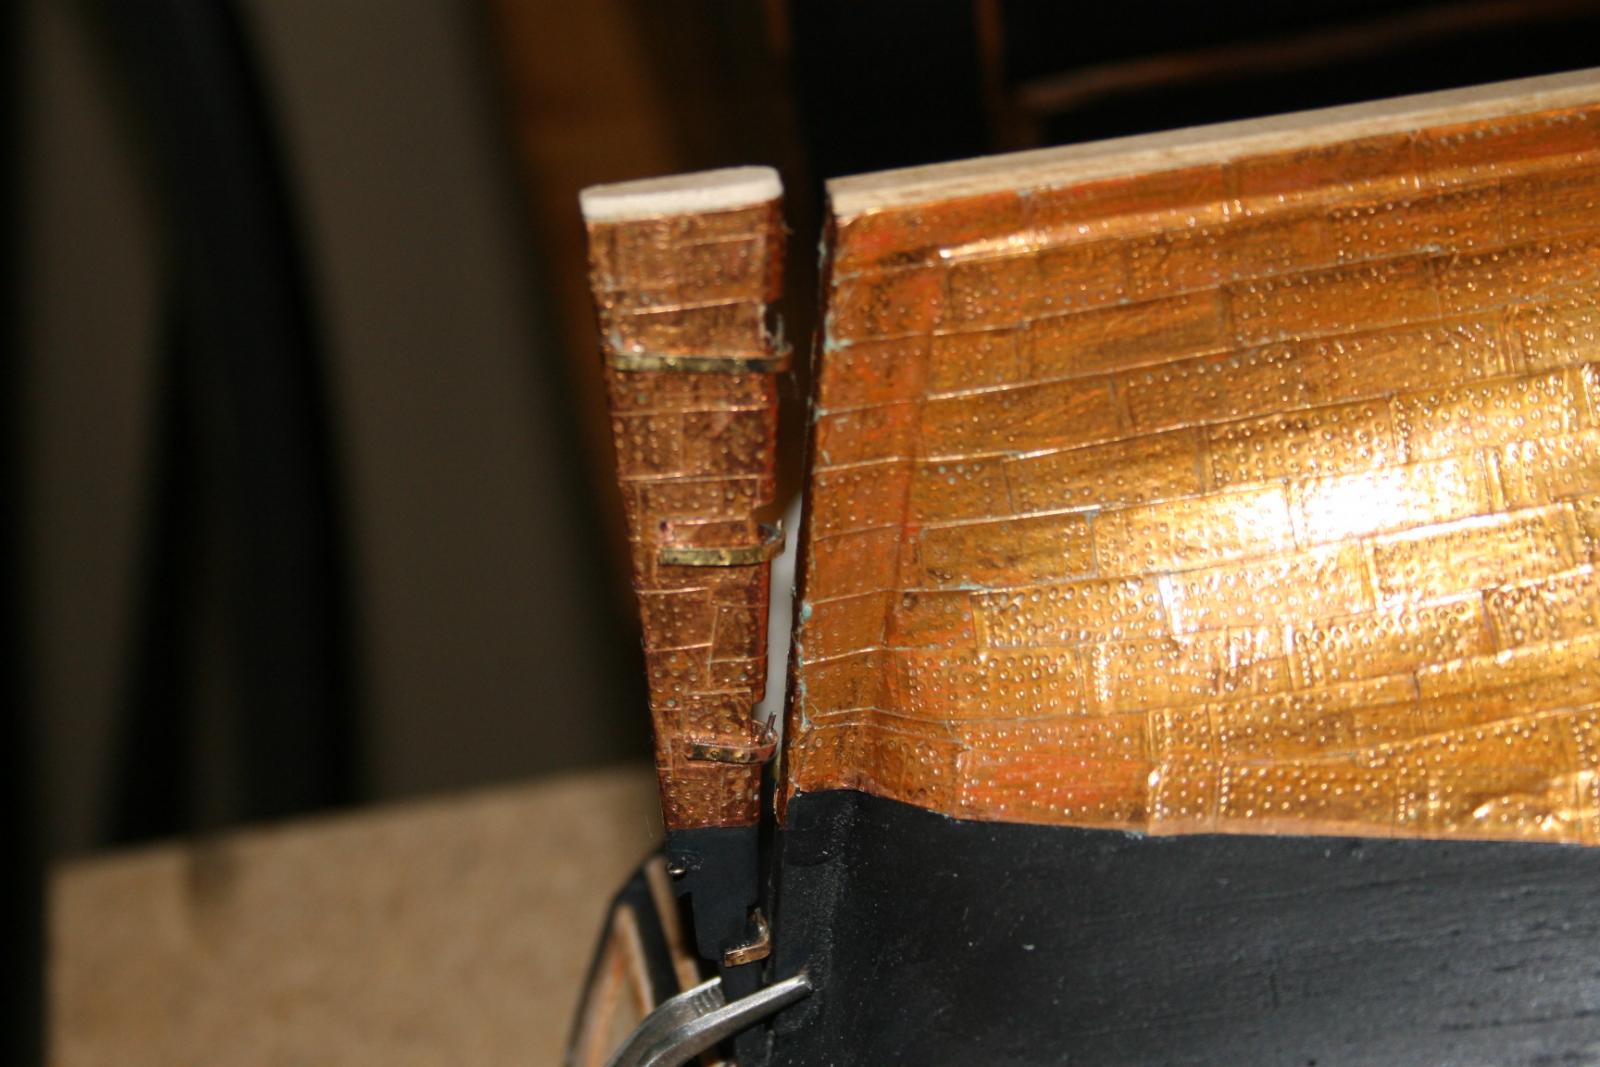
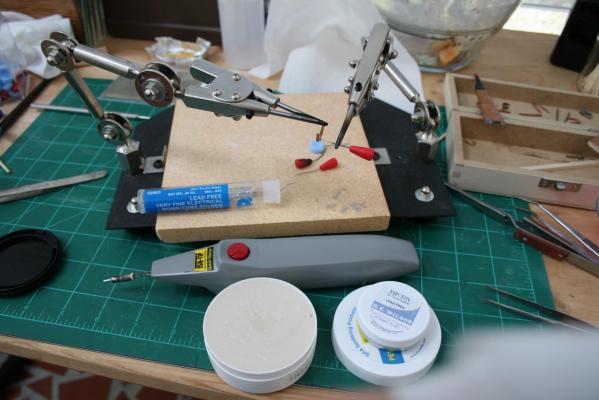
I thought time for an update even though I have not made much progress. Most of the time has been learning to use tools and experimenting. I wanted to try and put a small tube on the gudgeon to accept the Pintle pin. I first cut some brass tubing to size. For this operation I had to dump all the work I had shown in my last posting. In that first set I had the pintles and gudeons wrapped in the copper tape. They looked nice, but when I went to solder on them I found that regardless of tool, torch or iron, wrapping the brass with copper tape was a disaster. Of course the tape will burn.. Duh.. It also seemed too clumsy to wrap with copper tape after the soldering. I decided to try the brass strip without any covering. So I re-cut the straps from the brass strip. Then I cut the tubes I ended up with a batch of tiny tubes I am just learning how to solder and I tried a small pencil torch. This did not work out for me. I could not control the soldering enough for a clean joint and without scorching the brass. So, after a few days of unsuccessfully trying the torch I decided to try a soldering Iron and bought one. This worked out better. I spent a fair amount of time researching (thank goodness for Utube.) I had to learn the basics, how to prep the iron, how to place the solder, applying enough heat but not too much. This is my set up. Not great, but acceptable for the first time. Next I experiment with different ways of coloring, salt and vinegar, blacken it, Liver of Sulphur. Here is a comparison of my attempts. The darker ones were acceptable (third from top was my final choice.) finally, After placing some faux bolt heads of copper on the Pintles and Gudgeons I treated them and ended up with attached to the rudder Not what I had hoped for so I decided to do it yet again. I want to rebuild the rudder also, I think I can do better. For much of the build I find myself working the parts multiple times until I establish some skill and finally get an acceptable version. Luckily I enjoy the learning and experimenting process. I guess I am one of those..."Its the journey as much as the destination..." types. So i changed my plan. I read that the straps would have been made of the same type of copper as the hull plates. Instead of trying to get the brass to look right, I decided to order some copper strips and see how they work out. I found some with the same dimensions. I am now waiting for the copper strips to arrive so I can evaluate them to see if they will work instead of the brass. and so it goes... Richard


-
thanks Michael
-
Grant, I am enjoying the heck out of your build. I am considering this as potential for my next build. Thanks for a thorough build log. Richard
- 456 replies
-
- 1
-
-
- finished
- bomb ketch
- (and 2 more)
-
Jaager, darn... I never stopped to realize that draw plates were originally for wire. That will be very helpful. I read that you should stretch the wire to harden it(??) would you do that before or after using the draw plate? Richard
-
I agree with the others and you might as well learn how to use a chisel. But,if your dead set against it, you might try sandpaper wrapped tightly around a long block, maybe 1/2 inch square and three to five inches long. Its tough to adjust your lines if you take off too much or gouge the wood which is easy to do with a Dremel (most of us have learned that the hard way.) Manual sanding will give you more control of the depth and the long flat surface under the sandpaper will help yield a level, smooth keel. For me, part of the fun of this hobby is learning the skill and techniques including new tools. I am new to the hobby and spend a lot of time learning how to use tools that are new to me from chisels to soldering, jig saw to lathe, and so on. In Frolich's book, The Art of Ship Modeling he says, the ship modeler needs to be "... a carpenter, carver, coppersmith, block-maker, rigger, sail maker and painter" ... "using a multitude of crafts ... working with wood, metal, fit, saw, turn, solder, glue, make rope, drill, grind, cut sails, sew, dye, paint, dozens of motions, techniques, turns of the hand." I agree with him. Richard
-
I appreciate all your responses. Jaager, The retailer I mentioned has cherry and maple. Would these be similar to rock maple and black cherry? Doc Blake, The retailer has Bolivian rosewood, Indian Rosewood, Yellow Heart, cherry and maple. Sometimes they have holly. and blood wood. I have already ordered yellow heart and cherry from them, and will experiment with these and will order the others you recommended next time they have a free shipping offer.. Mahuna, I will check out the woodworkers source. Hopefully they have a website. all, I am afraid that harvesting my own is not in the picture for me which is why I am checking what is available that is square and in thin thickness. Thanks Richard. Thanks to all Richard
-
I have recently begun to mill my own lumber. I find that boxwood and Swiss pear, while most popular, are expensive and often difficult to obtain. So I began to look for more readily available, and less expensive wood. Wood that would have fine grain and other attributes required for modelling. I have listed below some of the varieties of one online retailer that is available various, thin stocks, some stock as thin as 1/8". So I wondered which of those you all would use and for what. Again this list is only from the stock of one, major, U.S. retailer and are readily available. Walnut Cherry Maple white ash Basswood Purple Heart padauk red heart's Bolivian Rosewood east Indian Rosewood katalox bubinga African mahogany granadillo I was going to do this as a survey but really looked forward to the comments. Richard
-
thanks Matrim, richard