rtropp
-
Posts
936 -
Joined
-
Last visited
Content Type
Profiles
Forums
Gallery
Events
Everything posted by rtropp
-
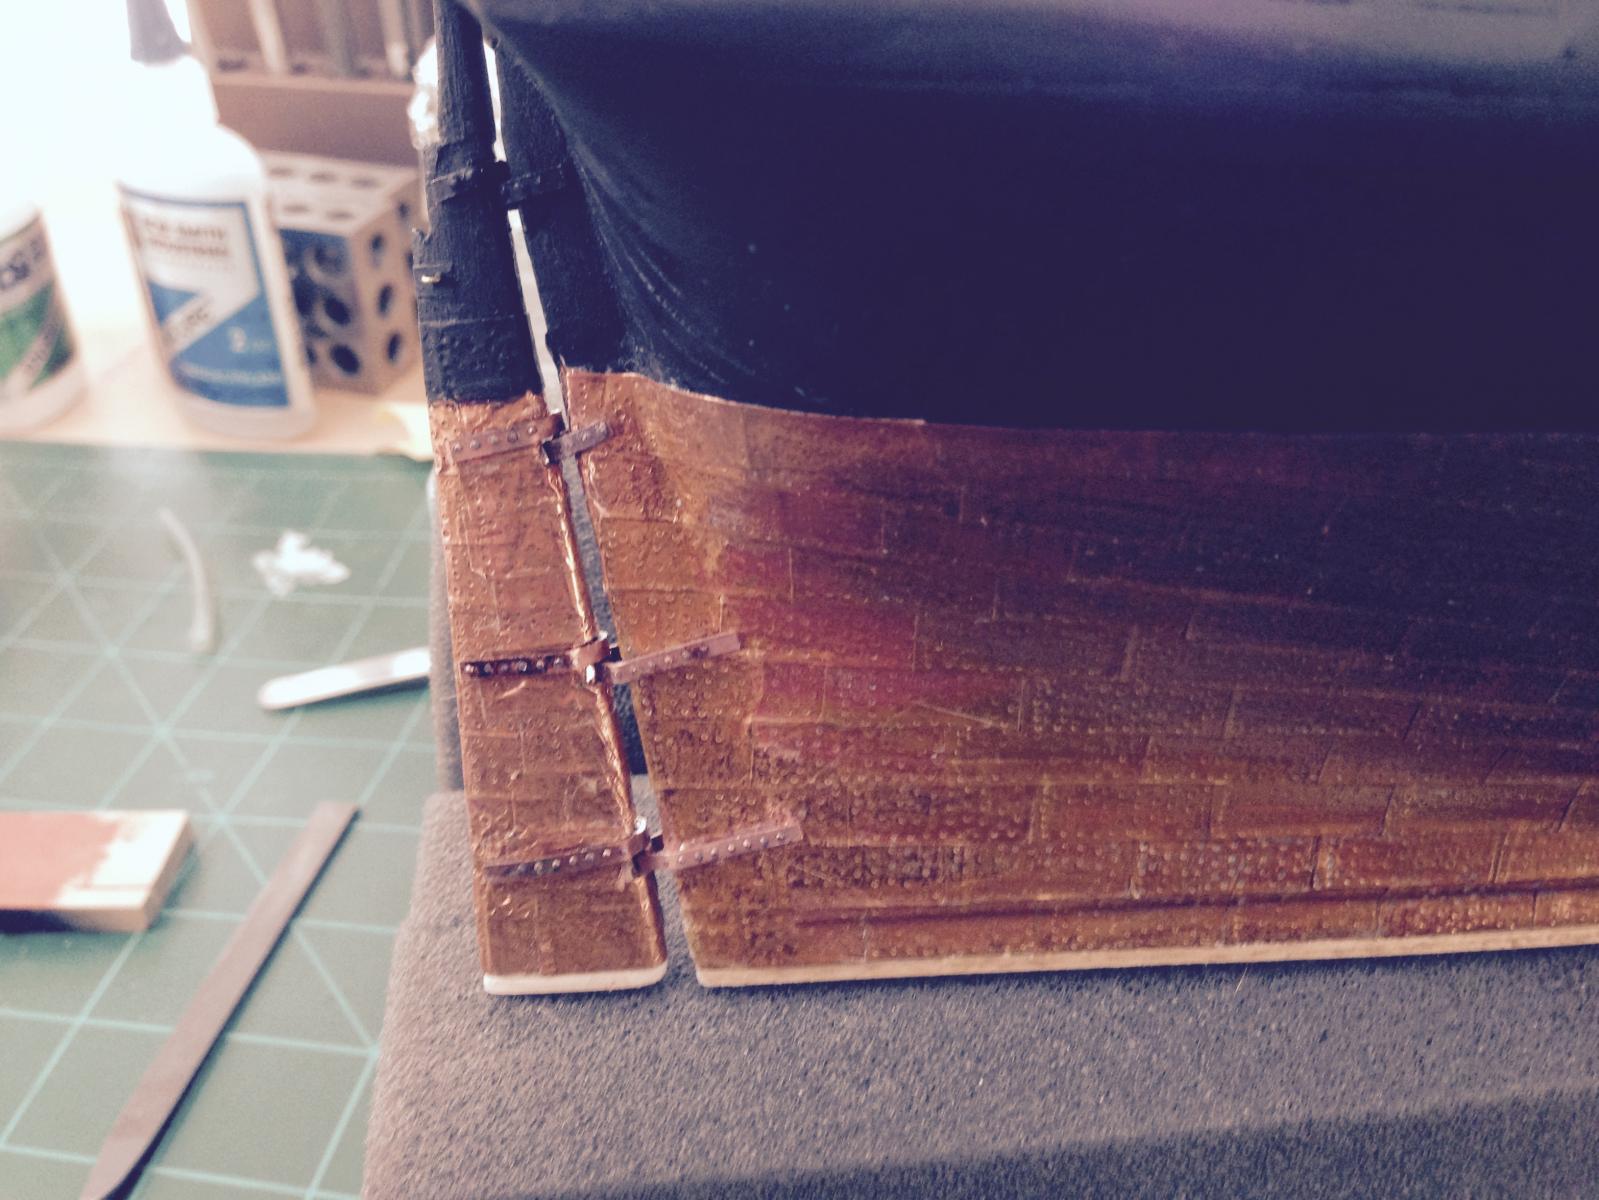
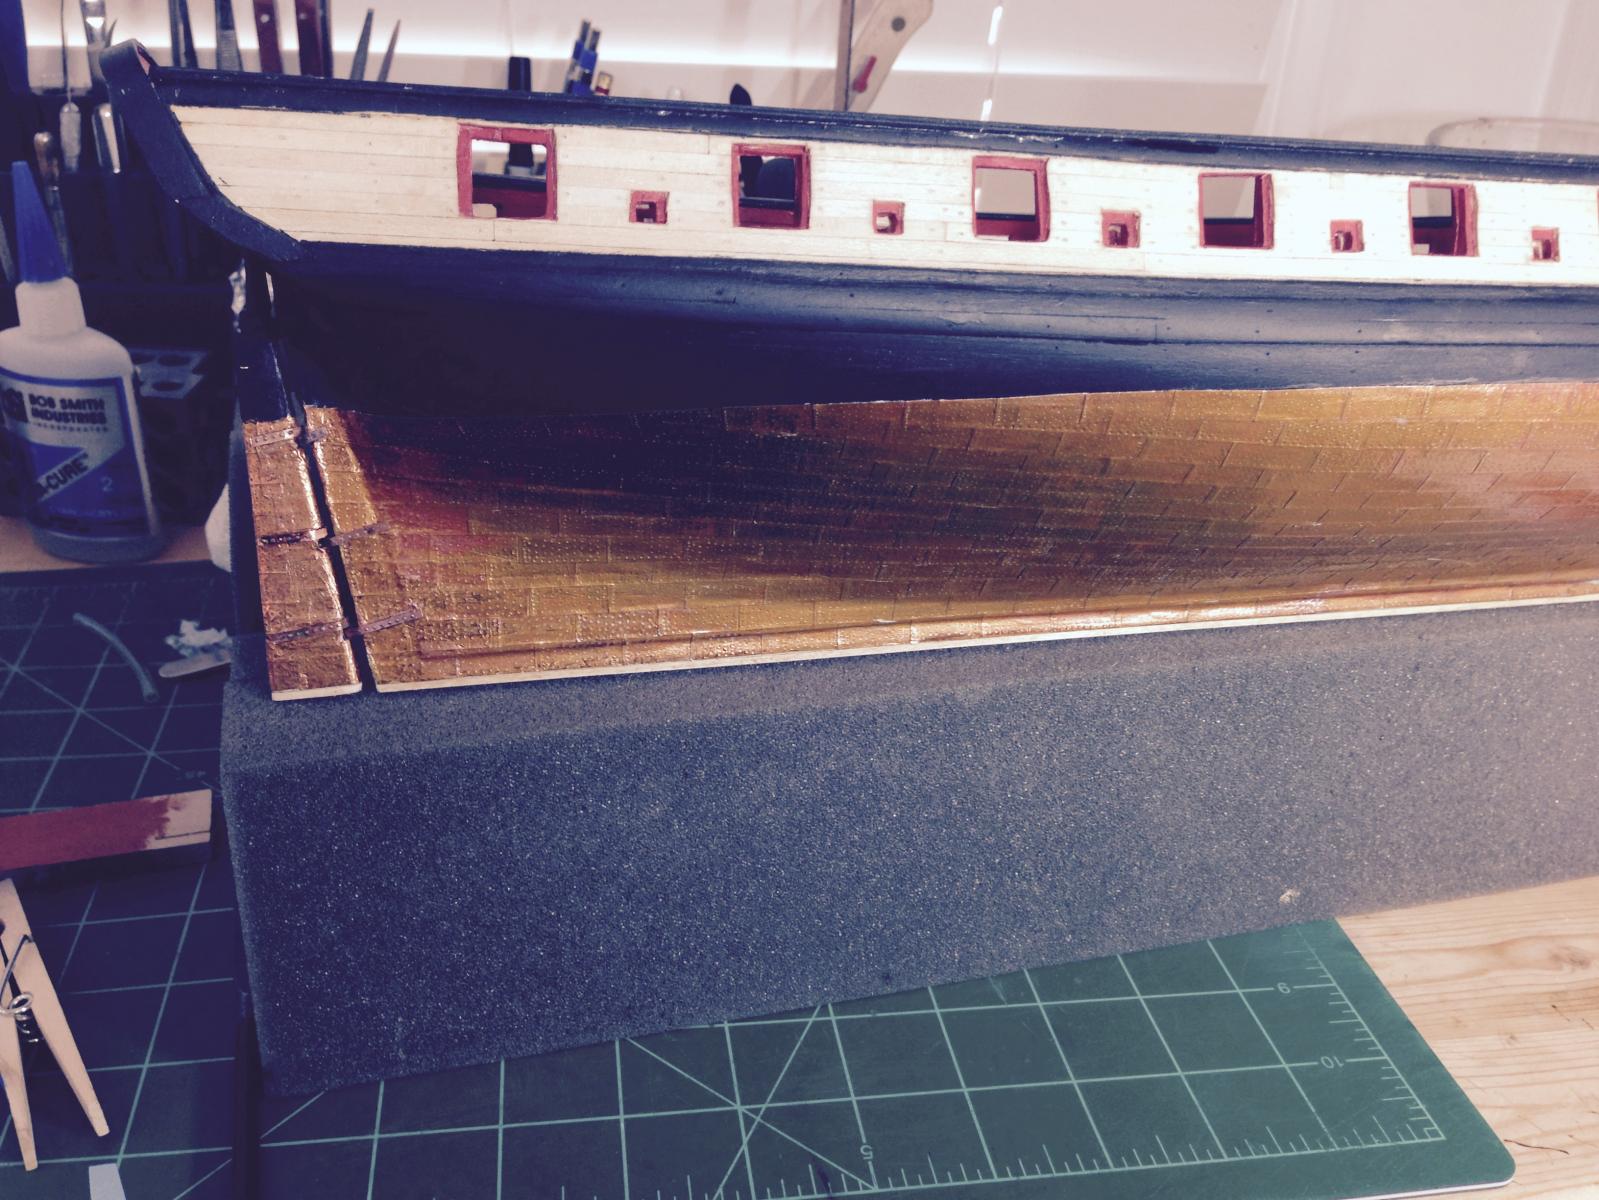
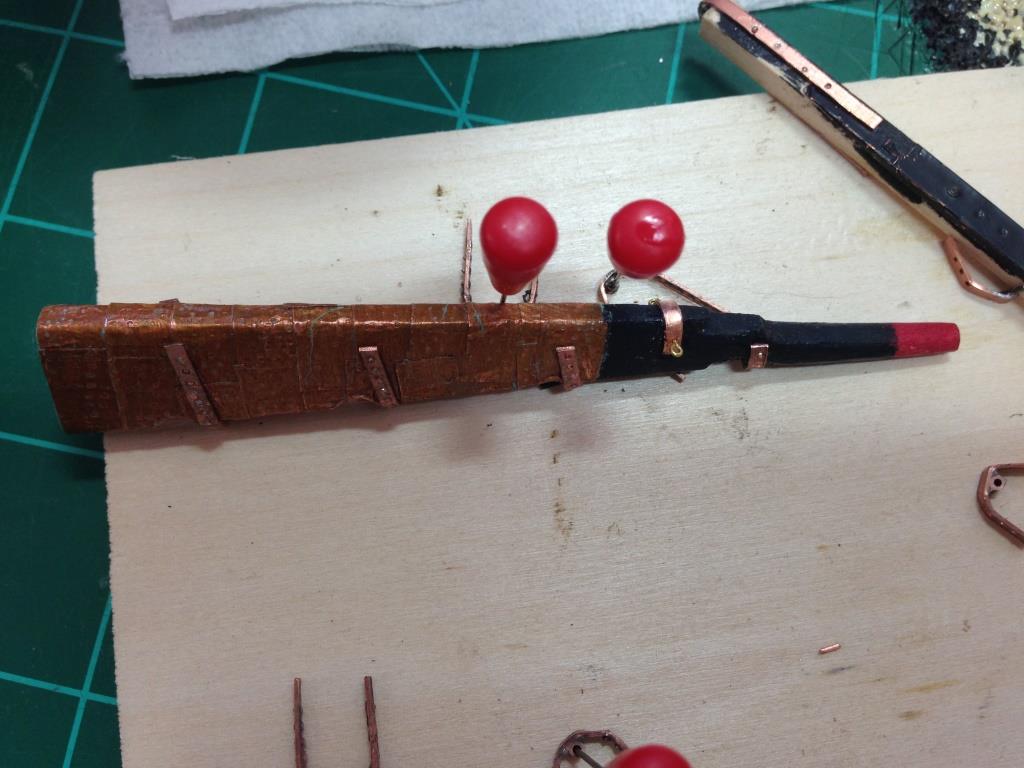
Finally the rudder in place and close up Honestly, I am not sure how I feel about it. The rudder will actually move, so all of that worked out alright. But, there is a little too much space between the rudder and the boat. I can see where I left some space between them during the gluing. I was thinking about taking it apart and redoing it yet again but it has taken a long time to get this far and I am eager to move on to the next challenge. Also, the copper looks a little beat up but the build is not meant to look new and fresh out of the yards. That's part of the reason for aging the copper. I guess I'll sleep on it and then decide. Thanks all for looking in Richard
-
if you enter "soft sander" in the amazon search window you will find a number of them from different sources including Grizzly. Richard
- 456 replies
-
- 2
-

-
- finished
- bomb ketch
- (and 2 more)
-
Tips and Tricks for Airbrushing
rtropp replied to JPett's topic in Painting, finishing and weathering products and techniques
Good thread, very helpful. I started learning how to airbrush when I began my build about a year ago. I only use it occasionally. For instance, I just used it to paint one pintle and one gudgeon that needed to be black. It is a lot of effort to get ready for just the two pieces but with the air brush I can see the heads of the nails on the pintles. Very nice. My process is to run a load of cleaner (brand compatible) through the cup after every use. Running about 1/4 of the feed cup I repeat four or five times. Maybe overkill, but I will do almost anything to avoid taking it apart. My set up is an inexpensive one, a compressor made for beauticians and two inexpensive, double action airbrushes. One supposedly similar to the Iwata. They seem to work pretty well and serve their purpose now but if I continue to use it I can see an upgrade of both the compressor and airbrushes in my future. I use acrylic, Badger Model Flex Marine Colors. They also seem to work pretty well and the colors are labeled in marine nomenclature which is kind of nice, i.e., hull black, wrought Iron black, etc. J Pett, Hmmm... five minutes to break down and reassemble? Well, I can break it down, clean it a rebuild the gun in just under three hours... yes, three hours. All those teeny parts. The most trouble is with the little feed gizmo that hooks to the trigger and its spring. It can real frustrating. After the last time I reassembled it my trigger became sluggish. It lacks the smooth, responsive feel it had. The next time I take it apart to clean I will see what I might have screwed up. I think my real challenge will be when I start to use it to varnish. Since I work inside, I found it much easier to stick with acrylic. It dries while still in the air and I can easily vacuum any paint "dust". I'll have to figure out a collection / venting system without having windows that have standard frames for opening. Richard- 39 replies
-
- 1
-
-
- Airbrushing
- Tips
- (and 1 more)
-
Bill, That's hard to answer. Since I this is my first model, I am into trying different things so always think its a good idea. I found the cellulose easier to work with than poly. It seemed a little clearer and had few brush strokes. But, that can be an inexperienced hand talking. I only found one place in the U.S. that carried it but there might be more in Canada. Richard
-
Silver soldering - Copper vs Brass
rtropp replied to rtropp's topic in Metal Work, Soldering and Metal Fittings
grsjax, had not thought of that. I will give it a try as soon as I get my torch back. David, I bought some flakes and tried them but they were really tiny and difficult to place. I will try shaving some off a silver solder wire and using that. Thanks, Richard -
Chuck, Thanks for the close up. I did not use pencil before filling when I first attempted treenails. I did not like the look so I went to making treenails. Next time around I will experiment with this technique. As for the change in color in the photos, I believe the light settings on cameras are programmed to rebalance color depending on the light source. The goal of the rebalance is to give a natural look for light sources other than natural (outdoor lighting). So using outdoor setting, which looks for one color balance (natural) in what is actually fluorescent light (which gives a greenish hue to things) will trick it into thinking that the greenish color will accurately display what you see. If you hold the second picture next to your build, you should see a difference in wood tone where the first one should match correctly. Now, that comes from 40 year old photography experience and others may correct this. Richard
- 1,051 replies
-
- 4
-
-
- cheerful
- Syren Ship Model Company
- (and 1 more)
-
Silver soldering - Copper vs Brass
rtropp replied to rtropp's topic in Metal Work, Soldering and Metal Fittings
I tried to use silver solder with flux (wire) and it did not melt. I thought that the copper might be the problem so I just held the wire solder in a tweezer and put flame to it. It did not melt. Just to be sure before I continue my efforts, I sent the torch to Blaze to have it's operation checked. I probably is skill rather than equipment, but before I use up more supplies I thought I should make sure. If the copper is wicking the heat away, how would I work around that. Most of my work will be with copper. Thanks for the help, Richard -
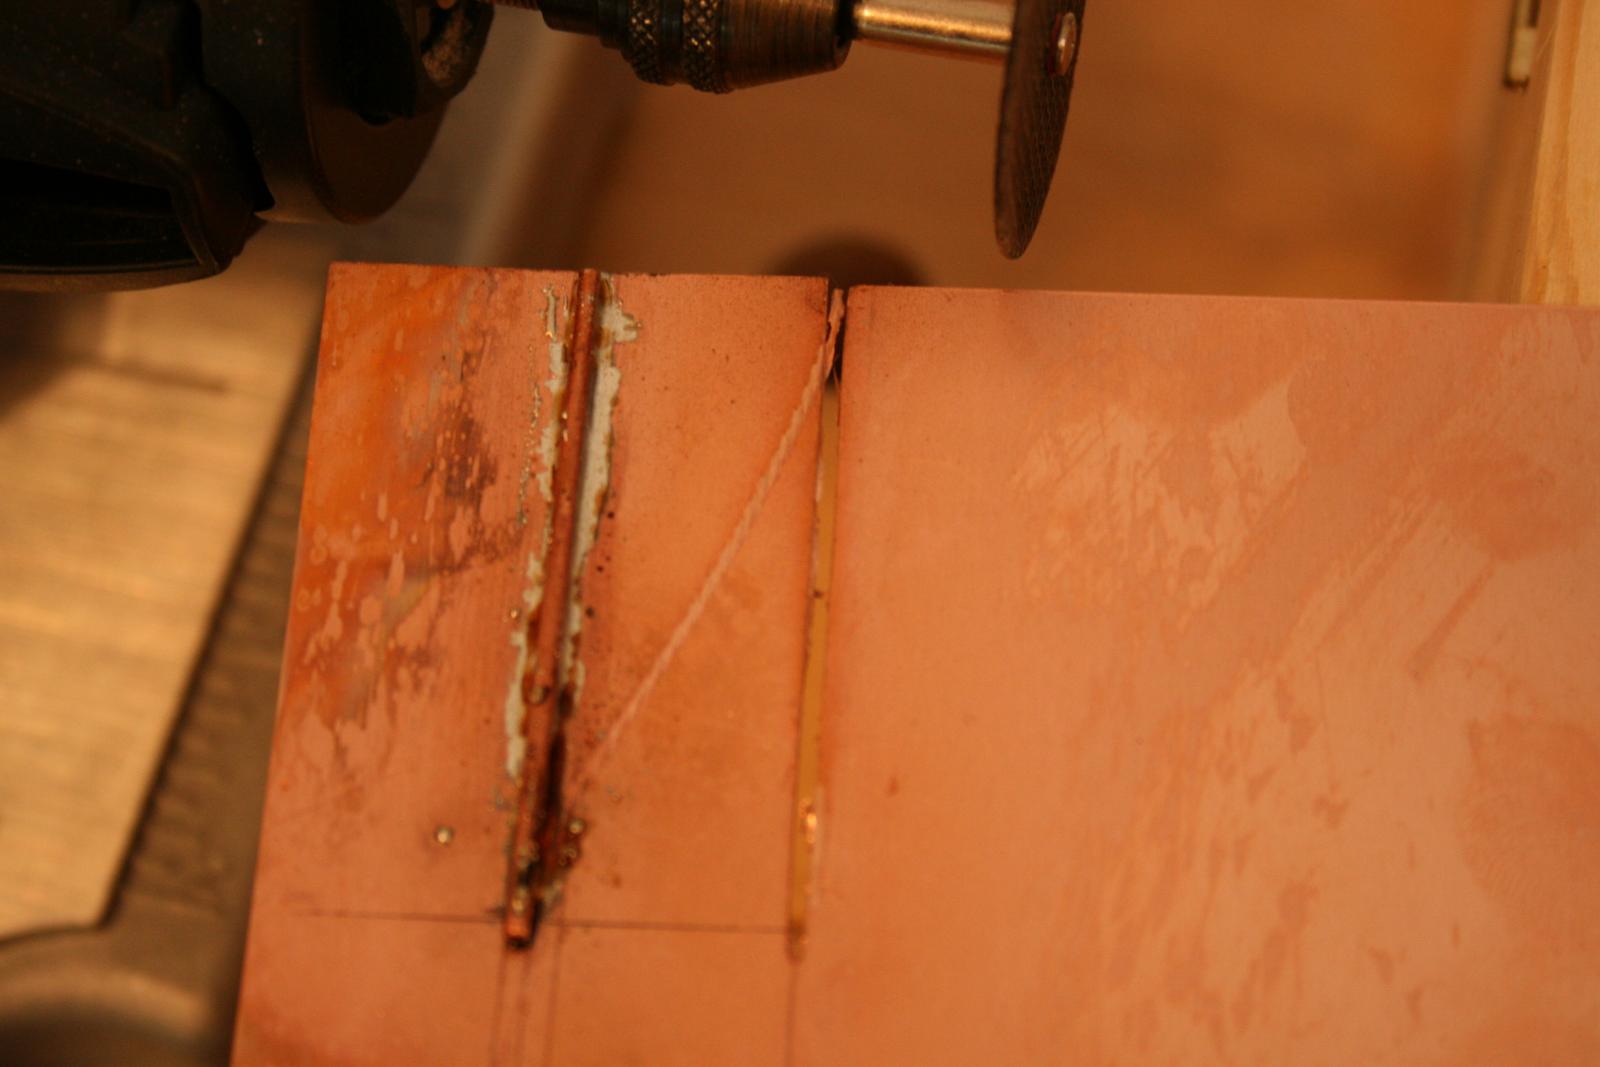
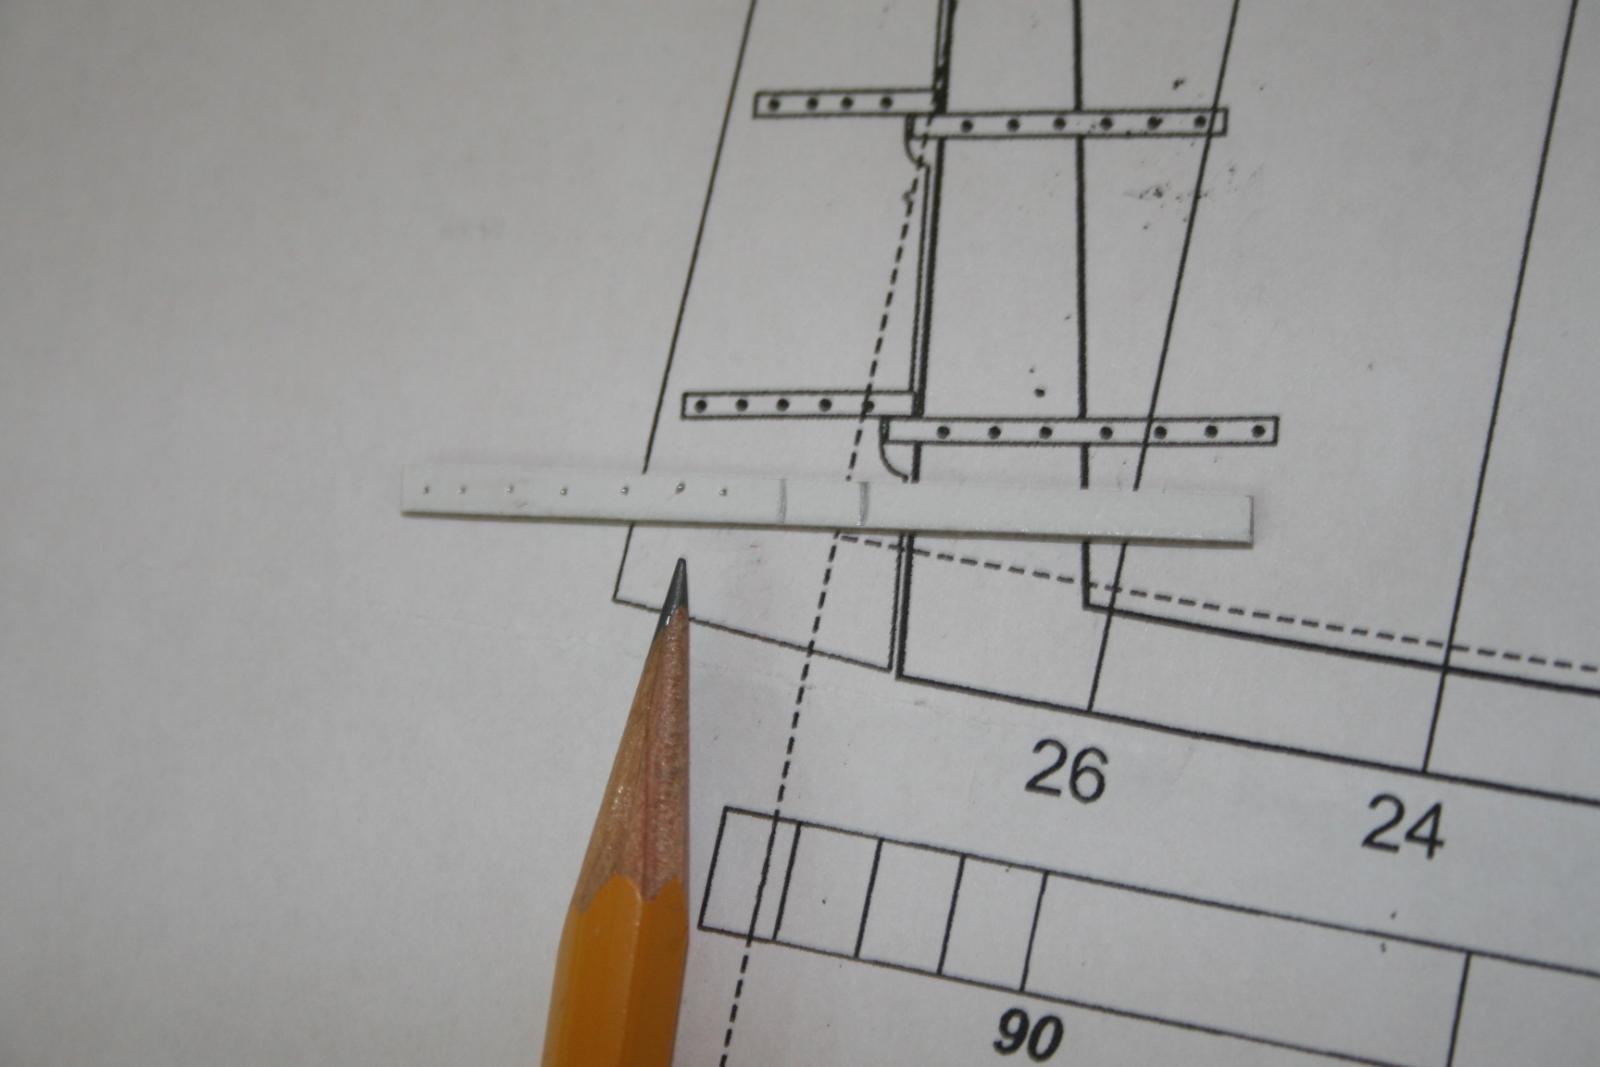
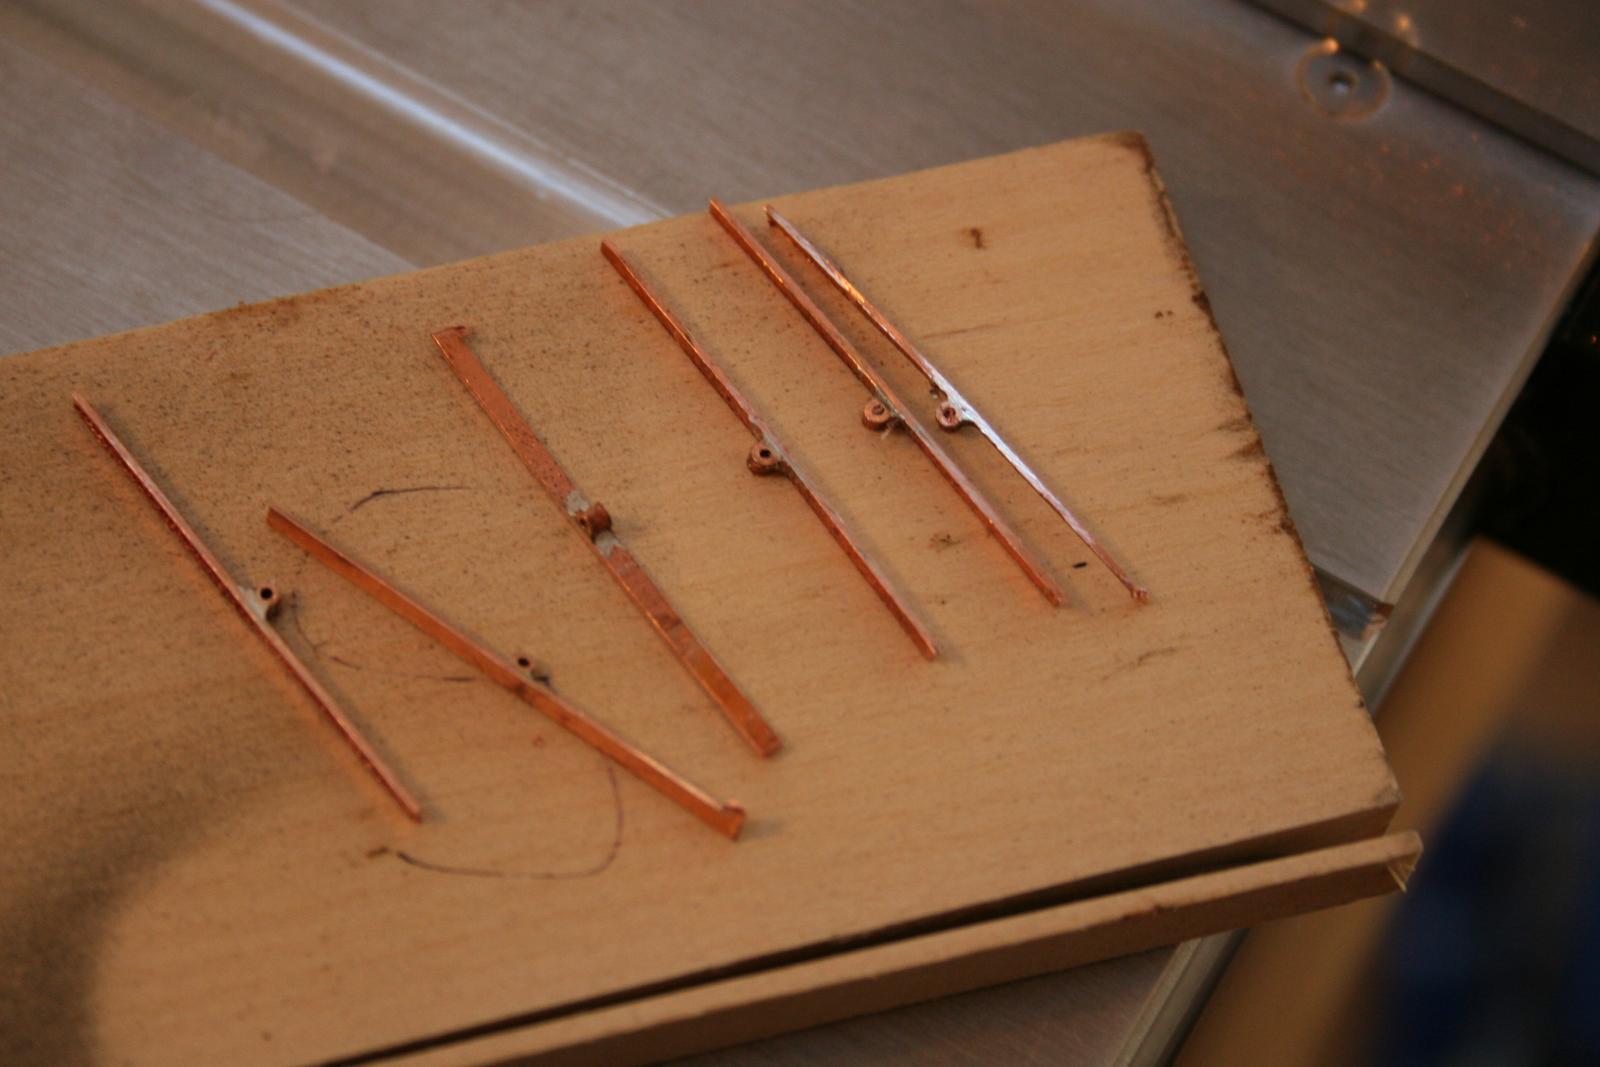
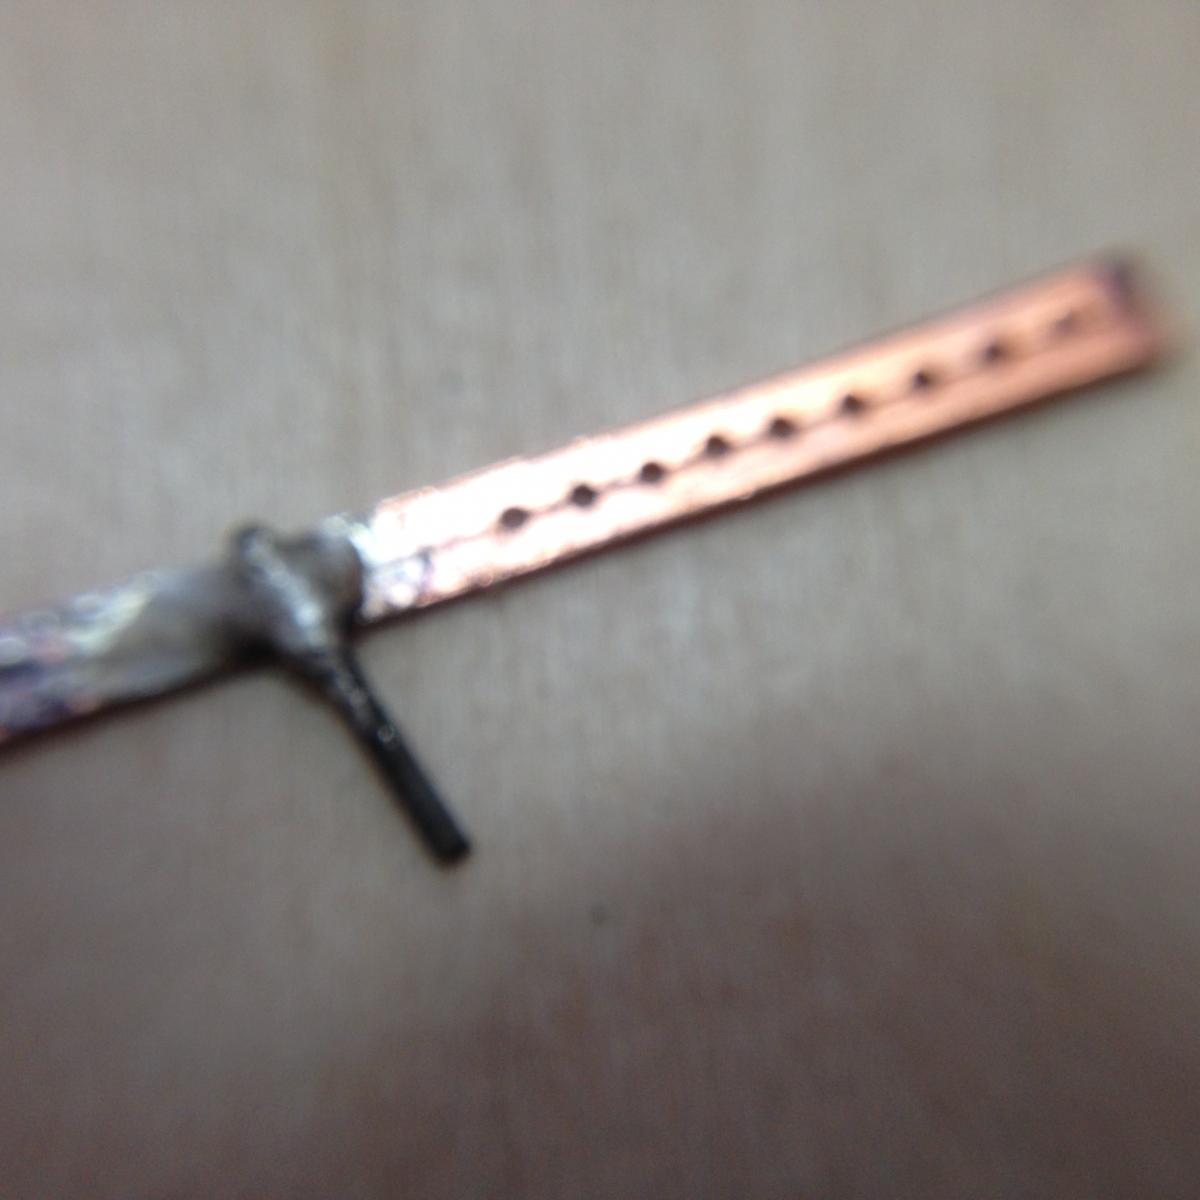
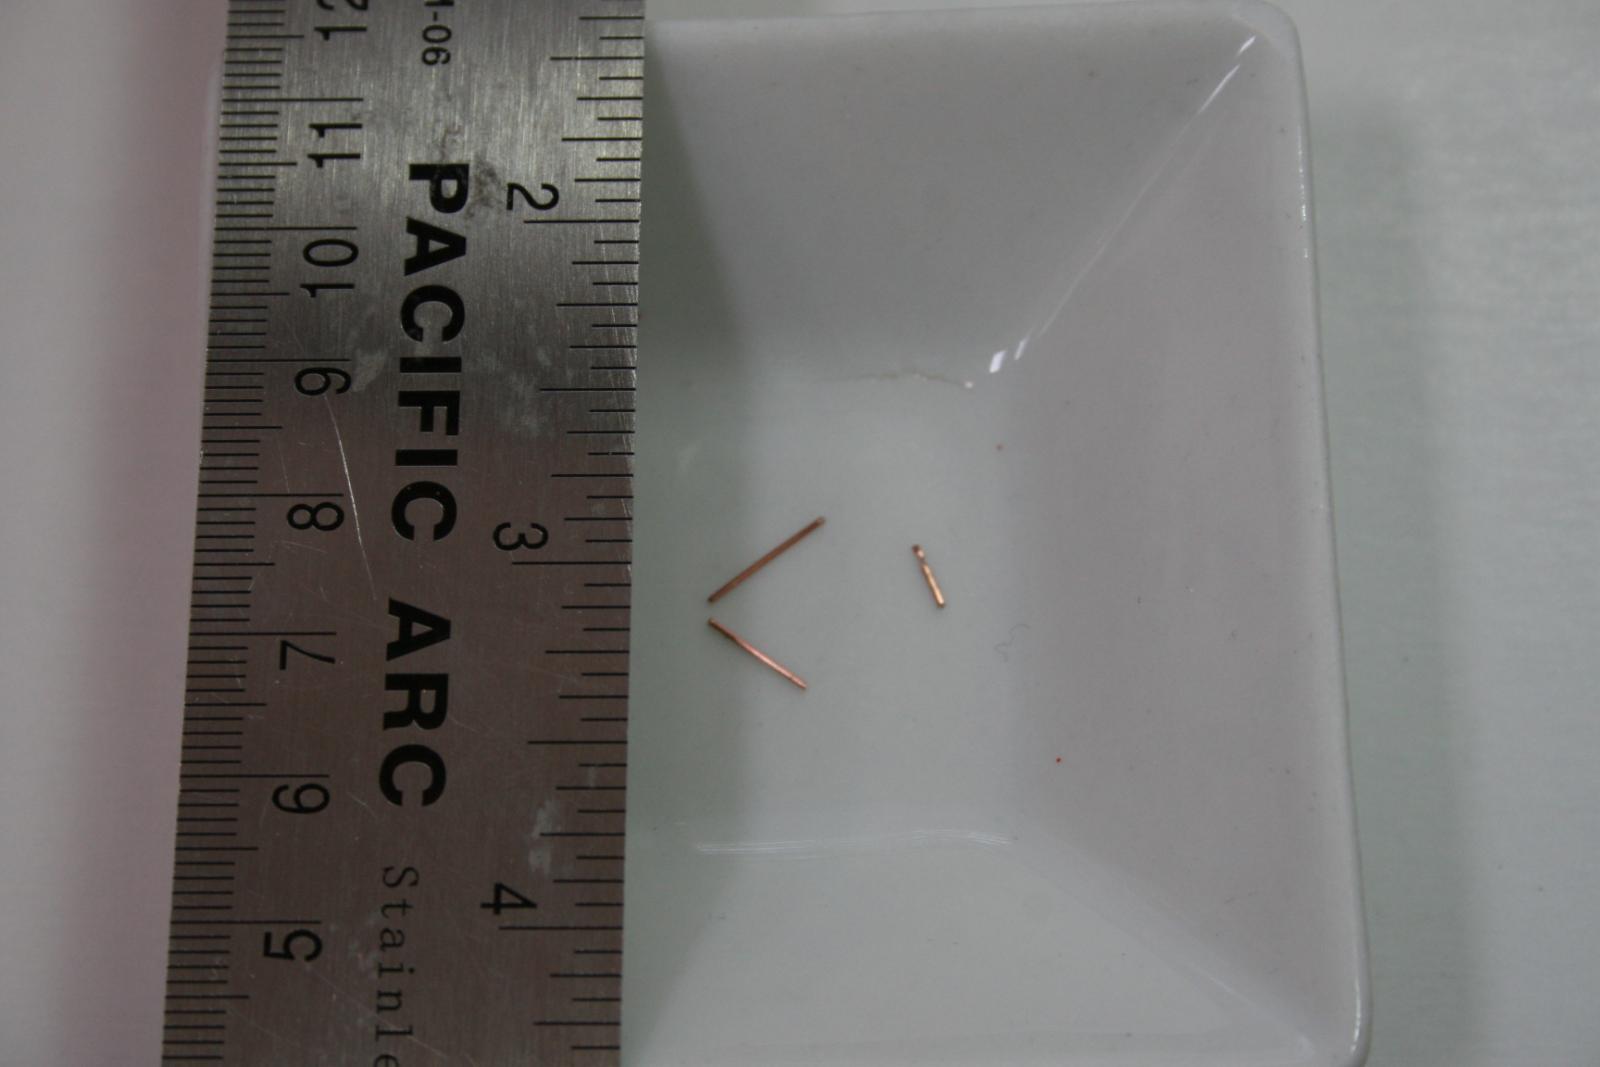
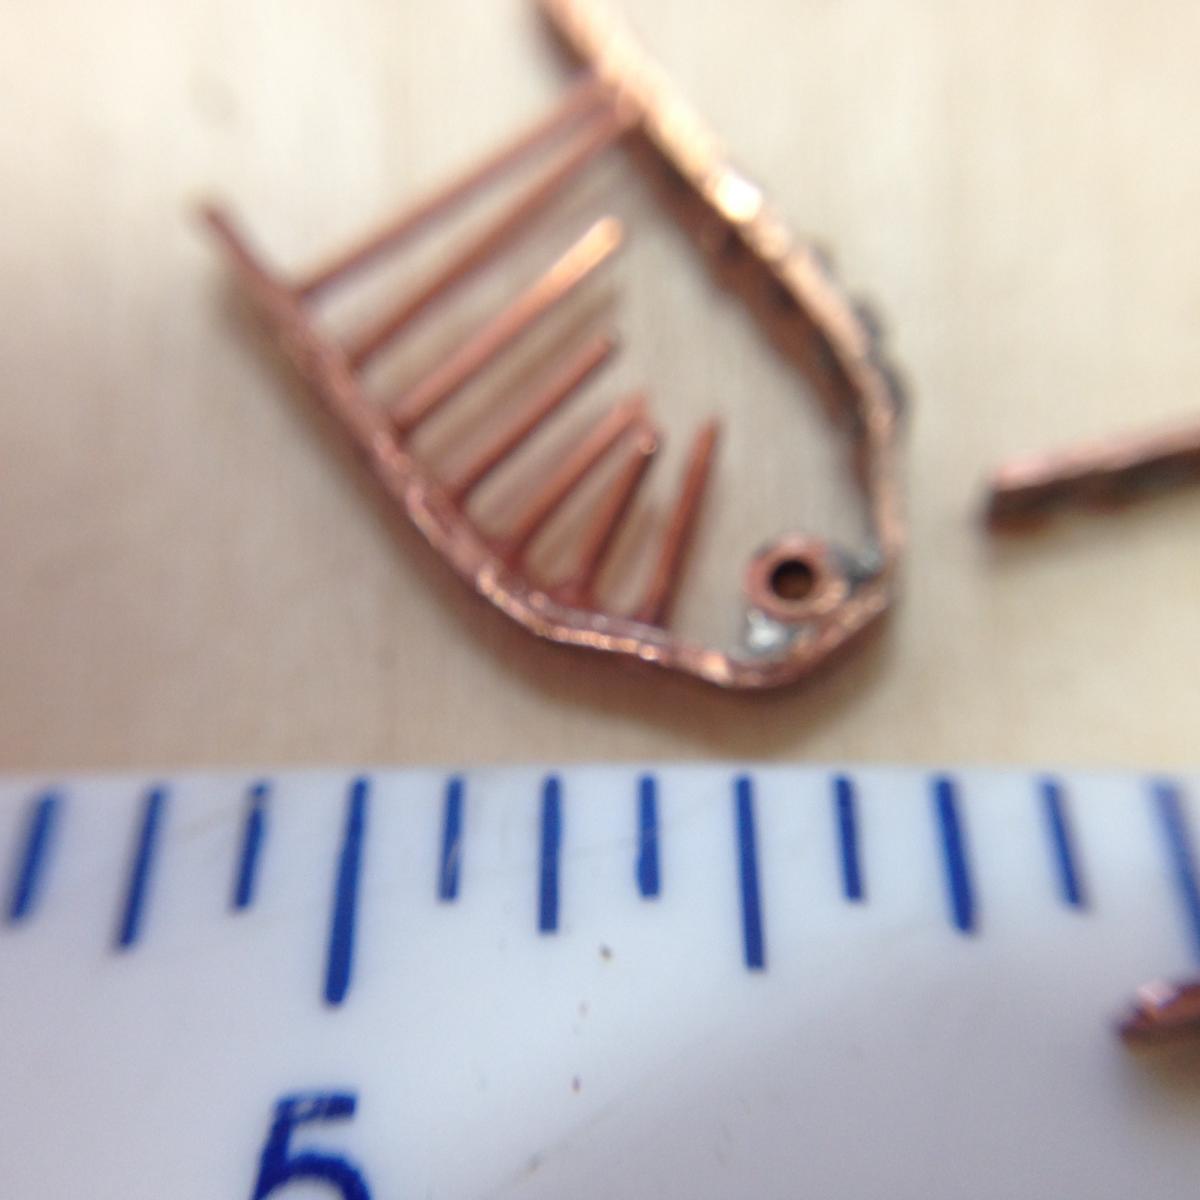
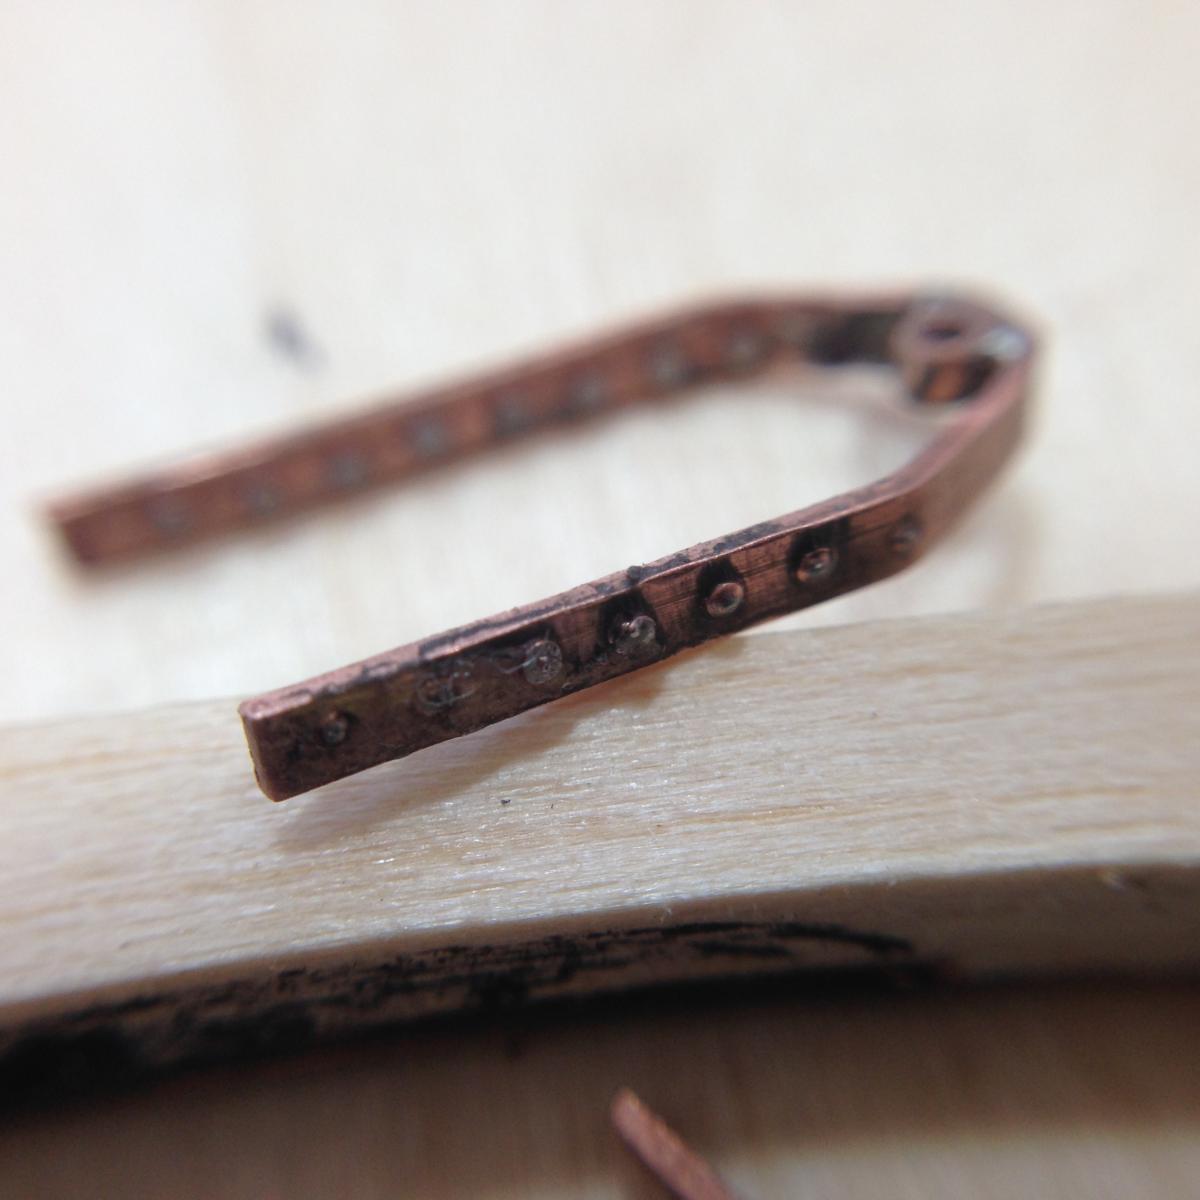
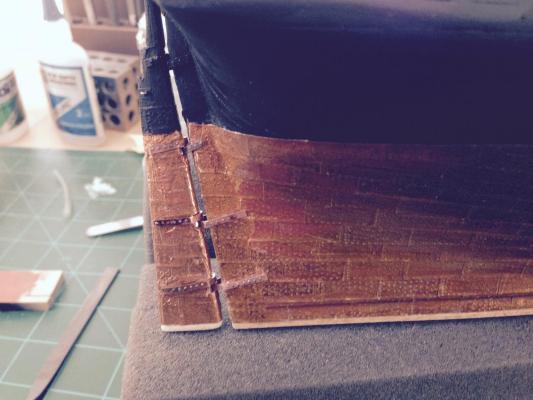
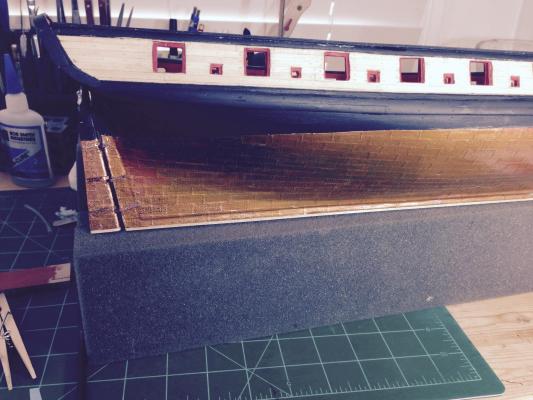
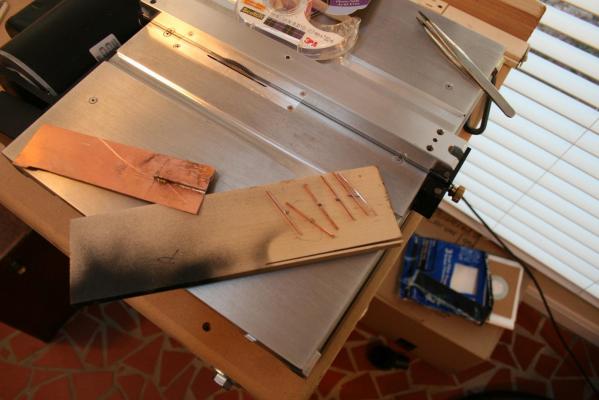
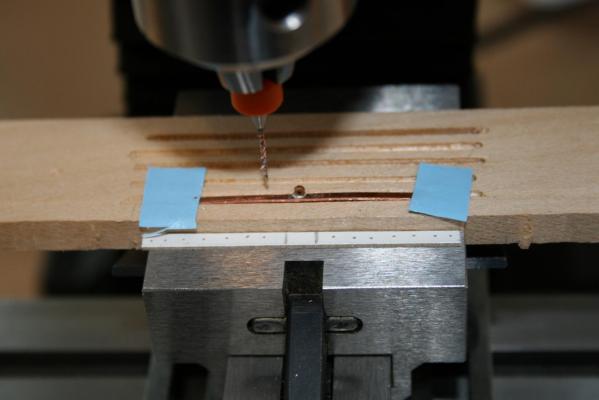
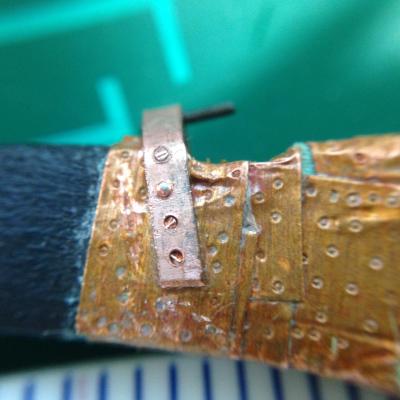
Hi all, well, a couple of weeks have gone by and I am making some progress. I also revised some of the work described in the last post. This latest round started when I decided to use copper for the pintles and gudgeons instead of brass. I tried high temperature soldering in order to use brass/copper colored solder but it will take me too long to learn so I went on with low temperature, paste solder. I could not find copper strips so had to learn how to fabricate from sheet. For the Gudgeons, I first soldered a copper tube to receive the pintle. You can see in this picture that I tried the dremel first but it was too coarse a cut. So I switched to my table saw with a fine blade. Then I cut 1/16" strips on my table saw. (I fabricated the pintles differently, cutting the strips first then soldered the pins in place.) At his point the pintles and gudgeons were dipped in vinegar and salt solution to age them to match the copper plates on the hull. (That is the reason for some of the dark spots you see on the copper.) I decided to simulate nails using the method shown by Alexey Domanoff - "Making small nails with round heads" can be found on youtube. The pins shown below will be shortened even more before attached in place. I then created a drilling template. Free hand drilling following the template did not yield satisfactory results so I used the template to mark the center as well as the ends of each Pintle and Gudgeon and used the compound table on my mill to create a straight line of holes that were equidistant. I used two sided tape to hold the strip on wood backing and some additional tape to keep the ends firmly in place. I did two of each to make sure I had extras for fabrication rejects. (should have made 4 or 5 of each:-) The pintles were glued on the rudder then the holes were cut into (not through) using the existing holes in the copper as guides. I handled the gudgeons differently. For these, I inserted the nails, used CA, then cut the the nail flush to the inside. Finally I added the rings for the rudder chains. That about covers the last few weeks. Next challenge is attaching the rudder with the pintles and gudges to the rest of the ship. Richard


-
US Brig Syren by Gahm - Model Shipways
rtropp replied to Gahm's topic in - Kit build logs for subjects built from 1801 - 1850
I guess that not having a cannon ball when you need it is more dangerous than tripping over one on the way to your hammock:-) Richard -
Your tree nailing looks a heck of a lot easier than when I used a draw plate to make the wooden nails. Is it possible for you to take a close up picture of the tree nails so I could get a better look? Thanks Richard
- 1,051 replies
-
- 1
-
-
- cheerful
- Syren Ship Model Company
- (and 1 more)
-
US Brig Syren by Gahm - Model Shipways
rtropp replied to Gahm's topic in - Kit build logs for subjects built from 1801 - 1850
Thomas Beautiful crastsmenship. It's great to have your examples as I work through my build. I had a thought, really a question. It seems curious that there would be cannon balls at the entry to the companion way. Wouldn't that have been a hazard? Richard -
Hi Randy, great build, I will enjoy following along. Richard
-
Hi Chuck, I will come along for the ride. Richard
-
Silver soldering - Copper vs Brass
rtropp replied to rtropp's topic in Metal Work, Soldering and Metal Fittings
Mark, You are correct. They are not silver but they are sold as a high temperature solders along with the actual silver solder and supposed to act the same. When used with the brass both performed as expected. That's what is confusing me. When I used soft solder (low temperature paste) the joint held. But, I had been advised to hard solder to reduce risk of it coming loose later. Also there are "yellow" high temperature solders that would better match the copper. Hmm... I realize after reading your comment that I have not tried the same thing with actual silver solder. I have some in flake form and will test it today. Jud, I am using a silquar board which reflects heat back to the piece. I am not clamping the pieces since both are flat and stay in contact without pressure. But, I will recheck my set up just in case. I appreciate all your tips and am working through them. I may go ahead and make the gudgeons using soft solder just to move ahead with my build, but I will continue working with hard soldering to master it. It has become a challenge. Richard -
Silver soldering - Copper vs Brass
rtropp replied to rtropp's topic in Metal Work, Soldering and Metal Fittings
Harvey, I used emery paper in all trials and could see the shine come up before setting up for soldering. I did the same with the brass. I had dipped them in a warm pickle solution, Sparex #2. Do I need to use acetone or alcohol instead? Also, I did not soak it for very long so tomorrow I will leave it in longer. The torch has an upper temperature of 2400 F. With the brass it only took a minute for it to melt. With the copper I kept extending the time. Finally, probably our of frustration, I went about 10 minutes. As I think of it now, the solder wire was still a wire an not melted for these trials. With the brass it melted as described. I will do as you suggest and coat the tube and the sheet separately and see what happens. The parts were in direct contact. The sheet was flat and the tube was straight. In some of the trials I made sure to apply a fair amount of pressure to make sure they were in contact. Thanks for the tips, I'll will let you know tomorrow how the trials went. Richard -
Silver soldering - Copper vs Brass
rtropp replied to rtropp's topic in Metal Work, Soldering and Metal Fittings
The copper sheets are K&S copper sheet, 14 gauge. Richard. -
I recently used cellulose varnish but only for the copper plating at this time. It gave a fine, protective and clear finish and was easy to work. Richard
-
Silver soldering - Copper vs Brass
rtropp replied to rtropp's topic in Metal Work, Soldering and Metal Fittings
Yes and yes. They were not only cleaned with an emery cloth but also dipped in pickle before and after. To make sure it was not an isolated incident, I repeated the solder 6 times, 4 in copper (failed) 2 in brass (worked.) Richard -
Silver soldering - Copper vs Brass
rtropp posted a topic in Metal Work, Soldering and Metal Fittings
Hi all, I am running into some problems silver soldering. I am trying to fabricate gudgeons using .016 thick copper sheet with copper tubing. My set up and technique closely follow the lessons available on Youtube, Rio Grande supplier and Beadalon. I have tried a number of variations, all with careful cleaning etc. I cannot get the wire or paste solder to fuse the copper tube to the copper sheet. I figured I was doing something wrong but then I tried the same with a brass sheet and brass tube. No problem, the brass fused in under a minute with the paste or wire. I am listing my set up in case that helps. A Blaze torch (rated 2,500 Degrees Fahrenheit), Paste solder: Paste Solder For Brass, Bronze, Copper and Yellow Gold-Filled Item Number: 503053 Form: Paste Metal type: Base metal Liquidus temperature: 1,140°–1,500°F (616°–816°C) Country of origin: United States Wire solder: Gold filled wire with solder inside 18 gauge wire, 0.4mm diameter, 18 inches long Melt 1315 degrees F, flow 1500 degrees Use for all gold filled jump rings and chain; not pure gold solder Karat/purity: 14/20 Both solders have flux built in but I even tried adding flux in some attempts. I cannot figure out what is going on. Brass works without a problem, copper does not. I suspect I am overlooking something simple but it would make more sense if neither worked. I would appreciate any thoughts. Richard. -
Tadeusz Can you provide close ups of your stern and bow clamps in pictures #3, 4 and 6? Thanks, Richard
-
I have read about pickling in silver soldering. I will be soldering copper wire and copper parts. I was hoping for some opinions on those who do or do not pickle. I thought that pickling was to remove burn off in the finished piece but now am not so sure. One member said they pickle before soldering and after. I would appreciate any ideas. Richard
-
a quick update, Following a combination of suggestions, I tried soldering the tubes to a sheet of copper and cut it into the 1/16th strips, then, using double sided tape, attached the gudgeon to a block of wood and drilled the holes for the nails. That seemed to work. I considered drilling the holes than cutting the strip but not sure if I can hold the 1/16th tight enough to avoid the holes. by cutting them with the tube first I am able to file/correct the strip if they have a problem. I use an x-y table for the drilling and that is working out pretty well. If I get skilled enough sawing copper plate into strips, I will drill holes for nails prior to cutting. Right now I am learning how to make the nails. After a few failed attempts, I watched the video from Alex D. and use his method. I seems to work fairly well, although I am not getting a really distinct nail head, but it does look better than my other attempts. I will post photos when I have something presentable. Right now it is still a lot of experimentation. If anyone has any other methods for turning copper wire into nail heads, please let me know. I have received the torch and supplies for silver soldering. I also found a couple of silver solders that are yellow to better match copper, gold, or brass. So as long as I am in for a penny, might as well go in for a pound. ... and so it goes, Richard
-
Hi, Are your plans the same size as the boat parts, or are the plans smaller? A couple of us just bought the model and the plans do not match the kit parts, they are smaller. Thanks Richard
-
Thanks David, Works well in Windows. I will also set it up for smartphone when I get some time. Richard
-
Toni, beautiful collection. What a great room. I would be spending a lot of time in there. Have a question. Do you pickle the parts before you solder? If so, why? Also, do you pickle again after you solder? Thanks, Richard