wmherbert
-
Posts
292 -
Joined
-
Last visited
Content Type
Profiles
Forums
Gallery
Events
Everything posted by wmherbert
-
Nicely done. The equipment you made for the top of the pilot house came out well. A nice touch. All the little odds and ends are fun to make and add a lot of interest. Your hose worked out well in cloth. I made mine with silkspan but it didn't roll up as smooth. I think the cloth worked out better. I agree, not much deck space left. Bill
-
Looking very good. I like the nice touch of making the grating for the platform. I had trouble with the handrails also. I also had to install the lower rail in sections. Came out fine like yours but it seemed like there had to be a better way. Not a lot of rigging so you're nearly at the end! Have you made a stand for it? Bill
-
Great job on the windlass! A huge improvement.
-
David, The life boats came out very well. I have seen Tom Laurie's video. I made up some sails today. I'm going to attach the mast hoops to the sails before slipping them on the masts and booms while off the model. Then I'll try furling them. I'll let you know how they come out. You're making nice progress. Bill
-
David, Looks like you got it figured out right. The only part you can't see is what is going alongside the life boats on the sides of the house. I remember seeing a photo somewhere showing that section as an exposed rod like you have done but I can't find it now. I noticed in your photos that there are two taller vent pipes aft of the house that I didn't notice. So back to some more construction. I started shaping mast and spars while glue elsewhere was drying. Looks pretty straight forward . Any thoughts on sails? I think I might try furled sails with silk span. I like sails on models so I will give some thought to furled or full. Also I noticed that the aft galley exhaust pipe has guy wires for support while forward one doesn't. I've been avoiding ladder construction.., but cant keep putting it off. Bill
-
I'm a fan of sails on a model. Yours are looking good. Also nice rope coils. Bill
-
David, Ladders came out great. The wing walls look a lot better with the wall framing rather than the solid slab of wood the kit provides. It's my next construction too. Where do you get the strip metal you used for the ladders? Bill
-
Wiping the end of the thread with some CA makes it much easier to get the line thru the block. And drill out the hole in the block so the line can pass thru easily.
-
Welcome. And don't worry , your English will probably be better than us americans
-
I too have a long way to go on my soldering skills, or lack of them. I did ok on a 1:48 scratch built tug on my first attempt at soldering rails but failed miserably on a 1:72 plastic LCT kit. But on the plastic kit I used polystyrene rod and glued it. Came out pretty good. I think I will try that again for the ladders. Also I'll try gluing brass rod pieces. Bill

- 64 replies
-
- 2
-

-
- St. Roch
- Billing Boats
- (and 1 more)
-
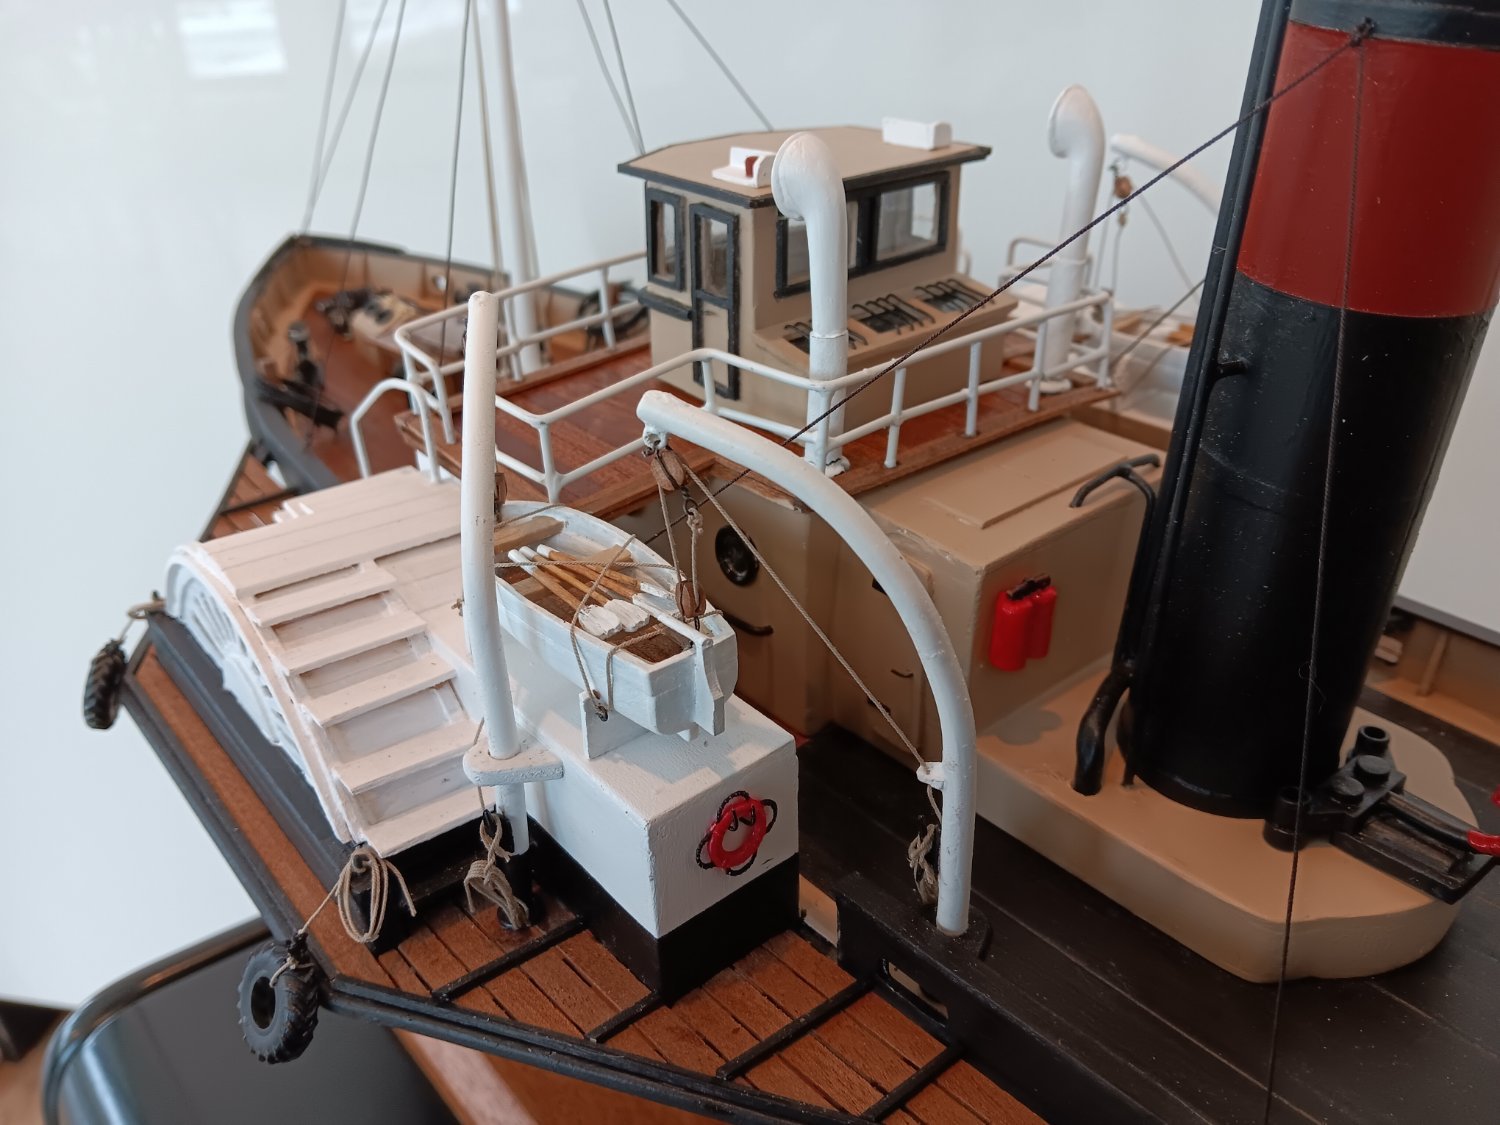
David, looking very nice. I like the opening pilot house window. (I will copy that) The hose valves are a nice touch. Did you use the plastic for the glass in the pilot house? Also did you paint the interior of the pilot house black or is that just the photo? I added plastic behind the port lights in the main house but I'm not sure if you can actually it. I've been working on the stack. Trying to get the top piece to look like the real thing and shaping the flattened sides of the stack itself . I would like to figure some way of making the small flat vent near the bottom. I'm sure you will come up with a good idea that I can copy! And there is a little box on the back wall of the main house that will be fun to construct. What are your thoughts on the ladders? Bill
-
Welcome. I saw Passagemaker about 18 years ago on the hard in a boat yard in Trinidad Bill
-
David, Good idea for the fire hose. I'll try with some silkspan too. Looks like you are coming along fine. The forward plating is a nice touch. Now that the house roof is on pretty much everything else are details. I'm about as far along as you are. Just about ready to build the house. I have just about all of boxes etc built and ready for paint. I need to do final coat of topside paint and then paint rub rails. Then mount rudder and put on stand. This is a pretty fun model. Bill
-
Looking good. are you going to plank the sides of the main house? I tried making the rack for the fire hose that is on the ship but not the kit. Rack came out fine but haven't figured out what/how to make the hose. This model has a bunch of deck structures that are kind of fun to make and miscellaneous vents and pipes that should add to the details that always seem to add a lot to a model. I'll be interested in how you approach these. Bill
-
Welcome. Is that a kit or scratch built? Really nice looking
-
Certainly no expert. But I would have hoops stacked at base of masts. And if you decide to do sails they are there. Need to get them on before the trees or you'll never get them on. Easy to forget. (Don't ask how I know this? Bill
- 184 replies
-
- 2
-
-
- Bluenose
- Model Shipways
- (and 1 more)
-
Planking came out very nice. Not much fairing to do. Bill
-
Beautiful build. The rigging on these ships is amazing and you pulled it off perfectly and at that scale. You should be proud of yourself.
-
Look at the trouble figuring all this out for a ship less than a hundred years old, In the time of photographs and films and still existing. Then think about the accuracy of information about ships from 2-300 years ago. we need to keep on mind that these ships were not built as museum pieces but as working craft that changed over the years as usage and technology changed. So historical accuracy is important to an extent but remembering it's just a snap shot of a moment in its life. We get to chose what we want it to look like. For example I've never liked the blue gray paint color and reddish deck paint and feel no guilt about changing it to how I would have painted it. Bill
- 64 replies
-
- 2
-
-
- St. Roch
- Billing Boats
- (and 1 more)
-
And of course if it's not a steering wheel up on the roof then where was the one shown in the film. A nice little mystery.
-
Also there is a tripod structure up there which almost looks like some sort of search light.
-
You are right about steering base being triangular rather than round. So it is a bit puzzling. The other things looks like it has a Compass on top of it. I think that this is a Compass that is connected to an autopilot. I had something similar on our old sailboat. If so it is certainly an add on and not from the original time period. Bill
-
David thanks for the parts info. One question. It seems to me there was an outside steering station on the roof of the pilot house. I think it shows on the 360 virtual covered with canvas and the documentary about the voyage definity shows the skipper standing outside doing some steering. Have you noticed this? Bill
-
Hull is looking very good. I think i do the planking about like you do. Although I have never used pins or nails to clamp the planks. I use a drop of CA at each bulkhead and pva along the joint between planks. I'm certainly not skilled enough to plank like the good modelers do. Bill
-
Oh, my vote is to space port lights to look right regardless of historical accuracy.