chris watton
-
Posts
2,205 -
Joined
-
Last visited
Content Type
Profiles
Forums
Gallery
Events
Everything posted by chris watton
-
 Smoke signals and national TV and newspaper ads should cover all the bases...
 -
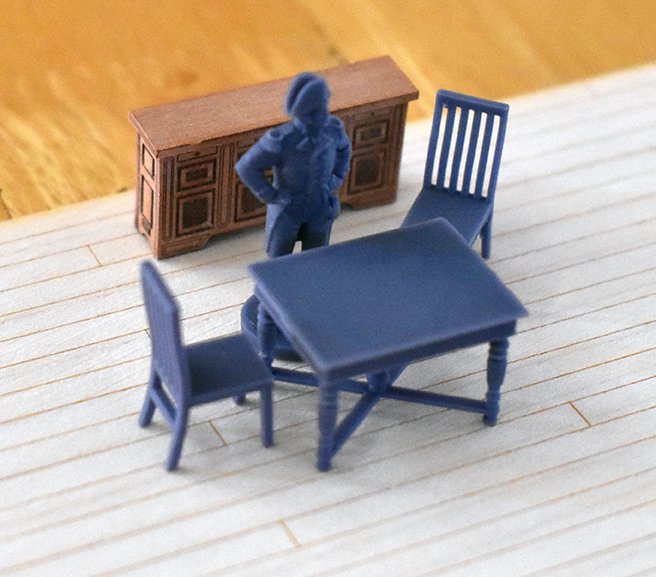
I have now almost fully recovered from my Covid experience, I had two weeks wasted, couldn't do anything except moan and sleep! Indy is still progressing (although I am now two weeks behind where I wanted to be with the drawings..). For those who may be interested, I have commissioned a set of 6 cannon crew figures, followed by a ship's cook, as I do get asked about expanding the figure range. I should also have cabin chairs and table available to buy soon.
-
Damn, what a week! Had a great day last Monday, working away and even working out in the gym. Tuesday, came down with Covid (had to be, as the only other times I experienced the same symptoms was immediately after having my Covid vax jabs) So, I have been out of it the past week. I could not do anything except lie down and take anti-inflammatories and pain killers, feeling completely helpless, and lazy! My wife seems to have overcome it a lot quicker than me, with my throat hurting so much, with even a small cough feeling like 1000 glass shards in my throat - not my best week! However, I am now over the worst (that or I have been popping too many drugs...), so will try to get back into it next week, as I have now lost a whole week to this....
-
The laser cut gun port openings are deliberately made a little smaller than they should be, to take into account any slight deviations with each build. This is why you need to finish the gun ports with a knife or file. Just file until you each the edges of the MDF frames. Usually with kits, you have a paper template or just one ply pattern with the gun ports on, and then you have to either transfer the paper template to the hull, mark the positions and then cut out each opening from scratch, or with the latter, plank both the inner and outer ply pattern. In both cases, you have a lot more work to do with the gun ports than you do with the Sphinx set up. I have said this before, these are not Tamiya kits where you can just add the parts and forget, you still need to finish most parts, being wood, and not plastic.
-
The gun ports are not exactly square shaped, they will need cutting/filing to the same size as the MDF frames for the gun ports. You have the gun port opening and shape ready made, I do not know why you think you would mess it up?
-
Just stuff I am toying with right now. But it's a good chance they will be for sale at some point soon.
-
I forgot to mention this, but right now, there seems to be a world-wide copper shortage, or at least, thin copper sheet, as none of my suppliers of photo etched parts can get hold of this material. This is UK, Czech Republic and Italy. This is a bit of a headache, as Speedy has the copper plates and Indy was going to have them too. So, for the time being, I have no choice but to offer 6mm wide copper tape (which works very well, I am told) in lieu of the PE copper. Right now, I have absolutely no choice in this. This situation has not changed in the past 6 months. The current Speedy stock still has the PE copper plates. but once that stock in gone, and I still cannot get the copper PE, that too will have to be copper tape.
-
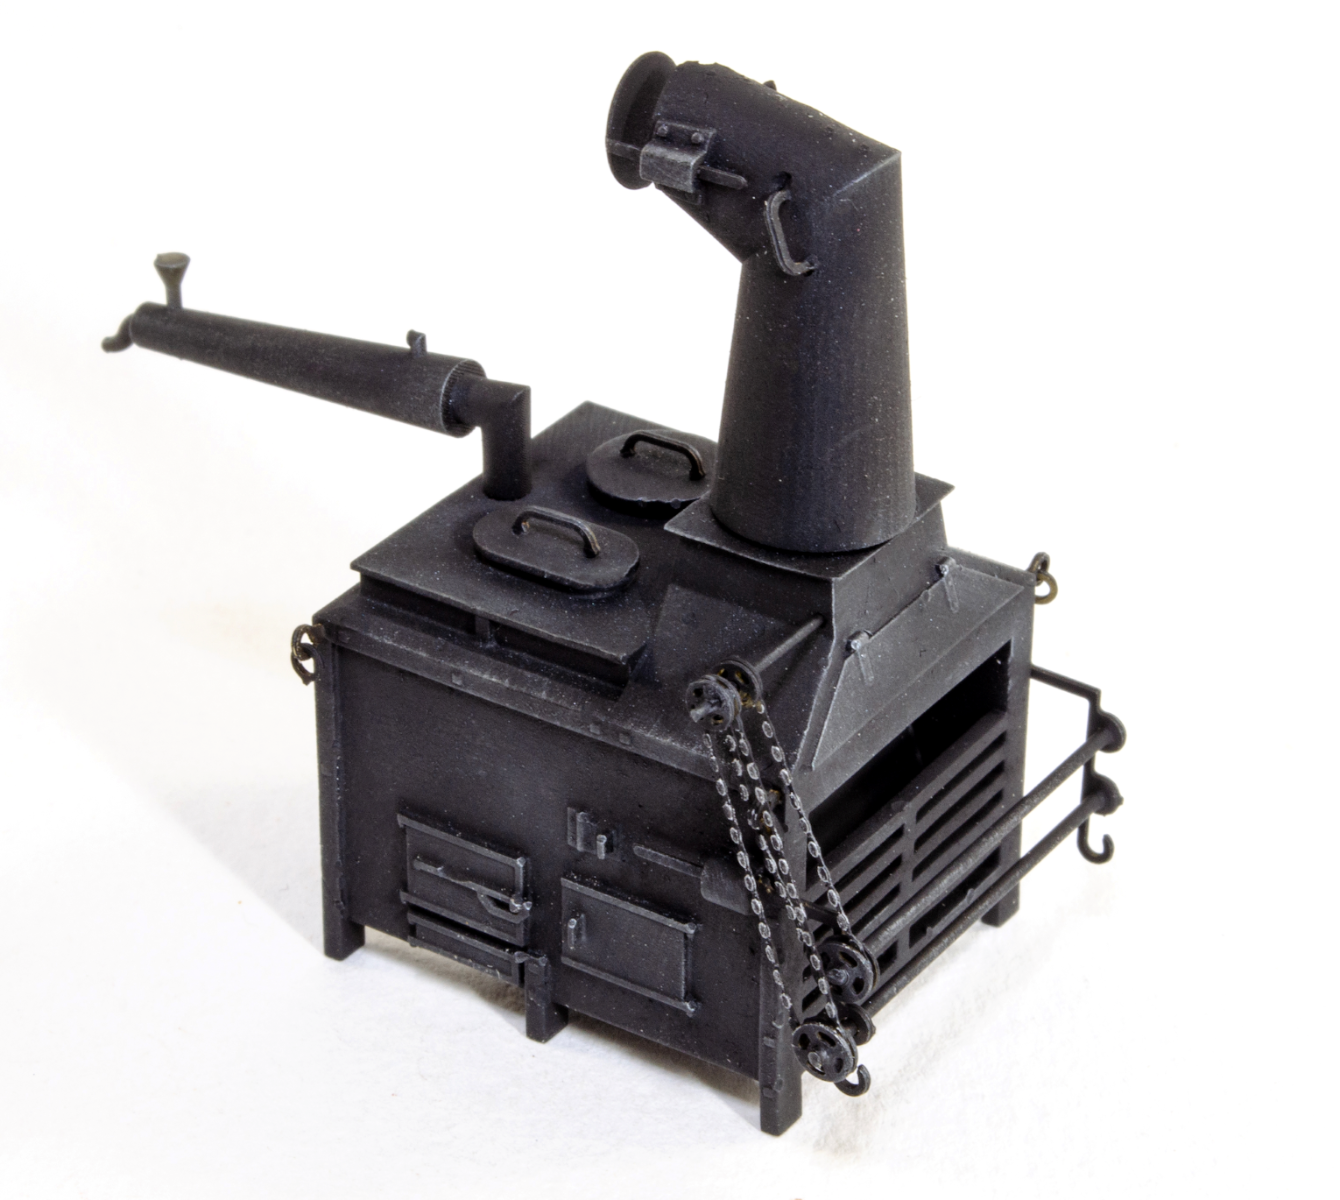
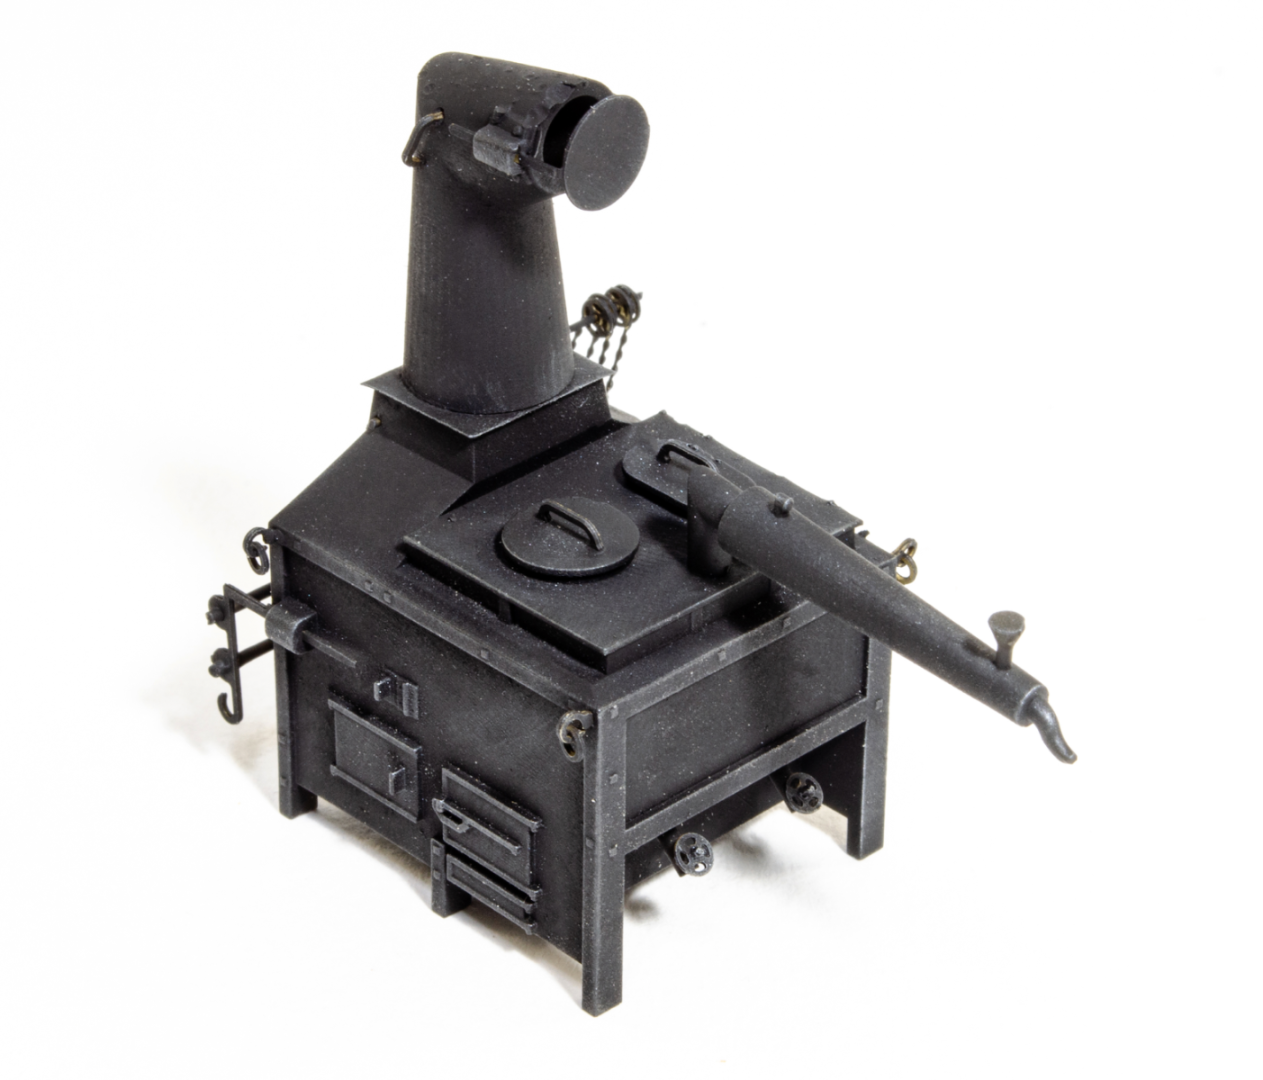
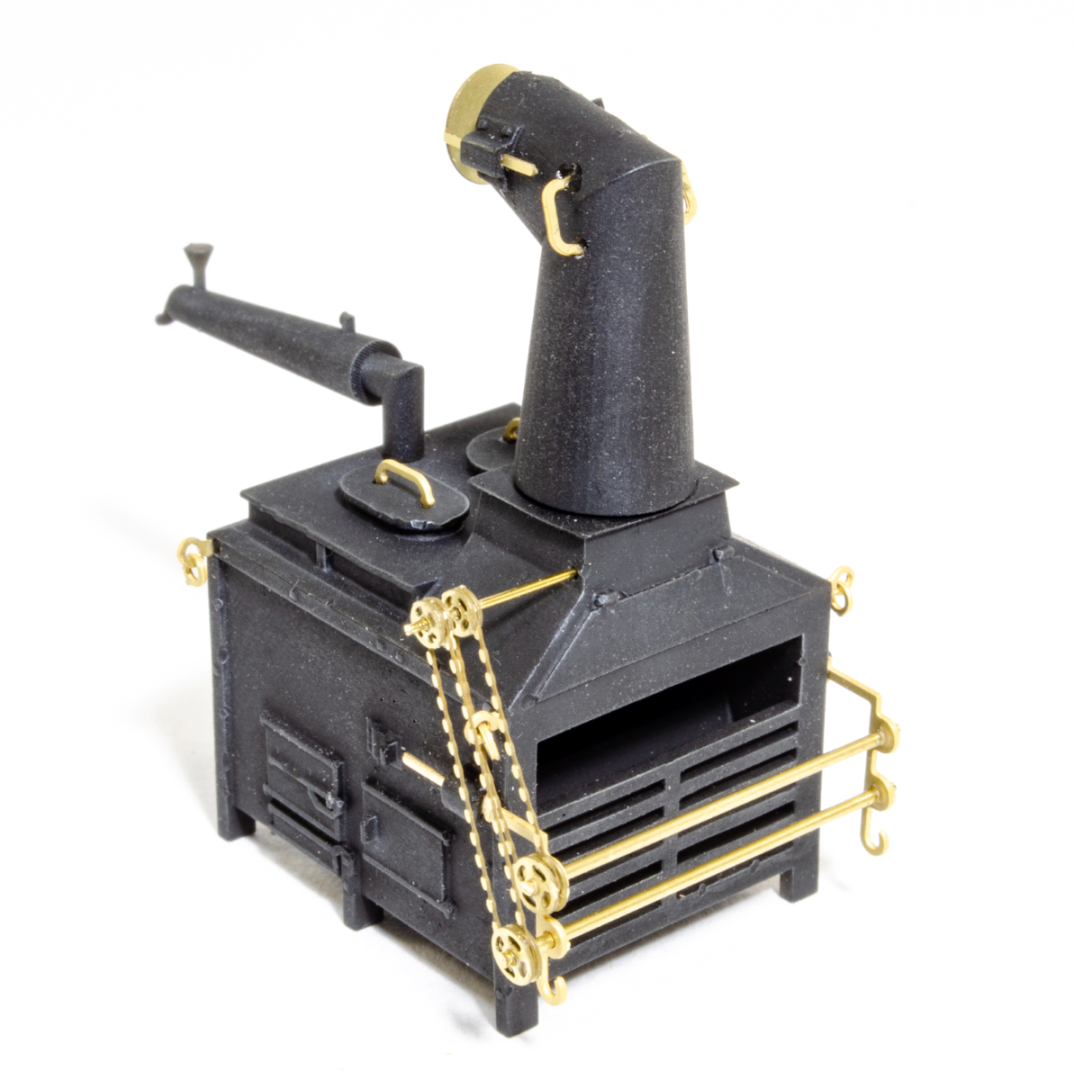
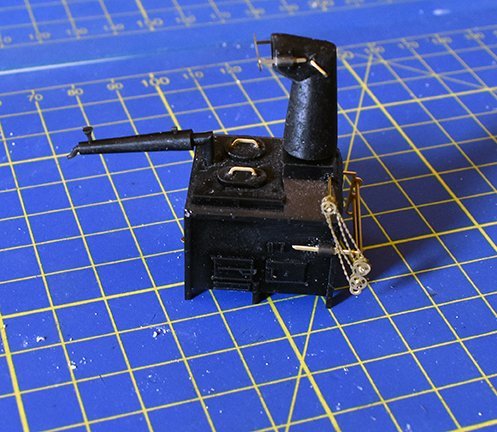
In case it was missed on my thread, the Brodie Stove is now available as a complete mini kit: Brodie Stove – VANGUARD MODELS Microsoft Word - 1-64-Brodie.docx (vanguardmodels.co.uk) I may have to get a ships cook (complete with wooden leg) done at some point...


- 488 replies
-
- 39
-

-
- Indefatigable
- Vanguard Models
- (and 1 more)
-
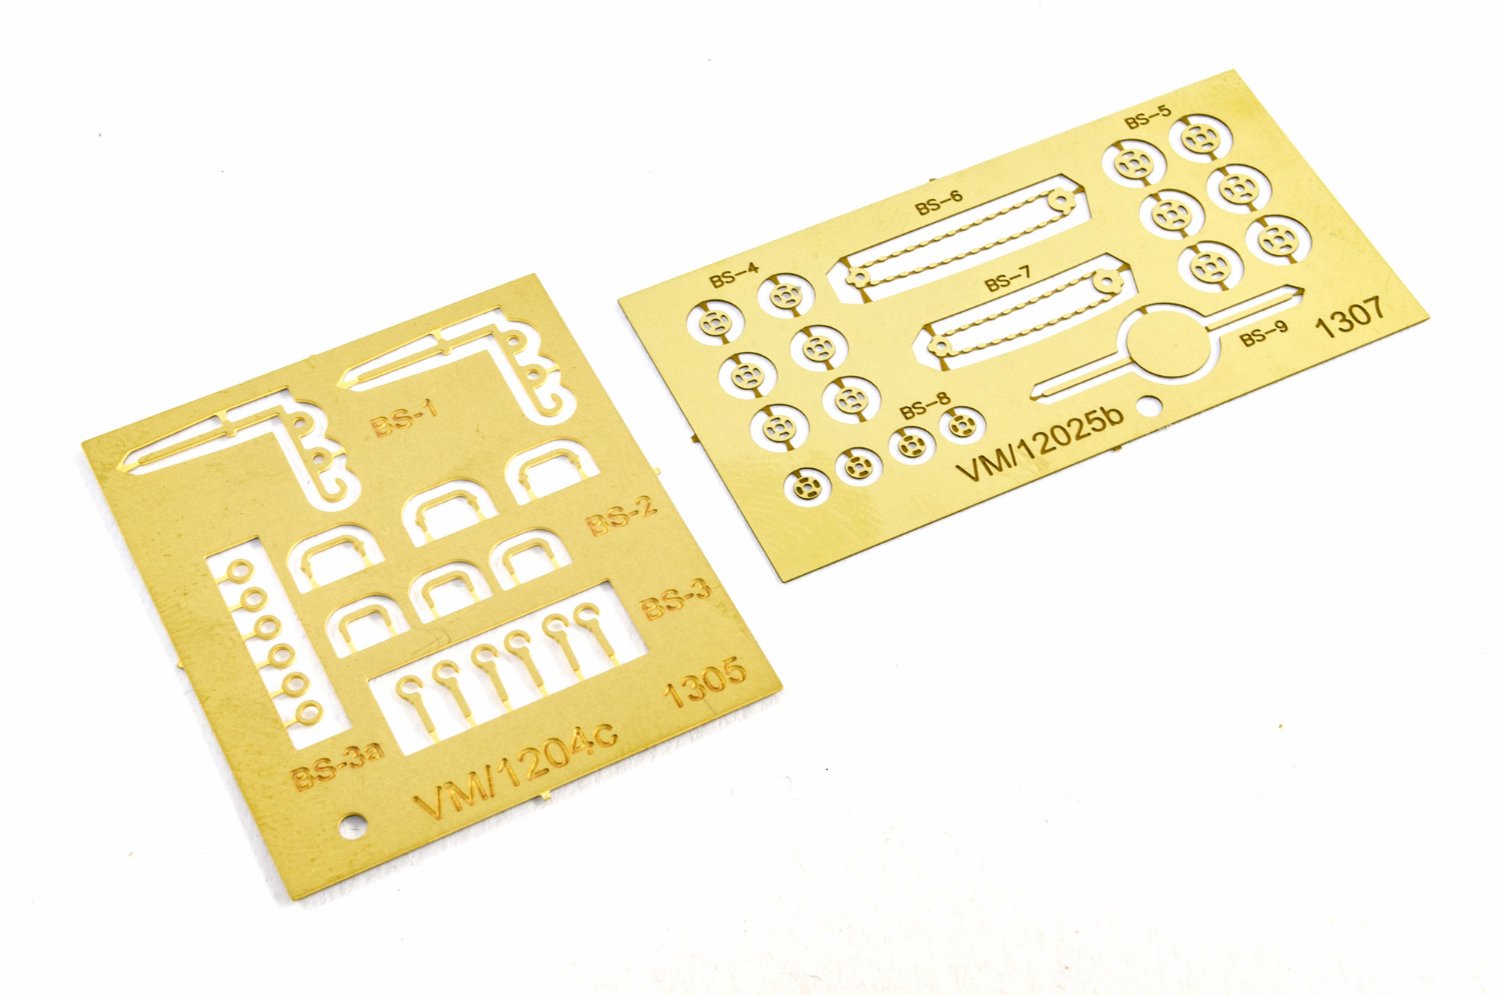
OK, Jim has just finished added the PE to the 64th scale Brodie Stove. This should be available for sale very soon. Included with this mini kit will be the 4 printed resin parts, 2 brass PE frets (2 chains for spit, handles, chimney baffles and handles etc.) and wire. This will also be in the Indy kit (as it was designed for this kit in the first place) The pic shows the very first printed stove, so isn't 100%, there are a few defects, but we wanted to try out the PE to double check the fit of everything. Only the 64th scale stove will have the PE. Brodie Stove – VANGUARD MODELS In the meantime, I am still plodding on with Indy drawings....


-
That would be a gross understatement....
-
Not sure what I can add, as this is something I did almost a quarter of a century ago! All I know/remember is that Snake and Cruiser were designed together and very very quickly, they were, I think, the second and third period kits I designed after Diana. There should be no crossjack sheet blocks, as being the crossjack, it had no sail.
-
kit review 1:200 German Battleship Bismarck - Amati
chris watton replied to James H's topic in REVIEWS: Model kits
What the hell is wrong with some people! -
The maple I sent mtaylor is not a veneer, but solid wood, 100% maple, albeit very thin solid wood
-
This maple wood sheet is only 0.8mm thick, 150mm wide and 600mm long. It is inevitable it will curl, more so when shipping, with changes in temperature and humidity. When the batches of this thin material reach me, it can take a week to 'acclimatise' to be stable enough to laser cut/engrave. And even them it has to be securely taped down on all four edges to keep it perfectly flat. I am not sure why there would be a problem using the sheet as is, as it needs clamping down whilst the glue cures, with clamps, weights or pins. Once glued on the beams, it is not going anywhere.
- 16 replies
-
- 10
-
-
It does take staining yes, but I will advise these parts are painted ochre or similar. I think they look much better than PE equivalents.
- 488 replies
-
- 9
-
-
- Indefatigable
- Vanguard Models
- (and 1 more)
-
Cheers! No 3D printed parts on the stern at all, it is a mixture of pear, 0.6mm PolyBak (both laser engraved and cut) and PE brass for the windows (and lantern brackets). Lanterns will be 3D printed to the correct shape.
- 488 replies
-
- 12
-
-
- Indefatigable
- Vanguard Models
- (and 1 more)
-
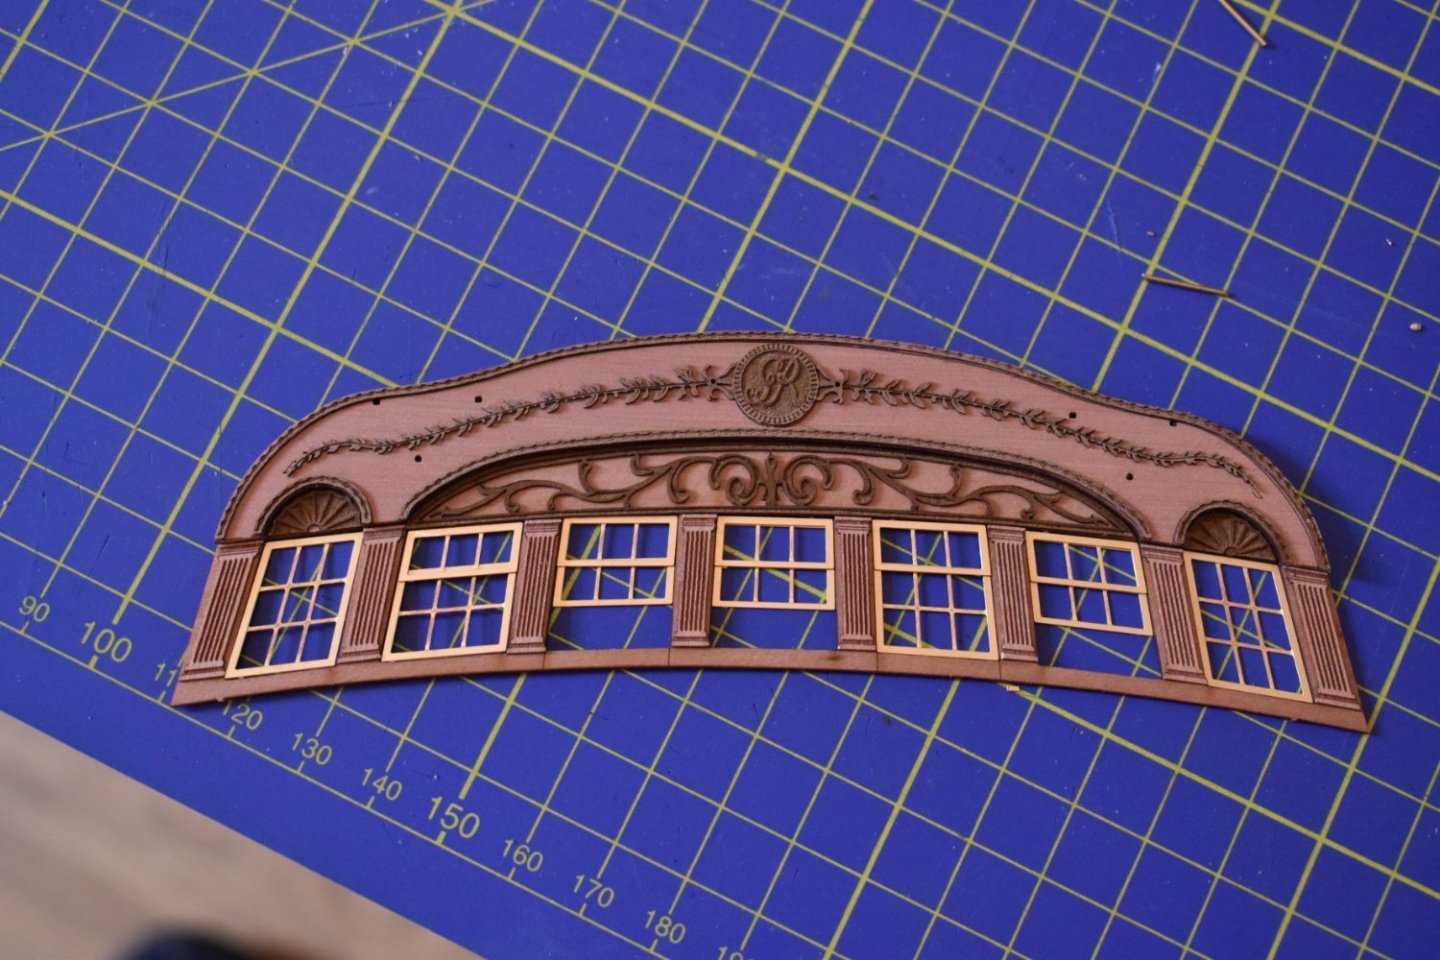
Just checked stern windows - there will be options for open or closed...
- 488 replies
-
- 42
-
-

-
- Indefatigable
- Vanguard Models
- (and 1 more)
-
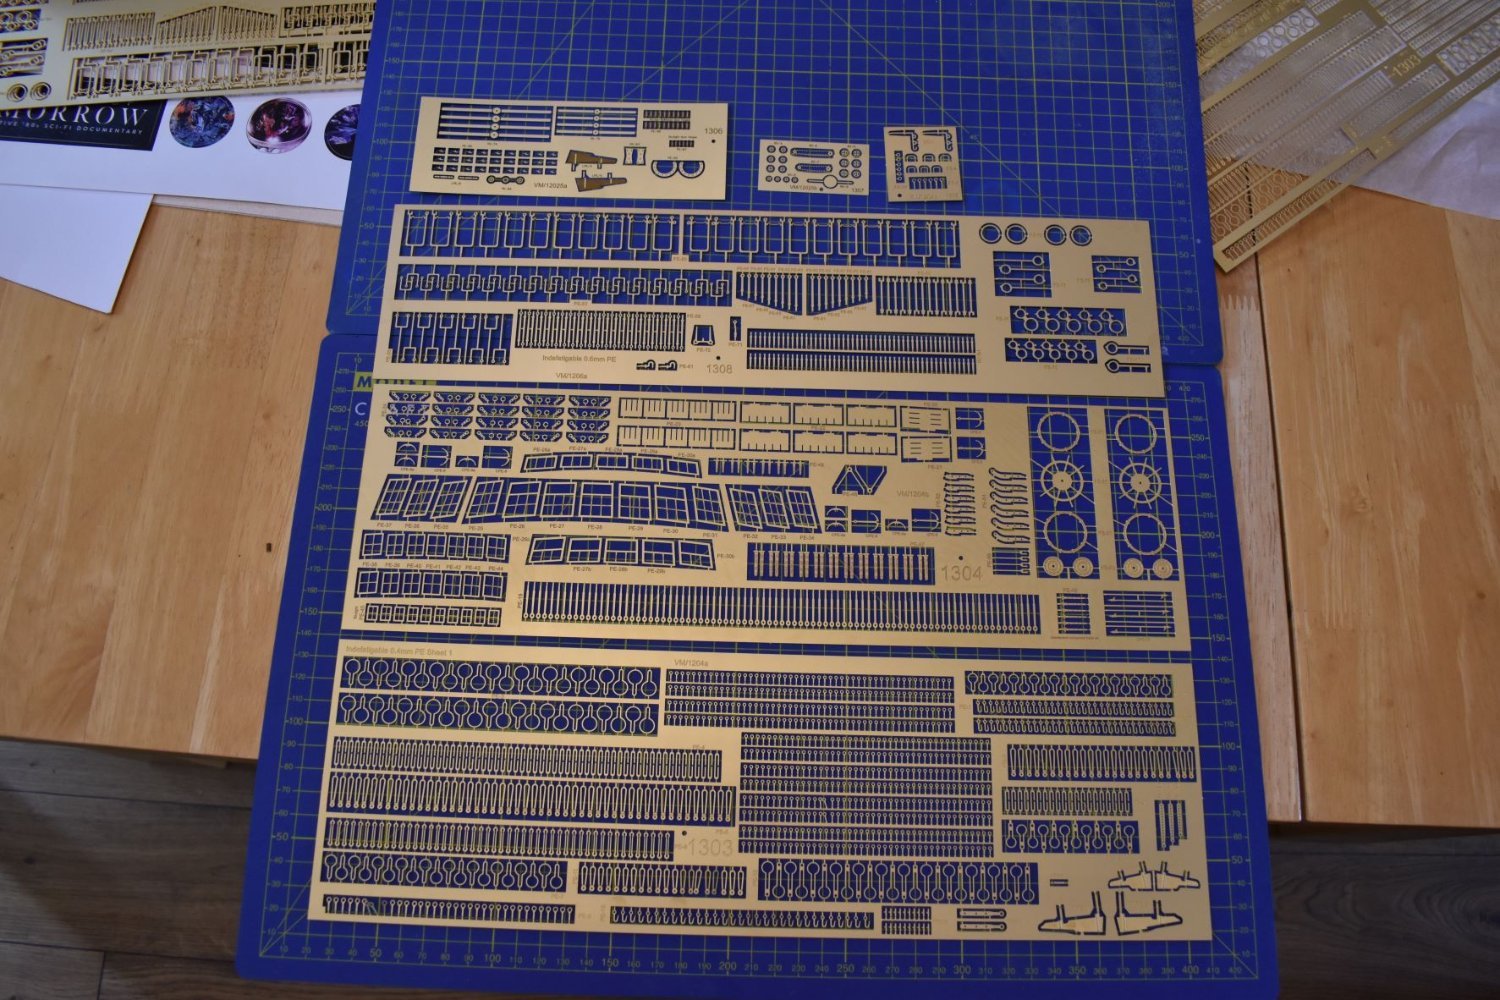
Today I received the Indy sample photo etched sheets. These will be sent over to Jim soon! I put together the PE for the stove (wrong glasses so very rough), the stove is an old prototype print, so doesn't look great, but you can see how the PE fits. This set will also be available to buy separately (64th only with the PE) soon.

- 488 replies
-
- 31
-
-
- Indefatigable
- Vanguard Models
- (and 1 more)
-
If you're not fitting the boats, I would definitely leave the cradles off.
- 855 replies
-
- 6
-
-
- Sphinx
- Vanguard Models
- (and 1 more)
-
I have been told I must be more of a salesman so: Starting today, Vanguard Models are having a 10% SUMMER SALE on our own brand model kits. That can represent an extremely nice saving that could more than pay for kit postage! Our Summer Sale runs from 1st July through to 30th September!

-
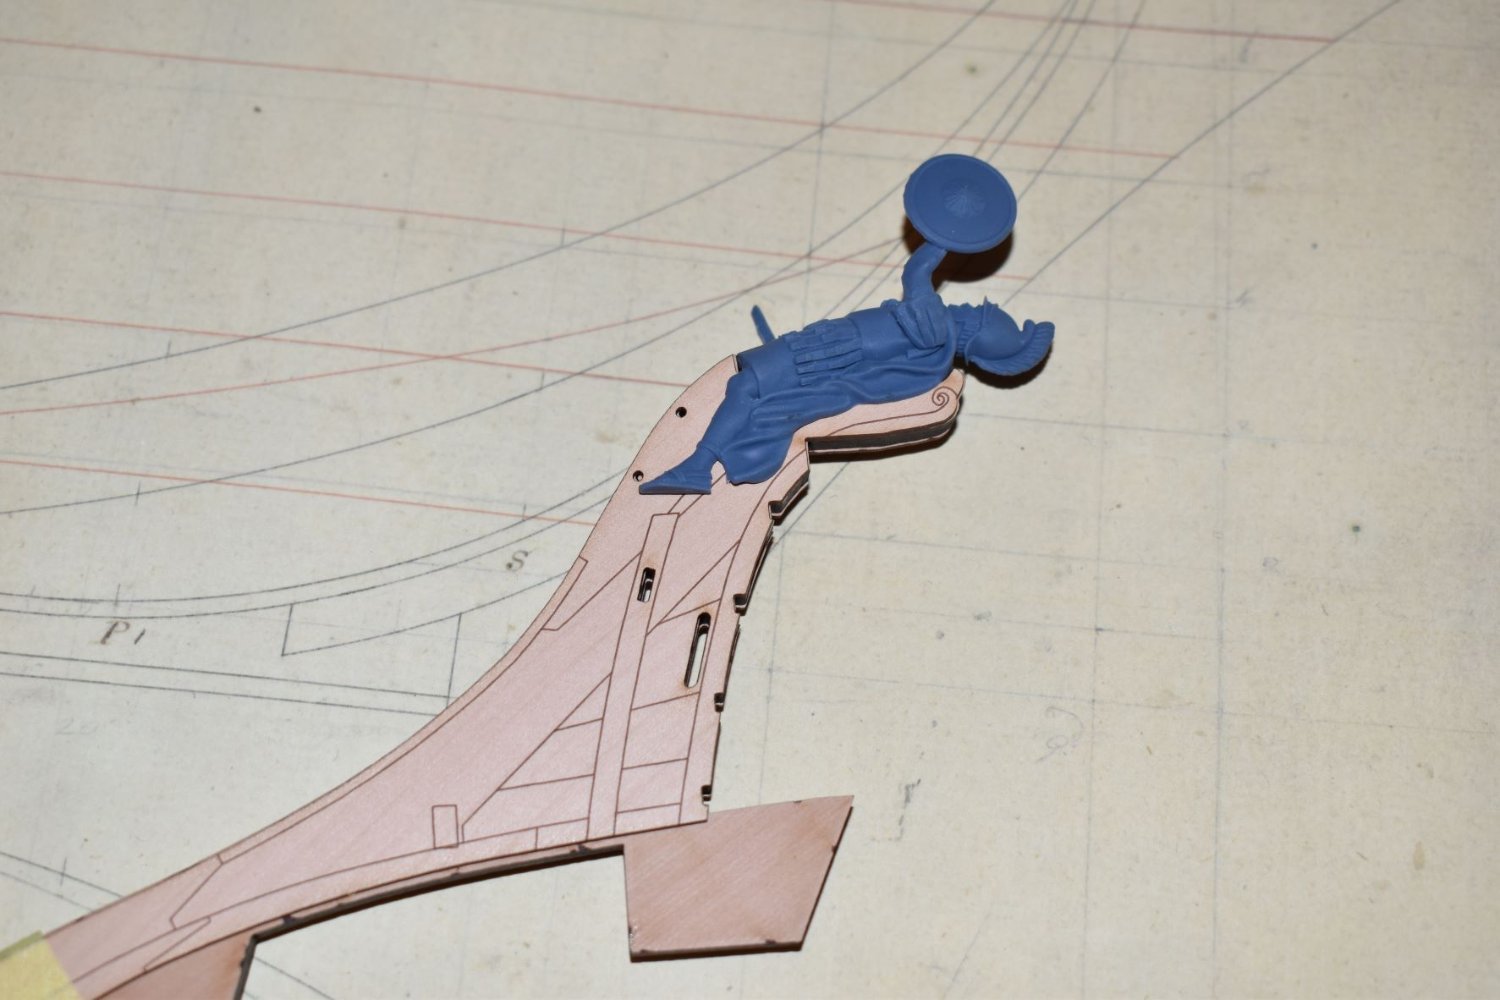
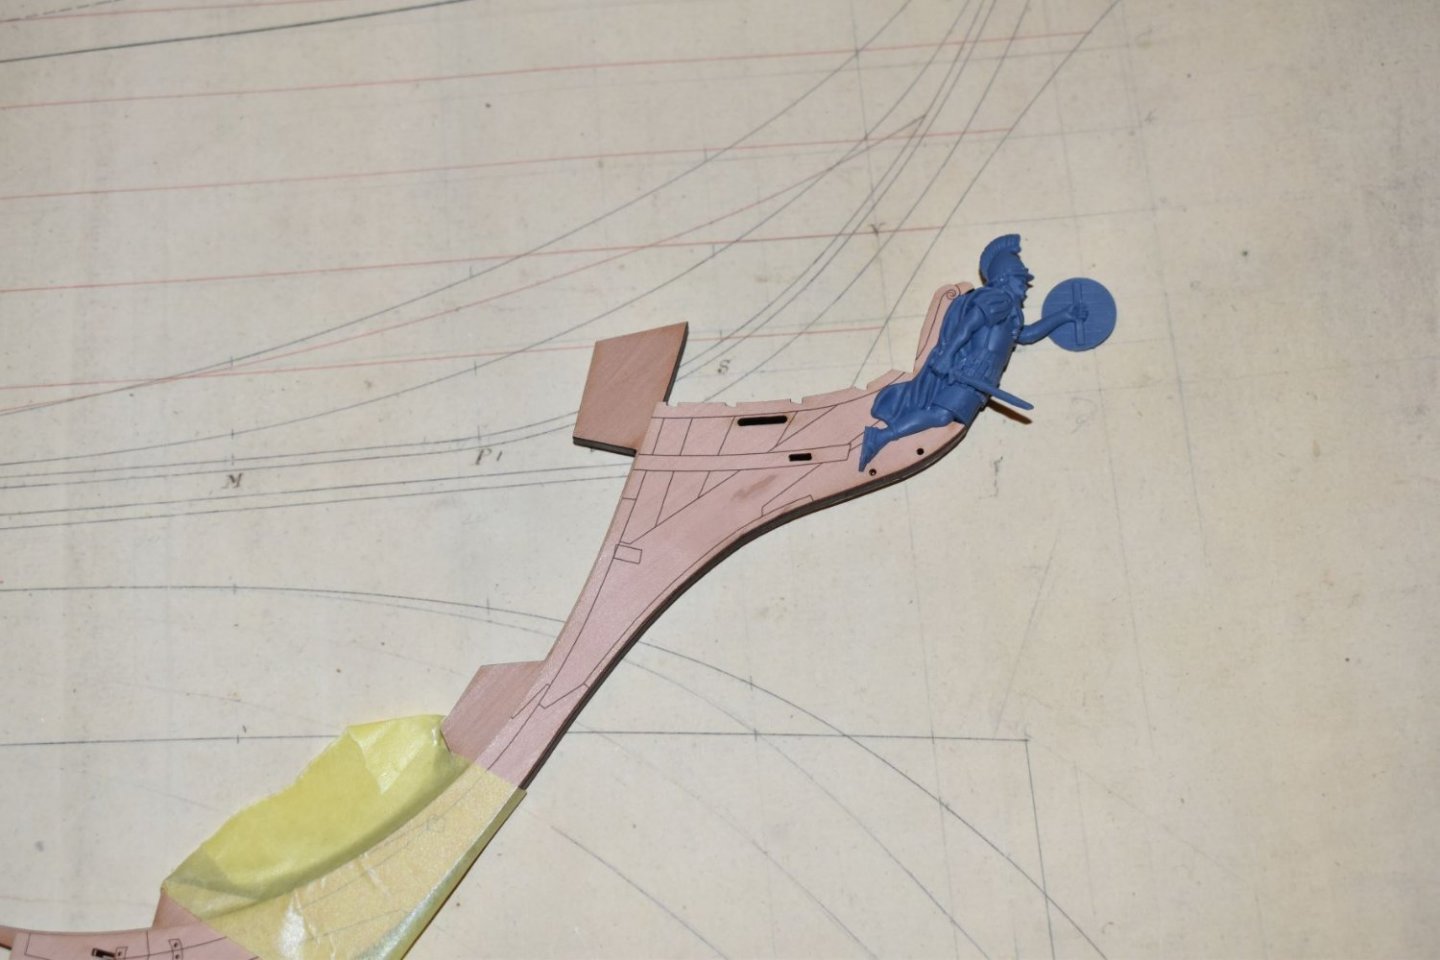
For those who thought the figurehead stuck out too much, here are some pics I just taken showing the final position of the figurehead. I will be sending this revised prow assembly to Jim.

- 488 replies
-
- 25
-
-
- Indefatigable
- Vanguard Models
- (and 1 more)
-
Later today, I should have available to buy the Hornblower and Pellew figures in 72nd, 64th and 48th scale. I like the bases, as most of the supports go there, so very few on the figures themselves. Also today Jim should be receiving another parcel containing the remainder of the Indy laser cut parts along with figurehead and figures.
- 488 replies
-
- 9
-
-

-
- Indefatigable
- Vanguard Models
- (and 1 more)
-
'Siraya Tech Fast ABS-Like 3D Printer Resin' (Navy Grey) The base can be very easily cut or filed/sanded down.
- 488 replies
-
- 6
-
-
-
- Indefatigable
- Vanguard Models
- (and 1 more)